

As summer evenings beckon, the vibrant flavors of French cuisine become irresistible for outdoor dining. Picture yourself savoring a Ratatouille Tart as the sun sets or enjoying the delicate balance of a Niçoise Salad. Each dish captures the essence of the season, making it perfect for al fresco gatherings. Let’s explore these delightful recipes together and discover some new favorites to enjoy under the open sky.
Ratatouille Tart
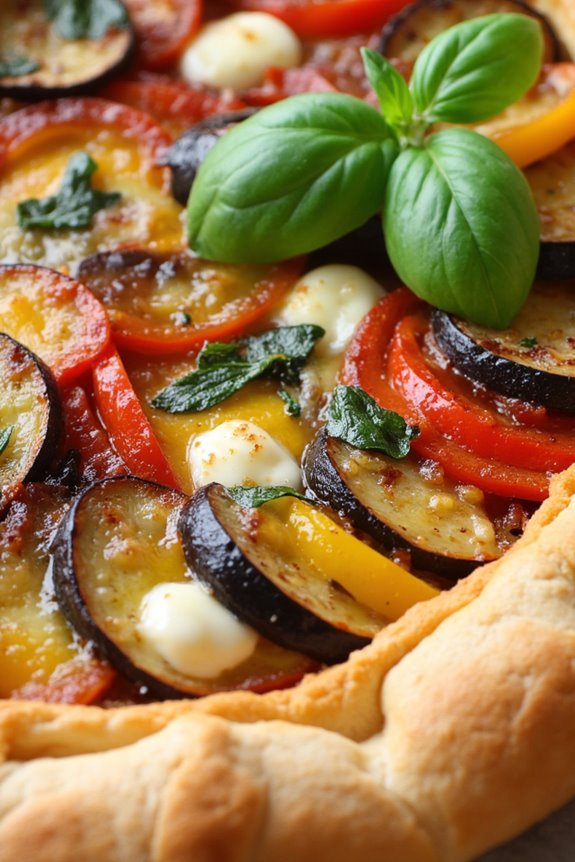
Ratatouille Tart is a delightful French dish that combines the classic flavors of ratatouille with the elegance of a tart. It’s a beautiful way to celebrate summer vegetables such as zucchini, eggplant, and bell peppers, all nestled in a buttery crust. This dish not only looks stunning when served but also bursts with a medley of flavors that are certain to impress your guests at any summer gathering.
The tart can be served warm or at room temperature, making it a versatile option for picnics, brunches, or dinner parties.
To create this Ratatouille Tart, you’ll start by preparing a flaky pastry crust that will serve as the foundation for your colorful vegetable filling. Layering the vegetables in an artistic manner not only enhances the presentation but also allows each flavor to shine. Pair this tart with a simple green salad and a glass of chilled rosé for a truly French dining experience that embodies the essence of summer.
Ingredients (serves 4-6 people):
- 1 pre-made pie crust (or homemade shortcrust pastry)
- 1 medium eggplant, thinly sliced
- 1 medium zucchini, thinly sliced
- 1 medium yellow squash, thinly sliced
- 1 red bell pepper, thinly sliced
- 1 yellow bell pepper, thinly sliced
- 1 medium onion, thinly sliced
- 2 cloves garlic, minced
- 2 tablespoons olive oil
- 1 teaspoon dried thyme
- 1 teaspoon dried basil
- Salt and pepper to taste
- 1 cup marinara sauce (or tomato sauce)
- 1 cup shredded mozzarella cheese (optional)
- Fresh basil leaves for garnish (optional)
Cooking Instructions:
- Preheat the Oven: Begin by preheating your oven to 375°F (190°C). This step is essential as it guarantees that the tart bakes evenly and the crust becomes golden and crispy.
- Prepare the Pie Crust: If using a pre-made pie crust, roll it out and fit it into a tart pan. If making your own shortcrust pastry, roll it out to about 1/8 inch thick, then place it in the tart pan. Prick the base with a fork to prevent it from puffing up during baking. Place the crust in the fridge to chill while you prepare the filling.
- Cook the Vegetables: In a large skillet over medium heat, add the olive oil and sauté the sliced onions and garlic until soft and fragrant, about 5 minutes. Then, add the sliced eggplant, zucchini, and bell peppers, cooking until they’re tender, roughly 8-10 minutes. Season with dried thyme, basil, salt, and pepper. Remove from heat and let cool slightly.
- Assemble the Tart: Spread the marinara sauce evenly over the bottom of the chilled pie crust. Next, layer the sautéed vegetables artistically on top of the sauce. You can arrange them in a circular pattern or in rows for a more structured look.
- Add Cheese (Optional): If you like, sprinkle shredded mozzarella cheese over the top of the vegetables for an extra layer of flavor. This step is optional but adds a wonderful cheesy texture.
- Bake the Tart: Place the tart in the preheated oven and bake for 30-35 minutes, or until the crust is golden brown and the vegetables are heated through. If using cheese, it should be melted and bubbly.
- Cool and Serve: Once done, remove the tart from the oven and allow it to cool for about 10 minutes. Garnish with fresh basil leaves, slice, and serve warm or at room temperature.
Extra Tips:
When making your Ratatouille Tart, feel free to get creative with the vegetables you use—add in favorites like tomatoes or mushrooms for additional flavor.
It’s best to slice the vegetables as uniformly as possible for even cooking. If you want to enhance the flavor further, consider adding a layer of ricotta cheese under the vegetables or a sprinkle of Parmesan on top before baking.
This dish is also perfect for meal prep as it tastes even better the next day after the flavors have melded together. Enjoy your culinary journey through summer with this vibrant and delicious tart!
Grilled Salmon With Herbed Butter

Grilled Salmon with Herbed Butter is a delightful dish that perfectly captures the essence of summer dining. The combination of fresh salmon fillets and a rich, flavorful herbed butter creates a meal that isn’t only visually appealing but also packed with taste. As you fire up the grill, the aroma of the salmon mingling with the fragrant herbs will transport you to a sunny terrace overlooking the sea.
This dish is ideal for outdoor gatherings or a cozy dinner at home, making it a versatile choice for any occasion. To complement the richness of the salmon, the herbed butter, made with fresh herbs and a hint of lemon, adds brightness and depth to each bite. The preparation is straightforward and requires minimal ingredients, making it an excellent option for both novice cooks and seasoned chefs.
Whether you serve it with a side of grilled vegetables, a fresh salad, or some crusty bread, this dish promises to impress your family and friends.
Ingredients (Serves 4-6)
- 4-6 salmon fillets (6 ounces each)
- 1/2 cup unsalted butter, softened
- 2 tablespoons fresh parsley, finely chopped
- 1 tablespoon fresh dill, finely chopped
- 1 tablespoon fresh chives, finely chopped
- 1 tablespoon fresh lemon juice
- Salt and pepper, to taste
- Lemon wedges, for serving
Cooking Instructions
1. Prepare the Herbed Butter: In a medium bowl, combine the softened unsalted butter, chopped parsley, dill, chives, lemon juice, salt, and pepper. Mix until well incorporated. If desired, you can use a fork or a spatula to guarantee everything is evenly blended.
Once mixed, transfer the herbed butter onto a piece of plastic wrap, shape it into a log, and refrigerate until firm, about 30 minutes.
2. Preheat the Grill: While the herbed butter is firming up, prepare your grill. Preheat it to medium-high heat (about 375°F to 400°F). This temperature allows for a nice sear on the salmon while cooking it through.
3. Season the Salmon Fillets: Pat the salmon fillets dry with paper towels. Season both sides with salt and pepper to taste. This step is essential as it enhances the flavor of the fish and helps to form a crust during grilling.
4. Grill the Salmon: Once the grill is heated, oil the grill grates to prevent sticking. Place the salmon fillets skin-side down on the grill. Grill for about 4-5 minutes, then carefully flip the fillets using a spatula. Grill for an additional 3-5 minutes, or until the salmon is cooked through and flakes easily with a fork. The internal temperature should reach 145°F.
5. Serve with Herbed Butter: Once the salmon is cooked, remove it from the grill and let it rest for a couple of minutes. Slice the chilled herbed butter into rounds and place a piece on top of each fillet just before serving. The butter will melt into the salmon, adding rich flavor.
6. Garnish and Enjoy: Serve the grilled salmon with lemon wedges on the side for an extra zing. Pair it with your choice of sides and enjoy your summer dinner!
Extra Tips
When grilling salmon, it’s important to avoid overcooking to prevent it from becoming dry. Using a fish spatula can help you flip the fillets without breaking them apart.
If you’re unsure about the cooking time, check the salmon a minute or two earlier than expected, as grilling times can vary based on the thickness of the fillets. This dish can also be adapted with different herbs based on your preference, such as basil or tarragon, for a unique twist. Enjoy your dinner al fresco to fully embrace the summer vibes!
Niçoise Salad
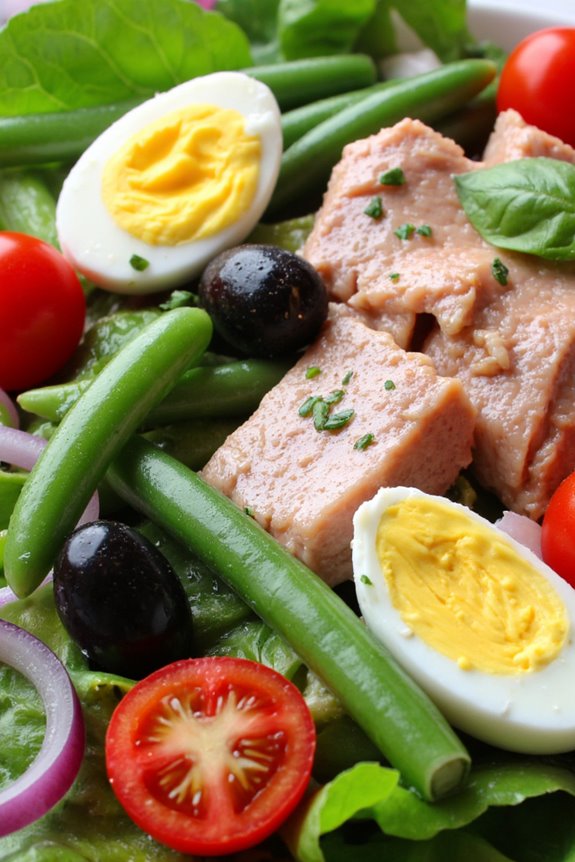
Niçoise Salad, a classic French dish originating from the sunny region of Nice, is a vibrant and invigorating combination of fresh vegetables, protein, and olives. This colorful salad isn’t only visually appealing but also packed with flavor and nutrients, making it a perfect choice for a summer dinner.
Traditionally, Niçoise Salad features ingredients like tomatoes, green beans, hard-boiled eggs, tuna, and olives, all beautifully arranged for a delightful presentation.
Preparing a Niçoise Salad is simple and quick, making it an ideal recipe for a warm summer evening when you want to enjoy something light yet satisfying. The key to this dish is using the freshest ingredients you can find, as they truly elevate the flavors.
Serve it as a main course or as a side dish, and pair it with a glass of chilled rosé for a delightful dining experience.
Ingredients (serves 4-6):
- 4 cups mixed salad greens (such as arugula, romaine, or butter lettuce)
- 2 cups cherry tomatoes, halved
- 1 cup green beans, trimmed and blanched
- 4 hard-boiled eggs, peeled and quartered
- 1 can (5 oz) tuna in olive oil, drained
- 1/2 cup black olives, pitted (preferably Niçoise or Kalamata)
- 1/4 cup red onion, thinly sliced
- 1/4 cup fresh basil leaves, torn
- 1/4 cup olive oil
- 2 tablespoons red wine vinegar
- Salt and pepper to taste
Cooking Instructions:
1. Prepare the Vegetables: Start by rinsing and preparing all your vegetables. Wash the mixed salad greens thoroughly and spin them dry in a salad spinner. Rinse the cherry tomatoes and slice them in half. Trim the ends of the green beans and blanch them in boiling water for about 3-4 minutes until they’re tender but still crisp.
Immediately transfer them to an ice bath to stop the cooking process, then drain and set aside.
2. Hard-Boil the Eggs: To Hard-Boil the Eggs, place them in a saucepan and cover them with cold water. Bring the water to a boil, then reduce the heat and let them simmer for about 9-12 minutes. Once done, transfer them to an ice bath for several minutes before peeling and quartering them.
3. Assemble the Salad: In a large serving platter or bowl, start by laying down a generous base of mixed salad greens. Artfully arrange the halved cherry tomatoes, blanched green beans, quartered hard-boiled eggs, and chunks of tuna over the greens.
Scatter the black olives, red onion slices, and torn basil leaves on top for added flavor and color.
4. Prepare the Dressing: In a small bowl, whisk together the olive oil, red wine vinegar, salt, and pepper to create a simple dressing. Adjust the seasoning to your taste, ensuring it complements the freshness of the salad.
5. Dress and Serve: Drizzle the dressing over the assembled salad just before serving. Gently toss the salad to combine the ingredients, or serve it in sections for guests to mix their own portions.
Enjoy your Niçoise Salad at room temperature or slightly chilled.
Extra Tips:
For an authentic touch, consider using fresh tuna steak instead of canned tuna. Simply grill or sear the tuna to your desired doneness and flake it over the salad.
Additionally, feel free to customize the salad by adding other ingredients like artichoke hearts, capers, or even roasted potatoes for a heartier version. The beauty of Niçoise Salad lies in its versatility, so don’t hesitate to experiment with seasonal produce!
Baked Camembert With Honey and Nuts
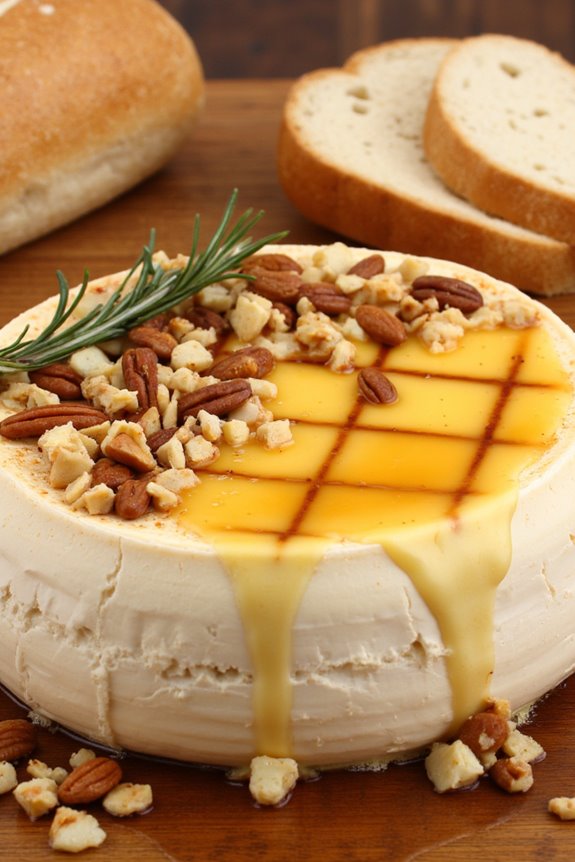
Baked Camembert with Honey and Nuts is a delightful dish that perfectly encapsulates the essence of summer dining in France. This warm and gooey cheese is elevated with the natural sweetness of honey and the satisfying crunch of nuts, making it an irresistible appetizer or sharing dish for any outdoor gathering or dinner party.
The creamy texture of Camembert, when baked, becomes even more luscious and is a fantastic accompaniment to crusty bread or fresh fruit. This dish isn’t only easy to prepare but also quick to cook, allowing you to enjoy more time socializing with your guests.
The combination of flavors—from the rich, buttery cheese to the sweet, aromatic honey and crunchy nuts—creates a harmonious blend that will impress your friends and family. Serve it alongside a light salad and a glass of crisp white wine for a complete summer meal.
Ingredients (Serves 4-6):
- 1 whole wheel of Camembert cheese (about 250g)
- 2 tablespoons of honey
- 1/4 cup of mixed nuts (such as walnuts, almonds, and pecans), roughly chopped
- 1 teaspoon of fresh rosemary, finely chopped (optional)
- Fresh baguette or crusty bread, for serving
- Fresh fruit (such as apples or pears), for serving (optional)
- Olive oil, for drizzling (optional)
Cooking Instructions:
- Preheat the Oven: Begin by preheating your oven to 180°C (350°F). This guarantees that once your Camembert is ready to go in, it will bake evenly and thoroughly.
- Prepare the Cheese: Remove the Camembert from its packaging and place it in a small oven-safe dish or on a baking tray lined with parchment paper. You can also score the top of the cheese in a crisscross pattern to allow the honey and nuts to penetrate the cheese as it bakes.
- Add Honey and Nuts: Drizzle the honey generously over the top of the Camembert. Then, sprinkle the chopped mixed nuts evenly over the honey. If you’re using fresh rosemary, add it on top as well for an aromatic touch.
- Bake the Camembert: Place the dish in the preheated oven and bake for approximately 15-20 minutes or until the cheese is bubbling and soft in the center. Keep an eye on it to prevent over-baking.
- Serve Warm: Once baked, carefully remove the dish from the oven. Allow it to cool slightly before serving. Drizzle with a little olive oil if desired, and serve with slices of fresh baguette or crusty bread along with some fresh fruit for a revitalizing contrast.
Extra Tips:
For an additional flavor kick, consider adding a pinch of sea salt on top of the cheese before baking or experimenting with different types of honey—like lavender or rosemary honey—to complement the nuts.
This dish can also be prepared in advance; simply assemble the Camembert with honey and nuts, cover it, and refrigerate until ready to bake. Just remember to bring it to room temperature before popping it in the oven for the best results.
Enjoy your baked Camembert warm for a truly indulgent experience!
Provençal Stuffed Tomatoes
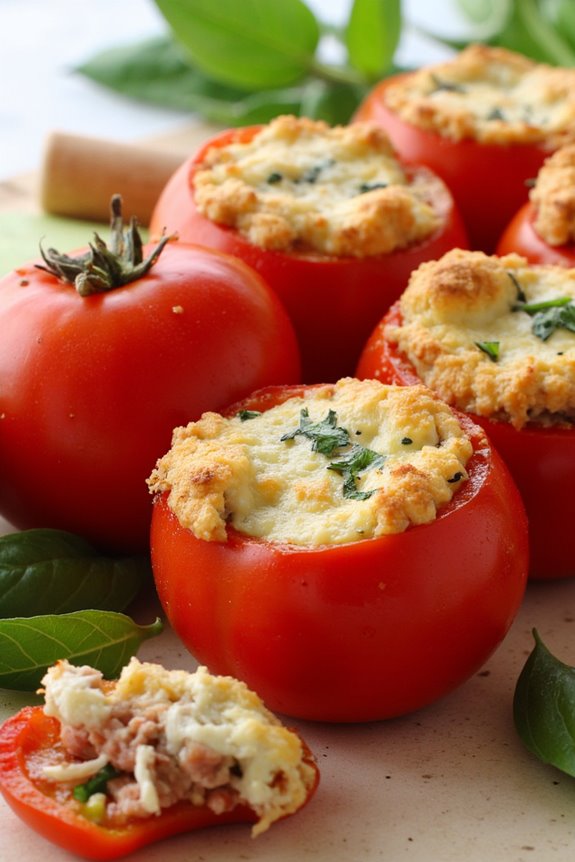
Provençal Stuffed Tomatoes are a delightful dish that captures the flavors of summer in the south of France. Juicy tomatoes are hollowed out and filled with a savory mixture of herbs, spices, and a choice of fillings, typically involving rice or ground meat. This dish isn’t only visually appealing but also a great way to use fresh garden tomatoes, making it a perfect choice for a summer dinner.
The combination of fresh ingredients and bold flavors will transport you straight to the sun-soaked terraces of Provence. This recipe for Provençal Stuffed Tomatoes is simple yet elegant, making it ideal for family gatherings or dinner parties. The stuffed tomatoes can be served as a main dish or as a side, and they pair wonderfully with crusty bread and a glass of chilled rosé.
This dish is versatile, allowing you to customize the stuffing based on your preferences, whether you prefer a vegetarian option or a heartier meat-based filling.
Ingredients (Serves 4-6)
- 6 large ripe tomatoes
- 1 cup cooked rice (or quinoa for a healthier option)
- 1 cup ground beef or turkey (optional for a meat filling)
- 1 small onion, finely chopped
- 2 cloves garlic, minced
- 1/4 cup fresh parsley, chopped
- 1/4 cup fresh basil, chopped
- 1 teaspoon dried thyme
- 1/2 teaspoon salt
- 1/4 teaspoon black pepper
- 1/2 cup grated cheese (such as Parmesan or mozzarella)
- 2 tablespoons olive oil
- 1 tablespoon balsamic vinegar (optional)
Cooking Instructions
1. Prepare the Tomatoes: Preheat your oven to 375°F (190°C). Wash the tomatoes thoroughly and carefully cut the tops off each tomato. Use a spoon to gently scoop out the insides, removing seeds and pulp, while keeping the outer shell intact. Set aside the tomato shells and chop the scooped-out flesh for the filling.
2. Cook the Filling: In a large skillet, heat the olive oil over medium heat. Add the chopped onion and minced garlic, sautéing for about 2-3 minutes until they become translucent. If using ground meat, add it to the skillet, breaking it apart with a spoon, and cook until browned.
Stir in the chopped tomato flesh, cooked rice (or quinoa), parsley, basil, thyme, salt, and pepper. Cook for an additional 5 minutes, allowing the flavors to meld.
3. Stuff the Tomatoes: Remove the skillet from heat and stir in the grated cheese. Carefully spoon the filling mixture into each hollowed tomato, packing it slightly to guarantee they’re filled well. Place the stuffed tomatoes upright in a baking dish.
4. Bake the Tomatoes: Drizzle the stuffed tomatoes with balsamic vinegar, if using, and a little more olive oil. Cover the baking dish with aluminum foil and bake in the preheated oven for 25 minutes. Remove the foil and bake for an additional 10-15 minutes, or until the tomatoes are tender and the tops are golden brown.
5. Serve: Once done, carefully remove the baking dish from the oven. Let the stuffed tomatoes cool for a few minutes before serving. They can be enjoyed warm or at room temperature, garnished with additional fresh herbs if desired.
Extra Tips
When preparing Provençal Stuffed Tomatoes, it’s important to choose ripe, firm tomatoes that will hold their shape during baking. Feel free to experiment with the filling; adding ingredients like olives, capers, or feta cheese can elevate the dish further.
You can also prepare the filling a day ahead, allowing the flavors to develop, and then stuff the tomatoes right before baking. This dish can be stored in the refrigerator for up to three days, making it perfect for meal prep or leftovers. Enjoy the vibrant tastes of Provence in your kitchen this summer!
Chicken Provençal
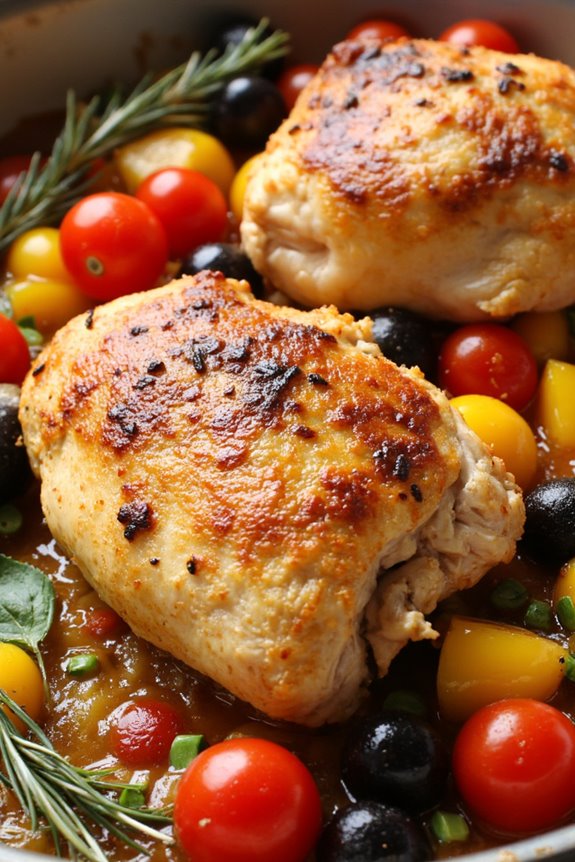
Chicken Provençal is a classic French dish that beautifully captures the essence of summer through its vibrant flavors and aromatic ingredients. This delightful recipe hails from the Provence region, where the sun-soaked landscapes produce an abundance of fresh vegetables, herbs, and high-quality olive oil. The combination of juicy chicken pieces, ripe tomatoes, olives, and fragrant herbs creates a dish that isn’t only hearty but also light and invigorating, making it perfect for warm summer evenings.
Preparing Chicken Provençal is a straightforward process that allows the natural flavors of the ingredients to shine through. Whether you’re hosting a dinner party or enjoying a cozy meal with family, this dish is sure to impress. Served alongside crusty bread or over a bed of fluffy rice, Chicken Provençal is a delightful way to bring a taste of the French countryside to your table.
Ingredients (Serves 4-6)
- 4-6 bone-in, skin-on chicken thighs
- 2 tablespoons olive oil
- 1 onion, chopped
- 3 cloves garlic, minced
- 1 bell pepper, sliced (red or yellow)
- 2 cups cherry tomatoes, halved
- 1 cup pitted olives (Kalamata or Niçoise)
- 1/2 cup dry white wine
- 1 tablespoon fresh thyme leaves (or 1 teaspoon dried thyme)
- 1 tablespoon fresh rosemary, chopped (or 1 teaspoon dried rosemary)
- Salt and pepper to taste
- Fresh basil for garnish (optional)
Cooking Instructions
- Prepare the Chicken: Pat the chicken thighs dry with paper towels and season both sides generously with salt and pepper. This helps to guarantee the chicken gets a nice crust when cooked.
- Sear the Chicken: In a large, oven-safe skillet or Dutch oven, heat the olive oil over medium-high heat. Once hot, add the chicken thighs, skin-side down. Sear for about 5-7 minutes until the skin is golden and crispy. Flip the chicken and cook for an additional 5 minutes on the other side. Remove the chicken from the skillet and set aside.
- Sauté the Vegetables: In the same skillet, add the chopped onion and bell pepper. Sauté for about 3-4 minutes until the vegetables are softened. Add the minced garlic and cook for an additional 30 seconds until fragrant.
- Add Tomatoes and Herbs: Stir in the halved cherry tomatoes, olives, thyme, and rosemary. Cook for another 3-4 minutes until the tomatoes start to soften and release their juices.
- Deglaze the Pan: Pour in the white wine and use a wooden spoon to scrape up any browned bits from the bottom of the skillet. This adds additional flavor to your dish.
- Return the Chicken to the Skillet: Nestle the seared chicken thighs back into the skillet, skin-side up. Spoon some of the vegetable mixture over the chicken. Bring the mixture to a simmer.
- Bake: Preheat your oven to 375°F (190°C). Transfer the skillet to the preheated oven and bake for 25-30 minutes, or until the chicken is cooked through and the internal temperature reaches 165°F (74°C).
- Serve: Remove from the oven and let the dish rest for a few minutes. Garnish with fresh basil if desired, and serve warm with crusty bread or over rice.
Extra Tips
For a deeper flavor, consider marinating the chicken in olive oil, garlic, and herbs for a few hours or overnight before cooking.
You can also customize the vegetables based on what you have on hand; zucchini, eggplant, or even artichokes can make wonderful additions.
Additionally, feel free to experiment with different types of olives for a unique twist. Just remember that the key to a great Chicken Provençal is using fresh, high-quality ingredients to let the dish shine!
Quinoa Salad With Roasted Vegetables
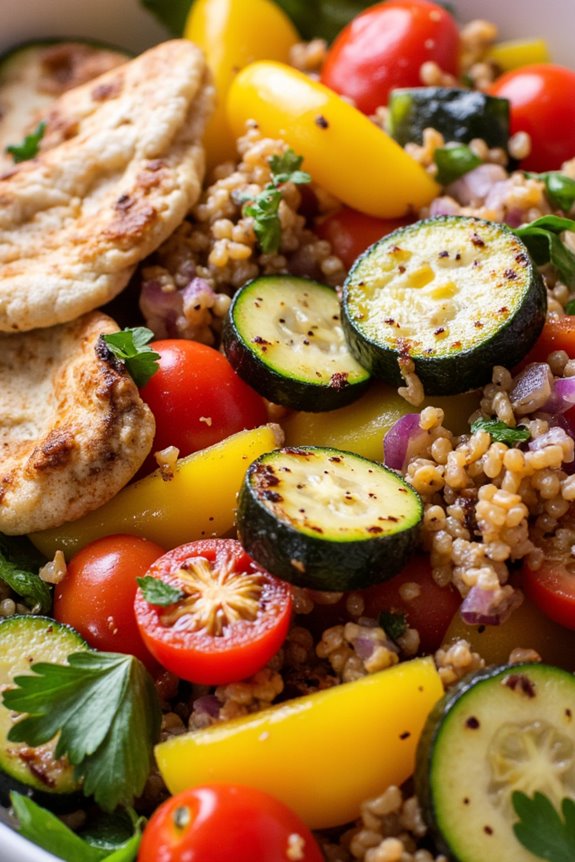
Quinoa Salad with Roasted Vegetables is a revitalizing and nutritious dish perfect for those warm summer evenings. This vibrant salad isn’t only filling but also packed with flavor and nutrients, making it an excellent choice for a light dinner or a side dish at a summer gathering.
The combination of roasted vegetables adds a depth of flavor and a lovely texture, while the quinoa provides a hearty base that complements the veggies beautifully. This dish is versatile and can be customized with your favorite seasonal vegetables.
Whether you include zucchini, bell peppers, or cherry tomatoes, the roasted vegetables bring out their natural sweetness, making every bite a delightful experience. Tossed in a light lemon vinaigrette, this salad is both revitalizing and satisfying, elevating your summer dining experience.
Ingredients (Serves 4-6)
- 1 cup quinoa
- 2 cups vegetable broth or water
- 1 medium zucchini, diced
- 1 red bell pepper, diced
- 1 yellow bell pepper, diced
- 1 cup cherry tomatoes, halved
- 1 red onion, chopped
- 2 tablespoons olive oil
- Salt and pepper to taste
- 1 teaspoon dried oregano
- 1 teaspoon garlic powder
- 1/4 cup fresh parsley, chopped
- Juice of 1 lemon
- 2 tablespoons balsamic vinegar
Cooking Instructions
1. Preheat the Oven: Begin by preheating your oven to 425°F (220°C). This high temperature will help the vegetables roast quickly and develop a nice caramelization.
2. Prepare the Quinoa: Rinse the quinoa under cold water to remove any bitterness. In a medium saucepan, combine the rinsed quinoa and vegetable broth (or water). Bring to a boil over medium-high heat, then reduce the heat to low, cover, and let it simmer for about 15 minutes or until the quinoa is fluffy and all the liquid is absorbed. Remove from heat and let it sit covered for an additional 5 minutes.
3. Roast the Vegetables: While the quinoa is cooking, prepare the vegetables. In a large mixing bowl, combine the diced zucchini, red and yellow bell peppers, cherry tomatoes, and chopped red onion. Drizzle with olive oil, then season with salt, pepper, dried oregano, and garlic powder. Toss everything together to guarantee the vegetables are evenly coated.
Spread the vegetables on a baking sheet in a single layer and roast in the preheated oven for about 20-25 minutes, or until they’re tender and slightly browned.
4. Combine Ingredients: Once the quinoa is done and the vegetables are roasted, fluff the quinoa with a fork and transfer it to a large serving bowl. Add the roasted vegetables to the quinoa, along with the chopped fresh parsley.
5. Make the Dressing: In a small bowl, whisk together the lemon juice and balsamic vinegar. Drizzle this dressing over the quinoa and vegetable mixture, then gently toss to combine all ingredients thoroughly.
6. Serve: Taste and adjust the seasoning if necessary. This salad can be served warm or chilled, making it a versatile option for summer dining.
Extra Tips
For an added layer of flavor, consider adding feta cheese or goat cheese crumbles to the salad right before serving. You can also experiment with different vegetables based on what’s in season or what you have on hand.
For a protein boost, feel free to add chickpeas or grilled chicken. This salad also keeps well in the fridge for a couple of days, making it a great option for meal prep!
Ratatouille Pasta

Ratatouille Pasta is a delightful dish that perfectly captures the essence of summer with its vibrant colors and fresh flavors. This dish combines the traditional French ratatouille—a medley of seasonal vegetables—with al dente pasta, creating a satisfying and hearty meal.
It’s a wonderful way to use up the bounty of summer vegetables like zucchini, bell peppers, and tomatoes, all simmered down into a rich sauce that clings beautifully to the pasta. Not only is this dish visually appealing, but it’s also incredibly versatile. You can customize it by adding your favorite herbs or even protein like chicken or chickpeas for added heartiness.
Perfect for a summer dinner gathering, Ratatouille Pasta is sure to impress your guests while allowing you to enjoy the fresh tastes of the season.
Ingredients (Serves 4-6)
- 12 oz pasta (penne or fusilli work well)
- 2 tablespoons olive oil
- 1 medium onion, diced
- 2 cloves garlic, minced
- 1 medium zucchini, diced
- 1 bell pepper (red or yellow), diced
- 1 medium eggplant, diced
- 2 cups cherry tomatoes, halved
- 1 teaspoon dried thyme
- 1 teaspoon dried basil
- Salt and pepper to taste
- Fresh basil leaves for garnish
- Grated Parmesan cheese (optional)
Cooking Instructions
- Cook the Pasta: In a large pot, bring salted water to a boil. Add the pasta and cook according to package instructions until al dente. Once cooked, drain the pasta and set aside, reserving a cup of pasta water.
- Sauté the Aromatics: In a large skillet, heat the olive oil over medium heat. Add the diced onion and sauté for about 5 minutes, or until it becomes translucent. Stir in the minced garlic and cook for an additional minute until fragrant.
- Add the Vegetables: Add the diced zucchini, bell pepper, and eggplant to the skillet. Cook for about 8-10 minutes, stirring occasionally, until the vegetables are tender and lightly browned.
- Incorporate the Tomatoes: Stir in the halved cherry tomatoes, dried thyme, and dried basil. Season with salt and pepper. Cook for another 5-7 minutes, allowing the tomatoes to soften and release their juices, creating a flavorful sauce.
- Combine with Pasta: Add the cooked pasta to the skillet with the vegetable mixture. If the dish looks dry, add a little reserved pasta water until you reach your desired consistency. Toss everything together to guarantee the pasta is well coated with the sauce.
- Serve and Garnish: Remove from heat and serve the Ratatouille Pasta hot. Garnish with fresh basil leaves and sprinkle with grated Parmesan cheese if desired.
Extra Tips
When preparing Ratatouille Pasta, feel free to mix and match the vegetables based on what’s in season or what you have on hand. For a creamier version, you can stir in a splash of cream or a dollop of ricotta cheese just before serving.
Additionally, letting the dish sit for a few minutes before serving allows the flavors to meld together beautifully. Enjoy this dish warm or at room temperature, making it a perfect option for summer picnics or potlucks!
Tarte Tatin With Fresh Peaches

Tarte Tatin is a classic French dessert known for its delightful combination of caramelized fruit and flaky pastry. Traditionally made with apples, this version incorporates fresh peaches, offering a sweet and juicy twist perfect for summer gatherings. The contrast of the tender, caramelized peaches with the buttery pastry creates a satisfying dessert that’s certain to impress your guests. Serve it warm with a dollop of crème fraîche or a scoop of vanilla ice cream for an extra indulgent treat.
This recipe is simple yet elegant, allowing the natural sweetness of the peaches to shine through. The caramelization process enhances their flavor, while the pastry adds a wonderful crunch. Whether you’re hosting a dinner party or enjoying a quiet evening at home, this Tarte Tatin is an excellent choice to celebrate the season’s bounty.
Ingredients (Serves 4-6)
- 4-5 ripe peaches, pitted and halved
- 1 cup granulated sugar
- 1/4 cup unsalted butter
- 1 teaspoon vanilla extract
- 1/2 teaspoon cinnamon
- 1 tablespoon lemon juice
- 1 sheet of puff pastry, thawed
- Flour for dusting
- A pinch of salt
Cooking Instructions
- Prepare the Peaches: Start by washing the peaches thoroughly. Cut them in half and remove the pits. To prevent browning, toss the peach halves with lemon juice and set aside.
- Make the Caramel: In a large oven-safe skillet or cast-iron pan, melt the butter over medium heat. Once melted, add the granulated sugar. Stir the mixture gently until the sugar has dissolved and begins to turn a light amber color, about 5-7 minutes. Be cautious to not let it burn.
- Add the Peaches: Carefully add the peach halves to the caramel, cut side down. Sprinkle the cinnamon over the peaches and let them cook for about 5-10 minutes until they begin to soften and caramelize. The peaches should be coated well in the caramel.
- Prepare the Puff Pastry: While the peaches are cooking, lightly flour your work surface and roll out the puff pastry to fit your skillet. It should be about 1 inch larger than the skillet diameter. Prick the pastry lightly with a fork to allow steam to escape while baking.
- Assemble the Tarte Tatin: Once the peaches are caramelized, remove the skillet from the heat. Carefully place the puff pastry over the peaches, tucking the edges down around the fruit. This will create a sealed environment for the peaches to bake.
- Bake the Tarte: Preheat your oven to 375°F (190°C). Place the skillet in the oven and bake for 25-30 minutes, or until the pastry is golden brown and puffed up.
- Invert the Tarte: Once baked, remove the skillet from the oven and allow it to cool for a few minutes. Carefully run a knife around the edges to loosen the pastry. Place a large plate over the skillet and quickly invert it to release the tarte. The peaches should be beautifully caramelized on top.
- Serve: Slice the Tarte Tatin while it’s still warm and serve it on its own or with a scoop of vanilla ice cream or crème fraîche for a delightful finish.
Extra Tips
When making Tarte Tatin, make sure that your peaches are ripe but not overripe to maintain their structure during cooking. If you can’t find fresh peaches, you can substitute them with other seasonal fruits like plums or nectarines.
Additionally, be cautious when working with hot caramel, as it can cause burns. If you prefer a deeper flavor, consider adding a splash of brandy or rum to the caramel for a more complex taste. Enjoy your delicious summer dessert!
Lavender Lemonade

Lavender Lemonade is a revitalizing and aromatic drink that perfectly complements any summer French dinner. This delightful beverage combines the zesty brightness of fresh lemons with the floral notes of lavender, creating a unique and soothing drink that’s ideal for warm evenings.
Not only is it visually appealing with its gentle purple hue, but it also offers a delightful contrast to savory dishes, making it an excellent choice for entertaining guests.
Making Lavender Lemonade is simple and requires just a few ingredients. The essence of this drink lies in the infusion of lavender, which adds a sophisticated touch to the classic lemonade. Whether you’re hosting a garden party or enjoying a quiet evening at home, this drink is sure to impress and reenergize everyone at the table.
Ingredients for Lavender Lemonade (serving size: 4-6 people):
- 1 cup freshly squeezed lemon juice (about 4-6 lemons)
- 1 cup granulated sugar
- 4 cups water (divided)
- 2 tablespoons dried culinary lavender
- Ice cubes
- Lemon slices (for garnish)
- Fresh lavender sprigs (for garnish, optional)
Cooking Instructions:
1. Make the Lavender Syrup: In a medium saucepan, combine 1 cup of water, the sugar, and dried culinary lavender. Bring the mixture to a gentle boil over medium heat, stirring occasionally until the sugar has completely dissolved.
Once boiling, reduce the heat and let it simmer for about 5 minutes to allow the lavender to infuse its flavor into the syrup. After simmering, remove the saucepan from heat, cover it, and let it steep for an additional 15 minutes.
2. Strain the Syrup: After steeping, strain the lavender syrup through a fine mesh sieve or cheesecloth into a clean bowl or jar to remove the lavender buds. Press down gently on the lavender to extract as much syrup as possible.
Discard the lavender remnants and set the syrup aside to cool.
3. Mix the Lemonade: In a large pitcher, combine the freshly squeezed lemon juice and the remaining 3 cups of cold water. Add the cooled lavender syrup to the pitcher and stir well to combine all the ingredients.
Taste the lemonade and adjust the sweetness by adding more syrup or water if desired.
4. Serve the Lavender Lemonade: Fill glasses with ice cubes and pour the lavender lemonade over the ice. Garnish each glass with a lemon slice and a sprig of fresh lavender, if using.
Stir gently before serving to mix in the garnishes, and enjoy your revitalizing Lavender Lemonade!
Extra Tips: When making Lavender Lemonade, it’s important to use culinary-grade lavender to guarantee it’s safe for consumption.
You can also experiment with the sweetness level by adding less sugar if you prefer a more tart lemonade. Additionally, feel free to mix in other flavors, such as mint or berries, for a unique twist on this classic drink.
Finally, this lemonade can be made in advance and stored in the refrigerator for up to a week, making it a convenient option for summer gatherings.
Chocolate Mousse With Fresh Berries
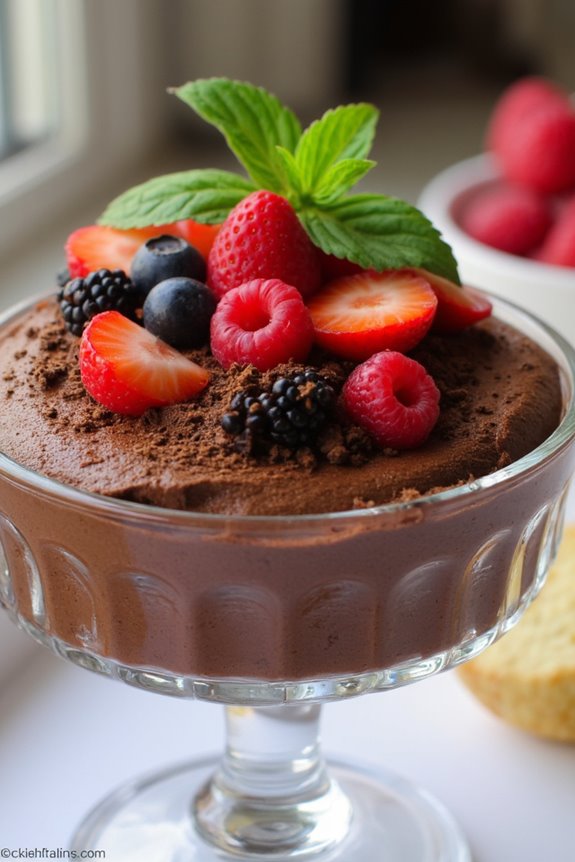
Chocolate Mousse is a classic French dessert that embodies both elegance and indulgence. Its rich, creamy texture paired with the lightness of whipped egg whites makes it a delightful end to any summer dinner. This dessert isn’t only a treat for the taste buds but also a visual feast when beautifully garnished with fresh berries.
Serving this chocolate mousse with a medley of seasonal fruits adds a revitalizing contrast, making it the perfect finish to a warm evening meal.
Making chocolate mousse may seem intimidating, but it’s surprisingly simple and requires only a few basic ingredients. The key to achieving a light and airy mousse lies in the technique of folding whipped cream and egg whites into the melted chocolate. This method preserves the airiness, giving the mousse its signature texture.
Prepare to impress your guests with this delectable dessert that showcases the best of summer’s bounty.
Ingredients (Serves 4-6)
- 200g dark chocolate (70% cocoa), chopped
- 3 large eggs, separated
- 50g granulated sugar
- 1 cup heavy cream
- 1 teaspoon vanilla extract
- A pinch of salt
- Fresh mixed berries (strawberries, raspberries, blueberries) for garnish
- Mint leaves for garnish (optional)
Cooking Instructions
- Melt the Chocolate: Begin by placing the chopped dark chocolate in a heatproof bowl. Set the bowl over a pot of simmering water (double boiler method) and stir until the chocolate is completely melted and smooth. Remove from heat and let it cool slightly.
- Whip the Egg Whites: In a clean bowl, use an electric mixer to beat the egg whites with a pinch of salt until soft peaks form. Gradually add the granulated sugar, continuing to beat until the mixture is glossy and holds stiff peaks. Set aside.
- Prepare the Cream: In another bowl, whip the heavy cream with the vanilla extract until soft peaks form. Be careful not to overwhip, as you want the cream to remain light and fluffy.
- Combine Chocolate and Egg Yolks: Once the melted chocolate has cooled slightly, stir in the egg yolks until well combined. Make sure the chocolate isn’t hot, or it will cook the yolks.
- Fold in the Mixtures: Gently fold one-third of the whipped cream into the chocolate mixture to lighten it. Then, carefully fold in the whipped egg whites in two additions, making sure to retain as much air as possible. Finally, fold in the remaining whipped cream until there are no visible streaks.
- Chill the Mousse: Spoon the mousse into serving dishes or glasses and refrigerate for at least 2 hours, or until set.
- Serve with Berries: Once set, top the mousse with a generous handful of fresh mixed berries and garnish with mint leaves if desired. Serve immediately and enjoy!
Extra Tips
For an extra touch of flavor, consider adding a splash of coffee liqueur or orange zest to the chocolate mixture before folding in the creams. This will enhance the chocolate taste and add a unique twist to your mousse.
Additionally, make certain that all your equipment is clean and free of grease, especially when whipping egg whites, as any fat can prevent them from achieving the desired volume.
Finally, serve the mousse chilled for the best texture and taste!