

As spring graces us with its presence, it’s the perfect time to bring the season’s fresh produce into our kitchens. Asparagus, peas, and herb-crusted lamb chops are just a few of the delicious ingredients that make this time of year so special. Each recipe is a nod to renewal and the vibrant flavors of spring. If you’re looking to add a touch of French elegance to your meals, these 14 lively recipes are just what you need. Trust me, you’ll want to try every single one.
Asparagus and Pea Risotto
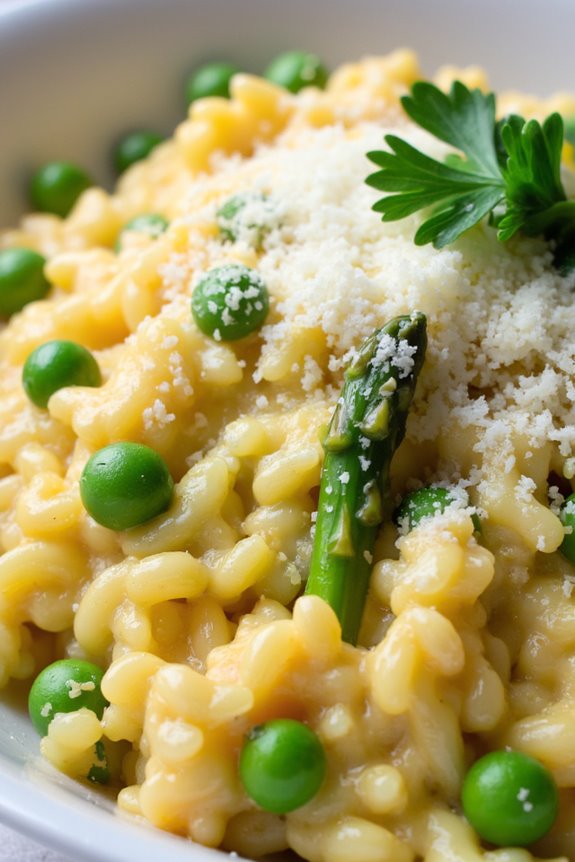
Asparagus and Pea Risotto is a delightful dish that captures the essence of spring with its vibrant colors and fresh flavors. This creamy rice dish isn’t only comforting but also elegant enough to serve at a dinner party. The combination of tender asparagus and sweet peas creates a beautiful harmony that brings a taste of the season to your table.
With its rich texture and rich flavors, this risotto will impress your guests and satisfy your family. Making risotto requires a bit of patience and attention, but the results are well worth the effort. The technique involves slowly adding warm broth to rice, allowing it to absorb the liquid gradually, which results in a creamy consistency.
With the addition of asparagus and peas, this dish is elevated to a spring classic. Pair it with a crisp white wine and a light salad for a complete meal.
Ingredients (Serves 4-6)
- 1 ½ cups Arborio rice
- 4 cups vegetable broth (or chicken broth)
- 1 cup white wine (optional)
- 1 medium onion, finely chopped
- 2 cloves garlic, minced
- 1 cup asparagus, trimmed and cut into 1-inch pieces
- 1 cup fresh or frozen peas
- ½ cup grated Parmesan cheese
- 2 tablespoons olive oil
- 2 tablespoons unsalted butter
- Salt and pepper to taste
- Fresh parsley, chopped (for garnish, optional)
Cooking Instructions
- Prepare the Broth: In a saucepan, bring the vegetable or chicken broth to a gentle simmer over medium heat. Keep it warm throughout the cooking process, as adding cold broth can slow down the cooking of the rice.
- Sauté Aromatics: In a large skillet or heavy-bottomed pot, heat the olive oil and 1 tablespoon of butter over medium heat. Add the chopped onion and cook until translucent, about 4-5 minutes. Stir in the minced garlic and cook for an additional minute until fragrant.
- Toast the Rice: Add the Arborio rice to the skillet and stir well to coat the grains with the oil and aromatics. Cook for about 2-3 minutes, stirring frequently, until the rice becomes slightly translucent around the edges. This step helps release the starches that give risotto its creamy texture.
- Deglaze with Wine: If using, pour in the white wine and stir until it’s mostly absorbed by the rice. This adds depth of flavor to the dish. If not using wine, skip this step and proceed to the next.
- Add Broth Gradually: Begin adding the warm broth, one ladle at a time, stirring frequently. Allow the rice to absorb most of the liquid before adding the next ladle. This process will take about 18-20 minutes, and the rice should be creamy and al dente when finished.
- Incorporate Vegetables: In the last 5 minutes of cooking, add the asparagus pieces and peas to the risotto. Continue to stir and add broth as needed until the vegetables are tender and the rice is cooked to your liking.
- Finish the Risotto: Once the rice is cooked, remove the skillet from the heat and stir in the remaining tablespoon of butter and the grated Parmesan cheese. Season with salt and pepper to taste. The risotto should be creamy and luscious.
- Serve: Spoon the risotto into serving bowls and garnish with chopped fresh parsley if desired. Serve immediately for the best texture and flavor.
Extra Tips
To enhance the flavor of your Asparagus and Pea Risotto, consider adding a squeeze of fresh lemon juice or some lemon zest right before serving for a bright finish. You can also experiment with different herbs, such as basil or mint, to complement the spring vegetables.
If you want to make the dish a bit heartier, feel free to add grilled chicken or shrimp. Remember to stir the risotto often to prevent it from sticking to the pan, and adjust the consistency with additional broth if it becomes too thick. Enjoy your culinary adventure!
Herb-Crusted Lamb Chops
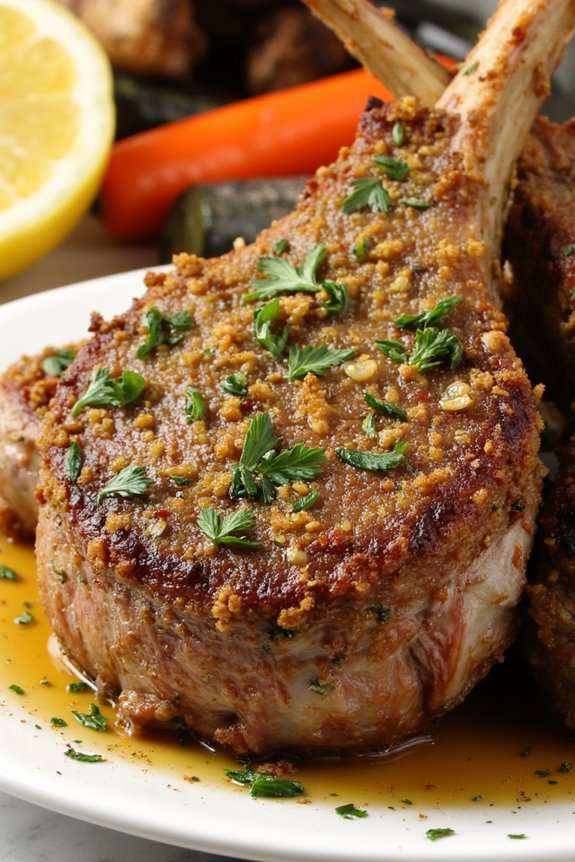
Herb-Crusted Lamb Chops are a delightful and flavorful dish that can elevate any spring dinner. Combining the rich taste of succulent lamb with a fragrant herb crust, this dish is perfect for impressing guests or enjoying a special family meal. The vibrant herb mixture not only enhances the flavor but also brings a stunning visual appeal to the plate, making it a true centerpiece for your dining table.
To prepare Herb-Crusted Lamb Chops, you’ll want to select high-quality lamb, preferably from the rack or loin, which provides tender meat ideal for this preparation. The key to achieving that perfect crust lies in the blend of fresh herbs, breadcrumbs, and a splash of olive oil, which together create a delicious topping that complements the natural flavors of the lamb. Serve with roasted vegetables or a light salad to complete the meal.
Ingredients (Serves 4-6):
- 8 lamb chops (about 1 inch thick)
- 1 cup fresh parsley, finely chopped
- 1/4 cup fresh rosemary, finely chopped
- 1/4 cup fresh thyme, finely chopped
- 1 cup breadcrumbs
- 3 cloves garlic, minced
- 1/4 cup Dijon mustard
- 1/4 cup olive oil
- Salt and pepper to taste
- Lemon wedges (for serving)
Cooking Instructions:
- Prepare the Lamb Chops: Begin by taking the lamb chops out of the refrigerator and letting them sit at room temperature for about 20-30 minutes. This allows for even cooking. Season both sides generously with salt and pepper.
- Make the Herb Mixture: In a large mixing bowl, combine the chopped parsley, rosemary, thyme, breadcrumbs, and minced garlic. Drizzle in the olive oil and mix until all the ingredients are well combined and the breadcrumbs are evenly coated with oil.
- Apply the Mustard: Preheat your oven to 400°F (200°C). Brush each lamb chop on one side with Dijon mustard. This not only adds flavor but also helps the herb mixture adhere to the meat.
- Crust the Lamb: Press the herb and breadcrumb mixture onto the mustard-coated side of each lamb chop, guaranteeing a thick, even layer. This crust will provide a flavorful contrast to the tender meat.
- Sear the Chops: In a large oven-safe skillet, heat a tablespoon of olive oil over medium-high heat. Once hot, add the lamb chops crust-side down and sear for about 3-4 minutes until the crust is golden brown. Flip the chops and sear the other side for an additional 2 minutes.
- Bake the Lamb Chops: Transfer the skillet to the preheated oven and bake for 8-10 minutes for medium-rare, or longer if you prefer your lamb cooked more. Use a meat thermometer to check for doneness; the internal temperature should reach 145°F (63°C).
- Rest and Serve: Once cooked, remove the lamb chops from the oven and let them rest for 5 minutes. This resting period allows the juices to redistribute within the meat. Serve with lemon wedges for an added burst of freshness.
Extra Tips:
When preparing Herb-Crusted Lamb Chops, consider using a mix of fresh herbs according to your preference; mint can also add a unique twist. Additionally, if you have leftover herb mixture, it can be sprinkled over roasted vegetables or used as a topping for other meats. Always let the lamb rest after cooking, as this will guarantee a juicier and more flavorful result.
Ratatouille Tart
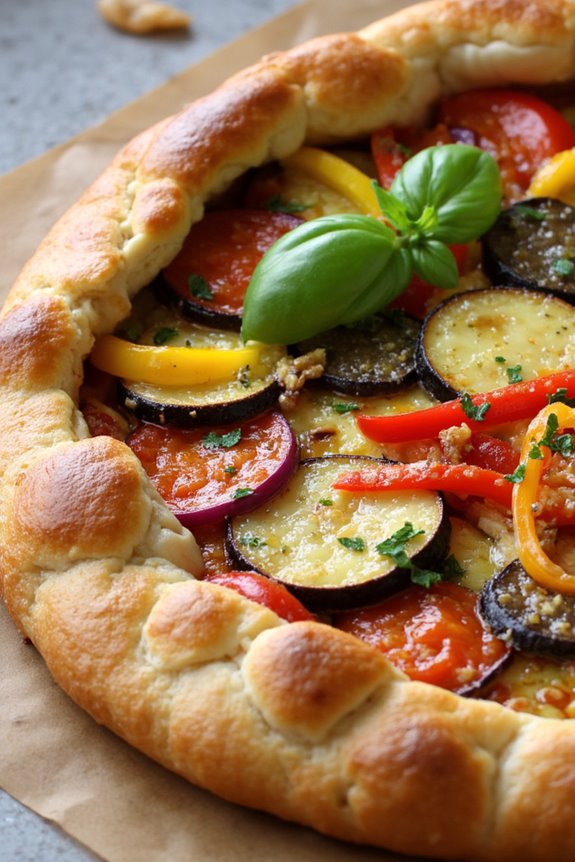
Ratatouille Tart is a delightful dish that combines the rustic flavors of a traditional ratatouille with the elegance of a tart. This recipe transforms the classic French vegetable medley into a beautiful, savory pastry that’s perfect for a spring dinner party or a cozy family meal.
The tart features a flaky, buttery crust and is filled with a vibrant mixture of zucchini, eggplant, bell peppers, and tomatoes, all seasoned with aromatic herbs. Serving this dish not only brings a taste of Provence to your table but also showcases the fresh, seasonal produce of spring.
Creating a Ratatouille Tart is relatively straightforward and allows for personal touches, such as adding your favorite herbs or cheeses. The tart can be served warm or at room temperature, making it an excellent option for entertaining.
Pair it with a fresh green salad and a glass of rosé wine for a complete French-inspired meal. This recipe serves 4-6 people and is sure to impress your guests with its colorful presentation and rich flavors.
Ingredients:
- 1 pre-made pie crust (9-inch)
- 1 medium eggplant, diced
- 2 medium zucchinis, sliced
- 1 red bell pepper, diced
- 1 yellow bell pepper, diced
- 1 medium onion, diced
- 2 cloves garlic, minced
- 2 cups diced tomatoes (fresh or canned)
- 1 teaspoon dried thyme
- 1 teaspoon dried basil
- 1/2 teaspoon salt
- 1/4 teaspoon black pepper
- 1 tablespoon olive oil
- 1 cup shredded mozzarella cheese (optional)
- Fresh basil leaves for garnish (optional)
Instructions:
1. Preheat the Oven: Begin by preheating your oven to 400°F (200°C). This step guarantees that your tart will bake evenly and achieve a golden crust.
2. Prepare the Pie Crust: Place the pre-made pie crust into a 9-inch tart pan, pressing it firmly into the edges. Trim any excess dough hanging over the sides. Poke several holes in the bottom of the crust with a fork to prevent it from puffing up during baking.
3. Sauté the Vegetables: In a large skillet, heat the olive oil over medium heat. Add the diced onion and minced garlic, cooking until the onion becomes translucent, about 5 minutes.
Then, stir in the diced eggplant, zucchini, and bell peppers. Cook for another 5-7 minutes, stirring occasionally, until the vegetables are tender.
4. Add Tomatoes and Seasoning: Once the vegetables are tender, add the diced tomatoes, thyme, basil, salt, and black pepper to the skillet. Cook for an additional 5 minutes, allowing the flavors to meld together.
Remove the skillet from heat and let the mixture cool slightly.
5. Assemble the Tart: Spoon the vegetable mixture into the prepared pie crust, spreading it evenly. If desired, sprinkle shredded mozzarella cheese on top for added flavor and richness.
6. Bake the Tart: Place the tart in the preheated oven and bake for 25-30 minutes, or until the crust is golden brown and the cheese (if used) is melted and bubbly.
7. Cool and Serve: Once baked, remove the tart from the oven and allow it to cool for about 10 minutes. Garnish with fresh basil leaves before slicing and serving.
Extra Tips:
For a twist on the classic Ratatouille Tart, consider adding crumbled feta or goat cheese for a tangy flavor.
If you want to enhance the dish further, you can brush the crust with a bit of olive oil or egg wash before baking for a richer color. Additionally, feel free to customize the vegetables based on what you have on hand or what’s in season.
This dish can be made ahead of time and stored in the refrigerator; simply reheat before serving for a convenient and delicious meal.
Lemon-Dill Salmon With Spring Vegetables
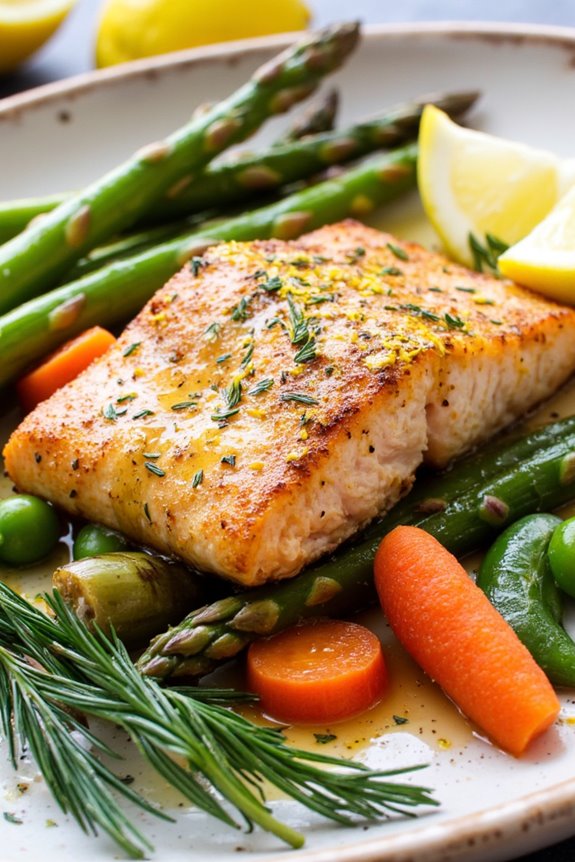
As spring arrives, it brings with it a bounty of fresh vegetables that pair beautifully with light and flavorful dishes. One such dish is Lemon-Dill Salmon with Spring Vegetables, which captures the essence of the season. The combination of tender salmon, bright lemon, and aromatic dill creates a delightful meal that isn’t only satisfying but also healthy.
This dish is perfect for a family dinner or a gathering with friends, showcasing the vibrant flavors of spring.
Cooking Lemon-Dill Salmon with Spring Vegetables is a straightforward process that can be completed in under an hour. The salmon fillets are baked to perfection, while a medley of fresh spring vegetables, such as asparagus and peas, complements the dish with their crisp texture and vibrant colors.
This recipe is sure to impress your guests, offering a taste of French cuisine that feels both elegant and comforting.
Ingredients (serving size: 4-6 people)
- 4-6 salmon fillets (about 6 ounces each)
- 2 tablespoons olive oil
- 2 lemons (1 for zest and juice, 1 sliced for garnish)
- 2 tablespoons fresh dill, chopped
- Salt and pepper, to taste
- 1 pound asparagus, trimmed and cut into 2-inch pieces
- 1 cup snap peas, trimmed
- 1 cup baby carrots, halved lengthwise
- 1/4 cup vegetable broth or white wine
Cooking Instructions
- Preheat the Oven: Begin by preheating your oven to 400°F (200°C). This will guarantee that your salmon cooks evenly and comes out flaky and tender.
- Prepare the Salmon: Place the salmon fillets on a large baking sheet lined with parchment paper. Drizzle each fillet with olive oil and season with salt and pepper. Add lemon zest, lemon juice, and chopped dill on top of the salmon, making sure to coat them well. This step infuses the salmon with essential flavor.
- Prepare the Vegetables: In a separate bowl, toss together the asparagus, snap peas, and baby carrots. Drizzle with a little olive oil and season with salt and pepper. Spread the vegetables around the salmon on the baking sheet, ensuring they’re evenly distributed.
- Add Liquid: Pour the vegetable broth or white wine around the salmon and vegetables on the baking sheet. This will help steam the vegetables and keep the salmon moist while it bakes.
- Bake the Dish: Place the baking sheet in the preheated oven and bake for about 15-20 minutes, or until the salmon is cooked through and flakes easily with a fork, and the vegetables are tender yet still crisp. The cooking time may vary slightly depending on the thickness of the salmon fillets.
- Serve and Garnish: Once done, remove the baking sheet from the oven and let it sit for a couple of minutes. Serve the salmon and vegetables warm, garnished with lemon slices and additional fresh dill if desired.
Extra Tips
For an extra layer of flavor, consider marinating the salmon in the lemon-dill mixture for 30 minutes before baking. This allows the flavors to meld beautifully.
Additionally, feel free to substitute the spring vegetables with any seasonal favorites you have on hand, such as zucchini or bell peppers. Remember to keep an eye on the salmon as it bakes, as overcooking can dry it out.
Serve this dish with a light salad or crusty bread for a complete meal!
Quiche Lorraine With Fresh Herbs

Quiche Lorraine is a classic French dish that combines the rich flavors of cream, eggs, and cheese with the savory goodness of bacon, resulting in a creamy and satisfying pie. This delightful dish is perfect for a spring dinner, showcasing fresh herbs that add a fragrant touch and elevate the overall flavor profile.
Whether served warm or at room temperature, Quiche Lorraine is sure to impress your guests and provide a delightful culinary experience.
Making Quiche Lorraine isn’t only simple but also versatile. You can enjoy it for brunch, lunch, or dinner, and it pairs wonderfully with a crisp salad or a glass of white wine.
With fresh herbs like chives and parsley, the traditional recipe gets a vibrant twist that brings a taste of spring to your table. Let’s explore the ingredients and steps needed to create this delicious dish for 4-6 people.
Ingredients
- 1 pre-made pie crust (9-inch)
- 6 large eggs
- 1 cup heavy cream
- 1 cup milk
- 4 ounces cooked bacon, chopped
- 1 cup grated Gruyère cheese
- 1 tablespoon fresh chives, chopped
- 1 tablespoon fresh parsley, chopped
- Salt and pepper to taste
- A pinch of nutmeg
Cooking Instructions
- Preheat the Oven: Begin by preheating your oven to 375°F (190°C). This guarantees that your quiche will bake evenly and achieve a golden crust.
- Prepare the Pie Crust: Place the pre-made pie crust into a 9-inch pie dish. Press it down gently to fit the dish and crimp the edges for a decorative touch. If desired, prick the bottom of the crust with a fork to prevent bubbling.
- Cook the Bacon: In a skillet over medium heat, cook the chopped bacon until crispy. Remove it from the skillet and place it on a paper towel to absorb excess grease. This step adds a nice crunch and flavor to the quiche.
- Mix the Egg Filling: In a large mixing bowl, whisk together the eggs, heavy cream, and milk until well combined. Add in the salt, pepper, and nutmeg, adjusting to your taste. The heavy cream and milk create a rich, custardy filling.
- Add Cheese and Herbs: Stir in the grated Gruyère cheese, cooked bacon, chopped chives, and parsley into the egg mixture. This combination of ingredients will enhance the flavor and texture of the quiche.
- Pour and Bake: Pour the egg mixture into the prepared pie crust. Bake in the preheated oven for about 35-40 minutes, or until the quiche is set in the center and lightly golden on top. You can check doneness by inserting a knife into the center; it should come out clean.
- Cool and Serve: Once baked, remove the quiche from the oven and let it cool for about 10 minutes before slicing. This allows the filling to set further and makes it easier to serve.
Extra Tips
For a richer flavor, consider using a combination of different cheeses such as cheddar or feta along with the Gruyère.
To make your quiche even more vibrant, experiment with other fresh herbs like thyme or rosemary. If you want to reduce prep time, you can use a store-bought pie crust, but feel free to make your own for an extra special touch.
Finally, Quiche Lorraine can be made ahead of time and stored in the refrigerator, making it a perfect make-ahead dish for entertaining. Enjoy your culinary creation!
Spring Vegetable Soup
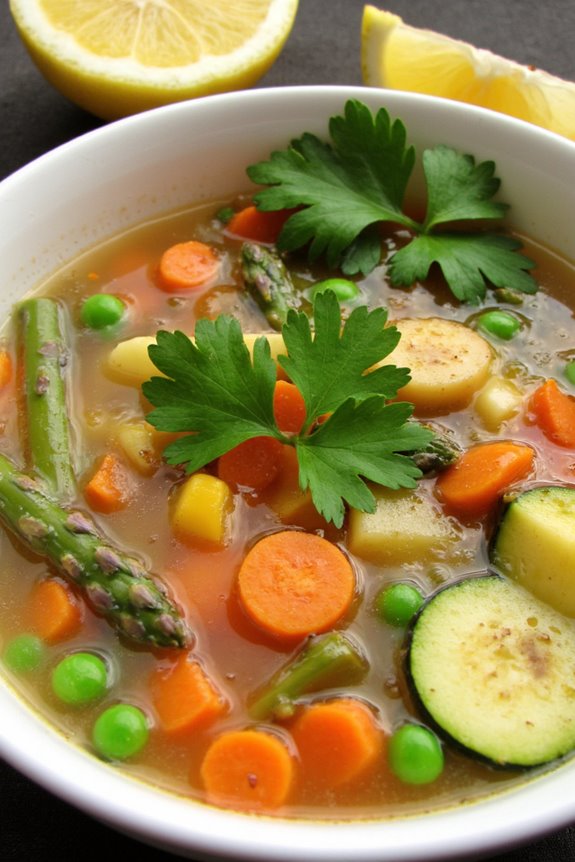
As the days grow longer and the weather warms up, spring brings a delightful array of fresh vegetables that can be used to create a vibrant and healthy dish. A classic French Spring Vegetable Soup captures the essence of this season, allowing the flavors of tender greens, crisp vegetables, and aromatic herbs to shine through.
This soup not only warms the soul but also provides a nutritious and satisfying meal that can be enjoyed as a starter or a main course, making it perfect for a spring dinner gathering.
To make a delicious Spring Vegetable Soup, you can incorporate a variety of seasonal vegetables such as asparagus, peas, and carrots, along with fragrant herbs like thyme and parsley. The beauty of this soup lies in its flexibility; you can adjust the recipe based on what vegetables are available at your local market or in your garden.
Serve it with a slice of crusty French bread for a complete meal that celebrates the vibrant flavors of spring.
Ingredients (serves 4-6):
- 2 tablespoons olive oil
- 1 medium onion, diced
- 2 cloves garlic, minced
- 2 medium carrots, peeled and diced
- 2 stalks celery, diced
- 1 cup asparagus, trimmed and cut into 1-inch pieces
- 1 cup green peas (fresh or frozen)
- 1 medium zucchini, diced
- 4 cups vegetable broth
- 1 teaspoon fresh thyme leaves (or ½ teaspoon dried thyme)
- 1 bay leaf
- Salt and pepper to taste
- ¼ cup fresh parsley, chopped (for garnish)
- Lemon wedges (for serving, optional)
Cooking Instructions:
- Heat the Oil: In a large pot, heat the olive oil over medium heat. This will allow you to sauté the vegetables and develop their flavors.
- Sauté the Aromatics: Add the diced onion and minced garlic to the pot. Cook for about 3-4 minutes until the onion becomes translucent, stirring occasionally. This step is essential for building a flavorful base for your soup.
- Add the Vegetables: Stir in the diced carrots and celery, cooking for an additional 5 minutes. These vegetables will add sweetness and texture to the soup.
- Incorporate Asparagus and Peas: Add the asparagus and green peas to the pot, cooking for another 3-4 minutes. This helps to maintain the vibrant color and nutrients of these spring vegetables.
- Add Zucchini and Broth: Mix in the diced zucchini, followed by the vegetable broth. Bring the mixture to a gentle boil. The zucchini adds a nice creaminess to the soup.
- Season and Simmer: Add the thyme, bay leaf, salt, and pepper. Reduce the heat to low and let the soup simmer for approximately 15-20 minutes, allowing the flavors to meld together and the vegetables to become tender.
- Finish and Serve: Remove the bay leaf, taste, and adjust the seasoning if necessary. Ladle the soup into bowls and garnish with fresh parsley. Serve with lemon wedges on the side for an extra burst of freshness.
Extra Tips: For an added depth of flavor, consider roasting some of the vegetables before adding them to the soup. This can enhance their natural sweetness and create a more complex taste profile.
Additionally, feel free to mix in other vegetables like spinach or kale, or even add a splash of cream for a richer texture. Don’t forget to serve the soup hot with fresh, crusty bread for dipping!
Grilled Chicken With Mustard and Thyme
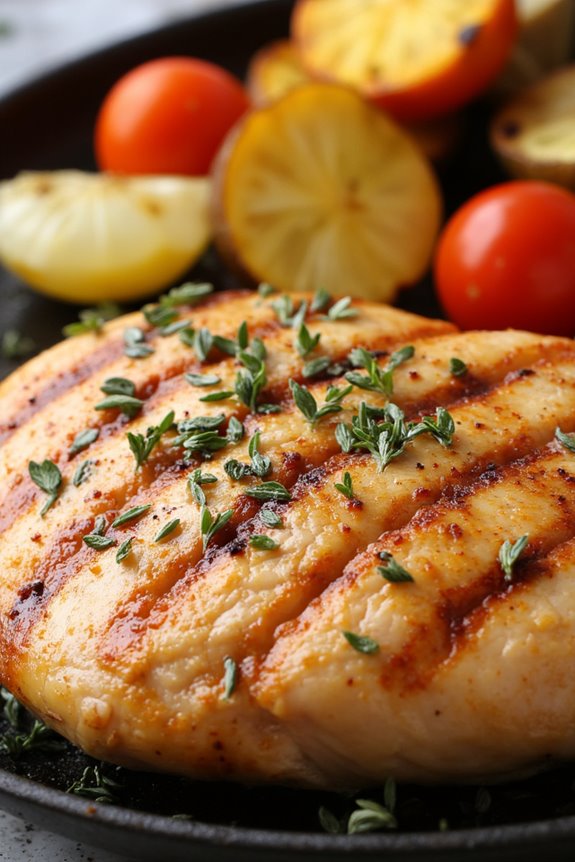
Grilled Chicken With Mustard and Thyme is a delightful dish that perfectly combines the bold flavors of mustard with the aromatic essence of fresh thyme. This dish isn’t only simple to prepare but also packs a punch when it comes to flavor, making it ideal for a spring dinner gathering. The tangy mustard marinade enhances the natural juiciness of the chicken while the grilling process adds a smoky depth that elevates the entire meal.
Serve it up with a light salad or roasted vegetables, and you have a complete dining experience that showcases the beauty of spring ingredients.
As the warmer weather approaches, the appeal of outdoor cooking becomes irresistible. Grilling is a fantastic way to enjoy the fresh air while preparing a delicious meal. This recipe for Grilled Chicken With Mustard and Thyme will guarantee your dinner is both flavorful and satisfying, bringing a taste of French cuisine to your table.
Whether you’re cooking for family or friends, this dish is sure to impress and leave everyone asking for seconds.
Ingredients (serving size: 4-6 people):
- 4-6 boneless, skinless chicken breasts
- 1/4 cup Dijon mustard
- 2 tablespoons olive oil
- 2 teaspoons fresh thyme, chopped (or 1 teaspoon dried thyme)
- 2 cloves garlic, minced
- 1 tablespoon honey
- Salt and black pepper, to taste
- Fresh thyme sprigs, for garnish (optional)
Cooking Instructions:
- Prepare the Marinade: In a mixing bowl, combine the Dijon mustard, olive oil, chopped thyme, minced garlic, and honey. Whisk the ingredients together until well combined. This marinade will impart a wonderful flavor to the chicken, guaranteeing it remains moist and delicious during grilling.
- Marinate the Chicken: Place the chicken breasts in a large resealable plastic bag or a shallow dish. Pour the marinade over the chicken, guaranteeing each piece is thoroughly coated. Seal the bag or cover the dish and refrigerate for at least 30 minutes, or up to 2 hours for enhanced flavor. Marinating allows the chicken to absorb the mustard and thyme flavors deeply.
- Preheat the Grill: While the chicken is marinating, preheat your grill to medium-high heat. This will guarantee a nice sear on the chicken, locking in the juices and creating appealing grill marks.
- Grill the Chicken: Once the grill is hot, remove the chicken from the marinade, allowing any excess marinade to drip off. Season the chicken with salt and black pepper on both sides. Place the chicken breasts on the grill and cook for about 6-7 minutes on one side. Flip the chicken and grill for an additional 6-7 minutes until the internal temperature reaches 165°F (75°C).
- Rest and Serve: Once cooked, remove the chicken from the grill and let it rest for about 5 minutes. This resting period allows the juices to redistribute throughout the chicken, resulting in a more succulent bite. Serve the grilled chicken garnished with fresh thyme sprigs, if desired.
Extra Tips: For added flavor, consider using a mixture of herbs in addition to thyme, such as rosemary or parsley. If you prefer a bit of heat, add a pinch of cayenne pepper or red pepper flakes to the marinade.
Additionally, you can grill some seasonal vegetables alongside the chicken for a complete meal that celebrates the fresh flavors of spring. Enjoy your culinary adventure!
Sautéed Baby Carrots With Honey and Ginger
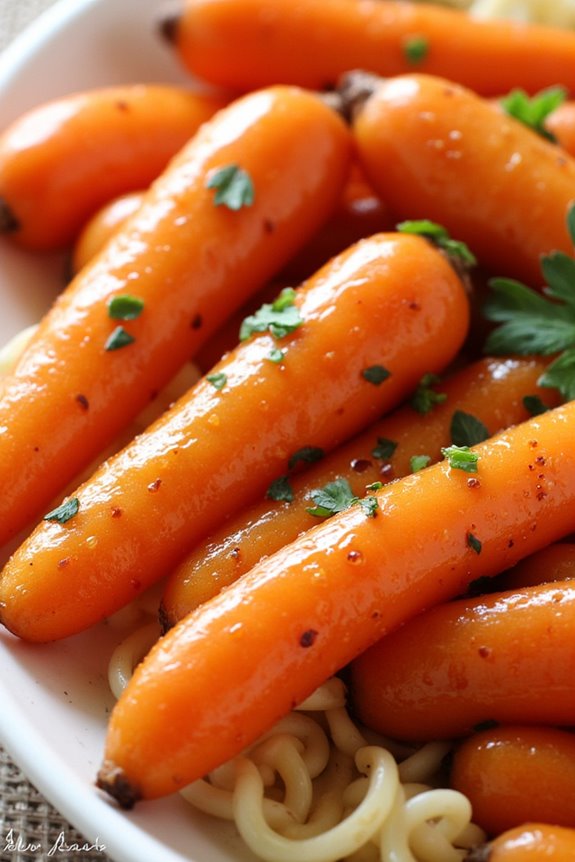
Sautéed Baby Carrots With Honey and Ginger is a delightful spring dish that elevates the humble carrot into a sweet and savory treat. The natural sweetness of the baby carrots is enhanced by a luscious glaze of honey, while fresh ginger adds a zesty warmth that perfectly balances the dish. This vibrant side dish isn’t only colorful but also packed with flavor, making it a fantastic accompaniment to any spring dinner gathering.
Perfect for serving 4-6 people, this recipe is simple yet elegant, allowing the fresh ingredients to shine through. Whether you’re hosting a dinner party or enjoying a family meal, this dish will certainly impress your guests and add a touch of sophistication to your table. Let’s get started on how to make these delicious sautéed baby carrots!
Ingredients
- 1 pound baby carrots, peeled and trimmed
- 2 tablespoons unsalted butter
- 2 tablespoons honey
- 1 tablespoon fresh ginger, grated
- Salt to taste
- Freshly ground black pepper to taste
- 1 tablespoon fresh parsley, chopped (for garnish)
Cooking Instructions
- Prepare the Carrots: Start by washing the baby carrots thoroughly under running water. Peel them if necessary and trim the tops to guarantee they’re uniform in size. This will help them cook evenly.
- Melt the Butter: In a large skillet, melt the unsalted butter over medium heat. Allow it to foam slightly, which indicates that it’s hot and ready for cooking. The butter will provide a rich flavor base for the carrots.
- Sauté the Carrots: Once the butter is melted, add the prepared baby carrots to the skillet. Sauté them for about 5-7 minutes, stirring occasionally, until they begin to soften and take on a slight golden color. This step helps to develop their natural sweetness.
- Add Honey and Ginger: Pour in the honey and sprinkle the grated ginger over the sautéed carrots. Stir well to coat the carrots evenly with the honey mixture. The honey will create a beautiful glaze as it heats up and caramelizes.
- Season and Cook Further: Season the carrots with salt and freshly ground black pepper to taste. Continue to sauté for another 5-7 minutes, allowing the carrots to cook through and the glaze to thicken. The goal is to have tender carrots with a shiny, flavorful coating.
- Garnish and Serve: Once the carrots are cooked and glazed to your liking, remove them from the heat. Transfer them to a serving dish and garnish with freshly chopped parsley for a pop of color and additional flavor. Serve warm as a side dish.
Extra Tips
For an added depth of flavor, consider incorporating a splash of lemon juice or a pinch of cayenne pepper for a subtle kick. You can also experiment with different herbs such as thyme or dill to complement the dish.
If you prefer a more caramelized texture, let the carrots sauté a bit longer, but keep an eye on them to prevent burning. This dish is best enjoyed fresh, but it can be reheated gently if necessary.
Crêpes With Spinach and Goat Cheese
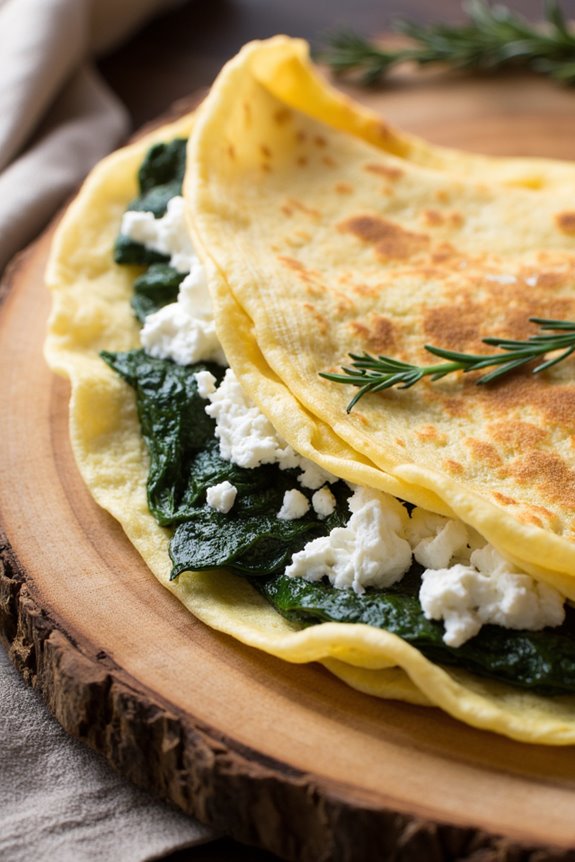
Crêpes with Spinach and Goat Cheese is a delightful French dish that brings together the delicate texture of crêpes with the rich flavors of sautéed spinach and tangy goat cheese. This dish is perfect for a spring dinner, as it highlights fresh ingredients and can be served as a light main course or a satisfying appetizer.
The combination of creamy cheese and earthy spinach wrapped in thin, buttery crêpes makes for a dish that’s both elegant and comforting.
Making crêpes from scratch may seem intimidating, but with a little patience and practice, you’ll find it’s quite simple. The batter comes together quickly, and the filling can be prepared while the crêpes are cooking. This recipe is designed to serve 4-6 people, making it an ideal choice for a gathering of friends or family.
Ingredients:
- 1 cup all-purpose flour
- 2 large eggs
- 1 ½ cups milk
- 2 tablespoons melted butter (plus extra for cooking)
- 1 cup fresh spinach, chopped
- 4 ounces goat cheese, crumbled
- 1 small onion, finely chopped
- 2 cloves garlic, minced
- Salt and pepper to taste
- Fresh herbs (such as thyme or chives) for garnish (optional)
Cooking Instructions:
1. Prepare the Crêpe Batter: In a mixing bowl, whisk together the flour and eggs. Gradually add the milk while continuing to whisk until the batter is smooth and free of lumps. Stir in the melted butter. Let the batter rest for at least 30 minutes at room temperature; this helps the crêpes become tender.
2. Cook the Spinach Filling: In a skillet over medium heat, add a small amount of butter. Once melted, sauté the chopped onion until it becomes translucent, about 3-4 minutes. Add the minced garlic and the chopped spinach, cooking until the spinach is wilted and any excess moisture has evaporated.
Season with salt and pepper, then remove from heat and stir in the crumbled goat cheese.
3. Cook the Crêpes: Heat a non-stick skillet or crêpe pan over medium heat and add a little butter. Pour about ¼ cup of the crêpe batter into the pan, swirling it to cover the bottom evenly. Cook for about 1-2 minutes until the edges begin to lift and the bottom is lightly golden.
Flip the crêpe and cook for another minute on the other side. Repeat with the remaining batter, stacking the cooked crêpes on a plate.
4. Assemble the Crêpes: Take one crêpe and spoon a portion of the spinach and goat cheese filling onto one half. Fold the crêpe in half, then in half again to make a triangle. Repeat with the remaining crêpes and filling.
5. Serve: Arrange the filled crêpes on a serving platter. Optionally, garnish with fresh herbs before serving. These crêpes can be enjoyed warm or at room temperature.
Extra Tips:
When making crêpes, make sure that your pan is properly heated before adding the batter to achieve that perfect golden color. If your batter seems too thick, feel free to add a splash more milk until you reach the desired consistency.
For added flavor, consider incorporating herbs into the crêpe batter itself or experimenting with different fillings such as mushrooms or sun-dried tomatoes. Enjoy your culinary journey into French cuisine!
Provençal Stuffed Tomatoes
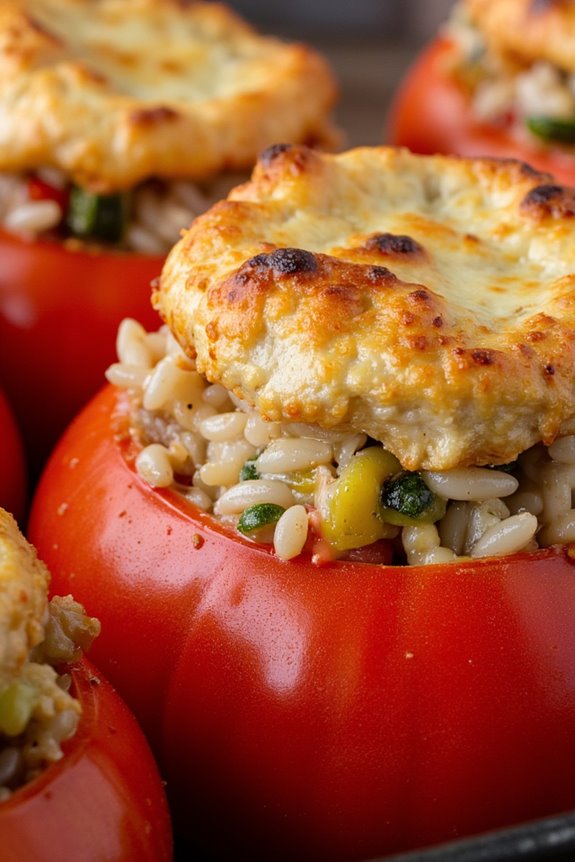
Provençal Stuffed Tomatoes are a delightful and colorful dish that showcases the vibrant flavors of the Mediterranean. This recipe combines ripe tomatoes with a flavorful filling that often includes herbs, rice, vegetables, and sometimes meat, making it a versatile option for any meal. Perfect for a spring dinner, these stuffed tomatoes can be served as a main course or a side dish, bringing a taste of the French countryside right to your table.
The beauty of Provençal Stuffed Tomatoes lies in their adaptability. You can customize the filling to suit your preferences or to make use of any leftover ingredients you may have. The combination of fresh herbs, garlic, and the natural sweetness of tomatoes creates a delightful harmony of flavors. Whether you’re hosting a dinner party or enjoying a quiet evening at home, this dish is sure to impress.
Ingredients (Serves 4-6)
- 6 large ripe tomatoes
- 1 cup cooked rice (white or brown)
- 1/2 cup onion, finely chopped
- 2 cloves garlic, minced
- 1 cup bell peppers, finely chopped (any color)
- 1/2 cup zucchini, diced
- 1/2 cup grated cheese (such as Parmesan or mozzarella)
- 2 tablespoons olive oil
- 1 teaspoon dried thyme
- 1 teaspoon dried basil
- Salt and pepper to taste
- Fresh parsley for garnish (optional)
Cooking Instructions
- Prepare the Tomatoes: Start by preheating your oven to 375°F (190°C). Wash the tomatoes thoroughly and slice the tops off. Gently scoop out the insides using a spoon, being careful not to break the outer shell. Reserve the pulp and juice in a bowl for use in the filling.
- Create the Filling: In a large skillet, heat the olive oil over medium heat. Add the chopped onion and garlic, sautéing until the onion becomes translucent. Incorporate the diced bell peppers and zucchini, cooking for another 5 minutes until softened. Stir in the reserved tomato pulp, rice, thyme, basil, salt, and pepper. Cook for an additional 2-3 minutes to meld the flavors.
- Combine with Cheese: Remove the skillet from heat and mix in half of the grated cheese to the filling. This will help bind the mixture together and add richness.
- Stuff the Tomatoes: Carefully spoon the filling mixture into each hollowed tomato, pressing down gently to pack it in. Place the stuffed tomatoes upright in a baking dish. Sprinkle the remaining cheese on top of each tomato for a delicious, cheesy crust.
- Bake: Cover the baking dish with aluminum foil and place it in the preheated oven. Bake for 25-30 minutes, then remove the foil and bake for an additional 10-15 minutes, or until the tomatoes are tender and the top is golden brown.
- Serve: Once cooked, remove the stuffed tomatoes from the oven and let them cool slightly. Garnish with fresh parsley if desired, and serve warm.
Extra Tips
For an even more flavorful dish, consider adding ground meat like beef or lamb to the filling mixture for added protein. You can also experiment with different types of cheese or spices to suit your taste preferences.
If you have leftover filling, it can be served alongside the tomatoes or used in a salad. Additionally, be sure to choose tomatoes that are ripe but firm, as this will help them hold their shape during baking. Enjoy your Provençal Stuffed Tomatoes!
Seared Scallops With Pea Purée
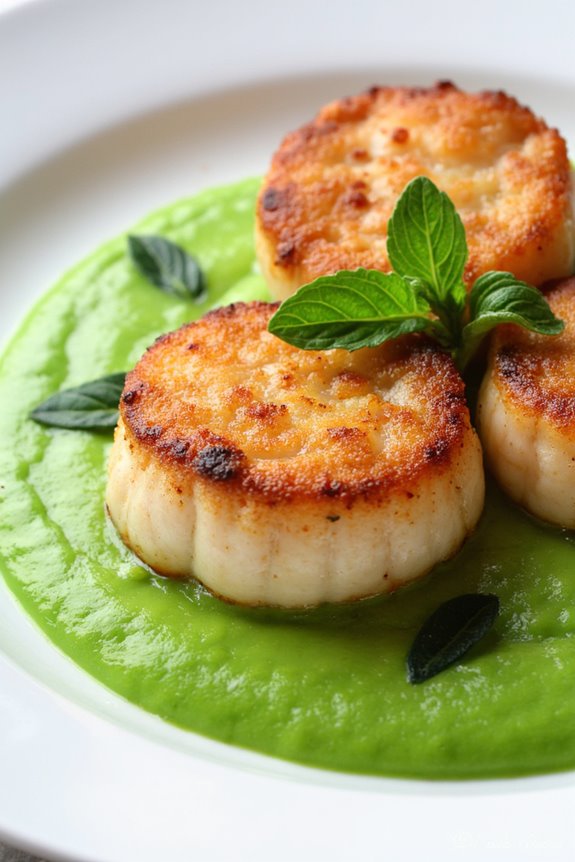
Seared Scallops with Pea Purée is a delightful dish that showcases the elegance of French cuisine, perfect for a spring dinner. The sweetness of the scallops pairs beautifully with the creamy, vibrant pea purée, creating a dish that not only tastes exquisite but also looks stunning on the plate. This recipe is ideal for impressing guests at a dinner party or enjoying a special meal at home. The bright flavors and the simplicity of the ingredients make this dish a favorite among seafood lovers.
To prepare this dish, fresh scallops are seared to perfection, achieving a golden crust while remaining tender inside. The accompanying pea purée, made from fresh or frozen peas, adds a vibrant color and a hint of sweetness that complements the scallops beautifully. With a few simple steps, you’ll create a plate that embodies the essence of spring, bursting with flavor and elegance.
Ingredients (serves 4-6):
- 1 pound (450g) fresh sea scallops
- 2 cups fresh or frozen peas
- 1/2 cup heavy cream
- 2 tablespoons unsalted butter
- 1 tablespoon olive oil
- 1 shallot, finely chopped
- Salt and pepper to taste
- Fresh mint leaves for garnish (optional)
- Lemon wedges for serving (optional)
Cooking Instructions:
- Prepare the Pea Purée: In a medium saucepan, bring water to a boil and add the peas. Cook for about 3-4 minutes until tender. Drain and transfer the peas to a blender or food processor. Add the heavy cream, a pinch of salt, and pepper. Blend until smooth and creamy. If the purée is too thick, you can add a little more cream or water to achieve your desired consistency. Set aside.
- Sear the Scallops: Pat the scallops dry with paper towels and season both sides with salt and pepper. In a large skillet, heat the olive oil and 1 tablespoon of butter over medium-high heat. Once the oil is shimmering, carefully add the scallops to the pan, making sure not to overcrowd them. Sear for about 2-3 minutes on one side until a golden crust forms, then flip and cook for an additional 1-2 minutes until cooked through. Remove the scallops from the pan and set aside.
- Sauté the Shallots: In the same skillet, reduce the heat to medium and add the remaining tablespoon of butter. Once melted, add the chopped shallots and sauté for about 2-3 minutes until they’re translucent and fragrant. This will add a depth of flavor to the dish.
- Plate the Dish: To serve, spoon a generous amount of the pea purée onto each plate, creating a base for the scallops. Arrange the seared scallops on top of the purée. For added flavor, you can drizzle a little of the butter and shallot mixture over the scallops. Garnish with fresh mint leaves and serve with lemon wedges on the side.
Extra Tips:
When cooking scallops, verify they’re dry before searing to achieve that perfect golden crust. Avoid overcrowding the pan, as this can cause the scallops to steam instead of sear. If you find that your scallops are sticking to the pan, give them an extra minute before trying to flip them.
For an extra touch of sophistication, consider adding a splash of white wine to the shallots after sautéing for a more complex flavor profile. Enjoy your delicious Seared Scallops with Pea Purée!
French Potato Salad With Shallots
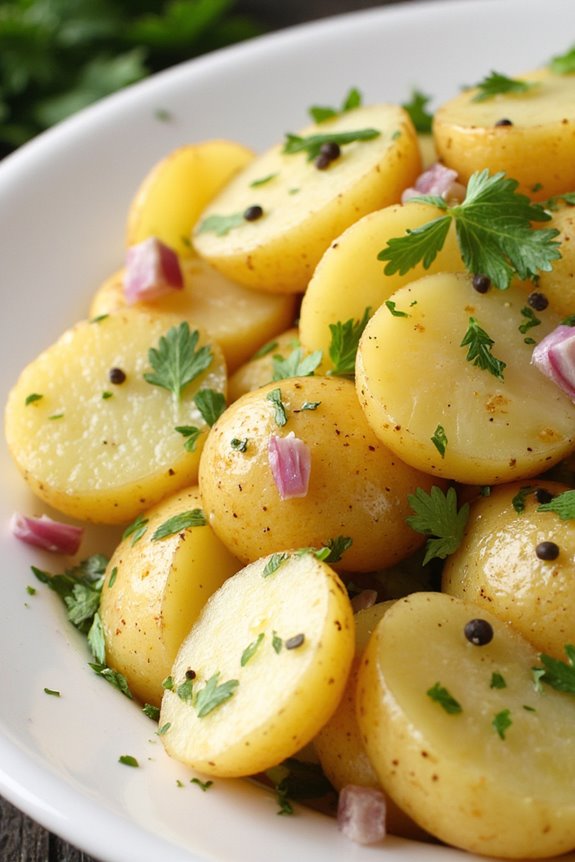
French Potato Salad With Shallots is a delightful dish that perfectly complements any spring dinner. It features tender potatoes tossed in a light vinaigrette, offering a fresh and zesty flavor profile that’s both satisfying and revitalizing. The addition of shallots adds a subtle sweetness and depth, making this salad a wonderful choice to accompany grilled meats or serve as a standalone dish at a picnic or gathering.
This potato salad isn’t your typical heavy version; it’s made without mayonnaise, allowing the natural flavors of the ingredients to shine through. The warm potatoes soak up the vinaigrette beautifully, creating a harmonious blend of flavors. Whether you’re hosting a dinner party or enjoying a casual meal outdoors, this French Potato Salad With Shallots will impress your guests and leave them asking for the recipe.
Ingredients (Serves 4-6)
- 2 pounds small waxy potatoes (like Yukon Gold or red potatoes)
- 1/4 cup extra-virgin olive oil
- 3 tablespoons white wine vinegar
- 2 tablespoons Dijon mustard
- 1 teaspoon salt
- 1/2 teaspoon freshly ground black pepper
- 2 shallots, finely chopped
- 1/4 cup fresh parsley, finely chopped
- 1 tablespoon capers (optional)
Cooking Instructions
- Prepare the Potatoes: Start by washing and scrubbing the small waxy potatoes to remove any dirt. Place them in a large pot and cover them with cold water. Adding a pinch of salt to the water will enhance the flavor of the potatoes while they cook.
- Cook the Potatoes: Bring the pot of water to a boil over medium-high heat. Once boiling, reduce the heat to medium and let the potatoes simmer for about 15-20 minutes, or until they’re tender when pierced with a fork. Be careful not to overcook them, as you want the potatoes to hold their shape.
- Drain and Cool: Once the potatoes are cooked, drain them in a colander and let them sit for a few minutes to cool slightly. While they’re still warm, cut them into halves or quarters, depending on their size.
- Make the Dressing: In a large mixing bowl, whisk together the extra-virgin olive oil, white wine vinegar, Dijon mustard, salt, and black pepper until well combined. This vinaigrette will add flavor and moisture to the salad.
- Combine Ingredients: Add the warm potatoes to the bowl with the vinaigrette. Gently toss the potatoes in the dressing to guarantee they’re evenly coated. The warmth of the potatoes will help them absorb the dressing better.
- Add Shallots and Herbs: Once the potatoes are coated, add the finely chopped shallots, parsley, and capers (if using) to the salad. Toss gently again to combine all the ingredients without breaking the potatoes.
- Let it Rest: Allow the salad to sit for about 15-20 minutes at room temperature. This resting period allows the flavors to meld together beautifully, making for a more delicious potato salad.
- Serve: Transfer the potato salad to a serving dish and garnish with additional parsley if desired. Serve it warm or at room temperature for the best flavor.
Extra Tips
For an added layer of flavor, consider experimenting with different herbs such as fresh tarragon or chives in place of parsley. You can also customize your salad by adding ingredients like roasted red peppers, olives, or even cherry tomatoes for a colorful twist.
Be sure to taste and adjust the seasoning before serving, as the flavors can develop and change as the salad sits. Enjoy your French Potato Salad With Shallots as a revitalizing side dish that delights the palate!
Strawberry Rhubarb Tart

Spring is the perfect season to enjoy the vibrant flavors of fresh strawberries and tart rhubarb, and what better way to showcase them than in a delectable Strawberry Rhubarb Tart? This classic dessert features a buttery, flaky crust that perfectly complements the sweet and tangy filling. The combination of strawberries and rhubarb creates a delightful balance of flavors, making it a favorite for spring dinners and gatherings.
With its stunning presentation and irresistible taste, this tart is sure to captivate your guests. Making a Strawberry Rhubarb Tart is an enjoyable process that allows you to experience the beauty of seasonal ingredients. The tart isn’t only visually appealing but also offers a deliciously satisfying bite with each slice.
Whether you’re serving it at a spring dinner party or enjoying it with family on a sunny afternoon, this dessert is a delightful way to celebrate the season.
Ingredients (Serves 4-6):
- 1 ½ cups all-purpose flour
- ½ cup unsalted butter, chilled and diced
- ¼ cup granulated sugar
- 1 egg yolk
- 3 tablespoons cold water
- 2 cups fresh strawberries, hulled and halved
- 2 cups fresh rhubarb, chopped into 1-inch pieces
- ¾ cup granulated sugar (for filling)
- 2 tablespoons cornstarch
- 1 tablespoon lemon juice
- 1 teaspoon vanilla extract
- 1 egg, beaten (for egg wash)
- Powdered sugar (for dusting)
Cooking Instructions:
1. Prepare the Crust: In a large mixing bowl, combine 1 ½ cups of flour and ¼ cup of sugar. Add the chilled, diced butter and use a pastry cutter or your fingers to mix until the mixture resembles coarse crumbs.
Stir in the egg yolk and cold water until the dough comes together. Form the dough into a disk, wrap it in plastic wrap, and refrigerate for at least 30 minutes.
2. Preheat the Oven: While the dough is chilling, preheat your oven to 375°F (190°C). This will guarantee that the tart cooks evenly once it’s filled and assembled.
3. Make the Filling: In a large bowl, combine the halved strawberries and chopped rhubarb. Sprinkle with ¾ cup of sugar, cornstarch, lemon juice, and vanilla extract.
Gently toss the mixture until the fruit is well coated and set aside to let the juices meld while you roll out the dough.
4. Roll Out the Dough: On a lightly floured surface, roll out the chilled dough into a circle about 1/8 inch thick. Carefully transfer the rolled dough into a tart pan, pressing it into the edges and trimming any excess.
Prick the bottom of the crust with a fork to prevent bubbling.
5. Fill the Tart: Pour the prepared fruit filling into the crust, spreading it evenly. If you have any leftover dough, you can create a lattice top or decorative cutouts to place over the filling.
6. Egg Wash: Brush the edges of the crust with the beaten egg to give it a beautiful golden color as it bakes. This step adds an appealing shine and enhances the overall presentation of the tart.
7. Bake the Tart: Place the tart in the preheated oven and bake for 35-40 minutes or until the crust is golden brown and the filling is bubbly.
Keep an eye on it to prevent over-browning; you can cover the edges with foil if necessary.
8. Cool and Serve: Once baked, remove the tart from the oven and allow it to cool for at least 15 minutes before removing it from the tart pan.
Dust with powdered sugar before slicing and serving. This tart can be enjoyed warm or at room temperature, with a dollop of whipped cream if desired.
Extra Tips:
When making a Strawberry Rhubarb Tart, selecting the freshest strawberries and rhubarb is crucial for achieving the best flavor.
If you find that your rhubarb is particularly tart, you can adjust the sugar in the filling to taste. Additionally, for added texture, consider mixing in some almond flour or ground nuts into the crust.
This will enhance the nuttiness of the tart and complement the fruit filling beautifully. Always allow the tart to cool completely to set the filling before slicing, guaranteeing clean pieces when serving. Enjoy your delightful spring dessert!
Lavender Honey Panna Cotta
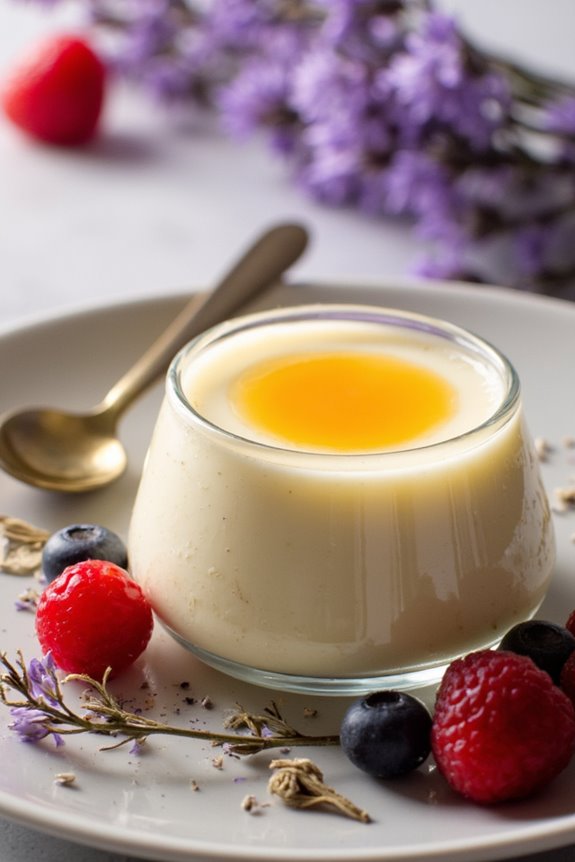
Lavender Honey Panna Cotta is a delightful French dessert that combines the floral notes of lavender with the sweetness of honey, creating a dish that’s both elegant and aromatic. This creamy, custard-like dessert is a perfect way to end a spring dinner, as it offers a light and invigorating finish.
The panna cotta is incredibly easy to prepare, requiring minimal cooking skills, yet it presents beautifully when served in individual cups or ramekins. The infusion of lavender elevates this classic Italian dessert, transforming it into a uniquely French experience.
The delicate flavor of the lavender paired with the sweet, rich honey creates a harmonious balance that’s sure to impress your guests. Serve it with fresh berries or a drizzle of additional honey for an extra touch of sophistication.
Ingredients (Serves 4-6)
- 2 cups heavy cream
- 1/2 cup whole milk
- 1/4 cup honey
- 2 tablespoons dried culinary lavender
- 1/4 cup granulated sugar
- 2 1/4 teaspoons gelatin (1 packet)
- 3 tablespoons cold water
- 1 teaspoon vanilla extract
- Pinch of salt
Cooking Instructions
1. Infuse the Cream: In a medium saucepan, combine the heavy cream, whole milk, honey, dried lavender, and granulated sugar. Heat the mixture over medium heat, stirring occasionally until it’s hot but not boiling.
Once heated, remove the saucepan from the heat and let the lavender steep for about 15-20 minutes to infuse its flavor into the cream.
2. Prepare the Gelatin: In a small bowl, sprinkle the gelatin over the cold water and let it sit for about 5 minutes. This allows the gelatin to bloom and soften before it’s incorporated into the cream mixture.
3. Strain the Cream Mixture: After the cream has steeped, strain it through a fine-mesh sieve into a clean bowl to remove the lavender flowers. This guarantees a smooth texture for the panna cotta.
4. Combine Gelatin and Cream: While the cream mixture is still warm (but not boiling), add the bloomed gelatin and stir until it’s fully dissolved. Mix in the vanilla extract and a pinch of salt to enhance the flavors.
5. Pour and Chill: Pour the panna cotta mixture into individual cups or ramekins. Cover them with plastic wrap and refrigerate for at least 4 hours, or until the panna cotta has set completely.
6. Serve: Once set, carefully unmold the panna cotta if desired, or serve it directly in the cups. Garnish with fresh berries, a drizzle of honey, or a sprinkle of additional lavender for an extra touch.
Extra Tips
When making Lavender Honey Panna Cotta, it’s important to use culinary-grade lavender to guarantee safety and flavor. Be cautious with the amount of lavender, as it can become overpowering if too much is used.
Adjust the sweetness by varying the amount of honey based on your preference and feel free to experiment with different toppings, such as citrus zest or edible flowers, to complement the floral notes of the dessert. Enjoy this elegant treat as a highlight of your spring dinner!