

There’s something so enchanting about French cuisine, isn’t there? The rich flavors and comforting textures make it truly irresistible. But if you’re gluten-free, enjoying dishes like Coq Au Vin and Beef Bourguignon can feel like a challenge. Fear not! These 11 gluten-free recipes bring all the authentic taste of French cooking to your table, catering perfectly to your dietary needs. Get ready to impress everyone with these delightful dishes that are as indulgent as they are satisfying.
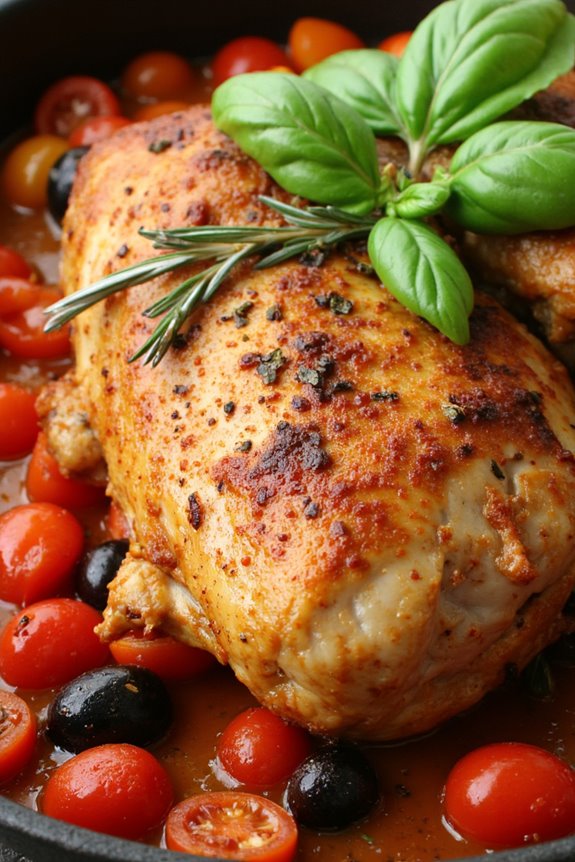
Coq Au Vin

Coq Au Vin is a classic French dish that beautifully marries tender chicken with rich flavors from red wine, mushrooms, onions, and bacon, making it the perfect centerpiece for a gluten-free French dinner. Traditionally, this dish is prepared using a rooster, but chicken is a more practical and widely available choice. The slow-cooking method allows the ingredients to meld together, resulting in a comforting and flavorful meal. This gluten-free version guarantees that everyone can enjoy this beloved dish without compromising on taste.
This recipe takes some time to prepare, but the result is worth every minute. It features a deep, savory sauce that’s perfect for spooning over sides like mashed potatoes or gluten-free noodles. The combination of herbs and the depth of flavor from the wine create a dish that feels both rustic and elegant, making it ideal for both weeknight dinners and special occasions.
Ingredients (Serves 4-6):
- 4-6 chicken thighs, bone-in and skin-on
- Salt and black pepper, to taste
- 3 tablespoons olive oil
- 4 ounces bacon or pancetta, diced
- 1 medium onion, chopped
- 2 cloves garlic, minced
- 2 cups button mushrooms, quartered
- 2 cups red wine (preferably Burgundy or Pinot Noir)
- 1 cup chicken broth
- 2 tablespoons tomato paste
- 2 teaspoons dried thyme
- 2 bay leaves
- Fresh parsley, chopped (for garnish)
Cooking Instructions:
- Prepare the Chicken: Start by seasoning the chicken thighs generously with salt and black pepper on both sides. This enhances the flavor of the meat and prepares it for browning.
- Brown the Chicken: In a large Dutch oven or heavy pot, heat 2 tablespoons of olive oil over medium-high heat. Add the seasoned chicken thighs, skin-side down, and cook for about 5-7 minutes until they’re golden brown. Flip and brown the other side for another 5 minutes. Remove the chicken from the pot and set aside.
- Cook the Bacon: In the same pot, add the diced bacon or pancetta. Cook until crispy, about 4-5 minutes, then remove with a slotted spoon and set aside with the chicken. Leave the rendered fat in the pot for added flavor.
- Sauté the Vegetables: Add the chopped onion to the pot and sauté for about 3-4 minutes until softened. Then, add the minced garlic and quartered mushrooms, cooking for an additional 5 minutes until the mushrooms are browned and tender.
- Deglaze with Wine: Pour in the red wine, scraping the bottom of the pot to release any flavorful bits stuck to the bottom. This adds depth to the sauce. Bring the mixture to a simmer.
- Combine Ingredients: Add the chicken back to the pot, along with the bacon, chicken broth, tomato paste, thyme, and bay leaves. Stir to combine all ingredients well.
- Simmer: Bring the mixture to a gentle boil, then reduce the heat to low. Cover the pot and let it simmer for about 40-45 minutes, or until the chicken is cooked through and tender.
- Serve: Once the chicken is tender, remove the bay leaves. Serve the Coq Au Vin warm, garnished with fresh parsley, alongside gluten-free sides like mashed potatoes or rice.
Extra Tips:
When making Coq Au Vin, choose a good quality red wine as it greatly influences the dish’s flavor. If you can, let the dish sit for a few hours or even overnight in the fridge after cooking; this allows the flavors to deepen and meld together beautifully.
For a slightly thicker sauce, you can also whisk in a slurry of cornstarch and water towards the end of cooking. Always taste and adjust the seasoning before serving, as the flavors will develop during the cooking process. Enjoy your culinary journey to France!
Ratatouille
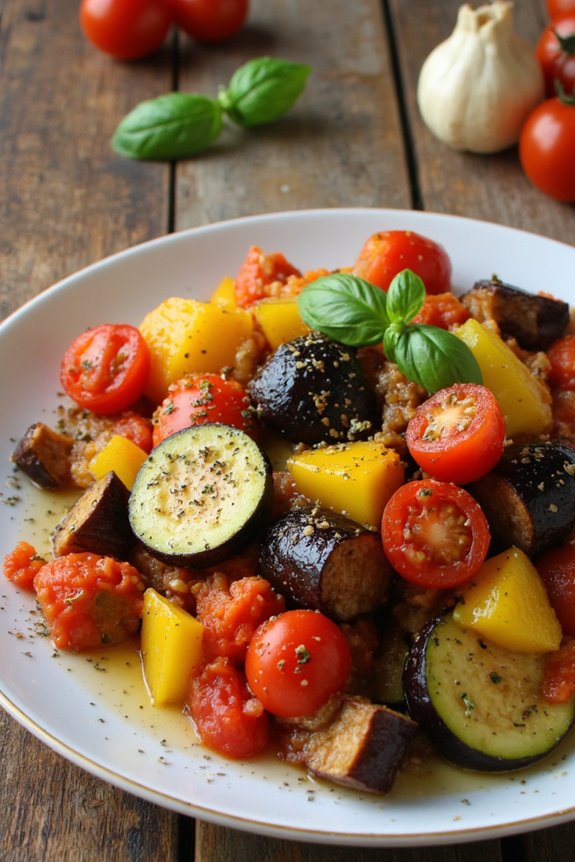
Ratatouille is a classic French dish that celebrates the vibrant flavors of summer vegetables. Originating from the Provence region, this rustic vegetable stew isn’t only gluten-free but also packed with nutrients and delightful taste. The combination of eggplant, zucchini, bell peppers, and tomatoes, simmered with aromatic herbs, makes Ratatouille a versatile dish that can be served as a main course, side dish, or even as a filling for savory crepes.
Its colorful presentation and rich flavors are bound to impress your guests and bring a taste of France to your dinner table.
Preparing Ratatouille isn’t only a feast for the palate but also an enjoyable cooking experience. The dish allows for variations based on the vegetables you have on hand, making it easy to customize according to your personal preferences or seasonal produce.
Whether you’re hosting a fancy dinner or simply looking to enjoy a comforting meal at home, Ratatouille is a delightful option that showcases the best of what fresh ingredients have to offer.
Ingredients (for 4-6 servings):
- 1 medium eggplant, diced
- 2 medium zucchinis, sliced
- 1 medium yellow bell pepper, diced
- 1 medium red bell pepper, diced
- 1 large onion, chopped
- 4 cloves garlic, minced
- 4 large ripe tomatoes, diced (or 1 can of diced tomatoes)
- 1/4 cup olive oil
- 1 teaspoon dried thyme
- 1 teaspoon dried basil
- Salt and pepper to taste
- Fresh basil leaves for garnish (optional)
Cooking Instructions:
- Prepare the Vegetables: Begin by washing and cutting your vegetables. Dice the eggplant, zucchinis, and bell peppers into bite-sized pieces. Chop the onion and mince the garlic. If using fresh tomatoes, dice them as well. Make sure all the vegetables are roughly the same size for even cooking.
- Sauté the Onions and Garlic: In a large skillet or Dutch oven, heat the olive oil over medium heat. Add the chopped onion and sauté for about 5 minutes until it becomes translucent. Then, add the minced garlic and sauté for an additional minute, being careful not to let it burn.
- Cook the Eggplant: Next, add the diced eggplant to the skillet. Stir well and cook for about 5-7 minutes, allowing the eggplant to soften and absorb some of the olive oil. This step is vital as eggplant has a tendency to absorb flavors.
- Add Remaining Vegetables: Once the eggplant is softened, add the sliced zucchinis, diced bell peppers, and diced tomatoes (or canned tomatoes) to the skillet. Stir everything together to combine the ingredients evenly.
- Season and Simmer: Sprinkle in the dried thyme and basil, along with salt and pepper to taste. Stir everything again and bring the mixture to a gentle simmer. Reduce the heat to low, cover the skillet, and let it cook for about 30-40 minutes, stirring occasionally. This allows the flavors to meld beautifully.
- Final Touches: After simmering, taste the Ratatouille and adjust the seasoning if needed. If you prefer a thicker consistency, you can remove the lid and let it simmer for an additional 10 minutes, allowing excess liquid to evaporate.
- Serve: Once cooked, remove from heat and let it sit for a few minutes. Garnish with fresh basil leaves if desired before serving. Ratatouille can be enjoyed warm or at room temperature.
Extra Tips:
Ratatouille is a forgiving dish that allows for plenty of creativity. Feel free to add other vegetables such as mushrooms or squash, depending on your taste and availability.
It can also be made ahead of time, as the flavors deepen and improve after a day in the refrigerator. Reheat gently before serving. For a heartier meal, consider serving Ratatouille over gluten-free pasta or alongside grilled meats. Enjoy your culinary journey through the flavors of France!
Beef Bourguignon
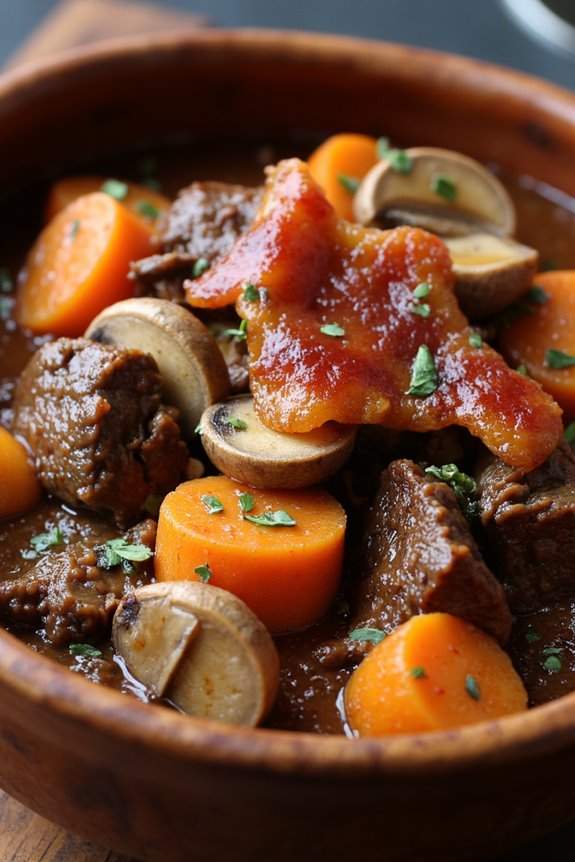
Beef Bourguignon is a classic French dish that embodies the rich flavors and culinary traditions of France. This hearty stew, traditionally made with red wine, tender beef, and a medley of vegetables, is perfect for a cozy dinner or a special occasion. In this gluten-free version, we maintain all the delicious elements while ensuring that anyone with gluten sensitivities can enjoy this comforting meal.
The process of making Beef Bourguignon may take some time, but the result is undeniably worth it. The beef is slow-cooked until it’s melt-in-your-mouth tender, and the flavors develop beautifully over time. With aromatic herbs and vegetables simmering in a luscious sauce, this dish is bound to impress your family or guests.
Ingredients (Serves 4-6)
- 2 pounds beef chuck, cut into 1-inch cubes
- Salt and freshly ground black pepper, to taste
- 3 tablespoons olive oil
- 1 large onion, chopped
- 2 carrots, sliced
- 2 cloves garlic, minced
- 2 cups gluten-free beef broth
- 1 cup gluten-free red wine (such as Cabernet Sauvignon)
- 2 tablespoons tomato paste
- 2 teaspoons fresh thyme leaves (or 1 teaspoon dried thyme)
- 2 bay leaves
- 8 ounces gluten-free mushrooms, quartered
- 4 ounces bacon or pancetta, diced
- 1 tablespoon gluten-free all-purpose flour (optional, for thickening)
Cooking Instructions
- Season the Beef: Begin by seasoning the beef chunks generously with salt and pepper. This step is essential for enhancing the flavor of the meat as it cooks.
- Brown the Beef: In a large, heavy-bottomed pot or Dutch oven, heat the olive oil over medium-high heat. Add the beef in batches, ensuring not to overcrowd the pan. Brown each piece on all sides for about 5-7 minutes, then remove and set aside. Browning creates a rich depth of flavor.
- Sauté the Vegetables: In the same pot, add the chopped onion and sliced carrots. Cook for about 5 minutes until the onions are translucent. Add the minced garlic and sauté for an additional minute until fragrant.
- Deglaze the Pot: Pour in the gluten-free red wine, scraping the bottom of the pot to release any browned bits. This adds complexity to the sauce. Allow the wine to simmer for 2-3 minutes, reducing slightly.
- Combine Ingredients: Return the browned beef to the pot, along with any juices that have accumulated. Stir in the gluten-free beef broth, tomato paste, thyme, and bay leaves. Bring the mixture to a gentle boil.
- Simmer the Stew: Reduce the heat to low, cover the pot, and let it simmer for about 2-3 hours. Stir occasionally, ensuring the beef is tender and the flavors meld together beautifully.
- Cook the Mushrooms and Bacon: In a separate skillet, cook the diced bacon or pancetta over medium heat until crispy. Remove and set aside. In the bacon fat, sauté the quartered mushrooms for about 5 minutes until browned and tender.
- Finish the Dish: Once the beef is tender, stir in the cooked mushrooms and bacon. If you prefer a thicker sauce, mix the optional gluten-free flour with a bit of water to create a slurry, then stir into the stew. Simmer for an additional 10 minutes.
- Serve: Remove the bay leaves before serving. Ladle the Beef Bourguignon into bowls and enjoy with gluten-free bread or over a bed of gluten-free pasta or rice.
Extra Tips
For ideal flavor, consider marinating the beef in the red wine for a few hours or overnight before cooking. This not only enhances the taste but also helps to tenderize the meat.
Additionally, feel free to customize your Beef Bourguignon by adding other vegetables such as pearl onions or parsnips, which will complement the dish well.
Finally, remember that this dish often tastes even better the next day, as the flavors continue to develop, making it a great make-ahead option for entertaining.
Duck Confit
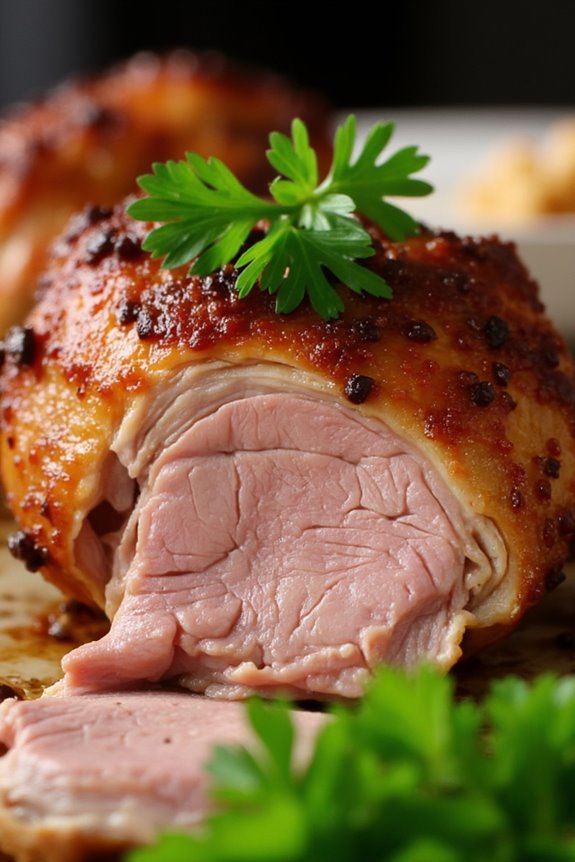
Duck Confit is a classic French dish that has become a favorite among food lovers for its rich flavors and tender meat. The process of cooking duck confit involves slowly cooking duck legs in their own fat, resulting in a succulent and flavorful dish that’s simply irresistible. This method not only enhances the taste but also preserves the meat, making it a great option for meal prep or entertaining guests.
With its origins in the Gascony region of France, Duck Confit embodies the essence of French cuisine and is perfect for a gluten-free dinner that will impress your family and friends.
Making Duck Confit does require some time and patience, but the result is well worth the effort. The duck legs are seasoned and left to marinate, then cooked slowly in the oven until they’re tender and the skin is beautifully crisp. The rendered duck fat can also be used for roasting vegetables or potatoes, adding even more depth to your meal.
Whether you’re serving it with a side of garlic potatoes or a fresh salad, Duck Confit is sure to be a showstopper at your next French dinner night.
Ingredients (Serves 4-6)
- 4 duck legs
- 1 tablespoon kosher salt
- 4 cloves garlic, minced
- 1 teaspoon black pepper
- 4 sprigs fresh thyme
- 2 bay leaves
- 4 cups duck fat (or enough to cover the duck legs)
- Optional: fresh parsley for garnish
Cooking Instructions
- Prepare the Duck Legs: Start by patting the duck legs dry with paper towels. In a bowl, mix the kosher salt, minced garlic, black pepper, fresh thyme, and bay leaves. Rub this mixture generously onto the duck legs, making sure they’re well coated. Place the duck legs in a dish, cover, and refrigerate for at least 24 hours (up to 48 hours for deeper flavor).
- Rinse and Dry: After the marinating period, remove the duck legs from the refrigerator and rinse them under cold water to remove excess salt and seasoning. Pat them dry thoroughly with paper towels to make certain they crisp up nicely when cooked.
- Preheat the Oven: Preheat your oven to 225°F (107°C). This low cooking temperature will allow the duck to cook slowly and tenderize.
- Cook the Duck Legs: In a large, oven-safe pot or Dutch oven, melt the duck fat over medium heat until it’s liquid. Carefully add the duck legs to the pot, ensuring they’re fully submerged in the fat. If necessary, add more duck fat to cover the legs completely.
- Slow Cook: Transfer the pot to the preheated oven and cook the duck legs for about 4 to 6 hours, or until the meat is tender and easily pulls away from the bone. You can check the doneness by poking the meat with a fork; it should be fall-off-the-bone tender.
- Crisp the Skin: Once cooked, remove the duck legs from the fat and place them skin-side up on a baking sheet. Preheat your broiler and broil the duck legs for about 5-7 minutes, or until the skin is crispy and golden brown.
- Serve: Remove from the oven and let the duck confit rest for a few minutes before serving. Optionally, garnish with fresh parsley and serve with your choice of sides.
Extra Tips
When making Duck Confit, it’s crucial to use high-quality duck fat for the best flavor and results. If you’re unable to find duck fat, you can substitute with a blend of olive oil and butter, but keep in mind it may not yield the same depth of flavor.
Additionally, you can save the leftover duck fat in a jar for future use; it can be used for frying or roasting, adding an incredible richness to your other dishes. Finally, remember that the longer you allow the duck to marinate, the more flavor it will absorb, so don’t rush the process!
French Onion Soup
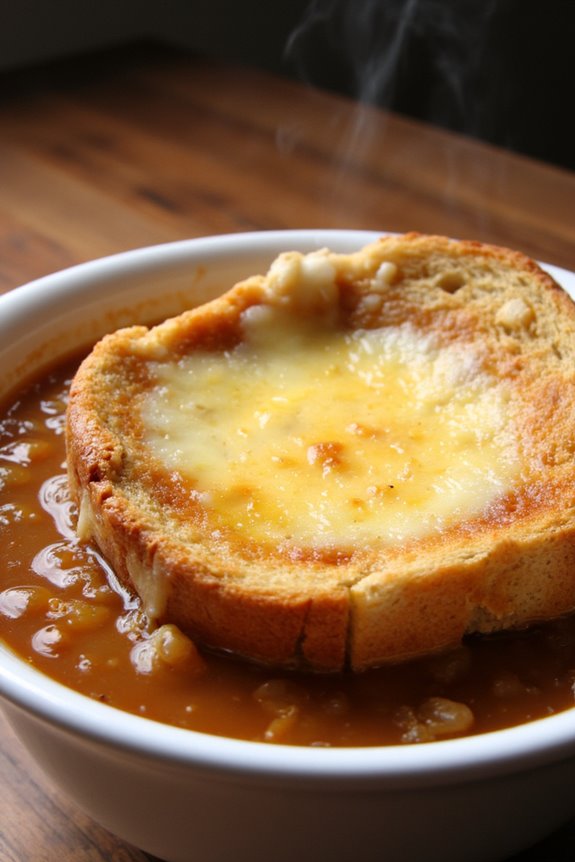
French Onion Soup is a classic dish that warms the heart and soul with its rich flavors and comforting aroma. It’s a perfect starter for any dinner or a delightful meal on its own. The dish is traditionally made with a hearty broth, caramelized onions, and topped with melted cheese over crusty bread. This gluten-free version substitutes traditional bread with gluten-free options, allowing everyone to enjoy this timeless favorite without worry.
The key to a great French Onion Soup lies in the slow caramelization of the onions, which brings out their natural sweetness and adds depth to the broth. Using high-quality beef or vegetable stock enhances the flavor, while the addition of fresh herbs elevates the dish to new heights. With a few simple ingredients and some patience, you can create a bowl of French Onion Soup that will impress your family and friends.
Ingredients (Serves 4-6):
- 4 large onions, thinly sliced
- 4 tablespoons unsalted butter
- 1 tablespoon olive oil
- 1 teaspoon salt
- 1 teaspoon sugar
- 4 cups beef or vegetable stock (ensure gluten-free)
- 1/2 cup dry white wine (optional)
- 1 teaspoon fresh thyme leaves (or 1/2 teaspoon dried thyme)
- Freshly ground black pepper, to taste
- 8 slices gluten-free bread
- 2 cups shredded Gruyère cheese (or any preferred cheese)
Cooking Instructions:
- Caramelize the Onions: In a large pot or Dutch oven, melt the butter and olive oil over medium heat. Add the sliced onions, salt, and sugar. Stir well to coat the onions. Cook for about 30-40 minutes, stirring frequently, until the onions are deeply caramelized and golden brown. This slow cooking process is essential for developing the sweet flavor of the soup.
- Add the Stock and Wine: Once the onions are caramelized, pour in the beef or vegetable stock and white wine (if using). Stir to combine. Bring the mixture to a simmer and allow it to cook for an additional 20-30 minutes. This allows all the flavors to meld together beautifully.
- Season the Soup: After the soup has simmered, add the fresh thyme leaves and season with freshly ground black pepper to taste. Taste the broth and adjust the seasoning if necessary. Remove from heat and set aside.
- Prepare the Bread: While the soup is cooking, preheat your oven to 400°F (200°C). Place the slices of gluten-free bread on a baking sheet and toast them in the oven until they’re golden and crispy, about 5-7 minutes. This step is important to prevent the bread from becoming soggy when added to the soup.
- Assemble and Broil: Ladle the soup into oven-safe bowls, placing a slice of toasted gluten-free bread on top of each bowl. Generously sprinkle the shredded Gruyère cheese over the bread. Place the bowls on a baking sheet and broil them in the oven for 2-3 minutes, or until the cheese is bubbling and golden brown.
- Serve: Carefully remove the bowls from the oven (they will be hot!) and let them cool slightly before serving. Enjoy your warm and comforting bowl of Gluten Free French Onion Soup.
Extra Tips:
For added depth of flavor, consider using a mix of stocks, such as combining beef and vegetable stock. If you prefer a vegetarian option, simply use vegetable stock and omit the wine.
Additionally, feel free to experiment with different types of cheese for the topping; aged cheddar or mozzarella can provide a unique twist. For an even richer taste, you can add a splash of balsamic vinegar to the soup while it simmers.
Enjoy your culinary adventure with this classic French dish!
Quiche Lorraine

Quiche Lorraine is a classic French dish that features a rich and creamy filling encased in a flaky pastry crust. This savory tart hails from the Lorraine region of France and is typically filled with eggs, cream, cheese, and crispy bacon.
The beauty of Quiche Lorraine lies in its versatility; it can be enjoyed warm or cold, making it a perfect dish for brunch, lunch, or even dinner. Plus, by using gluten-free ingredients, you can cater to those with dietary restrictions without compromising flavor.
To prepare a gluten-free version of this beloved French classic, it’s vital to select the right gluten-free flour blend for the crust. This guarantees that you achieve the right texture while keeping the dish light and airy. The combination of creamy custard and savory bacon creates a delightful harmony of flavors that will impress your guests.
Serve it alongside a simple green salad for a complete meal that feels both indulgent and wholesome.
Ingredients (Serves 4-6):
- 1 ½ cups gluten-free all-purpose flour
- ½ cup cold butter, cubed
- 1/4 teaspoon salt
- 1/4 cup ice water
- 6 slices of bacon, chopped
- 1 cup shredded Gruyère cheese
- 3 large eggs
- 1 cup heavy cream
- 1/2 teaspoon black pepper
- 1/4 teaspoon nutmeg
- 1/4 teaspoon salt
Cooking Instructions:
1. Prepare the Crust: In a large mixing bowl, combine the gluten-free flour and salt. Add the cold, cubed butter and use a pastry cutter or your fingers to mix until the mixture resembles coarse crumbs. Gradually add ice water, one tablespoon at a time, mixing until the dough comes together.
Form the dough into a disc, wrap it in plastic wrap, and refrigerate for at least 30 minutes.
2. Blind Bake the Crust: Preheat your oven to 375°F (190°C). On a lightly floured surface (using gluten-free flour), roll out the chilled dough to fit a 9-inch pie pan. Press the dough into the pan and trim any excess. Prick the bottom with a fork to prevent bubbles.
Line the crust with parchment paper and fill with pie weights or dried beans. Bake for 15 minutes, then remove the weights and parchment paper and bake for an additional 10 minutes until lightly golden. Let it cool slightly.
3. Cook the Bacon: In a skillet over medium heat, cook the chopped bacon until crispy. Use a slotted spoon to transfer the bacon to a paper towel-lined plate to drain excess fat. Leave a tablespoon of bacon fat in the skillet.
4. Prepare the Filling: In a mixing bowl, whisk together the eggs, heavy cream, black pepper, nutmeg, and salt until well combined. Stir in the cooked bacon and shredded Gruyère cheese.
5. Assemble the Quiche: Pour the egg mixture into the cooled crust, spreading it evenly. Bake in the preheated oven for 30-35 minutes or until the filling is set and the top is lightly golden.
6. Cool and Serve: Allow the quiche to cool for about 10 minutes before slicing. Serve warm or at room temperature.
Extra Tips:
For a flavorful twist, consider adding sautéed onions, spinach, or mushrooms to the filling. Additionally, let the quiche sit for a few minutes before slicing; this will help it set and make for cleaner slices.
If you have leftovers, Quiche Lorraine can be stored in the refrigerator for up to three days and reheated in the oven or microwave. Enjoy your delightful gluten-free Quiche Lorraine!
Poulet Provençal
Poulet Provençal is a classic French dish that beautifully captures the essence of the southern region of Provence. This dish features tender chicken that’s infused with the flavors of fresh herbs, garlic, tomatoes, and olives, creating a vibrant and aromatic meal that embodies the spirit of French cooking. The combination of these ingredients not only brings out the natural flavors of the chicken but also creates a delightful sauce that’s perfect for serving over rice or alongside crusty gluten-free bread.
What makes Poulet Provençal unique is the use of fresh, seasonal ingredients that are characteristic of the Provençal region. The incorporation of herbs like thyme and rosemary, along with the sweetness of ripe tomatoes and the brininess of olives, transforms ordinary chicken into a dish worthy of any dinner table. It’s an excellent choice for gatherings, as it can easily serve 4-6 people, and the comforting flavors make it a crowd-pleaser.
Ingredients (Serves 4-6):
- 4-6 chicken thighs (bone-in, skin-on)
- 2 tablespoons olive oil
- 1 onion, chopped
- 4 cloves garlic, minced
- 1 cup cherry tomatoes, halved
- 1 cup black olives (Kalamata or Niçoise), pitted and halved
- 1 cup chicken broth
- 1 teaspoon dried thyme
- 1 teaspoon dried rosemary
- Salt and pepper to taste
- Fresh basil leaves, for garnish (optional)
Cooking Instructions:
- Preheat the Oven: Start by preheating your oven to 375°F (190°C). This guarantees that your dish cooks evenly once you place it in the oven.
- Sear the Chicken: In a large oven-safe skillet or Dutch oven, heat the olive oil over medium-high heat. Season the chicken thighs with salt and pepper, then place them skin-side down in the skillet. Sear for about 5-7 minutes, or until the skin is golden brown and crispy. Flip the chicken over and sear for an additional 3-4 minutes. This step locks in the juices and adds a rich flavor to the dish.
- Remove Chicken and Sauté Aromatics: Once the chicken is seared, remove it from the skillet and set it aside on a plate. In the same skillet, add the chopped onion and cook for about 3-4 minutes until translucent. Add the minced garlic and sauté for an additional minute, being careful not to burn it.
- Add Tomatoes and Olives: Stir in the halved cherry tomatoes and black olives, cooking for another 2-3 minutes until the tomatoes begin to soften. This will create a flavorful base for the dish.
- Combine Ingredients: Pour in the chicken broth and add the dried thyme and rosemary. Stir to combine, then bring the mixture to a gentle simmer.
- Return Chicken to Skillet: Nestle the seared chicken thighs back into the skillet, skin-side up. Spoon some of the sauce over the chicken to guarantee it absorbs all the flavors.
- Bake: Transfer the skillet to the preheated oven and bake for 25-30 minutes, or until the chicken is cooked through and reaches an internal temperature of 165°F (75°C). The sauce should be bubbling and the chicken tender.
- Serve: Once cooked, remove the skillet from the oven and let it rest for a few minutes. Garnish with fresh basil leaves before serving, and enjoy this delightful dish with gluten-free rice or bread.
Extra Tips:
For an even more flavorful Poulet Provençal, consider marinating the chicken in olive oil, garlic, and herbs for a few hours or overnight before cooking. This allows the flavors to penetrate the meat deeply, resulting in a more robust taste.
Additionally, feel free to experiment with seasonal vegetables such as bell peppers or zucchini, which can be added during the sautéing step to enhance the dish’s nutritional value and flavor profile.
Bouillabaisse
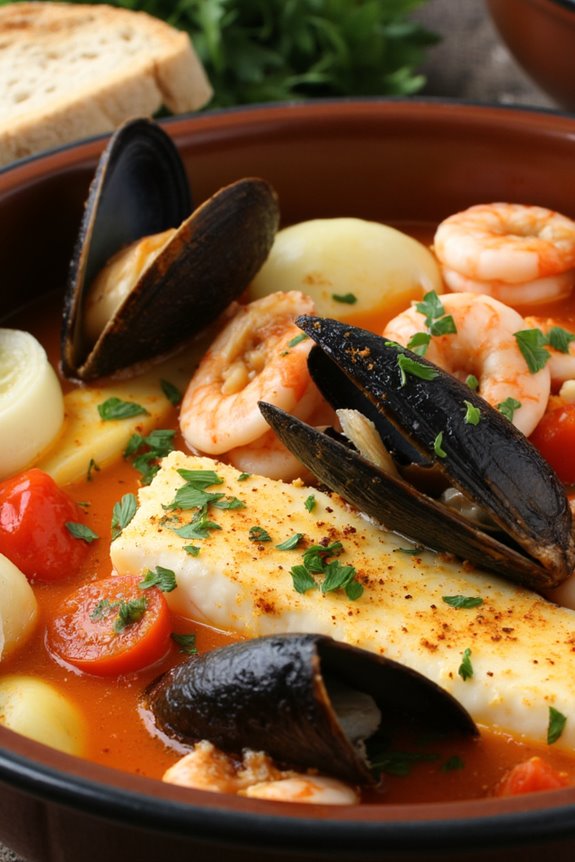
Bouillabaisse is a traditional Provençal fish stew that hails from the port city of Marseille, known for its rich flavor and aromatic ingredients. This gluten-free version preserves the essence of the classic dish while ensuring it accommodates those with gluten sensitivities. The dish typically combines a variety of fresh seafood, including fish, shellfish, and aromatic herbs, all simmered in a fragrant broth flavored with saffron and fennel. Enjoying bouillabaisse isn’t just about the taste; it’s a sensory experience that transports you to the sun-drenched shores of the Mediterranean.
When preparing bouillabaisse, it’s vital to source high-quality seafood for the best flavor and texture. Feel free to customize the types of fish and shellfish based on what’s available or your personal preferences. Serve this delightful dish with gluten-free crusty bread or a side of rouille, a garlic and saffron mayonnaise, to enhance the experience. This recipe is designed to serve 4-6 people, making it perfect for a cozy dinner or a festive gathering.
Ingredients:
- 1 lb firm white fish (such as cod or snapper), cut into chunks
- 1 lb mussels, cleaned and debearded
- 1 lb shrimp, peeled and deveined
- 1 medium onion, diced
- 2 cloves garlic, minced
- 1 medium fennel bulb, sliced
- 1 can (14 oz) diced tomatoes, with juice
- 4 cups fish stock or broth (gluten-free)
- 1 cup dry white wine
- 1 tsp saffron threads
- 1 tsp dried thyme
- 1 bay leaf
- 2 tbsp olive oil
- Salt and pepper to taste
- Fresh parsley, chopped for garnish
- Gluten-free crusty bread (for serving)
Cooking Instructions:
- Sauté Aromatics: In a large pot, heat the olive oil over medium heat. Add the diced onion and sliced fennel, sautéing for about 5 minutes or until softened. Add the minced garlic and sauté for an additional minute until fragrant. This step builds the flavor base for the broth.
- Add Liquids and Seasonings: Pour in the dry white wine, scraping any browned bits from the bottom of the pot. Allow it to simmer for 2-3 minutes. Next, add the can of diced tomatoes (with juice), fish stock, saffron threads, thyme, and bay leaf. Stir to combine and bring the mixture to a gentle boil.
- Simmer the Broth: Reduce the heat to low and let the broth simmer for about 10-15 minutes to allow the flavors to meld. This step is significant as it develops the hearty and aromatic base of your bouillabaisse.
- Add Seafood: Carefully add the chunks of white fish into the simmering broth, followed by the mussels and shrimp. Cover the pot and cook for an additional 5-7 minutes, or until the mussels have opened and the shrimp are pink and cooked through. Be careful not to overcook the seafood for ideal texture.
- Season and Serve: Once cooked, taste the soup and season with salt and pepper as needed. Remove the bay leaf and ladle the bouillabaisse into bowls. Garnish with fresh chopped parsley and serve hot with gluten-free crusty bread on the side.
Extra Tips:
For the best results, opt for a variety of seafood that reflects your taste and availability. You can include clams, scallops, or even squid for added diversity. Make sure to clean all seafood thoroughly to avoid any grit or sand in the dish.
If you can’t find fish stock, a high-quality vegetable broth can work in a pinch. Additionally, if you enjoy a spicier bouillabaisse, consider adding a pinch of red pepper flakes when cooking the aromatics. Enjoy your culinary journey to the Mediterranean with this delightful gluten-free bouillabaisse!
Gratin Dauphinois
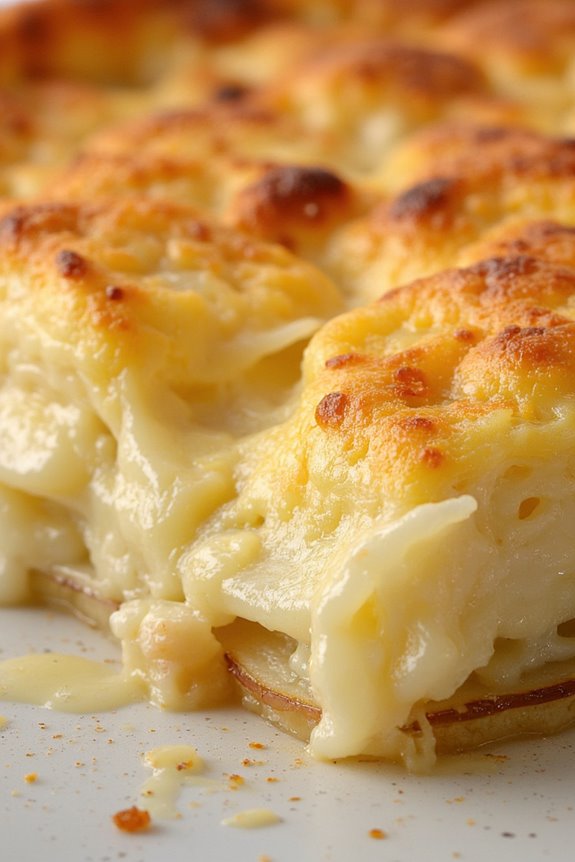
Gratin Dauphinois is a classic French dish that combines the creamy goodness of potatoes with the rich flavors of garlic and cheese. Originating from the Dauphiné region in southeastern France, this comforting casserole is a staple in French dining and is particularly enjoyed for special occasions and family gatherings.
What makes Gratin Dauphinois particularly appealing is its gluten-free nature, allowing those with dietary restrictions to indulge in this delightful dish without worry. This dish isn’t only a great side to accompany meats and vegetables, but it also stands well on its own as a hearty vegetarian option.
The layers of thinly sliced potatoes, creamy sauce, and a golden-brown top create a comforting and satisfying experience for the palate. When you take that first bite, the smooth texture of the potatoes combined with the richness of the cream and cheese will have you coming back for more!
Ingredients (serving size of 4-6 people):
- 2 pounds of Yukon Gold potatoes
- 2 cups heavy cream
- 1 cup whole milk
- 2 cloves garlic, finely minced
- 1 teaspoon salt
- 1/2 teaspoon black pepper
- 1/4 teaspoon nutmeg (freshly grated if possible)
- 1 cup grated Gruyère cheese (or a blend of Gruyère and Parmesan)
- 1 tablespoon unsalted butter (for greasing the baking dish)
Cooking Instructions:
1. Preheat the Oven: Begin by preheating your oven to 350°F (175°C). This guarantees that your gratin will cook evenly and develop a nice golden crust on top.
2. Prepare the Baking Dish: Take a baking dish (approximately 9×13 inches) and butter the bottom and sides with the unsalted butter. This step helps prevent the gratin from sticking and adds a bit of flavor.
3. Slice the Potatoes: Wash and peel the Yukon Gold potatoes. Using a sharp knife or a mandoline, slice the potatoes thinly (about 1/8-inch thick). Aim for uniform thickness to guarantee even cooking.
4. Mix the Cream and Seasonings: In a mixing bowl, combine the heavy cream, whole milk, minced garlic, salt, black pepper, and nutmeg. Whisk the mixture well to guarantee the garlic and seasonings are evenly distributed throughout the cream.
5. Layer the Potatoes: Begin layering the sliced potatoes in the prepared baking dish. Start with a layer of potatoes, then pour a portion of the cream mixture over the potatoes. Sprinkle a bit of the grated Gruyère cheese on top.
Repeat this process until all the potatoes are used, finishing with a layer of cream and cheese on top.
6. Bake the Gratin: Cover the baking dish with aluminum foil and place it in the preheated oven. Bake for about 45 minutes. After 45 minutes, remove the foil and continue baking for an additional 30 minutes, or until the top is golden brown and the potatoes are tender when pierced with a fork.
7. Let It Rest: Once the gratin is out of the oven, allow it to rest for about 10-15 minutes before serving. This resting period helps the dish set and makes it easier to serve.
Extra Tips:
For an added layer of flavor, consider infusing the cream mixture with fresh herbs like thyme or rosemary, or even a splash of white wine.
Additionally, if you prefer a crunchier topping, you can sprinkle some gluten-free breadcrumbs mixed with a bit of melted butter over the top before the last 30 minutes of baking. This will give your Gratin Dauphinois a delightful texture contrast.
Enjoy your culinary journey into French cuisine!
Tarte Tatin
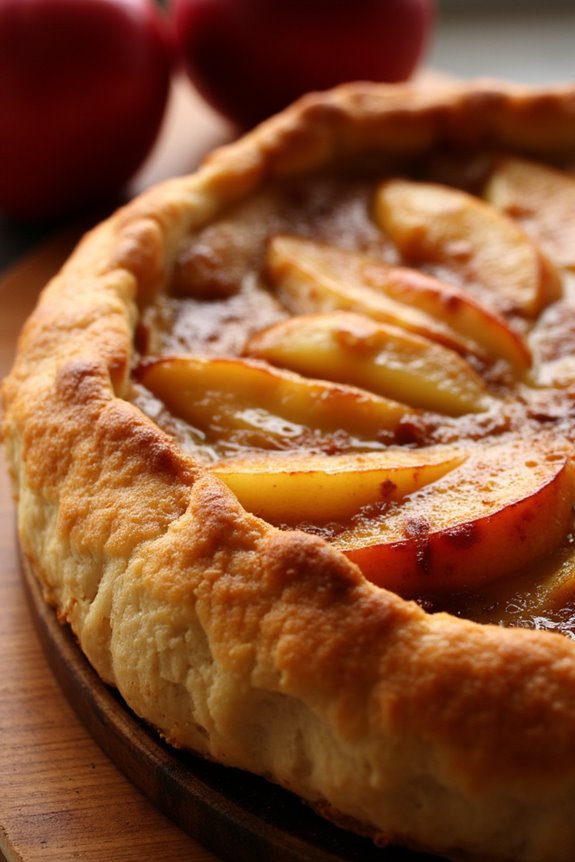
Tarte Tatin is a classic French dessert that boasts a delightful combination of caramelized apples and a buttery pastry crust. Traditionally made with a puff pastry, this gluten-free version substitutes regular flour with a gluten-free blend to guarantee that everyone can enjoy this delectable treat without any dietary concerns. The beauty of Tarte Tatin lies in its simplicity and the way it transforms humble ingredients into something truly special.
This upside-down caramelized apple tart is perfect for impressing guests at a dinner party or simply enjoying with family at home. The sweet, tender apples are nestled in a rich caramel sauce, while the crispy crust adds an irresistible crunch. Served warm with a scoop of vanilla ice cream or a dollop of whipped cream, this dessert is sure to be a hit with everyone around the table.
Ingredients (Serves 4-6)
- 6 medium-sized apples (such as Granny Smith or Honeycrisp)
- 1 cup granulated sugar
- 1/2 cup unsalted butter
- 1 teaspoon vanilla extract
- 1 teaspoon ground cinnamon
- 1/4 teaspoon salt
- 1 1/2 cups gluten-free all-purpose flour
- 1/4 teaspoon xanthan gum (if not included in the flour blend)
- 1/4 cup cold water
- 1 egg (for egg wash)
Cooking Instructions
- Prepare the Apples: Start by peeling, coring, and quartering the apples. This will guarantee they cook evenly and fit nicely in the tart. Set them aside while you prepare the caramel.
- Make the Caramel: In a large oven-safe skillet, melt the butter over medium heat. Once melted, add the sugar, vanilla extract, cinnamon, and salt. Stir constantly until the mixture begins to turn a light amber color, which usually takes about 5-7 minutes. Be careful not to burn the sugar.
- Add the Apples: Once your caramel is ready, carefully add the quartered apples to the skillet. Arrange them in a circular pattern, guaranteeing they’re packed tightly. Cook the apples in the caramel for about 10 minutes, turning them occasionally to coat evenly.
- Prepare the Gluten-Free Crust: In a mixing bowl, combine the gluten-free flour and xanthan gum (if using). Add cold water gradually and mix until a dough forms. If the dough is too crumbly, add a little more water until it holds together. Roll out the dough on a floured surface until it’s slightly larger than the skillet.
- Assemble the Tart: Preheat your oven to 375°F (190°C). Once the apples are tender and caramelized, carefully lay the rolled-out dough over the apples, tucking the edges down around the apples. Brush the top with the beaten egg for a golden finish.
- Bake the Tart: Place the skillet in the preheated oven and bake for 25-30 minutes, or until the crust is golden brown. Keep an eye on it to prevent over-browning.
- Invert the Tart: Once baked, remove the skillet from the oven and let it cool for about 5 minutes. Place a large serving plate over the skillet, and with a quick flip, invert the tart onto the plate. Be cautious, as the caramel may be hot.
- Serve: Allow the tart to cool slightly before slicing. Serve warm with a scoop of vanilla ice cream or a dollop of whipped cream for an extra indulgence.
Extra Tips
When making Tarte Tatin, it’s important to choose the right apples—those that hold their shape and have a good balance of sweetness and tartness work best.
If you want to enhance the flavor, consider adding a splash of lemon juice to the apples before cooking them. For a unique twist, you can also try adding a sprinkle of nutmeg or ginger to the caramel for added warmth.
Finally, verify that your gluten-free flour blend contains a good mix of starches and proteins to mimic the texture of traditional flour for the best results.
Chocolate Mousse

Chocolate mousse is a classic French dessert that combines rich, velvety chocolate with a light, airy texture, making it a delightful end to any meal. This gluten-free version guarantees that everyone can indulge in its decadent flavors without worry. The recipe is simple yet elegant, showcasing the beauty of high-quality chocolate and the magic of whipped egg whites.
Whether you’re hosting a dinner party or just satisfying your sweet tooth, this chocolate mousse will impress your guests and leave them craving more.
Creating this chocolate mousse requires minimal ingredients, which allows the chocolate to shine. It’s vital to use good quality chocolate, preferably dark chocolate with at least 70% cocoa content, for a rich flavor. The whipped egg whites add a lightness to the mousse, while the egg yolks create a creamy texture.
Chilling the mousse before serving enhances its flavor and provides the perfect consistency. Follow this recipe to create an indulgent treat that’s sure to please.
Ingredients (Serving Size: 4-6 people):
- 8 oz (225g) dark chocolate (70% cocoa or higher)
- 3 large eggs, separated
- 1/4 cup (50g) granulated sugar
- 1/2 cup (120ml) heavy cream
- 1/2 teaspoon vanilla extract
- A pinch of salt
- Optional: fresh berries or whipped cream for garnish
Cooking Instructions:
- Melt the Chocolate: In a heatproof bowl over a pot of simmering water (double boiler method), melt the dark chocolate. Stir occasionally until smooth and fully melted. Remove from heat and let it cool slightly.
- Whip the Egg Whites: In a clean mixing bowl, use an electric mixer to beat the egg whites with a pinch of salt until soft peaks form. Gradually add the granulated sugar while continuing to beat until stiff peaks form. This step is fundamental as it helps give the mousse its airy texture.
- Prepare the Egg Yolks: In a separate bowl, whisk the egg yolks until they’re light in color. Gradually add the melted chocolate to the egg yolks, whisking continuously to prevent the yolks from cooking. Once fully combined, stir in the vanilla extract.
- Fold in the Egg Whites: Gently fold one-third of the whipped egg whites into the chocolate mixture to lighten it. Then, carefully fold in the remaining egg whites in two parts, being cautious not to deflate the mixture. This folding technique is key to maintaining the mousse’s lightness.
- Whip the Cream: In another bowl, whip the heavy cream until soft peaks form. Gently fold the whipped cream into the chocolate mixture until fully incorporated. This adds richness and creaminess to the mousse.
- Chill the Mousse: Divide the chocolate mousse into individual serving dishes or a large bowl. Cover with plastic wrap and refrigerate for at least 2 hours, or until set. Chilling allows the flavors to meld and the mousse to firm up.
- Serve: Once chilled, garnish with fresh berries or a dollop of whipped cream if desired. Serve immediately and enjoy the rich, decadent flavors of your gluten-free chocolate mousse.
Extra Tips:
When making chocolate mousse, it’s important to use room temperature eggs as they whip better than cold eggs. Confirm that your mixing bowls and utensils are clean and free from any grease, as this can prevent the egg whites from whipping properly.
For an added flavor twist, consider incorporating a splash of coffee or a liqueur like Grand Marnier into the melted chocolate for a deeper taste. Enjoy your delicious gluten-free chocolate mousse!