

When I think of Provence, I picture sunlit fields, bustling markets, and the irresistible scents of rustic French cuisine. It’s all about fresh ingredients and heartwarming flavors that bring loved ones together. I’ve rounded up 15 delightful dinner recipes that capture this charm, from the vibrant Ratatouille to the comforting Coq Au Vin. Each dish is a little taste of the French countryside, and I’m excited to share these lovely culinary experiences with you.
Ratatouille
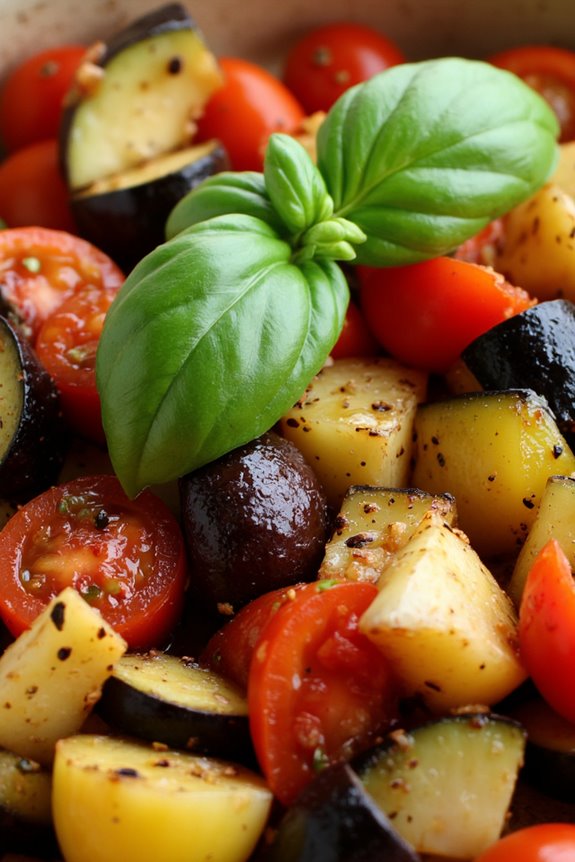
Ratatouille is a classic French Provençal vegetable dish that’s as beautiful as it’s delicious. Originating from Nice, this dish showcases the region’s bountiful summer produce, including zucchini, eggplant, bell peppers, tomatoes, and onions, all simmered together with fragrant herbs. It can be served warm or at room temperature, making it a versatile option for both casual family dinners and elegant gatherings.
This vibrant medley of vegetables not only pleases the palate but also makes for a stunning visual presentation, embodying the essence of French cuisine. In addition to being a fantastic vegetarian dish, ratatouille is also incredibly healthy and can be paired with crusty bread, served over rice, or enjoyed as a filling for crepes.
With its rich flavors and delightful textures, this dish is perfect for any occasion. Whether you’re preparing an intimate meal for friends or simply want to indulge in a taste of France, ratatouille is a dish that never disappoints.
Ingredients (serving size: 4-6 people):
- 1 medium eggplant, diced
- 2 medium zucchinis, sliced
- 1 large bell pepper (any color), chopped
- 1 large onion, diced
- 3 cloves of garlic, minced
- 4 medium ripe tomatoes, diced (or one can of diced tomatoes)
- 1/4 cup olive oil
- 1 teaspoon dried thyme
- 1 teaspoon dried oregano
- Salt and pepper to taste
- Fresh basil leaves for garnish (optional)
Cooking Instructions:
- Prepare the Vegetables: Begin by washing and chopping all your vegetables. Dice the eggplant, zucchinis, bell pepper, and onion into uniform pieces for even cooking. Mince the garlic and dice the tomatoes if using fresh ones. Preparation is key in ensuring that all the vegetables cook evenly.
- Sauté the Base: In a large, heavy-bottomed pot or skillet, heat the olive oil over medium heat. Add the diced onion and bell pepper, and sauté until they’re soft and translucent, about 5-7 minutes. This step builds a flavorful foundation for the ratatouille.
- Add the Garlic: Stir in the minced garlic and cook for an additional 1-2 minutes, until fragrant. Be careful not to let the garlic burn, as it can turn bitter, which would affect the overall flavor of the dish.
- Incorporate the Eggplant and Zucchini: Add the diced eggplant and sliced zucchinis to the pot. Stir well to combine and cook for another 5-7 minutes. The eggplant should begin to soften, and this will help meld the flavors together.
- Add Tomatoes and Seasonings: Once the vegetables are tender, add the diced tomatoes (or canned tomatoes), dried thyme, oregano, salt, and pepper. Stir everything together and bring the mixture to a simmer. This is where the essence of ratatouille starts to develop.
- Simmer the Ratatouille: Cover the pot and reduce the heat to low. Allow the ratatouille to simmer gently for about 30-40 minutes, stirring occasionally. This slow cooking process helps the vegetables become tender and allows the flavors to deepen and blend beautifully.
- Serve and Garnish: Once the ratatouille is cooked to your liking, taste and adjust the seasoning if necessary. Serve warm or at room temperature, garnished with fresh basil leaves for an aromatic touch.
Extra Tips: When making ratatouille, feel free to customize the ingredients based on what’s in season or what you have on hand. You can also experiment with adding other vegetables like squash or carrots.
For a richer flavor, consider roasting the vegetables instead of sautéing them, or finish the dish with a drizzle of balsamic vinegar or a sprinkle of cheese for added depth. Ratatouille can also be made ahead of time; it often tastes even better the next day as the flavors continue to meld.
Coq Au Vin
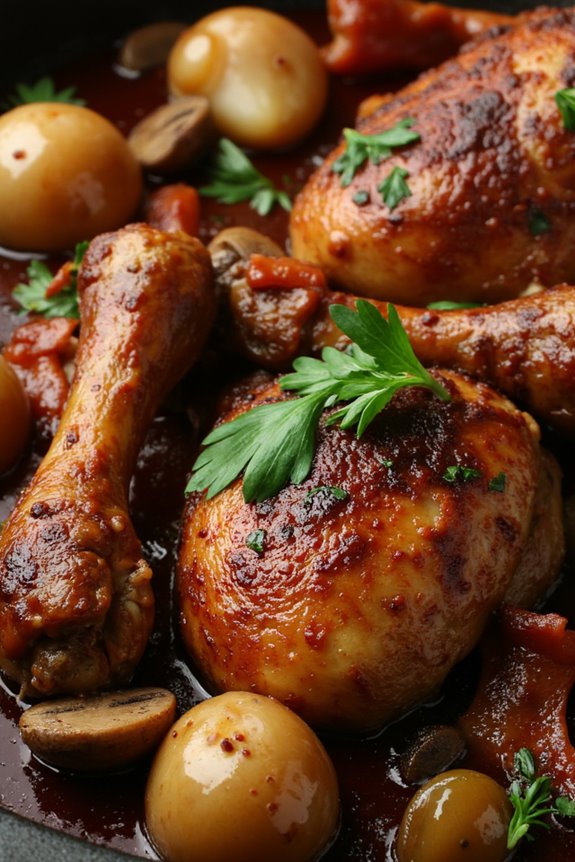
Coq Au Vin, or “rooster in wine,” is a classic French dish that showcases the rich flavors of tender chicken simmered in a robust wine sauce. This dish is traditionally made with a whole rooster, but for convenience, chicken pieces are often used. The combination of deep red wine, aromatic herbs, and earthy vegetables creates a comforting and hearty meal, perfect for gatherings or a cozy night in.
Originating from the Burgundy region of France, Coq Au Vin is a celebration of rustic French cooking and is sure to impress your guests with its complex flavor profile.
To prepare this dish, it’s important to allow the chicken to marinate in the wine and aromatics, which enhances the overall flavor and tenderness. The slow cooking method allows the chicken to absorb the flavors while becoming incredibly juicy. Serve Coq Au Vin with creamy mashed potatoes or crusty bread to soak up the delicious sauce, and don’t forget to pair it with a glass of the same wine used in cooking for a perfect dining experience.
Ingredients (Serves 4-6):
- 4-6 chicken thighs and drumsticks (bone-in, skin-on)
- 750 ml of red wine (preferably Burgundy or Pinot Noir)
- 4 slices of bacon, chopped
- 1 large onion, diced
- 3 cloves of garlic, minced
- 2 cups of mushrooms, quartered
- 2 cups of pearl onions, peeled
- 3 tablespoons of tomato paste
- 2 cups of chicken broth
- 2 tablespoons of all-purpose flour
- 2 tablespoons of olive oil
- 1 tablespoon of fresh thyme (or 1 teaspoon dried thyme)
- 2 bay leaves
- Salt and pepper to taste
- Fresh parsley for garnish
Cooking Instructions:
- Marinate the Chicken: In a large bowl, combine the chicken pieces with the red wine, thyme, and bay leaves. Cover and refrigerate for at least 4 hours or overnight to allow the flavors to meld.
- Cook the Bacon: In a large Dutch oven or heavy pot, cook the chopped bacon over medium heat until crispy. Remove the bacon with a slotted spoon and set aside, leaving the rendered fat in the pot.
- Sear the Chicken: Remove the chicken from the marinade (reserve the marinade) and pat it dry with paper towels. Season with salt and pepper. In the same pot, add the chicken pieces skin-side down and brown for about 5-7 minutes on each side until golden. Remove the chicken and set aside.
- Sauté the Vegetables: Add the diced onion, pearl onions, and mushrooms to the pot. Sauté for about 5-6 minutes until softened. Add the minced garlic and cook for another minute until fragrant.
- Build the Sauce: Stir in the tomato paste and cook for 2 minutes. Sprinkle flour over the vegetables and stir well to combine. Slowly pour in the reserved marinade, scraping the bottom of the pot to release any flavorful bits.
- Simmer the Dish: Return the chicken and cooked bacon to the pot, along with the chicken broth. Bring the mixture to a boil, then reduce the heat to low. Cover and let it simmer for about 45 minutes to an hour until the chicken is tender and the sauce has thickened.
- Final Touches: Taste and adjust seasoning with salt and pepper if needed. Remove bay leaves before serving. Garnish with freshly chopped parsley for a touch of color.
Extra Tips:
When making Coq Au Vin, it’s essential to choose a good quality wine, as the flavor will greatly impact the final dish. For an added depth of flavor, consider using homemade chicken stock instead of store-bought broth.
Additionally, be patient while simmering; the longer the chicken cooks, the more tender it will become. This dish can also be made a day in advance, as the flavors deepen overnight, making it even better when reheated. Enjoy your culinary journey into the heart of French cuisine!
Bouillabaisse
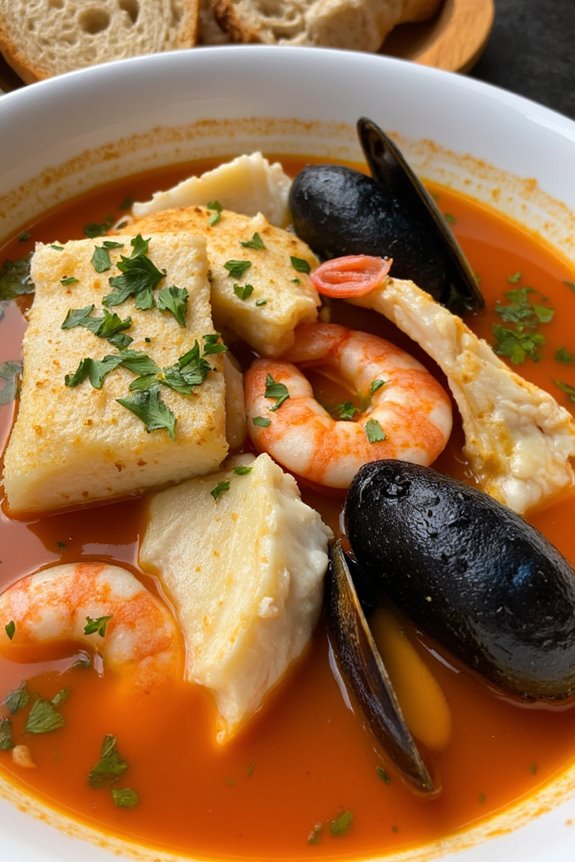
Bouillabaisse is a traditional Provençal fish stew that hails from the port city of Marseille. This hearty dish beautifully showcases the flavors of the Mediterranean, featuring a blend of fresh fish, shellfish, and aromatic herbs. The base of the stew is a fragrant broth made from fish stock, tomatoes, garlic, and a medley of spices, which creates a rich and inviting flavor profile.
Served with a side of rouille, a garlic mayonnaise spiced with saffron, bouillabaisse isn’t only a meal but an experience that transports you to the sun-drenched shores of southern France.
Preparing bouillabaisse may seem intimidating, but with careful attention to the ingredients and cooking process, you can create a delightful dish that will impress your family and friends. The key to a successful bouillabaisse lies in the quality of the seafood used, so try to source the freshest fish and shellfish available. This recipe serves 4-6 people, making it perfect for a dinner gathering or a special occasion.
Ingredients
- 1/4 cup olive oil
- 1 onion, finely chopped
- 1 leek, white part only, finely chopped
- 2 garlic cloves, minced
- 2 ripe tomatoes, diced
- 1 teaspoon orange zest
- 1 teaspoon saffron threads
- 1 teaspoon fennel seeds
- 1/2 teaspoon red pepper flakes
- 1 bay leaf
- 4 cups fish stock
- 1 cup dry white wine
- 1 pound firm white fish fillets (such as cod or haddock), cut into chunks
- 1 pound mussels, cleaned and debearded
- 1 pound shrimp, peeled and deveined
- Salt and pepper, to taste
- Fresh parsley, chopped, for garnish
- Rouille, for serving
Cooking Instructions
- Sauté the Aromatics: In a large pot or Dutch oven, heat the olive oil over medium heat. Add the chopped onion and leek, cooking until they’re softened and translucent, about 5-7 minutes. Stir in the minced garlic and cook for an additional minute until fragrant.
- Add the Vegetables and Spices: Incorporate the diced tomatoes into the pot, followed by the orange zest, saffron threads, fennel seeds, red pepper flakes, and bay leaf. Stir well to combine and let the mixture cook for about 5 minutes to allow the flavors to meld.
- Pour in the Liquids: Once the vegetables are softened, pour in the fish stock and dry white wine. Increase the heat and bring the mixture to a gentle boil, then reduce the heat to a simmer. Allow it to simmer for about 15-20 minutes, which helps develop the broth’s flavor.
- Add the Seafood: Carefully add the chunks of white fish, mussels, and shrimp to the pot. Stir gently to guarantee the seafood is submerged in the broth. Cover the pot and let it simmer for another 10-12 minutes, or until the mussels have opened and the fish is cooked through.
- Season to Taste: After the seafood is cooked, taste the broth and season with salt and pepper as desired. Remove the bay leaf and discard it.
- Serve: Ladle the bouillabaisse into bowls and garnish with freshly chopped parsley. Serve hot with a side of rouille and crusty bread for dipping.
Extra Tips
To elevate your bouillabaisse, consider using a variety of seafood such as scallops or clams for added texture and flavor. If you want a deeper flavor, let the broth simmer longer before adding the seafood.
Always verify that the mussels are fresh and discard any that remain closed after cooking. Don’t forget to serve the rouille on the side, as it adds a wonderful creaminess and complements the dish perfectly!
Tarte Tatin
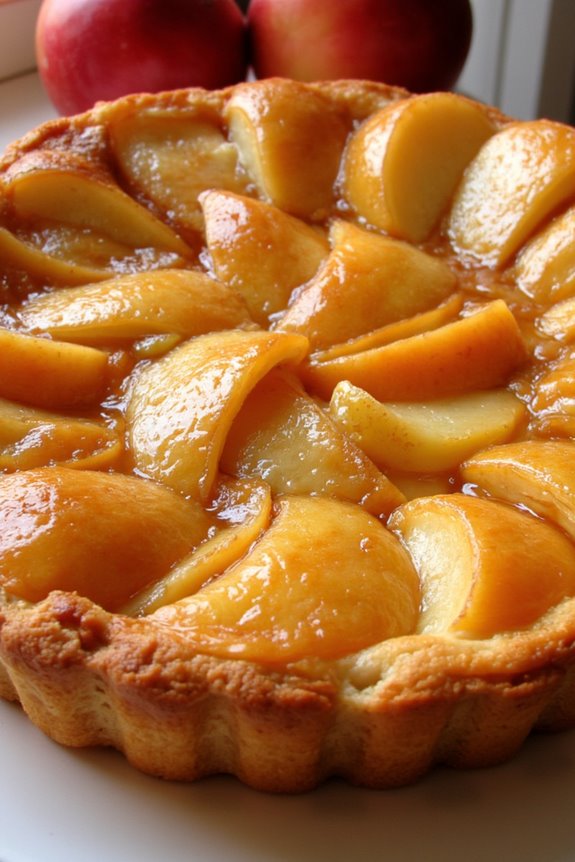
Tarte Tatin is a classic French dessert that showcases the beauty of caramelized apples atop a flaky pastry crust. Originating from the Tatin sisters who accidentally created this upside-down tart in their hotel kitchen, it has since become a beloved staple in French cuisine.
The combination of sweet, tender apples with a rich caramel sauce, all encased in buttery pastry, creates a delightful contrast of textures and flavors that’s certain to impress any guest at your dinner table.
This delectable dessert is traditionally served warm, often accompanied by a dollop of crème fraîche or a scoop of vanilla ice cream. Making Tarte Tatin does require a bit of patience, but the end result is well worth the effort.
The sweet and slightly tangy taste of the apples, combined with the caramel’s richness, creates a harmonious balance that will leave your palate wanting more. Whether you’re hosting a dinner party or simply treating yourself, Tarte Tatin is the perfect way to finish off a French-inspired meal.
Ingredients (serving size: 4-6 people):
- 6 medium-sized firm apples (such as Granny Smith or Honeycrisp)
- 1 cup granulated sugar
- 1/2 cup unsalted butter (1 stick)
- 1 teaspoon vanilla extract
- 1 teaspoon ground cinnamon
- 1 sheet of puff pastry (thawed if frozen)
- Pinch of salt
- Optional: crème fraîche or vanilla ice cream for serving
Cooking Instructions:
- Prepare the Apples: Start by peeling, coring, and slicing the apples into quarters. It’s important to choose firm apples that hold their shape when cooked. Set the prepared apples aside.
- Make the Caramel: In a heavy, oven-safe skillet (preferably cast iron), melt the butter over medium heat. Once melted, add the sugar, vanilla extract, and a pinch of salt. Stir the mixture continuously until it begins to bubble and turn a golden brown color, which should take about 5-7 minutes. Be careful not to burn the caramel.
- Add the Apples: Once the caramel is ready, carefully place the apple quarters in the skillet, arranging them tightly in a circular pattern, with the rounded sides facing down. Sprinkle the ground cinnamon over the apples and let them cook in the caramel for about 10-15 minutes, until they start to soften and caramelize.
- Preheat the Oven: While the apples are cooking in the skillet, preheat your oven to 375°F (190°C). This step guarantees that the Tarte Tatin cooks evenly and thoroughly.
- Top with Puff Pastry: Once the apples are caramelized, remove the skillet from the heat. Gently roll out the puff pastry on a floured surface and cut it to fit over the apples in the skillet. Tuck the edges of the pastry down around the apples, ensuring they’re covered completely.
- Bake the Tart: Place the skillet in the preheated oven and bake for about 25-30 minutes, or until the pastry is golden brown and puffed up. Keep an eye on it to prevent over-browning.
- Invert the Tart: Once baked, remove the skillet from the oven and allow it to cool for a few minutes. Carefully run a knife around the edges to loosen the tart. Place a large serving plate over the skillet and quickly flip it over to invert the tart onto the plate. Be cautious, as caramel can be very hot.
- Serve: Allow the Tarte Tatin to cool slightly before slicing. Serve warm, with a scoop of crème fraîche or vanilla ice cream if desired.
Extra Tips: For an extra layer of flavor, consider adding a splash of Calvados (apple brandy) or a sprinkle of nutmeg to the caramel mixture. Additionally, if you want to experiment with different fruits, pears or peaches can also be used for a delicious twist on the classic recipe.
Remember to serve the Tarte Tatin warm for the best taste experience, and enjoy the delightful aroma that fills your kitchen as it bakes!
Quiche Lorraine

Quiche Lorraine is a classic French dish that combines a buttery, flaky crust with a rich filling of eggs, cream, cheese, and crispy bacon. Originating from the Lorraine region of France, this savory tart is perfect for brunch, lunch, or even a light dinner. Its versatility allows it to be served warm or at room temperature, making it an ideal dish for entertaining guests or enjoying a quiet meal at home.
The beauty of Quiche Lorraine lies in its simplicity and the quality of its ingredients. The creamy custard filling is enhanced by the smoky flavor of bacon and the nutty taste of Gruyère cheese. Additionally, the dish can be easily adapted to include various vegetables or herbs, making it a canvas for culinary creativity. With a light salad on the side, this quiche becomes a delightful meal that transports you straight to a quaint French café.
Ingredients (Serves 4-6)
- 1 pre-made pie crust (9-inch)
- 6 large eggs
- 1 cup heavy cream
- 1 cup whole milk
- 8 ounces Gruyère cheese, grated
- 6 strips of bacon, cooked and crumbled
- 1/2 teaspoon salt
- 1/2 teaspoon black pepper
- 1/4 teaspoon ground nutmeg
- 2 tablespoons chopped fresh chives (optional)
Cooking Instructions
- Preheat the Oven: Begin by preheating your oven to 375°F (190°C). This will guarantee that the quiche bakes evenly and achieves a golden crust.
- Prepare the Pie Crust: Place the pre-made pie crust into a 9-inch pie dish. Gently press the crust against the bottom and sides of the dish. Use a fork to poke small holes in the bottom of the crust, which helps prevent bubbling during baking. Set aside.
- Cook the Bacon: In a skillet over medium heat, cook the strips of bacon until they’re crispy. Once cooked, remove them from the skillet, let them cool, and crumble them into small pieces. Keep the rendered fat in the skillet for additional flavor if desired, or discard it.
- Make the Custard: In a large mixing bowl, whisk together the eggs, heavy cream, whole milk, salt, black pepper, and nutmeg until fully combined. This mixture will create the creamy filling for your quiche.
- Combine Fillings: Add the crumbled bacon and grated Gruyère cheese to the custard mixture. If using, stir in the chopped chives for added flavor. Confirm that all ingredients are evenly distributed.
- Fill the Crust: Carefully pour the custard and filling mixture into the prepared pie crust. Use a spatula to spread the mixture evenly throughout the crust.
- Bake the Quiche: Place the quiche in the preheated oven and bake for 35-40 minutes, or until the filling is set and the top is golden brown. You can check for doneness by inserting a knife in the center; it should come out clean.
- Cool and Serve: Once baked, remove the quiche from the oven and allow it to cool for about 10-15 minutes. This cooling time helps the filling set further, making it easier to slice. Serve warm or at room temperature.
Extra Tips
For the best results, use high-quality ingredients, particularly the cheese and bacon, as they greatly enhance the flavor of the quiche. If you prefer a lighter version, you can substitute half-and-half for the heavy cream or milk.
Additionally, feel free to customize your Quiche Lorraine by adding sautéed vegetables like spinach, mushrooms, or caramelized onions for a delicious twist. Finally, storing leftovers is easy; simply wrap the quiche in plastic wrap and refrigerate for up to 3 days. Reheat gently in the oven before serving.
Provençal Chicken
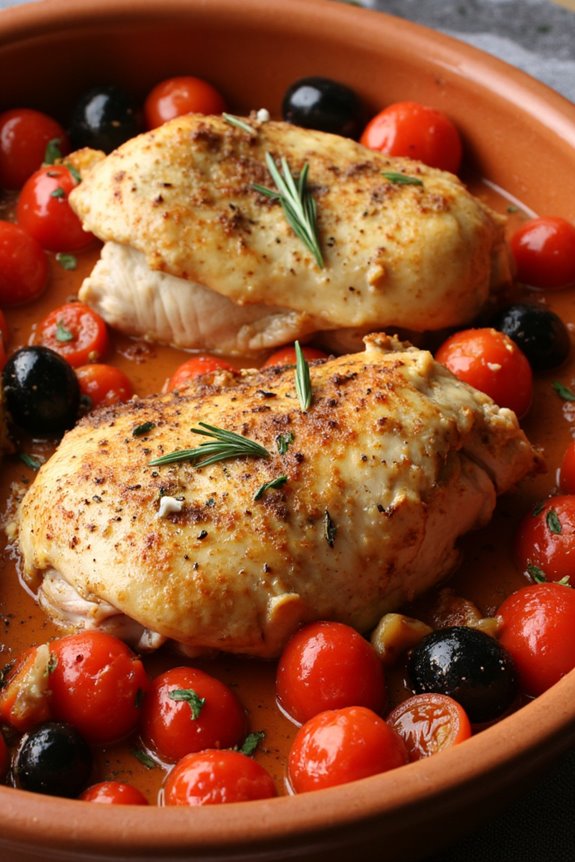
Provençal Chicken is a delightful dish that captures the essence of southern France, combining aromatic herbs and fresh vegetables to create a flavorful experience. This recipe is perfect for a cozy family dinner or an elegant gathering, showcasing the vibrant flavors of the Mediterranean.
With its tender chicken slowly cooked in a rich sauce of tomatoes, olives, and herbs, this dish is a celebration of rustic French cooking that will transport you straight to the sun-drenched hills of Provence.
This dish isn’t only delicious but also relatively simple to prepare, making it accessible for cooks of all skill levels. By using fresh ingredients and a few key techniques, you can create a meal that’s both satisfying and impressive.
Pair it with a crusty baguette or a side of rice to soak up the flavorful sauce, and you have a complete meal that’s sure to impress your guests.
Ingredients (Serves 4-6):
- 4-6 chicken thighs (bone-in, skin-on)
- 2 tablespoons olive oil
- 1 onion, diced
- 3 cloves garlic, minced
- 2 cups cherry tomatoes, halved
- 1 cup black olives (Kalamata or Niçoise), pitted
- 1 cup chicken broth
- 1 tablespoon fresh thyme leaves
- 1 tablespoon fresh rosemary, chopped
- 1 teaspoon dried herbes de Provence
- Salt and pepper to taste
- Fresh basil leaves for garnish (optional)
Cooking Instructions:
- Prepare the Chicken: Season the chicken thighs generously with salt and pepper on both sides. This step enhances the flavor of the chicken and helps to create a nice crust when seared.
- Sear the Chicken: In a large Dutch oven or heavy skillet, heat the olive oil over medium-high heat. Once hot, add the chicken thighs, skin side down, and sear for about 5-7 minutes until the skin is golden brown and crispy. Flip the chicken and cook for an additional 5 minutes. Remove the chicken from the pot and set aside.
- Sauté the Aromatics: In the same pot, add the diced onion and sauté for about 3-5 minutes until softened. Then add the minced garlic and cook for an additional 1 minute until fragrant. Be careful not to burn the garlic.
- Add the Vegetables and Herbs: Stir in the halved cherry tomatoes, olives, chicken broth, thyme, rosemary, and herbes de Provence. Mix well to combine all the ingredients, ensuring the tomatoes are evenly distributed in the mixture.
- Return the Chicken and Simmer: Place the seared chicken thighs back into the pot, skin side up. Bring the mixture to a gentle simmer, then reduce the heat to low. Cover the pot and let it cook for about 30-40 minutes, or until the chicken is cooked through and tender.
- Serve: Once the chicken is cooked, remove the pot from the heat. Taste the sauce and adjust the seasoning with more salt and pepper if needed. Serve the Provençal Chicken hot, garnished with fresh basil leaves if desired, alongside crusty bread or rice to soak up the delicious sauce.
Extra Tips:
For an added depth of flavor, consider marinating the chicken in olive oil, garlic, and herbs for a few hours or overnight before cooking. This will infuse the meat with more taste.
Additionally, feel free to customize the vegetables by adding bell peppers or zucchini for a more colorful dish. Leftovers can be stored in the refrigerator for up to three days and taste even better the next day as the flavors meld beautifully.
French Onion Soup
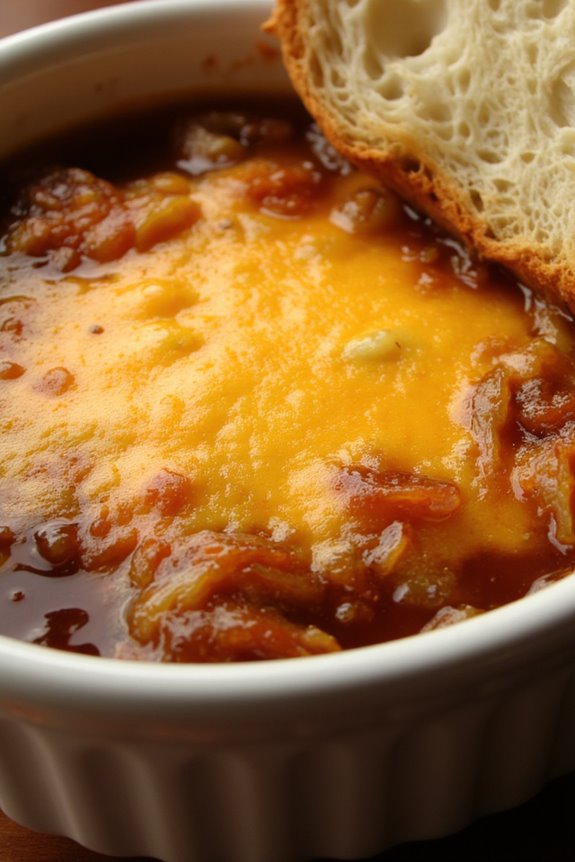
French Onion Soup is a classic dish that embodies the essence of French cuisine with its simplicity and depth of flavor. This comforting soup features caramelized onions, rich beef broth, and a delightful topping of melted cheese on toasted bread, making it perfect as an appetizer or a main course. The process of slowly cooking the onions brings out their natural sweetness, which is the star of this recipe.
This soup not only warms the soul but also allows for creativity; you can adjust the cheese or add herbs to personalize it to your taste. Traditionally served in a crock or oven-safe bowl, French Onion Soup is as pleasing to the eye as it’s to the palate. Whether you’re hosting a dinner party or enjoying a quiet night at home, this dish is sure to impress.
Ingredients (Serves 4-6)
- 4 large yellow onions, thinly sliced
- 4 tablespoons unsalted butter
- 1 tablespoon olive oil
- 1 teaspoon sugar
- 4 cups beef broth
- 1 cup dry white wine (or sherry)
- 2 tablespoons all-purpose flour
- 1 teaspoon fresh thyme leaves (or ½ teaspoon dried thyme)
- Salt and pepper, to taste
- 1 French baguette, sliced into 1-inch pieces
- 2 cups shredded Gruyère cheese
- ½ cup grated Parmesan cheese (optional for topping)
Cooking Instructions
- Caramelize the Onions: In a large heavy-bottomed pot, melt the butter and olive oil over medium-low heat. Add the sliced onions and sprinkle with sugar. Cook, stirring occasionally, for about 30-40 minutes until the onions are soft and caramelized. This slow cooking process is essential for developing the deep, sweet flavor of the onions.
- Add Flour and Cook: Once the onions are caramelized, sprinkle the flour over the top and stir to combine. Cook for an additional 2-3 minutes to remove the raw flour taste, stirring constantly to prevent burning.
- Deglaze the Pot: Slowly add the white wine (or sherry) to the pot, scraping the bottom to release any flavorful bits stuck to the pot. Allow the wine to simmer for about 5 minutes until it has reduced by half.
- Add Broth and Season: Pour in the beef broth and add thyme, along with salt and pepper to taste. Bring the mixture to a boil, then reduce the heat and let it simmer for 20-30 minutes to meld the flavors together.
- Prepare the Bread: While the soup is simmering, preheat your oven to 400°F (200°C). Arrange the baguette slices on a baking sheet and toast them in the oven for about 5-7 minutes until golden brown on both sides.
- Assemble the Soup: Once the soup has finished simmering, ladle it into oven-safe bowls. Place a toasted baguette slice on top of each bowl, then generously sprinkle with the Gruyère cheese and optional Parmesan.
- Broil the Cheese: Place the bowls on a baking sheet and broil in the oven for 3-5 minutes until the cheese is bubbly and golden. Keep a close eye on it to prevent burning.
- Serve and Enjoy: Carefully remove the bowls from the oven (they will be hot!) and allow them to cool slightly before serving. Enjoy your delicious homemade French Onion Soup!
Extra Tips
For an even deeper flavor, consider adding a splash of balsamic vinegar or a bay leaf while simmering the broth.
If you want a vegetarian option, substitute the beef broth with vegetable broth and confirm your cheese is vegetarian-friendly.
Additionally, for a richer taste, you could use a mix of different cheeses, such as mozzarella or fontina, alongside Gruyère.
Always serve the soup hot and fresh for the best experience, and don’t hesitate to garnish with fresh herbs for an added touch!
Salade Niçoise
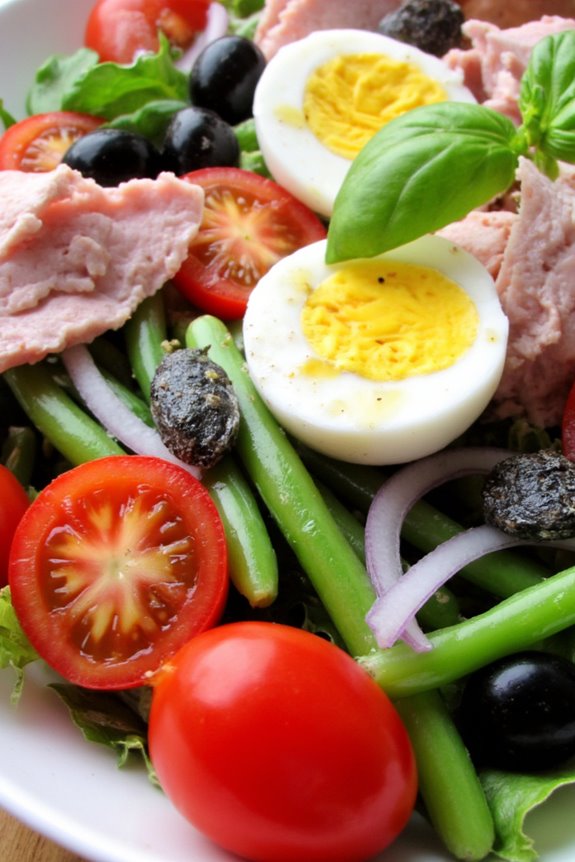
Salade Niçoise is a classic French salad that hails from the sunny region of Nice on the French Riviera. This vibrant dish is a celebration of fresh Mediterranean ingredients, typically featuring a combination of greens, tomatoes, hard-boiled eggs, tuna, olives, and anchovies. The beauty of Salade Niçoise lies not only in its colorful presentation but also in its versatility; it can be enjoyed as a hearty main course or a delightful side dish, making it perfect for any occasion.
Traditionally, Salade Niçoise is served with a simple vinaigrette dressing that enhances the natural flavors of the ingredients without overpowering them. The key to an authentic Salade Niçoise is to use high-quality, fresh produce, as well as good olive oil. This dish truly embodies the essence of French cuisine: simple yet elegant, with each ingredient playing a crucial role in the overall harmony of flavors.
Ingredients (Serves 4-6)
- 4 cups mixed salad greens (such as arugula, romaine, and frisée)
- 2 cups cherry tomatoes, halved
- 1 cup green beans, trimmed and blanched
- 4 large hard-boiled eggs, peeled and quartered
- 1 can (6 oz) of high-quality tuna, drained (preferably packed in olive oil)
- 1/2 cup black olives (such as Niçoise or Kalamata), pitted
- 6-8 anchovy fillets, drained (optional)
- 1/4 cup red onion, thinly sliced
- 1/4 cup extra virgin olive oil
- 2 tablespoons red wine vinegar
- Salt and pepper to taste
- Fresh basil leaves for garnish (optional)
Cooking Instructions
- Prepare the Ingredients: Begin by washing and drying the salad greens thoroughly. Next, rinse the cherry tomatoes and slice them in half. For the green beans, trim the ends and blanch them in boiling water for about 3-4 minutes until they’re bright green and tender-crisp. Drain them and immediately plunge into an ice bath to stop the cooking process.
- Cook the Eggs: Place the eggs in a saucepan and cover them with cold water. Bring the water to a boil, then cover the pot and remove it from heat. Let the eggs sit for 9-12 minutes, depending on your preferred level of doneness. Once finished, transfer the eggs to an ice bath to cool before peeling and quartering them.
- Make the Dressing: In a small bowl, whisk together the extra virgin olive oil and red wine vinegar. Season with salt and pepper to taste. This dressing will bring the salad together, so make sure to taste and adjust the seasoning as needed.
- Assemble the Salad: In a large serving platter or bowl, start by laying down the mixed salad greens as a base. Arrange the halved cherry tomatoes, blanched green beans, quartered hard-boiled eggs, drained tuna, olives, and anchovy fillets (if using) atop the greens. Scatter the thinly sliced red onion evenly over the salad.
- Dress the Salad: Drizzle the prepared vinaigrette over the assembled salad. Use tongs to gently toss the salad, ensuring that all ingredients are coated with the dressing. Be careful not to break the eggs or tuna too much while mixing.
- Garnish and Serve: Finish with a sprinkle of fresh basil leaves for a delightful aromatic touch. Serve the Salade Niçoise immediately as a main course or side dish, allowing your guests to enjoy the fresh, vibrant flavors.
Extra Tips
For the best flavor, try to use the freshest ingredients possible, especially the tuna and vegetables. If you prefer a variation, consider adding other ingredients such as artichoke hearts, capers, or even avocado.
Additionally, feel free to adjust the dressing to your taste; a squeeze of fresh lemon juice can add a lovely brightness to the dish. Remember, Salade Niçoise is best enjoyed fresh, so prepare it close to serving time for the ultimate culinary experience!
Duck Confit
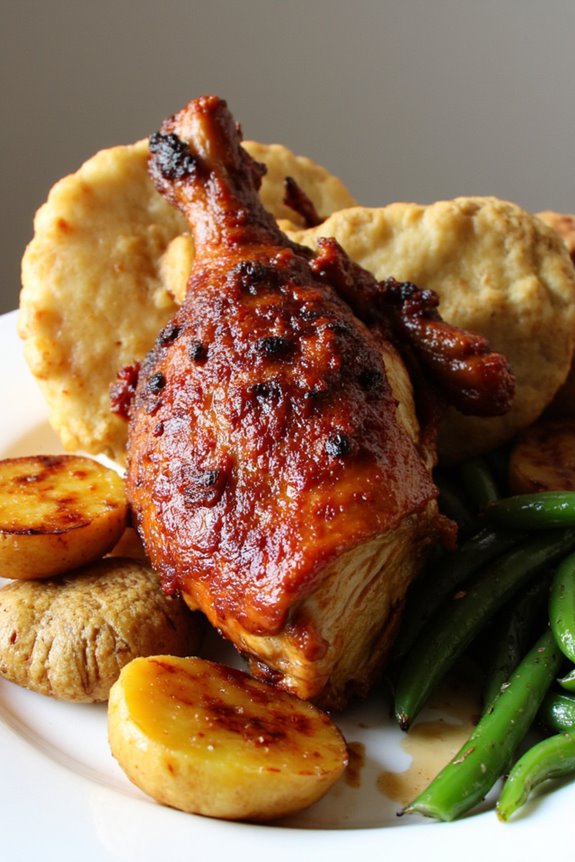
Duck Confit is a classic French dish that epitomizes the art of slow cooking and flavor infusion. Originating from the southwestern region of France, this dish combines tender, succulent duck legs with rich, aromatic seasonings. The secret lies in the slow-cooking process, which not only preserves the meat but also allows the flavors to meld beautifully, resulting in an unforgettable dining experience.
Served with crispy skin and often accompanied by potatoes or green beans, Duck Confit is perfect for a cozy dinner or a special occasion.
Preparing Duck Confit might require some time and patience, but the reward is well worth it. The process begins with marinating the duck legs in a blend of salt, herbs, and spices, allowing the flavors to penetrate the meat. After marination, the duck is slowly cooked in its own fat, which keeps the meat moist and flavorful.
Once cooked, the duck can be stored for weeks in the refrigerator, making it a fantastic make-ahead meal that can impress your guests with minimal last-minute effort.
Ingredients (Serves 4-6):
- 4 duck legs
- 1 tablespoon kosher salt
- 4 cloves garlic, minced
- 2 sprigs fresh thyme
- 1 sprig fresh rosemary
- 1 teaspoon black peppercorns
- 4 cups duck fat (or enough to completely submerge the duck legs)
- 2 bay leaves
Cooking Instructions:
- Marinate the Duck: In a large bowl, combine the kosher salt, minced garlic, thyme, rosemary, and black peppercorns. Rub this mixture all over the duck legs, ensuring they’re well-coated. Cover the bowl with plastic wrap and refrigerate for at least 24 hours, or up to 48 hours for more intense flavor.
- Preheat the Oven: When you’re ready to cook, preheat your oven to 225°F (107°C). This low temperature is essential for the slow cooking process that will render the fat and tenderize the meat.
- Rinse and Dry the Duck: After marination, remove the duck legs from the refrigerator and rinse them under cold water to remove excess salt. Pat them dry with paper towels, which will help achieve crispy skin during cooking.
- Prepare the Duck Fat: In a large oven-safe pot or Dutch oven, melt the duck fat over low heat until it’s completely liquid. If you don’t have enough duck fat, you can supplement with olive oil.
- Submerge the Duck: Once the fat is melted, add the duck legs to the pot, ensuring they’re fully submerged. Add the bay leaves to the pot for added flavor.
- Cook Slowly: Place the pot in the preheated oven and cook the duck for about 2 to 3 hours, or until the meat is tender and easily pulls away from the bone. The cooking time may vary depending on the size of the legs.
- Crisp the Skin: Once the duck is cooked, carefully remove the legs from the pot and place them on a baking sheet. Preheat your broiler, then broil the duck legs for 5-7 minutes, or until the skin is golden brown and crispy. Keep a close eye on them to prevent burning.
- Serve and Enjoy: Once crispy, serve the Duck Confit immediately. Accompany it with roasted potatoes, sautéed green beans, or a fresh salad for a complete meal.
Extra Tips:
For the best results, invest in high-quality duck fat, as it greatly enhances the flavor of the dish. If you have leftover duck fat, strain and store it in the refrigerator for future use—it’s excellent for frying potatoes or adding flavor to other dishes.
Additionally, Duck Confit can be made in advance and stored in the fat in the refrigerator, allowing the flavors to deepen over time. Just reheat the duck legs in the oven or skillet before serving for a delightful meal anytime.
Socca
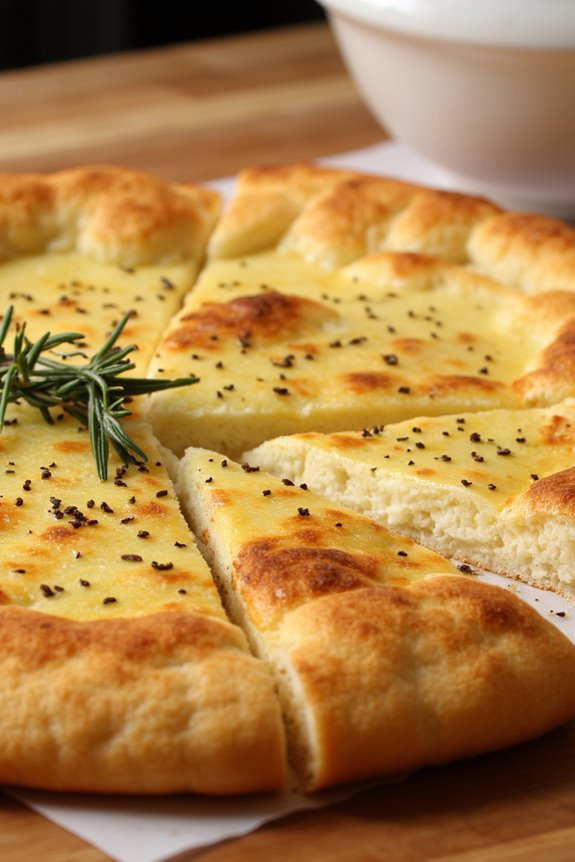
Socca is a traditional street food from the sunny region of Nice, France, and is a wonderful way to introduce a taste of Provence to your dinner table. This simple yet delicious dish is made primarily from chickpea flour, water, olive oil, and a pinch of salt. It’s inherently gluten-free and packed with protein, making it not only tasty but also nutritious.
Socca is typically baked in a wood-fired oven, giving it a delightful crispy texture on the outside and a soft, creamy interior. It’s usually enjoyed hot, straight from the oven, and can be served as an appetizer or a main dish, often accompanied by a fresh salad or topped with herbs and spices.
To make the perfect socca, it’s important to allow the batter to rest for a while before cooking. This resting period helps the flour to hydrate fully and contributes to a better texture. Traditionally, socca is cooked in a large, round pan, but you can also use a cast-iron skillet or a baking tray if you don’t have a specific socca pan.
The result is a beautifully golden-brown pancake that can be cut into wedges or squares and served with a sprinkle of black pepper and fresh herbs for an authentic touch.
Ingredients (Servings: 4-6):
- 1 cup chickpea flour
- 1 ½ cups water
- 4 tablespoons extra-virgin olive oil (plus more for the pan)
- 1 teaspoon salt
- ½ teaspoon black pepper (optional)
- Fresh herbs (such as rosemary or thyme) for garnish (optional)
Cooking Instructions:
- Prepare the Batter: In a mixing bowl, whisk together the chickpea flour, water, olive oil, and salt until you achieve a smooth batter. Make sure there are no lumps. The consistency should be similar to that of pancake batter. Cover the bowl and let it rest for at least 30 minutes at room temperature. This resting time allows the flour to hydrate and will yield a better texture after cooking.
- Preheat the Oven: While the batter is resting, place your oven rack in the upper third position and preheat your oven to 450°F (230°C). If using a cast-iron skillet or socca pan, place it in the oven to heat up as well. A hot pan is vital for achieving that crispy exterior.
- Heat the Pan: Once the oven is preheated, carefully remove the hot pan from the oven using oven mitts. Add a generous drizzle of olive oil to the pan, ensuring the bottom is well coated. Swirl the pan to evenly distribute the oil.
- Cook the Socca: Pour the rested batter into the hot, oiled pan. It should sizzle upon contact. Spread the batter evenly using a spatula if needed. Return the pan to the oven and bake for about 10-15 minutes, or until the edges are crispy and the top is golden brown.
- Serve: Remove the socca from the oven and let it cool for a minute. Cut it into wedges or squares and serve immediately, garnished with freshly cracked black pepper and chopped herbs if desired.
Extra Tips: For the best flavor, experiment with adding spices like cumin or smoked paprika to the batter before cooking. You can also serve socca with a side of homemade pesto or a drizzle of tahini sauce for an extra kick.
Keep in mind that socca is best enjoyed fresh out of the oven, so try to time it with your meal service for maximum enjoyment. If you have leftovers, they can be stored in the refrigerator and reheated in a skillet for a quick snack or light meal.
Gratin Dauphinois

Gratin Dauphinois is a classic French dish that embodies the comfort of creamy potatoes baked to perfection. Originating from the Dauphiné region in southeastern France, this dish is known for its rich, velvety texture and simple yet luxurious flavors. The combination of thinly sliced potatoes, cream, and cheese creates a delectable side that pairs beautifully with meats, poultry, or can be enjoyed on its own as a vegetarian option.
The beauty of Gratin Dauphinois lies in its elegance and the ease of preparation. With just a handful of ingredients, it transforms into a sophisticated dish that’s perfect for dinner parties or a cozy family meal. While the traditional recipe calls for Gruyère cheese, feel free to experiment with other cheeses for a personalized touch. This dish is sure to impress your guests and leave them longing for seconds!
Ingredients (Serves 4-6)
- 2 lbs (900g) of Yukon Gold or Russet potatoes
- 2 cups (500ml) heavy cream
- 1 cup (100g) grated Gruyère cheese (or cheese of your choice)
- 2 cloves garlic, minced
- 1 teaspoon salt
- 1/2 teaspoon black pepper
- 1/4 teaspoon nutmeg (optional)
- 2 tablespoons unsalted butter (for greasing the baking dish)
Cooking Instructions
- Prepare the Potatoes: Begin by preheating your oven to 350°F (175°C). While the oven is heating, peel the potatoes and slice them thinly (about 1/8 inch thick) using a sharp knife or mandoline. This guarantees even cooking and a delightful texture.
- Mix the Cream and Seasonings: In a medium bowl, combine the heavy cream, minced garlic, salt, black pepper, and nutmeg (if using). Whisk the mixture together until well combined. The cream mixture will infuse the potatoes with flavor as they bake.
- Layer the Potatoes: Grease a baking dish (approximately 9×13 inches) with the unsalted butter to prevent sticking. Arrange a layer of potato slices on the bottom of the dish, slightly overlapping them. Pour a portion of the cream mixture over the potatoes, followed by a sprinkle of grated Gruyère cheese.
- Continue Layering: Repeat the layering process until all the potato slices are used up, finishing with a layer of cream mixture on top. Make sure to reserve some cheese for the final topping to guarantee a golden, cheesy crust.
- Bake the Gratin: Cover the baking dish with aluminum foil and place it in the preheated oven. Bake for about 45 minutes, then remove the foil and sprinkle the remaining cheese on top. Return to the oven and bake for an additional 15-20 minutes, or until the top is golden brown and bubbly.
- Let it Rest: Once baked, remove the Gratin Dauphinois from the oven and let it rest for about 10-15 minutes before serving. This allows the layers to set and makes it easier to serve.
Extra Tips
For an extra layer of flavor, consider adding caramelized onions or sautéed mushrooms between the layers of potatoes. Additionally, confirm that the cream mixture is well-seasoned as it’s the primary flavor source in this dish.
If you prefer a lighter version, you can substitute half of the heavy cream with milk. For a crispy topping, broil the gratin for a couple of minutes at the end of baking, keeping a close eye to prevent burning. Enjoy your culinary adventure with this comforting French classic!
Pissaladière
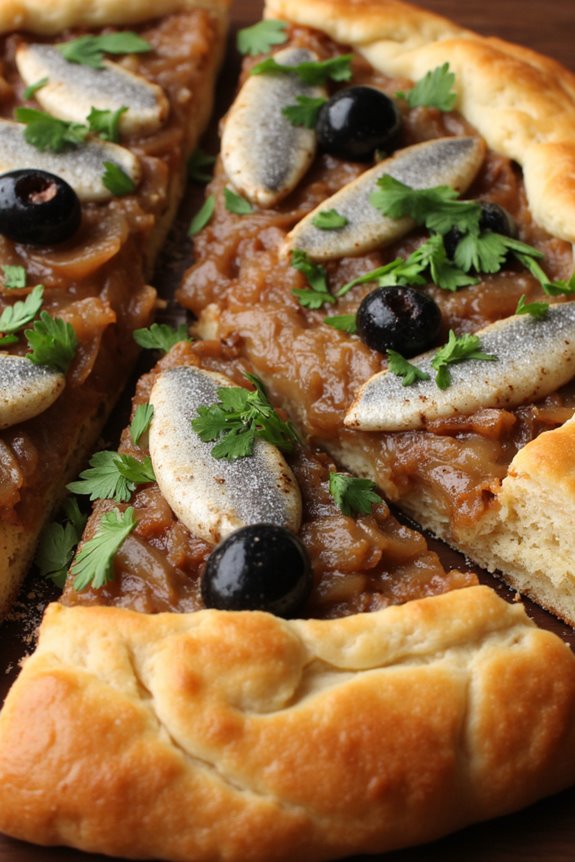
Pissaladière is a classic dish from the Provence region of France, particularly associated with Nice. This savory tart is made with a flaky pastry base topped with caramelized onions, black olives, and anchovies, making it a delicious option for a light dinner or a delightful appetizer. The combination of sweet onions and salty anchovies creates a symphony of flavors that’s both comforting and satisfying.
Traditionally served warm or at room temperature, Pissaladière is perfect for sharing with family and friends, and pairs wonderfully with a crisp green salad and a glass of rosé.
Making Pissaladière at home is an enjoyable process that allows you to explore the delicious flavors of French cuisine. The dish is versatile and can be served as a main course or as part of a charcuterie board. The key to a successful Pissaladière lies in the slow cooking of the onions, which brings out their natural sweetness, and in using high-quality ingredients, especially olives and anchovies.
Ingredients (Serving Size: 4-6 people)
- 1 sheet of puff pastry (thawed if frozen)
- 4 large onions (thinly sliced)
- 3 tablespoons olive oil
- 2 cloves garlic (minced)
- 1 teaspoon dried thyme
- Salt and black pepper (to taste)
- 12 anchovy fillets (packed in oil)
- 1 cup black olives (preferably Niçoise or Kalamata, pitted and halved)
- Fresh parsley (for garnish, optional)
Cooking Instructions
- Preheat the Oven: Begin by preheating your oven to 400°F (200°C). This temperature is ideal for baking the puff pastry to a golden, flaky texture.
- Prepare the Puff Pastry: Roll out the sheet of puff pastry on a lightly floured surface to fit a rectangular or circular tart pan. Press the pastry into the pan, guaranteeing that it covers the bottom and sides evenly. Prick the base with a fork to prevent it from puffing up during baking. Chill in the refrigerator while you prepare the filling.
- Cook the Onions: In a large skillet, heat the olive oil over medium heat. Add the sliced onions, minced garlic, and dried thyme. Season with salt and pepper. Cook the onions slowly, stirring occasionally, for about 25-30 minutes until they’re soft and caramelized. This step is essential as it develops the rich flavor of the dish.
- Assemble the Tart: Once the onions are caramelized, remove the pastry from the refrigerator and spread the onion mixture evenly over the base. Arrange the anchovy fillets in a decorative pattern on top of the onions and scatter the halved black olives over the tart.
- Bake: Place the assembled tart in the preheated oven and bake for about 25-30 minutes or until the pastry is golden brown and crispy. Keep an eye on it to make sure it doesn’t burn.
- Garnish and Serve: Once baked, remove the Pissaladière from the oven and let it cool for a few minutes. If desired, sprinkle with fresh parsley before slicing. Serve warm or at room temperature.
Extra Tips
When preparing Pissaladière, it’s important to choose high-quality anchovies and olives, as these ingredients greatly impact the flavor of the dish. If you’re not a fan of anchovies, you can substitute them with capers for a similar briny taste.
Additionally, don’t rush the caramelization of the onions; low and slow cooking will yield the best results. For a twist, feel free to add fresh herbs like basil or oregano for added flavor. Enjoy this delightful dish as a part of your next French-inspired dinner!
Boulettes De Viande
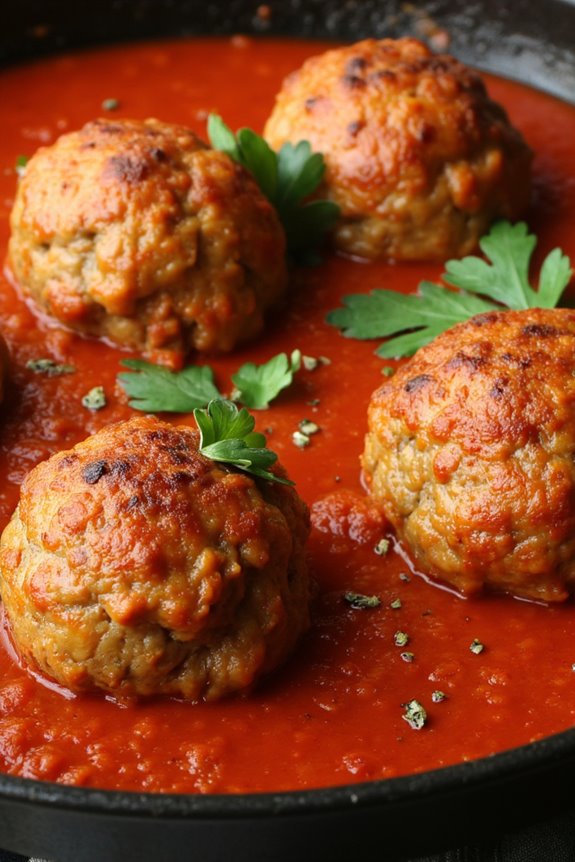
Boulettes De Viande, or French meatballs, are a delightful dish that showcases the rich flavors and culinary finesse of French cuisine. These tender meatballs are typically made from a mixture of ground meat, herbs, and spices, then simmered in a savory sauce. They’re perfect served with crusty bread, over pasta, or alongside a fresh salad, making them a versatile choice for any dinner table. The dish isn’t only comforting but also a fantastic way to impress your family and friends with a taste of France.
To make Boulettes De Viande, you’ll want to use quality ingredients to guarantee the meatballs are flavorful and succulent. This recipe combines ground beef and pork, seasoned with fresh herbs and garlic, then cooked in a tomato-based sauce that enhances their taste. The combination of textures and flavors will transport you to a quaint French bistro with every bite.
Ingredients (Serves 4-6):
- 500g ground beef
- 500g ground pork
- 1 cup breadcrumbs
- 1/2 cup grated Parmesan cheese
- 1/4 cup fresh parsley, chopped
- 2 cloves garlic, minced
- 1 large egg
- Salt and pepper, to taste
- 2 cups canned crushed tomatoes
- 1 onion, finely chopped
- 2 tablespoons olive oil
- 1 teaspoon dried oregano
- 1 teaspoon dried thyme
Cooking Instructions:
- Prepare the Meatball Mixture: In a large bowl, combine the ground beef, ground pork, breadcrumbs, grated Parmesan cheese, chopped parsley, minced garlic, egg, salt, and pepper. Mix everything together using your hands or a spoon until well combined. Be careful not to overmix, as this can make the meatballs tough.
- Shape the Meatballs: With wet hands, take small portions of the mixture and roll them into balls approximately the size of a golf ball. Place the formed meatballs on a baking sheet lined with parchment paper. This will help keep them from sticking and make for easier handling.
- Brown the Meatballs: In a large skillet, heat the olive oil over medium heat. Once hot, add the meatballs in batches, making sure not to overcrowd the pan. Brown the meatballs on all sides, which should take about 5-7 minutes. This step adds flavor and texture to the meatballs.
- Prepare the Sauce: In the same skillet, after the meatballs are browned and removed, add the chopped onion and sauté until translucent, about 3-4 minutes. Stir in the canned crushed tomatoes, dried oregano, dried thyme, and season with salt and pepper. Bring the sauce to a simmer.
- Cook the Meatballs in Sauce: Gently add the browned meatballs back into the skillet with the sauce. Cover and let them simmer in the sauce for about 20-25 minutes, or until cooked through. This allows the meatballs to absorb the flavors of the sauce while remaining juicy.
- Serve: Once cooked, remove from heat and let it sit for a couple of minutes. Serve the Boulettes De Viande hot, garnished with additional parsley and paired with your choice of sides.
Extra Tips:
When preparing Boulettes De Viande, feel free to experiment with the herbs and spices to suit your taste. You can add a pinch of red pepper flakes for a slight kick or incorporate other fresh herbs like thyme or basil.
Additionally, letting the meatballs rest for a few minutes after cooking can enhance their flavor as they continue to absorb the sauce. If you have leftovers, they can be stored in the refrigerator for up to three days or frozen for later use, making this dish a great make-ahead option!
Caille Aux Pruneaux
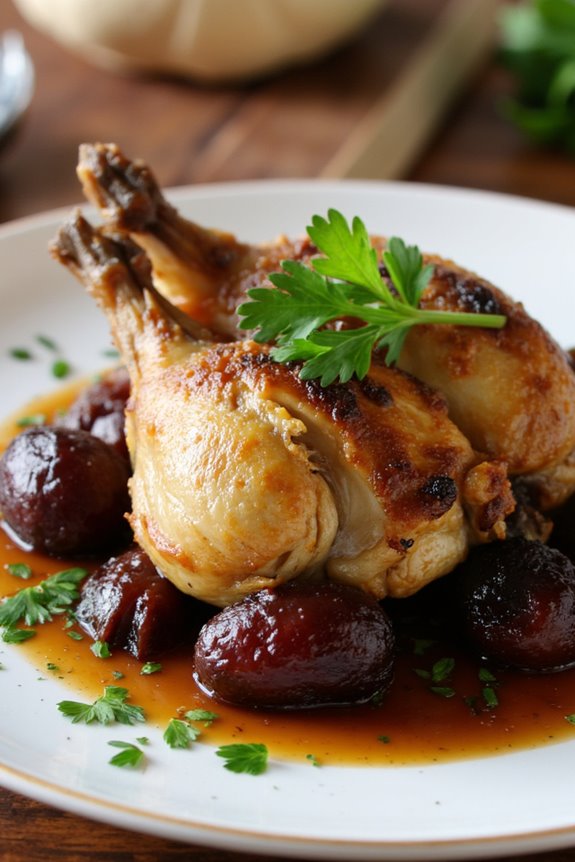
Caille aux Pruneaux, or quail with prunes, is a classic French dish that beautifully marries the rich and delicate flavors of bird with the sweetness of dried plums. This dish showcases the rustic charm of French cuisine, often prepared during special occasions or family gatherings. The succulent quail is slow-cooked to perfection, allowing the meat to absorb the sweet and savory notes of the prunes, resulting in a dish that isn’t only flavorful but also visually appealing.
To complement the quail, a simple yet elegant sauce can be created using the cooking juices, enhancing the overall dining experience. Served with a side of creamy polenta or roasted vegetables, Caille aux Pruneaux is sure to impress your guests and transport them to the heart of France with each bite. This recipe serves 4-6 people, making it ideal for a cozy dinner or festive celebration.
Ingredients:
- 4-6 quails, cleaned and prepared
- 200g dried prunes, pitted
- 1 onion, finely chopped
- 2 cloves of garlic, minced
- 2 tablespoons olive oil
- 1 cup red wine
- 1 cup chicken stock
- 2 tablespoons honey
- 1 teaspoon thyme leaves
- Salt and pepper to taste
- Fresh parsley for garnish
Cooking Instructions:
- Prepare the Quails: Begin by cleaning and preparing the quails. Rinse them under cold water and pat them dry with paper towels. Season the insides and outsides generously with salt and pepper. This step is essential to guarantee the meat is well-flavored.
- Sauté Aromatics: In a large skillet or Dutch oven, heat the olive oil over medium heat. Add the chopped onion and minced garlic, sautéing until they become translucent and fragrant, about 3-4 minutes. This will form the flavorful base of your dish.
- Brown the Quails: Increase the heat to medium-high and add the seasoned quails to the skillet, browning them on all sides for about 5-7 minutes. The goal is to achieve a golden color, which will enhance the flavor of the final dish.
- Add Prunes and Liquids: Once the quails are browned, add the dried prunes, red wine, chicken stock, honey, and thyme to the skillet. Stir to combine, guaranteeing that the prunes are evenly distributed around the quails. The wine and stock will deglaze the pan, lifting any flavorful bits stuck to the bottom.
- Simmer: Reduce the heat to low and cover the skillet with a lid. Allow the dish to simmer gently for 25-30 minutes, or until the quails are fully cooked and tender. Occasionally check the liquid level and add more stock if necessary to prevent burning.
- Serve: Once the quails are cooked, carefully transfer them to a serving platter. Drizzle the sauce over the quails and garnish with fresh parsley. Serve hot with your choice of side dish, such as polenta or seasonal vegetables.
Extra Tips:
To elevate the flavors of your Caille aux Pruneaux, consider marinating the quails in red wine and herbs for a few hours or overnight prior to cooking. This will infuse the meat with additional depth and complexity.
Additionally, feel free to experiment with other dried fruits like apricots or figs for a unique twist. Pairing the dish with a light-bodied red wine will also enhance the overall dining experience, making it a memorable meal for your guests.
Crêpes Suzette

Crêpes Suzette is a classic French dessert that showcases the delicate and versatile crêpe, paired with a spectacular orange-flavored sauce. Originating from the 19th century, this dish isn’t only a feast for the palate but also a visual delight, often flambéed at the table for a touch of theatrical flair.
The combination of buttery, sweet crêpes with a tangy citrus sauce makes for an unforgettable dining experience, perfect for impressing guests at a French-inspired dinner. The crêpes themselves are light and airy, while the Suzette sauce is a harmonious blend of orange juice, zest, and Grand Marnier or other orange liqueur.
Whether you’re serving them as a dessert or a special treat, Crêpes Suzette is bound to be a hit. With a bit of practice, anyone can master this elegant dish and bring a taste of France to their dining table.
Ingredients (Serves 4-6):
- 1 cup all-purpose flour
- 2 large eggs
- 1 ½ cups milk
- 2 tablespoons melted butter
- 2 tablespoons granulated sugar
- 1 teaspoon vanilla extract
- Pinch of salt
- ½ cup unsalted butter (for cooking crêpes)
- ¼ cup fresh orange juice
- Zest of 1 orange
- ¼ cup Grand Marnier or orange liqueur
- 2 tablespoons powdered sugar (for garnish)
Cooking Instructions:
1. Prepare the Crêpe Batter: In a mixing bowl, whisk together the flour, eggs, milk, melted butter, granulated sugar, vanilla extract, and salt until smooth. The batter should be somewhat thin and free of lumps.
Cover the bowl and let the batter rest for about 30 minutes at room temperature. This helps the gluten relax and results in more tender crêpes.
2. Cook the Crêpes: Heat a non-stick skillet or crêpe pan over medium heat. Add a small amount of butter to coat the bottom of the pan.
Pour in about ¼ cup of the crêpe batter, tilting the pan to spread the batter evenly into a thin layer. Cook for about 1-2 minutes until the edges start to lift and the bottom is lightly golden.
Flip the crêpe and cook for another minute on the other side. Transfer the cooked crêpe to a plate and cover with a kitchen towel to keep warm. Repeat the process until all batter is used.
3. Make the Suzette Sauce: In a small saucepan, melt ½ cup of unsalted butter over medium heat. Add the fresh orange juice and zest, stirring to combine.
Allow the mixture to simmer for a couple of minutes until slightly thickened. Carefully add the Grand Marnier or orange liqueur, and let it simmer for another minute.
If desired, you can flambé the sauce by carefully igniting the liqueur with a long lighter and allowing the flames to subside.
4. Fill and Fold the Crêpes: Take one crêpe and place it in the pan with the Suzette sauce. Fold it into quarters and let it soak in the sauce for a few seconds.
Repeat this process with the remaining crêpes, stacking them in the sauce to warm through.
5. Serve: Arrange the folded crêpes on serving plates, drizzling the remaining sauce over the top. Dust with powdered sugar for an elegant finish.
Serve immediately, and if desired, you can flambé the plates at the table for a dramatic presentation.
Extra Tips:
When preparing Crêpes Suzette, confirm that your batter is lump-free for a smooth texture. Letting the batter rest is key to achieving delicate crêpes.
You can also experiment with different liqueurs or citrus juices to customize the flavor to your liking. When flambéing, make sure your kitchen is well-ventilated and keep a safe distance from the flames.
Enjoy the process and the delightful aromas that fill your kitchen; making Crêpes Suzette is as much about the experience as it’s about the delicious end result!