

When it comes to ending a French meal, desserts are the perfect way to add a sweet touch. From the rich chocolate mousse to delicate macarons, each treat brings a bit of French charm to the table. The caramelized top of crème brûlée and the cozy feel of tarte Tatin are simply irresistible. Let’s take a look at these heavenly French desserts that are sure to make your dining experience unforgettable.
Chocolate Mousse
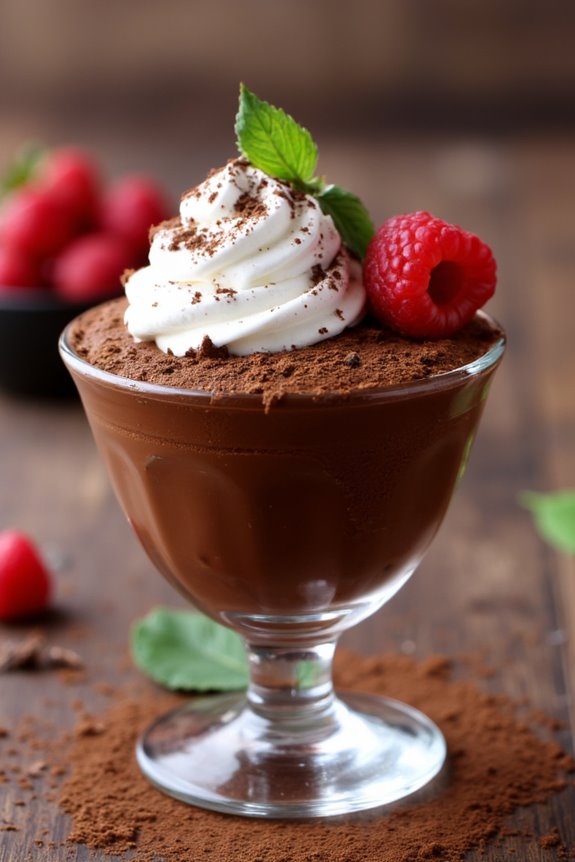
Chocolate mousse is a classic French dessert that combines the rich flavors of chocolate with a light and airy texture, making it an irresistible treat for any chocolate lover. This elegant dessert is often served in individual cups or bowls, allowing for a decadent presentation that’s bound to impress your guests.
The beauty of chocolate mousse lies not only in its taste but also in its simplicity, requiring just a handful of ingredients to achieve a luxurious result.
Making chocolate mousse at home can seem intimidating, but with the right technique, you can create a delightful dessert that rivals any restaurant offering. The key to a successful mousse is to whip the cream and egg whites to the perfect consistency, which creates the signature lightness of the dish. By folding the chocolate mixture carefully into the whipped cream and egg whites, you guarantee that your mousse maintains its airy texture while still being rich and chocolatey.
Ingredients (Serves 4-6)
- 200g dark chocolate (70% cocoa)
- 3 large eggs, separated
- 3 tablespoons granulated sugar
- 1 cup heavy cream
- 1 teaspoon vanilla extract
- Pinch of salt
Cooking Instructions
- Melt the Chocolate: Begin by breaking the dark chocolate into small pieces and placing it in a heatproof bowl. Set the bowl over a pot of simmering water, ensuring that the bottom of the bowl doesn’t touch the water (this is called a double boiler). Stir the chocolate occasionally until it’s completely melted and smooth. Remove from heat and let it cool slightly.
- Whip the Egg Whites: In a clean bowl, add the egg whites and a pinch of salt. Using an electric mixer, whip the egg whites on medium speed until they become frothy. Gradually add the granulated sugar while continuing to whip until stiff peaks form. This means that when you lift the beaters out of the mixture, the peaks stand straight up without collapsing.
- Prepare the Cream: In another bowl, pour the heavy cream and add the vanilla extract. Whip the cream until it reaches soft peaks. Be careful not to over-whip, as you want the cream to be light and fluffy, not grainy.
- Combine Chocolate and Egg Yolks: Once the melted chocolate has cooled slightly, whisk in the egg yolks until well combined. This will create a rich chocolate base.
- Fold in Cream and Egg Whites: Take a portion of the whipped cream and gently fold it into the chocolate mixture to lighten it. Then, carefully fold in the remaining whipped cream. Finally, add the whipped egg whites in three additions, folding gently after each addition until the mixture is uniform. Be cautious to not deflate the batter.
- Chill the Mousse: Spoon the mousse into individual serving cups or bowls and refrigerate for at least 2 hours, or until set. The chilling process allows the flavors to meld and the mousse to firm up.
- Serve: Once the mousse is set, you can garnish it with additional whipped cream, chocolate shavings, or fresh berries before serving. Enjoy your decadent chocolate mousse!
Extra Tips
For the best results, make sure all your equipment is clean and dry, particularly when whipping egg whites, as any grease can prevent them from whipping properly.
Use high-quality chocolate for a richer flavor, and feel free to experiment with different chocolate percentages to find your preferred taste. If you’re looking for a twist, consider adding a splash of liqueur, such as Grand Marnier or rum, to the chocolate mixture for an added depth of flavor. Enjoy creating this delightful French dessert!
Crème Brûlée
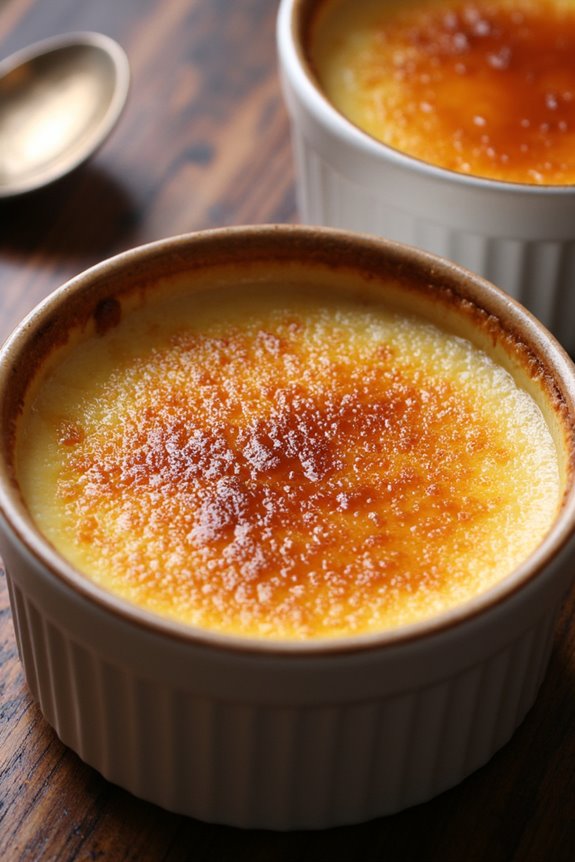
Crème Brûlée is a classic French dessert that’s adored for its creamy custard base and the satisfying crack of its caramelized sugar topping. This luxurious dessert is often served in individual ramekins, making it an elegant choice for dinner parties or special occasions.
The combination of rich vanilla flavor with the contrasting texture of the crunchy top creates a delightful experience for the palate. Once you master this recipe, you’ll find that it’s surprisingly simple to make and can be a show-stopping finale to any meal.
The beauty of Crème Brûlée lies in its versatility. While traditional recipes often use vanilla, you can infuse the custard with a variety of flavors, such as coffee, chocolate, or citrus.
The key to a perfect Crème Brûlée is achieving the right balance between the creamy custard and the perfectly caramelized sugar topping, which should be done just before serving for the best texture. Follow this recipe to create an impressive dessert that will leave your guests raving.
Ingredients (serving size: 4-6 people)
- 2 cups heavy cream
- 1 cup whole milk
- 5 large egg yolks
- 1/2 cup granulated sugar (plus extra for topping)
- 1 teaspoon pure vanilla extract
- Pinch of salt
Cooking Instructions
1. Preheat the Oven: Begin by preheating your oven to 325°F (160°C). This step is essential as it guarantees that the custard cooks evenly and gently, resulting in a silky texture.
2. Heat the Cream and Milk: In a medium saucepan, combine the heavy cream and whole milk. Place the saucepan over medium heat and heat the mixture until it’s steaming but not boiling, stirring occasionally. This will help to infuse the flavors into the custard.
3. Whisk the Egg Yolks and Sugar: In a separate bowl, whisk together the egg yolks, granulated sugar, and a pinch of salt until the mixture is pale and slightly thickened. This process helps to aerate the yolks, creating a lighter texture in the final custard.
4. Combine Mixtures: Slowly pour the hot cream and milk mixture into the egg yolk mixture, whisking continuously to avoid cooking the eggs. Add the vanilla extract and mix until fully incorporated. This step is critical to guarantee a smooth custard without any lumps.
5. Strain the Custard: To achieve an ultra-smooth texture, strain the custard mixture through a fine mesh sieve into a clean bowl or measuring jug. This will remove any cooked egg bits and guarantee a silky finish.
6. Prepare Ramekins: Place your ramekins in a baking dish. Carefully pour the custard mixture into each ramekin, filling them about three-quarters full. This will allow space for the sugar topping later on.
7. Create a Water Bath****: Fill the baking dish with hot water until it reaches halfway up the sides of the ramekins. This water bath will help to cook the custard evenly and prevent it from cracking.
8. Bake: Transfer the baking dish to the preheated oven and bake for 30-35 minutes, or until the custards are set but still slightly jiggly in the center. Remove from the oven and let them cool in the water bath for about 10 minutes before transferring them to the refrigerator to chill for at least 2 hours or overnight.
9. Caramelize the Sugar: Once the custards are thoroughly chilled, remove them from the fridge. Sprinkle a thin, even layer of granulated sugar over the top of each custard. Using a kitchen torch, Caramelize the Sugar until it melts and turns golden brown.
If you don’t have a torch, you can place the ramekins under a broiler for about 1-2 minutes, watching closely to avoid burning.
10. Serve: Allow the Crème Brûlée to sit for a minute or two to let the sugar harden before serving. Enjoy your delicious creation!
Extra Tips
To achieve the perfect Crème Brûlée, verify that your ingredients are at room temperature, as this will help the custard to cook evenly.
When caramelizing the sugar, move the torch in circular motions to achieve an even layer without burning. If you prefer not to use a torch, be cautious with the broiler, as it can burn the sugar quickly.
Finally, consider experimenting with different flavor infusions by adding herbs, spices, or citrus zest to the cream mixture for a unique twist on this classic dessert.
Tarte Tatin
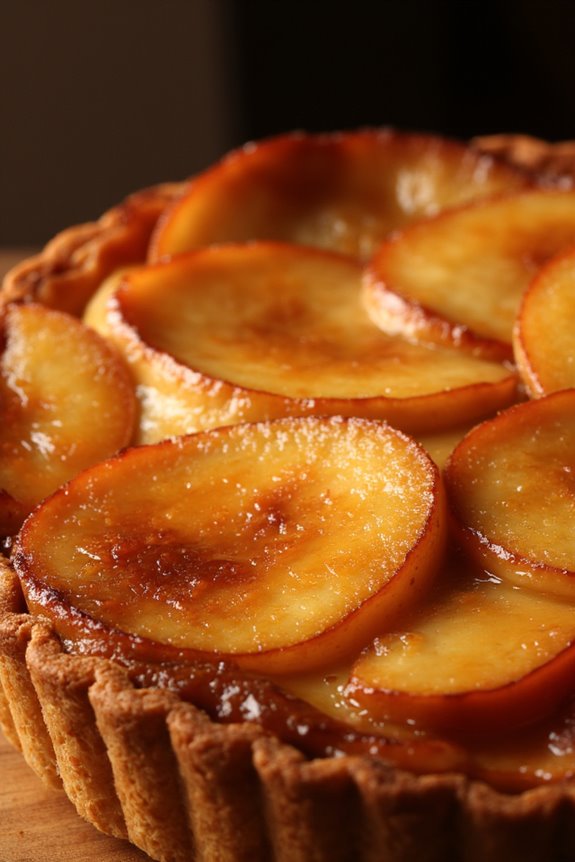
Tarte Tatin is a classic French dessert that showcases the beauty of caramelized apples, all perfectly encased in a flaky pastry. This upside-down tart is said to have originated in the late 19th century at the Tatin sisters’ hotel in Lamotte-Beuvron, France. The story goes that one of the sisters accidentally created this delightful dish when she mistakenly cooked the apples in butter and sugar before placing the pastry on top. The result was a deliciously rich and sweet dessert that has since become a staple in French cuisine.
The beauty of Tarte Tatin lies in its simplicity and the balance of flavors. The sweet, tender apples caramelize beautifully, creating a deep, rich flavor that pairs wonderfully with the buttery pastry. When inverted, the tart reveals a stunning presentation, making it a perfect dessert for any occasion. Serve it warm with a scoop of vanilla ice cream or a dollop of crème fraîche for an indulgent treat.
Ingredients (serves 4-6):
- 6 medium-sized apples (such as Granny Smith or Honeycrisp)
- 100g unsalted butter
- 150g granulated sugar
- 1 teaspoon vanilla extract
- 1 sheet of puff pastry (about 250g)
- A pinch of salt
- Optional: cinnamon or nutmeg for extra flavor
Cooking Instructions:
- Prepare the Apples: Peel, core, and slice the apples into quarters. This will help them cook evenly and make them easier to arrange in the tart. Set aside in a bowl, and if desired, toss them with a pinch of cinnamon or nutmeg for added flavor.
- Make the Caramel: In a heavy, oven-safe skillet (preferably cast iron), melt the butter over medium heat. Once melted, add the sugar and stir constantly until the mixture begins to bubble and turns a light amber color. Be careful not to let it burn, as this will affect the final flavor of the tart.
- Add the Apples: Once the caramel is ready, carefully arrange the apple quarters in the skillet, standing them upright in a circular pattern. Cook the apples in the caramel for about 10-15 minutes, turning occasionally, until they’re slightly softened and well-coated in the caramel.
- Preheat the Oven: While the apples are cooking, preheat your oven to 190°C (375°F). This step guarantees that your Tarte Tatin bakes evenly and achieves a lovely golden-brown color.
- Top with Pastry: Roll out the puff pastry on a lightly floured surface to fit the size of your skillet. Once rolled out, carefully place the pastry over the apples, tucking the edges down around the apples to create a seal. This will help the pastry cook evenly and keep the apples in place.
- Bake the Tart: Transfer the skillet to the preheated oven and bake for about 25-30 minutes, or until the pastry is golden brown and puffed up. Keep an eye on it to prevent over-browning.
- Invert the Tart: After baking, remove the skillet from the oven and let it cool for about 5 minutes. Using a large plate, carefully invert the tart onto the plate, allowing the caramelized apples to be on top. Be cautious, as the caramel will be hot and may spill.
- Serve: Allow the Tarte Tatin to cool slightly before slicing and serving. It’s delicious warm, and you can accompany it with crème fraîche or vanilla ice cream for a delightful dessert experience.
Extra Tips:
When making Tarte Tatin, choose apples that hold their shape well during cooking, such as Granny Smith or Honeycrisp, to guarantee that they don’t turn mushy.
Additionally, keep a close eye on the caramel to prevent burning; a light amber color is ideal. If you’re looking for a twist, consider adding a splash of Calvados (apple brandy) to the caramel for an extra depth of flavor.
Finally, serving the tart warm will enhance the flavors and create a wonderfully comforting dessert.
Macarons
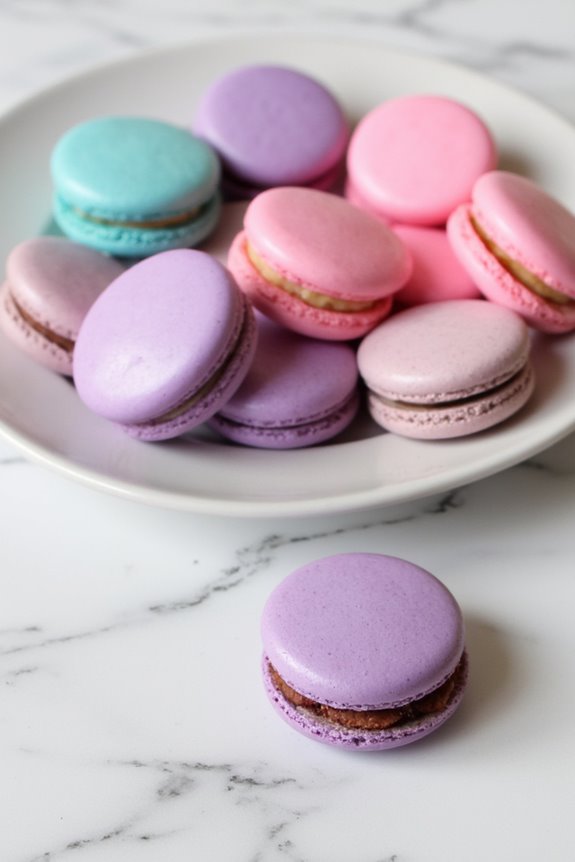
Macarons are delicate French meringue-based confections that have taken the culinary world by storm. With their smooth, glossy shells and soft, chewy interiors, these delightful treats come in a variety of flavors and colors, making them not only a delicious dessert but also a feast for the eyes.
The combination of almond flour, egg whites, and sugar creates a light and airy texture, while the filling can range from buttercream to ganache or jam, allowing for endless creative possibilities.
Making macarons can be a bit of a challenge, but with patience and practice, anyone can master the art of this elegant dessert. The key to successful macarons lies in the precision of measurements and the technique used in folding the batter.
Once you’ve grasped the basics, you can experiment with different flavors and fillings, turning these beautiful sweets into a personalized masterpiece. So, let’s get started on crafting your very own macarons!
Ingredients (Serves 4-6 people)
- 1 cup (100g) almond flour
- 1 ¾ cups (200g) powdered sugar
- 3 large egg whites (about 100g), aged at room temperature
- ¼ cup (50g) granulated sugar
- ½ teaspoon vanilla extract
- A pinch of salt
- Food coloring (optional)
- Filling of your choice (e.g., buttercream, ganache, or jam)
Cooking Instructions
- Prepare the Baking Sheet: Preheat your oven to 300°F (150°C). Line two baking sheets with parchment paper. To create perfect circles, you can trace circles onto the parchment paper using a pencil and then flip the paper over. This will give you guides for piping the macarons.
- Sift the Dry Ingredients: In a medium bowl, sift together the almond flour and powdered sugar to eliminate any lumps. This step is essential as it helps create a smooth macaron shell.
- Whip the Egg Whites: In a clean, dry mixing bowl, whisk the egg whites with a pinch of salt using an electric mixer. Gradually add the granulated sugar once the egg whites become frothy. Continue to beat until stiff peaks form and the mixture is glossy. If you’re using food coloring, add it at this stage.
- Fold the Mixture: Gently fold the sifted almond flour and powdered sugar mixture into the whipped egg whites. Use a spatula to fold the mixture carefully, being mindful not to deflate the egg whites. The batter is ready when it flows like lava and forms a ribbon when you lift it.
- Pipe the Macarons: Transfer the batter to a piping bag fitted with a round tip. Pipe even circles onto the prepared baking sheets, using the templates as a guide. Leave some space between each macaron as they’ll spread slightly.
- Rest the Macarons: Let the piped macarons sit at room temperature for 30 to 60 minutes, until they form a skin and are no longer sticky to the touch. This step is important for achieving the characteristic “foot” of the macaron.
- Bake: Bake the macarons in the preheated oven for 15-20 minutes, rotating the trays halfway through for even baking. They’re done when they’ve risen and have a firm shell. Allow them to cool completely on the baking sheets.
- Fill the Macarons: Once cooled, carefully remove the shells from the parchment paper. Pipe your desired filling onto the flat side of half of the shells and sandwich them with the remaining shells.
- Mature the Macarons: For the best flavor and texture, store the filled macarons in an airtight container in the refrigerator for at least 24 hours before serving.
Extra Tips
When making macarons, it’s vital to use aged egg whites, as they whip up better and provide the desired structure. Additionally, all tools and bowls should be free of grease to guarantee the egg whites whip properly.
Don’t rush the resting phase; it’s essential for forming the skin that helps achieve that beautiful foot. Finally, practice makes perfect—don’t be discouraged by initial attempts, as macarons can take a bit of time to master! Enjoy the process and have fun experimenting with different flavors and colors.
Profiteroles
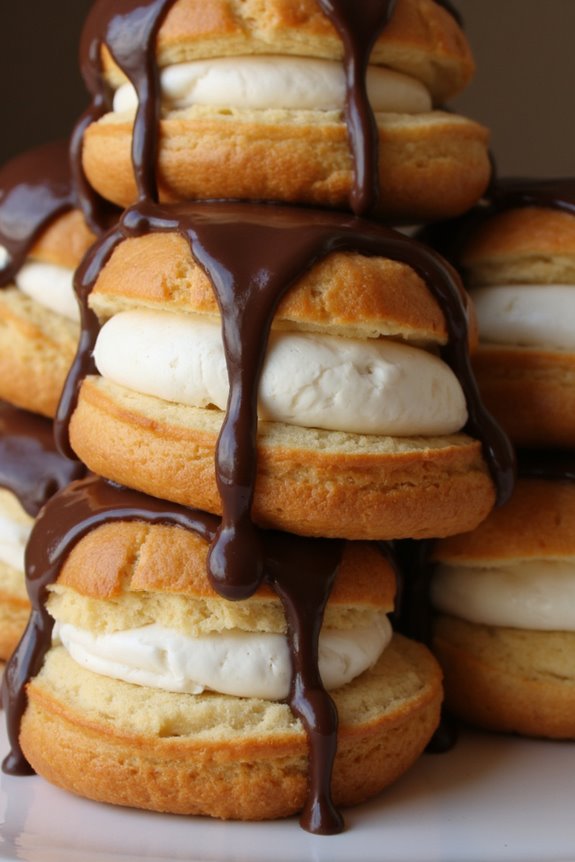
Profiteroles, also known as cream puffs, are a delightful French dessert that consists of choux pastry filled with cream and topped with rich chocolate sauce. The light and airy texture of the pastry combined with the smooth, creamy filling creates a perfect balance of flavors and textures that’s hard to resist.
Whether served at a dinner party or enjoyed as a special treat, profiteroles are sure to impress anyone who tastes them.
Making profiteroles may seem intimidating, but with the right technique, they can be a fun and rewarding project. The dough is made from simple ingredients, and the filling can be customized to your liking, whether you prefer whipped cream, pastry cream, or even ice cream.
With a bit of patience and attention to detail, you’ll create an elegant dessert that showcases your culinary skills.
Ingredients (Serves 4-6)
- 1 cup water
- 1/2 cup unsalted butter
- 1 cup all-purpose flour
- 1/4 teaspoon salt
- 4 large eggs
- 1 cup heavy cream
- 1 tablespoon powdered sugar
- 1 teaspoon vanilla extract
- 1 cup semisweet chocolate chips
- 1/2 cup heavy cream (for chocolate sauce)
Cooking Instructions
- Prepare the Choux Pastry: In a medium saucepan, bring the water and butter to a boil over medium heat. Once boiling, add the flour and salt all at once, stirring quickly until the mixture forms a ball and pulls away from the sides of the pan. This should take about 2-3 minutes.
- Incorporate the Eggs: Remove the saucepan from heat and let the mixture cool for a few minutes. Once slightly cooled, add the eggs one at a time, mixing well after each addition until the dough is smooth and glossy. The mixture should be thick but still pipeable.
- Pipe the Profiteroles: Preheat your oven to 400°F (200°C). Line a baking sheet with parchment paper. Using a piping bag or a spoon, pipe small mounds of dough (about the size of a golf ball) onto the prepared baking sheet, leaving space between each mound to allow for expansion.
- Bake the Profiteroles: Bake in the preheated oven for 20-25 minutes, or until the profiteroles are golden brown and puffed up. Avoid opening the oven door during baking, as this can cause them to collapse. Once baked, remove them from the oven and let them cool on a wire rack.
- Prepare the Filling: In a mixing bowl, whip the heavy cream with powdered sugar and vanilla extract until soft peaks form. Once the profiteroles are completely cooled, use a small knife to make a slit in the side of each puff and fill them with the whipped cream.
- Make the Chocolate Sauce: In a small saucepan, heat 1/2 cup of heavy cream until just boiling. Pour over the chocolate chips in a bowl and let sit for a minute. Stir until smooth and fully combined to create a glossy chocolate sauce.
- Assemble the Dessert: Drizzle the warm chocolate sauce over the filled profiteroles just before serving, or serve the sauce on the side for dipping.
Extra Tips
When making profiteroles, it’s vital to guarantee that the dough is well-mixed and has the right consistency; it should be thick enough to hold its shape but still pipeable.
Always allow the profiteroles to cool completely before filling them to prevent the cream from melting or becoming runny. For added flavor, consider infusing the whipped cream with a bit of espresso or citrus zest.
Finally, remember that profiteroles can be made ahead of time; simply fill and coat them with chocolate sauce just before serving for the best results.
Clafoutis
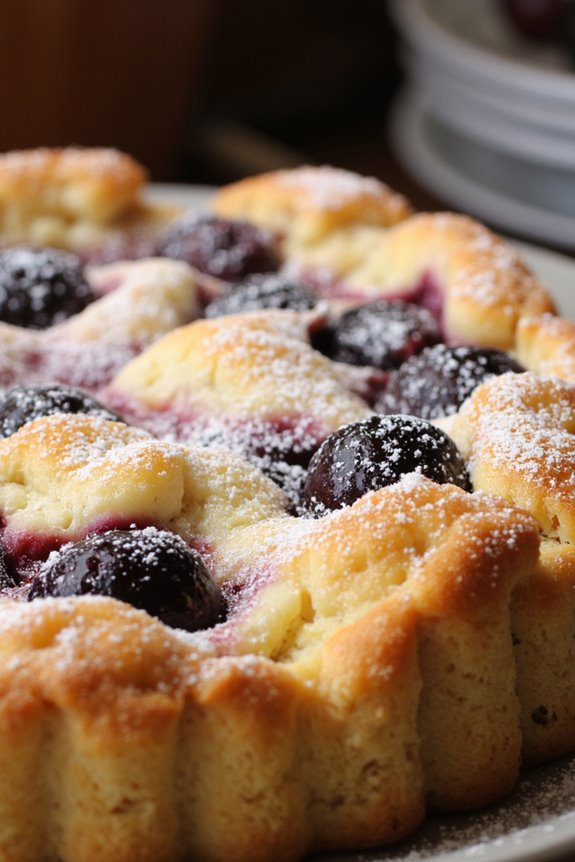
Clafoutis is a traditional French dessert that originates from the Limousin region, famous for its unique combination of fruit and a custard-like batter. Traditionally made with black cherries, this dish isn’t only simple to prepare but also delivers an unforgettable taste that captures the essence of rustic French baking. The result is a delightful, cake-like texture that’s both light and rich, making it a perfect ending to any meal or a sweet snack during the day.
This versatile dessert can be adapted with a variety of fruits, such as plums, apricots, or even berries, allowing you to customize it according to your preference or the seasonal fruits available. Regardless of the fruit you choose, clafoutis is usually served warm or at room temperature, often dusted with powdered sugar for an elegant finish. Its delightful custardy texture and fruity sweetness will leave you wanting more with each bite.
Ingredients (Serves 4-6):
- 2 cups fresh black cherries (pitted)
- 3 large eggs
- 1 cup whole milk
- 1/2 cup granulated sugar
- 1 teaspoon vanilla extract
- 1/4 teaspoon salt
- 1 cup all-purpose flour
- 2 tablespoons unsalted butter (melted)
- Powdered sugar (for dusting)
Cooking Instructions:
- Preheat the Oven: Start by preheating your oven to 350°F (175°C). This guarantees that your clafoutis bakes evenly and develops a nice golden crust.
- Prepare the Baking Dish: Grease a pie dish or a 9-inch round baking dish with butter. This will prevent the clafoutis from sticking to the dish during baking and will help in getting a nice golden edge.
- Prepare the Cherries: Wash the black cherries thoroughly and remove the pits. Arrange the pitted cherries evenly at the bottom of the greased baking dish.
- Make the Batter: In a mixing bowl, whisk together the eggs, granulated sugar, vanilla extract, and salt until well combined. Gradually add in the flour, whisking until smooth. Then, slowly incorporate the milk and melted butter, continuing to whisk until the batter is homogenous and free of lumps.
- Combine and Pour: Pour the batter over the arranged cherries in the baking dish, ensuring that the cherries are evenly distributed throughout the mixture.
- Bake the Clafoutis: Place the dish in the preheated oven and bake for about 35-40 minutes, or until the clafoutis is puffed up and golden brown around the edges. A toothpick inserted into the center should come out clean.
- Cool and Serve: Once baked, remove the clafoutis from the oven and allow it to cool for a few minutes. Dust with powdered sugar before serving. It can be enjoyed warm or at room temperature.
Extra Tips:
For a twist on the classic clafoutis, consider adding a splash of almond extract for a nutty flavor or a tablespoon of lemon zest to brighten the taste. You can also experiment with different fruits, keeping in mind that fruits with higher moisture content may require slightly longer baking times.
Finally, serve your clafoutis with a dollop of crème fraîche or a scoop of vanilla ice cream for an extra indulgent treat. Enjoy!
Soufflé Au Chocolat
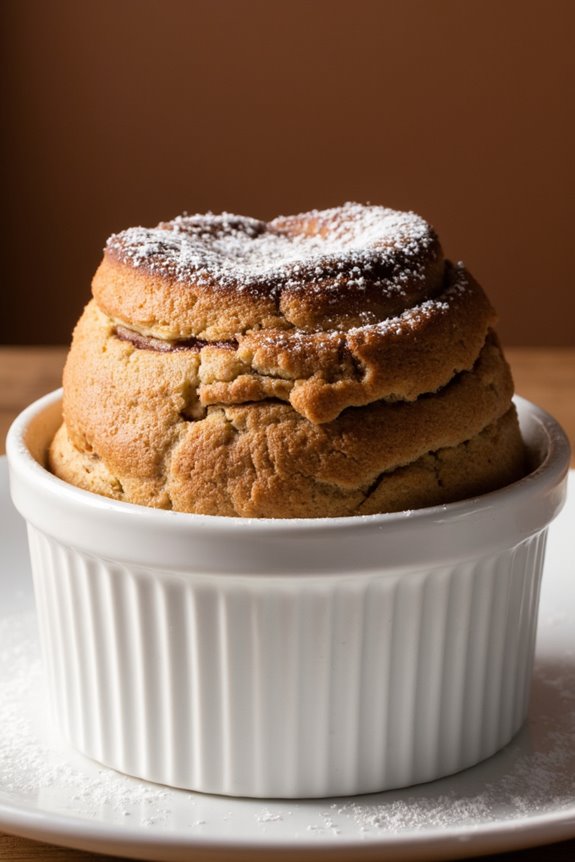
Soufflé au Chocolat is a classic French dessert that captures the essence of indulgence and elegance. Known for its light and airy texture, this chocolate soufflé is a perfect way to impress guests or treat yourself after a long day. The magic of the soufflé lies in its ability to rise beautifully in the oven, creating a delicate outer crust while maintaining a rich, molten center. With a balance of chocolate and sugar, it’s a dessert that’s certain to satisfy any sweet tooth, making it a favorite in French cuisine.
Creating a soufflé au chocolat may seem intimidating, but with the right technique and a little care, anyone can master this delightful dish. The key is to properly whip the egg whites to stiff peaks and gently fold them into the chocolate mixture, preserving the airiness that gives the soufflé its signature height. Follow this recipe to bring a taste of France into your home, and enjoy the delectable results of your culinary efforts.
Ingredients (serves 4-6):
- 6 ounces (170g) dark chocolate (70% cocoa)
- 3 tablespoons unsalted butter, plus extra for greasing
- 4 large eggs, separated
- 1/2 cup (100g) granulated sugar
- 1 teaspoon vanilla extract
- A pinch of salt
- Powdered sugar, for dusting (optional)
Cooking Instructions:
- Preheat the Oven: Start by preheating your oven to 375°F (190°C). This guarantees that the soufflés will cook evenly and rise properly when placed in the hot oven.
- Prepare the Ramekins: Generously butter four to six ramekins (depending on your serving size) and dust them with granulated sugar. This prevents the soufflé from sticking and helps it rise evenly. Tap out any excess sugar.
- Melt the Chocolate: In a heatproof bowl, combine the dark chocolate and butter. Set it over a pot of simmering water (a double boiler) and stir until melted and smooth. Remove from heat and let it cool slightly.
- Whip Egg Yolks: In a separate bowl, whisk the egg yolks with half of the granulated sugar (1/4 cup) and the vanilla extract until the mixture becomes pale and creamy. This helps to incorporate air into the yolks, contributing to the soufflé’s texture.
- Combine Mixtures: Gradually add the melted chocolate mixture to the egg yolk mixture, stirring gently until fully combined. Be careful not to overmix, as you want to maintain the airiness.
- Whip Egg Whites: In a clean bowl, whip the egg whites and a pinch of salt until soft peaks form. Gradually add the remaining sugar (1/4 cup) and continue whipping until stiff peaks form. This step is essential for achieving the soufflé’s airy texture.
- Fold in Egg Whites: Gently fold one-third of the whipped egg whites into the chocolate mixture to lighten it. Then, carefully fold in the remaining egg whites in two additions, using a spatula. Aim to keep as much air in the mixture as possible.
- Fill Ramekins: Spoon the soufflé mixture into the prepared ramekins, filling them about three-quarters full. Run your thumb around the edge of each ramekin to help the soufflé rise evenly.
- Bake: Place the ramekins in the preheated oven and bake for about 12-15 minutes, or until the soufflés have risen and are slightly firm to the touch. Keep an eye on them, as baking times may vary.
- Serve Immediately: Once baked, remove the soufflés from the oven and dust with powdered sugar if desired. Serve immediately, as they’ll begin to deflate shortly after being taken out.
Extra Tips:
When making soufflé au chocolat, room temperature ingredients work best, as they blend more easily and help create a smoother batter. For added flavor, consider mixing in a splash of espresso or a hint of orange zest to the melted chocolate.
Always serve soufflés fresh out of the oven for the best texture; reheating will cause them to lose their signature fluffiness. Enjoy the rich, chocolatey delight of your homemade soufflé!
Panna Cotta
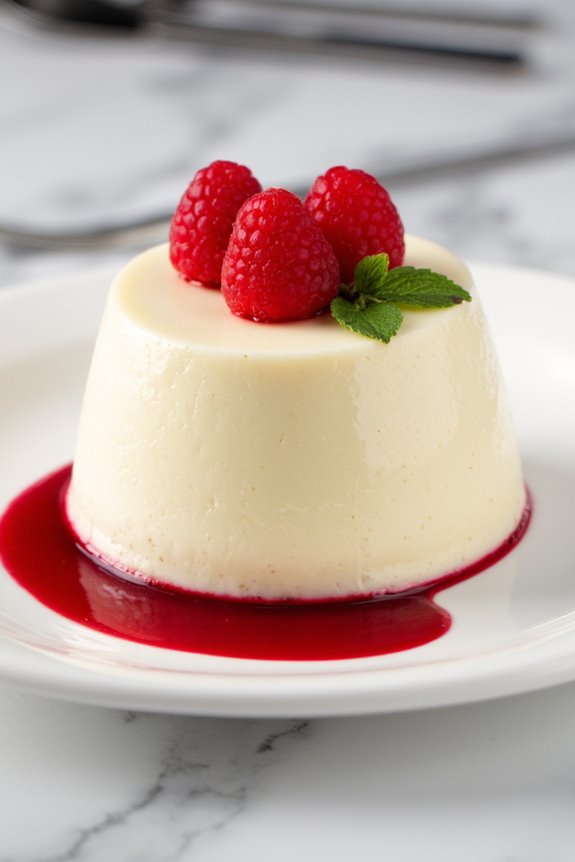
Panna Cotta, which translates to “cooked cream” in Italian, is a classic French dessert that boasts a creamy, silky texture and a delightful vanilla flavor. This dessert is incredibly versatile and can be paired with a variety of sauces, fruits, or coulis, making it a favorite among pastry chefs and home cooks alike.
Its simplicity in preparation and elegant presentation makes it a perfect choice for dinner parties or special occasions, allowing you to impress your guests without spending hours in the kitchen.
The base of Panna Cotta is made with heavy cream, sugar, and gelatin, which gives it that signature wobbly consistency. Once set, it can be served with berries, chocolate sauce, or a revitalizing citrus coulis to enhance its flavor. The recipe below yields a delicious Panna Cotta that serves 4-6 people, making it an ideal treat to share with friends and family.
Ingredients (Serves 4-6):
- 2 cups heavy cream
- 1/2 cup whole milk
- 1/2 cup granulated sugar
- 1 tablespoon gelatin powder
- 3 tablespoons cold water
- 1 teaspoon pure vanilla extract
- A pinch of salt
Cooking Instructions:
- Bloom the Gelatin: In a small bowl, combine the gelatin powder with cold water. Allow it to sit for about 5-10 minutes until the gelatin absorbs the water and swells, forming a gel-like consistency.
- Heat the Cream Mixture: In a medium saucepan, combine the heavy cream, whole milk, granulated sugar, and a pinch of salt. Place the saucepan over medium heat and stir occasionally until the mixture is warm but not boiling. This should take about 5 minutes.
- Incorporate the Gelatin: Once the cream mixture is warm, remove it from the heat. Add the bloomed gelatin to the warm cream and whisk until the gelatin is completely dissolved. Make sure there are no lumps.
- Add Vanilla: Stir in the pure vanilla extract to the mixture, guaranteeing it’s evenly distributed. This will infuse the Panna Cotta with a lovely vanilla flavor.
- Pour into Molds: Carefully pour the cream mixture into individual ramekins or molds. If you want to unmold the Panna Cotta later, lightly grease the molds with cooking spray.
- Chill: Cover the ramekins with plastic wrap and place them in the refrigerator. Allow the Panna Cotta to chill for at least 4 hours, or until it’s fully set. For best results, you can leave it overnight.
- Serve: Once set, remove the Panna Cotta from the molds by gently running a knife around the edges if needed. Invert onto a plate, or serve straight from the ramekins. Top with your choice of fruit, sauce, or coulis before serving.
Extra Tips:
When making Panna Cotta, it’s crucial to confirm that the gelatin is completely dissolved in the warm cream mixture to avoid any lumps in the final dessert.
If you wish to add a twist to the flavor, consider infusing the cream with herbs like lavender or mint while heating it, and strain it before adding the gelatin.
Always serve Panna Cotta chilled, as this enhances its creamy texture and flavor. Don’t hesitate to get creative with toppings; fresh berries, caramel sauce, or a dusting of cocoa powder can elevate this classic dessert to new heights!
Éclairs
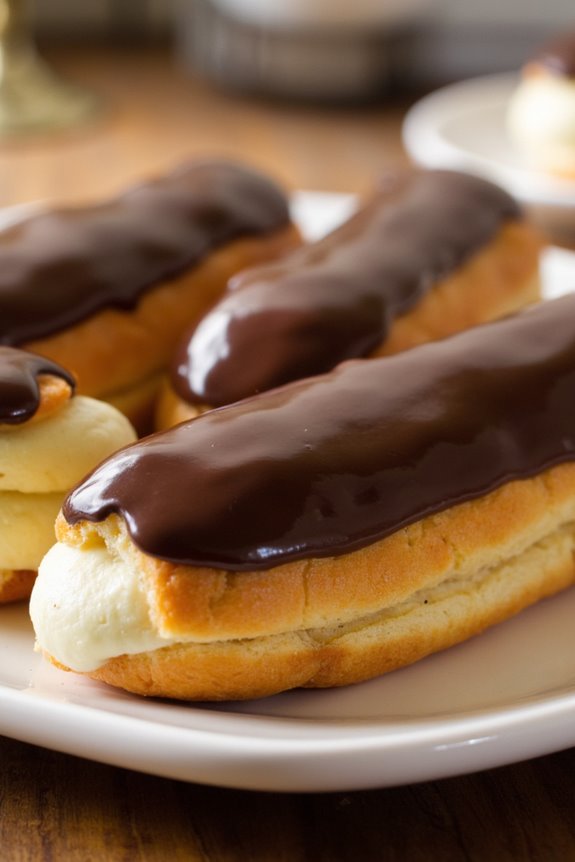
Éclairs are a classic French pastry that consists of a light and airy choux pastry filled with a rich cream and topped with a glossy icing. Traditionally, éclairs are filled with pastry cream, but variations can include whipped cream or mousse. The name “éclair” means “flash” in French, which is said to refer to the speed with which they’re eaten.
They’re a favorite among pastry lovers for their elegant appearance and delightful taste.
Making éclairs at home may seem intimidating, but with a little patience and practice, you can create these delightful pastries that will impress your family and friends. The key to a perfect éclair lies in the choux pastry, which puffs up beautifully when baked, creating a hollow center that can be filled with delicious cream.
Once you master the technique, you’ll be able to customize your éclairs with different fillings and toppings to suit your taste.
Ingredients (Serves 4-6 people)
- 1 cup water
- 1/2 cup unsalted butter
- 1 teaspoon sugar
- 1/4 teaspoon salt
- 1 cup all-purpose flour
- 4 large eggs
- 2 cups pastry cream (vanilla or chocolate)
- 1 cup dark chocolate (for ganache topping)
- 1/2 cup heavy cream (for ganache)
Cooking Instructions
- Prepare the Choux Pastry: In a medium saucepan, combine the water, butter, sugar, and salt. Bring to a boil over medium heat. Once the butter has melted, remove the pan from heat and stir in the flour all at once. Return to medium heat, stirring constantly until the mixture forms a ball that pulls away from the sides of the pan, about 1-2 minutes.
- Add the Eggs: Transfer the dough to a mixing bowl and allow it to cool for a few minutes. Once slightly cooled, add the eggs one at a time, mixing well after each addition until the dough is smooth and glossy.
- Pipe the Éclairs: Preheat your oven to 425°F (220°C). Line a baking sheet with parchment paper. Transfer the choux pastry to a piping bag fitted with a large round tip. Pipe 4-5 inch long strips onto the prepared baking sheet, leaving space between each one.
- Bake the Éclairs: Bake the éclairs in the preheated oven for 15 minutes. After 15 minutes, reduce the temperature to 375°F (190°C) and bake for an additional 10-15 minutes or until they’re golden brown and puffed. Turn off the oven and let the éclairs cool inside with the door slightly ajar for about 10 minutes.
- Make the Ganache: While the éclairs are cooling, prepare the ganache by heating the heavy cream in a small saucepan until just simmering. Pour the hot cream over the chopped chocolate in a bowl and let it sit for a minute. Stir until the chocolate is completely melted and smooth.
- Fill the Éclairs: Once the éclairs are completely cool, use a small knife to make a slit in the side of each éclair. Fill a piping bag with the pastry cream and pipe it into each éclair until filled.
- Glaze the Éclairs: Dip the top of each filled éclair in the chocolate ganache or use a spoon to drizzle it over the top. Allow the ganache to set before serving.
Extra Tips
When making éclairs, it’s essential not to open the oven door while they’re baking, as this can cause them to collapse.
To guarantee the éclairs are fully cooked, they should be a deep golden brown and feel light when lifted. If you’re looking to experiment, consider adding flavor to your pastry cream or ganache, such as orange zest or espresso powder, to give your éclairs a unique twist.
Enjoy your homemade éclairs fresh, as they’re best eaten the same day they’re made!
Madeleines
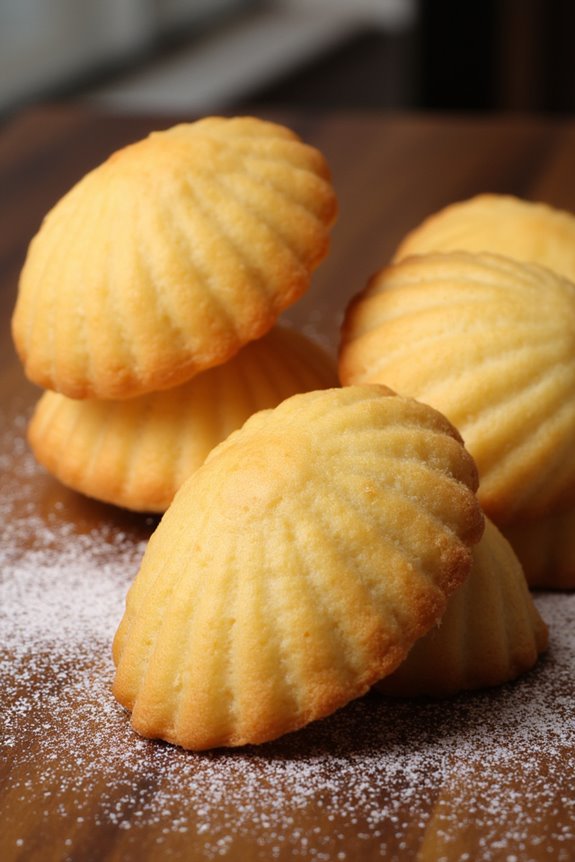
Madeleines are delightful French sponge cakes that are characterized by their distinctive shell shape. Originating from the Lorraine region of France, these tender little cakes are often enjoyed with tea or coffee. Their light, airy texture and subtle flavors make them a beloved treat, perfect for any occasion.
Traditionally flavored with lemon or almond, madeleines are a versatile dessert that can be customized with various extracts and additions, such as chocolate or lavender.
Making madeleines at home is easier than you might think, and the results are incredibly rewarding. With just a few simple ingredients, you can create a batch of these delectable treats that will impress your family and friends.
The key to achieving the perfect madeleine lies in the technique, particularly in the resting of the batter and the baking temperature. Follow this recipe, and you’ll be on your way to baking light and fluffy madeleines that are bound to become a favorite in your household.
Ingredients (Serves 4-6)
- 1 cup all-purpose flour
- 1/2 teaspoon baking powder
- 1/4 teaspoon salt
- 1/2 cup unsalted butter, melted and cooled
- 2 large eggs
- 2/3 cup granulated sugar
- 1 teaspoon vanilla extract
- Zest of 1 lemon
- Powdered sugar, for dusting (optional)
Instructions
- Preheat the Oven: Begin by preheating your oven to 375°F (190°C). This temperature is vital for achieving the signature puff of the madeleines as they bake.
- Prepare the Pan: Grease a madeleine pan with butter and lightly dust it with flour. This guarantees that the madeleines will easily release from the pan once baked. If you have a silicone madeleine pan, you can skip this step.
- Combine Dry Ingredients: In a mixing bowl, sift together the all-purpose flour, baking powder, and salt. This helps to aerate the flour, confirming your madeleines will be light and fluffy.
- Whisk Eggs and Sugar: In a separate large bowl, whisk together the eggs and granulated sugar until the mixture is pale and fluffy. This process incorporates air, which will help the madeleines rise during baking.
- Add Flavorings: Stir in the melted butter, vanilla extract, and lemon zest into the egg and sugar mixture. Confirm the butter has cooled slightly before adding it to prevent cooking the eggs.
- Incorporate Dry Ingredients: Gradually fold the dry ingredients into the wet mixture using a spatula. Be gentle to avoid deflating the batter, mixing only until just combined.
- Rest the Batter: Cover the bowl with plastic wrap and refrigerate the batter for at least 30 minutes. This resting period allows the gluten to relax and enhances the texture of the madeleines.
- Fill the Pan: Remove the batter from the fridge and spoon it into the prepared madeleine pan, filling each shell cavity about three-quarters full.
- Bake: Place the pan in the preheated oven and bake for 10-12 minutes, or until the madeleines are golden brown and spring back when lightly touched.
- Cool and Serve: Once baked, remove the pan from the oven and allow the madeleines to cool in the pan for about 2 minutes before transferring them to a wire rack to cool completely. Dust with powdered sugar before serving, if desired.
Extra Tips
To confirm your madeleines have the perfect rise, make sure to chill your batter before baking. The temperature difference between the cold batter and the hot oven creates steam, which helps the madeleines puff up beautifully.
Also, experiment with different flavorings and additions, such as chocolate chips or orange zest, to make each batch unique.
Finally, enjoy your madeleines fresh, as they’re best eaten the same day they’re made, but they can be stored in an airtight container for a couple of days.
Financier
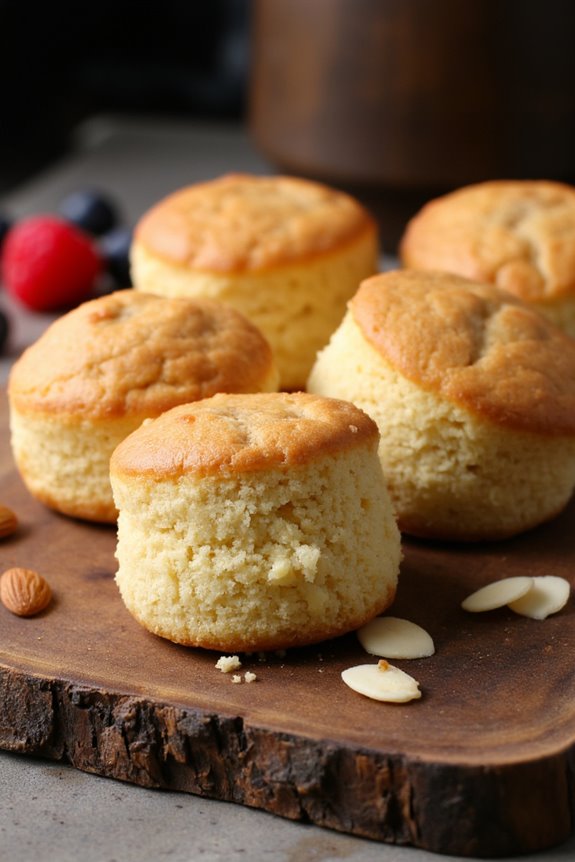
Financier is a classic French dessert that’s known for its moist, almond-infused texture and delicate crumb. These little almond cakes are light, airy, and incredibly easy to prepare, making them a popular choice for both novice bakers and seasoned pastry chefs. Often enjoyed with a cup of coffee or tea, financiers are the perfect sweet treat for any occasion. Their distinct shape, typically rectangular, resembles a gold bar, which is believed to be the origin of their name.
The beauty of the financier lies in its versatility. While the traditional recipe calls for almond flour, you can easily customize them by incorporating different flavors such as chocolate, fruits, or spices. These delightful cakes aren’t only delicious but also a fantastic way to use up egg whites left over from other recipes. With just a few simple ingredients and a bit of technique, you can impress your friends and family with these elegant French delights.
Ingredients (Serves 4-6)
- 100 g unsalted butter
- 100 g powdered sugar
- 50 g all-purpose flour
- 50 g almond flour
- 4 egg whites
- 1/2 tsp vanilla extract
- A pinch of salt
- Optional: sliced almonds or berries for garnish
Cooking Instructions
- Preheat the Oven: Start by preheating your oven to 190°C (375°F). This guarantees that the financiers bake evenly and develop a nice golden crust.
- Prepare the Baking Molds: Grease your financier molds or mini loaf pans with butter or line them with parchment paper. This will prevent the cakes from sticking and help them come out easily once baked.
- Brown the Butter: In a small saucepan, melt the unsalted butter over medium heat. Continue to cook it until it turns a golden brown color and emits a nutty aroma, about 5-7 minutes. Be careful not to let it burn. Once browned, remove the butter from heat and let it cool slightly.
- Mix Dry Ingredients: In a mixing bowl, sift together the powdered sugar, all-purpose flour, almond flour, and a pinch of salt. This step aerates the flour and guarantees there are no lumps in your batter.
- Whip the Egg Whites: In another bowl, beat the egg whites using a whisk or electric mixer until they’re frothy but not stiff. This helps to incorporate air into the batter, giving the financiers their light texture.
- Combine Ingredients: Gently fold the dry mixture into the whipped egg whites, being careful not to deflate the mixture. Then, pour in the browned butter and vanilla extract, and fold until just combined. The batter should be smooth and slightly thick.
- Fill the Molds: Spoon the batter into the prepared molds, filling them about 3/4 full. If desired, sprinkle some sliced almonds or place berries on top for added texture and flavor.
- Bake: Place the molds in the preheated oven and bake for 12-15 minutes, or until the edges are golden brown and a toothpick inserted in the center comes out clean.
- Cool and Serve: Once baked, remove the financiers from the oven and allow them to cool in the molds for a few minutes. Then, carefully transfer them to a wire rack to cool completely. Serve them warm or at room temperature.
Extra Tips
When making financiers, be sure to use high-quality almond flour as it greatly enhances the flavor of the cakes. You can experiment with different extracts, such as orange or almond, to give your financiers a unique twist.
Additionally, for a richer taste, consider adding a tablespoon of honey or maple syrup to the batter. Financiers can be stored in an airtight container at room temperature for a few days, but they’re best enjoyed fresh out of the oven.
Galette Des Rois
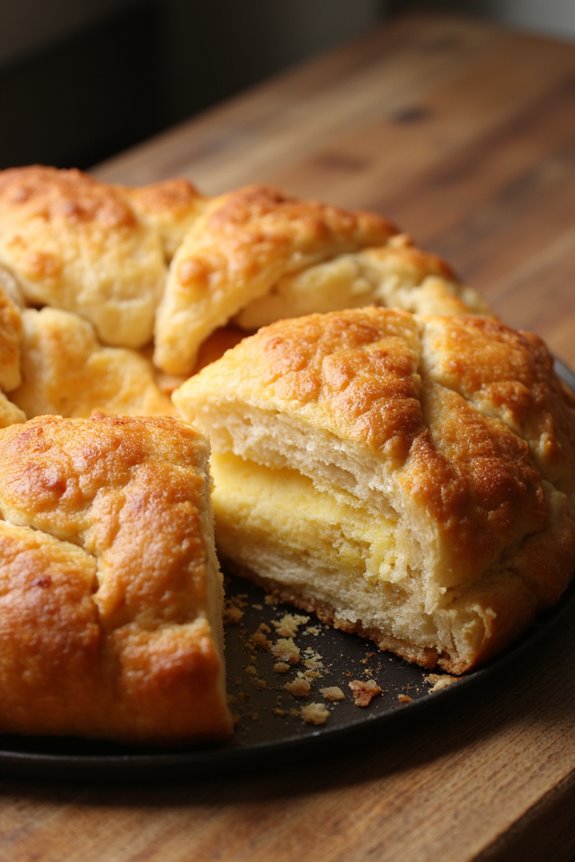
Galette Des Rois, also known as the King’s Cake, is a traditional French dessert that’s especially popular during the Epiphany celebration in January. This delightful pastry is made with layers of flaky puff pastry filled with a sweet almond cream known as frangipane. The galette is often adorned with a golden crust and typically hides a small figurine or a fève inside, adding an element of surprise to the experience.
Whoever finds the fève in their slice is crowned king or queen for the day, making it a festive and joyous occasion.
Making a Galette Des Rois at home isn’t only rewarding but also allows for creativity in both taste and presentation. While puff pastry can be purchased ready-made for convenience, crafting it from scratch can enhance the experience of this classic French dessert. The combination of the buttery pastry with the rich almond filling creates a delightful contrast in textures, making each bite truly irresistible.
Whether enjoyed at a family gathering or as a sweet treat with friends, Galette Des Rois is sure to impress.
Ingredients (Serves 4-6)
- 2 sheets of puff pastry (store-bought or homemade)
- 100g (3.5 oz) almond flour
- 100g (3.5 oz) unsalted butter, softened
- 100g (3.5 oz) granulated sugar
- 2 large eggs
- 1 teaspoon vanilla extract
- 1 tablespoon all-purpose flour
- 1 fève (small figurine or dried bean)
- Egg wash (1 egg beaten with 1 tablespoon of water for glazing)
Cooking Instructions
1. Prepare the frangipane filling: In a mixing bowl, combine the softened unsalted butter and granulated sugar. Using a hand mixer or a whisk, beat the mixture until it becomes light and fluffy.
Then, add the almond flour, flour, and vanilla extract. Mix thoroughly until all ingredients are well combined. Finally, incorporate the eggs one at a time, mixing until the filling is smooth and creamy.
2. Roll out the puff pastry: On a lightly floured surface, roll out one sheet of puff pastry into a round shape, about 10-12 inches in diameter. Transfer this sheet to a baking tray lined with parchment paper. Keep it in the refrigerator while you prepare the next layer to maintain its firmness.
3. Assemble the galette: Spread the frangipane filling evenly over the first sheet of puff pastry, leaving a 1-inch border around the edges. Insert the fève into the filling, ensuring it’s well hidden.
Roll out the second sheet of puff pastry and place it over the filling. Gently press down the edges to seal the galette, then use a fork to crimp the edges for a decorative touch.
4. Create a decorative pattern: Using a sharp knife, score a pattern on the top of the galette, being careful not to cut all the way through. This will allow steam to escape during baking and create an attractive design.
5. Apply the egg wash: Brush the top of the galette with the egg wash to give it a beautiful golden color when baked.
6. Bake the galette: Preheat your oven to 375°F (190°C). Bake the galette for 25-30 minutes, or until the pastry is golden brown and puffed up.
If the edges brown too quickly, cover them with aluminum foil.
7. Cool and serve: Once baked, allow the galette to cool for a few minutes before slicing. Serve warm and enjoy the delightful surprise of discovering the fève!
Extra Tips
When making Galette Des Rois, using high-quality butter in your puff pastry will elevate the flavor considerably. If you want to add a twist to the almond filling, consider incorporating orange zest or a splash of rum for added depth.
Remember to let the galette cool slightly before serving to avoid burns, and always warn your guests about the fève inside, so they can enjoy the celebration safely!
Canele
Canele is a classic French dessert that hails from the Bordeaux region, known for its unique texture and flavor. These small, cylindrical pastries have a soft, custardy interior and a dark, caramelized crust. The use of beeswax in the traditional recipe contributes to their signature glossy finish and delightful chewiness.
Canele are perfect for any occasion, serving as a delightful treat alongside coffee or tea, and are sure to impress your guests with their sophisticated taste and appearance.
Making canele can be a bit of a labor of love, but the results are well worth the effort. The batter requires some resting time to allow the flavors to develop fully, and the baking process is essential to achieving that iconic exterior.
With the right ingredients and a bit of patience, you can create your very own batch of these charming French pastries and enjoy a little taste of Bordeaux in your own kitchen.
Ingredients (Serves 4-6):
- 2 cups whole milk
- 1 tablespoon unsalted butter
- 1 teaspoon vanilla extract
- 1 cup granulated sugar
- 1/2 cup all-purpose flour
- 2 large eggs
- 1 egg yolk
- 1/4 cup dark rum
- 1 tablespoon beeswax (or substitute with extra butter)
- A pinch of salt
Cooking Instructions:
- Prepare the Molds: Preheat your oven to 425°F (220°C). If you’re using copper canele molds, grease them with a mixture of melted beeswax and butter to guarantee easy release. If using silicone molds, simply grease them lightly with butter.
- Heat the Milk: In a saucepan, combine the whole milk and unsalted butter. Heat over medium heat until the butter melts and the mixture is steaming but not boiling. Remove from heat, add the vanilla extract, and let it cool slightly.
- Mix the Dry Ingredients: In a bowl, whisk together the granulated sugar, all-purpose flour, and a pinch of salt until well combined.
- Combine Ingredients: In a separate bowl, whisk the eggs and egg yolk until frothy. Gradually add the cooled milk mixture to the eggs, whisking continuously. Then, slowly incorporate the dry ingredients into the wet mixture until you achieve a smooth batter.
- Add Rum: Stir in the dark rum until fully combined. The batter should be thin and pourable. Cover the bowl with plastic wrap and refrigerate for at least 24 hours to allow the flavors to meld.
- Fill the Molds: After the resting period, remove the batter from the refrigerator. Fill the prepared molds about three-quarters full with batter.
- Bake the Canele: Place the molds in the preheated oven and bake for 45-60 minutes, or until the canele are dark brown and have a firm crust. The baking time may vary depending on your oven, so keep an eye on them.
- Cool and Unmold: Once baked, remove the canele from the oven and let them cool in the molds for about 10 minutes. Carefully remove them from the molds and allow them to cool completely on a wire rack.
Extra Tips:
When making canele, the resting time is essential, so don’t skip the 24-hour refrigeration step; it greatly enhances the flavor and texture of the pastries.
Additionally, baking with copper molds provides the best results, but if you don’t have them, silicone molds work too. For an extra touch of authenticity, consider using high-quality vanilla extract and dark rum, as these ingredients play a significant role in the overall flavor profile.
Enjoy your freshly baked canele with a cup of coffee or tea for a truly delightful experience!
Tarte Au Citron

Tarte Au Citron, or lemon tart, is a classic French dessert that strikes a perfect balance between sweet and tangy. This delightful pastry features a buttery, flaky crust filled with a smooth and creamy lemon curd, making it a favorite among dessert lovers. The tartness of the lemons combined with the sweetness of the sugar creates a revitalizing treat that’s perfect for any occasion, from a casual family dinner to an elegant dinner party.
The history of Tarte Au Citron dates back to the 19th century, particularly in the region of Provence, where lemons were abundant. Over the years, this dessert has been refined and adapted, but its essential elements remain unchanged. Whether served plain or topped with a dollop of whipped cream or a sprinkle of powdered sugar, Tarte Au Citron is sure to impress with its vibrant flavor and beautiful presentation.
Ingredients (Serves 4-6):
- 1 ½ cups all-purpose flour
- ½ cup unsalted butter, softened
- ⅓ cup granulated sugar
- 1 large egg
- 1/4 teaspoon salt
- 1/4 cup fresh lemon juice (approximately 2-3 lemons)
- Zest of 2 lemons
- 1 cup granulated sugar (for filling)
- 3 large eggs
- 1/2 cup heavy cream
- Powdered sugar (for dusting, optional)
Cooking Instructions:
- Prepare the Tart Crust: In a mixing bowl, combine the flour, softened butter, granulated sugar, egg, and salt. Using your fingers or a pastry cutter, mix until the mixture resembles coarse crumbs. Then, knead gently until the dough comes together. Shape it into a disk, wrap in plastic wrap, and refrigerate for at least 30 minutes.
- Roll Out the Dough: Preheat your oven to 350°F (175°C). On a lightly floured surface, roll out the chilled dough into a circle about 1/8 inch thick. Carefully transfer the dough to a 9-inch tart pan, pressing it into the corners and trimming any excess. Prick the bottom of the crust with a fork to prevent bubbling.
- Blind Bake the Crust: Place a piece of parchment paper over the crust and fill it with pie weights or dried beans. Bake in the preheated oven for about 15 minutes. Remove the parchment and weights, and bake for an additional 10-15 minutes, or until the crust is golden brown. Allow it to cool completely.
- Make the Lemon Filling: In a bowl, whisk together the granulated sugar, eggs, lemon juice, lemon zest, and heavy cream until smooth. This mixture is your lemon filling.
- Bake the Filling: Pour the lemon filling into the cooled tart shell. Bake in the oven for 25-30 minutes, or until the filling is set but still slightly wobbly in the center. Remove from the oven and let it cool to room temperature.
- Chill and Serve: Once cooled, refrigerate the tart for at least 2 hours before serving. Dust with powdered sugar if desired and slice into wedges to serve.
Extra Tips:
To enhance the flavor of your Tarte Au Citron, consider using organic lemons, as they tend to have a more robust flavor and zest. Additionally, you can experiment with the addition of a little vanilla extract in the filling for a unique twist.
Serve the tart chilled for the best taste, and feel free to garnish with fresh berries or a sprig of mint for added color and elegance. Enjoy this delightful French dessert!