

French desserts have a unique charm that’s hard to resist. There’s something magical about creating them right in your own kitchen. I remember the first time I made a classic Crème Brûlée; the crack of the caramelized sugar was unforgettable. From airy soufflés to rich opera cakes, these desserts are easier to make than you might think. Ready to bring a touch of French patisserie to your home?
Classic Crème Brûlée
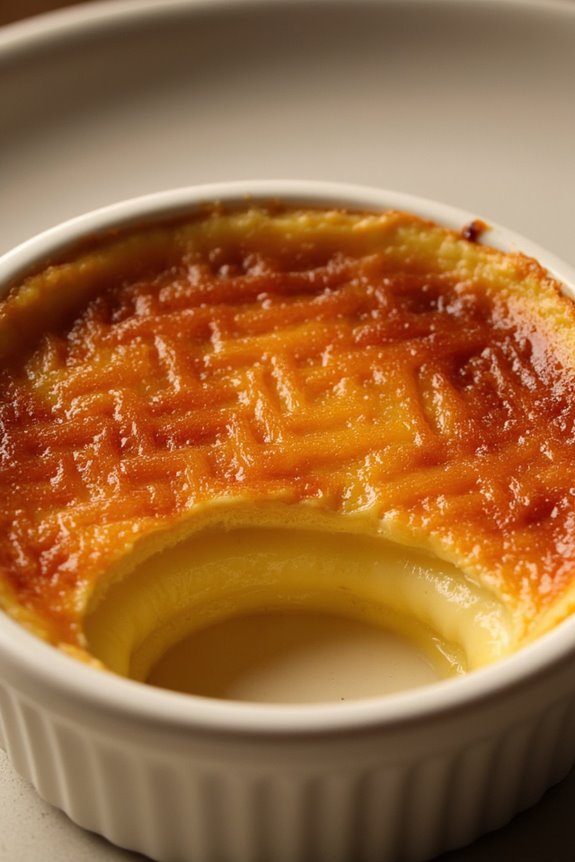
Crème Brûlée is a quintessential French dessert that epitomizes elegance and simplicity. It features a rich, creamy custard topped with a layer of crunchy caramelized sugar. The contrast of textures makes it a delightful treat, perfect for impressing guests or indulging in a sweet moment for yourself.
With its origins dating back to the 17th century, Crème Brûlée has become a beloved classic in French cuisine, appreciated for its velvety smoothness and the satisfying crack of its caramelized top.
This recipe for Classic Crème Brûlée serves 4-6 people and is surprisingly simple to make at home with just a few basic ingredients. By following the steps carefully, you’ll be able to create a dessert that looks and tastes impressive, despite its simplicity. The key to a perfect Crème Brûlée lies in achieving a silky custard and a perfectly caramelized sugar crust, which can be done even without specialized equipment.
Ingredients (serves 4-6):
- 2 cups heavy cream
- 1 vanilla bean (or 1 teaspoon vanilla extract)
- 5 large egg yolks
- 1/2 cup granulated sugar
- 1/4 cup granulated sugar (for topping)
Instructions:
- Preheat the Oven: Begin by preheating your oven to 325°F (160°C). Prepare a baking dish large enough to hold four to six ramekins by placing a kitchen towel at the bottom. This will keep the ramekins from sliding and help distribute heat evenly during baking.
- Prepare the Vanilla Cream: In a medium saucepan, combine the heavy cream and the seeds from the vanilla bean (or vanilla extract). Heat over medium heat until it just starts to simmer, then remove from heat and let it sit for 15 minutes to allow the flavors to infuse.
- Make the Custard Base: In a mixing bowl, whisk together the egg yolks and 1/2 cup of granulated sugar until the mixture becomes pale and thick. Gradually whisk the warm cream into the egg mixture, a little at a time, to prevent the eggs from curdling.
- Strain and Pour: Strain the custard through a fine-mesh sieve to remove any lumps or bits of cooked egg. Divide the custard evenly among the ramekins.
- Bake the Custards: Place the filled ramekins into the prepared baking dish. Carefully pour hot water into the dish until it reaches halfway up the sides of the ramekins. This water bath, or bain-marie, helps cook the custard evenly. Bake for 30-40 minutes, or until the custards are set but still slightly jiggly in the center.
- Chill: Remove the ramekins from the water bath and let them cool to room temperature. Cover each with plastic wrap and refrigerate for at least 2 hours, or overnight.
- Caramelize the Sugar: Just before serving, evenly sprinkle about 1 tablespoon of granulated sugar over each custard. Use a kitchen torch to melt the sugar until it turns golden brown and forms a hard crust. Alternatively, you can place the ramekins under a broiler, watching closely to avoid burning.
Extra Tips:
For best results, verify your custard is completely chilled before caramelizing the sugar, as this will prevent the custard from warming and losing its creamy texture.
If you don’t have a kitchen torch, be very cautious when using your oven’s broiler to caramelize the sugar, as it can quickly burn.
Additionally, experimenting with flavor variations, like adding a touch of orange zest or a dash of coffee, can elevate your Crème Brûlée to new heights.
Finally, make sure to use fresh ingredients, especially the cream and eggs, to achieve the richest flavor and smoothest texture.
Fluffy Madeleines
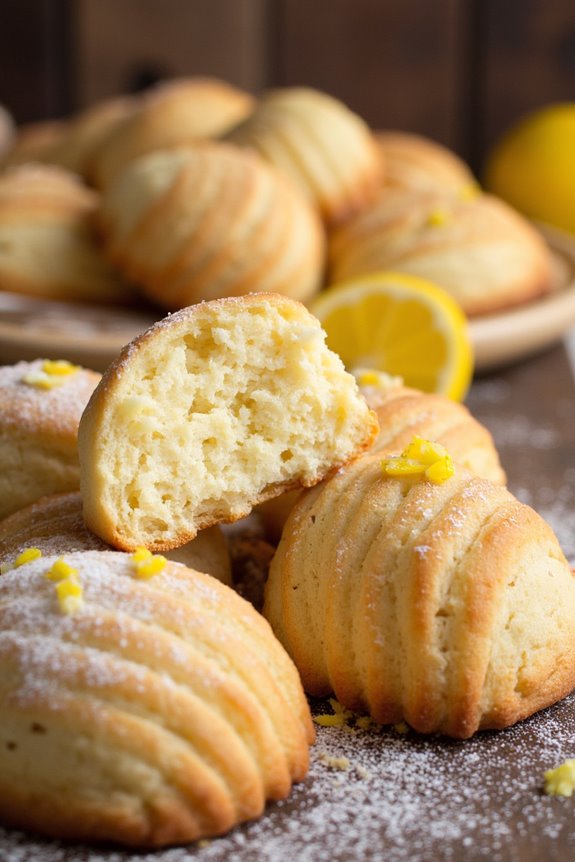
Fluffy Madeleines are a classic French dessert that epitomizes elegance and simplicity. These shell-shaped cakes are known for their light texture and delightful buttery flavor. Perfect for teatime or as a sweet treat to impress guests, madeleines are baked to perfection within minutes, creating a golden-brown exterior and a tender crumb inside. They’re best enjoyed fresh out of the oven, often dusted with a light sprinkle of powdered sugar or dipped in chocolate for an extra touch of decadence.
To achieve the signature hump and fluffy texture of Madeleines, the batter is typically prepared in advance and allowed to rest, which helps develop flavors and guarantee an even rise. Madeleines are traditionally baked in a special madeleine pan that gives them their iconic shape. While the ingredients are simple, the technique is what transforms these humble cakes into a sophisticated delight. Crafting the perfect Madeleine involves a delicate balance of mixing, resting, and baking, resulting in a dessert that’s as pleasing to the eye as it’s to the palate.
Ingredients for Fluffy Madeleines (Serving Size: 4-6 people):
- 2/3 cup all-purpose flour
- 3/4 teaspoon baking powder
- 1/4 teaspoon salt
- 1/2 cup unsalted butter
- 2/3 cup granulated sugar
- 3 large eggs
- 1 teaspoon vanilla extract
- Zest of 1 lemon
- Powdered sugar for dusting
Cooking Instructions:
- Prepare the dry ingredients. In a medium bowl, whisk together the all-purpose flour, baking powder, and salt. This guarantees that the baking powder is evenly distributed, which is important for the madeleines to rise properly.
- Melt the butter. In a small saucepan over low heat, melt the unsalted butter. Once melted, set it aside to cool slightly. This will be used later to give the madeleines their rich, buttery flavor.
- Mix the wet ingredients. In a large mixing bowl, beat the granulated sugar and eggs together with an electric mixer on medium-high speed for about 5 minutes until the mixture is thick and pale. This step incorporates air into the eggs, which is essential for achieving a fluffy texture.
- Add flavorings. Gently fold in the vanilla extract and lemon zest into the egg mixture. These additions will enhance the flavor profile of the madeleines, giving them a subtle, fragrant aroma.
- Combine dry and wet ingredients. Gradually fold the flour mixture into the egg mixture using a spatula. Be careful not to overmix, as this can deflate the batter. The goal is to combine the ingredients just until the flour is incorporated.
- Incorporate the butter. Finally, fold the melted butter into the batter, making sure it’s evenly distributed. The butter adds moisture and richness to the madeleines.
- Rest the batter. Cover the bowl with plastic wrap and refrigerate the batter for at least 1 hour or up to overnight. This resting period is important for the development of the madeleine’s characteristic hump.
- Preheat the oven and prepare the pan. Preheat your oven to 375°F (190°C). Grease a madeleine pan with butter and lightly dust with flour to prevent sticking.
- Fill the pan and bake. Spoon the batter into the prepared madeleine pan, filling each mold about three-quarters full. Bake for 10-12 minutes or until the edges are golden brown and a toothpick inserted into the center comes out clean.
- Cool and serve. Remove the madeleines from the oven and allow them to cool in the pan for a few minutes before transferring them to a wire rack. Dust with powdered sugar before serving.
Extra Tips:
For the best results when making Fluffy Madeleines, confirm that all your ingredients are at room temperature before you begin. This allows for easier mixing and a more uniform batter.
Additionally, using a non-stick madeleine pan will help with the release of the madeleines after baking. If you don’t have a madeleine pan, mini muffin tins can be used as a substitute, though they won’t have the traditional shell shape.
Finally, serve the madeleines while they’re still slightly warm for the best flavor and texture. Enjoy with a cup of tea or coffee for a classic French experience.
Easy Tarte Tatin
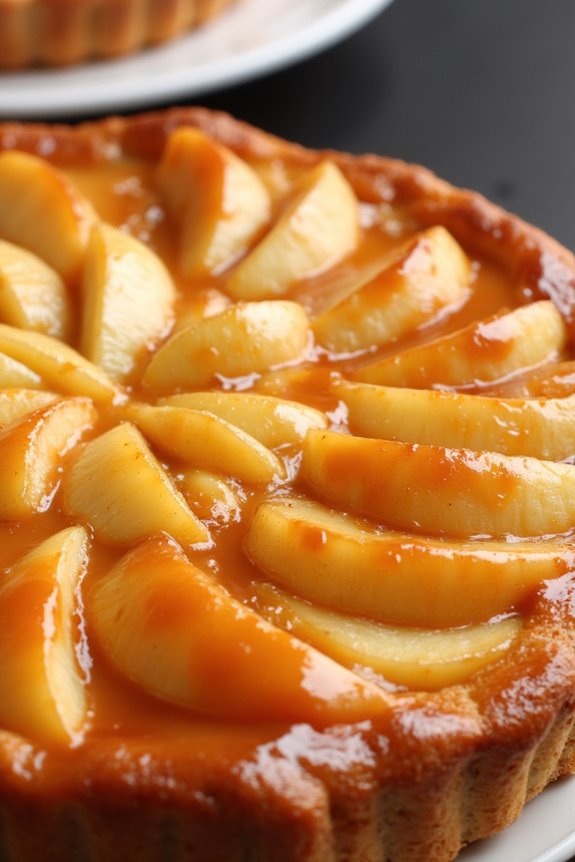
Tarte Tatin is a classic French dessert that beautifully combines caramelized apples and buttery pastry. It’s an upside-down tart that’s both elegant and surprisingly simple to make. The rich, golden caramel and tender apples are perfectly complemented by a crisp, flaky crust.
Traditionally, it’s made with apples, but you can experiment with other fruits, like pears or peaches, for a unique twist. This dessert is perfect for entertaining, as it can be prepared in advance and finished just before serving.
The recipe for an Easy Tarte Tatin focuses on using a few quality ingredients to achieve the perfect balance of flavors and textures. The key to mastering this dessert lies in caramelizing the apples to a deep amber color without burning them.
The pastry is then placed atop the caramelized apples and baked until golden brown. Once baked, the tart is flipped onto a plate, revealing the glossy, caramel-coated apples. Serve it warm with a dollop of crème fraîche or vanilla ice cream for an indulgent treat.
Ingredients for 4-6 servings:
- 6 medium-sized apples (such as Granny Smith or Honeycrisp)
- 1 cup granulated sugar
- 1/2 cup unsalted butter
- 1 sheet of puff pastry, thawed
- 1 tablespoon lemon juice
- 1 teaspoon vanilla extract
- A pinch of salt
Cooking Instructions:
- Preheat your oven to 375°F (190°C). This guarantees the oven is ready for the pastry to bake perfectly once the apples are caramelized.
- Prepare the apples by peeling, coring, and cutting them into quarters. Toss the apple quarters in a bowl with lemon juice to prevent browning and set aside.
- Caramelize the sugar by placing it in a large oven-safe skillet or pan over medium heat. Stir occasionally until the sugar melts and turns a deep amber color.
- Add the butter to the caramelized sugar, stirring continuously until fully incorporated. The mixture should be smooth and rich.
- Arrange the apples in the skillet, cut side up, in a circular pattern. Make sure they fit snugly, as they’ll shrink slightly during cooking. Cook for about 10 minutes, allowing the apples to soften and absorb the caramel.
- Stir in vanilla extract and a pinch of salt to enhance the flavors. Remove the pan from the heat.
- Roll out the puff pastry on a lightly floured surface until it’s large enough to cover the apples in the skillet. Carefully place the pastry over the apples, tucking in the edges around the fruit.
- Bake the tart in the preheated oven for 25-30 minutes, or until the pastry is golden brown and crisp.
- Remove from the oven and let it cool for about 5 minutes. Carefully invert the tart onto a serving plate, ensuring the caramelized apples are on top.
- Serve warm, optionally with a scoop of vanilla ice cream or a spoonful of crème fraîche.
Extra Tips:
When making Tarte Tatin, it’s essential to keep an eye on the caramel as it can quickly go from perfect to burnt. Stir gently to avoid crystallization and guarantee even caramelization.
If your caramel seizes or becomes grainy, simply add a small amount of water and gently reheat it until smooth. Additionally, using a well-seasoned cast-iron skillet can enhance the caramelization process, providing an even heat distribution.
Finally, serve the tart immediately after flipping to maintain the pastry’s crispness and the apples’ tenderness.
Decadent Chocolate Mousse
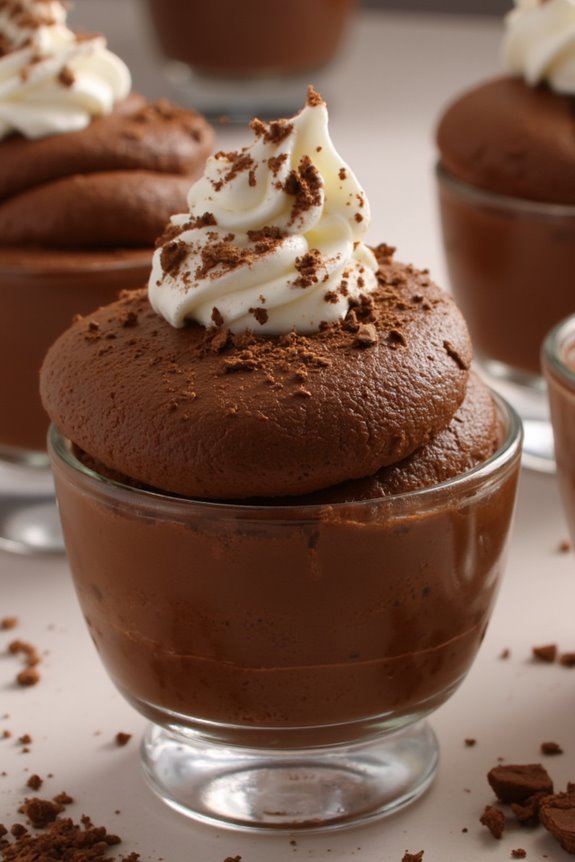
Chocolate mousse is a quintessential French dessert that exudes elegance and richness, making it a perfect indulgence for any occasion. This classic treat is celebrated for its light, airy texture and deep, chocolatey flavor. Whether you’re hosting a sophisticated dinner party or simply want to savor a luxurious dessert at home, this decadent chocolate mousse is sure to impress your guests and satisfy your sweet tooth.
This recipe yields a silky-smooth mousse that serves 4-6 people, making it an ideal choice for intimate gatherings or family treats. The process involves creating a rich chocolate base, gently folding in whipped cream, and allowing the mousse to chill, resulting in a dessert that’s both luscious and invigorating. With just a few simple ingredients and a bit of patience, you can create a dessert that captures the essence of French culinary finesse.
Ingredients:
- 200g (7 oz) dark chocolate (70% cocoa)
- 3 large eggs, separated
- 50g (1/4 cup) granulated sugar
- 1 tsp vanilla extract
- 1/4 tsp salt
- 250ml (1 cup) heavy cream
Instructions:
- Prepare the Chocolate Base: Begin by chopping the dark chocolate into small pieces and melting it gently in a heatproof bowl set over a pot of simmering water (double boiler method). Stir until the chocolate is completely melted and smooth. Remove from heat and allow it to cool slightly.
- Mix the Egg Yolks: In a separate bowl, whisk together the egg yolks, half of the sugar, and vanilla extract until the mixture is pale and creamy. Slowly pour the melted chocolate into the egg yolk mixture, stirring continuously until fully combined. Set aside.
- Whip the Egg Whites: In a clean, dry bowl, beat the egg whites with the salt until soft peaks form. Gradually add the remaining sugar, continuing to beat until stiff peaks are achieved. This will give the mousse its light and fluffy texture.
- Combine the Mixtures: Gently fold the whipped egg whites into the chocolate mixture in three parts, being careful not to deflate the mixture. This step requires a gentle hand to maintain the airy consistency of the mousse.
- Whip the Cream: In another bowl, whip the heavy cream until soft peaks form. Carefully fold the whipped cream into the chocolate mixture, making sure everything is well incorporated.
- Chill the Mousse: Spoon the mousse into individual serving dishes or a large serving bowl. Cover with plastic wrap and refrigerate for at least 2 hours, or until set. This chilling time allows the flavors to deepen and the texture to firm up.
- Serve and Enjoy: Once set, remove the mousse from the refrigerator. You can serve it as is, or garnish with a dollop of whipped cream, chocolate shavings, or fresh berries for an extra touch of elegance.
Extra Tips:
When preparing chocolate mousse, use high-quality dark chocolate, as it greatly influences the final flavor of your dessert.
Make sure that the bowls and utensils for whipping the egg whites are completely clean and free of any grease, as even a small amount of fat can prevent the whites from whipping properly.
Additionally, patience is key when folding the egg whites and cream into the chocolate base; a gentle folding technique helps maintain the mousse’s lightness.
Finally, plan ahead to allow sufficient chilling time, as this is essential for achieving the perfect texture.
Simple Clafoutis
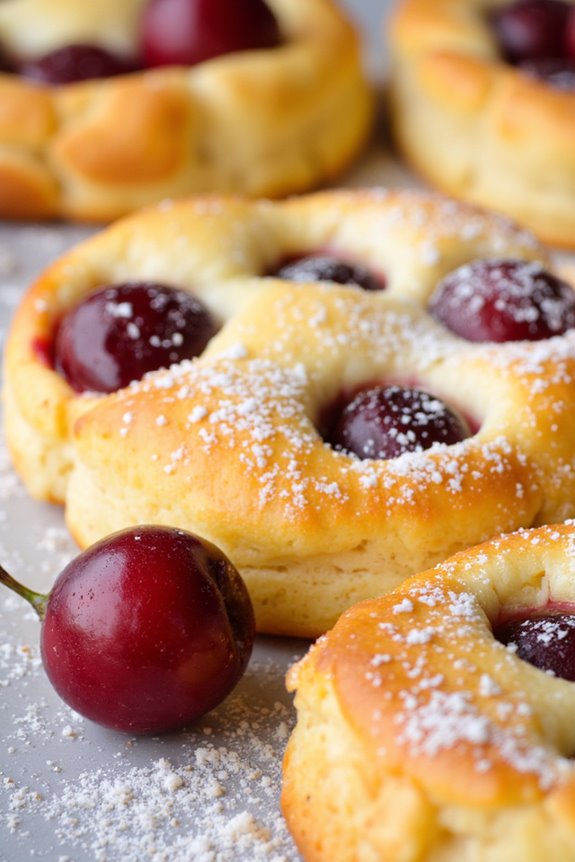
Clafoutis is a classic French dessert that’s both elegant and incredibly easy to prepare. Originating from the Limousin region, this dish traditionally features cherries baked in a thick, custard-like batter. The beauty of Clafoutis lies in its simplicity and versatility, as it can be made with various fruits. The rich, creamy texture of the batter perfectly complements the sweet tartness of the fruit, creating a delightful dessert that’s certain to impress your guests.
This recipe for Simple Clafoutis is designed to serve 4-6 people, making it an ideal choice for a family gathering or an intimate dinner party. With just a few basic ingredients and minimal effort, you can whip up this delicious dessert in no time. The result is a golden, lightly puffed Clafoutis that’s best enjoyed warm, perhaps with a generous dusting of powdered sugar or a scoop of vanilla ice cream.
Ingredients for 4-6 servings:
- 1 cup whole milk
- 1/2 cup heavy cream
- 3 large eggs
- 1 teaspoon vanilla extract
- 1/2 cup all-purpose flour
- 1/2 cup granulated sugar
- 1/4 teaspoon salt
- 2 cups fresh cherries, pitted
- 1 tablespoon unsalted butter (for greasing)
- Powdered sugar (optional, for dusting)
Cooking Instructions:
- Prepare the Oven and Dish: Preheat your oven to 350°F (175°C). Grease a 9-inch (23cm) round baking dish or pie pan with the unsalted butter, making certain it’s evenly coated.
- Make the Batter: In a mixing bowl, whisk together the eggs, milk, heavy cream, and vanilla extract until well combined. Gradually add the flour, sugar, and salt, whisking continuously until the mixture is smooth and free of lumps.
- Arrange the Cherries: Spread the pitted cherries evenly over the bottom of the greased baking dish. Make sure they’re evenly distributed to guarantee every bite has a taste of the fruit.
- Pour the Batter: Carefully pour the batter over the cherries, making certain they remain evenly spaced and are mostly submerged in the liquid.
- Bake the Clafoutis: Place the dish in the preheated oven and bake for 35-40 minutes, or until the clafoutis is puffed and golden brown. A toothpick inserted into the center should come out clean.
- Cool and Serve: Remove from the oven and let it cool for a few minutes. Dust with powdered sugar if desired before serving warm.
Extra Tips:
For the best results, choose fresh, ripe cherries as they provide the perfect balance of sweetness and acidity. If fresh cherries aren’t available, you can use frozen cherries—just be sure to thaw and drain them well before using.
Additionally, feel free to experiment with other fruits like plums, apricots, or berries to suit your taste preferences. If you prefer a more pronounced vanilla flavor, consider adding a vanilla bean or a splash of almond extract to the batter.
No-Fuss Choux Pastry
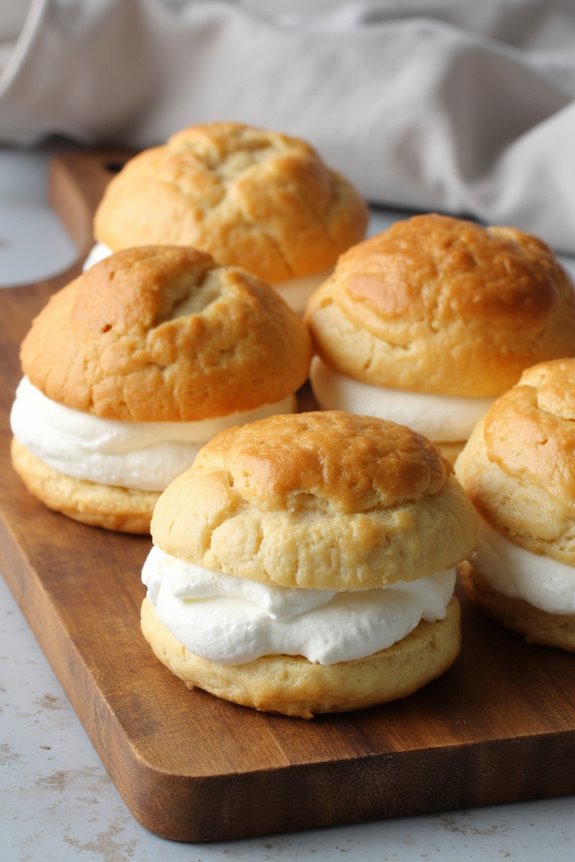
Choux pastry, also known as pâte à choux, is a versatile and classic French dough that creates light, airy puffs perfect for both sweet and savory dishes. One of the most delightful ways to use choux pastry is in making cream puffs—delicate, hollow pastries filled with rich, sweet cream. Their simplicity and elegance make them a favorite in French pâtisseries, and they’re surprisingly easy to make at home.
This recipe is designed to serve 4-6 people, making it perfect for a family gathering or a small dinner party. To create these delightful pastries, you’ll start by making the choux dough on the stovetop, then bake it until it’s golden brown and crisp. Once cooled, you’ll fill the puffs with a luscious vanilla cream filling. The result is a dessert that’s light yet indulgent, sure to impress your family and friends. Follow the instructions carefully, and you’ll soon be enjoying these classic French treats at your own table.
Ingredients (Serves 4-6):
- 1/2 cup (120 ml) water
- 1/2 cup (120 ml) milk
- 1/2 cup (113 g) unsalted butter
- 1 tablespoon granulated sugar
- 1/4 teaspoon salt
- 1 cup (125 g) all-purpose flour
- 4 large eggs
- 1 cup (240 ml) heavy cream
- 2 tablespoons powdered sugar
- 1 teaspoon vanilla extract
Instructions:
- Preheat Oven: Begin by preheating your oven to 400°F (200°C). Line a baking sheet with parchment paper to prevent the dough from sticking.
- Prepare Choux Dough: In a medium saucepan, combine the water, milk, butter, sugar, and salt. Heat over medium heat until the mixture comes to a boil and the butter is completely melted.
- Incorporate Flour: Remove the saucepan from heat and immediately add the flour all at once. Stir vigorously with a wooden spoon until the mixture forms a ball and pulls away from the sides of the pan.
- Cool Mixture: Allow the dough to cool slightly, about 5 minutes. This prevents the eggs from cooking when added.
- Add Eggs: Add the eggs one at a time, stirring well after each addition until the mixture is smooth and glossy. The dough should have a thick, pipeable consistency.
- Shape Puffs: Transfer the dough to a piping bag fitted with a large round tip. Pipe small mounds (about 1.5 inches in diameter) onto the prepared baking sheet, spacing them about 2 inches apart.
- Bake: Bake in the preheated oven for 20-25 minutes, or until the puffs are golden brown and sound hollow when tapped. Avoid opening the oven door during baking, as this can cause the puffs to collapse.
- Cool Puffs: Once baked, remove the puffs from the oven and allow them to cool completely on a wire rack.
- Prepare Filling: In a large mixing bowl, whip the heavy cream, powdered sugar, and vanilla extract until stiff peaks form.
- Fill Puffs: Once the puffs are cool, slice them in half horizontally and fill each with a generous spoonful of whipped cream. Alternatively, you can use a piping bag to fill the puffs without slicing them.
- Serve: Serve the cream puffs immediately, or refrigerate them for up to 2 hours before serving to keep the filling fresh.
Extra Tips:
For extra crispiness, you can return the filled puffs to the oven for a few minutes to dry them out slightly. If you prefer a more flavorful filling, consider adding a few tablespoons of your favorite liqueur to the whipped cream, or experiment with different extracts like almond or coffee.
Remember that the key to perfect cream puffs is ensuring your dough isn’t too runny or too thick; it should hold its shape but still be pliable enough to pipe easily. Enjoy your homemade French cream puffs with a cup of coffee or tea for the perfect sweet ending to any meal.
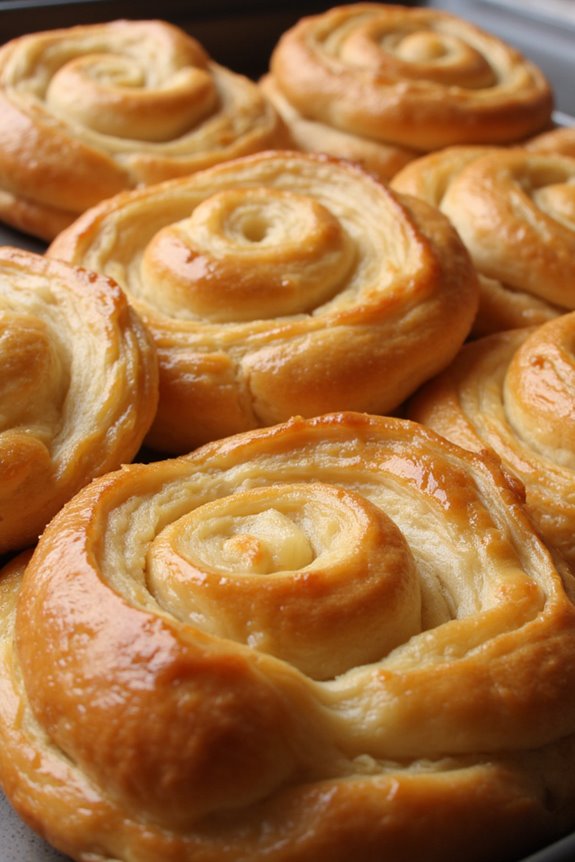
Quick Éclairs
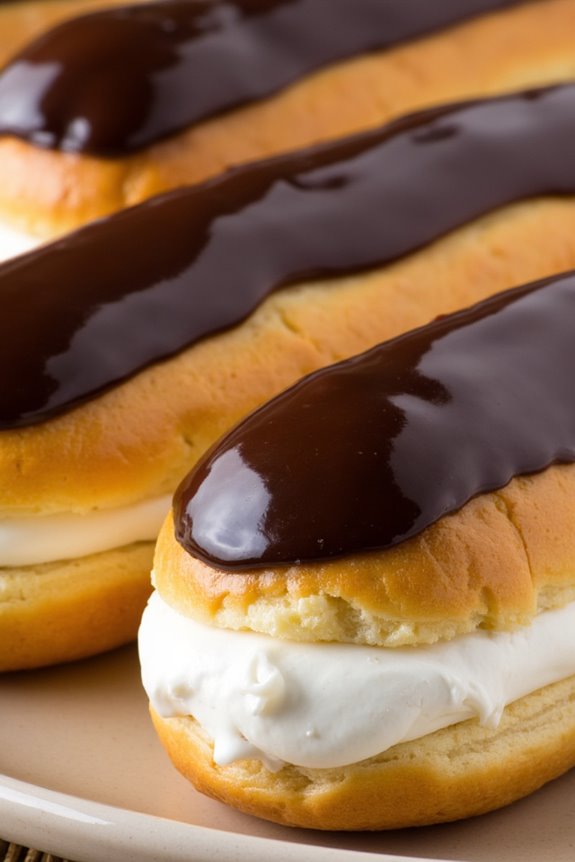
Éclairs are a classic French dessert that are as delicious as they’re elegant. Though they may seem complex, making éclairs at home can be a straightforward process with a little preparation and patience. Traditionally, éclairs are made from choux pastry, filled with a creamy custard or pastry cream, and topped with a glossy chocolate glaze. This recipe for Quick Éclairs simplifies the process without compromising on taste or presentation, making it perfect for any aspiring baker looking to impress guests or treat themselves to a delightful dessert.
The beauty of éclairs lies in the delicate balance of textures: a crisp and light pastry shell encasing a smooth, rich filling, all crowned with a layer of decadent chocolate. This recipe yields enough to serve 4-6 people, making it ideal for a small gathering or a family treat. Whether you’re a seasoned baker or a beginner, these Quick Éclairs are sure to become a favorite.
Ingredients (Serves 4-6):
- 1 cup water
- 1/2 cup unsalted butter
- 1 cup all-purpose flour
- 4 large eggs
- 1/4 teaspoon salt
- 1 cup heavy cream
- 1/2 cup powdered sugar
- 1 teaspoon vanilla extract
- 1 cup semisweet chocolate chips
- 1/2 cup heavy cream (for chocolate glaze)
Instructions:
- Prepare the Choux Pastry: Preheat the oven to 400°F (200°C). In a medium saucepan, combine 1 cup of water, 1/2 cup of unsalted butter, and 1/4 teaspoon of salt. Bring the mixture to a boil, then remove it from the heat. Add 1 cup of all-purpose flour all at once, stirring vigorously with a wooden spoon until the mixture forms a smooth ball and pulls away from the sides of the pan.
- Incorporate the Eggs: Allow the dough to cool slightly. Add the eggs one at a time, mixing well after each addition until the dough is smooth and glossy. Spoon or pipe the dough onto a baking sheet lined with parchment paper, forming 4-inch logs. Make sure there’s enough space between each to allow for expansion.
- Bake the Pastry Shells: Bake the pastry shells in the preheated oven for 20-25 minutes, or until they’re puffed and golden brown. Avoid opening the oven during baking to prevent the pastries from collapsing. Once baked, remove from the oven and cool on a wire rack.
- Prepare the Filling: In a mixing bowl, whip 1 cup of heavy cream with 1/2 cup of powdered sugar and 1 teaspoon of vanilla extract until stiff peaks form. Transfer the whipped cream into a piping bag fitted with a small round tip.
- Fill the Éclairs: Once the pastry shells are completely cooled, use a sharp knife to cut a small slit in the side of each shell. Pipe the whipped cream into each éclair until filled.
- Make the Chocolate Glaze: In a small saucepan, heat 1/2 cup of heavy cream until it just begins to simmer. Remove from heat and add 1 cup of semisweet chocolate chips. Let it sit for a minute, then stir until smooth and glossy.
- Glaze the Éclairs: Dip the top of each filled éclair into the chocolate glaze, allowing any excess to drip off. Place the glazed éclairs on a wire rack to set.
Extra Tips:
For the best results, make sure all ingredients are at room temperature before you begin. This will help the dough come together more smoothly and the whipped cream to reach its best volume.
If you don’t have a piping bag, a plastic sandwich bag with a corner snipped off can be a good substitute. Additionally, be patient while making the choux pastry; thorough mixing and allowing the dough to cool slightly before adding the eggs is vital to achieving the correct texture.
Enjoy your Quick Éclairs fresh for the best texture, as the pastry may soften if stored for too long.
Perfect Lemon Tart
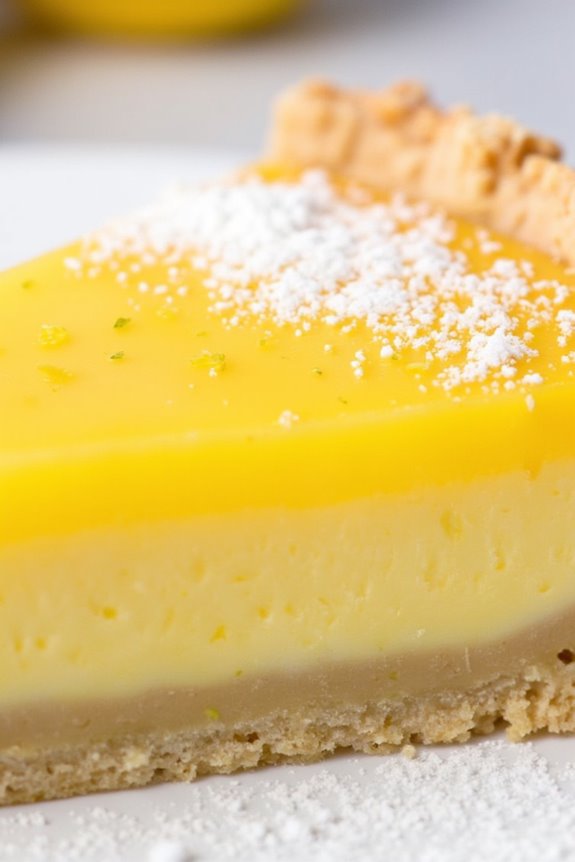
The Perfect Lemon Tart is a delightful French dessert that combines a buttery, flaky crust with a creamy, tangy lemon filling. Its bright flavor and smooth texture make it an ideal treat for any occasion, from casual get-togethers to elegant dinner parties. This classic dessert isn’t only visually appealing with its sunny hue but also offers a reviving taste that’s sure to brighten your palate.
Creating the Perfect Lemon Tart at home is simpler than it sounds, and the result is well worth the effort. The key is to achieve the right balance of sweetness and acidity in the filling while guaranteeing the crust is perfectly baked to provide a satisfying crunch. With a few quality ingredients and some time in the kitchen, you can master this quintessential French pastry and impress your family and friends.
Ingredients (Serves 4-6):
- 1 1/4 cups all-purpose flour
- 1/2 cup unsalted butter, chilled and diced
- 1/4 cup granulated sugar
- 1/4 teaspoon salt
- 1 large egg yolk
- 2 tablespoons cold water
- 1 cup granulated sugar
- 3 large eggs
- 1 tablespoon grated lemon zest
- 1/2 cup freshly squeezed lemon juice
- 1/2 cup heavy cream
- Powdered sugar, for dusting (optional)
Cooking Instructions:
- Prepare the Crust: In a food processor, combine the flour, sugar, and salt. Add the diced butter and pulse until the mixture resembles coarse crumbs. Add the egg yolk and cold water, and pulse until the dough begins to come together. Shape the dough into a disk, wrap it in plastic wrap, and refrigerate for at least 30 minutes.
- Preheat the Oven: Preheat your oven to 375°F (190°C).
- Roll Out the Dough: On a lightly floured surface, roll out the chilled dough to fit a 9-inch tart pan with a removable bottom. Carefully transfer the dough to the pan, pressing it into the edges and trimming any excess. Prick the bottom with a fork.
- Blind Bake the Crust: Line the crust with parchment paper and fill with pie weights or dried beans. Bake for 15 minutes, then remove the weights and parchment. Continue baking for another 5-10 minutes until lightly golden. Let it cool completely.
- Make the Filling: In a medium bowl, whisk together the sugar, eggs, lemon zest, lemon juice, and heavy cream until smooth.
- Fill and Bake the Tart: Pour the lemon filling into the cooled crust. Reduce the oven temperature to 350°F (175°C) and bake for 25-30 minutes, or until the filling is set and slightly jiggles in the center.
- Cool and Serve: Allow the tart to cool at room temperature, then refrigerate for at least 1 hour before serving. Dust with powdered sugar if desired.
Extra Tips:
For the best results, use fresh lemons for both the juice and zest to guarantee a vibrant flavor. Make sure the butter is very cold when incorporating it into the flour to achieve a flaky crust. If you find the edges of the crust browning too quickly while baking, you can cover them with strips of aluminum foil.
Finally, when serving, use a sharp knife to achieve clean slices, and wipe the knife between cuts to maintain the tart’s pristine appearance.
Light Soufflé
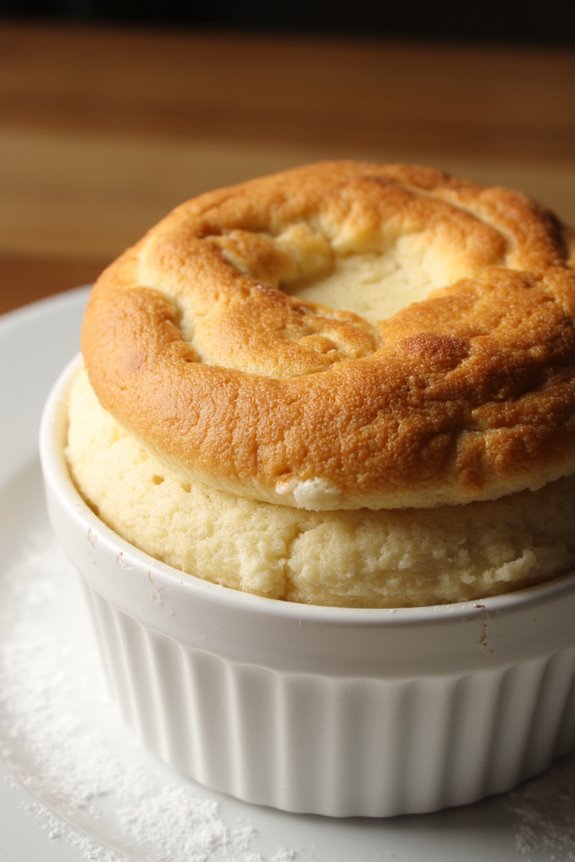
The Light Soufflé is a classic French dessert that perfectly balances airiness and flavor. This delicate dish is known for its impressive rise and melt-in-your-mouth texture, making it a popular choice for those who want to end their meal on a sweet yet not overly heavy note.
While the soufflé may have a reputation for being difficult to master, with the right techniques and ingredients, you can achieve a perfect rise and a delightful taste. This recipe is designed to serve 4-6 people and is perfect for a dinner party or a special occasion.
The key to a successful soufflé lies in the preparation and timing, guaranteeing that the dessert is served immediately after baking to enjoy its full rise and fluffiness. Follow the steps carefully, and you’ll be able to impress your guests with this light and elegant French dessert.
Ingredients (Serves 4-6):
- 4 tablespoons unsalted butter, plus extra for greasing
- 3 tablespoons all-purpose flour
- 1 cup whole milk
- 1 teaspoon vanilla extract
- 3 tablespoons granulated sugar, plus extra for dusting
- 4 large eggs, separated
- Pinch of cream of tartar
- Powdered sugar for dusting (optional)
Instructions:
- Prepare the Ramekins: Preheat your oven to 375°F (190°C). Grease the insides of six 6-ounce ramekins with butter, making sure you cover all the sides. Dust with granulated sugar, tapping out the excess, to help the soufflé rise evenly.
- Make the Base: In a medium saucepan, melt the 4 tablespoons of butter over medium heat. Add the flour and whisk continuously for about 1 minute to form a roux. Gradually add the milk, whisking constantly to avoid lumps, and cook until the mixture thickens, about 3-4 minutes. Remove from heat and stir in the vanilla extract.
- Prepare the Egg Yolks: In a separate bowl, whisk the egg yolks together, then slowly add them to the milk mixture while whisking to prevent the yolks from cooking. Set aside to cool slightly.
- Beat the Egg Whites: In a clean, dry bowl, beat the egg whites with a pinch of cream of tartar using an electric mixer until soft peaks form. Gradually add the 3 tablespoons of granulated sugar and continue to beat until stiff, glossy peaks form.
- Fold in Egg Whites: Gently fold a third of the beaten egg whites into the milk mixture to lighten it. Carefully fold in the remaining egg whites, being cautious not to deflate them.
- Fill the Ramekins: Spoon the mixture into the prepared ramekins, filling them to the top. Smooth the surface with a spatula and run your thumb around the inside edge to create a small channel, which helps the soufflé rise evenly.
- Bake: Place the ramekins on a baking sheet and bake in the preheated oven for 18-20 minutes, or until the soufflés are puffed and golden brown. Avoid opening the oven door during baking, as this can cause the soufflés to collapse.
- Serve Immediately: Once baked, remove the soufflés from the oven and dust with powdered sugar if desired. Serve immediately to enjoy the soufflés at their fullest height and fluffiness.
Extra Tips:
For the best results, confirm all ingredients are at room temperature before starting. This allows for better integration and a smoother mixture.
Be cautious when folding in the egg whites; use a spatula and gentle motions to maintain their volume. Timing is essential; aim to serve the soufflés as soon as they come out of the oven to enjoy their light and airy texture.
Finally, practice makes perfect—don’t be discouraged if your first attempt isn’t flawless. Each try will bring you closer to mastering this elegant dessert.
Rich Opera Cake
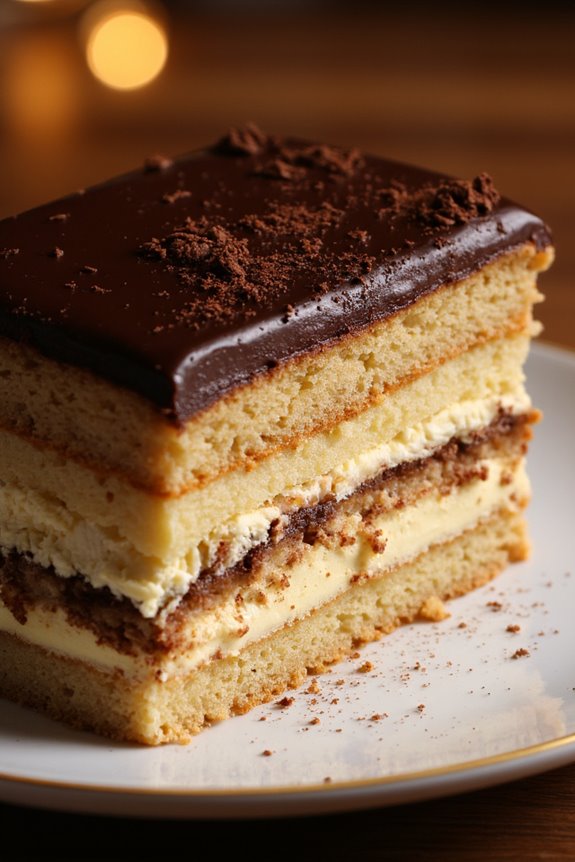
Rich Opera Cake is a classic French dessert known for its layers of almond sponge cake soaked in coffee syrup, layered with coffee buttercream and chocolate ganache. This luxurious treat is both elegant and indulgent, perfect for special occasions or when you want to impress your guests with your culinary skills.
With its combination of flavors and textures, Opera Cake is a demonstration of the artistry of French patisserie. Creating an Opera Cake requires some patience and attention to detail, but the end result is worth the effort. It involves preparing multiple components – the Joconde (almond sponge), coffee syrup, French buttercream, and a rich chocolate ganache – and assembling them into a multi-layered masterpiece.
This recipe serves 4-6 people, making it ideal for a dinner party or a gathering with friends and family.
Ingredients:
- 6 large eggs
- 150g almond flour
- 150g powdered sugar
- 40g all-purpose flour
- 40g unsalted butter, melted
- 3 egg whites
- 30g granulated sugar
- 1/2 cup strong brewed coffee
- 50g sugar (for coffee syrup)
- 100g unsalted butter, softened (for buttercream)
- 100g granulated sugar (for buttercream)
- 2 egg yolks (for buttercream)
- 100g dark chocolate, chopped
- 100ml heavy cream
- 1 tablespoon coffee liqueur (optional)
Cooking Instructions:
1. Prepare the Joconde Sponge: Preheat your oven to 180°C (350°F) and line a baking sheet with parchment paper. In a mixing bowl, whisk together almond flour, powdered sugar, and all-purpose flour. Add 6 eggs and mix until smooth.
Fold in the melted butter. In a separate bowl, whip the egg whites with the granulated sugar until stiff peaks form. Gently fold the egg whites into the almond mixture. Spread the batter evenly on the prepared baking sheet and bake for 10-12 minutes until golden. Let it cool completely before cutting it into three equal layers.
2. Make the Coffee Syrup: In a small saucepan, combine strong brewed coffee and 50g of sugar. Cook over medium heat until the sugar dissolves completely. Stir in coffee liqueur if using. Set aside to cool.
3. Prepare the Coffee Buttercream: In a heatproof bowl, whisk together 100g of sugar and 2 egg yolks. Place the bowl over a pot of simmering water (double boiler) and whisk continuously until the mixture thickens and doubles in volume.
Remove from heat and let it cool slightly. Beat in softened butter gradually until smooth and creamy. Add a tablespoon of coffee syrup for flavor.
4. Make the Chocolate Ganache: Heat 100ml of heavy cream in a small saucepan until it begins to simmer. Remove from heat and pour over the chopped dark chocolate. Let it sit for a minute, then stir until smooth and glossy.
5. Assemble the Cake: Place the first layer of Joconde sponge on a serving platter. Brush generously with coffee syrup. Spread half of the coffee buttercream over the sponge.
Place the second sponge layer on top, brush with syrup, and spread the remaining buttercream. Top with the final sponge layer and soak with syrup. Pour the chocolate ganache over the top, spreading it evenly.
6. Chill and Serve: Refrigerate the assembled cake for at least 2 hours to set. Before serving, trim the edges for neatness and cut into rectangular slices.
Extra Tips:
For a perfectly smooth ganache, make sure your chocolate is finely chopped before adding hot cream. If the buttercream appears to curdle while mixing, continue beating it; it will eventually come together.
When assembling the cake, use a pastry brush to apply the syrup evenly to prevent the sponge from becoming soggy. The cake can be made a day in advance and refrigerated, allowing the flavors to meld beautifully.
Traditional Financiers
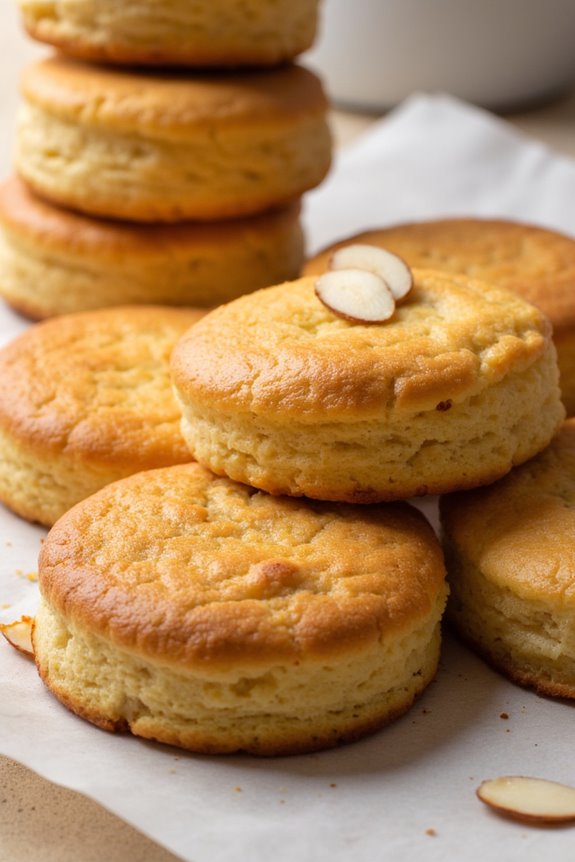
Financiers are delightful almond-flavored cakes originating from France, known for their moist interior and crispy exterior. These small, golden-brown treats are traditionally baked in rectangular molds, reminiscent of gold bars, which is how they acquired their name. The subtle nuttiness from the almonds combined with the rich, buttery flavor makes financiers a perfect accompaniment to tea or coffee.
Originally popularized in the financial district of Paris due to their convenience and luxurious taste, they’ve since become a beloved staple in French patisserie.
The magic of financiers lies in their simplicity and the use of browned butter, or “beurre noisette”, which adds a deep, nutty aroma that complements the almond flour beautifully. This recipe will guide you through creating these scrumptious cakes at home, perfect for a gathering of 4-6 people. Whether you’re a novice baker or a culinary enthusiast, these traditional financiers are easy to make and certain to impress with their elegance and taste.
Ingredients (Serves 4-6):
- 125g unsalted butter
- 100g almond flour
- 150g powdered sugar
- 50g all-purpose flour
- 4 large egg whites
- 1/2 teaspoon vanilla extract
- A pinch of salt
Instructions:
- Prepare the Browned Butter: In a small saucepan, melt the unsalted butter over medium heat. Continue cooking, swirling the pan occasionally, until the butter turns a light brown color and develops a nutty aroma. This should take about 5-7 minutes. Once done, remove from heat and set aside to cool slightly.
- Mix the Dry Ingredients: In a medium-sized bowl, sift together the almond flour, powdered sugar, all-purpose flour, and salt. This will help in blending the ingredients smoothly and guarantee there are no lumps in the batter.
- Whisk the Egg Whites: In another bowl, lightly whisk the egg whites just until they’re foamy. There’s no need to beat them stiff, just until they begin to form bubbles at the surface.
- Combine Ingredients: Pour the egg whites into the dry ingredient mixture, followed by the vanilla extract. Stir gently until combined. Gradually add the browned butter, mixing until the batter is smooth and well integrated.
- Preheat the Oven and Prepare Molds: Preheat your oven to 350°F (175°C). Grease financier molds or a muffin tin with butter, ensuring even coating to prevent sticking.
- Fill the Molds: Spoon the batter into the prepared molds, filling each mold about three-quarters full. This allows room for the financiers to rise and achieve their classic shape.
- Bake: Place the molds on a baking sheet and bake in the preheated oven for 12-15 minutes, or until the edges are golden brown and a toothpick inserted into the center comes out clean.
- Cool and Serve: Remove the financiers from the oven and allow them to cool in the molds for a few minutes before transferring them to a wire rack. Serve warm or at room temperature.
Extra Tips:
For an added twist, you can sprinkle some sliced almonds on top of the batter before baking for extra crunch and visual appeal. If you don’t have almond flour, you can make your own by pulsing blanched almonds in a food processor until finely ground. Be cautious not to over-process, as this can turn them into almond butter.
Finally, make sure to watch the butter closely while browning, as it can quickly go from perfect to burnt. Enjoy your financiers with a dusting of powdered sugar for an extra touch of sweetness.
Effortless Palmiers
Palmiers, also known as “Elephant Ears,” are a delightful French pastry that’s both light and crispy, making them the perfect treat for any occasion.
These delicious pastries are surprisingly easy to make, requiring only two main ingredients: puff pastry and sugar. With their elegant appearance and irresistible taste, palmiers are sure to impress your guests, whether served with tea or as a sweet ending to a dinner party.
The beauty of palmiers lies in their simplicity. This recipe is perfect for both novice bakers and experienced chefs looking for a quick yet impressive dessert. The puff pastry provides a flaky, buttery base, while the sugar caramelizes during baking to add a sweet, crunchy finish.
Best of all, these palmiers can be prepared in advance and stored, making them a convenient option for entertaining.
Ingredients for 4-6 Servings:
- 1 sheet of puff pastry (approximately 8-10 ounces), thawed
- 1/2 cup granulated sugar
- 1/4 teaspoon ground cinnamon (optional)
Cooking Instructions:
- Prepare the Workspace: Begin by preheating your oven to 400°F (200°C). Line a baking sheet with parchment paper or a silicone baking mat to prevent sticking.
- Roll Out the Pastry: Lightly flour your work surface. Roll out the thawed puff pastry sheet into a rectangle, approximately 12×12 inches. The pastry should be smooth and even in thickness.
- Add Sugar: Sprinkle half of the sugar evenly over the entire surface of the pastry. If using cinnamon, mix it with the sugar before sprinkling. Use a rolling pin to gently press the sugar into the pastry without thinning it out.
- Fold the Dough: Start by folding the two opposite ends of the pastry towards the center, so they meet halfway. Then fold each side again towards the center. Finally, fold one half over the other, creating a compact log.
- Chill the Dough: Wrap the folded pastry in plastic wrap and refrigerate for about 15-20 minutes. This step helps the dough firm up, making it easier to slice and maintain its shape during baking.
- Slice and Coat: Remove the pastry from the refrigerator and unwrap it. Use a sharp knife to slice the dough into 1/2-inch pieces. Dip each piece in the remaining sugar, ensuring all sides are coated.
- Arrange and Bake: Place the sliced palmiers onto the prepared baking sheet, spacing them about 2 inches apart to allow for expansion. Bake in the preheated oven for 12-15 minutes, or until golden brown and caramelized.
- Cool: Remove from the oven and let the palmiers cool on the baking sheet for a few minutes. Transfer them to a wire rack to cool completely.
Extra Tips:
For the best results, verify your puff pastry is well-chilled before slicing, as this makes it easier to work with and helps maintain the shape of the palmiers.
If you prefer a richer flavor, you can use a mixture of brown and white sugars. Additionally, feel free to experiment with different spices or add a touch of vanilla extract to the sugar for a unique twist.
Store any leftover palmiers in an airtight container at room temperature for up to 3 days, and reheat them briefly in the oven to restore their crispiness before serving.