

When the summer heat feels unending, there’s nothing quite like the refreshing charm of French desserts to bring a sense of relief. Picture the zest of lemon paired with the sweetness of fresh berries or the subtle notes of lavender honey ice cream. These delightful treats not only offer a cool respite but also add a touch of elegance to any summer gathering. Ready to discover some delicious recipes? Let’s explore these refreshing French summer desserts that are perfect for beating the heat.
Lemon Tart With Fresh Berries
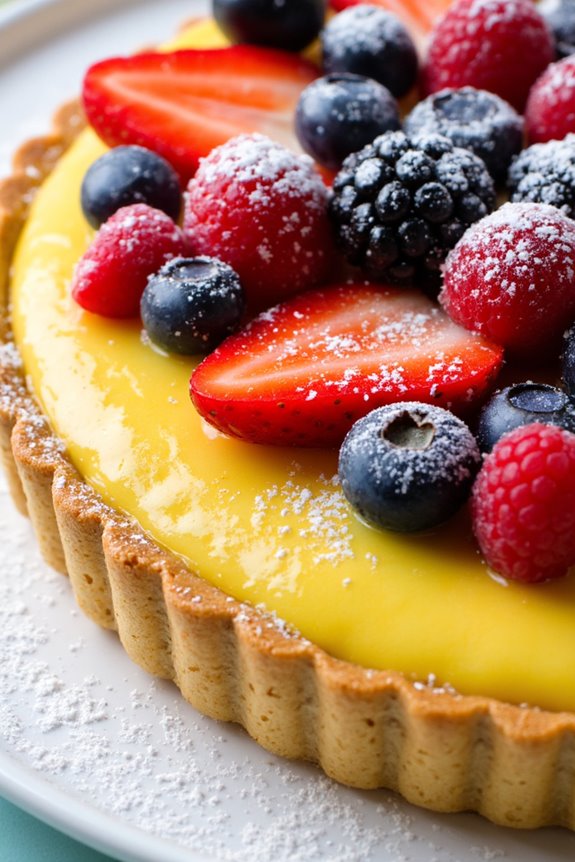
Lemon Tart with Fresh Berries is a quintessential French summer dessert that captures the essence of sunny days and leisurely afternoons. This delightful treat combines the tangy brightness of lemon with the natural sweetness of fresh berries, creating a harmonious balance of flavors that’s both invigorating and indulgent.
The crisp, buttery tart crust provides a perfect contrast to the silky lemon filling, while the vibrant berries on top add a burst of color and juiciness that makes this dessert as visually appealing as it’s delicious.
Perfect for a family gathering or a sophisticated dinner party, this Lemon Tart with Fresh Berries serves 4-6 people and is sure to impress your guests. The recipe requires a bit of time and patience, but the end result is a stunning dessert that looks like it came straight from a Parisian patisserie.
Whether you’re a seasoned baker or a novice in the kitchen, this recipe will guide you through each step to guarantee a successful and delectable creation.
Ingredients (serving size: 4-6 people):
- 1 1/2 cups all-purpose flour
- 1/2 cup unsalted butter, chilled and cubed
- 1/4 cup granulated sugar
- 1/4 teaspoon salt
- 2 large eggs
- 1/2 cup fresh lemon juice
- 1 tablespoon lemon zest
- 3/4 cup granulated sugar (for filling)
- 1/2 cup heavy cream
- 1 pint fresh berries (strawberries, raspberries, blueberries, or a mix)
- Powdered sugar, for dusting
Cooking Instructions:
1. Prepare the Tart Crust: In a mixing bowl, combine the flour, 1/4 cup sugar, and salt. Add the chilled butter cubes and use a pastry cutter or your fingers to blend until the mixture resembles coarse crumbs.
Add 1 egg and mix until the dough comes together. Form the dough into a disk, wrap it in plastic wrap, and refrigerate for at least 30 minutes.
2. Roll Out the Dough: Preheat your oven to 350°F (175°C). On a lightly floured surface, roll out the chilled dough to fit a 9-inch tart pan with a removable bottom.
Gently press the dough into the pan and trim any excess. Prick the bottom with a fork to prevent bubbling.
3. Bake the Crust: Line the crust with parchment paper and fill with pie weights or dried beans. Bake for 15 minutes, then remove the weights and parchment paper.
Bake for an additional 10 minutes or until lightly golden. Let it cool completely.
4. Make the Lemon Filling: In a saucepan over medium heat, whisk together the remaining egg, lemon juice, lemon zest, and 3/4 cup sugar.
Cook, stirring constantly, until the mixture thickens and coats the back of a spoon. Remove from heat and stir in the heavy cream. Pour the filling into the cooled crust.
5. Chill the Tart: Allow the tart to cool at room temperature for about 15 minutes, then refrigerate for at least 2 hours or until set.
6. Add the Berries: Before serving, arrange the fresh berries on top of the lemon filling. You can create a pattern or scatter them randomly for a more rustic look.
7. Serve and Enjoy: Dust the tart with powdered sugar just before serving for an extra touch of elegance.
Extra Tips:
When preparing the tart crust, make sure the butter is very cold to achieve a flaky texture. If you find the dough too sticky to handle, refrigerate it for a bit longer to make it easier to roll out.
For the lemon filling, constant stirring is key to prevent curdling and to achieve a smooth consistency. Feel free to experiment with different combinations of berries depending on what’s in season or your personal preference.
Remember to let the tart chill sufficiently to guarantee the filling is perfectly set before serving.
Classic Peach Melba
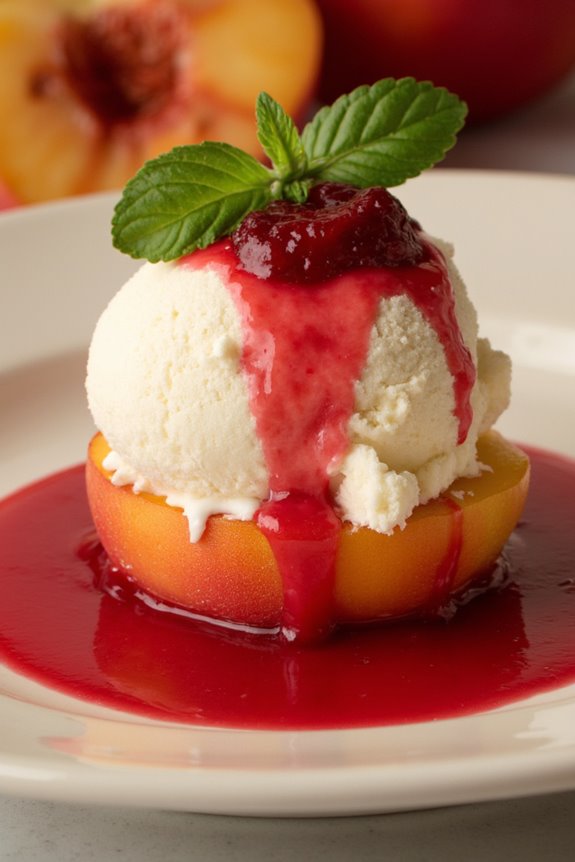
Peach Melba is a classic French dessert that combines the sweet, juicy taste of ripe peaches with the rich, creamy flavor of vanilla ice cream and a delightful raspberry sauce. This elegant dessert was created in the late 19th century by the famous French chef Auguste Escoffier in honor of the Australian opera singer Nellie Melba.
The combination of fresh fruit, ice cream, and a vibrant sauce makes Peach Melba a perfect treat for warm summer evenings, offering a revitalizing and satisfying end to any meal.
In this recipe, we’ll guide you through making a traditional Peach Melba that serves 4-6 people. We’ll begin by poaching the peaches to soften them and enhance their flavor. Then, we’ll create a simple raspberry sauce that will add a touch of tartness and color to the dish. Finally, we’ll assemble everything with a scoop of creamy vanilla ice cream for the ultimate indulgence.
This dessert isn’t only delicious but also visually stunning, making it a great choice for entertaining guests.
Ingredients for 4-6 servings:
- 4 ripe peaches
- 1 cup granulated sugar
- 2 cups water
- 1 teaspoon vanilla extract
- 2 cups fresh or frozen raspberries
- 2 tablespoons powdered sugar
- 1 tablespoon lemon juice
- 1 pint vanilla ice cream
- Fresh mint leaves (optional, for garnish)
Cooking Instructions:
- Poach the Peaches:
- Start by bringing a large pot of water to a boil. Carefully place the peaches in the boiling water for about 30 seconds. Then, immediately transfer them to a bowl of ice water to stop the cooking process.
- Once the peaches are cool, gently peel off their skins. Cut each peach in half and remove the pits.
- Prepare the Poaching Liquid:
- In a medium saucepan, combine the granulated sugar, 2 cups of water, and vanilla extract. Stir over medium heat until the sugar dissolves completely.
- Add the peeled peach halves to the saucepan. Simmer gently for about 5 minutes, or until the peaches are tender but not mushy. Remove the peaches from the liquid and let them cool.
- Make the Raspberry Sauce:
- In another saucepan, combine the raspberries, powdered sugar, and lemon juice. Cook over medium heat, stirring frequently, until the raspberries break down and the mixture thickens, about 5-7 minutes.
- Strain the sauce through a fine-mesh sieve to remove the seeds, pressing down to extract as much liquid as possible. Discard the seeds and set the smooth sauce aside to cool.
- Assemble the Dessert:
- In serving bowls, place a scoop of vanilla ice cream. Top with a poached peach half. Drizzle with the raspberry sauce.
- Garnish with fresh mint leaves if desired. Serve immediately for the best experience.
Extra Tips:
When choosing peaches for Peach Melba, make sure they’re ripe but firm to prevent them from becoming too soft during poaching. If fresh raspberries aren’t available, frozen raspberries work just as well for the sauce.
To enhance the presentation, consider chilling the serving bowls before assembling the dessert to keep the ice cream from melting too quickly. This classic dessert can be made ahead of time by poaching the peaches and preparing the raspberry sauce in advance, allowing you to focus on presentation when it’s time to serve.
Lavender Honey Ice Cream

Lavender Honey Ice Cream is a delightful and aromatic French summer dessert that combines the floral essence of lavender with the sweet richness of honey. This ice cream offers a revitalizing and unique flavor profile, perfect for those warm summer days when you’re craving something a bit different. The creamy texture and subtle hints of lavender make this dessert not only delicious but also a feast for the senses.
Whether you’re serving it at a summer gathering or enjoying it in the comfort of your home, Lavender Honey Ice Cream is sure to impress.
The key to making a perfect Lavender Honey Ice Cream lies in balancing the flavors. The lavender should be noticeable but not overpowering, while the honey should provide just the right amount of sweetness. Using fresh lavender flowers or culinary lavender guarantees a more vibrant flavor, but dried lavender can also be used if that’s what you have on hand. This recipe makes enough to serve 4-6 people, so it’s perfect for sharing with family and friends.
Ingredients (Serves 4-6):
- 2 cups heavy cream
- 1 cup whole milk
- 1/2 cup honey
- 2 tablespoons dried culinary lavender or 1 tablespoon fresh lavender flowers
- 5 large egg yolks
- 1 teaspoon vanilla extract
- A pinch of salt
Cooking Instructions:
- Prepare the Lavender Infusion: In a medium saucepan, combine the heavy cream, whole milk, and lavender. Heat the mixture over medium heat until it’s just about to simmer, then remove from heat. Cover and let it steep for about 20 minutes to allow the lavender to infuse its flavor into the cream.
- Strain and Reheat: Strain the lavender-infused cream mixture through a fine mesh sieve into another saucepan to remove the lavender flowers. Return the strained mixture to the stove and warm it over medium heat again until it’s just about to simmer.
- Mix Honey and Egg Yolks: In a separate bowl, whisk together the egg yolks, honey, and salt until the mixture is smooth and light.
- Temper the Eggs: Slowly pour about 1/2 cup of the hot cream mixture into the egg yolk mixture, whisking constantly to temper the eggs. This helps to gently heat the eggs without cooking them.
- Combine and Cook: Pour the tempered egg mixture back into the saucepan with the remaining cream. Cook over medium heat, stirring constantly with a wooden spoon, until the mixture thickens slightly and coats the back of the spoon. This should take about 5-7 minutes.
- Add Flavoring: Remove the saucepan from heat and stir in the vanilla extract.
- Chill the Mixture: Pour the mixture into a bowl and cover with plastic wrap, pressing it directly onto the surface to prevent a skin from forming. Refrigerate for at least 4 hours, or until thoroughly chilled.
- Churn the Ice Cream: Once chilled, pour the mixture into an ice cream maker and churn according to the manufacturer’s instructions until it reaches the desired consistency.
- Freeze the Ice Cream: Transfer the ice cream to an airtight container and freeze for at least 2 hours before serving to allow it to firm up.
Extra Tips:
When making Lavender Honey Ice Cream, it’s important to use culinary lavender, as ornamental lavender varieties may have an unpleasant soapy taste.
Adjust the amount of honey to suit your preference for sweetness, as different types of honey can vary in intensity. If you don’t have an ice cream maker, you can still make this recipe by pouring the chilled mixture into a shallow container, freezing it, and stirring every 30 minutes until it reaches the desired consistency. This method may not give you the same creaminess but will still result in a delicious treat.
Chilled Cherry Clafoutis
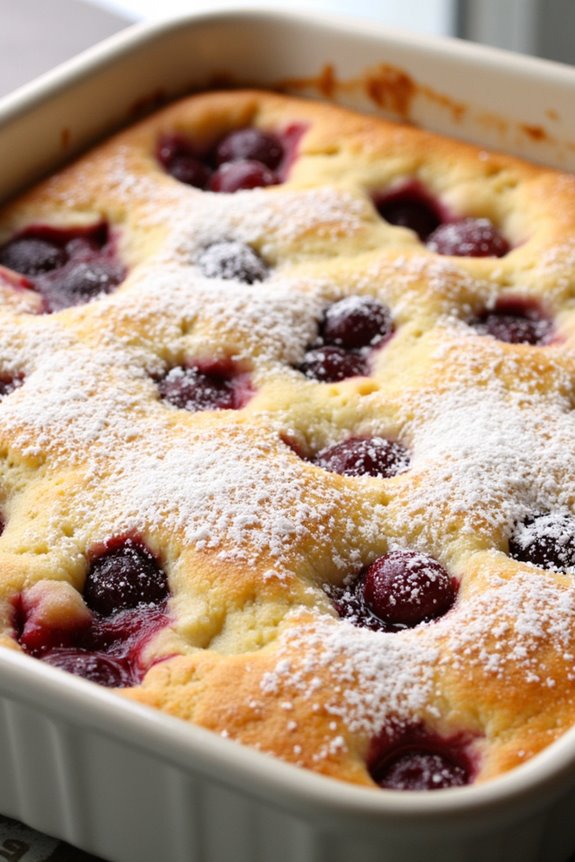
Chilled Cherry Clafoutis is a classic French dessert that beautifully captures the essence of summer with its rich, creamy custard and juicy cherries. This dish is traditionally made with unpitted cherries, which are said to impart an almond-like flavor to the batter during baking. However, for ease of consumption, you may choose to pit the cherries before baking. Clafoutis is simple yet elegant, making it a perfect choice for both casual family gatherings and more formal dinner parties.
The beauty of a Chilled Cherry Clafoutis lies in its simplicity and the fresh, vibrant flavor of cherries. The batter is similar to that of a crepe, resulting in a custardy, slightly sweet dessert that’s delicious whether served warm or chilled. Once baked, the clafoutis is sprinkled with powdered sugar and can be paired with a dollop of whipped cream or a scoop of vanilla ice cream for added indulgence. This recipe is designed to serve 4-6 people, making it ideal for sharing.
Ingredients (serves 4-6):
- 1 cup cherries, pitted
- 3 large eggs
- 1 cup whole milk
- 1/2 cup granulated sugar
- 1/2 cup all-purpose flour
- 1 teaspoon vanilla extract
- 1/4 teaspoon almond extract
- A pinch of salt
- Butter, for greasing the baking dish
- Powdered sugar, for dusting
Instructions:
- Preheat the Oven: Begin by preheating your oven to 350°F (175°C). This guarantees that the clafoutis will bake evenly once placed in the oven.
- Prepare the Baking Dish: Grease a 9-inch round or square baking dish with butter. This prevents the clafoutis from sticking to the dish and makes it easier to serve.
- Arrange the Cherries: Spread the pitted cherries evenly across the bottom of the greased baking dish. Set aside while you prepare the batter.
- Make the Batter: In a mixing bowl, whisk together the eggs and granulated sugar until well combined. Add the flour and salt, whisking until smooth. Gradually pour in the milk, followed by the vanilla and almond extracts, mixing until the batter is smooth and homogenous.
- Combine and Bake: Pour the batter over the cherries in the baking dish, ensuring they’re evenly covered. Place the dish in the preheated oven and bake for about 35-40 minutes, or until the clafoutis is puffed, lightly golden, and a toothpick inserted into the center comes out clean.
- Cool and Chill: Once baked, remove the clafoutis from the oven and allow it to cool to room temperature. Then, place it in the refrigerator to chill for at least 2 hours before serving.
- Serve: Dust the chilled clafoutis with powdered sugar just before serving. Cut into slices and enjoy as is, or with a dollop of whipped cream or vanilla ice cream.
Extra Tips:
For the best flavor, use fresh, ripe cherries. If fresh cherries are out of season, you can use frozen cherries, but be sure to thaw and drain them well before using.
If you choose to keep the cherries unpitted, inform your guests beforehand to avoid any surprises. Additionally, the clafoutis may deflate slightly as it cools, which is perfectly normal.
The chilled clafoutis can be stored in the refrigerator for up to three days, making it a great make-ahead dessert.
Raspberry Sorbet With Mint
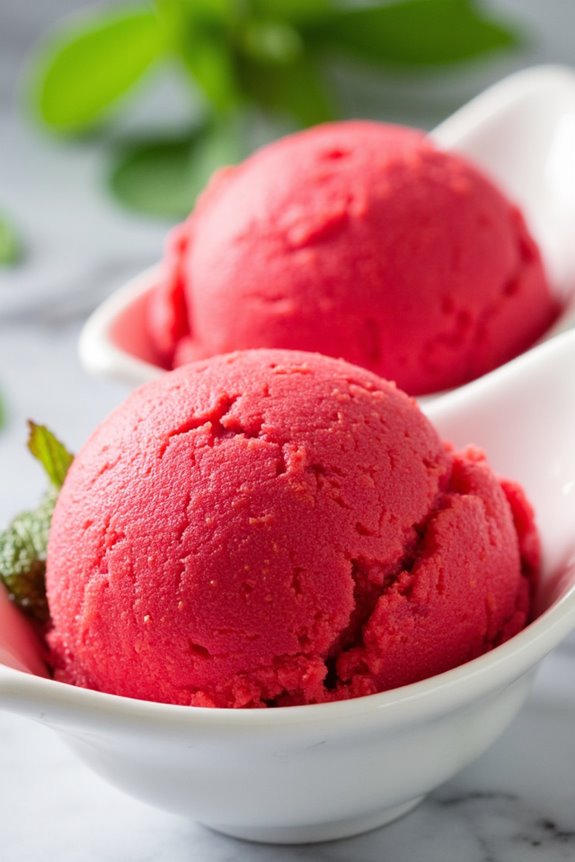
Raspberry Sorbet With Mint is a delightful French summer dessert that combines the tartness of fresh raspberries with the invigorating note of mint. This frozen treat is perfect for warm days, offering a light and energizing experience that’s both simple to make and elegantly delicious.
The vibrant red hue of the sorbet contrasts beautifully with the flecks of green mint, making it visually appealing as well as a taste sensation.
To create this sorbet, ripe raspberries are blended with sugar and a touch of lemon juice to enhance the natural sweetness of the fruit. Fresh mint leaves are then added to the mix, infusing the sorbet with a cool, herbal flavor that complements the tartness of the raspberries.
This recipe is straightforward and requires minimal ingredients, making it an ideal choice for an impromptu summer gathering or a sophisticated finish to a meal.
Ingredients (serving size: 4-6 people):
- 4 cups fresh raspberries
- 1 cup granulated sugar
- 1 tablespoon lemon juice
- 1/2 cup water
- 1/4 cup fresh mint leaves, finely chopped
Cooking Instructions:
- Prepare the Raspberries: Rinse the raspberries thoroughly under cold water and pat them dry with a paper towel. This step is important to confirm no excess water dilutes the sorbet’s flavor.
- Make the Syrup: In a small saucepan, combine the sugar and water. Heat over medium heat, stirring until the sugar is completely dissolved. Remove from heat and let it cool to room temperature.
- Blend the Ingredients: In a blender, combine the raspberries, cooled sugar syrup, lemon juice, and chopped mint leaves. Blend until the mixture is smooth and the mint is fully incorporated.
- Strain the Mixture: Pour the blended raspberry mixture through a fine-mesh sieve into a bowl, using a spatula to press down on the solids to extract as much liquid as possible. This step removes the seeds and confirms a smooth texture for the sorbet.
- Chill the Mixture: Cover the strained mixture and refrigerate for at least an hour until it’s thoroughly chilled. This helps to develop the flavors and improves the texture of the sorbet.
- Churn the Sorbet: Pour the chilled mixture into an ice cream maker and churn according to the manufacturer’s instructions until it reaches a soft-serve consistency.
- Freeze the Sorbet: Transfer the sorbet to an airtight container and freeze for at least 2 hours, or until it’s firm enough to scoop.
Extra Tips:
For the best results, use the freshest raspberries you can find as they’ll provide the most flavor. If fresh raspberries aren’t available, you can use frozen ones, but make sure they’re fully thawed before blending.
Adjust the amount of sugar based on the sweetness of the raspberries. If you don’t have an ice cream maker, you can still make this sorbet by placing the mixture in a shallow dish in the freezer and stirring it every 30 minutes until it reaches the desired consistency. This will mimic the churning process and help prevent ice crystals from forming.
Apricot Galette With Almond Cream
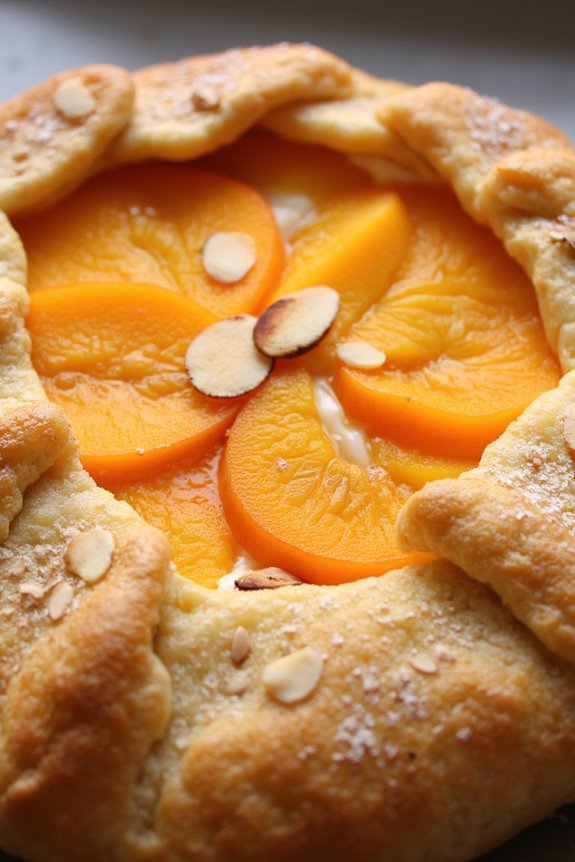
Indulge in the delightful flavors of summer with a classic French dessert, the Apricot Galette with Almond Cream. This rustic yet elegant dish combines the tart sweetness of fresh apricots with the rich, nutty flavor of almond cream, all encased in a buttery, flaky pastry. Perfect for a summer gathering or a special treat, this galette celebrates the best of seasonal ingredients with its simple preparation and stunning presentation.
The beauty of a galette lies in its imperfection; the free-form crust wraps around the filling in a way that’s both beautiful and unique to each creation. The almond cream adds a luxurious depth to the dessert, complementing the juicy apricots without overpowering them. This recipe is designed to serve 4-6 people, making it an ideal choice for small gatherings or a family dinner.
Ingredients:
- 1 1/2 cups all-purpose flour
- 1/2 cup cold unsalted butter, cubed
- 1/4 cup granulated sugar
- 1/4 teaspoon salt
- 1/4 cup ice water
- 1/2 cup almond flour
- 1/4 cup confectioners’ sugar
- 1 large egg
- 1/2 teaspoon almond extract
- 1 pound fresh apricots, pitted and sliced
- 2 tablespoons honey
- 1 tablespoon cornstarch
- 1 tablespoon lemon juice
- 1 tablespoon milk or cream for brushing
- 2 tablespoons sliced almonds
- Optional: powdered sugar for dusting
Instructions:
1. Prepare the Dough: In a food processor, combine the all-purpose flour, granulated sugar, and salt. Add the cold, cubed butter and pulse until the mixture resembles coarse crumbs. Gradually add the ice water, one tablespoon at a time, pulsing until the dough starts to come together.
Form the dough into a disk, wrap it in plastic wrap, and refrigerate for at least 30 minutes.
2. Make the Almond Cream: In a bowl, mix the almond flour, confectioners’ sugar, egg, and almond extract until smooth and creamy. Set aside.
3. Prepare the Apricots: In a separate bowl, gently toss the sliced apricots with the honey, cornstarch, and lemon juice. This mixture will help thicken the juices and enhance the apricot flavor.
4. Assemble the Galette: Preheat your oven to 400°F (200°C). Roll out the chilled dough on a lightly floured surface into a 12-inch circle.
Transfer the dough to a parchment-lined baking sheet. Spread the almond cream over the center of the dough, leaving about a 2-inch border. Arrange the apricot slices over the almond cream.
5. Fold the Edges: Carefully fold the edges of the dough over the apricots, pleating as necessary to create a rustic edge. Brush the dough with milk or cream and sprinkle with sliced almonds.
6. Bake the Galette: Bake in the preheated oven for 35-40 minutes, or until the crust is golden brown and the apricots are tender. Allow the galette to cool slightly before serving.
7. Serve: Dust with powdered sugar if desired, and serve warm or at room temperature.
Extra Tips:
For the best results, use ripe but firm apricots to guarantee they hold their shape during baking. If fresh apricots aren’t available, you can substitute with peaches or plums.
Make sure to chill the dough thoroughly to prevent it from becoming too soft to handle. The almond cream can be prepared a day in advance and stored in the refrigerator to save time on the day of baking.
Enjoy this galette with a scoop of vanilla ice cream or a dollop of whipped cream for an extra indulgent treat.
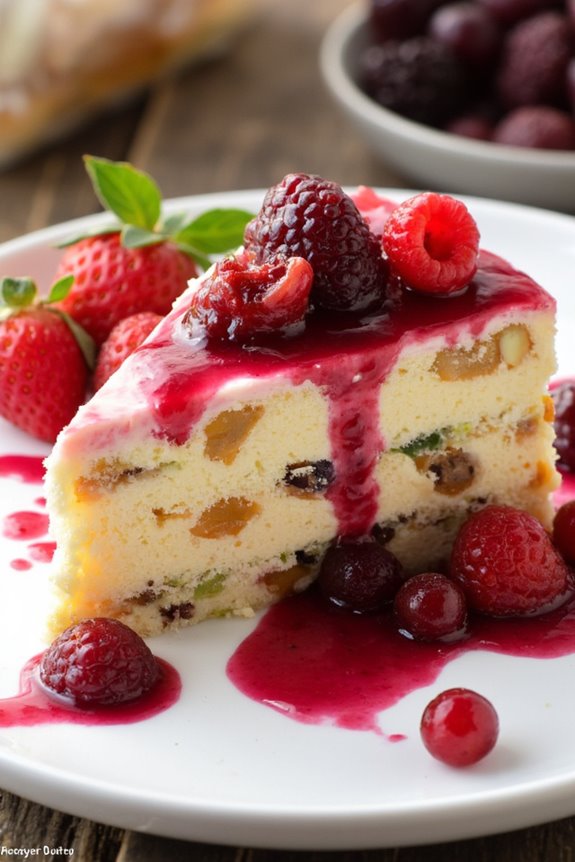
French Vanilla Custard With Summer Fruits
Indulge in the classic French dessert, Vanilla Custard, enriched with the vibrant flavors of summer fruits. This dish captivates with its creamy, silky texture and the natural sweetness of ripe fruits, offering a perfect balance between richness and vitality. The custard, with its smooth consistency, serves as a luscious base, while the addition of bright, juicy fruits like berries, peaches, or apricots elevates the dessert into a delightful symphony of flavors.
Ideal for summer gatherings or a special treat, this dessert is both elegant and easy to prepare, making it a favorite for those who love to blend classic French cuisine with seasonal ingredients.
The key to mastering this dessert is in the preparation of the custard, which involves gently cooking a mixture of eggs, sugar, and vanilla-infused milk until it thickens to the perfect consistency. Once the custard is ready, it’s chilled and then adorned with an array of fresh summer fruits just before serving. This combination not only enhances the flavor but also adds a burst of color to the presentation, making it as visually appealing as it’s delicious.
Enjoy this dessert on a warm summer evening, and impress your guests with a taste of French culinary finesse.
Ingredients (serving size: 4-6 people):
- 2 cups whole milk
- 1 vanilla bean or 1 tablespoon pure vanilla extract
- 4 large egg yolks
- 1/2 cup granulated sugar
- 2 tablespoons cornstarch
- A pinch of salt
- 1 tablespoon unsalted butter
- Assorted summer fruits (e.g., strawberries, blueberries, raspberries, peaches, apricots)
- Mint leaves for garnish (optional)
Instructions:
- Prepare the Vanilla Infusion: Pour the milk into a medium saucepan. If using a vanilla bean, split it lengthwise and scrape out the seeds. Add both the seeds and the pod to the milk. If using vanilla extract, hold off on adding it until later. Heat the milk gently over medium heat until it just begins to simmer. Remove from heat and let it steep for 10 minutes to infuse the vanilla flavor.
- Mix the Custard Base: In a mixing bowl, whisk together the egg yolks, sugar, cornstarch, and salt until the mixture becomes pale and slightly thickened.
- Combine Milk and Egg Mixture: Gradually pour the warm milk into the egg mixture, whisking constantly to prevent the eggs from cooking. Once fully combined, return the mixture to the saucepan.
- Cook the Custard: Place the saucepan over medium-low heat and cook, stirring constantly with a wooden spoon or heat-resistant spatula, until the custard thickens and coats the back of the spoon. This should take about 7-10 minutes. Don’t let it boil, as this can cause the custard to curdle.
- Finish the Custard: Remove from heat and stir in the butter and vanilla extract (if using extract instead of a vanilla bean). Strain the custard through a fine-mesh sieve into a clean bowl to remove any cooked egg bits and vanilla pod.
- Chill the Custard: Cover the custard with plastic wrap, pressing it directly onto the surface to prevent a skin from forming. Refrigerate for at least 2 hours, or until thoroughly chilled.
- Prepare the Fruits: While the custard chills, wash and prepare your chosen summer fruits. Slice larger fruits like peaches and apricots; leave smaller fruits like berries whole.
- Assemble the Dessert: Once the custard is chilled, spoon it into serving bowls or glasses. Top generously with the prepared summer fruits. Garnish with mint leaves if desired.
Extra Tips:
For an extra depth of flavor, consider roasting the fruits lightly with a touch of honey before placing them atop the custard. This can enhance their natural sweetness and add a slight caramelized note to the dessert.
Additionally, if you find the custard hasn’t thickened as much as you’d like, you can return it to the heat briefly, continuing to stir until it reaches the desired consistency. Always remember to serve this dessert cold, as the contrast between the chilled custard and the fresh fruits is what makes it particularly revitalizing and enjoyable during the summer months.
Cantaloupe and Basil Granita
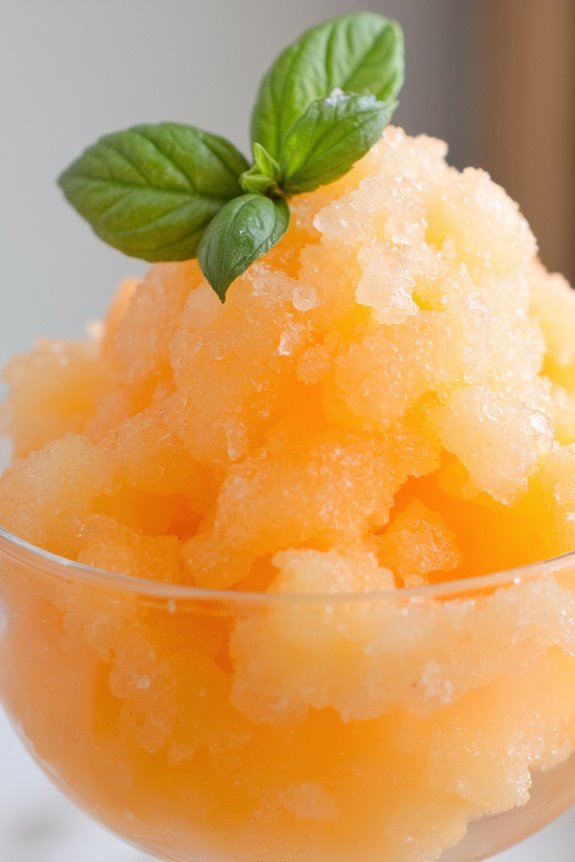
Cantaloupe and Basil Granita is a revitalizing French summer dessert that’s perfect for warm weather gatherings. This icy treat combines the sweet, juicy flavors of cantaloupe with the aromatic notes of fresh basil, creating a delightful balance of sweet and herbal. The granita’s coarse, crystalline texture makes it a unique dessert that melts beautifully in your mouth, allowing you to savor each spoonful slowly. It’s easy to prepare and requires minimal ingredients, making it a go-to choice for a light and elegant finish to any meal.
Granita is a semi-frozen dessert that originates from Italy, but it has become popular in French cuisine due to its versatility and invigorating qualities. The process of making granita involves freezing a flavored liquid and scraping it into icy crystals. For this recipe, we’ll use ripe cantaloupe and fresh basil to infuse the granita with natural sweetness and a hint of herbal freshness.
The preparation is simple and requires only a few steps, making it an accessible dessert for cooks of all skill levels. This recipe serves 4-6 people, perfect for a small gathering or family treat.
Ingredients (Serves 4-6):
- 1 large ripe cantaloupe, peeled, seeded, and cubed
- 1/2 cup granulated sugar
- 1/2 cup water
- 1/4 cup fresh basil leaves, packed
- 2 tablespoons freshly squeezed lemon juice
- Pinch of salt
Instructions:
- Prepare the Simple Syrup: In a small saucepan over medium heat, combine the granulated sugar and water. Stir until the sugar has completely dissolved, then remove from heat. Add the fresh basil leaves and let them steep in the syrup for about 10 minutes to infuse the flavor. Strain the syrup to remove the basil leaves and set aside to cool.
- Blend the Cantaloupe: In a blender or food processor, add the cubed cantaloupe, lemon juice, a pinch of salt, and the cooled basil-infused syrup. Blend until the mixture is smooth and well combined.
- Freeze the Mixture: Pour the cantaloupe mixture into a shallow baking dish or a large freezer-safe container. Place it in the freezer for about 1 hour.
- Scrape the Granita: After the first hour, use a fork to scrape the partially frozen mixture, creating icy crystals. Return the dish to the freezer and repeat the scraping process every 30 minutes for about 2-3 hours, or until the granita is fully frozen and has a light, fluffy texture.
- Serve: Once the granita has reached the desired consistency, scoop it into individual serving dishes or glasses. Garnish with a few fresh basil leaves for an extra touch of elegance and serve immediately.
Extra Tips: To maximize the best flavor, use a ripe cantaloupe as it will provide the necessary sweetness and juiciness for the granita. If you prefer a more pronounced basil flavor, consider adding a few more leaves.
Be patient during the freezing process and remember to scrape the mixture frequently to achieve the perfect granita texture. If the mixture becomes too hard, let it sit at room temperature for a few minutes before scraping again. This granita can be made a day in advance; just scrape it again before serving for a fresh, fluffy texture.
Profiteroles With Chocolate Sauce
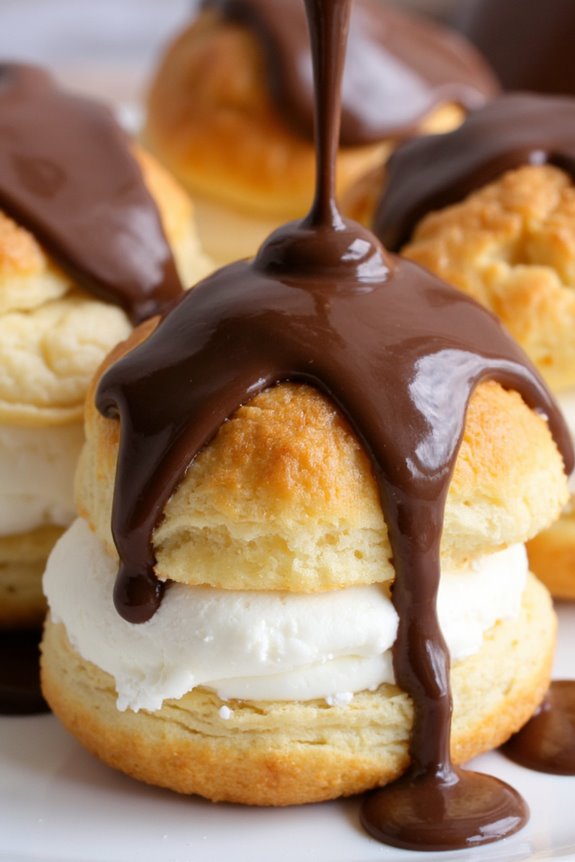
Profiteroles with Chocolate Sauce is a classic French dessert that combines delicate choux pastry puffs filled with a rich vanilla ice cream, topped with a warm, decadent chocolate sauce. This delightful treat is perfect for any summer gathering, offering a revitalizing contrast between the cold, creamy filling and the warm, luscious topping.
The profiteroles are light and airy, providing the perfect vessel for the indulgent flavors of the ice cream and chocolate.
To create this mouthwatering dessert, you’ll start by making the choux pastry, which will be baked into light and hollow puffs. Once cooled, these puffs are filled with your choice of vanilla ice cream, and then generously drizzled with a smooth and glossy chocolate sauce.
The combination of textures and flavors creates a dessert that’s both elegant and comforting, sure to impress your guests and satisfy any sweet tooth.
Ingredients for 4-6 Servings
- For the Choux Pastry:
- 1/2 cup (120ml) water
- 1/2 cup (120ml) milk
- 8 tablespoons (1 stick) unsalted butter
- 1 tablespoon sugar
- Pinch of salt
- 1 cup (125g) all-purpose flour
- 4 large eggs
- For the Filling:
- 1 pint vanilla ice cream
- For the Chocolate Sauce:
- 4 ounces (115g) dark chocolate, chopped
- 1/2 cup (120ml) heavy cream
- 2 tablespoons sugar
- 1 tablespoon unsalted butter
- 1 teaspoon vanilla extract
Cooking Instructions
- Prepare the Choux Pastry:
- Preheat your oven to 400°F (200°C) and line a baking sheet with parchment paper.
- In a medium saucepan, combine water, milk, butter, sugar, and salt. Bring to a boil over medium heat.
- Remove from heat and add flour all at once, stirring vigorously until the mixture forms a ball.
- Return to heat and cook for 1-2 minutes, stirring constantly, until the dough pulls away from the sides of the pan and leaves a film on the bottom.
- Transfer the dough to a mixing bowl and let it cool for 5 minutes. Add eggs one at a time, beating well after each addition until the dough is smooth and glossy.
- Spoon or pipe small mounds of dough onto the prepared baking sheet, spacing them about 2 inches apart.
- Bake for 20-25 minutes until the profiteroles are puffed and golden brown. Allow them to cool completely on a wire rack.
- Prepare the Chocolate Sauce:
- In a small saucepan, heat the heavy cream and sugar over medium heat until just simmering.
- Remove from heat and add the chopped chocolate, stirring until melted and smooth.
- Stir in the butter and vanilla extract until fully incorporated.
- Assemble the Profiteroles:
- Once the profiteroles are cool, cut them in half horizontally.
- Fill each bottom half with a scoop of vanilla ice cream and replace the top.
- Drizzle the warm chocolate sauce over the filled profiteroles just before serving.
Extra Tips
For best results, verify your profiteroles are completely cooled before filling them with ice cream to prevent melting. The choux pastry can be made a day in advance and stored in an airtight container.
For a more intense chocolate flavor, you can use a higher cocoa percentage chocolate for the sauce. Experiment with different ice cream flavors or even a touch of liqueur in the chocolate sauce to personalize your dessert.
Strawberry and Rhubarb Compote
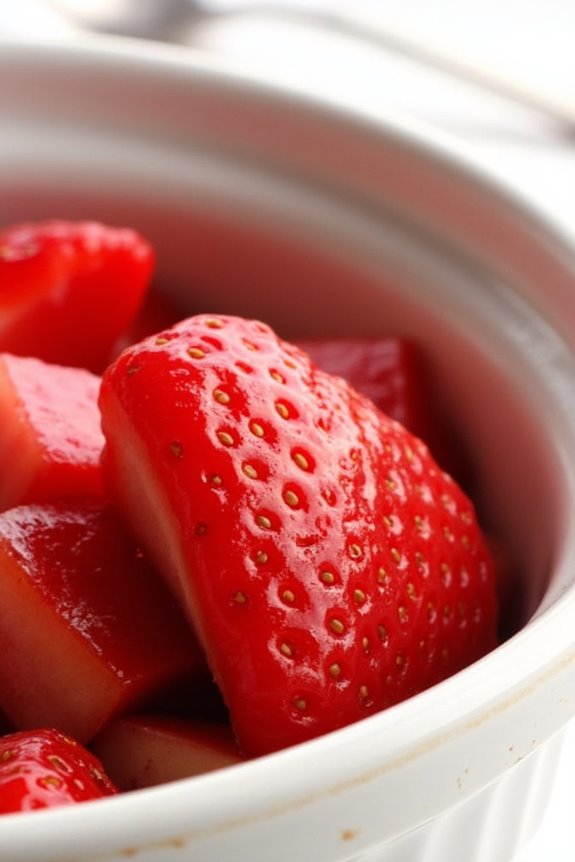
Indulge in the delightful flavors of a traditional French summer dessert with this Strawberry and Rhubarb Compote. Combining the sweet tanginess of strawberries and the tartness of rhubarb, this dessert is perfect for a warm summer day.
The compote can be served on its own, with a dollop of whipped cream, or as a topping for ice cream, yogurt, or even pancakes. Whether you’re hosting a fancy dinner party or simply craving a sweet treat, this dessert is sure to be a hit with family and friends.
The vibrant red color and the invigorating taste of this compote make it a visually appealing and delicious addition to any dessert table. Not only is it simple to prepare, but it also takes advantage of the fresh, seasonal produce available during the summer months.
With just a few ingredients and minimal cooking time, you’ll have a mouthwatering dessert ready to enjoy. So, let’s plunge into the recipe and discover how to make this delightful Strawberry and Rhubarb Compote!
Ingredients (serves 4-6):
- 2 cups fresh strawberries, hulled and halved
- 2 cups rhubarb, chopped into 1/2-inch pieces
- 3/4 cup granulated sugar
- 1/4 cup water
- 1 teaspoon vanilla extract
- Zest of 1 lemon
- Optional: a pinch of cinnamon
Instructions:
- Prepare the Ingredients: Start by washing the strawberries and rhubarb under cold water. Hull and halve the strawberries, and chop the rhubarb into 1/2-inch pieces. This guarantees even cooking and allows the flavors to meld together nicely.
- Combine the Ingredients: In a medium-sized saucepan, combine the strawberries, rhubarb, sugar, and water. Stir gently to guarantee the sugar is evenly distributed among the fruit.
- Cook the Compote: Place the saucepan over medium heat. Bring the mixture to a gentle simmer while stirring occasionally. Allow it to cook for about 10-15 minutes, or until the fruit begins to break down and the mixture thickens slightly.
- Add Flavorings: Once the compote has reached the desired consistency, remove it from heat and stir in the vanilla extract and lemon zest. If you like, add a pinch of cinnamon for an extra layer of flavor.
- Cool and Serve: Allow the compote to cool slightly before serving. It can be enjoyed warm or chilled, depending on your preference. Serve it in individual bowls or use it as a topping for your favorite dessert.
Extra Tips:
For the best flavor, use ripe and fresh strawberries and rhubarb when in season. If fresh rhubarb isn’t available, frozen rhubarb can be used as a substitute.
Adjust the sugar content according to your taste preference or the sweetness of the strawberries. For a thicker compote, continue to simmer the mixture for a few more minutes until the desired thickness is achieved.
This compote can be stored in an airtight container in the refrigerator for up to a week, making it a convenient make-ahead dessert option.
Nougat Glacé With Red Berry Coulis
Nougat Glacé with Red Berry Coulis is a delicate and revitalizing French dessert that perfectly captures the flavors of summer. This dish combines the creamy, nutty texture of nougat glacé with the vibrant and tangy taste of a red berry coulis. The nougat glacé, fundamentally a frozen nougat, is a luxurious treat made with whipped cream, honey, and a variety of nuts and dried fruits, offering a delightful contrast to the smooth, slightly tart coulis made from fresh berries. Together, they create an elegant dessert that isn’t only visually appealing but also tantalizing to the taste buds, making it a perfect finale for any summer meal.
Creating Nougat Glacé with Red Berry Coulis requires a bit of preparation, but the results are well worth the effort. This dessert is ideal for serving at gatherings and can be prepared in advance, allowing you to focus on enjoying the occasion with your guests. The nougat glacé needs time to freeze properly, so planning ahead is crucial. The red berry coulis, on the other hand, is quick to prepare and can be made right before serving to guarantee its freshness and vibrant color.
With a serving size designed for 4-6 people, this recipe is perfect for small dinner parties or family get-togethers.
Ingredients for Nougat Glacé with Red Berry Coulis (Serves 4-6):
- 3/4 cup (150g) sugar
- 1/4 cup (60g) honey
- 3 egg whites
- 1 1/4 cups (300ml) heavy whipping cream
- 1/2 cup (75g) almonds, toasted and roughly chopped
- 1/2 cup (75g) pistachios, toasted and roughly chopped
- 1/4 cup (50g) dried apricots, finely chopped
- 1/4 cup (50g) dried figs, finely chopped
- 1/2 cup (100g) raspberries
- 1/2 cup (100g) strawberries, hulled and halved
- 1/4 cup (50g) red currants
- 2 tablespoons (30g) caster sugar
- 1 tablespoon (15ml) lemon juice
Cooking Instructions:
- Prepare the Nougat Glacé Base:
- In a saucepan, combine the sugar and honey. Heat gently, stirring constantly until the sugar dissolves and the mixture reaches a syrupy consistency. Remove from heat and set aside.
- Whip the Egg Whites:
- In a large mixing bowl, beat the egg whites until soft peaks form. Gradually add the sugar-honey syrup in a thin stream while continuing to beat until the mixture becomes glossy and holds stiff peaks.
- Prepare the Cream:
- In a separate bowl, whip the heavy whipping cream until it reaches soft peaks. Carefully fold the whipped cream into the egg white mixture, ensuring it’s evenly combined without deflating the mixture.
- Add Nuts and Dried Fruits:
- Gently fold in the toasted almonds, pistachios, dried apricots, and figs into the mixture. Pour the mixture into a loaf pan lined with plastic wrap or parchment paper. Smooth the top and cover with plastic wrap. Freeze for at least 6 hours or overnight until firm.
- Make the Red Berry Coulis:
- In a blender, combine raspberries, strawberries, red currants, caster sugar, and lemon juice. Blend until smooth. Strain the mixture through a fine sieve to remove seeds, resulting in a smooth coulis.
- Serve:
- To serve, remove the nougat glacé from the freezer and let it sit at room temperature for a few minutes to soften slightly. Slice and place on serving plates. Drizzle with the red berry coulis and garnish with extra fresh berries if desired.
Extra Tips:
When making Nougat Glacé with Red Berry Coulis, be sure to toast the nuts beforehand to enhance their flavor and add a delightful crunch to the creamy nougat. Freezing the nougat glacé in a loaf pan allows for easy slicing, but you can also use individual molds for a more sophisticated presentation.
Adjust the sweetness of the coulis by adding more or less sugar, depending on the natural sweetness of your berries. If you want to experiment further, try adding a splash of liqueur, such as Grand Marnier or Cointreau, to the coulis for an extra layer of complexity.
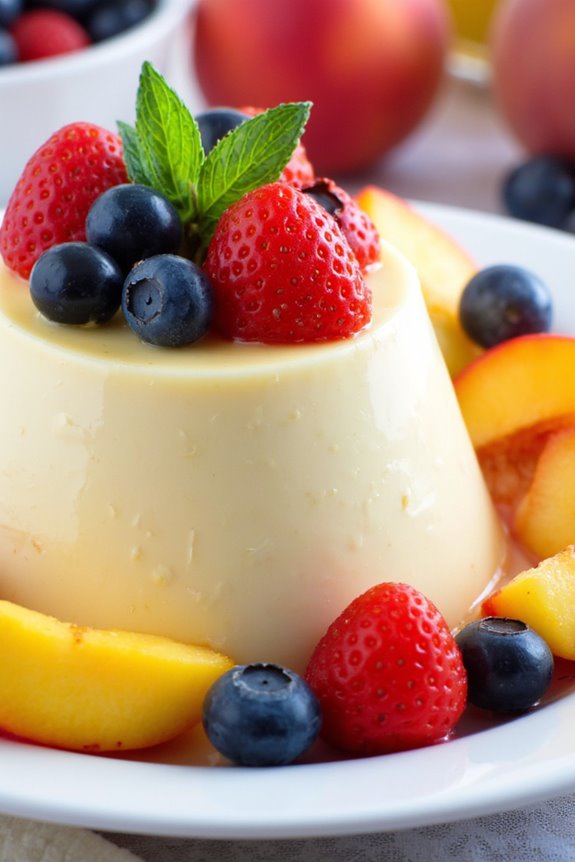
Lemon Verbena Panna Cotta
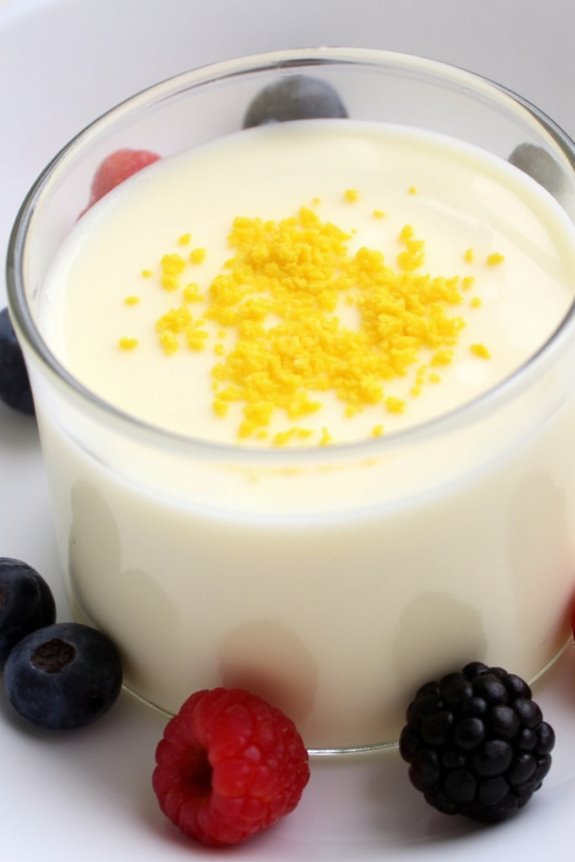
Lemon Verbena Panna Cotta is a delicate and rejuvenating dessert, perfect for a summer evening. With its silky texture and subtle citrusy aroma, this panna cotta makes for a sophisticated finish to any meal.
Lemon verbena, an herb known for its lemony fragrance, infuses the creamy panna cotta with a unique flavor that’s both light and energizing. This delightful dessert isn’t only easy to prepare but also makes a beautiful presentation with its elegant simplicity.
The key to a successful Lemon Verbena Panna Cotta lies in balancing the herb’s aromatic notes with the creamy base, creating a harmony of flavors that captivate the palate. It’s vital to select fresh lemon verbena leaves for this recipe to guarantee the most vibrant flavor.
The following recipe will guide you through creating this exquisite dessert, serving 4-6 people, with ingredients that are easy to find and steps that are straightforward to follow.
Ingredients (for 4-6 servings):
- 2 cups heavy cream
- 1 cup whole milk
- 1/2 cup granulated sugar
- 1/4 cup fresh lemon verbena leaves
- 2 teaspoons unflavored gelatin
- 3 tablespoons cold water
- 1 teaspoon vanilla extract
- Fresh berries or lemon zest for garnish (optional)
Instructions:
- Infuse the Cream: In a medium saucepan, combine the heavy cream, whole milk, and granulated sugar. Heat the mixture over medium heat until it begins to steam, stirring occasionally to dissolve the sugar.
- Add the fresh lemon verbena leaves and remove the saucepan from the heat. Cover and let the mixture steep for about 30 minutes to infuse the flavors.
- Prepare the Gelatin: While the cream is steeping, sprinkle the gelatin over 3 tablespoons of cold water in a small bowl. Allow it to sit for about 5 minutes, or until the gelatin has softened and absorbed the water.
- Strain and Heat the Cream: After the cream mixture has steeped, strain it through a fine-mesh sieve into a clean saucepan to remove the lemon verbena leaves.
- Reheat the strained cream over low heat, without boiling, until it’s warm.
- Dissolve the Gelatin: Add the softened gelatin to the warm cream mixture. Stir gently until the gelatin is completely dissolved.
- Remove the saucepan from the heat and stir in the vanilla extract.
- Mold the Panna Cotta: Pour the mixture into individual ramekins or serving glasses. Allow them to cool to room temperature, then cover and refrigerate for at least 4 hours, or until set.
- Serve: To serve, you can unmold the panna cotta onto a plate, or serve it directly in the ramekin or glass. Garnish with fresh berries or a sprinkle of lemon zest for an added touch of flavor and color.
Extra Tips: For a more intense lemon verbena flavor, you can increase the amount of leaves used or extend the steeping time. Confirm that the cream mixture doesn’t boil, as this can alter the texture of the panna cotta.
If you find it challenging to unmold the panna cotta, briefly dip the bottom of the ramekin in hot water and then invert it onto a plate. The panna cotta should slide out easily. Adjust the sweetness to your preference by adding or reducing the sugar content slightly.