

French desserts have a special place in my heart. They’re the ultimate blend of indulgence and elegance. Think about the delightful crack of a perfect crème brûlée or the tempting richness of a molten chocolate fondant. These aren’t just any desserts; they’re little experiences that whisk you away to a cozy Parisian café. Ready to uncover the secrets behind these classic treats?
Classic Crème Brûlée
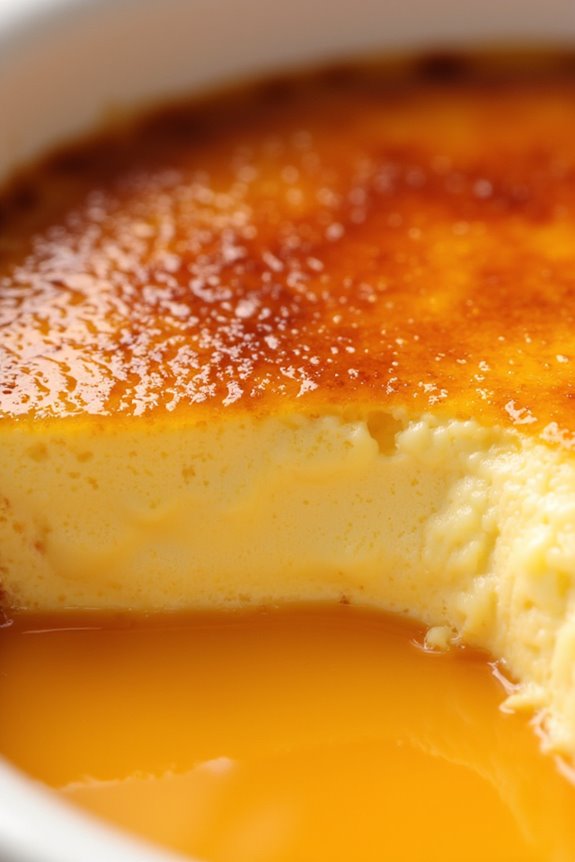
Classic Crème Brûlée is a timeless French dessert that combines a rich, creamy custard base with a perfectly caramelized sugar topping. It’s a dish that exudes elegance and simplicity, making it a favorite in many fine dining establishments as well as at home. The key to a successful Crème Brûlée lies in achieving the right balance between the smooth, velvety custard and the crisp, sugary crust that cracks with the tap of a spoon.
This dessert is perfect for serving at dinner parties, as it can be prepared in advance and caramelized just before serving. The use of vanilla in the custard enhances the flavor profile, creating a delicately sweet and aromatic experience. Whether you’re a seasoned chef or a home cook looking to impress your guests, Classic Crème Brûlée is a dish that’s sure to delight and satisfy the sweet tooth of any dessert lover.
Ingredients (serves 4-6):
- 2 cups heavy cream
- 1 vanilla bean or 1 teaspoon vanilla extract
- 6 large egg yolks
- 1/2 cup granulated sugar
- 1/4 cup granulated sugar (for topping)
- A pinch of salt
Cooking Instructions:
- Preheat the Oven: Preheat your oven to 325°F (160°C). Place a kitchen towel at the bottom of a large roasting pan to prevent the ramekins from sliding.
- Prepare the Custard Base: In a medium saucepan, pour the heavy cream and add the vanilla bean (split and seeds scraped) or vanilla extract. Heat the cream over medium heat until it’s just about to boil, then remove it from the heat. Allow the vanilla to infuse the cream for about 10 minutes.
- Whisk the Egg Yolks: In a medium mixing bowl, whisk together the egg yolks, 1/2 cup of granulated sugar, and a pinch of salt until the mixture is pale and slightly thickened.
- Combine the Mixtures: Slowly pour the warm cream into the egg yolk mixture, whisking constantly to avoid curdling the eggs. Confirm the mixture is smooth and well combined.
- Strain the Custard: Pour the mixture through a fine-mesh sieve into a large measuring cup or bowl to remove the vanilla bean and any cooked egg bits, guaranteeing a smooth custard.
- Fill the Ramekins: Divide the custard evenly among the ramekins, filling each about three-quarters full. Place the ramekins in the prepared roasting pan.
- Bake the Custard: Pour hot water into the roasting pan, reaching halfway up the sides of the ramekins. Carefully transfer the pan to the oven and bake for 30-40 minutes, or until the edges are set but the center still jiggles slightly when shaken.
- Cool and Chill: Remove the ramekins from the water bath and let them cool to room temperature. Then, refrigerate for at least 2 hours or overnight to set the custard.
- Caramelize the Sugar: Just before serving, sprinkle 1 tablespoon of granulated sugar evenly over each custard’s surface. Use a kitchen torch to carefully caramelize the sugar, forming a crisp, golden-brown crust. If you don’t have a torch, you can use the broiler in your oven, watching closely to avoid burning.
Extra Tips:
For the best results, use fresh, high-quality ingredients, particularly the vanilla bean, as it contributes greatly to the flavor. If you find the custard too sweet or prefer a lighter version, you can reduce the sugar slightly.
Additionally, when caramelizing the sugar, make sure to move the torch or rotate the ramekins evenly to achieve a consistent crust. Finally, if using the broiler method, keep a close eye on the custards to confirm they don’t over-brown.
With these tips in mind, your Classic Crème Brûlée will surely be a hit at your next gathering!
Decadent Chocolate Fondant
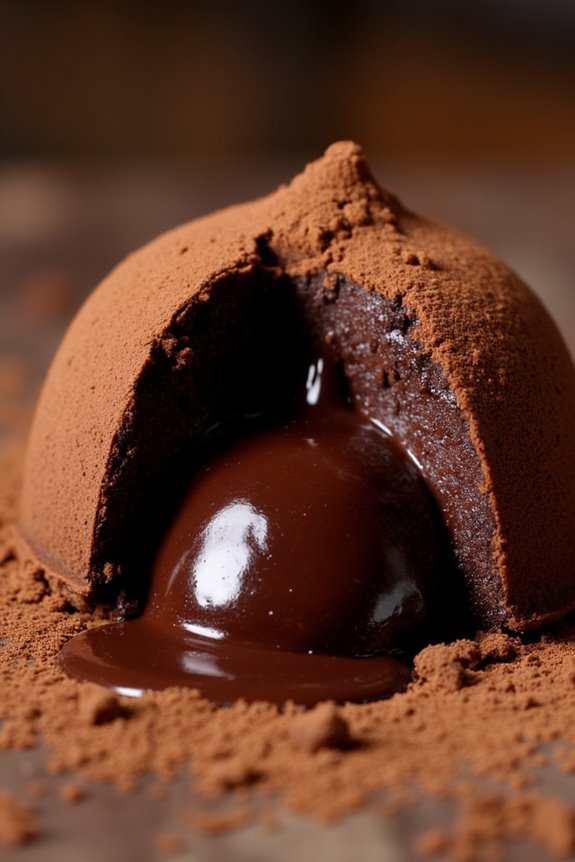
Indulge in the rich, gooey goodness of Decadent Chocolate Fondant, a classic French dessert that perfectly balances the flavors of dark chocolate and butter to create a delightful experience for your taste buds. This dessert is renowned for its molten chocolate center that flows out upon cutting into the warm fondant, offering a luxurious treat ideal for special occasions or simply when you crave something exquisite.
Its combination of a firm outer cake with a luscious, liquid center makes it a favorite among chocolate lovers and a demonstration of the art of French pastry. The key to mastering a perfect Chocolate Fondant lies in precision and timing, guaranteeing that the outer shell is baked just right to encase the molten interior.
Despite its sophisticated appearance, this dessert is surprisingly simple to prepare. With basic ingredients and a straightforward method, you can bring a touch of French elegance to your dining table. Gather the ingredients listed below and follow the precise cooking instructions to create a sumptuous serving for 4-6 people, ideal for a small gathering or a family treat.
Ingredients (Serves 4-6):
- 200g of high-quality dark chocolate (70% cocoa)
- 200g of unsalted butter
- 4 large eggs
- 200g of granulated sugar
- 1 teaspoon of vanilla extract
- 50g of all-purpose flour
- A pinch of salt
- Butter and cocoa powder for greasing the molds
Cooking Instructions:
- Preheat the Oven: Begin by preheating your oven to 200°C (390°F). This temperature is essential to achieve the perfect texture for the fondant.
- Prepare the Molds: Thoroughly butter 4-6 ramekins and dust them with cocoa powder to prevent the fondant from sticking.
- Melt Chocolate and Butter: In a heatproof bowl, combine the dark chocolate and butter. Place the bowl over a pot of simmering water (double boiler method) and gently melt, stirring occasionally until smooth. Once melted, remove from heat and let it cool slightly.
- Mix Eggs and Sugar: In a separate bowl, whisk together the eggs, granulated sugar, and vanilla extract until the mixture is light and fluffy, which should take about 3-5 minutes.
- Combine Ingredients: Gradually fold the melted chocolate mixture into the egg mixture. Incorporate gently to maintain the airy texture.
- Add Flour: Sift in the flour and salt, carefully folding them into the mixture until just combined. Avoid overmixing to guarantee a delicate texture.
- Fill the Molds: Divide the batter evenly among the prepared ramekins, filling each about three-quarters full.
- Bake: Place the ramekins on a baking tray and bake in the preheated oven for about 10-12 minutes. The fondants should have set edges with a wobbly center.
- Serve: Once baked, let the fondants rest for a minute before gently running a knife around the edges and inverting them onto plates. Serve immediately for the best molten center experience.
Extra Tips:
For a truly impressive dessert, make sure to use high-quality chocolate as it greatly impacts the flavor profile of the fondant. Timing is also essential; keep an eye on the baking time to guarantee the perfect consistency.
If you’re preparing these ahead of time, you can refrigerate the batter-filled ramekins and bake them just before serving. For an added touch, serve with a scoop of vanilla ice cream or a dollop of whipped cream to complement the rich chocolate flavor.
Tarte Tatin: The Upside-Down Apple Tart
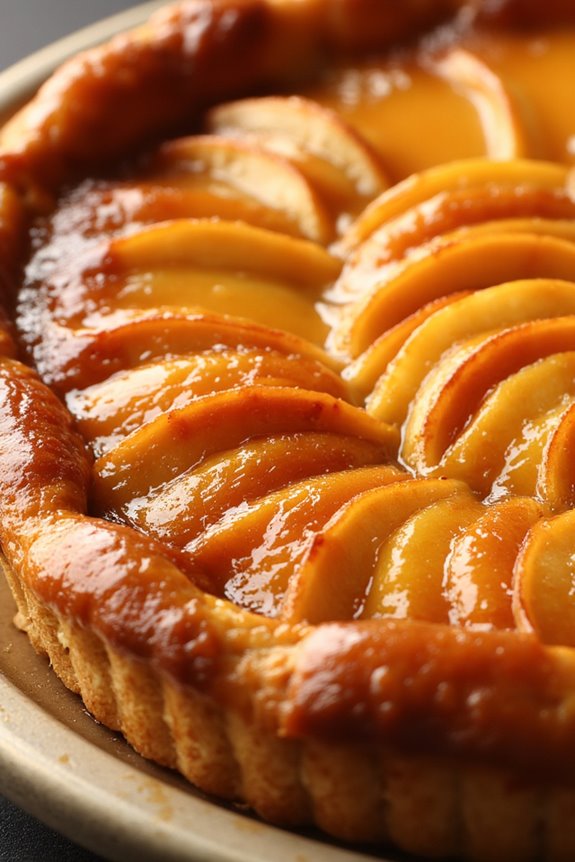
Tarte Tatin is a classic French dessert that uses simple ingredients to create a stunningly delicious tart. The hallmark of this dish is its unique presentation; it’s cooked upside down with the apples at the bottom, and then flipped over to reveal a glistening, caramelized top. This dessert is believed to have been created accidentally by the Tatin sisters in the 1880s, and it has since become a staple in French cuisine.
The tart combines the rich, buttery flavor of caramel with the sweet, tender apples, all encased in a crisp pastry shell. Creating a Tarte Tatin requires some patience and careful attention to detail, but the reward is well worth the effort. The key is to achieve that perfect caramelization, which infuses the apples with a deep, complex sweetness.
The pastry needs to be crisp enough to hold the tart together but tender enough to melt in your mouth. With the right balance of ingredients and a few helpful techniques, you can master this impressive dessert and delight your guests with a slice of French culinary tradition.
Ingredients for 4-6 servings:
- 6 to 8 medium apples (such as Granny Smith or Golden Delicious)
- 1 cup granulated sugar
- 1/2 cup unsalted butter
- 1 vanilla bean (or 1 tsp vanilla extract)
- 1 sheet of puff pastry (store-bought or homemade)
- Flour (for dusting)
- Pinch of salt
- Juice of 1/2 lemon
Cooking Instructions:
- Prepare the Apples: Peel, core, and quarter the apples. Place them in a bowl and toss with lemon juice to prevent browning.
- Make the Caramel: In a heavy, ovenproof skillet (about 9-10 inches in diameter), melt the butter over medium heat. Add the sugar and a pinch of salt, stirring until it dissolves. Split the vanilla bean, scrape out the seeds, and add them to the mixture. Continue to cook until the mixture turns a light caramel color.
- Arrange the Apples: Carefully arrange the apple quarters in the skillet, rounded side down. Pack them tightly as they’ll shrink during cooking. Cook over medium heat for 15-20 minutes, basting occasionally with the caramel, until the apples are slightly tender and the caramel is a deep amber color.
- Preheat the Oven: While the apples are cooking, preheat your oven to 375°F (190°C).
- Prepare the Pastry: Roll out the puff pastry on a lightly floured surface until it’s slightly larger than the skillet. Trim to fit if necessary.
- Assemble the Tart: Carefully place the pastry over the apples in the skillet. Tuck the edges down around the apples to encase them completely.
- Bake the Tart: Transfer the skillet to the preheated oven. Bake for 25-30 minutes, or until the pastry is golden brown and puffed.
- Invert the Tart: Remove from the oven and let it cool for 5 minutes. Place a large plate over the skillet and carefully invert the tart, ensuring the caramel doesn’t spill. Allow the tart to cool for a further 10 minutes before serving.
Extra Tips:
When making Tarte Tatin, the choice of apples is important. Use apples that hold their shape during cooking, such as Granny Smith or Golden Delicious. Make sure the caramel reaches a deep amber color before adding the apples for the best flavor.
If the caramel hardens after you add the apples, don’t worry; it will liquefy again as it bakes. Always exercise caution when inverting the tart, as the caramel is extremely hot and can cause burns. Serve warm with a dollop of crème fraîche or a scoop of vanilla ice cream for an indulgent treat.
Irresistible Éclairs

Éclairs are a classic French dessert that combines delicate choux pastry with a rich, creamy filling and a decadent chocolate glaze. Originating from France, these delightful pastries have become beloved worldwide for their irresistible taste and elegant appearance. Perfect for any occasion, from a sophisticated dinner party to a casual afternoon tea, éclairs are certain to impress your guests with their light, airy texture and indulgent flavors.
Creating the perfect éclair involves mastering the art of choux pastry, which forms the foundation of this delectable treat. Once baked, the golden-brown éclairs are filled with a luscious pastry cream, adding a delightful contrast to the crisp exterior. Finally, the éclairs are topped with a smooth chocolate glaze, providing the finishing touch to this exquisite dessert. With a little practice and attention to detail, you can create these irresistible éclairs in your own kitchen, delighting family and friends with your culinary skills.
Ingredients (Serves 4-6)
- For the Choux Pastry:
- 1/2 cup (120ml) water
- 1/2 cup (120ml) whole milk
- 1/2 cup (113g) unsalted butter, cubed
- 1 tablespoon granulated sugar
- 1/4 teaspoon salt
- 1 cup (125g) all-purpose flour
- 4 large eggs
- For the Pastry Cream:
- 2 cups (480ml) whole milk
- 1/2 cup (100g) granulated sugar
- 4 large egg yolks
- 1/4 cup (30g) cornstarch
- 2 tablespoons unsalted butter
- 1 teaspoon vanilla extract
- For the Chocolate Glaze:
- 1/2 cup (120ml) heavy cream
- 4 ounces (113g) semi-sweet chocolate, chopped
Instructions
- Prepare the Choux Pastry:
- Preheat your oven to 400°F (200°C) and line a baking sheet with parchment paper.
- In a medium saucepan, combine water, milk, butter, sugar, and salt. Bring to a boil over medium heat.
- Add the flour all at once, stirring vigorously with a wooden spoon until the mixture forms a ball and pulls away from the sides of the pan.
- Remove from heat and let it cool slightly. Add eggs one at a time, beating well after each addition until the dough is smooth and glossy.
- Transfer the dough to a piping bag fitted with a large round tip. Pipe 4-inch long strips onto the prepared baking sheet.
- Bake for 20-25 minutes or until puffed and golden brown. Cool completely on a wire rack.
- Make the Pastry Cream:
- In a saucepan, heat milk over medium heat until it begins to simmer.
- In a separate bowl, whisk together sugar, egg yolks, and cornstarch until pale and smooth.
- Gradually whisk the hot milk into the egg mixture to temper the eggs, then return the mixture to the saucepan.
- Cook over medium heat, stirring constantly, until the mixture thickens and comes to a boil.
- Remove from heat and stir in butter and vanilla extract. Let it cool slightly before transferring to a piping bag.
- Prepare the Chocolate Glaze:
- Heat the heavy cream in a small saucepan until it simmers.
- Pour the hot cream over the chopped chocolate in a heatproof bowl, letting it sit for a minute.
- Stir until smooth and glossy. Allow the glaze to cool to room temperature.
- Assemble the Éclairs:
- Once the éclairs are completely cooled, use a skewer to poke a hole in each end of the éclair.
- Pipe the pastry cream into each éclair, filling them generously.
- Dip the top of each filled éclair into the chocolate glaze, allowing excess chocolate to drip off.
- Place the éclairs on a wire rack and let the glaze set before serving.
Extra Tips
To guarantee your éclairs are light and airy, make sure the choux pastry is cooked thoroughly and allowed to cool completely before filling. When baking, avoid opening the oven door too soon as this can cause the éclairs to deflate.
If you’re short on time, the pastry cream can be made a day ahead and stored in the refrigerator. For a decorative touch, you can drizzle white chocolate over the set glaze or add a sprinkle of chopped nuts for added texture. Enjoy your homemade éclairs fresh for the best taste and texture.
Heavenly Madeleines
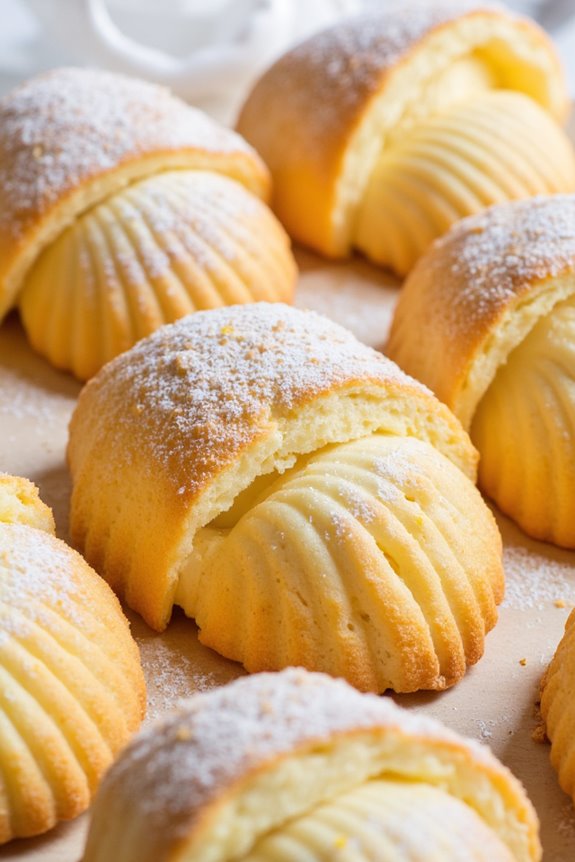
Madeleines are delicate, shell-shaped sponge cakes that originate from the Lorraine region of France. Known for their light texture and buttery flavor, they’re a beloved treat for many dessert enthusiasts. These delightful little cakes are perfect for enjoying with a cup of tea or coffee, making them an ideal choice for an afternoon snack or a light dessert.
With a simple yet elegant appearance, madeleines are a classic example of French patisserie that can be easily made at home. Creating heavenly madeleines involves a few basic ingredients and a special madeleine pan to achieve their signature shape. The key to their delightful texture is a batter that’s allowed to rest, which helps create the characteristic hump on each cake.
This recipe yields approximately 24 madeleines, making it perfect for serving a group of 4-6 people. Follow this thorough guide to bake your own batch of these exquisite little cakes and bring a touch of French elegance to your dessert table.
Ingredients for 4-6 Servings:
- 1 cup (120g) all-purpose flour
- 1/2 cup (113g) unsalted butter, melted and cooled
- 2/3 cup (135g) granulated sugar
- 2 large eggs
- 1 teaspoon vanilla extract
- 1/2 teaspoon almond extract (optional)
- Zest of 1 lemon
- 1/4 teaspoon salt
- 1/2 teaspoon baking powder
- Powdered sugar, for dusting
Cooking Instructions:
1. Prepare the Batter: In a medium bowl, whisk together the flour, baking powder, and salt. In a separate large bowl, beat the eggs and sugar together until the mixture becomes pale and thick, about 3-5 minutes.
Add the vanilla extract, almond extract (if using), and lemon zest, and mix until well combined.
2. Combine Ingredients: Gradually fold the flour mixture into the egg mixture, being careful not to overmix. Gently fold in the melted butter until just combined. The batter should be smooth and slightly thick.
3. Rest the Batter: Cover the bowl with plastic wrap and refrigerate the batter for at least 1 hour. This step is essential for developing the classic madeleine shape and texture.
4. Preheat the Oven: Preheat your oven to 375°F (190°C). While the oven is heating, butter and flour your madeleine pan thoroughly to prevent sticking.
5. Fill the Pan: Spoon the batter into the prepared madeleine pan, filling each mold about 3/4 full. Be careful not to overfill, as the batter will expand during baking.
6. Bake the Madeleines: Place the pan in the preheated oven and bake for 10-12 minutes, or until the edges are golden brown and the centers spring back when lightly touched.
7. Cool and Serve: Remove the madeleines from the oven and allow them to cool in the pan for a few minutes before gently removing them to a wire rack. Dust with powdered sugar before serving.
Extra Tips:
To achieve the perfect madeleine hump, verify your batter is well-chilled before baking. This helps the center rise beautifully during the first few minutes in the oven.
If you prefer a citrusy flavor, consider adding a bit more lemon zest to the batter. Remember to handle the madeleines delicately when removing them from the pan to maintain their lovely shape.
Enjoy your madeleines fresh; they’re best consumed on the same day they’re baked. However, if you have leftovers, store them in an airtight container for up to two days.
Perfectly Flaky Croissants
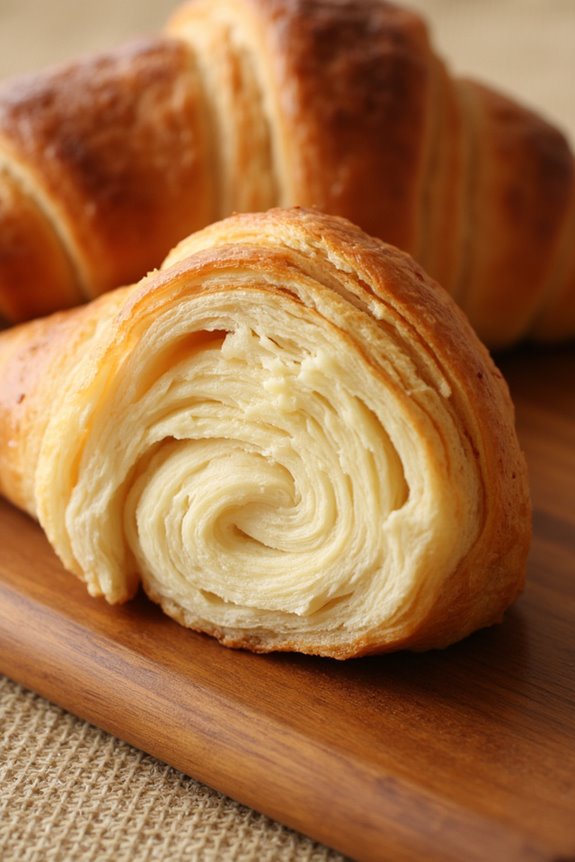
There’s nothing quite like biting into a freshly baked croissant with its layers of buttery, flaky pastry. Perfectly Flaky Croissants are a classic French delicacy that can elevate a simple breakfast into an elegant affair.
While they may seem intimidating to make at home, with some patience and attention to detail, you can achieve bakery-quality croissants right in your own kitchen. This recipe will guide you through creating these delicious pastries for a serving size of 4-6 people, allowing you to share the joy of homemade croissants with family and friends.
Creating croissants involves laminating dough, which is the process of folding butter into the dough multiple times to create very thin layers. When baked, these layers rise and separate, creating the trademark flakiness.
The key to success is keeping everything cool and working quickly to prevent the butter from melting into the dough. Follow the steps carefully, and you’ll be rewarded with croissants that are crisp on the outside and tender on the inside, with a delightful buttery flavor.
Ingredients (Serves 4-6):
- 4 cups all-purpose flour
- 1/2 cup granulated sugar
- 2 teaspoons salt
- 1 tablespoon active dry yeast
- 1 1/4 cups warm milk
- 1 cup unsalted butter (cold)
- 1 large egg (for egg wash)
Cooking Instructions:
- Prepare the Dough: In a large bowl, combine 4 cups of all-purpose flour, 1/2 cup of granulated sugar, and 2 teaspoons of salt. In a separate small bowl, dissolve 1 tablespoon of active dry yeast in 1 1/4 cups of warm milk. Allow the yeast to activate for about 5 minutes, until foamy.
- Mix the Dough: Pour the yeast mixture into the dry ingredients and stir until a dough begins to form. Knead the dough on a floured surface for about 5-7 minutes until smooth and elastic. Form the dough into a ball, place it in a lightly greased bowl, cover with plastic wrap, and let it rise in a warm place for about 1 hour or until doubled in size.
- Prepare the Butter Block: Place 1 cup of cold unsalted butter between two sheets of parchment paper. Using a rolling pin, flatten the butter into a rectangle about 8×5 inches. Refrigerate the butter block while the dough rises.
- Laminate the Dough: Once the dough has risen, roll it out into a rectangle about 12×8 inches on a floured surface. Place the chilled butter block in the center of the dough. Fold the dough over the butter like an envelope, sealing the edges to encase the butter completely.
- First Fold and Rest: Roll the dough out to a rectangle about 20×10 inches. Fold the dough into thirds, like a letter, and wrap it in plastic wrap. Refrigerate for 30 minutes to allow the butter to firm up again.
- Second and Third Folds: Repeat the rolling and folding process two more times, refrigerating for 30 minutes between each fold. This creates the multiple layers needed for the flakiness.
- Shape the Croissants: After the final rest, roll the dough out to a large rectangle about 24×12 inches. Cut the dough into triangles, about 5 inches wide at the base. Roll each triangle from the base to the tip, forming a crescent shape.
- Proof the Croissants: Place the shaped croissants on a baking sheet lined with parchment paper. Cover them with a clean kitchen towel and let them proof in a warm place for 1-2 hours, until they’re puffy and have nearly doubled in size.
- Bake the Croissants: Preheat your oven to 375°F (190°C). Brush the croissants with a beaten egg to give them a golden color. Bake for 15-20 minutes, until they’re deep golden brown and crisp.
Extra Tips:
To guarantee your croissants turn out perfectly, be mindful of the temperature of your ingredients and workspace. Keeping the butter cold is vital for achieving the ideal layers, so work quickly and return the dough to the refrigerator if it becomes too warm.
Additionally, use a light touch when rolling out the dough to prevent tearing the layers. If you find the dough too difficult to handle, allow it to rest for a few minutes to relax the gluten before continuing.
With practice, you’ll develop the skills needed to make these delightful pastries with ease.
Delicate Macarons
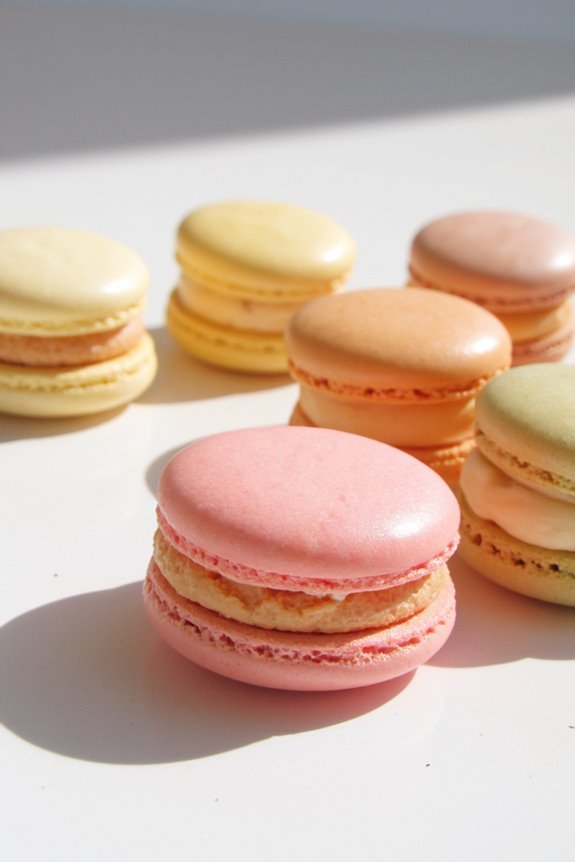
Macarons are a delicate and delicious French dessert that have captured the hearts (and taste buds) of many around the world. These delightful confections consist of two almond meringue cookies filled with a luscious ganache, buttercream, or jam filling. Achieving the perfect macaron requires patience and precision, but the reward is a light, airy, and slightly chewy treat that can be customized with various flavors and colors to suit any occasion.
The key to making successful macarons is understanding the delicate balance between the ingredients and the technique used in preparing them. While the process may seem intimidating at first, with careful attention to detail and practice, anyone can master this classic French dessert. Below is a detailed recipe for making 24 to 30 macarons, enough to serve 4-6 people.
Ingredients:
- 1 3/4 cups (175g) powdered sugar
- 1 cup (100g) almond flour
- 3 large egg whites, room temperature
- 1/4 cup (50g) granulated sugar
- 1/4 teaspoon cream of tartar
- 1/4 teaspoon salt
- Gel food coloring (optional)
- 1/2 cup (120g) unsalted butter, softened
- 1 1/2 cups (190g) powdered sugar (for the filling)
- 2 tablespoons heavy cream
- 1 teaspoon vanilla extract
Instructions:
- Prepare the Dry Ingredients: Begin by sifting the powdered sugar and almond flour together into a large bowl. Make sure there are no lumps, and the mixture is smooth. This step is essential for achieving the macarons’ smooth surface.
- Beat the Egg Whites: In a separate clean, dry bowl, beat the room temperature egg whites with an electric mixer on medium speed until they become foamy. Add the cream of tartar and salt, and continue beating until soft peaks form.
- Add Sugar Gradually: Gradually add the granulated sugar to the egg whites, one tablespoon at a time, while continuing to beat on high speed. Beat until stiff, glossy peaks form. This will take about 5-7 minutes.
- Incorporate Food Coloring (Optional): If desired, add a few drops of gel food coloring to the meringue and gently fold until evenly distributed. Be careful not to overmix, as this can deflate the meringue.
- Fold in the Dry Ingredients: Carefully fold the almond flour and powdered sugar mixture into the meringue in three additions. Use a rubber spatula to gently fold the mixture, trying not to deflate the egg whites. The batter should be smooth and flow like lava.
- Pipe the Macarons: Transfer the batter into a piping bag fitted with a round tip. Pipe small, even circles onto a baking sheet lined with parchment paper, spacing them about 1 inch apart.
- Rest the Macarons: Allow the piped macarons to rest at room temperature for 30-60 minutes, or until a skin forms on their surface and they’re no longer sticky to the touch.
- Bake the Macarons: Preheat the oven to 300°F (150°C). Bake the macarons in the preheated oven for 15-18 minutes, rotating the baking sheet halfway through. The macarons are done when they’ve risen with a ‘foot’ and don’t stick to the parchment paper.
- Cool Completely: Allow the macarons to cool completely on the baking sheet before removing them.
- Prepare the Filling: While the macarons are cooling, beat the softened butter until creamy. Gradually add the powdered sugar and mix until smooth. Add the heavy cream and vanilla extract, and beat until light and fluffy.
- Assemble the Macarons: Once the macarons are cool, pair them with similar-sized shells. Pipe a small amount of filling onto one shell, then top with another shell to create a sandwich.
Extra Tips:
Success in making macarons often depends on the fineness of your almond flour and the consistency of your meringue. Make sure the almond flour is extremely well-ground and sifted to prevent a lumpy batter.
Room temperature egg whites whip better, creating a more stable meringue. Humidity can affect macarons, so try to work on a dry day. Don’t skip the resting step before baking, as it helps to form the characteristic ‘feet’ of the macarons.
Finally, allow the macarons to mature in the refrigerator for 24 hours before serving for the best texture and flavor.
Raspberry Clafoutis
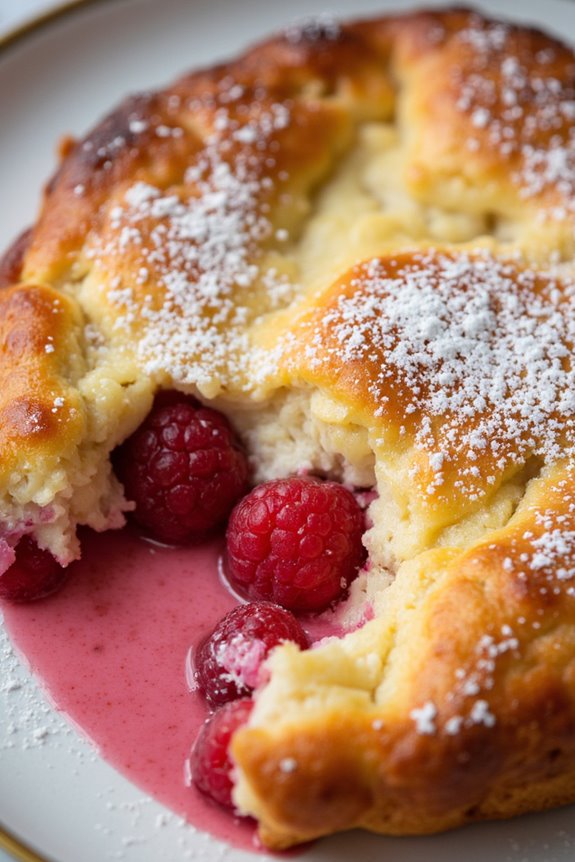
Raspberry Clafoutis is a delightful French dessert that combines the tartness of fresh raspberries with a rich, custard-like batter. Originating from the Limousin region of France, this simple yet elegant dessert is traditionally made with cherries, but the substitution of raspberries adds a revitalizing twist.
The clafoutis is baked until golden and slightly puffed, creating a luscious texture that melts in your mouth. Perfect for summer gatherings or as a comforting treat on a cozy evening, Raspberry Clafoutis is sure to charm your taste buds and impress your guests.
This dessert isn’t overly sweet, allowing the natural flavor of the raspberries to shine through. It’s typically served warm, sometimes dusted with powdered sugar or accompanied by a dollop of whipped cream. The preparation is straightforward, making it an excellent choice for both novice and experienced bakers.
With just a few ingredients and steps, you can create a dessert that looks and tastes like it came from a French patisserie. Here’s how to make Raspberry Clafoutis for a serving size of 4-6 people.
Ingredients:
- 1 1/4 cups whole milk
- 1/3 cup granulated sugar
- 3 large eggs
- 1 tablespoon vanilla extract
- 1/8 teaspoon salt
- 1/2 cup all-purpose flour
- 1 cup fresh raspberries
- 2 tablespoons unsalted butter, melted
- Powdered sugar for dusting (optional)
Cooking Instructions:
- Prepare the Oven and Baking Dish: Preheat your oven to 350°F (175°C). Grease a 9-inch (23 cm) round baking dish or pie pan with the melted butter, ensuring the bottom and sides are well-coated.
- Mix the Batter: In a large mixing bowl, whisk together the milk, granulated sugar, and eggs until well combined. Add the vanilla extract and salt, whisking until smooth. Gradually add the flour, whisking until the batter is smooth and free of lumps.
- Assemble the Clafoutis: Pour a thin layer of the batter into the prepared baking dish, just enough to cover the bottom. Place the dish in the oven for about 5 minutes to set the bottom layer slightly.
- Add Raspberries: Carefully remove the dish from the oven. Evenly distribute the raspberries over the set layer of batter. Gently pour the remaining batter over the raspberries, ensuring they’re covered.
- Bake the Clafoutis: Return the dish to the oven and bake for 35-40 minutes, or until the clafoutis is puffed and a golden brown. A toothpick inserted into the center should come out clean.
- Cool and Serve: Allow the clafoutis to cool for about 10 minutes before serving. Dust with powdered sugar if desired. Serve warm, and enjoy your Raspberry Clafoutis with a side of whipped cream or ice cream if you like.
Extra Tips:
For the best results, use fresh, ripe raspberries as they’ll provide the most flavor and juiciness. If fresh raspberries aren’t available, you can use frozen raspberries, but be sure to thaw and drain them well to prevent excess moisture in the batter.
Additionally, experiment with other fruits like blueberries or sliced peaches for a different take on this classic French dessert. If you want a more decadent version, consider adding a splash of liqueur, such as Grand Marnier, to the batter for a hint of sophistication.
Lemon Tart With a Twist
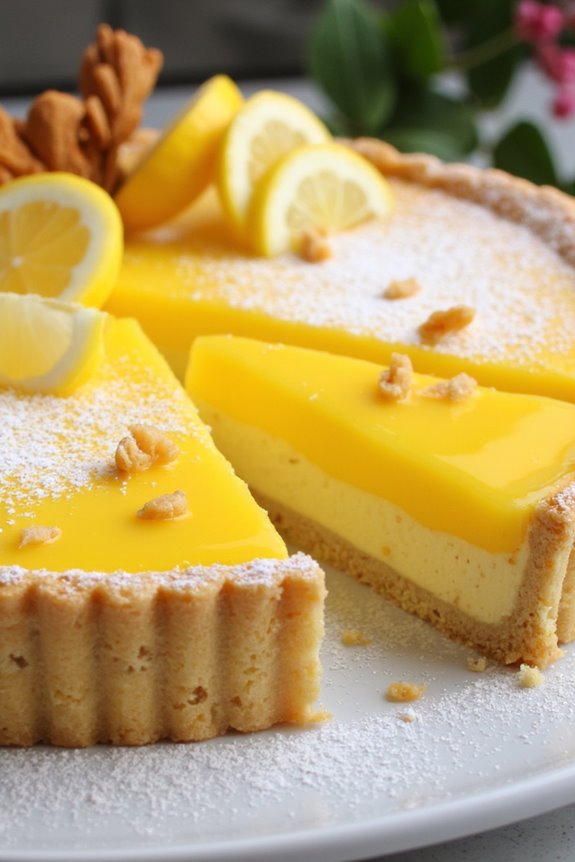
Lemon Tart With a Twist is a delightful and invigorating dessert that combines the classic zesty flavor of lemons with an unexpected surprise. This dessert is a perfect balance of tangy and sweet, with a unique twist that elevates the traditional lemon tart to a new level of sophistication. The crust is buttery and flaky, while the filling is creamy and bursting with fresh lemon flavor, complemented by the subtle addition of ginger and a dash of cardamom.
The twist in this recipe comes from the infusion of ginger and cardamom, which adds warmth and depth to the bright lemony flavor. The result is a tart that isn’t only pleasing to the palate but also intriguing to the senses. This Lemon Tart With a Twist is perfect for dinner parties, family gatherings, or any occasion where you want to impress your guests with a dessert that’s both classic and innovative.
Ingredients for 4-6 servings:
- 1 1/2 cups all-purpose flour
- 1/2 cup unsalted butter, chilled and diced
- 1/4 cup granulated sugar
- 1/4 teaspoon salt
- 1 egg yolk
- 3 tablespoons cold water
- 4 large eggs
- 1 cup granulated sugar
- 1/2 cup fresh lemon juice
- Zest of 2 lemons
- 1/4 cup heavy cream
- 1 tablespoon grated fresh ginger
- 1/2 teaspoon ground cardamom
- Powdered sugar, for dusting
Cooking Instructions:
- Prepare the Crust: In a large bowl, mix the flour, sugar, and salt. Add the diced butter and rub it into the flour mixture using your fingertips until it resembles coarse breadcrumbs. Add the egg yolk and cold water, and mix until the dough comes together. Shape it into a disk, wrap it in plastic wrap, and refrigerate for at least 30 minutes.
- Preheat the Oven: Preheat your oven to 375°F (190°C) while the dough is chilling.
- Roll Out the Dough: On a lightly floured surface, roll out the chilled dough to fit a 9-inch tart pan. Carefully transfer the dough to the pan and press it into the edges. Trim any excess dough. Prick the base with a fork and line with parchment paper, filling with pie weights or dried beans.
- Bake the Crust: Bake the crust for 15 minutes. Remove the parchment and weights, and bake for an additional 10 minutes until golden brown. Let the crust cool completely.
- Prepare the Filling: In a medium bowl, whisk together the eggs, sugar, lemon juice, lemon zest, grated ginger, and cardamom until smooth. Stir in the heavy cream until well combined.
- Bake the Tart: Pour the filling into the cooled crust. Reduce the oven temperature to 325°F (160°C) and bake the tart for 25-30 minutes, or until the filling is set but still slightly jiggly in the center. Let it cool to room temperature.
- Serve: Once cooled, dust the tart with powdered sugar. Slice and serve with a dollop of whipped cream or a scoop of vanilla ice cream if desired.
Extra Tips:
To guarantee the best results, use fresh lemons for the juice and zest, as they provide the brightest flavor. Grating the ginger finely will help it blend seamlessly into the filling. If you find the dough too sticky to handle, refrigerate it for an additional 10-15 minutes.
When rolling out the dough, work quickly to prevent the butter from melting, which helps maintain the crust’s flakiness. To give the tart an even more professional look, you can garnish it with thin lemon slices or a sprinkle of finely chopped candied ginger.
Profiteroles With Vanilla Ice Cream
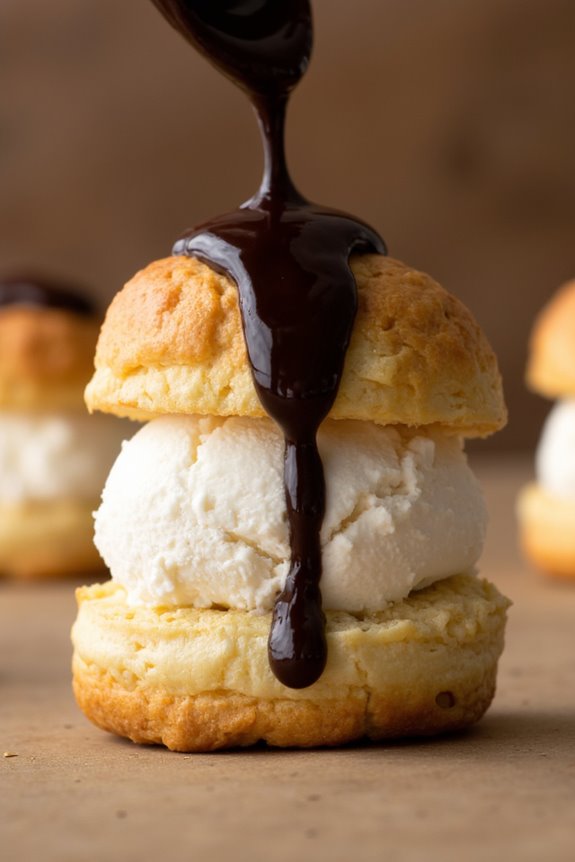
Profiteroles are a classic French dessert that combines delicate pastry puffs with a decadent filling. In this recipe, we’ll take the traditional profiterole experience up a notch by filling them with creamy vanilla ice cream and drizzling them with rich chocolate sauce. This indulgent treat is perfect for any occasion and will surely impress your guests with its combination of textures and flavors.
The light and airy choux pastry paired with the cold, smooth ice cream and warm chocolate sauce creates a delightful contrast that’s irresistible. Making profiteroles with vanilla ice cream may seem like an intimidating task, but with a little patience and attention to detail, you can create this elegant dessert at home.
We’ll guide you through the process of making choux pastry from scratch, baking it to perfection, and assembling the profiteroles with your favorite vanilla ice cream. Whether you’re hosting a dinner party or simply treating yourself, these profiteroles are sure to be a hit. Let’s get started on this delicious journey!
Ingredients (for 4-6 servings):
- 1/2 cup unsalted butter
- 1 cup water
- 1/4 teaspoon salt
- 1 cup all-purpose flour
- 4 large eggs
- 1 quart vanilla ice cream
- 1 cup heavy cream
- 8 oz dark chocolate, finely chopped
- 2 tablespoons sugar
- 1 teaspoon vanilla extract
Cooking Instructions:
- Prepare the Choux Pastry:
- In a medium saucepan, combine the butter, water, and salt. Bring to a boil over medium heat.
- Once boiling, reduce the heat to low and add the flour all at once. Stir vigorously with a wooden spoon until the mixture forms a ball and pulls away from the sides of the pan.
- Transfer the dough to a mixing bowl and let it cool for a few minutes.
- Beat in the eggs one at a time, making sure each egg is fully incorporated before adding the next. The dough should be smooth and shiny.
- Bake the Choux Pastry:
- Preheat your oven to 400°F (200°C) and line a baking sheet with parchment paper.
- Using a piping bag or a spoon, drop tablespoon-sized mounds of dough onto the prepared baking sheet, spacing them about 2 inches apart.
- Bake for 20-25 minutes or until the profiteroles are puffed and golden brown. Avoid opening the oven door during baking.
- Once baked, remove from the oven and make a small slit in each profiterole to release steam. Cool completely on a wire rack.
- Prepare the Chocolate Sauce:
- In a small saucepan, heat the heavy cream and sugar over medium heat until it begins to simmer. Don’t let it boil.
- Remove from heat and add the chopped dark chocolate. Let it sit for a minute, then stir until the chocolate is melted and the sauce is smooth.
- Stir in the vanilla extract and set aside to cool slightly.
- Assemble the Profiteroles:
- Once the profiteroles are cool, cut them in half horizontally.
- Place a scoop of vanilla ice cream in each bottom half and replace the top.
- Arrange the filled profiteroles on a serving platter and drizzle generously with the warm chocolate sauce.
Extra Tips:
When making choux pastry, make sure that each egg is fully incorporated before adding the next to achieve a smooth dough. If you find the dough is too thick, you can add another egg to reach the desired consistency.
For the best texture, serve the profiteroles immediately after filling with ice cream to prevent them from becoming soggy. If you’re preparing them in advance, store the baked choux pastry and chocolate sauce separately, then fill and assemble just before serving.
Nutty Financiers
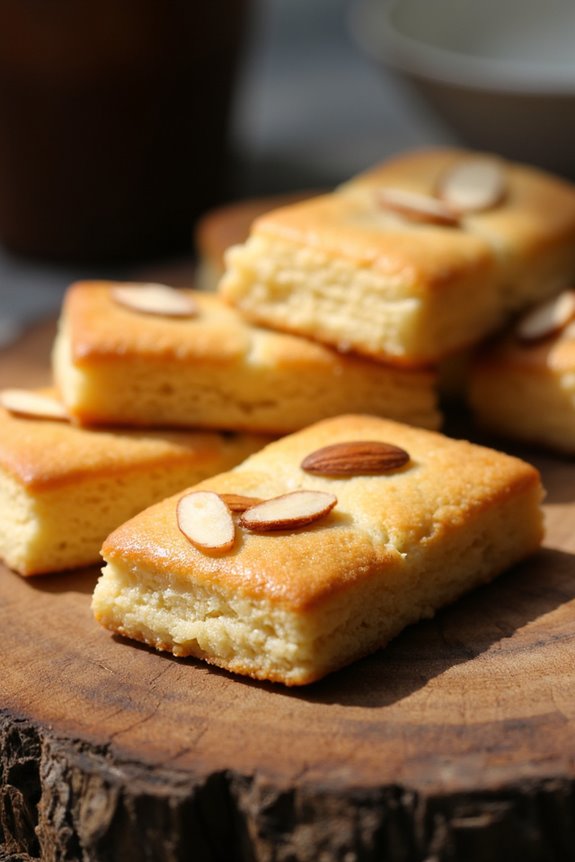
Nutty Financiers are a classic French dessert known for their rich, buttery flavor and delicate, nutty aroma. These small, golden-brown cakes are traditionally made with ground almonds, but for this recipe, we’ll enhance the flavor by using a mix of almonds and hazelnuts. Perfectly crisp on the outside and tender on the inside, Nutty Financiers are an elegant treat that pairs beautifully with a cup of tea or coffee.
They’re easy to make and require just a few ingredients, making them a delightful addition to any dessert spread.
The origins of Financiers date back to the late 19th century, where they were created by a pastry chef in Paris. They were designed to cater to stockbrokers who frequented his bakery, hence the name “Financiers.” The cake’s rectangular shape is said to resemble a gold bar, symbolizing wealth and prosperity.
Whether you’re hosting a brunch or simply indulging in a sweet craving, these Nutty Financiers offer a taste of French sophistication that’s sure to impress your guests.
Ingredients (serving size: 4-6 people):
- 1/2 cup all-purpose flour
- 1/2 cup almond meal
- 1/4 cup finely ground hazelnuts
- 3/4 cup powdered sugar
- 1/2 teaspoon baking powder
- 1/4 teaspoon salt
- 1/2 cup unsalted butter
- 4 large egg whites
- 1 teaspoon vanilla extract
- 1/4 teaspoon almond extract
- 1/4 cup sliced almonds for topping
Instructions:
- Prepare the Dry Ingredients: In a large bowl, sift together the flour, almond meal, ground hazelnuts, powdered sugar, baking powder, and salt. Sifting guarantees there are no lumps and combines the ingredients evenly.
- Brown the Butter: In a small saucepan, melt the unsalted butter over medium heat. Continue cooking until the butter turns a golden brown and emits a nutty aroma, about 5 minutes. Be sure to stir frequently to prevent burning. Remove from heat and let it cool slightly.
- Whisk Egg Whites: In a separate bowl, whisk the egg whites until they become frothy. There’s no need to beat them into soft peaks; just confirm they’re well combined and lightly foamy.
- Combine Wet and Dry Ingredients: Gradually add the browned butter to the dry ingredients, stirring continuously. Add the egg whites, vanilla extract, and almond extract, and mix until you have a smooth batter.
- Preheat the Oven: Preheat your oven to 375°F (190°C). Grease a financier mold or a muffin tin with butter or non-stick spray.
- Fill the Molds: Pour the batter into the prepared molds, filling each about two-thirds full. Sprinkle sliced almonds over the top of each financier for added texture and flavor.
- Bake: Place the molds in the preheated oven and bake for 12-15 minutes, or until the financiers are golden brown and a toothpick inserted into the center comes out clean.
- Cool and Serve: Remove from the oven and allow the financiers to cool in the molds for 5 minutes before transferring to a wire rack. Serve warm or at room temperature.
Extra Tips:
To achieve the best texture and flavor, make sure not to overmix the batter once the wet and dry ingredients are combined. This will help keep the financiers light and airy.
If you don’t have a financier mold, a mini muffin tin works just as well. Additionally, if you prefer a different nut flavor, feel free to substitute ground pistachios or walnuts.
Finally, financiers can be stored in an airtight container for up to 3 days, maintaining their delightful crispness.