

French cuisine has a magical way of setting a romantic tone, especially when you add a vegetarian twist. As someone who loves experimenting in the kitchen, I find that blending classic French flavors with fresh ingredients creates culinary magic. Picture the aroma of caramelized onions filling your home or the vibrant colors of a Ratatouille Tart. Intrigued? These delightful dishes promise to turn any evening into a memorable culinary experience.
Classic French Onion Soup With a Twist
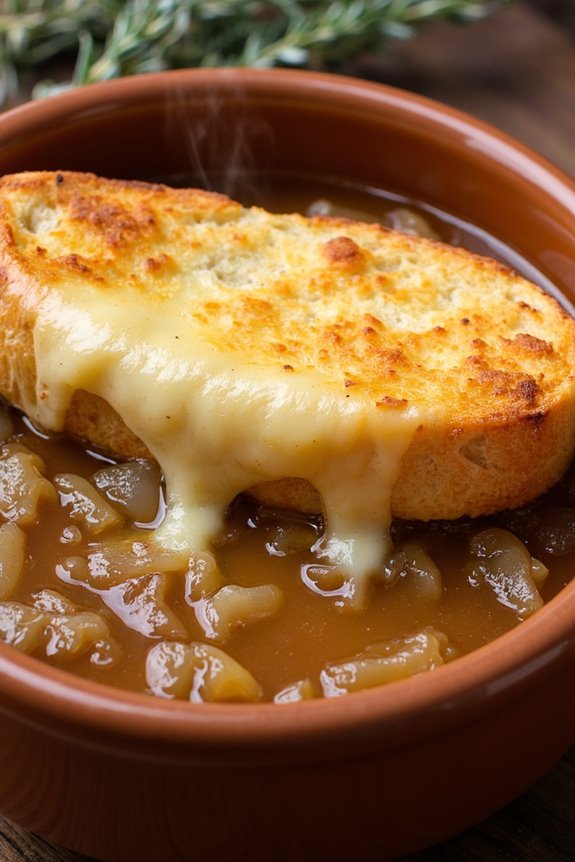
French Onion Soup is a classic dish that captures the essence of French cuisine with its rich, savory flavors and comforting warmth. Traditionally made with beef broth, this vegetarian version offers a unique twist that maintains the soul of the classic while catering to those who prefer plant-based options. The secret lies in using a high-quality vegetable broth, which, when combined with caramelized onions and herbs, creates a depth of flavor that rivals the original.
A topping of melted cheese and crispy baguette slices finishes off this delightful soup, making it perfect for a romantic French-inspired dinner at home.
This recipe for Classic French Onion Soup With a Twist serves 4-6 people. The key to success is in the slow caramelization of the onions, which reveals their natural sweetness and adds complexity to the dish. To add an extra layer of flavor, a splash of white wine is included, enhancing the aromatic qualities and bringing a subtle acidity that balances the richness of the soup. The ultimate result is a hearty, satisfying dish that’s sure to impress and warm the hearts of all who partake.
Ingredients:
- 6 large yellow onions, thinly sliced
- 4 tablespoons unsalted butter
- 2 tablespoons olive oil
- 1 teaspoon sugar
- 1 teaspoon salt
- 4 cloves garlic, minced
- 8 cups high-quality vegetable broth
- 1/2 cup dry white wine
- 2 bay leaves
- 3 sprigs fresh thyme
- Salt and pepper to taste
- 1 baguette, sliced
- 2 cups grated Gruyère cheese
Instructions:
- Caramelize the Onions: In a large, heavy-bottomed pot, melt the butter with the olive oil over medium heat. Add the sliced onions, sugar, and salt. Stirring occasionally, cook the onions for about 30-40 minutes, or until they’re deep golden brown and caramelized. Be patient, as this step is essential for developing the soup’s flavor.
- Add Garlic and Deglaze: Stir in the minced garlic and cook for an additional 1-2 minutes until fragrant. Pour in the white wine to deglaze the pot, scraping up any browned bits from the bottom. Allow the wine to reduce by half.
- Simmer the Soup: Add the vegetable broth, bay leaves, and thyme to the pot. Bring the mixture to a boil, then reduce the heat to low and let it simmer for 20-30 minutes. Season with salt and pepper to taste.
- Prepare the Baguette and Cheese: While the soup simmers, preheat your oven to 400°F (200°C). Arrange the baguette slices on a baking sheet and toast them in the oven until they’re golden brown and crispy, about 5-7 minutes.
- Assemble and Serve: Ladle the soup into oven-safe bowls, top each serving with a slice of toasted baguette, and sprinkle generously with Gruyère cheese. Place the bowls on a baking sheet and broil in the oven until the cheese is bubbly and golden, about 3-5 minutes. Carefully remove from the oven and serve immediately.
Extra Tips:
For best results, use sweet Vidalia onions if available, as they caramelize beautifully and enhance the soup’s sweetness. If you prefer a stronger cheese flavor, consider mixing in some Comté or Emmental with the Gruyère.
When toasting the baguette, you can also rub a cut clove of garlic over the warm slices for an extra burst of flavor. Finally, if you don’t have oven-safe bowls, you can broil the baguette slices with the cheese separately and place them on top of the soup just before serving.
Ratatouille Tart With Herbes De Provence
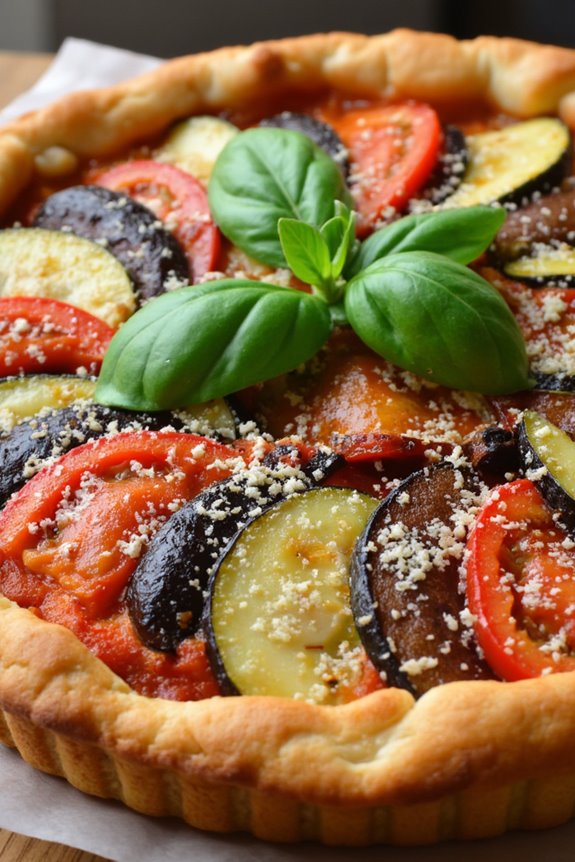
Ratatouille Tart With Herbes De Provence is a delightful and elegant dish that combines the rustic flavors of traditional French ratatouille with the sophisticated presentation of a savory tart. Perfect for a romantic dinner or a special occasion, this vegetarian recipe highlights the fresh flavors of summer vegetables and the aromatic blend of Herbes de Provence.
This dish not only looks beautiful on the plate but also delivers a burst of flavor with each bite. The tart features a crispy, flaky pastry base filled with a medley of roasted vegetables—zucchini, eggplant, bell peppers, and tomatoes—seasoned with fragrant Herbes de Provence.
The vegetables are arranged in a visually pleasing pattern, creating a colorful mosaic that’s as much a feast for the eyes as it’s for the palate. This recipe serves 4-6 people, making it an ideal centerpiece for a gathering or an intimate dinner for two with leftovers to enjoy.
Ingredients for 4-6 servings:
- 1 sheet puff pastry (thawed if frozen)
- 1 medium eggplant, thinly sliced
- 2 medium zucchinis, thinly sliced
- 2 red bell peppers, thinly sliced
- 4 Roma tomatoes, thinly sliced
- 1 red onion, thinly sliced
- 3 tablespoons olive oil
- 1 tablespoon Herbes de Provence
- Salt and black pepper to taste
- 1/2 cup ricotta cheese
- 1/4 cup grated Parmesan cheese
- Fresh basil leaves for garnish
Cooking Instructions:
- Preheat the Oven: Begin by preheating your oven to 400°F (200°C). This will guarantee that the tart cooks evenly and the pastry becomes perfectly golden and flaky.
- Prepare the Pastry Base: Roll out the puff pastry on a lightly floured surface to fit a 9-inch tart pan. Gently press the pastry into the pan, trimming any excess. Prick the base with a fork to prevent it from puffing up during baking.
- Season the Vegetables: In a large bowl, combine the sliced eggplant, zucchini, bell peppers, tomatoes, and red onion. Drizzle with olive oil, sprinkle with Herbes de Provence, salt, and pepper, and toss until the vegetables are well-coated.
- Assemble the Tart: Spread the ricotta cheese evenly over the base of the pastry. Arrange the seasoned vegetables in a circular pattern, starting from the outer edge and working your way inwards. Sprinkle grated Parmesan cheese over the top.
- Bake the Tart: Place the tart in the preheated oven and bake for 30-35 minutes, or until the pastry is golden and the vegetables are tender and slightly caramelized.
- Garnish and Serve: Remove the tart from the oven and let it cool for a few minutes. Garnish with fresh basil leaves before slicing and serving.
Extra Tips:
For the best results, verify that the vegetables are sliced to a uniform thickness to promote even cooking. If you find the pastry edges browning too quickly, cover them with aluminum foil during baking.
Additionally, feel free to experiment with different herbs or cheese varieties to suit your taste preferences. This tart can be served warm or at room temperature, making it a versatile option for any occasion.
Savory Mushroom and Gruyère Crêpes
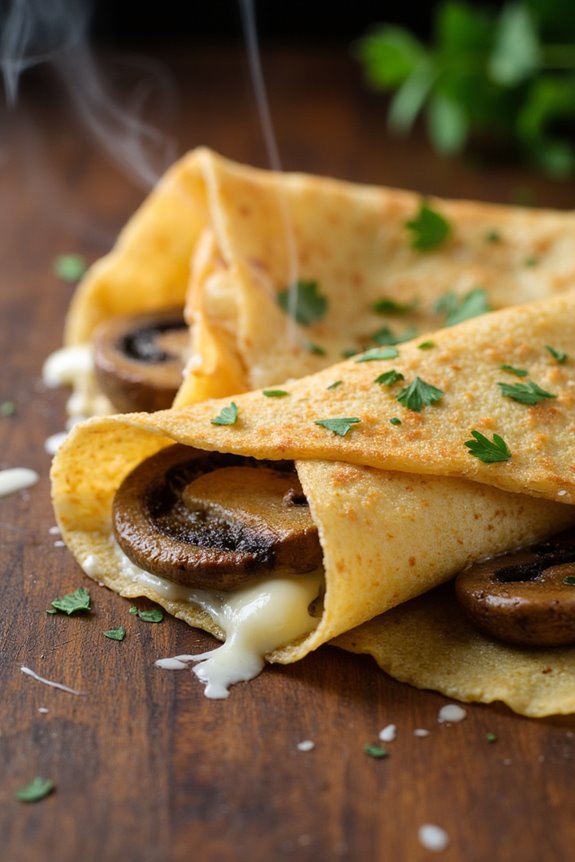
Savory Mushroom and Gruyère Crêpes are a delightful French dish that offers a perfect blend of earthy mushrooms and nutty Gruyère cheese wrapped in a delicate crêpe. This vegetarian recipe is ideal for a romantic dinner or a cozy brunch, as it combines the rich flavors of sautéed mushrooms with the creamy texture of melting cheese, all enveloped in a thin, soft crêpe.
The dish isn’t only elegant but also versatile, allowing for modifications based on personal preferences or the availability of seasonal ingredients.
The key to making these crêpes truly memorable lies in the quality of the ingredients. Fresh mushrooms such as cremini or shiitake provide a robust flavor, while the Gruyère cheese adds a subtle complexity that elevates the dish. The crêpes themselves should be light and tender, providing the perfect vessel for the savory filling. This recipe yields enough for 4-6 people, making it suitable for an intimate gathering or a family meal.
Ingredients for Savory Mushroom and Gruyère Crêpes (Serves 4-6):
- 1 cup all-purpose flour
- 2 large eggs
- 1 1/2 cups milk
- 2 tablespoons unsalted butter, melted
- 1/4 teaspoon salt
- 2 tablespoons vegetable oil (for cooking crêpes)
- 2 tablespoons unsalted butter (for filling)
- 1 pound mushrooms (cremini or shiitake), sliced
- 2 cloves garlic, minced
- 1/4 cup dry white wine
- 1 cup grated Gruyère cheese
- Salt and pepper to taste
- 2 tablespoons chopped fresh parsley
Cooking Instructions:
- Prepare the Crêpe Batter: In a large mixing bowl, whisk together the flour and salt. In another bowl, beat the eggs and gradually add the milk, whisking until smooth. Create a well in the center of the flour mixture, pour in the egg and milk mixture, and stir until combined. Add the melted butter and whisk until the batter is smooth and free of lumps. Let the batter rest for at least 30 minutes.
- Cook the Crêpes: Heat a small non-stick skillet or crêpe pan over medium heat and lightly brush with vegetable oil. Pour about 1/4 cup of batter into the pan, swirling to coat the bottom evenly. Cook for about 1-2 minutes, until the edges begin to lift and the bottom is golden brown. Flip the crêpe and cook for another minute. Remove from the pan and repeat with the remaining batter, stacking crêpes on a plate.
- Prepare the Mushroom Filling: In a large skillet, melt 2 tablespoons of unsalted butter over medium heat. Add the sliced mushrooms and sauté until they release their moisture and begin to brown, about 5-7 minutes. Add the minced garlic and cook for another minute. Pour in the white wine and cook until the liquid has mostly evaporated. Season with salt and pepper to taste.
- Assemble the Crêpes: Preheat your oven to 350°F (175°C). Lay a crêpe flat and place a portion of the mushroom filling in the center. Sprinkle with grated Gruyère cheese and fold the crêpe over the filling. Place the filled crêpe in a baking dish. Repeat with the remaining crêpes and filling.
- Bake the Crêpes: Once all the crêpes are filled and in the baking dish, sprinkle any remaining Gruyère over the top. Bake in the preheated oven for 10-15 minutes, or until the cheese is melted and bubbly. Garnish with chopped fresh parsley before serving.
Extra Tips: For the best results, verify your crêpe batter rests for at least 30 minutes to allow the gluten to relax, which helps in achieving a tender texture.
If you’re short on time, the crêpes can be made a day in advance and stored in the refrigerator, separated by parchment paper. When cooking the mushrooms, avoid overcrowding the pan to verify they brown properly rather than steam.
Feel free to experiment with different types of mushrooms or add a pinch of nutmeg to the béchamel sauce for an extra layer of flavor.
Zucchini and Goat Cheese Gratin
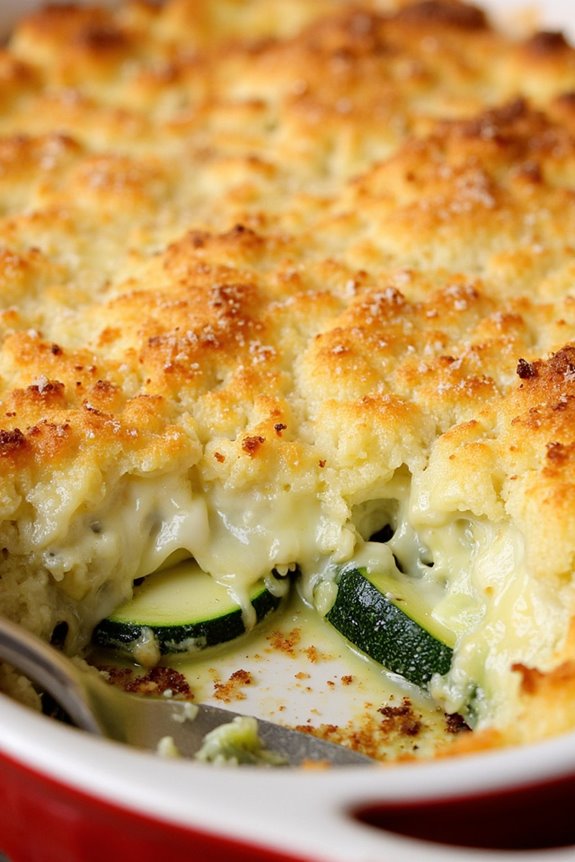
Zucchini and Goat Cheese Gratin is a delightful dish that perfectly captures the essence of French vegetarian cuisine. This dish combines the fresh flavors of zucchini with the rich, tangy taste of goat cheese, creating a harmonious blend that’s both comforting and elegant.
It’s the perfect choice for a romantic dinner or a special occasion, offering a satisfying yet light meal that can impress any guest. The creamy goat cheese complements the tender zucchini, while the crispy topping adds a delightful texture.
This gratin isn’t only delicious but also visually appealing, with its golden-brown crust and vibrant green zucchini slices peeking through. Best of all, it’s a versatile recipe that can be prepared in advance and baked just before serving, making it an ideal choice for entertaining.
Ingredients (serves 4-6):
- 4 medium zucchinis, thinly sliced
- 2 tablespoons olive oil
- 2 cloves garlic, minced
- 1 teaspoon salt
- 1/2 teaspoon black pepper
- 1 teaspoon fresh thyme leaves
- 8 ounces goat cheese, crumbled
- 1 cup heavy cream
- 1/2 cup grated Parmesan cheese
- 1 cup breadcrumbs
Cooking Instructions:
- Preheat the Oven: Begin by preheating your oven to 375°F (190°C). This guarantees that the oven is hot and ready to properly cook the gratin.
- Prepare the Zucchini: Wash and slice the zucchinis into thin, even rounds. This guarantees they cook evenly and absorb the flavors of the other ingredients.
- Sauté the Garlic: In a large skillet, heat the olive oil over medium heat. Add the minced garlic and sauté for about 1 minute until fragrant. Be careful not to burn the garlic.
- Cook the Zucchini: Add the sliced zucchini to the skillet and season with salt, pepper, and thyme. Cook for about 5-7 minutes until the zucchini is slightly softened. Stir occasionally to guarantee even cooking.
- Assemble the Gratin: In a baking dish, layer half of the cooked zucchini slices. Sprinkle half of the crumbled goat cheese over the zucchini. Repeat with the remaining zucchini and goat cheese.
- Prepare the Cream Mixture: In a small bowl, mix the heavy cream with half of the grated Parmesan cheese. Pour this mixture evenly over the layered zucchini and goat cheese.
- Add the Topping: In another bowl, combine the breadcrumbs with the remaining Parmesan cheese. Sprinkle this mixture evenly over the top of the gratin.
- Bake: Place the assembled gratin in the preheated oven and bake for 25-30 minutes, or until the top is golden brown and the cheese is bubbly.
- Cool and Serve: Remove the gratin from the oven and let it cool for a few minutes before serving. This allows the flavors to meld and makes it easier to serve.
Extra Tips:
For an extra layer of flavor, consider adding a sprinkle of nutmeg to the cream mixture, as it pairs beautifully with the goat cheese. If you prefer a gluten-free option, substitute the breadcrumbs with gluten-free breadcrumbs or crushed nuts for a different texture.
Additionally, make sure to use fresh goat cheese for the best flavor, and feel free to experiment with herbs like rosemary or basil to suit your taste.
Caramelized Shallot and Brie Galette
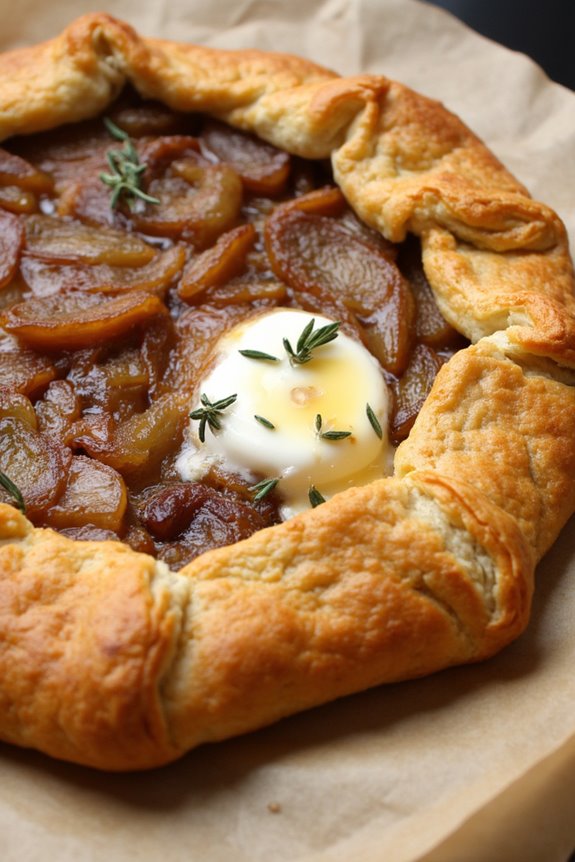
Caramelized Shallot and Brie Galette is a delightful French vegetarian dish that combines the rich flavors of caramelized shallots with the creamy, indulgent taste of Brie cheese, all enveloped in a flaky, buttery pastry crust. This elegant yet simple dish is perfect for a romantic dinner or a special occasion.
The balance of sweet and savory notes makes this galette a favorite among those who appreciate the art of French cuisine. Whether you’re a seasoned cook or a beginner, this recipe is designed to guide you through creating a meal that’s certain to impress.
The process of making a Caramelized Shallot and Brie Galette involves preparing a homemade pastry crust, slow-cooking the shallots to bring out their natural sweetness, and assembling everything together with slices of creamy Brie cheese. The galette is then baked to golden perfection, resulting in a dish that’s as pleasing to the eye as it’s to the palate.
Serve it with a simple green salad and a glass of your favorite white wine for a complete and satisfying meal.
Ingredients (Serves 4-6):
- 1 1/2 cups all-purpose flour
- 1/2 teaspoon salt
- 1/2 cup unsalted butter, chilled and cubed
- 1/4 cup ice water
- 2 tablespoons olive oil
- 6-8 large shallots, thinly sliced
- Salt and pepper, to taste
- 1 teaspoon fresh thyme leaves
- 8 ounces Brie cheese, sliced
- 1 egg, beaten (for egg wash)
- 1 tablespoon honey (optional)
Cooking Instructions:
1. Prepare the Pastry Dough: In a large mixing bowl, combine the all-purpose flour and salt. Add the chilled and cubed butter and use your fingers or a pastry cutter to work the butter into the flour until the mixture resembles coarse crumbs. Gradually add the ice water, mixing until the dough comes together.
Form the dough into a disc, wrap it in plastic wrap, and refrigerate for at least 30 minutes.
2. Caramelize the Shallots: Heat the olive oil in a large skillet over medium heat. Add the thinly sliced shallots, seasoning with salt and pepper. Cook the shallots, stirring occasionally, until they’re soft and caramelized, about 20-25 minutes.
Stir in the fresh thyme leaves and set aside.
3. Roll Out the Dough: Preheat your oven to 400°F (200°C). On a lightly floured surface, roll out the chilled dough into a rough 12-inch circle. Transfer the rolled dough to a parchment-lined baking sheet.
4. Assemble the Galette: Spread the caramelized shallots over the pastry, leaving a 2-inch border around the edges. Arrange the Brie slices over the shallots. Fold the edges of the dough over the filling, pleating as you go to create a rustic edge.
Brush the crust with the beaten egg wash.
5. Bake the Galette: Place the galette in the preheated oven and bake for 25-30 minutes, or until the crust is golden brown and the cheese is bubbly.
If desired, drizzle the finished galette with honey for a touch of sweetness before serving.
Extra Tips:
When preparing the pastry dough, make sure that your butter is very cold to achieve a flaky crust. If you find the dough difficult to handle, refrigerate it for another 10 minutes before rolling it out.
For an extra flavor boost, consider adding a splash of balsamic vinegar to the shallots during the caramelization process. This dish is versatile; you can substitute Brie with another soft cheese like Camembert or goat cheese if you prefer.
Remember to serve the galette warm for the best tasting experience.
Spinach and Ricotta Stuffed Puff Pastry
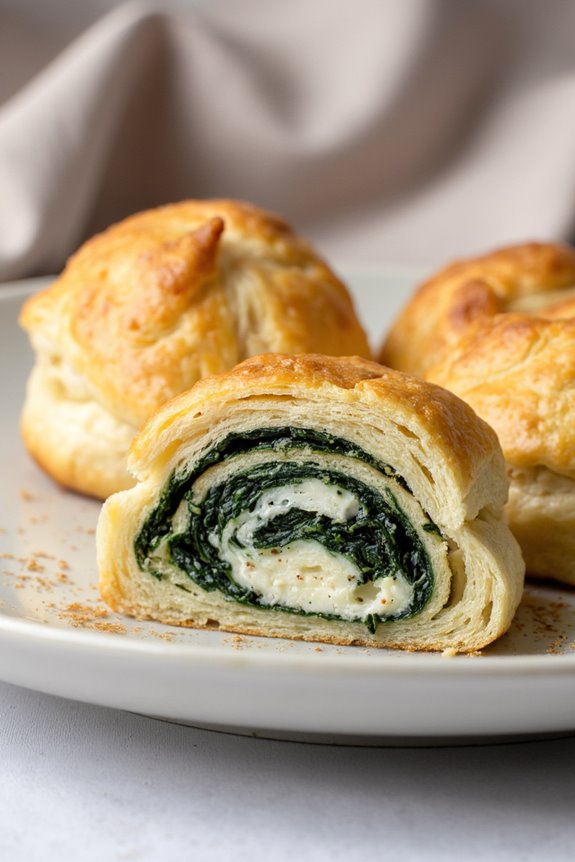
Spinach and Ricotta Stuffed Puff Pastry is a delightful French-inspired vegetarian dish that embodies elegance and simplicity. This recipe combines the earthy flavors of fresh spinach with the creamy goodness of ricotta cheese, all encased in a flaky puff pastry. It’s perfect for a romantic dinner or a special occasion where you want to impress your loved ones with a taste of sophisticated French cuisine.
The subtle hint of nutmeg and the richness of Parmesan cheese elevate this dish to a whole new level of flavor complexity. This dish isn’t only visually appealing but also incredibly satisfying. The golden-brown pastry provides a crisp texture that contrasts beautifully with the soft, savory filling.
Whether served as an appetizer or a main course, Spinach and Ricotta Stuffed Puff Pastry will impress vegetarians and non-vegetarians alike. Pair it with a light salad and a glass of white wine for a truly romantic meal.
Ingredients for 4-6 servings:
- 2 sheets of puff pastry
- 2 cups fresh spinach leaves
- 1 cup ricotta cheese
- 1/2 cup grated Parmesan cheese
- 1 egg (beaten, for egg wash)
- 1/4 teaspoon ground nutmeg
- Salt and pepper to taste
- 1 tablespoon olive oil
- 1 clove garlic (minced)
Cooking Instructions:
- Prepare the Spinach: Heat olive oil in a large skillet over medium heat. Add the minced garlic and sauté for about 1 minute until fragrant. Add the fresh spinach leaves and cook until wilted, about 3-4 minutes. Remove from heat and let it cool slightly.
- Make the Filling: In a mixing bowl, combine the ricotta cheese, grated Parmesan cheese, and ground nutmeg. Stir in the cooked spinach and mix well. Season with salt and pepper to taste. Set the filling aside.
- Prepare the Puff Pastry: Preheat your oven to 400°F (200°C). On a lightly floured surface, roll out the puff pastry sheets to smooth out any creases. Cut each sheet into 4 equal squares.
- Assemble the Pastries: Spoon a generous amount of the spinach and ricotta mixture onto the center of each pastry square. Fold the corners of the pastry over the filling to form a parcel, pressing the edges to seal. You can also use a fork to crimp the edges for extra security.
- Apply Egg Wash: Place the pastries on a baking sheet lined with parchment paper. Brush the tops with the beaten egg to guarantee a beautiful golden color during baking.
- Bake: Bake in the preheated oven for 20-25 minutes, or until the pastries are puffed and golden brown. Remove from the oven and let cool for a few minutes before serving.
Extra Tips:
To enhance the flavor of the filling, you can add a pinch of red pepper flakes for a slight kick or incorporate some chopped fresh herbs such as basil or parsley. If you prefer a richer filling, consider adding a handful of crumbled feta cheese.
Always work with cold puff pastry to prevent it from becoming too sticky or difficult to handle. Additionally, confirm your spinach is well-drained to avoid a soggy filling. Enjoy your romantic French dinner with these delightful stuffed pastries!
Asparagus and Lemon Risotto
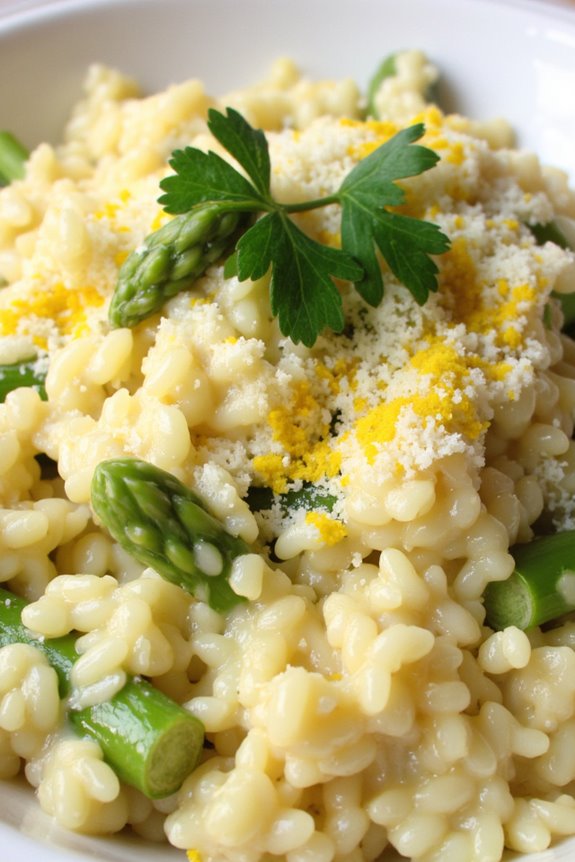
Asparagus and Lemon Risotto is a delightful dish that perfectly captures the essence of French cuisine with its rich flavors and creamy texture. This vegetarian recipe combines the tender bite of fresh asparagus with the zesty brightness of lemon, creating a harmonious balance that’s both satisfying and invigorating. Ideal for romantic dinners or special occasions, this risotto will impress not only with its taste but also with its elegant presentation.
Despite its gourmet appearance, Asparagus and Lemon Risotto is surprisingly simple to prepare. The key to achieving the perfect risotto lies in the gradual addition of broth to the rice, allowing it to slowly absorb the liquid and develop its creamy consistency. With a few basic ingredients and some patience, you can create a dish that isn’t only delicious but also a proof of the art of French cooking.
Ingredients for 4-6 servings:
- 1 ½ cups Arborio rice
- 1 bunch asparagus, trimmed and cut into 1-inch pieces
- 1 medium onion, finely chopped
- 2 cloves garlic, minced
- Zest and juice of 1 lemon
- 1 cup dry white wine
- 4 cups vegetable broth
- ½ cup grated Parmesan cheese
- 3 tablespoons unsalted butter
- 2 tablespoons olive oil
- Salt and freshly ground black pepper to taste
- Fresh parsley, chopped (for garnish)
Cooking Instructions:
- Prepare the Broth: In a medium saucepan, heat the vegetable broth over low heat and keep it warm throughout the cooking process. This will allow the rice to absorb the liquid more efficiently.
- Cook the Asparagus: In a large skillet, heat 1 tablespoon of olive oil over medium heat. Add the asparagus pieces and sauté for about 5 minutes until they’re tender but still crisp. Remove from the skillet and set aside.
- Sauté the Aromatics: In the same skillet, add the remaining olive oil and 1 tablespoon of butter. Add the chopped onion and garlic, and sauté over medium heat until the onion becomes translucent, about 3-4 minutes.
- Toast the Rice: Add the Arborio rice to the skillet with the onion and garlic. Stir well to coat the rice with the oil and butter, allowing it to toast slightly. This should take about 2 minutes.
- Deglaze with Wine: Pour in the white wine and stir continuously until the wine is mostly absorbed by the rice.
- Cook the Risotto: Begin adding the warm vegetable broth to the rice, one ladleful at a time. Stir frequently, allowing each addition of broth to be absorbed before adding more. Continue this process until the rice is creamy and cooked to al dente, which should take about 18-20 minutes.
- Finish the Risotto: Once the rice is cooked, stir in the sautéed asparagus, lemon zest, lemon juice, remaining butter, and Parmesan cheese. Season with salt and pepper to taste.
- Serve: Serve the risotto hot, garnished with freshly chopped parsley for a touch of color and added flavor.
Extra Tips:
For the best flavor, use fresh, high-quality asparagus and lemon. When selecting asparagus, look for firm, bright green stalks with closed tips.
Additionally, keep the risotto moving by stirring often, as this helps release the starch from the rice and contributes to the dish’s signature creaminess.
If you prefer a slightly richer risotto, you can substitute half of the vegetable broth with vegetable stock.
Finally, remember that risotto is best served immediately, as it can continue to thicken as it sits.
Hearty Lentil and Vegetable Cassoulet
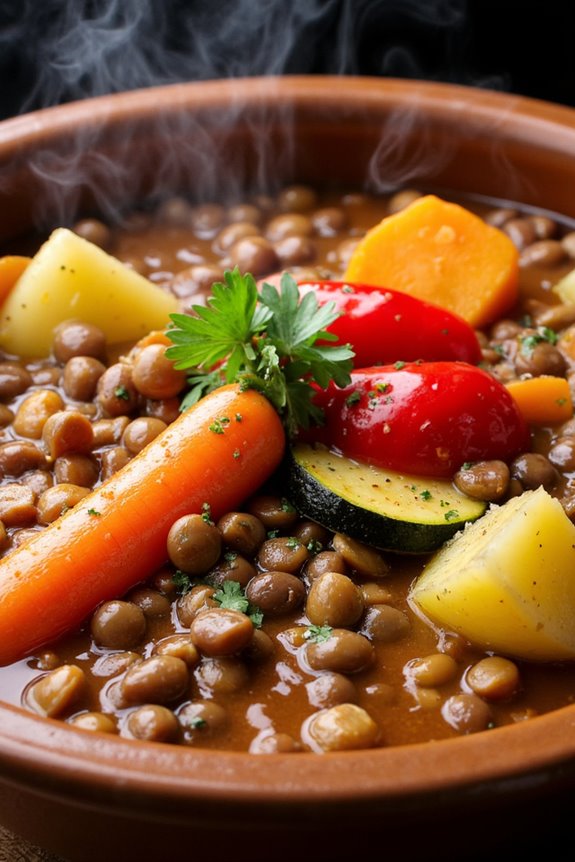
Discover the warmth and comfort of a classic French dish with a vegetarian twist in this Hearty Lentil and Vegetable Cassoulet. Originating from the south of France, cassoulet traditionally features meat and beans cooked slowly to develop deep, rich flavors. In this vegetarian version, protein-packed lentils take center stage, accompanied by an array of colorful vegetables and aromatic herbs.
This dish is perfect for a cozy evening, serving as a hearty main course that’s both satisfying and nourishing. The Hearty Lentil and Vegetable Cassoulet is ideal for gatherings or family dinners, serving 4-6 people. With layers of earthy lentils, sweet carrots, and tender potatoes, this cassoulet offers a delightful blend of textures and flavors.
The slow cooking process allows the ingredients to meld together, creating a comforting and aromatic dish that will fill your home with the essence of French cuisine. Pair this cassoulet with a crusty baguette and a light salad for a complete and romantic meal.
Ingredients (serving size: 4-6 people):
- 2 cups green or brown lentils
- 1 large onion, chopped
- 3 carrots, sliced
- 3 cloves garlic, minced
- 2 celery stalks, chopped
- 2 medium potatoes, diced
- 1 red bell pepper, chopped
- 1 zucchini, sliced
- 4 cups vegetable broth
- 1 can (14 oz) diced tomatoes
- 2 tablespoons tomato paste
- 1 teaspoon dried thyme
- 1 teaspoon dried rosemary
- 1 bay leaf
- Salt and pepper to taste
- 2 tablespoons olive oil
- Fresh parsley, chopped for garnish
Cooking Instructions:
- Prepare the Ingredients: Start by rinsing the lentils under cold water in a sieve and set aside. Chop all the vegetables as instructed to guarantee even cooking.
- Sauté the Aromatics: In a large oven-safe pot or Dutch oven, heat olive oil over medium heat. Add the chopped onion, carrots, and celery, and sauté for about 5-7 minutes until the onion becomes translucent and the vegetables start to soften.
- Add Garlic and Herbs: Stir in the minced garlic, dried thyme, rosemary, and bay leaf. Cook for an additional 1-2 minutes until the garlic is fragrant, being careful not to let it burn.
- Incorporate the Vegetables and Lentils: Add the diced potatoes, red bell pepper, zucchini, and lentils to the pot. Stir well to combine all the ingredients.
- Add Liquids: Pour in the vegetable broth, diced tomatoes, and tomato paste. Stir to make sure the tomato paste is fully dissolved into the mixture. Season with salt and pepper to taste.
- Simmer the Cassoulet: Bring the mixture to a boil, then reduce the heat to low. Cover the pot and let it simmer gently for about 45-50 minutes, or until the lentils and vegetables are tender. Stir occasionally to prevent sticking.
- Adjust Seasoning: Taste and adjust the seasoning with more salt and pepper if needed. Remove the bay leaf from the pot.
- Finish and Serve: Preheat your oven to 350°F (175°C). If using a Dutch oven or oven-safe pot, place it directly into the oven uncovered for an additional 10-15 minutes to slightly thicken and allow the top to caramelize gently. If your pot isn’t oven-safe, transfer the cassoulet to a baking dish before baking.
- Garnish and Enjoy: Once done, remove from the oven and let it cool for a few minutes. Garnish with freshly chopped parsley before serving.
Extra Tips: For added depth of flavor, consider adding a splash of red wine or a dash of smoked paprika during the cooking process. If you prefer a thicker consistency, mash a portion of the lentils and vegetables with a fork before baking.
Additionally, this cassoulet can be prepared in advance and tastes even better the next day as the flavors continue to develop. Serve with a side of crusty bread or a fresh salad for a complete and satisfying meal.
Delicate Cheese and Chive Soufflé

Indulge in the art of French cuisine with this delicate Cheese and Chive Soufflé, a vegetarian delight that promises to elevate any dining experience with its airy texture and rich flavor.
This dish combines the creamy goodness of cheese with the subtle onion-like taste of chives, resulting in a sophisticated yet comforting meal. Perfect for a romantic dinner or a special gathering, this soufflé is sure to impress both in taste and presentation.
The secret to a successful soufflé lies in mastering the balance between the lightness of whipped egg whites and the rich, cheesy base. As you begin this culinary journey, you’ll discover that creating this classic French dish is as much about technique as it’s about quality ingredients.
Whether you’re a seasoned cook or a beginner enthusiastic to explore new recipes, this Cheese and Chive Soufflé will guide you through a rewarding cooking experience.
Ingredients (Serves 4-6):
- 3 tablespoons unsalted butter, plus extra for greasing
- 3 tablespoons all-purpose flour
- 1 cup whole milk
- 1/2 teaspoon salt
- 1/4 teaspoon ground black pepper
- 1/8 teaspoon ground nutmeg
- 4 large eggs, separated
- 1 cup grated Gruyère cheese
- 2 tablespoons chopped fresh chives
- 1/4 teaspoon cream of tartar
Cooking Instructions:
1. Prepare the Oven and Dishes: Preheat your oven to 375°F (190°C). Generously butter a 1.5-quart soufflé dish or individual ramekins if serving separately. This guarantees that the soufflés will rise evenly and release smoothly after baking.
2. Make the Base: In a medium saucepan, melt 3 tablespoons of butter over medium heat. Stir in the flour, whisking constantly for about 1 minute to form a roux. Gradually whisk in the milk, making sure there are no lumps.
Cook the mixture for 3-4 minutes, stirring, until it thickens. Remove from heat and season with salt, pepper, and nutmeg.
3. Incorporate the Yolks and Cheese: Allow the mixture to cool slightly before whisking in the egg yolks one at a time. Stir in the grated Gruyère cheese and chopped chives until well combined. Set aside.
4. Beat the Egg Whites: In a clean, dry bowl, beat the egg whites and cream of tartar until soft peaks form. This step is essential for the soufflé’s rise and lightness.
5. Fold in the Whites: Gently fold one-third of the beaten egg whites into the cheese mixture to lighten it. Carefully fold in the remaining whites, being cautious not to deflate the mixture.
6. Bake the Soufflé: Pour the mixture into the prepared dish or ramekins. Place on the middle rack of the oven and bake for 25-30 minutes for a large soufflé or 15-20 minutes for individual ones, until puffed and golden brown.
Avoid opening the oven during baking to prevent the soufflé from collapsing.
Extra Tips:
To achieve the perfect soufflé, make sure all your ingredients are at room temperature before starting. This helps with the even mixing of the batter and the stability of the egg whites.
Additionally, when folding the egg whites into the cheese mixture, use a gentle hand to maintain as much air as possible. Finally, serve the soufflé immediately after baking, as it will begin to deflate shortly after being removed from the oven.
Enjoy your culinary masterpiece with a glass of crisp white wine to complement the flavors.
Warm Pear and Almond Clafoutis

Warm Pear and Almond Clafoutis is a delightful French dessert that combines the subtle sweetness of ripe pears with the nutty flavor of almonds. Traditionally made with cherries, this clafoutis variation is a warm and inviting dish that’s perfect for a romantic dinner.
The creamy custard-like texture paired with the tender pears creates a comforting experience that’s both light and satisfying. This dish showcases the versatility of pears, making it an ideal choice for those seeking a unique twist on a classic French dessert.
This recipe for Warm Pear and Almond Clafoutis serves 4-6 people, making it perfect for an intimate gathering or a special occasion with loved ones. The simplicity of the ingredients allows the flavors to shine, while the preparation process is straightforward enough for cooks of all skill levels.
With its golden-brown top and delicate aroma, this clafoutis is sure to impress your guests and add a touch of elegance to your meal.
Ingredients:
- 3 ripe pears, peeled, cored, and sliced
- 3 large eggs
- 1/2 cup granulated sugar
- 1 cup whole milk
- 1/2 cup heavy cream
- 1 teaspoon vanilla extract
- 1/2 cup all-purpose flour
- 1/2 cup almond flour
- 1/4 teaspoon salt
- 2 tablespoons unsalted butter, melted
- 1/4 cup sliced almonds
- Powdered sugar for dusting
Instructions:
- Preheat the Oven: Begin by preheating your oven to 350°F (175°C). This guarantees the clafoutis bakes evenly and the custard sets properly.
- Prepare the Pears: Peel, core, and slice the pears into thin wedges. Arrange them in a single layer in a buttered 9-inch baking dish or pie pan. This creates a lovely base for the custard to envelop.
- Make the Batter: In a mixing bowl, whisk together the eggs and granulated sugar until pale and frothy. Gradually add the milk, heavy cream, and vanilla extract, whisking continuously to combine.
- Incorporate Dry Ingredients: In a separate bowl, combine the all-purpose flour, almond flour, and salt. Slowly add this mixture to the wet ingredients, whisking until smooth and free of lumps.
- Add Butter: Stir in the melted butter into the batter, making certain it’s well combined. This adds richness and helps the clafoutis develop a beautiful color as it bakes.
- Assemble and Bake: Pour the batter over the arranged pears in the baking dish. Sprinkle the sliced almonds evenly on top to add texture and flavor. Place the dish in the preheated oven and bake for 35-40 minutes or until the clafoutis is golden brown and a toothpick inserted into the center comes out clean.
- Cool and Serve: Allow the clafoutis to cool slightly before dusting with powdered sugar. Serve warm to enjoy the full depth of flavors.
Extra Tips:
For the best results, use ripe yet firm pears to guarantee they hold their shape during baking. If you prefer a slightly sweeter clafoutis, consider adding a tablespoon of honey or maple syrup to the batter.
You can also experiment with different types of pears for varied flavors. To enhance the almond flavor, try adding a teaspoon of almond extract along with the vanilla extract. Clafoutis is best enjoyed warm, but it can also be served cold as a rejuvenating treat.