

As the holiday season draws near, I find myself longing for the comforting scents of French cuisine filling the kitchen. There’s something wonderfully heartwarming about dishes like classic French onion soup or coq au vin that gather family and friends around the table. Each recipe is a celebration of tradition and love, making every moment together feel special. If you’re eager to create that festive atmosphere with simple French recipes, you’ll want to keep reading.
Classic French Onion Soup

Classic French Onion Soup is a timeless dish that warms the soul, especially during the chilly festive season. Originating from France, this savory soup features caramelized onions, rich beef broth, and a delightful topping of melted cheese, making it a perfect starter for any holiday gathering.
The combination of sweet, slow-cooked onions and the hearty broth creates a comforting experience that evokes the essence of French bistro dining. Preparing this dish requires patience, especially when caramelizing the onions to achieve that deep, golden color and rich flavor.
The slow cooking process enhances the natural sweetness of the onions, resulting in a soup that’s both hearty and satisfying. Topped with crusty bread and gooey cheese, Classic French Onion Soup is sure to impress your guests and elevate your festive meal.
Ingredients (Serves 4-6):
- 4 large onions, thinly sliced
- 4 tablespoons unsalted butter
- 1 tablespoon olive oil
- 1 teaspoon sugar
- 1 teaspoon salt
- 1/2 teaspoon black pepper
- 1 tablespoon all-purpose flour
- 8 cups beef broth
- 1/2 cup dry white wine (optional)
- 1 teaspoon fresh thyme leaves (or 1/2 teaspoon dried thyme)
- 1 baguette, sliced into 1-inch thick pieces
- 2 cups grated Gruyère cheese
- Fresh parsley, chopped (for garnish)
Cooking Instructions:
- Caramelize the Onions: In a large heavy-bottomed pot, melt the butter and olive oil over medium heat. Add the sliced onions, sugar, salt, and pepper. Cook the onions slowly, stirring occasionally, until they’re soft and caramelized, about 25-30 minutes. This step is essential; take your time to develop the deep flavors.
- Add Flour: Once the onions are caramelized and have turned a rich golden brown, sprinkle the flour over them. Stir well to coat the onions and cook for an additional 2-3 minutes to eliminate the raw flour taste.
- Incorporate Broth and Wine: Gradually pour in the beef broth while stirring. If using, add the dry white wine at this point. Scrape the bottom of the pot to release any browned bits, which add flavor. Bring the mixture to a gentle simmer.
- Season the Soup: Stir in the fresh thyme. Allow the soup to simmer for about 30 minutes, stirring occasionally, to let the flavors meld together. Taste and adjust seasoning if necessary.
- Prepare the Bread: While the soup simmers, preheat your oven to 400°F (200°C). Place the baguette slices on a baking sheet and toast them in the oven for about 5-7 minutes, or until they’re golden and crisp.
- Serve the Soup: Ladle the hot soup into oven-safe bowls. Place a toasted baguette slice on top of each bowl, then generously sprinkle with grated Gruyère cheese.
- Broil to Melt Cheese: Place the bowls on a baking sheet and put them under the broiler for about 3-5 minutes, or until the cheese is bubbly and golden. Keep a close eye on them to prevent burning.
- Garnish and Enjoy: Carefully remove the bowls from the oven, garnish with chopped parsley, and serve immediately. Enjoy your delicious Classic French Onion Soup!
Extra Tips:
For an even richer flavor, consider using a combination of beef and chicken broth, or adding a splash of sherry for an extra layer of depth.
Make sure that you use a good quality Gruyère cheese, as it melts beautifully and adds a creamy texture to the soup. If you want to make a vegetarian version, simply swap the beef broth for vegetable broth and omit the wine.
Enjoy the process of making this classic dish, as the aromas of caramelized onions will fill your kitchen with warmth and holiday cheer.
Coq Au Vin
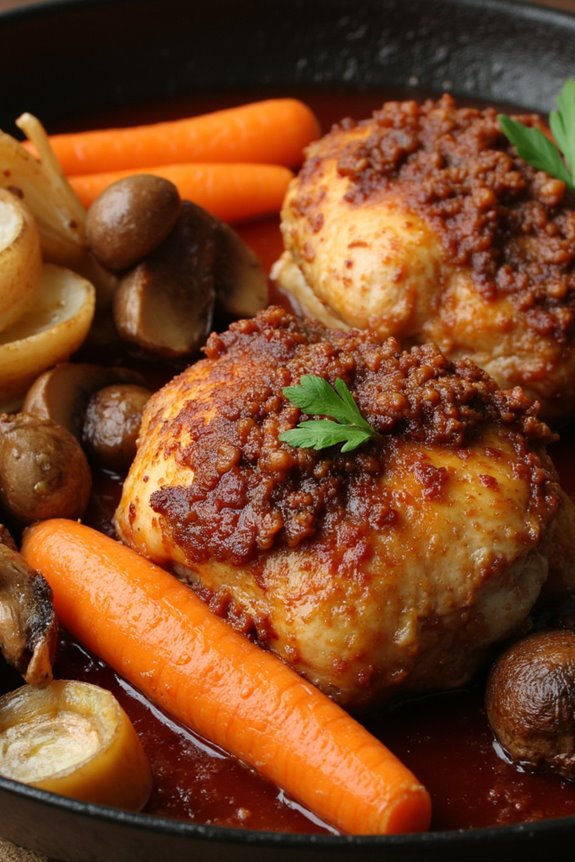
Coq Au Vin is a traditional French dish that embodies the heart and soul of rustic French cooking. This hearty meal consists of chicken braised slowly with red wine, lardons, mushrooms, onions, and aromatic herbs. The origins of this dish trace back to the rural provinces of France, where it was often prepared as a way to tenderize tougher cuts of meat through slow cooking. The result is a rich, savory sauce and melt-in-your-mouth chicken that’s perfect for festive gatherings or cozy family dinners.
To create a truly authentic Coq Au Vin, red Burgundy wine is often used, which enhances the flavor and provides a beautiful color to the dish. As the chicken simmers, it absorbs the wine and the earthy flavors of the vegetables, creating a comforting and luxurious meal that will impress your guests. Serve it with crusty bread or creamy mashed potatoes to soak up the delectable sauce.
Ingredients (Serves 4-6):
- 4-6 chicken thighs (bone-in, skin-on)
- 4 oz lardons or thick-cut bacon, diced
- 1 medium onion, chopped
- 2 carrots, sliced
- 2 cloves garlic, minced
- 2 cups red wine (preferably Burgundy)
- 2 cups chicken stock
- 1 cup button mushrooms, sliced
- 2 tablespoons tomato paste
- 2 tablespoons all-purpose flour
- 2 tablespoons olive oil
- 1 bouquet garni (a bundle of herbs, such as thyme, bay leaf, and parsley)
- Salt and pepper to taste
- Fresh parsley for garnish
Cooking Instructions:
- Prepare the Chicken: Season the chicken thighs generously with salt and pepper. In a large Dutch oven or heavy pot, heat the olive oil over medium-high heat. Add the chicken thighs, skin-side down, and sear until golden brown on both sides, about 5-7 minutes per side. Remove the chicken from the pot and set aside.
- Cook the Lardons: In the same pot, add the diced lardons or bacon and cook until crispy. This will take about 3-4 minutes. Once crispy, remove the lardons with a slotted spoon and set aside, leaving the rendered fat in the pot.
- Sauté the Vegetables: Add the chopped onion and sliced carrots to the pot. Sauté for about 5 minutes, or until the onions become translucent. Add the minced garlic and sauté for an additional minute, stirring frequently to avoid burning.
- Deglaze the Pot: Sprinkle the flour over the vegetables and stir well to combine. Cook for about 2 minutes to eliminate the raw flour taste. Pour in the red wine, scraping the bottom of the pot to deglaze and release any browned bits for added flavor. Bring the mixture to a gentle boil.
- Combine Ingredients: Once the wine is boiling, return the chicken thighs to the pot along with the cooked lardons, tomato paste, mushrooms, and the bouquet garni. Pour in the chicken stock, ensuring that the chicken is mostly submerged. Bring to a simmer.
- Braise the Chicken: Cover the pot and reduce the heat to low. Let it simmer gently for about 1.5 to 2 hours until the chicken is tender and the flavors meld together. You can stir occasionally and check the liquid levels, adding more stock if necessary.
- Final Touches: Once the chicken is tender, remove the bouquet garni. Taste the sauce and adjust seasoning with salt and pepper as needed. If you desire a thicker sauce, you can remove the chicken and boil the sauce for a few minutes to reduce it further.
- Serve: Serve the Coq Au Vin hot, garnished with fresh parsley. Accompany it with crusty bread or mashed potatoes to soak up the rich sauce.
Extra Tips:
When preparing Coq Au Vin, it’s important to choose a good quality red wine, as it greatly influences the dish’s flavor. Allowing the chicken to marinate in the wine overnight prior to cooking can enhance the taste even further.
For a deeper flavor, consider using a combination of different mushrooms, and don’t hesitate to experiment with other herbs in the bouquet garni, such as rosemary or tarragon, to tailor the dish to your palate.
Finally, Coq Au Vin tastes even better the next day, making it an excellent dish for leftovers!
Ratatouille
Ratatouille is a traditional Provençal vegetable dish that embodies the essence of French cuisine. Originating from Nice, this colorful medley of summer vegetables offers a delightful harmony of flavors and textures. Perfect for festive gatherings, it can be served as a vibrant side dish or a satisfying main course. The beauty of ratatouille lies in its simplicity and the ability to showcase fresh, seasonal produce, making it a staple in Mediterranean cooking.
Cooking ratatouille isn’t only a feast for the taste buds but also a visual delight, as the vibrant colors of the vegetables come together to create an appealing presentation. Whether it’s served hot, warm, or at room temperature, this dish is versatile and can be paired with crusty bread, rice, or pasta. Let’s explore crafting this delightful dish that will surely impress your holiday guests.
Ingredients (Serves 4-6):
- 1 large eggplant, diced
- 2 medium zucchini, sliced
- 1 bell pepper (red or yellow), diced
- 1 large onion, chopped
- 2 cloves garlic, minced
- 4 ripe tomatoes, diced (or one can of diced tomatoes)
- 1/4 cup olive oil
- 1 teaspoon dried thyme
- 1 teaspoon dried basil
- Salt and pepper to taste
- Fresh basil leaves for garnish (optional)
Cooking Instructions:
- Prepare the Vegetables: Start by washing and chopping all the vegetables. Dice the eggplant, zucchini, and bell pepper, chop the onion, and mince the garlic. If using fresh tomatoes, remove the skins if desired. Having all the vegetables prepared and ready will make the cooking process smoother.
- Sauté the Onions and Garlic: In a large heavy-bottomed skillet or Dutch oven, heat the olive oil over medium heat. Add the chopped onions and sauté until they become translucent, about 5 minutes. Stir in the minced garlic and sauté for an additional 1-2 minutes until fragrant. This step builds the aromatic base for the ratatouille.
- Cook the Eggplant: Add the diced eggplant to the skillet and cook for 5-7 minutes, stirring occasionally. The eggplant will absorb some oil and soften. This step is essential as it allows the eggplant to develop its flavor and texture before adding the other vegetables.
- Add Remaining Vegetables: Once the eggplant is softened, add the zucchini, bell pepper, and diced tomatoes (with their juices if using canned). Stir to combine all the vegetables. This mix will create a colorful and vibrant dish.
- Season and Simmer: Sprinkle in the dried thyme, dried basil, salt, and pepper. Stir well, then cover the skillet and reduce the heat to low. Allow the ratatouille to simmer for about 30-40 minutes, stirring occasionally. This slow cooking will meld the flavors together and soften the vegetables to the perfect tenderness.
- Final Adjustments: After the cooking time, taste the ratatouille and adjust the seasoning with more salt, pepper, or herbs as necessary. If the mixture is too watery, you can remove the lid and cook for an additional 10 minutes to let it reduce.
- Serve: Once your ratatouille is ready, remove it from heat and let it cool slightly. Garnish with fresh basil leaves for added flavor and presentation. Serve warm, at room temperature, or even chilled, allowing the flavors to deepen and evolve.
Extra Tips:
When making ratatouille, using fresh, seasonal vegetables will enhance the flavor considerably. Feel free to experiment by adding other vegetables like mushrooms or carrots according to your preference.
For a more robust flavor, consider roasting the vegetables before adding them to the pot. Additionally, ratatouille can be made a day in advance as the flavors will continue to develop and improve overnight, making it an ideal dish for holiday gatherings.
Quiche Lorraine

Quiche Lorraine is a classic French dish that elegantly combines a rich custard base with smoky bacon and creamy cheese, all encased in a flaky pastry crust. Traditionally hailing from the Lorraine region of France, this savory pie is perfect for festive gatherings or a cozy family dinner.
The beauty of Quiche Lorraine lies in its versatility; while the classic version features bacon, you can easily customize it by adding vegetables or different cheeses, making it a delightful dish for any palate.
This dish not only provides a satisfying meal but also showcases the art of French cooking in a simple yet delicious way. Whether served warm or at room temperature, Quiche Lorraine is an excellent choice for brunch, lunch, or dinner.
Pair it with a fresh salad and a glass of wine for a complete dining experience that will impress your guests and warm the hearts of your loved ones.
Ingredients (Serves 4-6):
- 1 pre-made pie crust (9-inch)
- 6 slices of bacon
- 1 cup shredded Gruyère cheese
- 4 large eggs
- 1 cup heavy cream
- 1/2 cup whole milk
- 1/2 teaspoon salt
- 1/4 teaspoon freshly ground black pepper
- 1/4 teaspoon nutmeg (optional)
- 2 green onions, chopped (optional, for garnish)
Cooking Instructions:
1. Preheat the Oven: Begin by preheating your oven to 375°F (190°C). A properly heated oven is essential for achieving a golden brown crust and perfectly set custard.
2. Prepare the Pie Crust: Place the pre-made pie crust into a 9-inch pie dish. Press it into the edges and trim any excess. Prick the bottom with a fork to prevent bubbling, then bake in the preheated oven for about 10 minutes until lightly golden.
Remove from the oven and set aside to cool slightly.
3. Cook the Bacon: In a skillet over medium heat, cook the bacon slices until crispy. Once cooked, remove them from the skillet and place on paper towels to drain excess grease.
Chop the bacon into small pieces and set aside.
4. Mix the Custard: In a large mixing bowl, whisk together the eggs, heavy cream, whole milk, salt, black pepper, and nutmeg until well combined.
This mixture will create the creamy filling for your quiche.
5. Assemble the Quiche: Evenly distribute the chopped bacon and shredded Gruyère cheese over the baked pie crust.
Pour the egg and cream mixture over the top, ensuring the bacon and cheese are well submerged.
6. Bake the Quiche: Place the assembled quiche into the oven and bake for 30-35 minutes or until the custard is set and the top is lightly golden.
You can check for doneness by inserting a knife into the center; it should come out clean.
7. Cool and Serve: Once baked, remove the quiche from the oven and allow it to cool for about 10-15 minutes before slicing.
This cooling time helps the filling set further.
Extra Tips:
For a delightful twist, try adding sautéed vegetables like spinach, mushrooms, or bell peppers to your quiche for added flavor and nutrition.
Additionally, using a mix of cheeses, such as cheddar or feta, can enhance the taste profile. Quiche Lorraine can be made ahead of time and stored in the refrigerator for up to three days, making it a convenient option for holiday entertaining.
Serve warm, at room temperature, or even cold, and enjoy every delicious bite!
Duck Confit
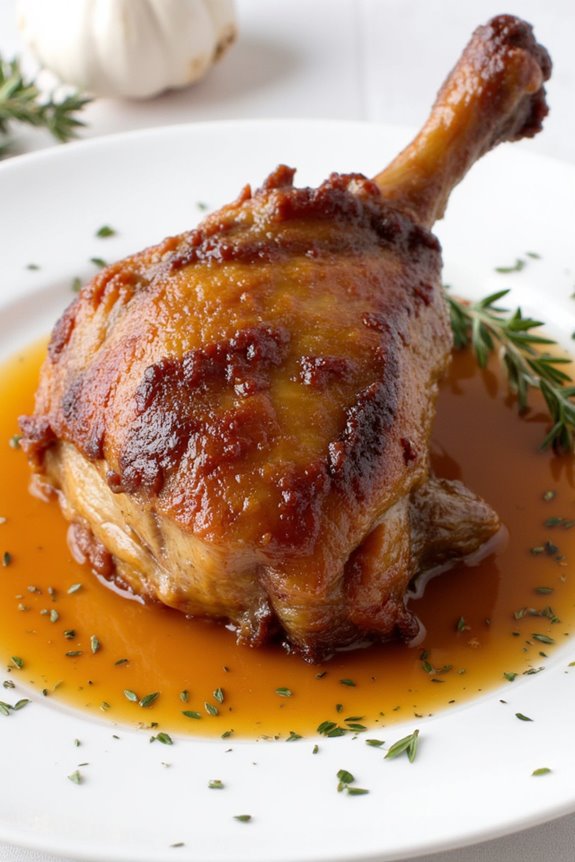
Duck Confit is a classic French dish that embodies the essence of comfort food and holiday feasting. This dish features duck legs that are slowly cooked in their own fat until they’re tender, flavorful, and irresistibly moist. Traditionally served with crispy skin, Duck Confit is often accompanied by rich sides, such as garlic potatoes or a fresh salad, making it perfect for festive gatherings.
With its roots in Gascony, this dish not only highlights the beauty of duck but also showcases the significance of patience in French cooking.
Preparing Duck Confit may seem intimidating, but with a little time and care, you can impress your guests with this elegant dish. The key to achieving the perfect confit lies in the slow cooking process, which allows the flavors to develop beautifully. The duck is typically seasoned with herbs and spices, then submerged in fat and cooked at a low temperature, resulting in tender meat that can be pulled apart with a fork.
Serve it up during your holiday festivities, and watch as it becomes the star of the meal!
Ingredients (Serves 4-6):
- 4 duck legs
- 2 teaspoons kosher salt
- 1 teaspoon black pepper
- 4 garlic cloves, crushed
- 2 sprigs fresh thyme
- 2 sprigs fresh rosemary
- 2 cups duck fat (or more to cover the duck legs)
- 1 bay leaf
Cooking Instructions:
- Prepare the Duck Legs: Start by patting the duck legs dry with paper towels. This will help the skin crisp up later. In a bowl, mix the kosher salt, black pepper, crushed garlic, thyme, rosemary, and bay leaf. Rub this herb mixture all over the duck legs, making sure to get under the skin as well. Cover and refrigerate the legs for at least 24 hours, or up to 3 days, to allow the flavors to penetrate the meat.
- Rinse and Dry: Once the duck legs have marinated, remove them from the refrigerator and rinse off the salt and herbs under cold water. Pat them dry thoroughly with paper towels. This step is essential as any excess moisture can prevent the skin from crisping up properly during cooking.
- Preheat the Oven: Preheat your oven to 225°F (107°C). This low cooking temperature is vital for rendering the fat and ensuring the duck cooks evenly and slowly.
- Cook the Duck: In a large, oven-safe pot or Dutch oven, melt the duck fat over medium heat. Once melted, carefully place the duck legs into the pot, making sure they’re completely submerged in the fat. If necessary, add more duck fat until the legs are fully covered. Cover the pot with a lid or aluminum foil and transfer it to the preheated oven.
- Slow Cook: Let the duck legs cook in the oven for about 4 to 6 hours, or until the meat is tender and easily pulls away from the bone. The low temperature allows the fat to render slowly and the flavors to develop fully.
- Crisp the Skin: Once the duck is cooked, remove it from the oven and let it cool in the fat for about 30 minutes. This helps the meat maintain its moisture. To crisp the skin, you can either preheat a skillet over medium-high heat and sear the duck legs skin-side down for about 5 minutes or place them under the broiler for 2-3 minutes, watching closely to prevent burning.
- Serve and Enjoy: Once the skin is crispy, serve the Duck Confit hot, paired with your choice of sides, such as roasted potatoes or a fresh green salad.
Extra Tips:
When making Duck Confit, it’s essential to use good-quality duck fat for the best flavor. You can find duck fat at specialty grocery stores or online. If you don’t have duck fat, you can substitute it with a mix of olive oil and vegetable oil, but the flavor won’t be quite the same.
Additionally, Duck Confit can be prepared in advance and stored in the refrigerator in its fat for several weeks. This makes it not only delicious but also convenient for holiday meal prep. Just remember to allow it to come to room temperature before reheating.
Beef Bourguignon
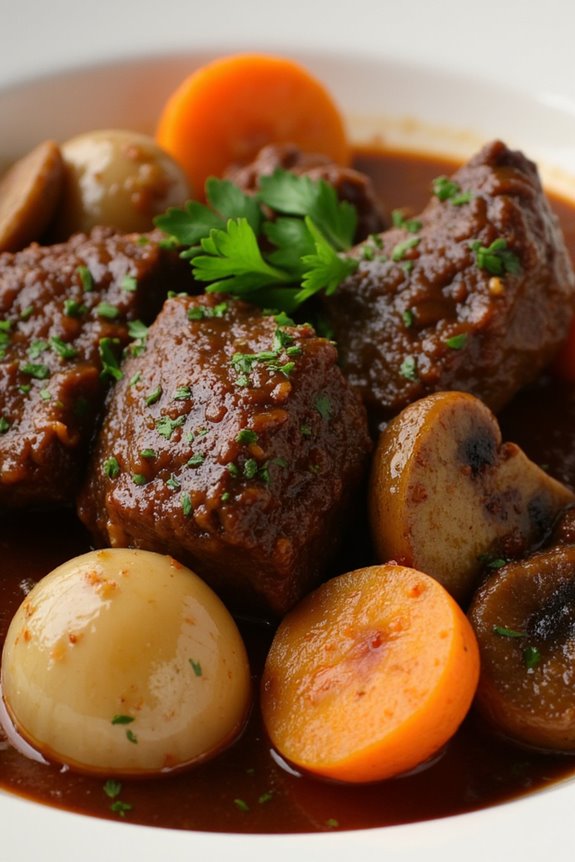
Beef Bourguignon is a classic French dish that embodies the heart and soul of rustic French cooking. Originating from the Burgundy region, this hearty stew is known for its rich flavors and tender beef, slow-cooked to perfection in red wine, usually from the same region. The dish isn’t only a comfort food favorite but is also an impressive offering for festive occasions, bringing warmth and depth to any holiday table.
With its aromatic blend of herbs, vegetables, and a luscious sauce, Beef Bourguignon is a recipe that’s sure to delight family and friends alike.
To achieve the best results, it’s essential to use quality ingredients and allow the dish to simmer for a considerable amount of time. This slow cooking process is what transforms the tough cuts of beef into melt-in-your-mouth morsels, infused with the complex flavors of the wine and aromatics.
Traditionally served with crusty bread or over a bed of buttery mashed potatoes, Beef Bourguignon is a dish that warms the heart and soul, perfect for sharing during the festive season.
Ingredients (Serves 4-6):
- 2 pounds beef chuck, cut into 2-inch cubes
- 1 bottle (750ml) red wine (preferably Burgundy)
- 2 cups beef broth
- 4 ounces bacon, diced
- 2 tablespoons olive oil
- 2 medium onions, chopped
- 3 cloves garlic, minced
- 4 medium carrots, sliced
- 2 tablespoons tomato paste
- 1 bouquet garni (a bundle of thyme, bay leaf, and parsley)
- 1 pound pearl onions, peeled
- 8 ounces mushrooms, quartered
- Salt and pepper, to taste
- Fresh parsley, for garnish
Cooking Instructions:
- Marinate the Beef: In a large bowl, combine the beef cubes with the red wine, ensuring the meat is fully submerged. Cover and refrigerate for at least 4 hours, preferably overnight. This step helps tenderize the beef and infuse it with flavor.
- Prepare the Bacon and Vegetables: In a large Dutch oven over medium heat, cook the diced bacon until crispy. Use a slotted spoon to transfer the bacon to a plate, leaving the rendered fat in the pot. Add the chopped onions and cook until soft and translucent, about 5 minutes. Stir in the minced garlic and sliced carrots, cooking for another 2-3 minutes until fragrant.
- Sear the Beef: Remove the beef from the marinade (reserving the wine) and pat dry with paper towels. Season the beef cubes with salt and pepper. In the same pot, add olive oil if necessary, and sear the beef in batches until browned on all sides. Transfer the browned beef to the plate with bacon.
- Build the Stew: Once all the beef is browned, return it to the pot along with the cooked bacon. Stir in the tomato paste and cook for 1-2 minutes. Pour in the reserved wine and beef broth, scraping the bottom of the pot to deglaze. Add the bouquet garni and bring the mixture to a simmer.
- Slow Cook: Cover the pot and reduce the heat to low. Let it simmer for about 2 to 2.5 hours, or until the beef is fork-tender. Stir occasionally and add water if needed to maintain the liquid level.
- Add Pearl Onions and Mushrooms: In the last 30 minutes of cooking, add the pearl onions and quartered mushrooms to the pot. Continue to simmer until the vegetables are tender and the stew is thickened.
- Serve: Remove the bouquet garni and adjust seasoning with salt and pepper. Serve the Beef Bourguignon hot, garnished with fresh parsley, alongside crusty bread or over mashed potatoes.
Extra Tips:
For an even richer flavor, consider using a higher quality wine that you’d also enjoy drinking. Additionally, allowing the stew to sit for a day before serving can enhance the flavors, as they’ve time to meld and develop.
If you have leftovers, they can be stored in the refrigerator for up to three days and taste even better the next day! When reheating, do so gently to preserve the tenderness of the beef.
Tarte Tatin
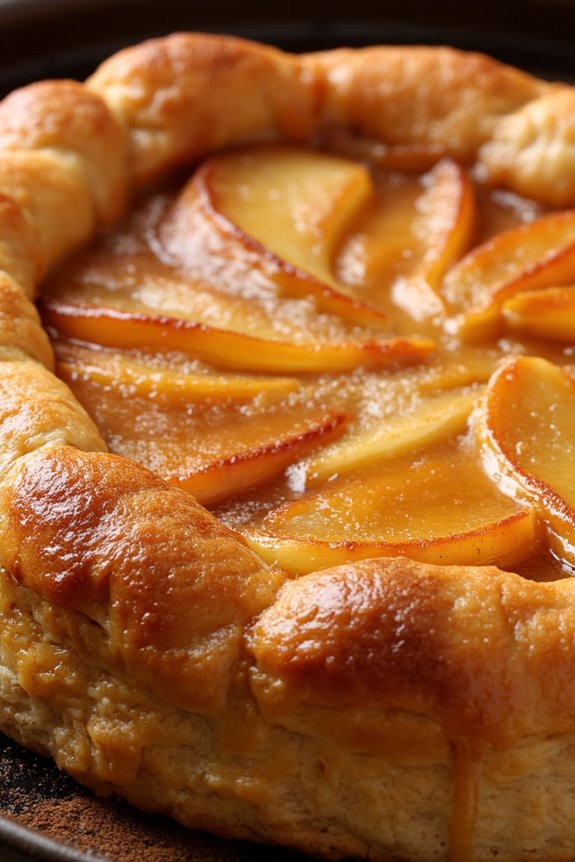
Tarte Tatin is a delightful French dessert that showcases the beauty of caramelized apples. Traditionally made with a flaky pastry crust, this upside-down tart is a favorite during the festive season, offering a warm and comforting finish to any meal. The combination of sweet, buttery apples and a hint of cinnamon creates a deliciously rich flavor that’s sure to impress your family and friends.
Whether served with a dollop of crème fraîche or a scoop of vanilla ice cream, Tarte Tatin is a quintessential indulgence that embodies the spirit of French culinary tradition.
This recipe for Tarte Tatin isn’t only simple to follow but also allows for some creativity with the choice of apples. While classic varieties like Granny Smith or Golden Delicious work beautifully, feel free to experiment with your local apple types to find your perfect match.
The caramelization process elevates the dish, creating a beautiful golden hue that will have everyone reaching for seconds. Ready to impress your guests? Let’s plunge into this festive classic!
Ingredients (Serves 4-6):
- 6 medium-sized apples (such as Granny Smith or Honeycrisp)
- 100g (1/2 cup) unsalted butter
- 200g (1 cup) granulated sugar
- 1 teaspoon vanilla extract
- 1 teaspoon ground cinnamon
- 1 sheet of puff pastry (thawed if frozen)
- A pinch of salt
- Optional: Crème fraîche or vanilla ice cream for serving
Cooking Instructions:
- Prepare the Apples: Begin by peeling, coring, and slicing the apples into quarters. This will guarantee that they cook evenly and caramelize beautifully. You can choose to use a mix of sweet and tart apples for added depth of flavor.
- Make the Caramel: In a large, oven-safe skillet or frying pan, melt the butter over medium heat. Once melted, add the granulated sugar, stirring continuously until the mixture turns a rich amber color. This should take about 5-7 minutes. Be careful not to burn it—keep a close eye on the color change.
- Add the Apples: Once the caramel is ready, carefully add the apple quarters to the skillet. Sprinkle the vanilla extract, ground cinnamon, and a pinch of salt over the apples. Gently toss the apples in the caramel to coat them evenly, cooking for about 10-15 minutes until they soften and begin to release their juices.
- Prepare the Puff Pastry: While the apples are cooking, preheat your oven to 190°C (375°F). Roll out the puff pastry on a lightly floured surface to ensure it fits snugly over the apples in the skillet.
- Assemble and Bake: Once the apples are soft, remove the skillet from the heat and lay the puff pastry over the apples, tucking the edges down inside the skillet. This will create a beautiful crust that will encase the apples. Place the skillet in the preheated oven and bake for about 25-30 minutes or until the pastry is golden brown and puffed up.
- Invert the Tart: Once baked, allow the Tarte Tatin to cool for a few minutes. Carefully run a knife around the edges to loosen it, then place a large serving plate over the skillet and swiftly invert the pan to release the tart. Be cautious, as the caramel will be hot and may splatter.
- Serve: Slice the Tarte Tatin while warm and serve it with a dollop of crème fraîche or a scoop of vanilla ice cream for an extra indulgent treat.
Extra Tips:
When making Tarte Tatin, the type of apples you use can greatly influence the flavor and texture of the dish. Choose a mix of sweet and tart varieties for a balance that will complement the caramel perfectly.
If you notice the sugar starting to burn while making the caramel, reduce the heat immediately and stir more frequently. For an added twist, consider incorporating a splash of Calvados or rum into the apple mixture for a deeper flavor.
Remember to serve the tart warm for the best experience, as the caramel is at its most delightful when it’s fresh from the oven!
Chocolate Fondue

Chocolate fondue is a delightful and interactive dessert that brings people together, making it perfect for festive French holiday gatherings. This indulgent treat features a luscious blend of high-quality chocolate melted to silky perfection, paired with an array of dippable delights.
Whether you’re celebrating Christmas, New Year’s, or any special occasion, chocolate fondue creates a warm and inviting atmosphere that promotes sharing and conversation.
To elevate your chocolate fondue experience, consider using a combination of dark, milk, and white chocolate to cater to various tastes. The beauty of this recipe lies not only in the chocolate itself but also in the selection of fruits, pastries, and snacks to dip.
From fresh strawberries to fluffy marshmallows, the possibilities are endless, making each bite an exciting surprise. Gather your loved ones around the fondue pot, and enjoy a sweet journey through the holiday season!
Ingredients (serving size: 4-6 people):
- 8 oz (225g) dark chocolate, chopped
- 8 oz (225g) milk chocolate, chopped
- 1 cup (240ml) heavy cream
- 1 tsp vanilla extract
- Fresh strawberries, halved
- Banana slices
- Marshmallows
- Cubed pound cake
- Pretzels
- Assorted cookies
Cooking Instructions:
1. Prepare the Chocolate Mixture: In a medium saucepan, combine the chopped dark and milk chocolate. Pour in the heavy cream and add the vanilla extract. Place the saucepan over low heat. Stir gently with a wooden spoon as the chocolate and cream begin to melt together.
It’s important to keep the heat low to avoid burning the chocolate.
2. Melt the Chocolate: Continue stirring the mixture until the chocolate is completely melted and smooth. This may take about 5-7 minutes. Be patient and make sure you don’t let the chocolate boil, as this can affect the texture.
3. Transfer to a Fondue Pot: Once the chocolate is fully melted, carefully pour the mixture into a preheated fondue pot. If you don’t have a fondue pot, you can use a heatproof bowl placed over a candle or a small burner to keep the chocolate warm and melted.
4. Prepare the Dippers: While the chocolate is melting, prepare your selection of dippers. Wash and slice the strawberries and bananas, cut the pound cake into cubes, and arrange the marshmallows, pretzels, and cookies on a platter.
5. Serve and Enjoy: With the chocolate in the fondue pot and the dippers arranged beautifully, invite your guests to gather around. Provide skewers or fondue forks for everyone to dip their chosen treats into the warm chocolate.
Extra Tips: For the best results, use high-quality chocolate with a cocoa content of at least 60% for a rich flavor. You can also experiment with adding flavors such as orange zest or a splash of liqueur to the chocolate for a unique twist.
If the chocolate begins to thicken while serving, gently reheat it with a splash of cream to restore its smooth consistency. Enjoy the experience, and don’t forget to have fun mixing and matching your favorite dippers!
Madeleines
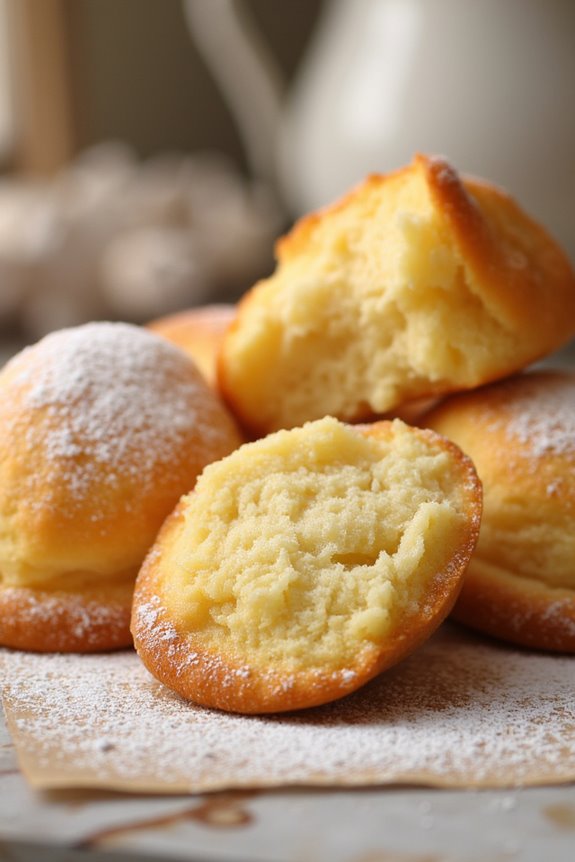
Madeleines are delightful little French sponge cakes that are perfect for any festive occasion. Their distinctive shell shape and soft, buttery texture make them a beloved treat, especially during the holiday season. Traditionally enjoyed with a cup of tea or coffee, these charming cakes can also be flavored with a variety of ingredients, such as lemon zest or chocolate, to suit your taste.
Making Madeleines at home is a rewarding experience, and with the right recipe, you can impress your guests with these elegant bites.
To achieve the perfect Madeleines, it’s vital to use a proper madeleine pan, which gives them their characteristic shape. The batter is relatively simple to prepare, consisting of basic ingredients that come together quickly. As you bake these delectable cakes, the aroma of butter and vanilla will fill your kitchen, creating a warm and inviting atmosphere.
Once baked, Madeleines can be dusted with powdered sugar or dipped in chocolate for an extra touch of sweetness.
Ingredients (Serves 4-6)
- 1 cup (120g) all-purpose flour
- 1/2 teaspoon baking powder
- 1/4 teaspoon salt
- 1/2 cup (113g) unsalted butter, melted and cooled slightly
- 3 large eggs
- 2/3 cup (130g) granulated sugar
- 1 teaspoon vanilla extract
- Zest of 1 lemon (optional)
- Powdered sugar for dusting (optional)
Cooking Instructions
- Preheat the Oven: Begin by preheating your oven to 375°F (190°C). This guarantees that your Madeleines bake evenly and achieve that perfect golden-brown color.
- Prepare the Madeleine Pan: Grease the madeleine pan with melted butter or cooking spray, and dust it lightly with flour. This step is important to prevent the cakes from sticking to the pan after baking.
- Mix Dry Ingredients: In a bowl, whisk together the all-purpose flour, baking powder, and salt. This helps to evenly distribute the leavening agent and salt throughout the flour.
- Beat the Eggs and Sugar: In a separate large mixing bowl, combine the eggs and granulated sugar. Using a hand mixer or stand mixer, beat the mixture on medium-high speed until it becomes pale, thick, and fluffy, which should take about 5 minutes. This process incorporates air into the batter, giving the Madeleines a light texture.
- Add Butter and Flavorings: Gently fold in the melted butter, vanilla extract, and lemon zest (if using) into the egg mixture. Be careful not to deflate the batter too much while mixing.
- Combine Dry and Wet Ingredients: Slowly sift the flour mixture into the wet ingredients, and fold it in using a rubber spatula until just combined. Avoid overmixing, as this can result in dense cakes.
- Fill the Pan: Using a spoon or a piping bag, fill each cavity of the madeleine pan about three-quarters full with the batter. This allows enough room for the cakes to rise without overflowing.
- Bake: Place the filled pan in the preheated oven and bake for about 10-12 minutes, or until the edges are golden brown and the tops spring back when lightly pressed.
- Cool and Serve: Once baked, remove the pan from the oven and allow the Madeleines to cool in the pan for a few minutes. Gently tap the pan to release the cakes, then transfer them to a wire rack to cool completely. Dust with powdered sugar before serving, if desired.
Extra Tips
For the best flavor and texture, allow the batter to rest in the refrigerator for at least 30 minutes before filling the molds. This step helps develop the signature hump on the Madeleines, giving them that classic shape.
Additionally, feel free to experiment with flavors by adding almond extract, orange zest, or even dipping the cooled Madeleines in melted chocolate for an indulgent treat. Enjoy these delightful cakes fresh, as they’re best consumed the same day they’re made!
Crêpes Suzette

Crêpes Suzette is a classic French dessert that perfectly balances the delicate textures of thin pancakes with a luxurious, zesty sauce. Traditionally served flambé, this dish isn’t only a delight for the palate but also a spectacle that can impress guests at any festive gathering. The crêpes are typically infused with orange flavor, complemented by a rich sauce made from butter, sugar, and liqueur, making it a sophisticated choice for special occasions.
Making Crêpes Suzette requires a bit of finesse, but the process is rewarding. The crêpes themselves can be prepared in advance, allowing you to focus on the sauce and presentation when it’s time to serve. With a little practice, you’ll be able to flip the crêpes with ease and create a stunning dessert that will leave your guests singing your praises.
Ingredients (serving size: 4-6 people)
- 1 cup all-purpose flour
- 2 large eggs
- 1 ½ cups milk
- 2 tablespoons unsalted butter, melted
- 2 tablespoons sugar
- 1 teaspoon vanilla extract
- Zest of 1 orange
- ¼ cup orange juice
- ½ cup Grand Marnier or orange liqueur
- 4 tablespoons unsalted butter (for the sauce)
- ¼ cup sugar (for the sauce)
Cooking Instructions
- Prepare the Crêpe Batter: In a mixing bowl, whisk together the flour, sugar, and a pinch of salt. In another bowl, beat the eggs with the milk, melted butter, vanilla extract, and orange zest. Gradually combine the wet ingredients into the dry mixture, whisking until smooth. Let the batter rest for at least 30 minutes to guarantee the crêpes are tender.
- Cook the Crêpes: Heat a non-stick skillet over medium heat and lightly grease it with a small amount of butter. Pour about ¼ cup of batter into the pan, swirling it quickly to spread the batter evenly across the surface. Cook for about 1-2 minutes until the edges begin to lift and the bottom is lightly golden. Carefully flip the crêpe and cook for another minute. Transfer to a plate and repeat with the remaining batter, stacking the crêpes as you go.
- Make the Sauce: In a separate saucepan, melt 4 tablespoons of butter over medium heat. Add ¼ cup of sugar and stir until dissolved. Pour in the orange juice and bring the mixture to a gentle simmer. Allow it to cook for a few minutes until slightly thickened.
- Flambé the Sauce: Remove the saucepan from the heat and carefully add the Grand Marnier. Using a long lighter or match, ignite the mixture to flambé it. Allow the flames to subside as the alcohol burns off, which will enhance the flavor of the sauce.
- Serve the Crêpes: Fold each crêpe into quarters and place them in the sauce, guaranteeing they’re well coated. Serve immediately, drizzling extra sauce over the top and garnishing with orange zest if desired.
Extra Tips
When making Crêpes Suzette, verify that your batter is smooth and free of lumps for the best texture. Resting the batter is key for achieving tender crêpes.
If you’re not comfortable flambéing, you can skip that step and simply serve the crêpes with the sauce warmed through. Additionally, feel free to experiment with other flavors such as lemon or different liqueurs to create a personalized twist on this classic dish.
Bûche De Noël
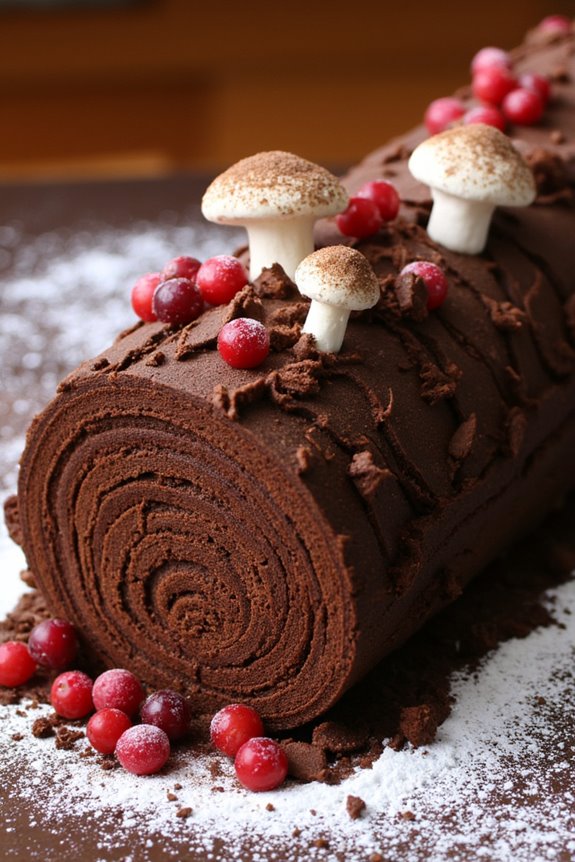
Bûche De Noël, also known as Yule Log, is a classic French dessert traditionally served during the Christmas season. This delightful confection isn’t only a treat for the taste buds but also a feast for the eyes, as it’s designed to resemble a log from a tree. The dessert consists of a light sponge cake rolled with a rich filling, typically made from chocolate or coffee buttercream.
Once assembled, the cake is covered with more buttercream and decorated to mimic the texture of bark, often adorned with festive decorations like marzipan mushrooms, berries, or edible glitter.
The origins of Bûche De Noël date back to old European traditions of burning a Yule log during the winter solstice to bring warmth and good fortune. While modern interpretations may vary, the spirit of this dessert remains the same, bringing families together to celebrate and enjoy the holiday season.
Making a Bûche De Noël can seem intimidating, but with a little patience and creativity, you’ll have a show-stopping centerpiece for your festive table that’s sure to impress your guests.
Ingredients (Serves 4-6):
- 4 large eggs
- 100g granulated sugar
- 100g all-purpose flour
- 30g unsweetened cocoa powder
- 1/2 teaspoon baking powder
- A pinch of salt
- 100g unsalted butter, softened
- 200g powdered sugar
- 200g dark chocolate, melted
- 1 teaspoon vanilla extract
- 100ml heavy cream
- Cocoa powder for dusting (optional)
- Decorative items (e.g., marzipan mushrooms, berries, edible glitter) for garnish
Cooking Instructions:
- Preheat the Oven: Begin by preheating your oven to 180°C (350°F). This step is vital for guaranteeing that the sponge cake rises properly and achieves a light, airy texture.
- Prepare the Baking Pan: Line a 10×15 inch (or similar size) jelly roll pan with parchment paper and lightly grease it. This will prevent the cake from sticking and make it easier to roll later.
- Whip the Eggs and Sugar: In a large mixing bowl, crack the eggs and add the granulated sugar. Using an electric mixer, whip them on high speed for about 5-7 minutes until the mixture turns pale and doubles in volume. This aeration is important for achieving a fluffy sponge.
- Combine Dry Ingredients: In a separate bowl, sift together the flour, cocoa powder, baking powder, and salt. This helps to eliminate lumps and guarantees even distribution of the dry ingredients in the batter.
- Fold Dry Ingredients into Egg Mixture: Gently fold the dry ingredients into the whipped egg mixture using a spatula. Be careful not to deflate the batter; use a light hand and mix until just combined.
- Bake the Sponge: Pour the batter into the prepared pan and spread it evenly. Bake in the preheated oven for 10-12 minutes, or until the cake springs back when lightly touched.
- Cool and Roll the Cake: Once baked, remove the cake from the oven and let it cool slightly in the pan. Place a clean kitchen towel on a flat surface and dust it with powdered sugar. Carefully invert the cake onto the towel, peel off the parchment paper, and roll the cake up from one end while it’s still warm. Let it cool completely in this rolled shape.
- Prepare the Filling: In a mixing bowl, beat the softened butter until creamy. Gradually add the powdered sugar, melted chocolate, and vanilla extract, mixing until smooth and fluffy. In a separate bowl, whip the heavy cream until soft peaks form, then gently fold it into the chocolate mixture.
- Unroll and Fill the Cake: Once the cake is fully cool, gently unroll it. Spread the chocolate filling evenly over the surface, leaving a small border around the edges. Roll the cake back up tightly, using the towel to assist. Place the cake seam-side down on a serving platter.
- Frost the Cake: Using the remaining chocolate filling, spread a layer over the entire surface of the rolled cake. Create texture to mimic tree bark by using a fork or a spatula.
- Decorate: Dust the finished Bûche De Noël with cocoa powder for a rustic look, and add decorative items like marzipan mushrooms or berries to enhance its festive appearance.
Extra Tips:
When making Bûche De Noël, it’s essential to verify your ingredients are at room temperature for ideal mixing. If you plan to make the dessert in advance, you can store it in the refrigerator for up to two days, but it’s best to add decorations just before serving to maintain their freshness.
Additionally, feel free to experiment with different flavors for the filling, such as coffee or hazelnut, to put your unique spin on this holiday classic. Enjoy your baking and the festive spirit of the season!
Galette Des Rois
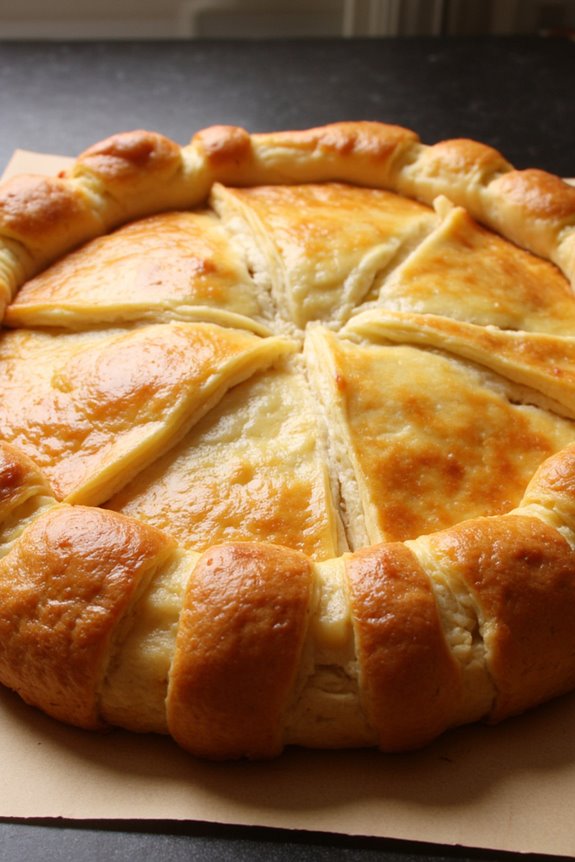
Galette des Rois, or King’s Cake, is a traditional French pastry celebrated during the Epiphany, marking the arrival of the Three Wise Men. This delightful dessert is typically made with layers of flaky puff pastry filled with a rich almond cream known as frangipane.
The galette isn’t only a treat for the taste buds but also a symbol of royalty, as a small figurine or bean is hidden inside the cake. The person who finds it is crowned king or queen for the day, making this dish a festive centerpiece for gatherings and celebrations.
Preparing a galette des rois at home is easier than it may seem, and the result is a stunning pastry that will impress your friends and family. With a golden, crisp exterior and a luscious, nutty filling, this cake is perfect for enjoying with a cup of tea or coffee.
Let’s plunge into the recipe to create this beautiful French holiday treat for 4-6 people.
Ingredients
- 2 sheets of puff pastry
- 100g (1 cup) almond flour
- 100g (1/2 cup) granulated sugar
- 100g (1/2 cup) unsalted butter, softened
- 2 large eggs
- 1 teaspoon vanilla extract
- 1 tablespoon all-purpose flour
- 1 small figurine or dried bean (optional, for tradition)
- 1 egg (for egg wash)
- Pinch of salt
Cooking Instructions
1. Prepare the Frangipane Filling: In a mixing bowl, combine the almond flour, granulated sugar, softened butter, and a pinch of salt. Beat the mixture until creamy and well blended.
Add one egg, the vanilla extract, and the tablespoon of all-purpose flour. Mix until smooth and set aside.
2. Roll Out the Puff Pastry: On a lightly floured surface, roll out one sheet of puff pastry into a circle, approximately 12 inches in diameter. Transfer the pastry to a baking sheet lined with parchment paper.
Repeat with the second sheet of puff pastry, making sure it’s also 12 inches in diameter.
3. Assemble the Galette: Spread the frangipane filling evenly over the first layer of puff pastry, leaving about an inch of border around the edges. If desired, insert the figurine or bean into the filling, making sure it’s hidden.
Brush the edges with a little water to help seal the pastry.
4. Cover and Seal: Place the second sheet of puff pastry over the frangipane filling. Gently press the edges together to seal.
Use a fork to crimp the edges for a decorative touch and to make certain it’s well sealed.
5. Create a Vent and Egg Wash: Use a sharp knife to create a few slits or a decorative pattern on the top pastry to allow steam to escape during baking.
In a small bowl, whisk together the remaining egg to create an egg wash. Brush the top of the galette with the egg wash for a golden finish.
6. Bake: Preheat your oven to 200°C (400°F). Bake the galette in the preheated oven for about 25-30 minutes or until the pastry is puffed and golden brown.
Remove from the oven and allow it to cool slightly before serving.
Extra Tips
When making a galette des rois, verify your puff pastry is chilled but not frozen, as this will help achieve a flaky texture.
You can also customize the filling by adding a splash of rum or orange blossom water to the frangipane for an extra flavor twist.
Don’t forget to let your guests know there’s a hidden figurine or bean inside; it adds to the fun! Serve the galette warm or at room temperature, and enjoy this festive treat with family and friends.