

When it comes to French desserts, chocolate takes center stage with its rich and indulgent flavors. Think of the silky smoothness of chocolate mousse or the sophistication of chocolate éclairs. I’ve gathered 14 French dessert recipes that are not only decadent but also easy to whip up at home. Perfect for those moments when you need to satisfy intense chocolate cravings. Let’s explore these delightful recipes that promise a touch of French elegance.
Classic Chocolate Mousse
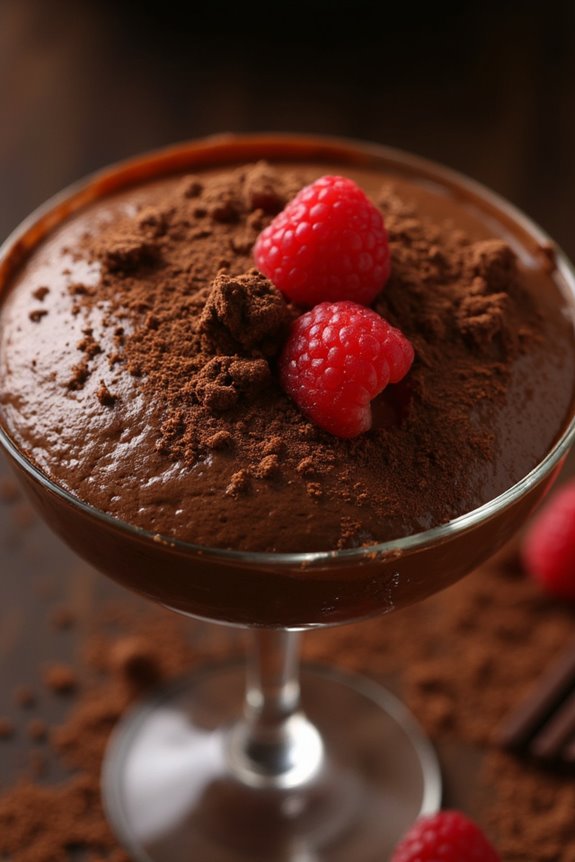
Classic Chocolate Mousse is a timeless French dessert that beautifully combines the rich flavors of chocolate with a light and airy texture. With its silky smooth consistency and decadent taste, it’s a perfect treat for any occasion, whether you’re celebrating a special event or simply indulging in a sweet craving.
This dessert not only satisfies chocolate lovers but also impresses guests with its elegant presentation.
Making chocolate mousse may seem intimidating, but it’s surprisingly easy and requires just a handful of ingredients. The key to achieving that signature fluffiness lies in the technique of folding whipped cream and egg whites into the melted chocolate.
Follow these simple steps to create a delightful dessert that’s bound to delight your family and friends.
Ingredients (Serves 4-6):
- 200g dark chocolate (70% cocoa)
- 3 large eggs, separated
- 50g granulated sugar
- 1 teaspoon vanilla extract
- 300ml heavy cream
- A pinch of salt
Cooking Instructions:
- Melt the Chocolate: Begin by breaking the dark chocolate into small pieces and placing them in a heatproof bowl. Set the bowl over a pot of simmering water (double boiler method) and gently stir until the chocolate is completely melted and smooth. Remove from heat and let it cool slightly.
- Whip Egg Whites: In a clean, dry bowl, whisk the egg whites with a pinch of salt using an electric mixer until soft peaks form. Gradually add the granulated sugar while continuing to whisk until the mixture is glossy and stiff peaks are achieved.
- Combine Egg Yolks and Chocolate: In another bowl, whisk the egg yolks with the vanilla extract until they’re pale and creamy. Slowly pour the melted chocolate into the egg yolk mixture, stirring continuously to prevent the eggs from scrambling.
- Fold in Egg Whites: Gently fold one-third of the whipped egg whites into the chocolate mixture to lighten it. Then, carefully fold in the remaining egg whites in two additions, using a spatula to avoid deflating the mixture. The goal is to keep the mousse light and airy.
- Whip the Cream: In a separate bowl, whip the heavy cream until it forms soft peaks. Be careful not to over-whip; the cream should be fluffy and smooth.
- Combine Whipped Cream and Chocolate Mixture: Gently fold the whipped cream into the chocolate mixture in two additions, making sure all the ingredients are well combined without losing volume.
- Chill the Mousse: Spoon the mousse into individual serving dishes or a large bowl. Cover with plastic wrap and refrigerate for at least 2-3 hours, or until set and chilled through.
- Serve: Once the mousse is set, it can be served as is, or garnished with whipped cream, chocolate shavings, or fresh berries for added flair.
Extra Tips:
For an even richer flavor, consider using high-quality chocolate with a cocoa percentage that suits your taste.
Additionally, you can experiment with flavors by adding a splash of liqueur, such as Grand Marnier or rum, to the chocolate mixture for an adult twist.
Confirm all your utensils are grease-free when whipping the egg whites, as any fat can hinder their ability to whip up properly.
Enjoy your Classic Chocolate Mousse with a sprinkle of sea salt on top for a delightful contrast!
Tarte Au Chocolat
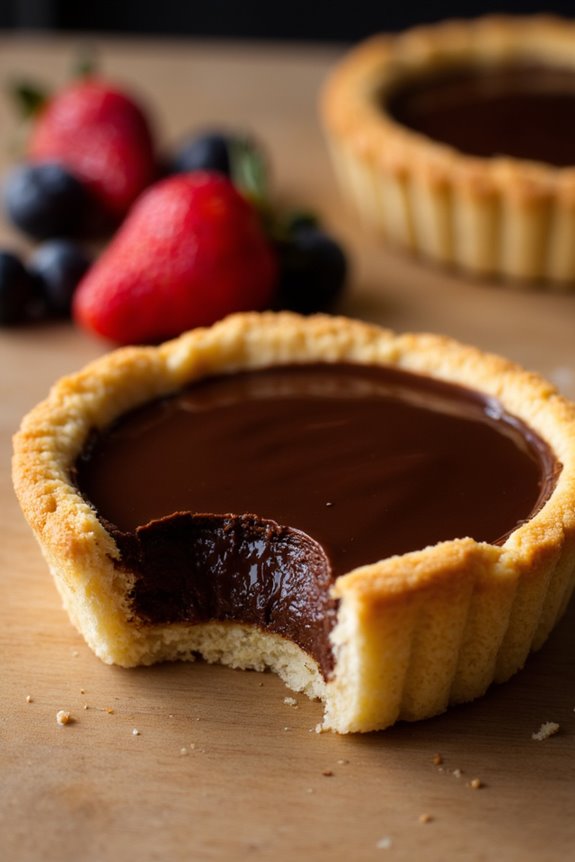
Tarte au Chocolat is a classic French dessert that brings together the rich flavors of chocolate and the flaky texture of pastry. This indulgent tart is perfect for any special occasion or simply as a sweet treat to enjoy with family and friends. With a smooth and creamy chocolate filling nestled in a buttery crust, it’s a dessert that promises to impress even the most discerning chocolate lover.
Making Tarte au Chocolat is a delightful experience that combines both baking and artistry. The process may seem intricate, but with a little patience and the right ingredients, you’ll be able to create a stunning dessert that tastes as good as it looks.
Whether served plain or garnished with fresh berries and whipped cream, this tart will quickly become a favorite in your dessert repertoire.
Ingredients (Serves 4-6 people):
- 1 pre-made tart shell (9-inch)
- 200g dark chocolate (70% cocoa)
- 150ml heavy cream
- 50ml whole milk
- 3 large eggs
- 50g granulated sugar
- 1 teaspoon vanilla extract
- A pinch of salt
- Cocoa powder (for dusting, optional)
Cooking Instructions:
- Prepare the Tart Shell: If using a pre-made tart shell, make certain it’s fully baked and cooled before starting the filling. If you prefer to make your own crust, roll out the dough, fit it into a tart pan, and bake it according to the recipe instructions until golden brown. Allow it to cool completely before adding the filling.
- Melt the Chocolate: In a heatproof bowl, break the dark chocolate into small pieces. Place the bowl over a pot of gently simmering water (double boiler method) or microwave in short bursts, stirring in between, until the chocolate is fully melted and smooth. Remove from heat and let it cool slightly.
- Prepare the Cream Mixture: In a saucepan, combine the heavy cream and whole milk. Heat over medium heat until it just begins to simmer. Remove from heat and set aside to cool for a few minutes.
- Combine Ingredients: In a mixing bowl, whisk together the eggs, granulated sugar, vanilla extract, and a pinch of salt until well combined. Slowly pour in the warm cream mixture while whisking continuously to temper the eggs. This will prevent them from scrambling.
- Incorporate the Chocolate: Gradually add the melted chocolate into the egg and cream mixture, whisking until the mixture is smooth and glossy. Ascertain that everything is well combined without any lumps.
- Fill the Tart Shell: Pour the chocolate filling into the prepared tart shell, smoothing the top with a spatula if necessary. Gently tap the tart on the counter to remove any air bubbles.
- Bake the Tart: Preheat your oven to 160°C (320°F). Place the tart in the oven and bake for about 20-25 minutes. The filling should be set but still slightly jiggly in the center. Remove from the oven and allow it to cool at room temperature before refrigerating for at least 2 hours to set completely.
- Serve: Once the tart is set, carefully remove it from the tart pan. Dust with cocoa powder if desired and slice into wedges. Serve it plain or with a dollop of whipped cream and fresh berries on the side.
Extra Tips:
When making Tarte au Chocolat, using high-quality dark chocolate will greatly enhance the flavor of your dessert. Be sure to let the tart cool completely before refrigerating it, as this will help achieve the best texture.
If you’re feeling adventurous, you can add a splash of liqueur like Grand Marnier or Espresso to the filling for an extra layer of flavor. Always remember to slice the tart with a warm knife for clean cuts. Enjoy your delicious creation!
Chocolate Fondant
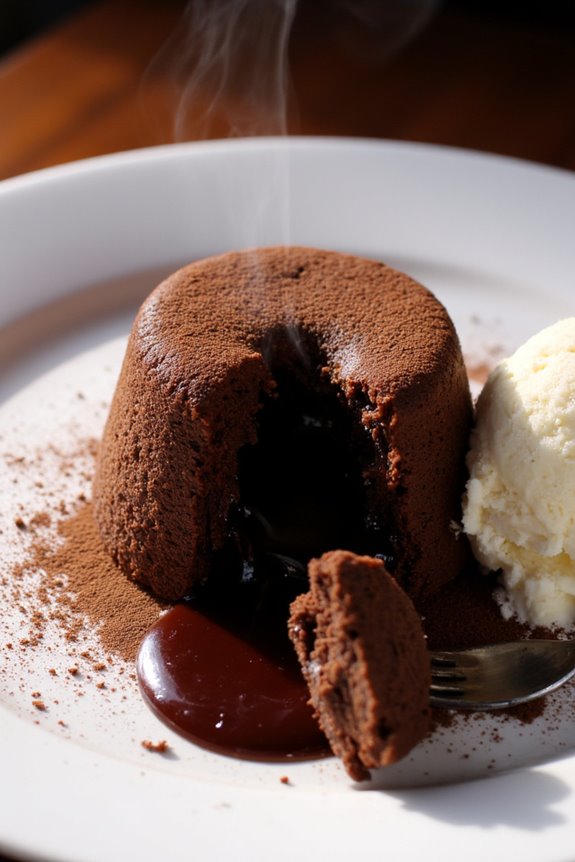
Chocolate Fondant is a rich and indulgent dessert that’s perfect for special occasions or a delightful treat after dinner. Known for its gooey, molten center, this French dessert has captivated the taste buds of chocolate lovers around the world. The beauty of Chocolate Fondant lies in its simplicity—using just a handful of ingredients, you can create a dessert that feels lavish and sophisticated.
Making Chocolate Fondant at home is easier than you might think. With a little bit of preparation and attention to detail, you can achieve that perfect balance of a firm outer shell and a luscious, flowing chocolate center. This dessert is best served warm, straight from the oven, making it a favorite among guests when served with a scoop of vanilla ice cream or a dollop of whipped cream.
Ingredients (Serves 4-6):
- 200g dark chocolate (70% cocoa)
- 150g unsalted butter
- 150g granulated sugar
- 4 large eggs
- 100g all-purpose flour
- 1 teaspoon vanilla extract
- A pinch of salt
- Butter and cocoa powder (for greasing ramekins)
Cooking Instructions:
- Preheat the Oven: Begin by preheating your oven to 200°C (392°F). This allows the oven to reach the right temperature for baking the fondants, ensuring they rise properly and cook evenly.
- Prepare the Ramekins: Grease six individual ramekins with unsalted butter and dust them with cocoa powder. This step is essential as it prevents the fondants from sticking to the ramekins, allowing them to release easily once baked.
- Melt the Chocolate and Butter: In a heatproof bowl, combine the dark chocolate and unsalted butter. Place the bowl over a saucepan of simmering water (a double boiler) and stir gently until the mixture is completely melted and smooth. Remove from heat and let it cool slightly.
- Whisk the Eggs and Sugar: In a separate mixing bowl, whisk together the eggs and granulated sugar until the mixture is pale and frothy. This creates a light texture and helps incorporate air into the batter.
- Combine Mixtures: Gradually pour the melted chocolate mixture into the egg and sugar mixture, stirring gently to combine. Be careful not to cook the eggs with the hot chocolate; you want to achieve a smooth and uniform batter.
- Add Flour and Flavor: Sift the all-purpose flour into the chocolate mixture along with the vanilla extract and a pinch of salt. Fold the flour in gently until just combined. It’s important not to overmix, as this could deflate the batter.
- Fill the Ramekins: Divide the batter evenly among the prepared ramekins, filling each about three-quarters full. This allows space for the fondants to rise without overflowing.
- Bake: Place the filled ramekins on a baking tray and bake in the preheated oven for 10-12 minutes. You want the edges to be set while the center remains soft and gooey.
- Cool Slightly and Serve: Once baked, remove the ramekins from the oven and let them cool for 1-2 minutes. Carefully run a knife around the edges to loosen the fondants, then invert them onto serving plates. Serve immediately while the centers are still molten.
Extra Tips:
For the best results, make sure all your ingredients are at room temperature before starting, as this helps blend everything smoothly.
Additionally, you can prepare the batter ahead of time and refrigerate it in the ramekins until you’re ready to bake. Just add a couple of extra minutes to the baking time if they’re cold from the fridge.
Enjoy your Chocolate Fondant warm for that perfect gooey experience!
Chocolate Éclairs
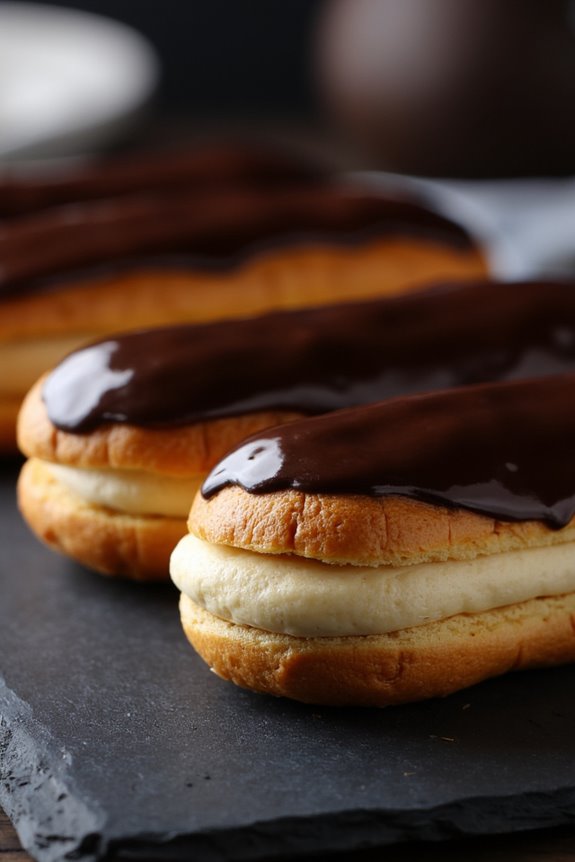
Chocolate éclairs are a classic French dessert that combines light and airy choux pastry with a rich and creamy filling, all topped with a decadent chocolate glaze. These delightful pastries are perfect for special occasions or simply to satisfy your sweet tooth. The contrast between the crispy exterior and the smooth filling makes each bite a heavenly experience.
While they may seem intimidating to make, with the right approach and a bit of patience, you can master this elegant treat in your own kitchen. The key to a successful chocolate éclair lies in the preparation of the choux pastry. This versatile dough is made from a simple combination of water, butter, flour, and eggs, which produces a puffy and airy texture when baked.
The filling typically consists of pastry cream, which can be flavored with vanilla, coffee, or chocolate, adding even more depth to the dessert. Finally, the éclairs are finished off with a glossy chocolate glaze, giving them a beautiful appearance and irresistible taste.
Ingredients (Serves 4-6 people)
- 1 cup water
- ½ cup unsalted butter
- 1 cup all-purpose flour
- 4 large eggs
- 1 cup milk
- ½ cup granulated sugar
- 3 tablespoons cornstarch
- 1 teaspoon vanilla extract
- ½ cup heavy cream
- 4 oz dark chocolate, chopped
- 2 tablespoons light corn syrup
- Pinch of salt
Cooking Instructions
1. Make the Choux Pastry: In a medium saucepan, combine the water and butter over medium heat. Once the butter has melted, bring the mixture to a boil. Remove from heat and quickly add the flour, stirring vigorously with a wooden spoon until the mixture forms a smooth ball and pulls away from the sides of the pan.
Allow it to cool for a few minutes.
2. Add the Eggs: Once the dough has cooled slightly, beat in the eggs one at a time, mixing well after each addition. The mixture should be smooth and glossy. Transfer the dough to a piping bag fitted with a large round tip.
3. Pipe the Éclairs: Preheat your oven to 400°F (200°C). Line a baking sheet with parchment paper. Pipe the dough into long strips, about 4 inches long and 1 inch wide, leaving space between each éclair.
Smooth the tops with a wet finger to prevent them from cracking during baking.
4. Bake the Pastries: Bake the éclairs in the preheated oven for 20-25 minutes, or until they’re puffed and golden brown. Avoid opening the oven door during the first 15 minutes of baking to guarantee they rise properly.
Once baked, remove them from the oven and let them cool completely on a wire rack.
5. Prepare the Pastry Cream: In a saucepan, whisk together the milk, sugar, cornstarch, and a pinch of salt. Cook over medium heat, stirring constantly until the mixture thickens.
Remove from heat and stir in the vanilla extract. Allow the pastry cream to cool before whipping the heavy cream and folding it into the cooled pastry cream for a light and fluffy filling.
6. Fill the Éclairs: Once the éclairs are cool, use a sharp knife to make a small slit in the side of each éclair. Fill a piping bag with the pastry cream mixture and pipe it into each éclair until filled.
7. Make the Chocolate Glaze: In a small saucepan, combine the chopped dark chocolate, heavy cream, and corn syrup over low heat. Stir until the chocolate is melted and the mixture is smooth.
Remove from heat and allow it to cool slightly.
8. Glaze the Éclairs: Dip the top of each filled éclair into the chocolate glaze, allowing any excess to drip off. Place the glazed éclairs on a serving platter and let the chocolate set before serving.
Extra Tips
When making chocolate éclairs, it’s important to ascertain that the choux pastry is cooked properly to achieve that perfect puff. Avoid opening the oven door while baking, as this can cause them to collapse.
Additionally, you can experiment with different flavors for the pastry cream by incorporating coffee, raspberry, or orange zest for a unique twist. Serve your éclairs chilled for the best texture and flavor, and enjoy them with a cup of coffee or tea for a delightful treat!
Mocha Crème Brûlée
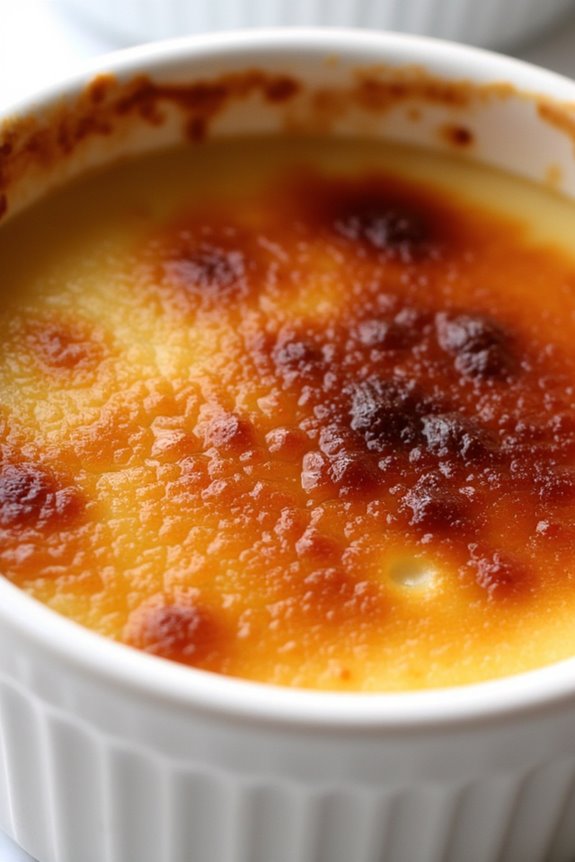
Mocha Crème Brûlée is a delightful twist on the classic French dessert, combining the rich flavors of coffee and chocolate into a creamy custard that’s perfectly torched to create a satisfying caramelized sugar crust. This decadent treat not only impresses with its elegant presentation but also offers a delightful balance of bitterness from the coffee and sweetness from the sugar.
Perfect for dinner parties or a special night in, this dessert is sure to be a crowd-pleaser.
Creating Mocha Crème Brûlée may seem intimidating, but the process is straightforward and rewarding. With simple ingredients and a few key techniques, you can whip up this luxurious dessert in no time. All you need is some heavy cream, chocolate, coffee, and a few staples from your kitchen to create a dessert that feels indulgent and sophisticated.
Ingredients (Serves 4-6):
- 2 cups heavy cream
- 1/2 cup granulated sugar
- 1/4 cup strong brewed coffee (cooled)
- 4 large egg yolks
- 1 teaspoon vanilla extract
- 1/2 cup semisweet chocolate chips
- Extra granulated sugar for topping
Cooking Instructions:
- Preheat the Oven: Start by preheating your oven to 325°F (163°C). This guarantees that the custard will cook evenly once it’s placed in the oven.
- Heat the Cream: In a medium saucepan over medium heat, combine the heavy cream, granulated sugar, brewed coffee, and semisweet chocolate chips. Stir constantly until the chocolate is fully melted and the mixture is hot but not boiling. Remove from heat.
- Whisk the Egg Yolks: In a separate bowl, whisk the egg yolks and vanilla extract together until well combined. This step is essential to confirm that your custard has a smooth texture without any lumps.
- Combine Mixtures: Gradually pour the hot cream mixture into the egg yolk mixture, whisking continuously. This prevents the eggs from cooking too quickly and curdling. Make sure all ingredients are well blended.
- Strain the Mixture: For an ultra-smooth texture, strain the custard through a fine-mesh sieve into a large measuring cup or bowl. This removes any bits of cooked egg and guarantees a silky custard.
- Prepare the Ramekins: Place 4-6 ramekins in a baking dish. Pour the custard mixture evenly into each ramekin, filling them about three-quarters full.
- Create a Water Bath: Fill the baking dish with hot water until it reaches halfway up the sides of the ramekins. This water bath helps regulate the temperature and prevents the custard from curdling during baking.
- Bake: Carefully transfer the baking dish to the preheated oven. Bake for 30-35 minutes, or until the edges are set but the center still has a slight jiggle.
- Cool and Chill: Once done, remove the ramekins from the water bath and let them cool to room temperature. Then, cover each ramekin with plastic wrap and refrigerate for at least 4 hours, or overnight for best results.
- Caramelize the Sugar: Just before serving, sprinkle a thin, even layer of granulated sugar over the top of each custard. Using a kitchen torch, caramelize the sugar until it melts and forms a crispy crust. If you don’t have a torch, you can place the ramekins under a broiler for a minute or two, watching carefully to avoid burning.
Extra Tips:
When making Mocha Crème Brûlée, always confirm that your custard mixture is fully cooled before refrigerating it, as this helps in achieving the right texture.
Additionally, when caramelizing the sugar, move the torch in a circular motion to prevent burning any one area. For an even more intense mocha flavor, consider adding a pinch of instant coffee granules to the cream mixture or garnishing with chocolate shavings.
Enjoy your elegant dessert!
Chocolate Soufflé
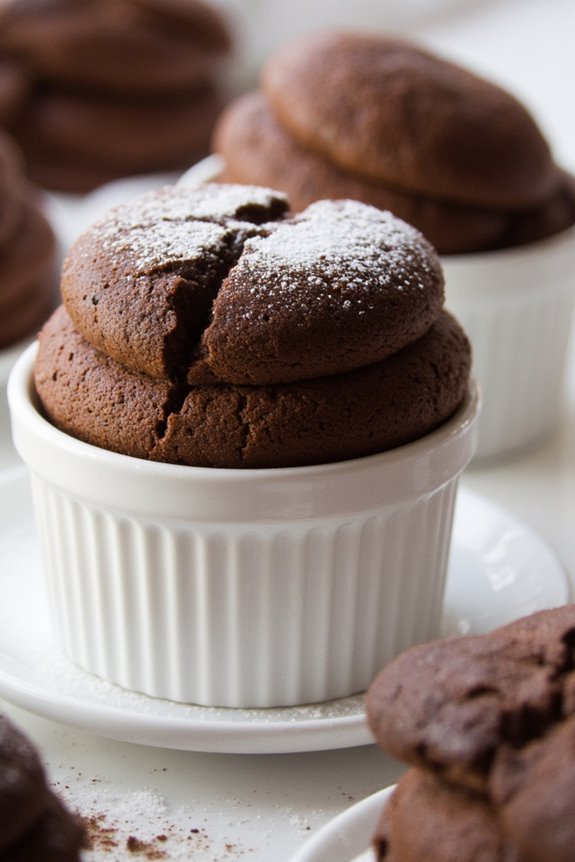
The Chocolate Soufflé is a classic French dessert known for its airy texture and rich chocolate flavor. This delightful treat is often served in individual ramekins and is a perfect ending to any meal. Although it may seem intimidating to make, with a little patience and precision, anyone can master this elegant dessert. The soufflé puffs up beautifully in the oven, creating a light and airy experience that will impress your guests.
To create the perfect Chocolate Soufflé, it’s crucial to use high-quality chocolate, as this will greatly impact the flavor of the dish. The key to a successful soufflé lies in the careful preparation of the egg whites, which must be beaten to stiff peaks to incorporate air into the mixture. Once baked, the soufflés should be served immediately, as they’ll begin to deflate quickly. Follow this recipe for a truly indulgent dessert that will leave everyone asking for seconds.
Ingredients (serving size: 4-6 people):
- 6 oz (170g) dark chocolate (70% cocoa)
- 4 large eggs, separated
- 1/2 cup (100g) granulated sugar
- 2 tablespoons unsalted butter, plus extra for greasing ramekins
- 1/4 teaspoon salt
- 1/2 teaspoon vanilla extract
- Powdered sugar, for dusting (optional)
Cooking Instructions:
- Preheat the Oven: Preheat your oven to 375°F (190°C). This guarantees that the soufflés bake evenly and rise properly.
- Prepare the Ramekins: Grease four to six ramekins with softened butter, making sure to coat the sides completely. This will help the soufflés rise without sticking. Dust the insides with granulated sugar, shaking out any excess.
- Melt the Chocolate: In a heatproof bowl, combine the dark chocolate and 2 tablespoons of butter. Place the bowl over a pot of simmering water (double boiler method) and stir until melted and smooth. Remove from heat and let cool slightly.
- Beat Egg Yolks: In a separate bowl, whisk the egg yolks and half of the granulated sugar (1/4 cup) until the mixture is pale and slightly thickened. Stir in the melted chocolate and vanilla extract until well combined.
- Beat Egg Whites: In a clean mixing bowl, add the egg whites and salt. Using an electric mixer, beat the egg whites until soft peaks form. Gradually add the remaining sugar (1/4 cup) and continue beating until stiff peaks form.
- Fold Mixtures: Gently fold one-third of the beaten egg whites into the chocolate mixture to lighten it. Then, carefully fold in the remaining egg whites until no white streaks remain. Be careful not to deflate the mixture.
- Fill Ramekins: Spoon the soufflé mixture into the prepared ramekins, filling them to the top. Smooth the surface with a spatula for an even rise.
- Bake: Place the ramekins on a baking sheet and bake in the preheated oven for 12-15 minutes, or until the soufflés have puffed up and have a slight jiggle in the center.
- Serve Immediately: Once baked, remove the soufflés from the oven and dust with powdered sugar if desired. Serve them immediately for the best texture.
Extra Tips: To enhance the flavor of your Chocolate Soufflé, consider adding a pinch of espresso powder to the chocolate mixture for a deeper chocolate taste. Make sure that your mixing bowls and beaters are completely clean and free of any grease when whipping the egg whites, as this can affect the volume of your soufflé.
If you’re feeling adventurous, you can also experiment with different flavorings, such as orange zest or almond extract, to create your unique twist on this classic dessert. Enjoy your delicious creation!
Chocolate Clafoutis
Chocolate Clafoutis is a delightful twist on the classic French dessert, traditionally made with fresh cherries. This version incorporates rich chocolate, creating a luscious and indulgent treat that’s perfect for chocolate lovers.
With a custard-like batter and a soft, cake-like texture, this dessert is deliciously satisfying and can be served warm or at room temperature. Whether you’re hosting a dinner party or simply looking to satisfy your sweet tooth, Chocolate Clafoutis is sure to captivate.
Making Chocolate Clafoutis is surprisingly easy and requires minimal preparation. The batter is a simple mixture of eggs, milk, sugar, and flour, combined with melted chocolate to create a creamy and decadent base.
The dessert is baked until set and slightly puffed, resulting in a beautiful, rustic-looking dish that’s both comforting and elegant. Serve it dusted with powdered sugar or topped with fresh fruit for an added touch of sweetness.
Ingredients (Serves 4-6):
- 1 cup whole milk
- 3 large eggs
- 1/2 cup granulated sugar
- 1 teaspoon vanilla extract
- 1/4 teaspoon salt
- 1/2 cup all-purpose flour
- 4 ounces dark chocolate, melted
- 1 tablespoon unsalted butter (for greasing)
- Powdered sugar (for dusting, optional)
- Fresh fruits (for serving, optional)
Cooking Instructions:
- Preheat the Oven: Begin by preheating your oven to 350°F (175°C). This guarantees that the clafoutis will bake evenly and thoroughly.
- Prepare the Baking Dish: Grease a 9-inch round pie dish or a similar-sized baking dish with the unsalted butter. This will prevent the clafoutis from sticking and make for easier serving.
- Mix the Wet Ingredients: In a mixing bowl, whisk together the milk, eggs, granulated sugar, vanilla extract, and salt until the mixture is smooth and well combined. This will form the base of your clafoutis.
- Incorporate the Flour: Gradually sift in the all-purpose flour while continuously whisking to prevent lumps. The batter should be smooth and slightly thickened.
- Add the Chocolate: Pour the melted dark chocolate into the batter and mix until thoroughly incorporated. This will give your clafoutis its rich chocolate flavor.
- Pour the Batter into the Dish: Pour the prepared batter into the greased baking dish. Make sure to spread it evenly across the surface.
- Bake: Place the dish in the preheated oven and bake for approximately 35-40 minutes, or until the clafoutis is puffed up and a toothpick inserted into the center comes out clean.
- Cool and Serve: Once baked, remove the clafoutis from the oven and allow it to cool for a few minutes. Dust with powdered sugar if desired and serve warm or at room temperature.
Optionally, you can add fresh fruits on top for an extra burst of flavor.
Extra Tips:
For the best results, use high-quality dark chocolate to enhance the flavor of your Chocolate Clafoutis. You can also experiment by adding a splash of orange or almond extract for a unique twist.
If you want to make this dessert even more indulgent, consider serving it with a scoop of vanilla ice cream or a dollop of whipped cream. Enjoy your delicious creation!
Chocolate Pots De Crème
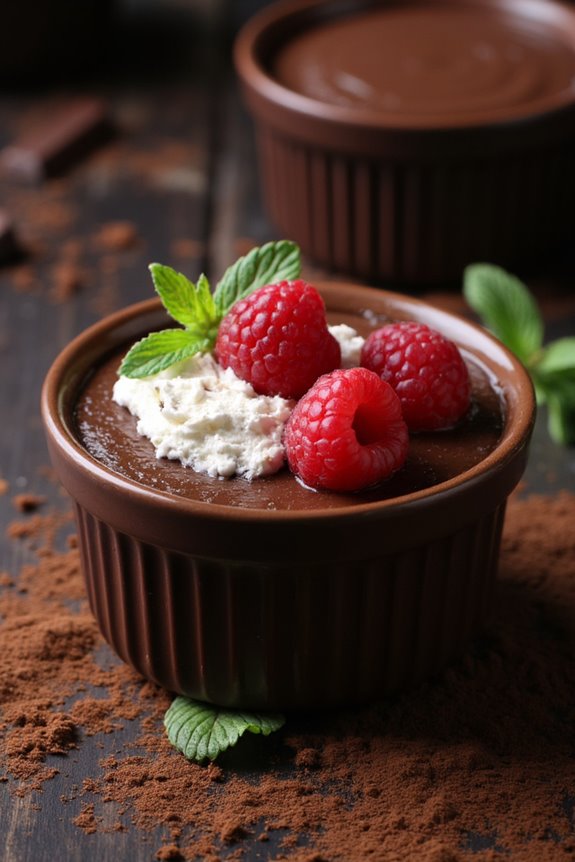
Chocolate Pots De Crème is a classic French dessert that’s both rich and elegant, making it a perfect choice for any special occasion or a delightful end to a weeknight dinner. This creamy chocolate custard is served in small pots, allowing each guest to indulge in their own personal serving. The texture is velvety smooth, and the deep chocolate flavor is certain to satisfy any chocolate lover’s cravings.
Best of all, this dessert can be made ahead of time, giving you more time to enjoy your evening with family and friends.
The beauty of Chocolate Pots De Crème lies in its simplicity. With just a few high-quality ingredients, you can create a dessert that feels luxurious and gourmet. The custard is gently baked in a water bath, which helps it achieve that perfect creamy consistency. Whether you decide to serve it plain or topped with whipped cream and fresh berries, this dessert is sure to impress.
Ingredients (Serves 4-6)
- 1 cup heavy cream
- 1 cup whole milk
- 6 ounces semi-sweet chocolate, chopped
- 4 large egg yolks
- 1/2 cup granulated sugar
- 1 teaspoon vanilla extract
- Pinch of salt
Cooking Instructions
- Preheat the Oven: Start by preheating your oven to 325°F (160°C). This guarantees that the oven is at the right temperature when you’re ready to bake your custards.
- Melt the Chocolate: In a medium saucepan over low heat, combine the chopped chocolate, heavy cream, and whole milk. Stir constantly until the chocolate is fully melted and the mixture is smooth. Remove from heat and set aside to cool slightly.
- Whisk the Egg Yolks: In a separate bowl, whisk together the egg yolks, granulated sugar, vanilla extract, and a pinch of salt until the mixture is pale and slightly thickened. This process incorporates air into the yolks, which will help create a light texture in the finished custard.
- Combine Mixtures: Gradually pour the warm chocolate mixture into the egg yolk mixture, whisking continuously to combine. This step is vital as it prevents the eggs from scrambling. Make sure the mixture is smooth and fully combined.
- Prepare for Baking: Place 4 to 6 small ramekins or pots in a baking dish. Carefully pour the chocolate custard mixture into the ramekins, filling them about 3/4 full. Then, pour hot water into the baking dish until it reaches halfway up the sides of the ramekins. This water bath will help the custards cook gently and evenly.
- Bake the Custards: Place the baking dish in the preheated oven and bake for about 30-35 minutes, or until the custards are set around the edges but still slightly jiggly in the center. Keep an eye on them to avoid overcooking.
- Cool and Chill: Once baked, remove the ramekins from the water bath and let them cool to room temperature. Once cool, cover them with plastic wrap and refrigerate for at least 2 hours or overnight to allow the flavors to meld and the custards to firm up.
- Serve: When ready to serve, you can enjoy the pots de crème plain or top them with a dollop of whipped cream and berries for an extra touch of elegance.
Extra Tips
When making Chocolate Pots De Crème, using high-quality chocolate will greatly enhance the flavor of your dessert, so don’t skimp on this ingredient.
Additionally, be careful not to overbake the custards; they should be slightly jiggly in the center when you remove them from the oven, as they’ll continue to set while cooling. For an added touch, consider infusing the cream with flavors like espresso or orange zest for a unique twist on the classic recipe.
Cocoa Macarons
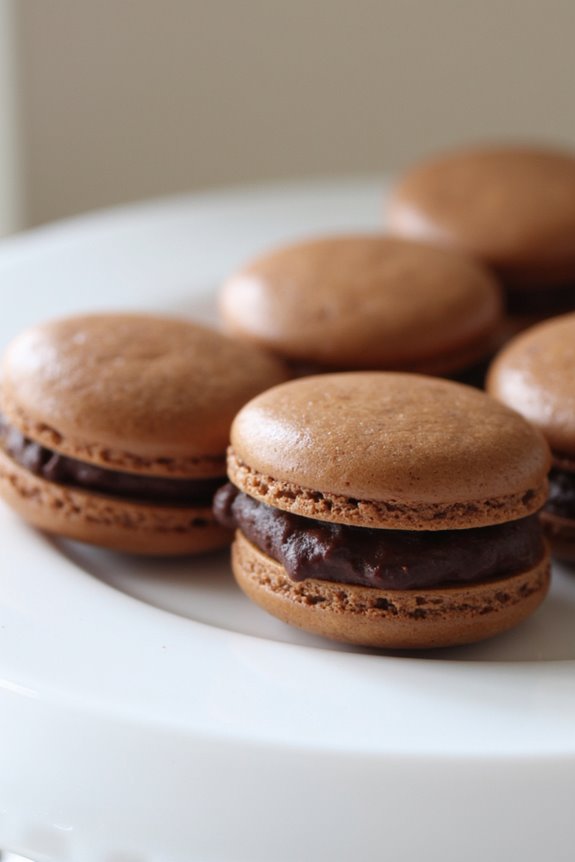
Cocoa macarons are a delightful twist on the classic French macaron, combining the delicate texture and airy nature of these treats with the rich flavor of cocoa. These bite-sized confections are perfect for impressing guests at a dinner party or for an indulgent afternoon treat with coffee or tea. The delicate shells, made with almond flour, egg whites, and sugar, are filled with a luscious chocolate ganache that will satisfy any chocolate lover’s cravings.
Making cocoa macarons requires precision and patience, but the result is well worth the effort. The key to achieving the perfect macaron is in the technique—from whipping the egg whites to the right consistency to guaranteeing that the macaron shells have a smooth surface. Follow the steps below to create these exquisite cocoa macarons that are sure to become a favorite in your dessert repertoire.
Ingredients (Serves 4-6):
- 1 cup almond flour
- 1 ½ cups powdered sugar
- 3 tablespoons unsweetened cocoa powder
- 3 large egg whites (aged at room temperature)
- 1/4 cup granulated sugar
- 1 teaspoon vanilla extract
- Pinch of salt
For the Chocolate Ganache Filling:
- 4 ounces dark chocolate, chopped
- 1/2 cup heavy cream
- 1 tablespoon unsalted butter
Cooking Instructions:
- Prepare the Macaron Batter:
- Begin by sifting together the almond flour, powdered sugar, and cocoa powder into a large bowl. This step is essential as it helps eliminate any lumps and guarantees a smooth macaron shell. Set the dry ingredients aside.
- Whip the Egg Whites:
- In a separate mixing bowl, add the aged egg whites and a pinch of salt. Using a stand mixer or electric mixer, beat the egg whites on medium speed until they become frothy. Gradually add the granulated sugar while continuing to beat the mixture. Increase the speed to high and whip until stiff peaks form, which will take about 5 minutes. The egg whites should be glossy and form peaks that hold their shape.
- Combine the Mixtures:
- Gently fold the dry mixture into the whipped egg whites using a spatula. Be careful not to deflate the egg whites; instead, use a figure-eight motion to combine the ingredients until just incorporated. The batter should flow like lava and have a thick, smooth consistency.
- Pipe the Macarons:
- Line two baking sheets with parchment paper. Transfer the macaron batter to a piping bag fitted with a round tip. Pipe small circles (about 1.5 inches in diameter) onto the parchment paper, leaving space between each circle. Tap the baking sheets on the counter to release any air bubbles.
- Let the Macarons Rest:
- Allow the piped macarons to rest at room temperature for 30-60 minutes, or until a skin forms on the surface. You should be able to lightly touch the tops without any batter sticking to your finger.
- Bake the Macarons:
- Preheat your oven to 300°F (150°C). Bake the macarons for 15-20 minutes, rotating the baking sheets halfway through. The macarons are done when they’ve risen and formed a “foot” at the bottom.
- Make the Ganache Filling:
- While the macarons cool, prepare the chocolate ganache. In a small saucepan, heat the heavy cream until it just begins to simmer. Pour the hot cream over the chopped dark chocolate in a bowl and let it sit for 2-3 minutes. Then, stir until smooth and combined. Add the butter and mix until melted and glossy. Allow the ganache to cool and thicken.
- Assemble the Macarons:
- Once the macaron shells are completely cool, pair them up by size. Pipe a small dollop of chocolate ganache onto the flat side of one macaron shell and sandwich with another shell. Repeat until all macarons are assembled.
Extra Tips:
When making cocoa macarons, guarantee that your mixing bowls and utensils are completely clean and free from any grease, as this can affect the stability of the egg whites. Additionally, be mindful of the humidity in your kitchen; macarons are sensitive to moisture.
If possible, use a kitchen scale for precise measurements, as accuracy is essential in achieving the perfect texture. Finally, allow the assembled macarons to rest in the refrigerator for at least a few hours or overnight before serving, as this allows the flavors to meld beautifully. Enjoy these delectable treats!
Chocolate Tiramisu
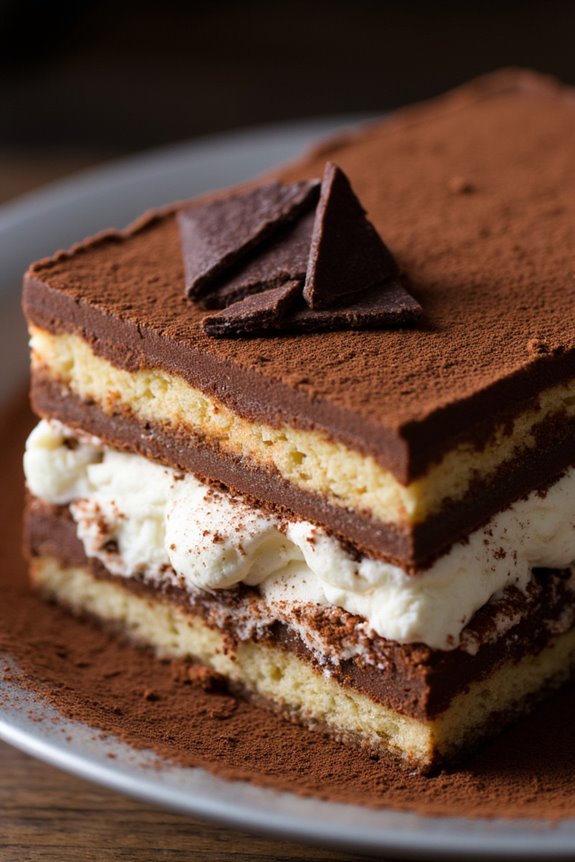
Chocolate Tiramisu is a delightful twist on the classic Italian dessert, combining the rich flavors of chocolate with the creamy, coffee-infused layers that make Tiramisu so beloved. This version is perfect for chocolate lovers, featuring cocoa powder and chocolate shavings that elevate the traditional recipe to new heights. Ideal for special occasions or a simple family dinner, this dessert is sure to impress your guests while being surprisingly simple to prepare.
The beauty of Chocolate Tiramisu lies in its no-bake nature, allowing it to be prepared ahead of time and chilled to perfection. With a few key ingredients, you can create a luscious dessert that showcases layers of coffee-soaked ladyfingers, velvety mascarpone cheese, and rich chocolate. Whether served in individual cups or a larger dish, this dessert is as pleasing to the eye as it’s to the palate.
Ingredients (Serves 4-6):
- 1 cup strong brewed coffee, cooled
- 2 tablespoons coffee liqueur (optional)
- 24 ladyfinger cookies (savoiardi)
- 1 cup mascarpone cheese
- 1 cup heavy cream
- 1/2 cup granulated sugar
- 1 teaspoon vanilla extract
- 2 tablespoons unsweetened cocoa powder
- 1/4 cup dark chocolate shavings (for garnish)
Instructions:
- Prepare the Coffee Mixture: Brew a strong cup of coffee and let it cool to room temperature. If desired, add coffee liqueur for an extra kick. Set aside.
- Whip the Cream: In a mixing bowl, pour the heavy cream and add the granulated sugar and vanilla extract. Using an electric mixer, whip the cream on medium-high speed until stiff peaks form. This should take about 3-5 minutes. The whipped cream will add a light and airy texture to the dessert.
- Mix the Mascarpone: In another bowl, add the mascarpone cheese and gently stir it with a spatula to soften it. Be careful not to overmix; you want to keep the creamy texture intact.
- Combine Cream and Mascarpone: Fold the whipped cream into the mascarpone mixture gently. Start by adding a small amount of whipped cream to lighten the mascarpone, then gradually fold in the remaining whipped cream until fully combined. This will create a luscious filling.
- Soak the Ladyfingers: Quickly dip each ladyfinger into the cooled coffee mixture, ensuring they’re soaked but not overly soggy. Layer them in a single row at the bottom of your serving dish or individual cups.
- Layer the Mixtures: Spread half of the mascarpone mixture over the layer of soaked ladyfingers. Smooth it out evenly with a spatula.
- Repeat the Layers: Add another layer of soaked ladyfingers on top of the mascarpone, followed by the remaining mascarpone mixture. Spread it evenly to create a beautiful, finished look.
- Chill the Dessert: Cover the dish with plastic wrap and refrigerate for at least 4 hours, or preferably overnight. This chilling time allows the flavors to meld beautifully.
- Garnish and Serve: Just before serving, dust the top of the dessert with cocoa powder and sprinkle dark chocolate shavings for an elegant touch. Slice and serve chilled.
Extra Tips:
When making Chocolate Tiramisu, consider using high-quality coffee and cocoa powder for the best flavor. If you want to make this dessert ahead of time, it keeps well in the refrigerator for up to 3 days, making it a great option for prepping for gatherings.
Additionally, feel free to adjust the sweetness by adding more or less sugar according to your taste. For a more intense chocolate flavor, you can mix in melted chocolate into the mascarpone filling or use chocolate-flavored ladyfingers. Enjoy your decadent dessert!
Pain Au Chocolat
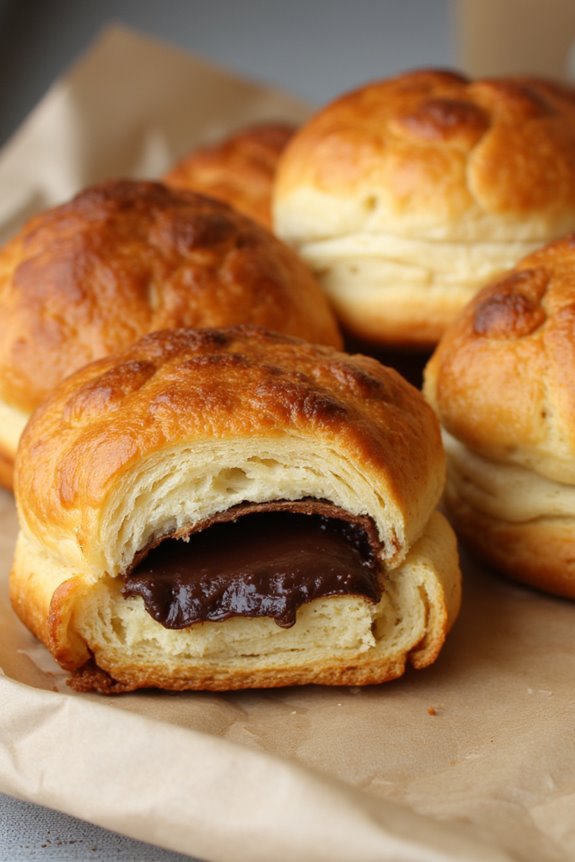
Pain au Chocolat, a delightful French pastry, is a beloved treat that combines flaky, buttery dough with rich dark chocolate. This classic dessert is perfect for breakfast or as an afternoon snack, and its irresistible combination of textures and flavors makes it a favorite among pastry lovers.
Making Pain au Chocolat at home may seem intimidating, but with a bit of patience and the right ingredients, you can create a bakery-quality treat in your own kitchen.
This recipe guides you through the process of making Pain au Chocolat from scratch, starting with the dough, which is a type of puff pastry known as pâte feuilletée. The dough is layered with butter, and as it bakes, it puffs up beautifully, creating a light and airy pastry that encases the rich chocolate filling.
Perfect for serving 4-6 people, these pastries will surely impress your family and friends.
Ingredients (serving size: 4-6 people)
- 2 cups all-purpose flour
- 1/2 teaspoon salt
- 1 tablespoon granulated sugar
- 1/2 cup unsalted butter, chilled and cubed
- 1/2 cup cold water
- 4 ounces dark chocolate (or chocolate batons)
- 1 egg (for egg wash)
Cooking Instructions
- Prepare the Dough: In a large mixing bowl, combine the flour, salt, and sugar. Add the cubed butter and use your fingers or a pastry cutter to work the butter into the flour until the mixture resembles coarse crumbs. Gradually add the cold water, mixing until a dough forms. Be careful not to overmix; it should be slightly sticky.
- Chill the Dough: Shape the dough into a rectangle, wrap it in plastic wrap, and refrigerate for at least 30 minutes. This resting period helps relax the gluten and keeps the butter cold, which is essential for the flaky texture.
- Roll Out the Dough: After chilling, lightly flour your work surface and roll out the dough into a larger rectangle, approximately 1/4 inch thick. Fold the dough into thirds, like a letter, and wrap it again. Refrigerate for another 30 minutes to chill.
- Repeat the Rolling Process: Repeat the rolling and folding process two more times (rolling out the dough and folding it into thirds each time). This creates layers of butter and dough, contributing to the pastry’s flakiness.
- Shape the Pastries: Once the dough has been rolled and folded, roll it out one final time to about 1/4 inch thickness. Cut the dough into rectangles, approximately 4×6 inches. Place a piece of dark chocolate at one end of each rectangle, then roll the dough tightly around the chocolate, sealing the edges.
- Prepare for Baking: Preheat your oven to 400°F (200°C). Place the rolled pastries seam side down on a baking sheet lined with parchment paper. Beat the egg and brush it over the tops of the pastries for a golden finish.
- Bake the Pastries: Bake in the preheated oven for 15-20 minutes, or until the pastries are golden brown and puffed. Keep an eye on them to prevent burning.
- Cool and Serve: Once baked, remove the pastries from the oven and let them cool slightly on a wire rack before serving. Enjoy your freshly made Pain au Chocolat warm or at room temperature.
Extra Tips
For an extra touch of decadence, consider adding a sprinkle of sea salt on top of the pastries right before baking to enhance the chocolate flavor.
Additionally, if you’re short on time, you can use store-bought puff pastry instead of making your own, although the homemade version offers a superior taste and texture.
Enjoy your Pain au Chocolat with a cup of coffee or tea for a truly indulgent experience!
Chocolate Croissant Pudding
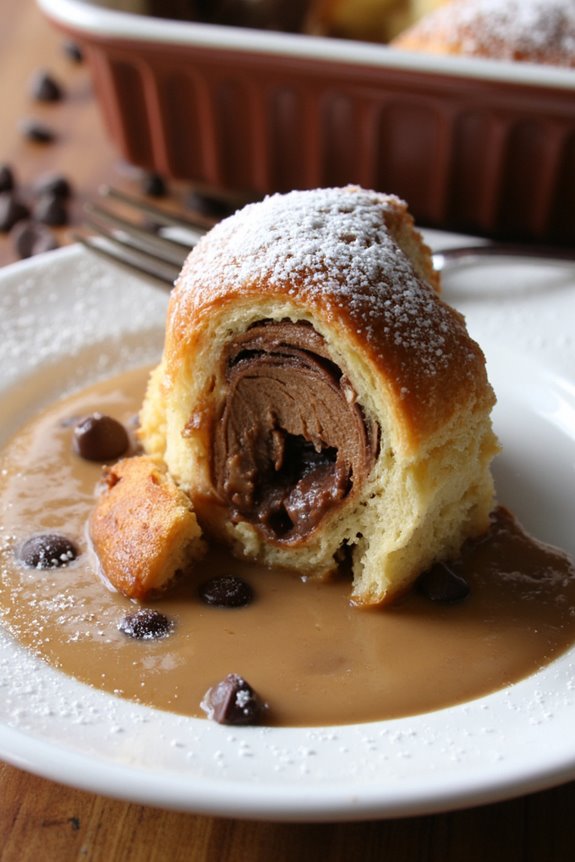
Chocolate Croissant Pudding is a delightful French-inspired dessert that combines the rich, flaky goodness of croissants with the indulgence of chocolate. This dish is perfect for breakfast, brunch, or as a sweet treat after dinner. The blend of buttery croissants soaked in a creamy chocolate custard creates a warm, decadent dessert that will impress your family and friends.
This recipe is simple to prepare and can be made ahead of time, allowing the flavors to meld beautifully. Whether you’re using leftover croissants or freshly baked ones, this dessert is versatile and can be customized with various toppings such as whipped cream or fresh berries. Serve it warm for the best experience, and enjoy the comforting embrace of this easy and delicious French treat.
Ingredients (Serves 4-6):
- 4 large croissants, preferably day-old
- 2 cups whole milk
- 1 cup heavy cream
- 4 large eggs
- 1 cup granulated sugar
- 1 teaspoon vanilla extract
- 1/2 cup semi-sweet chocolate chips
- A pinch of salt
- Powdered sugar for dusting (optional)
Cooking Instructions:
- Preheat the Oven: Preheat your oven to 350°F (175°C). This guarantees that the pudding will bake evenly and achieve a golden-brown top.
- Prepare the Croissants: Cut the croissants in half lengthwise or into bite-sized pieces, depending on your preference. Place the pieces in a large greased baking dish, ensuring they’re spread out evenly.
- Make the Custard: In a large mixing bowl, whisk together the whole milk, heavy cream, eggs, granulated sugar, vanilla extract, and a pinch of salt until well combined. Make sure the sugar is fully dissolved to achieve a smooth texture.
- Add the Chocolate Chips: Gently fold in the semi-sweet chocolate chips into the custard mixture. This will allow the chocolate to melt and distribute throughout the pudding as it bakes.
- Combine Croissants and Custard: Pour the custard mixture over the croissant pieces in the baking dish, ensuring that all pieces are soaked. Press down lightly on the croissants with a spatula to help them absorb the liquid.
- Bake the Pudding: Place the baking dish in the preheated oven and bake for 30-35 minutes, or until the top is golden brown and the custard has set. You can check for doneness by inserting a knife into the center; it should come out clean.
- Cool and Serve: Once baked, remove the dish from the oven and allow it to cool for about 10 minutes. Serve warm, dusted with powdered sugar if desired.
Extra Tips:
When making Chocolate Croissant Pudding, feel free to experiment with different types of chocolate, such as dark or white chocolate, to create your own unique flavor.
If you want to add a fruit element, consider incorporating raspberries or banana slices between the layers of croissants for added sweetness and texture.
Additionally, if you prepare the pudding ahead of time, let it sit in the refrigerator for a few hours or overnight to enhance the flavors before baking it.
Enjoy this delicious dessert with a scoop of vanilla ice cream or a dollop of whipped cream for an extra indulgent treat!
Chocolate Profiteroles
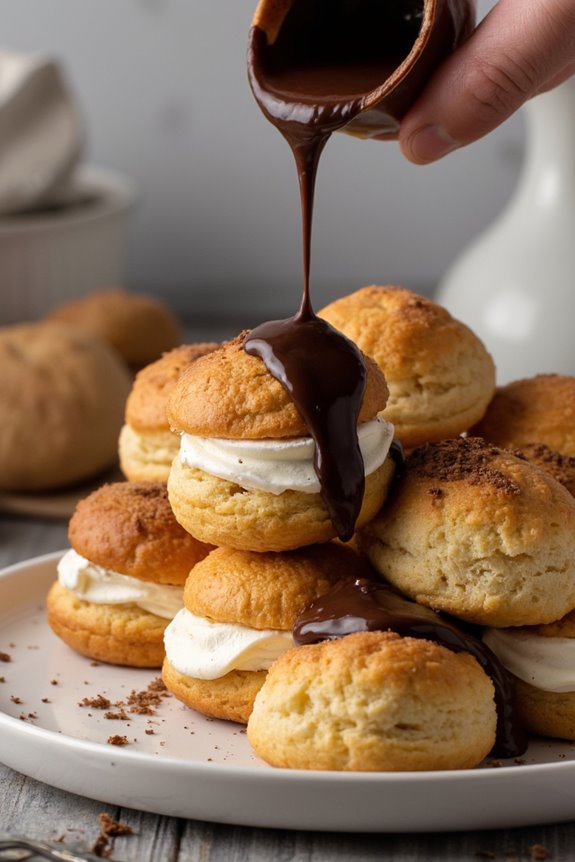
Chocolate Profiteroles are a delightful French dessert that combines the lightness of choux pastry, the richness of cream, and the decadence of chocolate sauce. These delightful little puffs are filled with whipped cream or pastry cream and topped with a luscious chocolate glaze, making them an indulgent treat for any occasion.
Whether you’re hosting a dinner party or simply satisfying a sweet tooth, these profiteroles are sure to impress your guests with their elegance and flavor.
Making Chocolate Profiteroles may seem intimidating, but with a little patience and practice, you can achieve perfect results. The choux pastry is surprisingly simple to make and requires just a few basic ingredients.
Once baked, they can be filled with your choice of creamy goodness and drizzled with a rich chocolate sauce. The result is a dessert that not only looks stunning but also delivers a delightful combination of textures and flavors.
Ingredients (Serves 4-6 people)
- 1 cup water
- 1/2 cup unsalted butter
- 1 cup all-purpose flour
- 1/4 teaspoon salt
- 1 teaspoon sugar
- 4 large eggs
- 1 cup heavy cream
- 2 tablespoons powdered sugar
- 1 teaspoon vanilla extract
- 1 cup semi-sweet chocolate chips
- 1/2 cup heavy cream (for chocolate sauce)
Cooking Instructions
1. Prepare the Choux Pastry: In a saucepan, combine the water, unsalted butter, salt, and sugar. Bring the mixture to a boil over medium heat. Once boiling, remove from heat and quickly stir in the flour until fully combined and a dough forms.
Return the saucepan to low heat for about 1-2 minutes to dry out the dough slightly, stirring continuously.
2. Incorporate the Eggs: Transfer the dough to a mixing bowl. Allow it to cool slightly, then add the eggs one at a time, mixing well after each addition until the dough is smooth and glossy. You may not need to use all the eggs; the dough should hold its shape but be soft enough to pipe.
3. Pipe the Profiteroles: Preheat your oven to 400°F (200°C). Line a baking sheet with parchment paper. Using a piping bag fitted with a round tip, pipe small mounds of dough (about 1 inch in diameter) onto the prepared baking sheet, spacing them about 2 inches apart.
4. Bake the Profiteroles: Bake in the preheated oven for 20-25 minutes, or until puffed and golden brown. Avoid opening the oven door during baking, as this can cause the profiteroles to deflate.
Once baked, remove from the oven and let them cool completely on a wire rack.
5. Prepare the Filling: In a mixing bowl, whip 1 cup of heavy cream with powdered sugar and vanilla extract until soft peaks form. Carefully cut the cooled profiteroles in half and fill each with the whipped cream using a spoon or piping bag.
6. Make the Chocolate Sauce: In a saucepan, heat 1/2 cup of heavy cream until it just begins to simmer. Remove from heat and add the chocolate chips, stirring until melted and smooth.
7. Assemble the Dessert: Place the filled profiteroles on a serving platter and drizzle the warm chocolate sauce over them. Serve immediately for the best taste and texture.
Extra Tips
When making Chocolate Profiteroles, it’s essential to confirm that your choux pastry is properly cooked to avoid sogginess. Be sure to let them cool completely before filling; otherwise, the heat may cause the filling to melt.
Additionally, you can get creative with the filling; consider using flavored creams or even ice cream for a revitalizing twist. If you want to make ahead, you can prepare the pastry and freeze them before baking; just confirm they’re baked straight from the freezer, adding a few extra minutes to the baking time.
Enjoy your culinary adventure with these delightful French treats!
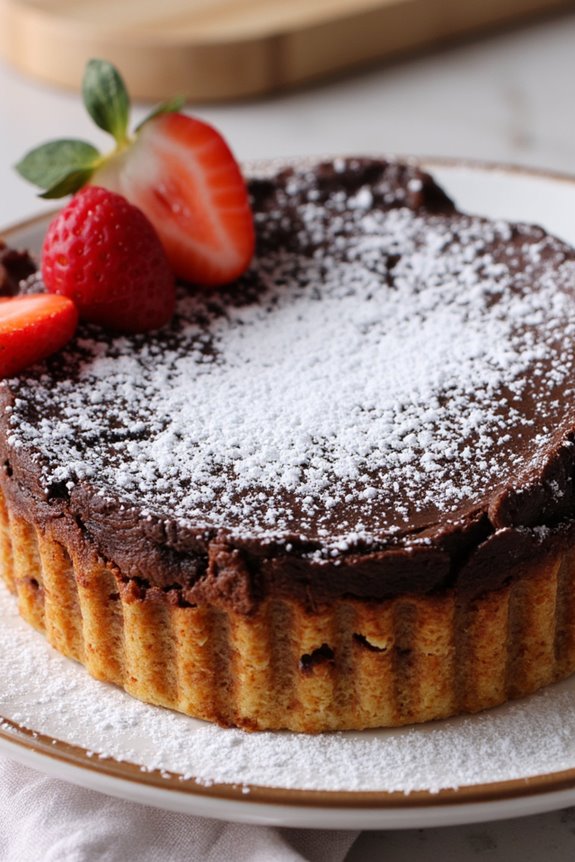
Chocolate Ganache Tart

Indulge in the rich and decadent flavors of a Chocolate Ganache Tart, a classic French dessert that’s sure to impress any chocolate lover. The combination of a buttery crust filled with silky smooth chocolate ganache creates an irresistible dessert that’s perfect for any occasion, whether it’s a fancy dinner party or a casual gathering with friends.
This tart is simple to make yet looks exquisite, making it a favorite among home bakers and professional chefs alike. With its luscious chocolate filling and a delicate crust, this dessert isn’t only delicious but also visually appealing. It can be served plain or adorned with fresh berries, whipped cream, or a dusting of cocoa powder for an extra touch of elegance.
Prepare to delight your taste buds and elevate your dessert game with this easy-to-follow recipe for Chocolate Ganache Tart.
Ingredients (Serves 4-6):
- 1 ½ cups all-purpose flour
- ½ cup unsweetened cocoa powder
- ½ cup powdered sugar
- ½ teaspoon salt
- ½ cup unsalted butter, chilled and cubed
- 1 large egg yolk
- 3 tablespoons ice water
- 1 cup heavy cream
- 8 oz. semi-sweet chocolate, chopped
- 1 teaspoon vanilla extract
Cooking Instructions:
1. Prepare the Crust: In a mixing bowl, combine the all-purpose flour, unsweetened cocoa powder, powdered sugar, and salt. Whisk together to guarantee they’re evenly mixed. Add the chilled, cubed unsalted butter to the dry ingredients.
Using your fingers or a pastry cutter, work the butter into the flour mixture until it resembles coarse crumbs.
2. Form the Dough: Add the egg yolk and ice water to the mixture. Stir gently until the dough begins to come together. If the dough is too crumbly, add a little more ice water, one teaspoon at a time, until it holds together.
Form the dough into a disk, wrap it in plastic wrap, and refrigerate for at least 30 minutes.
3. Preheat the Oven: While the dough is chilling, preheat your oven to 350°F (175°C). This guarantees that the crust will bake evenly and achieve a nice golden color.
4. Roll Out the Dough: Once chilled, lightly flour your work surface and Roll Out the Dough to about ¼ inch thickness. Carefully transfer the rolled dough to a 9-inch tart pan, pressing it into the bottom and sides.
Trim any excess dough from the edges.
5. Blind Bake the Crust: To prevent the crust from puffing up during baking, place a sheet of parchment paper over the crust and fill it with pie weights or dried beans. Bake in the preheated oven for 15 minutes.
Remove the parchment and weights, then bake for an additional 10 minutes until the crust is set and slightly firm. Let it cool completely.
6. Make the Ganache: In a small saucepan, heat the heavy cream over medium heat until it just begins to simmer. Remove from heat and pour it over the chopped semi-sweet chocolate in a heatproof bowl.
Let it sit for a minute to melt the chocolate, then stir until smooth and glossy. Stir in the vanilla extract for added flavor.
7. Fill the Tart: Pour the ganache into the cooled tart shell, using a spatula to spread it evenly. Tap the tart pan gently on the counter to remove any air bubbles.
Refrigerate the tart for at least 2 hours, or until the ganache is set.
8. Serve: Once set, carefully remove the tart from the pan. Slice into wedges and Serve as is, or with optional toppings like whipped cream or fresh berries.
Extra Tips:
For an added depth of flavor, consider using dark chocolate with a higher cocoa content for your ganache. This will enhance the richness of the dessert.
Additionally, if you want to play with textures, try adding a sprinkle of sea salt on top of the ganache before it sets for a delightful contrast to the sweetness.
Always allow the ganache tart to come to room temperature before serving for the best flavor experience, and feel free to get creative with garnishes based on seasonal fruits or your personal preferences. Enjoy your culinary creation!