

When I think about cooking with kids, I envision vibrant ingredients and playful dishes that spark joy. That’s where these 14 easy French recipes come in. Each one is designed to be hands-on, making mealtime an adventure rather than a chore. Imagine colorful crepes and cheesy gougères filling your kitchen with laughter. Ready to discover how these delightful dishes can turn your family’s meals into a fun culinary experience? Let’s explore the magic together.
Colorful Crepes

Crepes are a delightful French treat that can be filled with a variety of sweet or savory ingredients, making them perfect for breakfast, lunch, or dessert. Their thin, delicate texture and versatility can capture the imagination of any child, and they can be a fun hands-on cooking project for families.
With a splash of food coloring, these crepes can become a colorful canvas for your little chefs to express their creativity. Making colorful crepes isn’t only a delicious way to introduce children to cooking, but it also allows them to learn about measurements, mixing, and the joy of creating something from scratch.
Once the batter is ready, the fun begins with cooking and assembling. Kids can choose their favorite fillings, from Nutella and strawberries to ham and cheese, making each crepe a unique masterpiece.
Ingredients (Serves 4-6)
- 1 cup all-purpose flour
- 2 large eggs
- 1 ½ cups milk
- 2 tablespoons melted butter
- 2 tablespoons sugar (optional, for sweet crepes)
- 1 teaspoon vanilla extract (optional, for sweet crepes)
- Food coloring (various colors)
- Cooking spray or additional melted butter for the pan
- Assorted fillings (e.g., Nutella, whipped cream, fruits, cheese, ham)
Cooking Instructions
- Prepare the Batter: In a large mixing bowl, combine the flour and eggs. Gradually add the milk, whisking continuously to prevent lumps. Once the mixture is smooth, stir in the melted butter, sugar, and vanilla extract (if using). This will create a creamy batter that’s the base for your crepes.
- Divide and Color the Batter: Once the batter is well-mixed, divide it into small bowls, depending on how many colors you want to make. Add a few drops of food coloring to each bowl and stir until the desired shade is achieved. This step allows children to get creative with their color choices.
- Heat the Pan: Preheat a non-stick skillet or crepe pan over medium heat. Lightly grease the pan with cooking spray or a small amount of melted butter to prevent sticking.
- Cook the Crepes: Pour about ¼ cup of the colored batter into the hot pan, tilting the pan in a circular motion to evenly spread the batter into a thin layer. Cook for about 1-2 minutes or until the edges start to lift and the bottom is lightly golden. Carefully flip the crepe using a spatula and cook for an additional 1 minute on the other side.
- Repeat and Stack: Remove the cooked crepe and place it on a plate. Repeat this process with the remaining batter, stacking the crepes on top of each other as you go. If desired, you can alternate colors for a fun rainbow effect.
- Fill and Serve: Once all the crepes have been made, it’s time to fill them! Let the kids choose their favorite ingredients and fill each crepe as desired. Fold or roll the crepes and serve with additional toppings if you like.
Extra Tips
When cooking colorful crepes, the key is to maintain a consistent temperature on your pan to avoid burning. If the batter seems too thick, you can add a splash more milk to thin it out.
Encourage your kids to experiment with different fillings and toppings to create their own signature crepes. A sprinkle of powdered sugar or a drizzle of chocolate sauce can add an extra touch of sweetness, making these creations even more appealing!
Playful Ratatouille
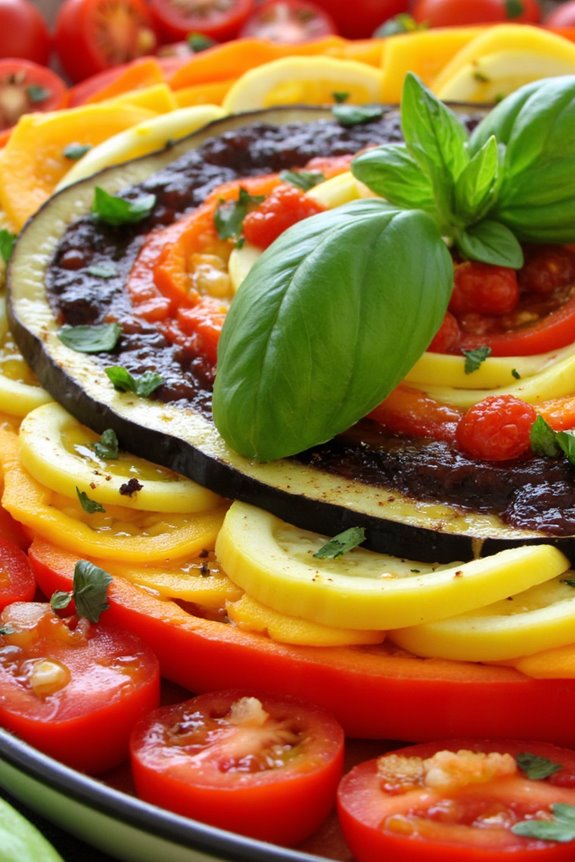
Ratatouille is a classic French dish that celebrates the vibrant colors and flavors of summer vegetables. This playful version is perfect for kids, blending fun shapes and textures with delicious tastes. It’s a wonderful way to introduce children to cooking, allowing them to explore various vegetables while creating a visually appealing meal. Not only is it healthy, but it also encourages them to embrace different flavors and textures in their diet.
This recipe is simple enough for kids to help with, making it a great family cooking activity. As they chop, slice, and arrange the veggies, they can learn about each ingredient’s role in the dish. Plus, the final creation looks like a piece of art on the plate! Gather the family and enjoy the process of making this delicious Playful Ratatouille together.
Ingredients (Serves 4-6):
- 1 medium eggplant
- 1 medium zucchini
- 1 medium yellow squash
- 1 bell pepper (any color)
- 1 medium onion
- 2 cloves garlic
- 2 cups diced tomatoes (canned or fresh)
- 2 tablespoons olive oil
- 1 teaspoon dried thyme
- 1 teaspoon dried basil
- Salt and pepper to taste
- Fresh basil leaves for garnish (optional)
Cooking Instructions:
- Prepare the Vegetables: Start by washing all the vegetables thoroughly. Cut the eggplant, zucchini, yellow squash, and bell pepper into thin slices or fun shapes using cookie cutters to make them more appealing to kids. Dice the onion and mince the garlic. This step is perfect for kids to help with under supervision!
- Sauté the Aromatics: In a large skillet or saucepan, heat the olive oil over medium heat. Add the diced onion and sauté for about 3-4 minutes until it becomes translucent. Then, add the minced garlic and sauté for an additional minute until fragrant. This helps to build a flavorful base for your ratatouille.
- Add the Tomatoes: Stir in the diced tomatoes, along with their juices, into the pan. This will create a delicious sauce for the vegetables to cook in. Let it simmer for about 5-7 minutes, allowing the flavors to meld together.
- Layer the Vegetables: Carefully arrange the sliced vegetables on top of the tomato mixture in a spiraled or layered pattern, making it visually appealing. Sprinkle with dried thyme, dried basil, salt, and pepper to taste. Cover the pan with a lid and let it cook for about 20-25 minutes on low heat. This will allow the vegetables to soften and absorb the flavors of the sauce.
- Serve and Garnish: Once the vegetables are tender, remove the lid and let it cool slightly. Serve the ratatouille warm, garnished with fresh basil leaves if desired. Encourage kids to serve themselves and enjoy their colorful creation!
Extra Tips:
When making Playful Ratatouille, feel free to experiment with different vegetables based on what you have on hand or what your kids enjoy. Carrots, mushrooms, and even green beans can make delightful additions.
Additionally, consider adding a sprinkle of cheese on top before serving for an extra layer of flavor that kids love. Finally, this dish can be stored in the fridge for a few days, making it a great make-ahead meal for busy weeknights!
Cheesy Gougères
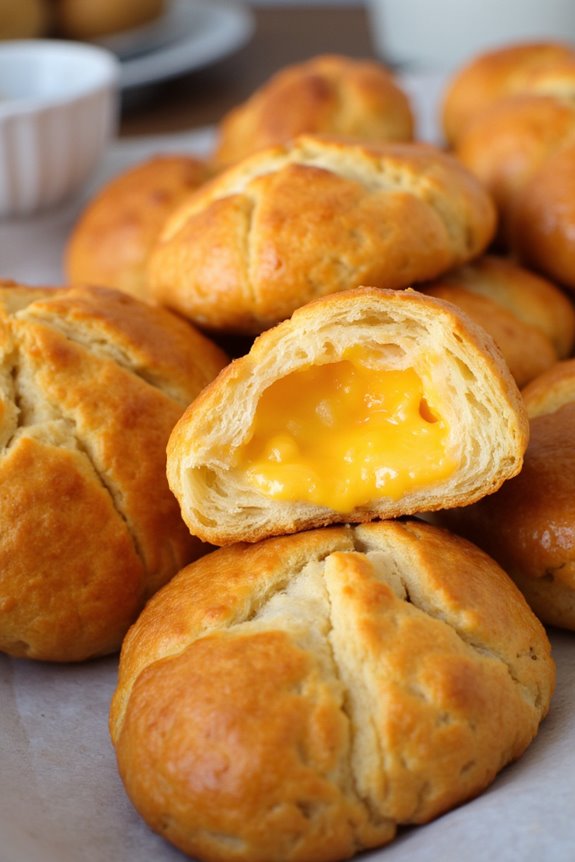
Cheesy gougères are delightful little cheese puffs that aren’t only fun to make but also a hit with kids and adults alike. Originating from France, these airy pastries are made from a simple choux pastry dough, which is then mixed with cheese to create a savory treat that’s perfect for any occasion.
They can be served as an appetizer, snack, or even a party food, making them versatile and appealing to everyone. Kids will love helping to mix the dough and watch as the gougères puff up in the oven!
Making cheesy gougères is an excellent way to introduce children to cooking, as it involves simple techniques that can be easily mastered. The process of creating the dough is fascinating and allows for creativity, especially when choosing different types of cheese to incorporate.
Plus, the end result isn’t only delicious but also gives kids a sense of accomplishment when they see their homemade gougères rise and turn golden brown.
Ingredients (serves 4-6):
- 1 cup (240 ml) water
- ½ cup (115 g) unsalted butter
- 1 teaspoon salt
- 1 cup (125 g) all-purpose flour
- 4 large eggs
- 1 cup (100 g) grated cheese (such as Gruyère, cheddar, or a mix)
- ¼ teaspoon black pepper (optional)
- ¼ teaspoon garlic powder (optional)
Cooking Instructions:
- Preheat the Oven: Start by preheating your oven to 400°F (200°C). This guarantees that the gougères will bake evenly and puff up nicely.
- Make the Choux Pastry: In a medium saucepan, combine the water, butter, and salt. Bring it to a boil over medium heat, stirring occasionally until the butter has completely melted. Once boiling, remove the saucepan from the heat.
- Add the Flour: Quickly add the flour to the saucepan, stirring vigorously with a wooden spoon until the mixture forms a ball and pulls away from the sides of the pan. This should take about 1-2 minutes.
- Cool the Dough: Transfer the dough to a mixing bowl and let it cool for about 5 minutes. This step is important because adding eggs to hot dough could cook them.
- Incorporate the Eggs: Once the dough has cooled slightly, add the eggs one at a time, mixing well after each addition. The dough will look a bit separated at first but will come together into a smooth, glossy batter.
- Add Cheese and Seasoning: Stir in the grated cheese and any optional seasonings (like black pepper or garlic powder) until well combined.
- Pipe the Dough: Using a piping bag or a spoon, drop small mounds of dough (about 1 tablespoon each) onto a baking sheet lined with parchment paper, leaving space between each puff for them to expand.
- Bake: Place the baking sheet in the preheated oven and bake for about 20-25 minutes, or until the gougères are puffed up and golden brown. Don’t open the oven door during the first 15 minutes of baking, as this may cause them to collapse.
- Cool and Serve: Once baked, remove the gougères from the oven and let them cool slightly before serving. They’re best enjoyed warm.
Extra Tips:
For a fun twist, try experimenting with different types of cheese or adding herbs and spices to the dough for extra flavor.
You can also use a small ice cream scoop instead of a piping bag for an easier method of portioning the dough. If you want to prepare the gougères in advance, you can freeze them before baking; just add a few extra minutes to the baking time when you’re ready to cook them.
Enjoy your cheesy gougères fresh out of the oven for the best flavor and texture!
Mini Quiches

Mini quiches are a delightful French dish that kids will love to help make and eat! These bite-sized treats are perfect for lunchboxes, snacks, or even a fun dinner option. The beauty of mini quiches is that they can be customized with different fillings to suit your family’s tastes, making them a versatile recipe that everyone can enjoy.
Plus, they’re simple enough for kids to get involved in the kitchen, allowing them to practice their cooking skills while creating something delicious.
To make mini quiches, you’ll need a muffin tin and a few basic ingredients. The quiches are made using a flaky pastry crust filled with a mixture of eggs, cheese, and your choice of vegetables or meats. Once baked, they become golden and fluffy, with a deliciously savory flavor that makes them irresistible.
Let’s get started on this fun and easy recipe!
Ingredients (serving size of 4-6 people):
- 1 sheet of puff pastry or pie crust
- 4 large eggs
- 1 cup milk
- 1 cup shredded cheese (cheddar, mozzarella, or your choice)
- 1 cup diced vegetables (such as bell peppers, spinach, or mushrooms)
- 1 cup cooked and crumbled bacon or ham (optional)
- Salt and pepper to taste
- Fresh herbs (such as parsley or chives, optional)
Cooking Instructions:
- Preheat the Oven: Begin by preheating your oven to 375°F (190°C). This guarantees that your mini quiches will bake evenly and become perfectly golden brown.
- Prepare the Pastry: Roll out the puff pastry or pie crust on a lightly floured surface. Using a round cookie cutter or a glass, cut out circles of dough that will fit into the muffin tin. Gently press each circle into the cups of the muffin tin to form a small crust.
- Mix the Filling: In a large bowl, crack the eggs and whisk them together. Add the milk, salt, and pepper, and mix well. Then, stir in the shredded cheese, diced vegetables, and any optional meats you wish to include. This mixture will be the delicious filling for your quiches.
- Fill the Crusts: Carefully pour the egg mixture into each pastry-lined muffin cup, filling them about three-quarters full. Be careful not to overfill, as the mixture will rise while baking.
- Bake: Place the muffin tin in the preheated oven and bake for about 20-25 minutes, or until the quiches are puffed up, golden brown, and a toothpick inserted into the center comes out clean.
- Cool and Serve: Once baked, remove the mini quiches from the oven and let them cool for a few minutes in the tin. Carefully take them out and serve warm or at room temperature. They can be enjoyed immediately or stored in an airtight container for later.
Extra Tips: When making mini quiches, feel free to get creative with the fillings! You can use leftovers from your fridge, like roasted vegetables or cooked meats, to personalize your quiches.
Additionally, you can experiment with different herbs and spices to enhance the flavor. If you’re making these for a party, consider preparing them in advance and reheating them slightly before serving. Enjoy your cooking adventure!
Sweet Tarte Tatin
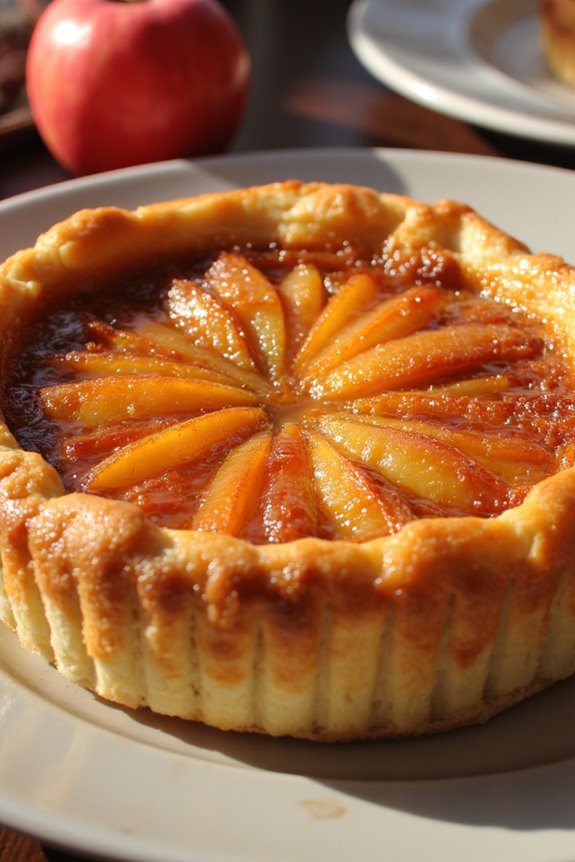
Sweet Tarte Tatin is a delightful upside-down caramelized apple tart that isn’t only delicious but also fun for kids to make. This classic French dessert is a wonderful way to introduce young chefs to the world of cooking. The combination of buttery pastry and sweet, caramelized apples creates a treat that’s sure to impress family and friends.
Plus, the process of flipping the tart over after baking adds an element of excitement that kids will love!
Making Sweet Tarte Tatin is a great opportunity for kids to learn basic cooking skills, such as peeling and slicing fruit, working with pastry, and understanding how caramelization works. With a few simple ingredients and steps, you can create a dish that’s both impressive and satisfying.
Gather your little ones in the kitchen, and let the fun begin as you begin this sweet culinary adventure!
Ingredients (serving size: 4-6 people)
- 5-6 medium-sized apples (such as Granny Smith or Honeycrisp)
- 1 cup granulated sugar
- 1/2 cup unsalted butter (1 stick)
- 1 teaspoon vanilla extract
- 1 sheet of puff pastry (thawed if frozen)
- 1 teaspoon ground cinnamon (optional)
- Pinch of salt
Cooking Instructions
- Prepare the Apples: Begin by peeling, coring, and slicing the apples into quarters. This step is vital as it makes the apples easier to layer in the tart. Make sure to have an adult supervise when using sharp knives.
- Make the Caramel: In a large, oven-safe skillet, melt the butter over medium heat. Once melted, add the sugar and stir continuously until the mixture turns a light golden brown and begins to bubble. Be careful not to let it burn, as burnt sugar can ruin the flavor.
- Add the Apples: Once the caramel is ready, carefully add the apple quarters to the skillet. Stir to coat the apples in the caramel and allow them to cook for about 10-15 minutes, turning occasionally until they’re tender and well-coated.
- Add Flavorings: Stir in the vanilla extract, ground cinnamon (if using), and a pinch of salt to enhance the flavor of the apples. Confirm that all the apples are evenly coated with the caramel mixture.
- Prepare the Puff Pastry: While the apples are cooking, roll out the puff pastry on a lightly floured surface to smooth out any creases. If the sheet is too large for your skillet, you can trim it down to fit.
- Cover the Apples: Once the apples are ready, remove the skillet from the heat. Drape the rolled-out puff pastry over the apples, tucking the edges down around the apples if necessary. This will create a beautiful crust that will hold everything together.
- Bake the Tart: Preheat the oven to 375°F (190°C). Place the skillet in the preheated oven and bake for 25-30 minutes, or until the pastry is golden brown and puffed up.
- Flip the Tart: Once baked, remove the skillet from the oven (use oven mitts!). Allow it to cool for a few minutes before carefully inverting it onto a large serving plate. Be cautious, as the caramel will be hot and can drip.
- Serve: Let the tart cool slightly before cutting into wedges. Serve warm, and if desired, top with a scoop of vanilla ice cream or a dollop of whipped cream for an extra treat!
Extra Tips
When making Sweet Tarte Tatin, it’s important to keep an eye on the caramel as it cooks since it can go from perfectly caramelized to burnt very quickly.
You can also experiment with different types of apples to find your favorite flavor combination. If you want to add a twist, consider adding a splash of lemon juice to the apples for a touch of tartness or sprinkle some nuts on top before serving for added crunch.
Enjoy your baking adventure!
French Toast Sticks
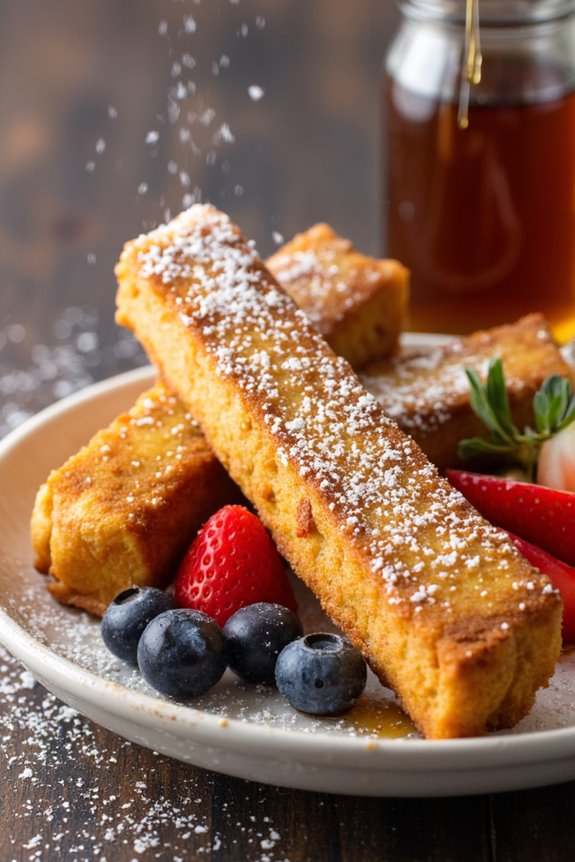
French Toast Sticks are a delightful and simple breakfast option that kids will love! This fun twist on traditional French toast makes it easy for little hands to dip and enjoy. Perfect for a lazy weekend morning or a special treat, these sticks are both delicious and versatile. You can serve them with maple syrup, fresh fruit, or even whipped cream for an extra indulgent experience.
Making French Toast Sticks isn’t only quick but also a great way to get kids involved in the kitchen. They can help with dipping the bread in the egg mixture and arranging the sticks on the cooking surface. This recipe is designed to serve 4-6 people, making it an ideal choice for family breakfasts or brunch gatherings.
Ingredients
- 6 slices of thick bread (such as Texas toast or challah)
- 3 large eggs
- 1 cup milk
- 2 tablespoons sugar
- 1 teaspoon vanilla extract
- 1 teaspoon ground cinnamon
- A pinch of salt
- Butter or oil for cooking
- Maple syrup, for serving (optional)
- Fresh fruit or powdered sugar, for serving (optional)
Cooking Instructions
- Prepare the Bread: Start by cutting each slice of bread into 3 equal strips, creating finger-sized sticks. This will guarantee that they’re easy for kids to hold and eat. Set aside the bread sticks on a plate.
- Mix the Egg Mixture: In a large mixing bowl, whisk together the eggs, milk, sugar, vanilla extract, cinnamon, and salt until well combined. This mixture will coat the bread sticks and give them that classic French toast flavor.
- Heat the Pan: Place a non-stick skillet or griddle over medium heat and add a small amount of butter or oil. Allow it to heat until it’s hot but not smoking. You want the cooking surface to be ready for the bread sticks to sizzle.
- Dip the Bread Sticks: Take each bread stick and dip it into the egg mixture, making sure that each side is well-coated but not overly soggy. Gently shake off any excess liquid before placing them in the pan.
- Cook the Sticks: Place the coated bread sticks onto the heated skillet, making sure not to overcrowd the pan. Cook for about 2-3 minutes on each side, or until they’re golden brown and crispy. Adjust the heat if necessary to prevent burning.
- Serve Warm: Once cooked, transfer the French Toast Sticks to a serving plate. Serve them warm with maple syrup, fresh fruit, or a dusting of powdered sugar for added sweetness.
Extra Tips
To make your French Toast Sticks even more exciting, consider adding various toppings or dips. Chocolate chips can be sprinkled on the bread sticks before cooking for a sweet twist. Alternatively, you can serve them with yogurt or fruit compote for a healthier option.
If you’re making these for a crowd, you can keep the cooked sticks warm in a low oven while you finish cooking the rest. Enjoy this delicious and fun breakfast with your kids!
Pâté Chaud

Pâté Chaud, also known as Vietnamese puff pastry, is a delightful dish that combines flaky pastry with a savory filling. It’s a perfect recipe for kids to help with, as they can assist in rolling out the dough and filling the pastries. This dish isn’t only fun to make but also delicious to eat, making it a great addition to family meals or gatherings.
The combination of tender meat, aromatic spices, and crispy pastry will surely be a hit with both kids and adults alike. This recipe is simple enough for kids to participate in, allowing them to learn about cooking while enjoying a delicious treat.
Pâté Chaud can be filled with ground pork, chicken, or even vegetables, making it versatile for different tastes. Once you serve these golden, flaky pastries, everyone will be asking for seconds!
Ingredients (Serves 4-6):
- 1 package of puff pastry (2 sheets)
- 1 lb ground pork (or chicken)
- 1 small onion, finely chopped
- 2 cloves garlic, minced
- 1 tablespoon soy sauce
- 1 tablespoon fish sauce
- 1 teaspoon ground black pepper
- 1 tablespoon sugar
- 1 egg (for egg wash)
- Fresh cilantro (optional, for garnish)
Cooking Instructions:
- Prepare the Filling: In a large mixing bowl, combine the ground pork (or chicken), finely chopped onion, minced garlic, soy sauce, fish sauce, black pepper, and sugar. Mix thoroughly until all ingredients are well combined. This mixture creates a flavorful filling for your pastries.
- Roll Out the Pastry: Preheat your oven to 400°F (200°C). On a lightly floured surface, roll out the puff pastry sheets to smooth out any creases. Use a rolling pin to flatten them gently, which will help them puff up nicely in the oven.
- Cut the Pastry: Using a sharp knife or a pizza cutter, cut the rolled pastry into rectangles (approximately 4×6 inches). You should be able to get about 8 rectangles from each sheet, depending on how you cut them.
- Fill the Pastry: Place a generous tablespoon of the filling mixture in the center of each rectangle. Be careful not to overfill, as this may cause the pastry to burst while baking.
- Seal the Pastries: Fold the pastry over to create a pocket, pressing the edges together firmly. Use a fork to crimp the edges, ensuring they’re well sealed. This will help keep the filling inside during baking.
- Apply Egg Wash: In a small bowl, beat the egg and use a pastry brush to apply a thin layer over the top of each pastry. This will give the Pâté Chaud a beautiful golden color when baked.
- Bake: Place the filled and sealed pastries on a baking sheet lined with parchment paper. Bake in the preheated oven for about 20-25 minutes or until they’re golden brown and puffed up.
- Serve: Once baked, remove the pastries from the oven and let them cool slightly before serving. Garnish with fresh cilantro if desired, and enjoy the crispy, savory treats!
Extra Tips:
When making Pâté Chaud, you can experiment with different fillings according to your family’s preferences. For a vegetarian option, consider using mushrooms or a mixture of finely chopped vegetables.
Make sure to keep an eye on the pastries while they bake to prevent them from over-browning. If you’re short on time, you can also use store-bought fillings, but homemade ones are always a crowd-pleaser! Enjoy this fun cooking experience with your kids!
Croque Monsieur Bites

Croque Monsieur Bites are a delightful twist on the classic French sandwich, making it a perfect option for kids and adults alike. These bite-sized snacks are easy to prepare and are bound to be a hit at parties, school lunches, or family dinners. The combination of gooey cheese, savory ham, and crispy bread creates a delicious flavor that kids will love.
Plus, they can be made in just a few simple steps, making them a fantastic choice for young chefs enthusiastic to help in the kitchen.
To make Croque Monsieur Bites, you’ll need just a handful of ingredients that are likely already in your pantry. This recipe isn’t only simple but also allows for some creativity—feel free to swap in your favorite cheeses or add vegetables to the mix.
These bites can be served with a side of salad or some fresh fruit for a well-rounded meal. Get ready to impress your family with these tasty treats!
Ingredients (Serves 4-6):
- 8 slices of bread (white or whole grain)
- 4 slices of ham
- 1 cup shredded Gruyère cheese (or Swiss cheese)
- 1/2 cup shredded mozzarella cheese
- 1/4 cup Dijon mustard
- 4 tablespoons unsalted butter
- 1/4 cup milk
- Salt and pepper to taste
- Optional: Fresh parsley for garnish
Cooking Instructions:
- Preheat the Oven: Start by preheating your oven to 400°F (200°C). This guarantees that your Croque Monsieur Bites will be perfectly crispy and golden when they come out.
- Prepare the Bread: Take the slices of bread and cut them into quarters to create bite-sized pieces. You should end up with 32 small squares. This size makes them easy to eat and perfect for little hands.
- Make the Cheese Mixture: In a bowl, combine the shredded Gruyère cheese and mozzarella cheese. Mix well so that the cheeses are evenly distributed. Set aside for later use.
- Assemble the Bites: On half of the bread squares, spread a thin layer of Dijon mustard. Next, place a slice of ham on top of the mustard, followed by a generous amount of the cheese mixture. Finally, top with another bread square to create a sandwich. Repeat this for all the bread pieces.
- Butter the Sandwiches: Melt the unsalted butter and mix in the milk in a small bowl. Brush the melted butter mixture over the top of each sandwich to help them achieve a beautiful golden color and rich flavor as they bake.
- Bake: Place the assembled bites on a baking sheet lined with parchment paper. Bake in the preheated oven for about 12-15 minutes, or until the tops are golden brown and the cheese is bubbling.
- Serve: Remove the Croque Monsieur Bites from the oven and let them cool for a few minutes. If desired, garnish with fresh parsley before serving. Enjoy them warm!
Extra Tips:
When making Croque Monsieur Bites, feel free to experiment with different types of bread, such as sourdough or whole wheat, for added flavor.
You can also customize the fillings by adding ingredients such as spinach, tomatoes, or even a sprinkle of herbs for extra taste. For a crunchier texture, consider toasting the bread lightly before assembling the bites.
These adjustments can help make this classic dish even more appealing to kids and give a personal touch to your culinary creation!
Ratatouille Pizza
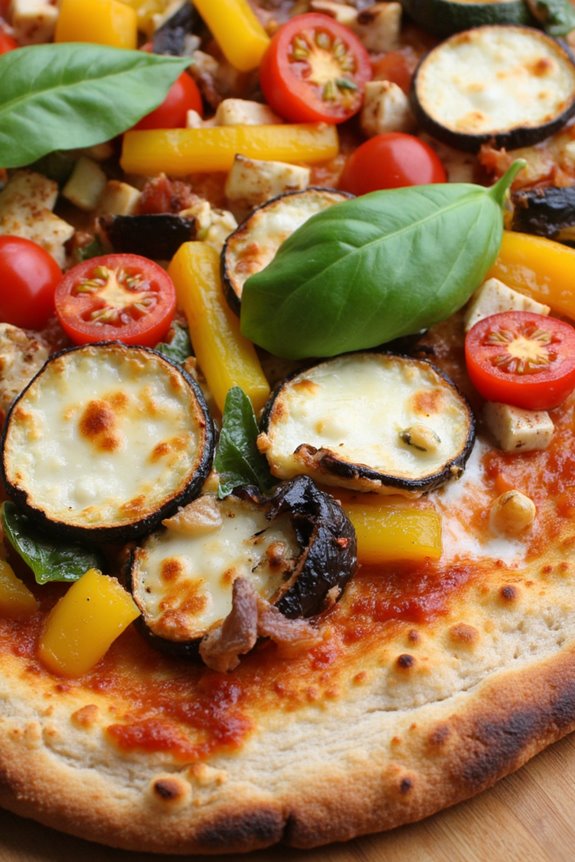
Ratatouille Pizza is a delightful fusion of two classic French dishes that kids will love to make and eat. Combining the vibrant flavors of ratatouille—a traditional vegetable stew—with the comforting familiarity of pizza creates a fun and healthy meal option. This recipe motivates little chefs to get involved in the kitchen by teaching them essential cooking skills such as chopping vegetables, spreading sauce, and assembling a dish.
Plus, it’s a great way to sneak in some nutritious veggies! Making Ratatouille Pizza isn’t only simple but also allows for creativity. Kids can choose their favorite toppings and customize their pizzas according to their preferences. This dish is perfect for family gatherings, parties, or a fun weeknight dinner. Get ready to enjoy a delicious, colorful pizza that celebrates the flavors of France!
Ingredients (serving size: 4-6 people):
- 1 pre-made pizza crust
- 1 cup pizza sauce
- 1 medium zucchini, sliced
- 1 medium eggplant, diced
- 1 bell pepper, diced (any color)
- 1 medium onion, diced
- 2 cloves garlic, minced
- 1 cup cherry tomatoes, halved
- 1 teaspoon dried oregano
- 1 teaspoon dried basil
- 1 cup shredded mozzarella cheese
- Olive oil
- Salt and pepper to taste
- Fresh basil leaves for garnish (optional)
Cooking Instructions:
1. Preheat the Oven: Preheat your oven to 425°F (220°C). This guarantees that your pizza cooks evenly and the crust becomes crispy.
2. Prepare the Vegetables: In a large skillet, heat a drizzle of olive oil over medium heat. Add the diced onion and minced garlic, sautéing until the onion becomes translucent.
Then, add the diced eggplant, zucchini, and bell pepper. Cook for about 5-7 minutes, or until the vegetables are tender but still hold their shape. Season with salt, pepper, oregano, and basil.
3. Add Cherry Tomatoes: Stir in the halved cherry tomatoes and cook for an additional 2-3 minutes until they soften slightly. Remove the skillet from heat and let the ratatouille mixture cool for a few minutes.
4. Assemble the Pizza: On a baking sheet or pizza stone, spread the pizza sauce evenly over the pre-made crust. Layer the sautéed ratatouille mixture on top of the sauce, distributing it evenly.
5. Add Cheese: Sprinkle the shredded mozzarella cheese generously over the vegetable mixture. Make sure to cover all the veggies for an extra cheesy bite!
6. Bake: Place the assembled pizza in the preheated oven and Bake for 12-15 minutes, or until the cheese is bubbly and golden brown and the crust is crispy.
7. Garnish and Serve: Once the pizza is out of the oven, let it cool for a minute. Garnish with fresh basil leaves if desired, then slice it into wedges and serve hot!
Extra Tips: When preparing Ratatouille Pizza, feel free to experiment with different vegetables based on what you have on hand or your children’s preferences. Other great options include mushrooms, spinach, or even artichokes.
Additionally, consider using whole wheat or gluten-free pizza crusts for a healthier alternative. Kids can also help by decorating their pizza with toppings, making it a fun and interactive cooking experience!
Fruit Salad With Honey Yogurt
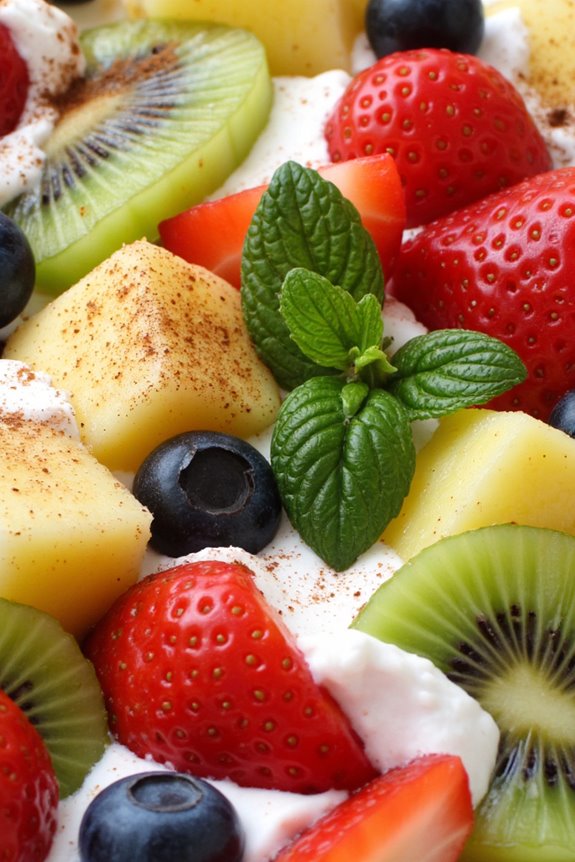
Fruit salad is a delightful and colorful dish that kids won’t only enjoy eating but also love helping to make. This simple yet invigorating recipe combines a variety of fruits with a creamy honey yogurt dressing, making it a perfect snack or a light dessert. The vibrant colors and sweet flavors make it appealing to young eaters, and it’s an excellent way for kids to explore different fruits while getting a healthy dose of vitamins.
Making fruit salad with honey yogurt is an engaging activity for children, as they can participate in washing, peeling, and cutting the fruits (with supervision). This recipe offers a chance to teach them about the different types of fruits and the importance of healthy eating. Plus, the honey yogurt dressing adds a delicious twist that takes this fruit salad to the next level!
Ingredients (serves 4-6):
- 2 cups strawberries, hulled and sliced
- 2 cups blueberries
- 2 cups pineapple, diced
- 2 cups kiwi, peeled and sliced
- 2 cups bananas, sliced
- 1 cup plain yogurt (Greek or regular)
- 2 tablespoons honey
- 1 teaspoon vanilla extract
- A sprinkle of cinnamon (optional)
Cooking Instructions:
- Prepare the Fruits: Start by washing all the fruits thoroughly under cool running water. Hull the strawberries and slice them into thin pieces. Peel and slice the kiwis, and dice the pineapple into bite-sized pieces. Slice the bananas and set all the prepared fruit aside in a large mixing bowl.
- Make the Honey Yogurt Dressing: In a small mixing bowl, combine the plain yogurt, honey, and vanilla extract. Use a whisk or spoon to mix until the ingredients are well blended and smooth. Taste the dressing and adjust sweetness by adding more honey if desired.
- Combine the Fruits and Dressing: Pour the honey yogurt dressing over the prepared fruits in the mixing bowl. Gently toss the fruits and dressing together with a spatula or wooden spoon until all the fruits are evenly coated with the dressing. Be careful not to mash the fruits while mixing.
- Chill and Serve: Once the fruit salad is well mixed, cover the bowl with plastic wrap or a lid and place it in the refrigerator for about 30 minutes. This chilling time allows the flavors to meld and makes the salad even more stimulating. When ready to serve, scoop the fruit salad into individual bowls or cups.
- Optional Garnish: If desired, sprinkle a little cinnamon over the top of each serving for an extra hint of flavor. You can also add a few mint leaves for a pop of color and freshness.
Extra Tips:
When making fruit salad, feel free to mix and match your favorite fruits based on seasonal availability or your children’s preferences. For a crunchier texture, consider adding chopped nuts or granola just before serving.
If you want to prevent bananas from browning too quickly, add them last and toss them in a little lime or lemon juice. This fruit salad is best enjoyed fresh, so try to serve it within a day or two for the best flavor and texture!
Savory Palmiers

Savory Palmiers are a delightful pastry that kids can help make, turning the kitchen into a fun cooking adventure. These flaky treats are made from puff pastry and can be filled with a variety of savory ingredients, such as cheese, herbs, or meats. Perfect as a snack or appetizer, they’re simple to prepare and require minimal baking skills, making them ideal for young chefs enthusiastic to impress family and friends with their culinary creations.
The process of making Savory Palmiers not only introduces kids to basic pastry techniques but also encourages creativity. They can choose their favorite fillings and experiment with different flavor combinations. Once baked, these golden, crispy delights are perfect for parties or family gatherings, appealing to both kids and adults alike. Let’s plunge into making these delicious treats!
Ingredients (Serves 4-6 people)
- 1 sheet of puff pastry (thawed)
- 1 cup grated cheese (such as cheddar, mozzarella, or a mix)
- 1/2 cup cooked and crumbled bacon or diced ham (optional)
- 1/4 cup chopped fresh herbs (such as basil, parsley, or thyme)
- 1/4 teaspoon garlic powder
- 1/4 teaspoon onion powder
- Salt and pepper to taste
- 1 egg (beaten, for egg wash)
Cooking Instructions
- Preheat the Oven: Begin by preheating your oven to 400°F (200°C). This guarantees that the palmiers will bake evenly and achieve a beautiful golden color.
- Prepare the Pastry: Roll out the thawed puff pastry on a lightly floured surface to smooth out any creases. Aim for a rectangular shape that’s about 1/8 inch thick. This will be the base for your savory filling.
- Mix the Filling: In a bowl, combine the grated cheese, crumbled bacon or diced ham (if using), chopped herbs, garlic powder, onion powder, and a pinch of salt and pepper. Stir until well mixed. This will be the delicious filling for your palmiers.
- Spread the Filling: Evenly sprinkle the filling mixture over the puff pastry, making sure to cover the surface but leaving a small border around the edges. This helps to seal the palmiers later.
- Roll the Pastry: Starting from one long edge, carefully roll the pastry towards the center until you reach the middle. Repeat with the other edge, rolling it towards the center as well. You should end up with a log shape.
- Chill the Roll: Place the rolled pastry in the refrigerator for about 15-20 minutes. This step is crucial as it helps the pastry firm up, making it easier to slice.
- Slice the Palmiers: Once chilled, remove the roll from the refrigerator and slice it into approximately 1/2-inch thick pieces. Arrange the slices on a baking sheet lined with parchment paper, leaving space between each palmier.
- Apply Egg Wash: Brush the tops of the sliced palmiers with the beaten egg. This egg wash will give them a beautiful glossy finish once baked.
- Bake: Place the baking sheet in the preheated oven and bake for 12-15 minutes, or until the palmiers are golden brown and puffed up. Keep an eye on them to prevent burning.
- Serve and Enjoy: Once baked, remove the palmiers from the oven and let them cool slightly before serving. They can be enjoyed warm or at room temperature.
Extra Tips
To make the process even more fun, let your kids customize their palmiers with different fillings. Try adding sun-dried tomatoes, olives, or even different types of cheese for a unique twist.
Also, remember that the puff pastry can be a bit delicate, so handle it gently to prevent tearing. Finally, these palmiers can be made ahead of time and frozen before baking. Just pop them in the oven when you’re ready to serve for fresh, warm treats!
Chocolate Mousse Cups
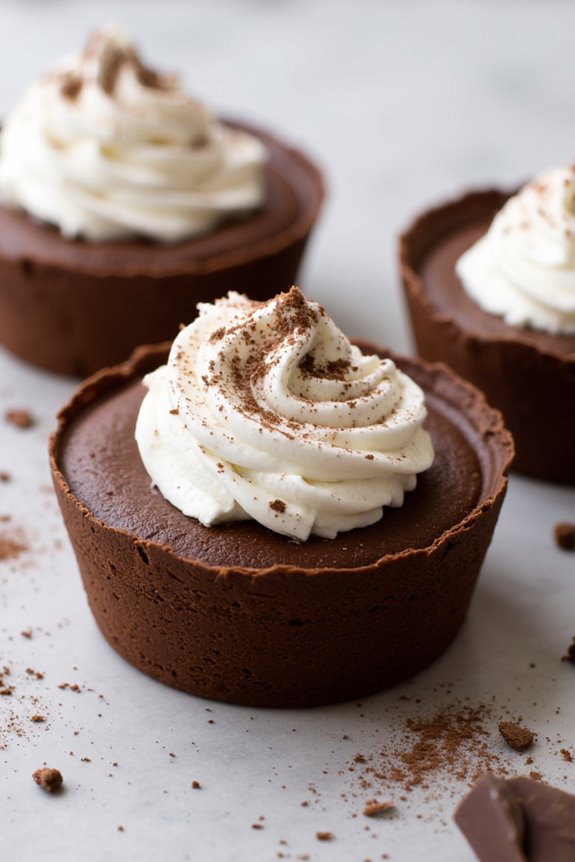
Chocolate mousse cups are a delightful and simple dessert that will impress both kids and adults alike. This rich and creamy treat is perfect for special occasions or just a fun cooking session with your little ones. The best part? It doesn’t require any baking, making it a straightforward recipe for kids to help with. With just a few ingredients, you can create a luxurious dessert that packs a chocolatey punch!
Making chocolate mousse cups isn’t only an enjoyable activity but also a great opportunity to teach kids about measuring ingredients and the science of mixing. The fluffy texture of the mousse comes from whipping air into the cream and egg whites, creating a light and airy dessert that melts in your mouth. Let’s get started on this delicious recipe that serves 4-6 people!
Ingredients:
- 200g dark chocolate (at least 70% cocoa)
- 3 large eggs
- 3 tablespoons of sugar
- 1 cup heavy cream
- 1 teaspoon vanilla extract
- A pinch of salt
- Whipped cream and chocolate shavings for garnish (optional)
Cooking Instructions:
- Melt the Chocolate: Begin by breaking the dark chocolate into small pieces and placing it in a heatproof bowl. Set the bowl over a pot of simmering water (double boiler) and stir occasionally until the chocolate is fully melted and smooth. Remove from heat and let it cool slightly.
- Separate the Eggs: While the chocolate cools, carefully separate the egg whites from the yolks. Place the egg whites in a clean, dry bowl and the yolks in another bowl. Make sure no yolk gets into the whites, as this can prevent them from whipping properly.
- Mix Egg Yolks and Sugar: Add the sugar to the bowl with the egg yolks and whisk vigorously until the mixture becomes pale and creamy. Then, stir in the melted chocolate and vanilla extract until well combined.
- Whip the Egg Whites: Using an electric mixer, beat the egg whites with a pinch of salt until soft peaks form. This means that when you lift the beaters out of the bowl, the peaks should gently bend over.
- Fold in the Egg Whites: Gently fold one-third of the whipped egg whites into the chocolate mixture to lighten it. Once incorporated, fold in the remaining egg whites, being careful not to deflate them. This will help keep the mousse light and airy.
- Whip the Cream: In a separate bowl, whip the heavy cream until soft peaks form. Then, gently fold the whipped cream into the chocolate mixture, ensuring everything is well combined but still fluffy.
- Chill the Mousse: Spoon the mousse mixture into individual cups or glasses and refrigerate for at least 2 hours, or until set. This allows the flavors to meld and the mousse to firm up.
- Serve and Garnish: Once set, remove the mousse cups from the fridge. You can top them with a dollop of whipped cream and sprinkle some chocolate shavings for an extra touch if desired.
Extra Tips:
When making chocolate mousse cups, it’s essential to use high-quality dark chocolate for the best flavor. You can also experiment with different toppings, such as fresh berries or a dusting of cocoa powder.
For a fun twist, consider adding a splash of orange or mint extract to the chocolate mixture for a hint of flavor. Remember to work gently when folding in the whipped egg whites and cream to maintain the mousse’s light texture. Enjoy this delightful treat with your family!
Baked Brie With Jam
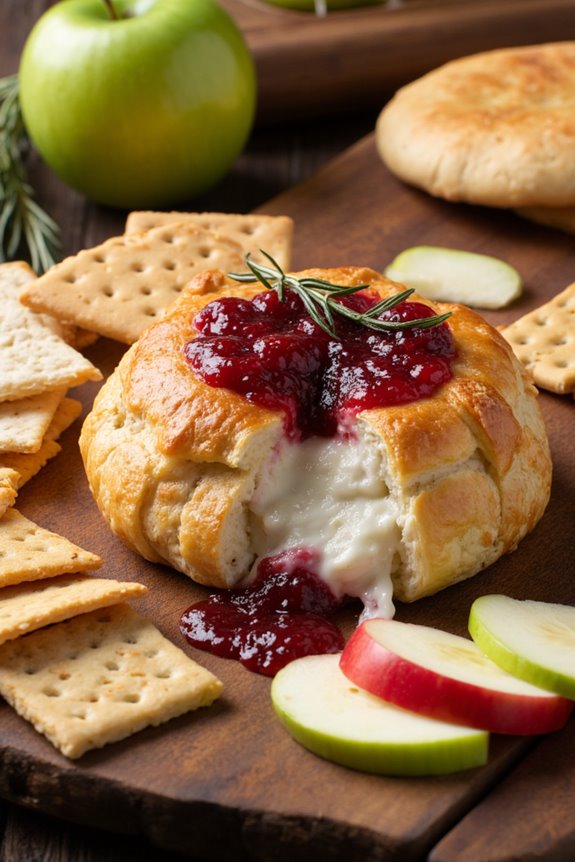
Baked Brie with Jam is a delightful treat that combines the creamy, rich texture of Brie cheese with the sweet and tangy flavors of your favorite jam. This dish isn’t only easy to prepare but also makes for an impressive appetizer that kids will love to help create. It’s perfect for family gatherings, parties, or just a cozy night in.
The warm, gooey Brie paired with the fruity jam creates a delicious contrast that’s sure to please young palates and adults alike. Involving kids in the kitchen can be a fun and educational experience, and this recipe is a great way to introduce them to cooking. They can help with spreading the jam and wrapping the cheese, making it a family-friendly activity.
Serve it with a selection of crackers, bread, or sliced fruit for a complete snack that everyone will enjoy.
Ingredients (Serves 4-6):
- 1 round of Brie cheese (approximately 8 ounces)
- 1/2 cup of your choice of jam (e.g., raspberry, apricot, or fig)
- 1 sheet of puff pastry (thawed if frozen)
- 1 egg (beaten, for egg wash)
- Fresh herbs (like thyme or rosemary, optional, for garnish)
Cooking Instructions:
- Preheat the Oven: Preheat your oven to 375°F (190°C). This step is essential as it guarantees that the Brie will cook evenly and melt properly when placed in the oven.
- Prepare the Puff Pastry: Roll out the puff pastry on a lightly floured surface to smooth it out. If you’re using pre-rolled pastry, simply unroll it and place it on a baking sheet lined with parchment paper. This pastry will encase the Brie, providing a wonderful flaky texture.
- Assemble the Cheese and Jam: Place the round of Brie in the center of the puff pastry. Using a spoon, spread the jam generously over the top of the Brie cheese. Make sure to cover it well so that the flavors meld during baking.
- Wrap the Brie: Fold the edges of the puff pastry over the Brie, pinching the seams to seal it well. You want to create a neat package to keep the cheese from leaking out while it bakes. Trim any excess pastry if needed, and use it to decorate the top if desired.
- Apply the Egg Wash: Brush the wrapped Brie with the beaten egg. This step is significant because it gives the pastry a beautiful golden color when baked. You can also sprinkle some fresh herbs on top for added flavor and decoration.
- Bake the Brie: Place the prepared Brie on the baking sheet in the preheated oven and bake for about 20-25 minutes, or until the pastry is golden brown and puffed up. Keep an eye on it towards the end to avoid over-baking.
- Cool and Serve: Once baked, remove the Brie from the oven and let it cool for a few minutes before serving. This short cooling time allows the cheese to set slightly, making it easier to slice without oozing too much.
Extra Tips:
When making Baked Brie with Jam, feel free to experiment with different types of jam and toppings. You can also add nuts or dried fruits inside the pastry for added texture and flavor.
If you’re looking for a more savory twist, consider using caramelized onions or garlic instead of jam. Serve the baked Brie warm with a variety of accompaniments such as sliced baguette, crackers, or apple slices for a delicious snack that everyone will love!
Muffin Tin Coq Au Vin
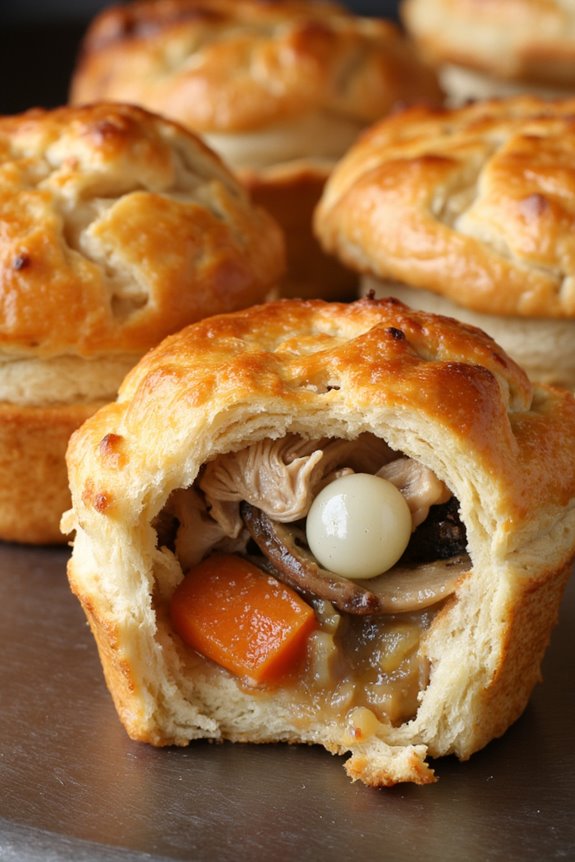
Muffin Tin Coq Au Vin is a delightful twist on the traditional French dish that kids will love. This recipe simplifies the classic flavors of coq au vin by transforming it into individual servings baked in a muffin tin. Perfect for family dinners or a fun cooking activity with the kids, these savory mini pies pack all the rich, comforting flavors into bite-sized portions that are easy to handle and eat.
Using a muffin tin not only makes serving easier, but it also allows for a fun presentation that will excite kids and encourage them to try new foods. This dish is a great way to introduce children to the joys of French cuisine while keeping the preparation simple and enjoyable. Let’s explore this easy-to-follow recipe that will have the entire family asking for seconds!
Ingredients (Serves 4-6):
- 2 cups cooked chicken, shredded
- 1 cup mushrooms, sliced
- 1 cup carrots, diced
- 1 cup pearl onions, peeled
- 1 cup chicken broth
- 1 cup red wine (like Pinot Noir)
- 2 tablespoons olive oil
- 2 tablespoons all-purpose flour
- 1 teaspoon dried thyme
- 1 teaspoon dried rosemary
- Salt and pepper to taste
- 1 package of refrigerated puff pastry (2 sheets)
- 1 egg, beaten (for egg wash)
Cooking Instructions:
1. Preheat the Oven: Begin by preheating your oven to 400°F (200°C). This guarantees that the muffin tin will be hot enough to create a deliciously flaky pastry crust once the Coq Au Vin mixture is added.
2. Sauté the Vegetables: In a large skillet, heat the olive oil over medium heat. Add the mushrooms, carrots, and pearl onions. Sauté for about 5-7 minutes until the vegetables are tender and slightly caramelized, then remove from the heat and set aside.
3. Prepare the Sauce: In the same skillet, add the shredded chicken, chicken broth, red wine, thyme, rosemary, and season with salt and pepper. Bring this mixture to a gentle boil and let it simmer for about 10 minutes, allowing the flavors to meld together.
After simmering, sprinkle the flour into the mixture while stirring to thicken the sauce, then remove from heat.
4. Fill the Muffin Tin: Unroll the puff pastry sheets and cut them into circles large enough to fit into the muffin cups. Press the pastry circles into the greased muffin tin, ensuring they cover the sides. Spoon the chicken and vegetable mixture into each cup, filling them generously.
5. Top with Pastry: Use any leftover puff pastry to create lids for each muffin tin cup. Cut smaller circles to place on top of the filling, or you can create fun shapes with cookie cutters. Seal the edges by pressing down with a fork and brush the tops with the beaten egg for a golden finish.
6. Bake: Place the muffin tin in the preheated oven and Bake for 20-25 minutes, or until the pastry is golden brown and puffed up. Keep an eye on them to make sure they don’t overcook.
7. Cool and Serve: Once baked, remove the muffin tin from the oven and let it cool for a few minutes. Carefully remove the muffin cups from the tin, and serve warm.
Extra Tips:
When preparing Muffin Tin Coq Au Vin, feel free to customize the filling with your family’s favorite vegetables or even different proteins such as turkey or tofu for a vegetarian version.
Make sure to let the filling cool slightly before adding it to the pastry to prevent the dough from becoming soggy. For an extra layer of flavor, consider marinating the chicken in the wine for a few hours before cooking.
This dish is perfect for leftovers, so don’t hesitate to double the recipe and enjoy them the next day!