

Transform your kitchen into a chic Parisian patisserie with these 11 stunning French dessert recipes. Each one is crafted for both taste and visual appeal. Picture the Mille-Feuille’s delicate, flaky layers or the vibrant hues of classic French macarons. These desserts promise to elevate your Instagram feed with their elegance and artistry. Curious about the secrets behind their beauty and flavor? Let’s commence on this sweet journey together.
Mille-Feuille: The Flaky Layered Delight
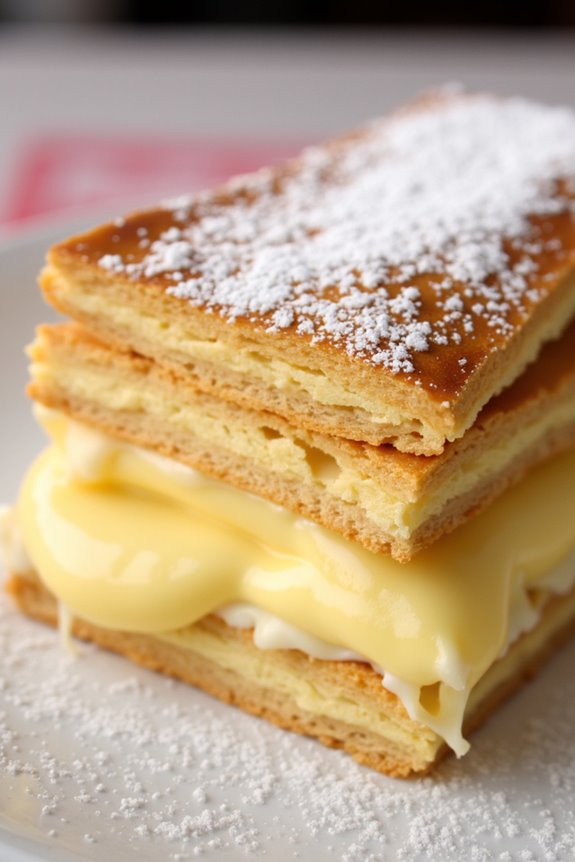
Mille-Feuille, also known as the “Napoleon,” is a classic French pastry that embodies the elegance and sophistication of French desserts. This exquisite delight features thin layers of crispy puff pastry alternated with creamy custard, creating a harmonious blend of textures and flavors. The key to a perfect Mille-Feuille is confirming the pastry is perfectly flaky and the custard is smooth and rich, making it a treat worth the effort.
The origins of Mille-Feuille can be traced back to the 17th century, and it remains a staple in French patisseries to this day. When prepared correctly, the pastry sheets should be so tender that they break apart with a gentle tap, and the custard should provide a sweet, creamy contrast. Completing the Mille-Feuille with a dusting of powdered sugar or a delicate icing adds the final touch of sweetness to this chic dessert. Serving this dessert to 4-6 people will surely impress and provide a delightful end to any meal.
Ingredients (Serves 4-6)
- 500g puff pastry
- 4 cups whole milk
- 1 vanilla bean (or 1 teaspoon vanilla extract)
- 6 large egg yolks
- 3/4 cup granulated sugar
- 1/2 cup all-purpose flour
- 1/4 cup cornstarch
- 2 tablespoons unsalted butter
- Powdered sugar for dusting
- Optional: chocolate glaze or fondant icing
Instructions
- Prepare the Puff Pastry:
- Preheat your oven to 200°C (400°F).
- Roll out the puff pastry into three equal rectangular sheets, about 3mm thick.
- Place the sheets on a baking tray lined with parchment paper. Prick the pastry all over with a fork to prevent excessive puffing.
- Place another baking tray on top of the pastry to keep it flat, and bake for 15-20 minutes until golden brown and crisp. Remove the top tray in the last 5 minutes for extra crispness. Cool on a wire rack.
- Make the Pastry Cream:
- In a medium saucepan, bring the milk and the scraped seeds of the vanilla bean (or vanilla extract) to a boil. Remove from heat and let it sit for 10 minutes.
- In a separate bowl, whisk together egg yolks and sugar until pale and fluffy. Add flour and cornstarch, mixing until smooth.
- Slowly pour the warm milk into the egg mixture, whisking constantly to prevent curdling.
- Return the mixture to the saucepan and cook over medium heat, whisking continuously until thickened and boiling.
- Remove from heat and add butter, stirring until melted and smooth. Transfer to a bowl, cover with plastic wrap, and chill in the refrigerator until set.
- Assemble the Mille-Feuille:
- Once the pastry sheets and pastry cream are completely cooled, place one pastry sheet on a serving platter.
- Spread half of the pastry cream evenly over the first layer. Top with the second pastry sheet and repeat the layer with the remaining pastry cream.
- Place the final pastry sheet on top. Dust generously with powdered sugar or spread with optional chocolate glaze or fondant icing.
- Serve:
- Use a sharp serrated knife to slice the Mille-Feuille into portions. Serve immediately to enjoy the delightful textures.
Extra Tips
When working with puff pastry, confirm it stays chilled before baking to achieve the best rise and flakiness. For a smoother pastry cream, strain it through a fine mesh sieve after cooking to remove any lumps. If you want a neater presentation, trim the edges of the pastry sheets before assembling the Mille-Feuille.
Finally, Mille-Feuille is best served fresh, as the pastry can soften over time when in contact with the cream.
Classic French Macarons: Mastering the Art
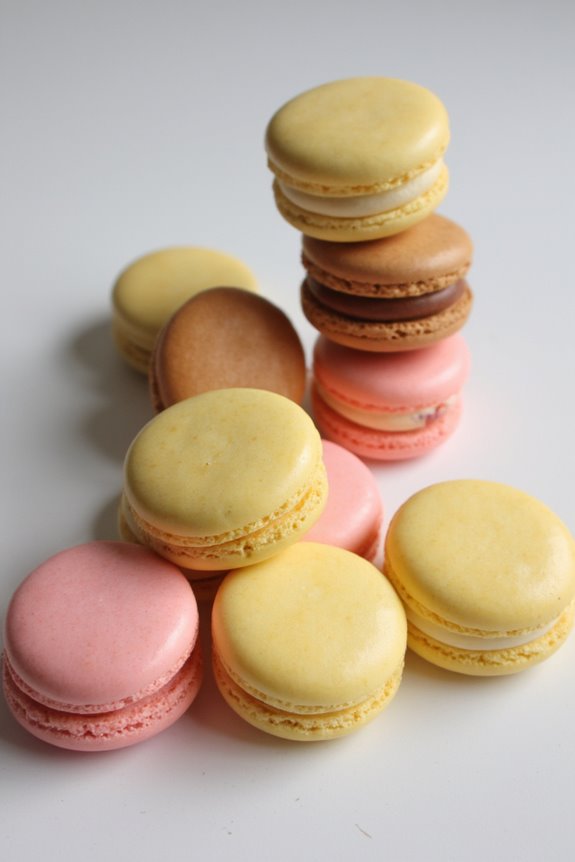
Classic French Macarons: Mastering the Art of these delightful treats can be a rewarding culinary experience, perfect for showcasing your baking prowess. French macarons are delicate sandwich cookies made with meringue, almond flour, and a sweet filling. Their smooth, crisp shells and chewy interiors make them a favorite among dessert enthusiasts.
While they may appear intimidating at first, with patience and precision, you can create these exquisite confections at home. The key lies in balancing technique with ingredients to achieve the perfect texture and flavor.
Before you begin, make sure you have all the necessary tools and ingredients on hand. A digital kitchen scale is essential for accurate measurements, and a piping bag with a round tip will help you achieve uniform macarons. The process involves making a meringue from aged egg whites, gently folding it into a mixture of almond flour and powdered sugar, then piping rounds onto a baking sheet.
Once baked, the shells are sandwiched together with a creamy filling of your choice. Whether you opt for classic flavors like vanilla or more adventurous ones like pistachio or raspberry, mastering macarons will surely impress your family and friends.
Ingredients (Serving Size: 4-6 people)
- 110 grams almond flour
- 200 grams powdered sugar
- 100 grams aged egg whites (approximately 3 large eggs)
- 1/4 teaspoon cream of tartar
- 50 grams granulated sugar
- 1 teaspoon vanilla extract or other flavorings (optional)
- Food coloring (optional)
- 1/2 cup filling of choice (buttercream, ganache, jam, etc.)
Cooking Instructions
- Prepare Ingredients: Begin by sifting the almond flour and powdered sugar together into a large bowl. This will guarantee a smooth macaron shell.
- Make the Meringue: In a separate clean bowl, add aged egg whites and beat with an electric mixer until foamy. Add the cream of tartar and continue to beat until soft peaks form. Gradually add granulated sugar, one tablespoon at a time, and beat until stiff, glossy peaks form. If using, add vanilla extract and food coloring.
- Combine Dry and Wet Ingredients: Carefully fold the sifted almond flour and powdered sugar mixture into the meringue. Use a gentle folding motion and continue until the batter flows like lava and a “figure 8” can be drawn with the batter without breaking.
- Pipe the Macarons: Transfer the batter into a piping bag fitted with a round tip. Pipe small circles (about 3 cm in diameter) onto a baking sheet lined with parchment paper or a silicone mat, spacing them slightly apart.
- Rest the Macarons: Allow the piped macarons to rest at room temperature for 30-60 minutes, or until a skin forms on the surface. This helps to develop the classic macaron “feet.”
- Bake the Macarons: Preheat your oven to 300°F (150°C). Bake one tray at a time for 15-18 minutes, rotating halfway through. The macarons should have risen and developed feet but shouldn’t brown.
- Fill the Macarons: Once cooled, gently remove the shells from the baking sheet. Pair similar-sized shells together and fill with your choice of filling using a piping bag or spoon. Sandwich the halves together carefully.
- Mature the Macarons: For best results, place the filled macarons in an airtight container and refrigerate for 24 hours before serving. This allows the flavors to meld and the texture to improve.
Extra Tips
To achieve consistent results when making classic French macarons, precise measurement and technique are vital. Use a kitchen scale for accuracy, and make sure all utensils and bowls are clean and free of grease.
Aging egg whites (leaving them uncovered in the refrigerator for 24-48 hours) helps achieve a stable meringue. If you encounter issues such as cracked shells or hollow macarons, experiment with tweaking the resting time or oven temperature.
Tarte Tatin: An Upside-Down Apple Elegance
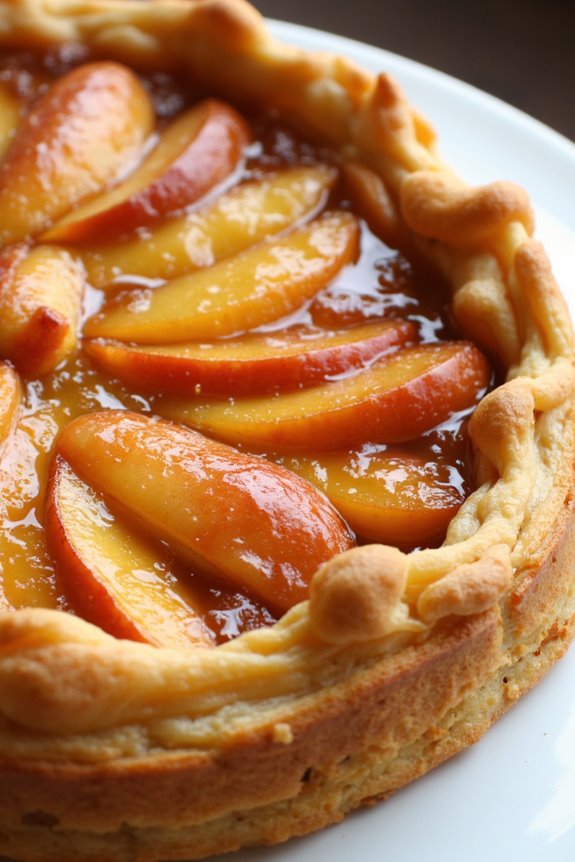
Tarte Tatin is a beloved French dessert known for its caramelized apples and buttery pastry, elegantly presented in an upside-down fashion. This classic dish offers a perfect balance between the rich sweetness of caramel and the tangy freshness of apples, all nestled in a crisp, flaky crust. Its origins trace back to the early 20th century in the Loire Valley, where it was reputedly invented by the Tatin sisters.
Today, Tarte Tatin remains a staple in French cuisine, celebrated for its simplicity and sophisticated flavor profile. For those looking to bring a touch of French chic to their dessert table, Tarte Tatin is a perfect choice. The preparation involves a few straightforward steps and ingredients, yet the end result is nothing short of impressive.
The recipe calls for a single pan to caramelize the apples and bake the tart, making the process both efficient and satisfying. As the tart bakes, the buttery pastry absorbs the luscious caramel, creating a harmonious blend of textures and flavors. Once baked, the tart is inverted onto a serving plate, revealing the beautifully caramelized apples on top, ready to delight your guests.
Ingredients (Serves 4-6):
- 5 to 6 firm apples (such as Granny Smith or Honeycrisp)
- 1 cup granulated sugar
- 1/4 cup unsalted butter
- 1 sheet puff pastry (store-bought or homemade)
- 1 teaspoon vanilla extract
- 1 tablespoon lemon juice
- Pinch of salt
Cooking Instructions:
- Prepare the Apples: Peel, core, and quarter the apples. Toss them in a bowl with lemon juice to prevent browning and set aside.
- Make the Caramel: In a 10-inch oven-proof skillet or cast-iron pan, heat the sugar over medium heat. Stir occasionally until the sugar melts and turns a deep amber color. Be cautious not to burn it.
- Add Butter and Flavor: Carefully add the butter, vanilla extract, and a pinch of salt to the caramel. Stir until the butter is fully melted and the mixture is smooth.
- Arrange the Apples: Remove the pan from heat and arrange the apple quarters in the skillet, rounded side down. Try to fit them tightly together as they’ll shrink during cooking.
- Cook the Apples: Return the skillet to medium heat and cook the apples for about 10 minutes, occasionally basting them with the caramel. This process helps to soften the apples and infuse them with caramel flavor.
- Prepare the Pastry: Roll out the puff pastry on a lightly floured surface to ascertain it’s large enough to cover the skillet. Carefully place the pastry over the apples, tucking the edges down around the apples.
- Bake the Tart: Preheat your oven to 375°F (190°C). Place the skillet in the oven and bake for 25-30 minutes, or until the pastry is golden brown and puffed.
- Invert the Tart: After baking, let the skillet cool for about 5 minutes. Then, carefully place a large serving plate over the skillet and, using oven mitts, invert the tart so the apples are on top.
- Serve: Allow the Tarte Tatin to cool slightly before serving. It pairs beautifully with vanilla ice cream or a dollop of crème fraîche.
Extra Tips:
When selecting apples for Tarte Tatin, choose firm varieties that hold their shape during cooking. Granny Smith and Honeycrisp are excellent choices for their balance of tartness and sweetness.
While making the caramel, ascertain your pan is clean and dry to avoid crystallization. If the caramel cools too quickly or hardens, gently reheat it before adding the apples. For a more personalized touch, consider adding spices such as cinnamon or nutmeg to the caramel for additional depth of flavor.
Éclair: The Iconic Cream-Filled Indulgence
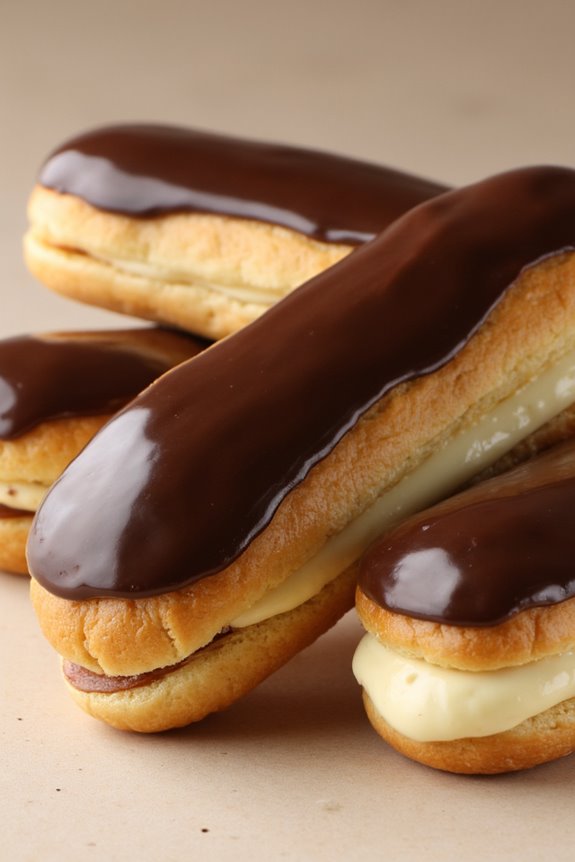
Éclairs are a quintessential French pastry, known for their delicate choux pastry shell and rich, creamy filling. These elongated pastries are topped with a glossy chocolate glaze, making them a feast for both the eyes and the palate.
Originating in the 19th century, éclairs have become a symbol of French patisserie elegance and are adored worldwide for their sumptuous blend of textures and flavors. Whether you’re hosting a sophisticated soirée or simply treating yourself to a luxurious dessert, éclairs are the perfect choice to impress and delight.
This recipe will guide you through the process of crafting éclairs from scratch, including the preparation of the choux pastry, the luscious cream filling, and the shiny chocolate glaze. Designed to serve 4-6 people, this recipe guarantees that each guest can indulge in at least one of these iconic pastries.
With patience and attention to detail, you’ll be able to create éclairs that rival those found in the finest French bakeries.
Ingredients (Serves 4-6)
*For the Choux Pastry:*
- 1/2 cup (120 ml) water
- 1/2 cup (120 ml) milk
- 1/2 cup (113 grams) unsalted butter
- 1 tablespoon sugar
- 1/4 teaspoon salt
- 1 cup (125 grams) all-purpose flour
- 4 large eggs
For the Cream Filling:
- 2 cups (480 ml) whole milk
- 1/2 cup (100 grams) sugar
- 1/4 cup (30 grams) cornstarch
- 4 large egg yolks
- 2 teaspoons vanilla extract
- 2 tablespoons unsalted butter
For the Chocolate Glaze:
- 1/2 cup (120 ml) heavy cream
- 4 ounces (115 grams) semi-sweet chocolate, chopped
Cooking Instructions
- Prepare the Choux Pastry:
- Preheat the oven to 400°F (200°C). Line a baking sheet with parchment paper.
- In a medium saucepan, combine water, milk, butter, sugar, and salt. Bring to a boil over medium heat.
- Remove from heat and add flour all at once, stirring vigorously until the mixture forms a ball and pulls away from the sides of the pan.
- Return to low heat and cook for 1-2 minutes, stirring constantly to dry the dough slightly.
- Transfer the dough to a bowl and let it cool for a few minutes. Add eggs one at a time, beating well after each addition, until smooth and glossy.
- Pipe the dough onto the prepared baking sheet into 4-inch long strips.
- Bake for 20-25 minutes or until puffed and golden brown. Cool completely on a wire rack.
- Make the Cream Filling:
- In a medium saucepan, heat milk over medium heat until it begins to simmer.
- In a separate bowl, whisk together sugar, cornstarch, and egg yolks until smooth.
- Gradually pour the hot milk into the egg mixture, whisking constantly to prevent curdling.
- Return the mixture to the saucepan and cook over medium heat, whisking constantly, until it thickens and comes to a boil.
- Remove from heat and stir in vanilla extract and butter until smooth.
- Cover with plastic wrap directly on the surface to prevent a skin from forming, and cool completely.
- Prepare the Chocolate Glaze:
- Heat the heavy cream in a small saucepan until it begins to simmer.
- Remove from heat and add chopped chocolate, stirring until the chocolate is melted and the mixture is smooth.
- Assemble the Éclairs:
- Once the choux pastries are cooled, use a small knife to make a small hole at one end.
- Fill a piping bag with the cooled cream filling and pipe it into each pastry until full.
- Dip the top of each filled éclair into the chocolate glaze, letting any excess drip off.
- Let the glaze set before serving.
Extra Tips
When making éclairs, verify that the choux pastry dough isn’t too wet; it should be smooth and pipeable but hold its shape. If your éclairs collapse after baking, it could be due to underbaking or opening the oven too early—avoid these by baking until they’re golden and firm.
For the cream filling, tempering the eggs carefully is vital to avoid scrambling. Finally, use quality chocolate for the glaze to achieve the best flavor and sheen. Enjoy your homemade éclairs with a cup of coffee or tea for an authentic French experience!
Lemon Madeleines: A Citrusy Tea-Time Treat

Lemon Madeleines are a quintessentially French dessert that exudes sophistication and simplicity in every bite. These petite, shell-shaped sponge cakes are infused with the zesty brightness of lemon, making them the perfect accompaniment to a steaming cup of tea. Celebrated for their delicate texture and subtle citrus aroma, Lemon Madeleines are a delightful treat that can be whipped up with ease, impressing both family and guests alike with their refined elegance and light, buttery flavor.
Originating from the Lorraine region of France, Madeleines have long been cherished as a symbol of French patisserie. This Lemon Madeleine recipe brings a rejuvenating twist to the classic version, incorporating fresh lemon juice and zest for a vibrant, citrusy kick. Ideal for afternoon tea, brunch, or a sophisticated dessert option, this recipe serves 4-6 people, guaranteeing there’s enough to share without sacrificing the joy of having a few to savor on your own.
Ingredients for Lemon Madeleines (Serves 4-6):
- 1 cup all-purpose flour
- 1/2 teaspoon baking powder
- 1/4 teaspoon salt
- 1/2 cup unsalted butter, melted
- 2/3 cup granulated sugar
- 2 large eggs
- 1 teaspoon vanilla extract
- Zest of 1 lemon
- 2 tablespoons fresh lemon juice
- Powdered sugar, for dusting
Cooking Instructions:
- Prepare the Pan: Preheat your oven to 375°F (190°C). Lightly butter and flour a madeleine pan to prevent sticking. Confirm every crevice is well-coated to achieve the signature shell shape.
- Mix Dry Ingredients: In a medium bowl, whisk together the flour, baking powder, and salt. This will evenly distribute the leavening agent and salt throughout the flour.
- Combine Wet Ingredients: In a large mixing bowl, beat the eggs and granulated sugar together using an electric mixer on medium-high speed until thick and pale, about 3-4 minutes. This step incorporates air, creating a light and airy batter.
- Incorporate Flavorings: Add the vanilla extract, lemon zest, and lemon juice to the egg mixture, beating until just combined, which will infuse the batter with a bright citrus flavor.
- Add Dry to Wet: Gently fold the dry ingredients into the wet mixture using a spatula. Be careful not to overmix, as this can lead to tough madeleines.
- Fold in Butter: Gradually fold in the melted butter until fully incorporated, affirming the batter is smooth and shiny.
- Chill the Batter: Cover the bowl with plastic wrap and refrigerate for at least 30 minutes. Chilling helps the batter firm up and results in the characteristic hump of a madeleine.
- Bake the Madeleines: Spoon the chilled batter into the prepared madeleine pan, filling each mold about three-quarters full. Bake for 10-12 minutes, or until the edges are golden brown and the centers spring back when lightly touched.
- Cool and Serve: Allow the madeleines to cool in the pan for a few minutes before transferring them to a wire rack to cool completely. Dust with powdered sugar before serving for an elegant finish.
Extra Tips:
For the best results, use room temperature ingredients, as they blend more smoothly and create a more consistent texture. If you don’t have a madeleine pan, a small muffin tin can be used as a substitute, though the classic shell shape will be absent.
To elevate the flavor profile, consider adding a pinch of ground ginger or cardamom to the batter. Finally, madeleines are best enjoyed fresh, so aim to serve them on the day they’re baked for ideal texture and flavor.
Opera Cake: A Multi-Layered Chocolate Symphony
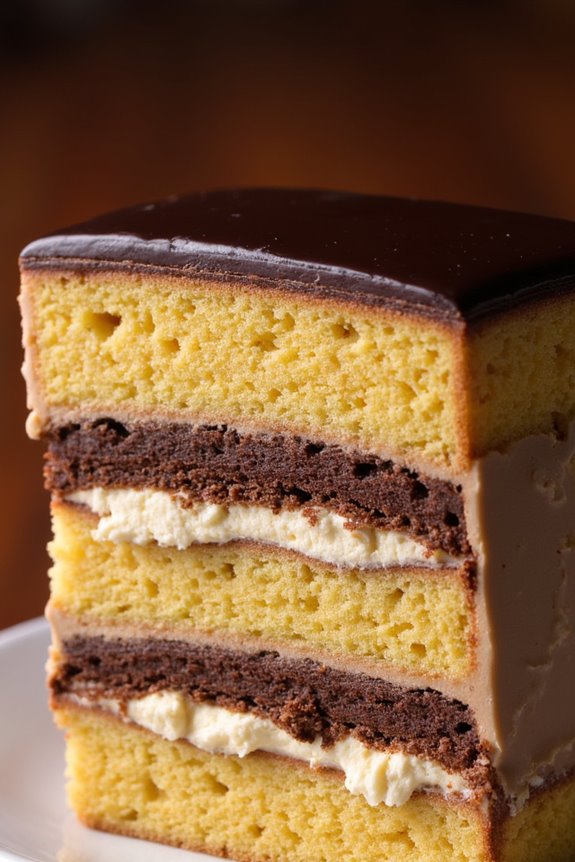
Opera Cake is a classic French dessert known for its exquisite layers and rich flavors. This elegant cake is a divine combination of almond sponge cake (known as Joconde), coffee buttercream, and layers of chocolate ganache, all topped with a shiny chocolate glaze. The harmonious blend of coffee and chocolate creates a symphony of flavors, making it a perfect dessert for special occasions or a chic gathering.
Though it requires precision and patience, the result is a stunning cake that pays homage to the grandeur of the Parisian opera.
The origins of Opera Cake are somewhat debated, but it’s often credited to the French pastry chef Cyriaque Gavillon from Dalloyau in 1955, who aimed to create a cake where all the flavors could be tasted in one bite. This recipe is designed for a serving size of 4-6 people, making it an ideal treat for a small dinner party or family gathering.
Crafted with care, each layer of this cake plays a vital role in delivering a delightful culinary experience that’s both visually and tastefully impressive.
Ingredients:
- For the Joconde (Almond Sponge Cake):
- 6 large eggs
- 150g almond flour
- 150g confectioners’ sugar
- 40g all-purpose flour
- 40g unsalted butter, melted
- 1 teaspoon vanilla extract
- 4 large egg whites
- 30g granulated sugar
- For the Coffee Syrup:
- 100ml strong brewed coffee
- 50g granulated sugar
- For the Coffee Buttercream:
- 3 large egg yolks
- 150g unsalted butter, softened
- 100g granulated sugar
- 50ml water
- 1 teaspoon instant coffee granules
- For the Chocolate Ganache:
- 200g dark chocolate, chopped
- 200ml heavy cream
- For the Chocolate Glaze:
- 150g dark chocolate, chopped
- 100ml heavy cream
- 20g unsalted butter
Instructions:
- Prepare the Joconde Sponge:
- Preheat your oven to 200°C (390°F). Line two 9×13 inch baking trays with parchment paper.
- In a large bowl, whisk together the almond flour, confectioners’ sugar, and all-purpose flour. Gradually add in the 6 eggs and vanilla extract, mixing until smooth. Stir in the melted butter.
- In a separate bowl, beat the egg whites until foamy, then gradually add the granulated sugar, continuing to beat until stiff peaks form.
- Gently fold the egg whites into the almond mixture in three additions, being careful not to deflate the batter.
- Divide the batter evenly between the prepared trays and smooth the tops. Bake for 8-10 minutes or until the cakes are golden brown and spring back to the touch. Allow to cool completely on a wire rack.
- Make the Coffee Syrup:
- Combine the brewed coffee and granulated sugar in a small saucepan. Bring to a boil, stirring until the sugar dissolves. Remove from heat and let it cool.
- Prepare the Coffee Buttercream:
- In a small saucepan, combine the sugar and water. Heat over medium heat, stirring until the sugar dissolves, then bring to a boil and cook until it reaches 115°C (240°F) on a candy thermometer.
- Meanwhile, beat the egg yolks in a stand mixer until pale and thick. Slowly pour the hot sugar syrup into the yolks while beating continuously. Continue to beat until the mixture cools to room temperature.
- Dissolve the instant coffee granules in a teaspoon of hot water. Beat the softened butter into the egg yolk mixture, then add the dissolved coffee, and mix until smooth and creamy.
- Make the Chocolate Ganache:
- Heat the heavy cream in a saucepan until it just begins to simmer. Pour over the chopped chocolate, let it sit for a few minutes, then stir until smooth. Allow it to cool slightly until it thickens but is still spreadable.
- Assemble the Cake:
- Cut each sponge cake in half to make four layers. Place one layer on a serving tray and brush with the coffee syrup.
- Spread a third of the coffee buttercream over the soaked cake. Top with another layer of cake, brush with syrup, and spread half of the ganache.
- Repeat with the next layer, adding coffee syrup and the remaining buttercream. Top with the final cake layer, brush with syrup, and cover with the remaining ganache. Chill the cake to set the layers.
- Make the Chocolate Glaze:
- Heat the cream and butter until the butter melts and the mixture is hot. Pour over the chopped chocolate, stir until smooth and glossy.
- Pour the glaze over the chilled cake, smoothing it over the top with a spatula. Allow it to set in the fridge for at least an hour before serving.
Extra Tips:
To guarantee each layer of the Opera Cake is even and smooth, take your time with spreading and leveling the buttercream and ganache. If you have a pastry comb, use it to create a texture on the topmost layer for an added visual effect.
Keep the cake refrigerated until you’re ready to serve, and use a hot knife to slice through the layers cleanly. Remember, patience is key; allow each layer to properly set so that the flavors meld beautifully together.
Crème Brûlée: The Quintessential Caramelized Custard
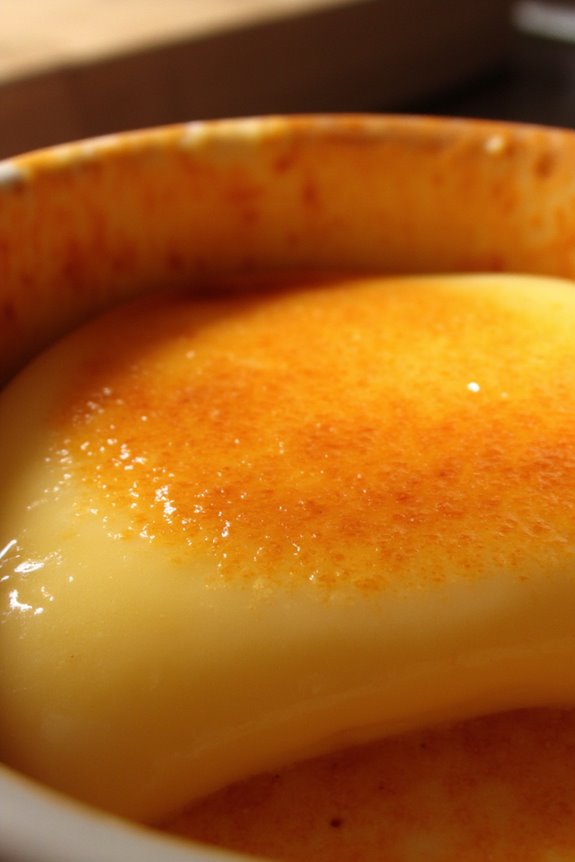
Crème Brûlée: The Quintessential Caramelized Custard is a classic French dessert that combines the smoothness of a rich custard base with the delightful crunch of caramelized sugar on top. This elegant dessert is perfect for any occasion, from intimate dinner parties to grand celebrations.
The beauty of crème brûlée lies in its simplicity and the contrast of textures; a velvety custard made from cream, sugar, vanilla, and egg yolks, topped with a thin, crisp layer of caramelized sugar that shatters with a satisfying crack when tapped with a spoon.
To create the perfect crème brûlée, patience and precision are key. The custard must be cooked slowly and evenly to achieve a silky texture, while the sugar topping requires a quick burst of intense heat to caramelize without burning. By following this recipe, you can master the art of making this quintessential French dessert that’s sure to captivate your guests and delight their taste buds.
Ingredients for 4-6 servings:
- 2 cups heavy cream
- 1 vanilla bean (or 1 teaspoon vanilla extract)
- 6 large egg yolks
- 1/2 cup granulated sugar (plus extra for caramelizing)
- A pinch of salt
Cooking Instructions:
- Preheat and Prepare: Preheat your oven to 325°F (160°C). Place 4-6 ramekins in a large baking dish with high sides.
- Infuse the Cream: In a medium saucepan over medium heat, combine the heavy cream and vanilla bean (split and seeds scraped out, or add vanilla extract if using). Heat the mixture until it starts to simmer, then remove from heat and let it infuse for about 15 minutes. Remove the vanilla bean pod if used.
- Whisk the Egg Yolks: In a mixing bowl, whisk the egg yolks, 1/2 cup sugar, and a pinch of salt together until the mixture becomes pale and slightly thickened.
- Combine and Temper: Slowly pour the warm cream into the egg yolk mixture while constantly whisking to prevent the eggs from cooking. This process is called tempering and guarantees a smooth custard.
- Strain and Pour: Strain the mixture through a fine-mesh sieve into a large measuring cup or bowl with a pour spout to remove any cooked egg bits. Then, divide the custard mixture evenly among the ramekins.
- Bake in Water Bath: Pour hot water into the baking dish, ensuring it reaches halfway up the sides of the ramekins. Carefully transfer the baking dish to the oven and bake for 30-40 minutes or until the custards are set but still slightly jiggly in the center.
- Cool and Chill: Remove the ramekins from the water bath and let them cool to room temperature. Then, refrigerate for at least 2 hours or until thoroughly chilled.
- Caramelize the Sugar: Just before serving, sprinkle a thin, even layer of granulated sugar over each custard. Using a kitchen torch, carefully caramelize the sugar by moving the flame evenly across the surface until it melts and turns golden brown.
Extra Tips:
For the best results, use a kitchen torch to caramelize the sugar, as it provides better control over the heat and guarantees an even caramelization without overheating the custard.
If you don’t have a torch, you can use a broiler, but keep a close eye on it to prevent burning. Allow the custard to rest for a few minutes after caramelizing to let the sugar harden, creating that perfect crackling top.
Additionally, experimenting with different types of sugar, such as turbinado or brown sugar, can add unique flavors and textures to your crème brûlée.
Profiteroles: a Creamy Pâte À Choux Creation

Profiteroles are a quintessential French dessert that exquisitely combines the airy lightness of pâte à choux with a rich, creamy filling. These delicate pastries are often served with a generous drizzle of chocolate sauce, making them an irresistible treat for any occasion.
Originating from the French culinary tradition, profiteroles are versatile and can be filled with anything from classic vanilla pastry cream to luscious whipped cream or even savory fillings for an innovative twist.
The process of making profiteroles begins with preparing the pâte à choux, a dough that’s cooked on the stovetop before baking to achieve its perfect hollow puff. Once baked, the golden-brown choux buns are cooled and filled with cream, then draped in a silky chocolate sauce. This recipe serves 4-6 people, ideal for a cozy gathering or a special dessert course.
Ingredients:
For the Pâte À Choux:
- 1/2 cup (120 ml) water
- 1/2 cup (120 ml) whole milk
- 1/2 cup (115 g) unsalted butter, cut into pieces
- 1 tablespoon granulated sugar
- 1/2 teaspoon salt
- 1 cup (125 g) all-purpose flour
- 4 large eggs
For the Filling:
- 1 1/2 cups (360 ml) heavy cream
- 2 tablespoons powdered sugar
- 1 teaspoon vanilla extract
For the Chocolate Sauce:
- 1 cup (175 g) semi-sweet chocolate chips
- 1/2 cup (120 ml) heavy cream
- 1 tablespoon unsalted butter
Cooking Instructions:
- Prepare the Pâte À Choux:
- Combine water, milk, butter, sugar, and salt in a saucepan over medium heat. Bring to a boil, confirming the butter is fully melted.
- Remove from heat and quickly add all the flour, stirring vigorously with a wooden spoon until the mixture forms a ball and pulls away from the sides of the pan.
- Return the pan to the heat and cook for 1-2 minutes, stirring constantly to remove excess moisture.
- Transfer the dough to a mixing bowl and let it cool for a few minutes. Add eggs one at a time, beating thoroughly after each addition until the dough is smooth and glossy.
- Bake the Choux Pastry:
- Preheat the oven to 425°F (220°C). Line a baking sheet with parchment paper.
- Use a piping bag fitted with a large round tip to pipe 1 1/2-inch mounds onto the prepared baking sheet, spacing them about 2 inches apart.
- Bake for 10 minutes at 425°F, then reduce the oven temperature to 375°F (190°C) and continue baking for an additional 20-25 minutes until the pastries are golden brown and crisp.
- Remove from the oven and pierce the side of each puff with a small knife to release steam. Cool completely on a wire rack.
- Prepare the Filling:
- Whip the heavy cream, powdered sugar, and vanilla extract in a chilled bowl until stiff peaks form.
- Transfer to a piping bag fitted with a small round tip.
- Fill the Profiteroles:
- Once the choux buns are completely cool, use the piping bag to fill each puff with whipped cream through the steam hole or by slicing the top third off each puff and piping the cream inside.
- Make the Chocolate Sauce:
- Heat the heavy cream in a saucepan over medium heat until it just begins to simmer.
- Pour the hot cream over the chocolate chips in a heat-proof bowl. Let it sit for a minute to melt the chocolate, then whisk until smooth.
- Stir in the butter until the sauce is shiny and smooth.
- Assemble and Serve:
- Arrange the filled profiteroles on a serving platter and drizzle generously with the warm chocolate sauce.
- Serve immediately or refrigerate for up to a few hours before serving.
Extra Tips:
When making pâte à choux, confirm that the dough is neither too hot nor too cold when adding the eggs, as this can affect the texture of the final pastry. The dough should be just warm enough to touch comfortably.
If you prefer a firmer filling, consider using a pastry cream instead of whipped cream. Additionally, if you don’t have a piping bag, a plastic bag with the corner snipped off will suffice for both filling and piping the dough.
Store any leftover profiteroles in the refrigerator, although they’re best enjoyed fresh.
Clafoutis: A Rustic Cherry-Almond Delight
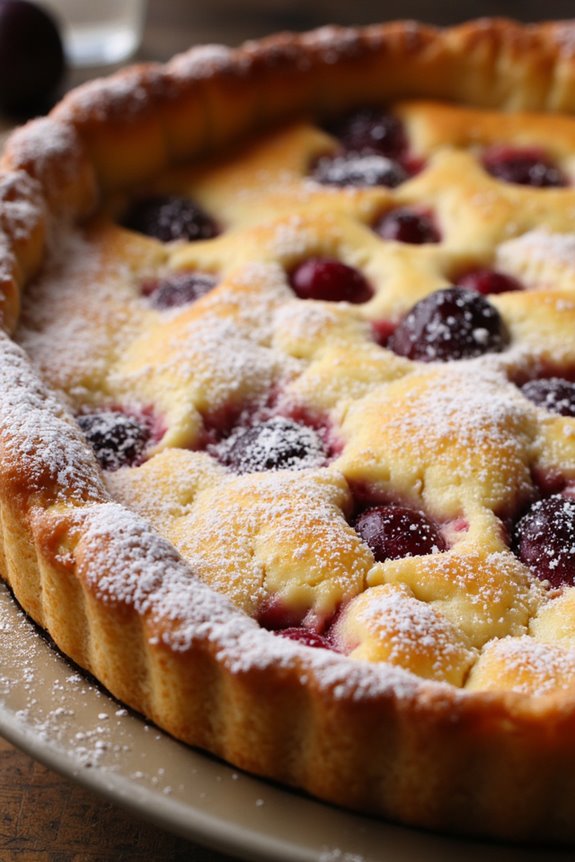
Clafoutis is a classic French dessert that perfectly captures the rustic charm and simplicity of traditional French cuisine. Originating from the Limousin region, this dish is a delightful blend of sweet cherries and a custardy batter, resulting in a luscious, cake-like dessert. While cherries are the classic choice for a clafoutis, other fruits such as apricots, plums, or peaches can also be used, making it an adaptable dessert for any season. The almond flavoring adds a subtle nuttiness that complements the sweet cherries, creating a harmonious balance of flavors.
The beauty of clafoutis is in its ease of preparation. It requires simple ingredients and minimal effort, making it an ideal choice for both novice bakers and experienced chefs. Traditionally, the cherries are left unpitted to add a hint of almond flavor from the pits, but for convenience and easy eating, you can pit them beforehand. This rustic dessert is perfect for a family gathering or a sophisticated dinner party, offering a taste of French elegance in every bite. Serve it warm or at room temperature, with a dusting of powdered sugar or a dollop of whipped cream for an extra touch of indulgence.
Ingredients for Clafoutis (Serves 4-6):
- 1 pound fresh cherries, pitted
- 1/2 cup all-purpose flour
- 1/2 cup granulated sugar
- 1/4 teaspoon salt
- 3 large eggs
- 1 cup whole milk
- 1 teaspoon vanilla extract
- 1/4 teaspoon almond extract
- 2 tablespoons unsalted butter, melted
- Powdered sugar, for dusting
- Optional: whipped cream or ice cream for serving
Cooking Instructions:
- Preheat the Oven: Begin by preheating your oven to 350°F (175°C). This will guarantee that the clafoutis bakes evenly.
- Prepare the Baking Dish: Grease a 9-inch round baking dish or pie plate with a bit of butter to prevent sticking. Scatter the pitted cherries evenly across the bottom of the dish.
- Mix the Dry Ingredients: In a medium-sized bowl, combine the flour, granulated sugar, and salt. Stir to blend the dry ingredients thoroughly.
- Blend the Wet Ingredients: In another bowl, whisk together the eggs, milk, vanilla extract, and almond extract until well combined. The mixture should be smooth and slightly frothy.
- Combine Ingredients: Gradually add the wet ingredients to the dry ingredients, whisking continuously to form a smooth batter. Make sure there are no lumps.
- Add Butter: Stir in the melted butter into the batter to add richness and flavor.
- Pour the Batter: Carefully pour the batter over the cherries in the prepared baking dish, ensuring they’re evenly distributed.
- Bake the Clafoutis: Place the baking dish in the preheated oven and bake for 35-40 minutes, or until the clafoutis is puffed and golden brown. A toothpick inserted into the center should come out clean.
- Cool and Serve: Allow the clafoutis to cool slightly before serving. Dust with powdered sugar and serve warm, optionally with a side of whipped cream or ice cream.
Extra Tips:
For the best flavor, use fresh, ripe cherries, but if they’re out of season, frozen cherries can be a good substitute. Just make sure to thaw and drain them before use. If you prefer a more pronounced almond flavor, consider adding a tablespoon of almond flour to the batter.
Clafoutis can be made a few hours ahead of time and gently reheated before serving. Remember, the texture is meant to be custard-like, so don’t worry if it seems slightly wobbly when you first take it out of the oven—this will firm up as it cools. Enjoy this delightful French treat with your loved ones!
Cannelés: The Caramelized Bordeaux Classic

Cannelés are a delightful French pastry hailing from the Bordeaux region, known for their dark, caramelized crust and soft, custardy interior. Traditionally baked in copper molds, these small, fluted cakes are a celebration of texture and flavor, with a hint of vanilla and rum that elevates them to gourmet status.
While their intricate appearance might seem intimidating, with a little patience and precision, you can recreate this sophisticated dessert in your own kitchen.
The secret to the perfect cannelé lies in the balance of ingredients and the method of preparation. The batter is simple, yet requires resting time to allow the flavors to meld and the texture to develop properly. Confirming that the batter is chilled before baking is essential, as is preheating the molds to achieve the signature caramelized crust that defines this delicacy.
Once they emerge from the oven, these golden-brown beauties are best enjoyed fresh, when their contrasting textures are most pronounced.
Ingredients (Serves 4-6):
- 500 ml whole milk
- 50 g unsalted butter
- 1 vanilla bean, split and scraped (or 1 teaspoon vanilla extract)
- 100 g all-purpose flour
- 200 g granulated sugar
- 1/4 teaspoon salt
- 2 large eggs
- 2 large egg yolks
- 50 ml dark rum
- Beeswax or butter for greasing the molds
Cooking Instructions:
1. Prepare the Milk Mixture: In a medium saucepan, combine the milk, butter, and vanilla bean (or extract). Heat over medium heat until the butter melts and the mixture is warm, but not boiling. Remove from heat and let it cool slightly.
2. Mix Dry Ingredients: In a mixing bowl, whisk together the flour, sugar, and salt until well combined.
3. Combine Dry and Wet Ingredients: Make a well in the center of the dry ingredients and add the eggs and egg yolks. Begin to whisk while gradually adding the warm milk mixture. Stir until the batter is smooth. Then, mix in the rum until fully incorporated.
4. Rest the Batter: Cover the bowl with plastic wrap or a lid and refrigerate the batter for at least 24 hours. This resting period is vital for developing the batter’s flavor and texture.
5. Prepare the Molds: Preheat the oven to 220°C (428°F). If using traditional copper molds, coat them with melted beeswax or butter to prevent sticking. Arrange the coated molds on a baking sheet.
6. Bake the Cannelés: Remove the batter from the refrigerator and give it a gentle stir. Fill each prepared mold with batter, leaving about 1 cm from the top. Place the baking sheet with the molds in the oven and bake for 10 minutes at 220°C (428°F).
Then, lower the oven temperature to 180°C (356°F) and continue baking for 45 to 50 minutes, until the cannelés are deep brown on the outside and slightly puffed.
7. Cool and Serve: Carefully remove the cannelés from the molds while they’re still warm. Allow them to cool on a wire rack. Serve once they’ve cooled slightly, enjoying them within a few hours of baking for the best texture.
Extra Tips:
For the best results, use high-quality ingredients such as fresh vanilla beans and good-quality dark rum, as these will greatly enhance the flavor of your cannelés.
If you don’t have copper molds, silicone cannelé molds can work as a substitute, though the texture might differ slightly. Also, confirm your oven is well-calibrated to maintain the correct temperature throughout the baking process, as this is key to achieving the perfect cannelé.
Finally, practice patience; resting the batter is non-negotiable for that authentic taste and texture.
Galette Des Rois: a Regal Almond Pastry
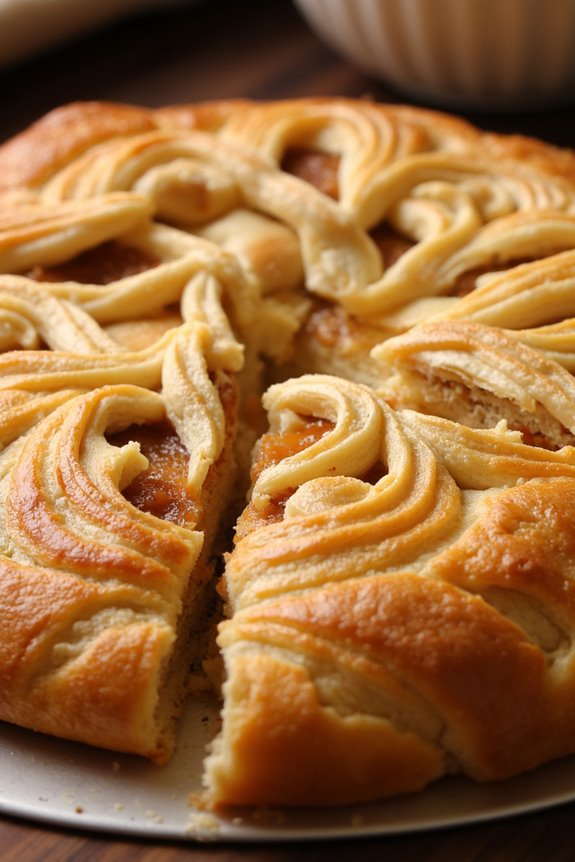
Galette Des Rois, also known as the “King Cake,” is a traditional French pastry enjoyed typically during the celebration of Epiphany. This regal almond pastry isn’t only a treat for the taste buds but also a feast for the eyes with its golden, flaky crust and intricate decorative patterns.
The Galette Des Rois is primarily filled with a creamy almond mixture known as frangipane, giving it a rich, nutty flavor that perfectly complements the buttery puff pastry encasing it. Traditionally, a small figurine or “fève” is hidden within the filling, and the person who finds it is crowned king or queen for the day.
The Galette Des Rois is a simple yet elegant dessert that’s both fun and delicious to make—ideal for a festive gathering or a cozy family meal. With this recipe, you’ll create a delightful pastry that will impress your guests with its authentic French flair. The following ingredients and instructions will guide you in making a Galette Des Rois that serves 4-6 people, perfect for sharing with loved ones.
Ingredients
- 2 sheets of puff pastry
- 100g (3.5 oz) almond meal
- 100g (3.5 oz) sugar
- 100g (3.5 oz) unsalted butter, softened
- 2 eggs
- 1 teaspoon almond extract
- 1 tablespoon all-purpose flour
- 1 egg yolk mixed with 1 tablespoon of milk (for egg wash)
- Optional: a fève or small ceramic trinket
Instructions
- Prepare the Frangipane Filling: In a mixing bowl, cream together the softened butter and sugar until light and fluffy. Add the almond meal, one egg, almond extract, and flour, mixing until the ingredients are well combined and form a smooth paste. This will be your frangipane filling.
- Roll Out the Puff Pastry: On a lightly floured surface, roll out the sheets of puff pastry. Cut one sheet into a 10-inch circle and the other into an 11-inch circle. Place the smaller circle on a parchment-lined baking sheet.
- Assemble the Galette: Spread the frangipane filling evenly over the smaller puff pastry circle, leaving a 1-inch border around the edges. If you’re using a fève, insert it into the filling at this point. Brush the edges with a little water to help seal the pastry.
- Seal the Edges: Place the larger puff pastry circle over the top of the frangipane filling. Press the edges together to seal, and gently crimp the edges with a fork for a decorative touch.
- Decorate and Glaze: Using a sharp knife, gently score the top of the pastry with a decorative pattern, being careful not to cut through to the filling. Brush the top with the egg yolk and milk mixture to give it a beautiful glaze.
- Bake the Galette: Preheat the oven to 200°C (400°F). Place the assembled galette in the refrigerator for 15 minutes to firm up the pastry. Then, bake for 20-25 minutes or until the pastry is golden brown and puffed.
- Cool and Serve: Allow the Galette Des Rois to cool slightly before serving. It can be enjoyed warm or at room temperature, often accompanied by a glass of cider or sparkling wine.
Extra Tips
For the best results, verify your puff pastry remains cold before baking to achieve maximum puff and crispiness. If you prefer a less sweet version, you can reduce the sugar in the frangipane filling slightly.