

Bonjour, lovely readers!
If your heart beats for all things chic and French, these vegetarian bistro recipes are your perfect match.
From a colorful Ratatouille Tart to a unique twist on French Onion Soup, each dish is designed to bring that cozy café vibe into your kitchen.
Celebrate the fresh ingredients and rich flavors that make French cuisine so special.
Ready to create something magnifique? Let’s get started!
Ratatouille Tart
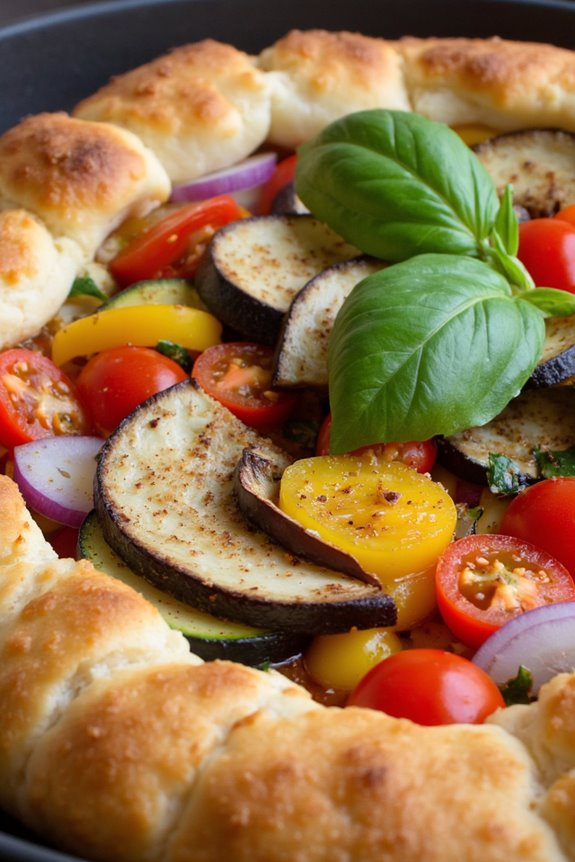
Ratatouille Tart is a delightful vegetarian dish inspired by the classic French ratatouille, but with a modern twist. This tart combines the vibrant flavors of fresh summer vegetables with a flaky pastry base, making it a perfect dish for lunch, dinner, or an elegant brunch. The combination of zucchini, eggplant, bell peppers, and tomatoes, seasoned with aromatic herbs, creates a visually appealing and scrumptious meal that’s sure to impress both vegetarians and non-vegetarians alike.
This recipe serves 4-6 people and offers a wonderful balance of textures and flavors. The buttery, crisp tart shell provides the perfect complement to the tender, juicy vegetables. It’s an ideal choice for those looking to explore French bistro cuisine with a vegetarian focus. Whether you’re hosting a dinner party or simply want to treat yourself to a special meal, this Ratatouille Tart is sure to be a hit.
Ingredients:
- 1 sheet of puff pastry, thawed
- 1 medium eggplant, diced
- 1 zucchini, sliced into thin rounds
- 1 red bell pepper, diced
- 1 yellow bell pepper, diced
- 2 medium tomatoes, sliced
- 1 red onion, thinly sliced
- 3 cloves of garlic, minced
- 2 tablespoons olive oil
- 1 teaspoon dried thyme
- 1 teaspoon dried oregano
- Salt and pepper to taste
- 1/2 cup grated Parmesan cheese (optional)
- Fresh basil leaves for garnish
Instructions:
- Prepare the Pastry Base: Preheat your oven to 400°F (200°C). Roll out the puff pastry on a lightly floured surface to fit into a tart pan. Press the pastry into the pan, trimming any excess from the edges. Prick the base with a fork to prevent it from puffing up during baking. Place a sheet of parchment paper over the pastry and fill with baking weights or dried beans. Bake for 10-12 minutes until lightly golden. Remove the weights and parchment paper, and set the pastry aside to cool slightly.
- Cook the Vegetables: While the pastry is baking, heat olive oil in a large skillet over medium heat. Add the minced garlic and sauté for 1 minute until fragrant. Add the eggplant, zucchini, red and yellow bell peppers, and red onion to the skillet. Season with thyme, oregano, salt, and pepper. Cook the vegetables, stirring occasionally, for about 8-10 minutes or until they’re tender. Remove from heat and let cool slightly.
- Assemble the Tart: Arrange the cooked vegetables evenly over the baked pastry shell. Layer the tomato slices on top, overlapping slightly. Sprinkle grated Parmesan cheese over the top if desired.
- Bake the Tart: Return the tart to the oven and bake for an additional 15-20 minutes, or until the edges of the pastry are golden and the cheese (if used) is melted and bubbly.
- Garnish and Serve: Remove the tart from the oven and let it cool for a few minutes. Garnish with fresh basil leaves before slicing and serving.
Extra Tips:
For a more robust flavor, consider roasting the vegetables in the oven before adding them to the tart. This can intensify their flavors and add a slight caramelization.
If you prefer a gluten-free option, use a gluten-free pastry or crust alternative. The tart can be served warm or at room temperature, making it a versatile dish for any occasion.
Additionally, feel free to experiment with other herbs like rosemary or basil, or add a layer of goat cheese for a creamy, tangy element.
French Onion Soup With a Twist

French Onion Soup is a classic dish that’s often associated with the cozy ambiance of a Parisian bistro. This vegetarian version offers a delightful twist by incorporating rich, flavorful vegetable broth instead of the traditional beef broth, making it suitable for vegetarians while maintaining the soup’s signature depth of flavor.
The combination of caramelized onions, garlic, and fresh herbs creates an aromatic base, while a splash of balsamic vinegar adds a subtle sweetness and tang. This recipe guarantees you can savor the comforting essence of this iconic dish while catering to diverse dietary preferences.
The twist in this recipe doesn’t just stop at the broth; a hint of white wine enhances the complexity of flavors, while a medley of cheeses adds a unique touch to the traditional Gruyère topping. Instead of the usual baguette slices, this recipe uses lightly toasted sourdough, which adds a slight tanginess that complements the sweet onions beautifully.
Perfect for a cozy night in or a dinner party, this French Onion Soup With a Twist promises to be a crowd-pleaser, offering a harmonious blend of tradition and innovation.
Ingredients for 4-6 servings:
- 6 large yellow onions
- 3 tablespoons olive oil
- 2 cloves garlic, minced
- 1 tablespoon sugar
- 1/2 cup dry white wine
- 8 cups vegetable broth
- 2 tablespoons balsamic vinegar
- 1 bay leaf
- 1 teaspoon thyme
- Salt and pepper to taste
- 1 loaf sourdough bread
- 1 cup grated Gruyère cheese
- 1/2 cup grated mozzarella cheese
- Fresh chopped parsley for garnish
Cooking Instructions:
- Caramelize the Onions: Slice the onions thinly. Heat the olive oil in a large pot over medium heat. Add the onions and sugar, stirring occasionally, until the onions are golden brown and caramelized, about 30-40 minutes.
- Add Aromatics: Add minced garlic to the caramelized onions and cook for an additional 2-3 minutes until the garlic is fragrant.
- Deglaze the Pot: Pour in the white wine to deglaze, scraping up any browned bits from the bottom of the pot. Allow the wine to simmer until it reduces by half, about 5 minutes.
- Incorporate Broth and Seasonings: Add the vegetable broth, balsamic vinegar, bay leaf, thyme, salt, and pepper. Bring the mixture to a gentle simmer and let it cook for 20-30 minutes to allow the flavors to meld.
- Prepare the Bread: While the soup simmers, slice the sourdough bread and lightly toast the slices until they’re crisp.
- Assemble and Broil: Preheat your oven’s broiler. Ladle the hot soup into oven-safe bowls, place a slice of toasted sourdough on top of each bowl, and sprinkle a mix of Gruyère and mozzarella cheese over the bread. Broil in the oven until the cheese is bubbly and golden brown, about 3-5 minutes.
- Garnish and Serve: Remove from the oven carefully, garnish with fresh parsley, and serve hot.
Extra Tips:
For the best results, confirm that the onions are caramelized to a deep, rich brown color, which is essential to developing the soup’s depth of flavor. Stir the onions regularly to avoid burning.
If you prefer a slightly thicker soup, you can reduce the broth further by letting it simmer longer. For a gluten-free option, substitute with a gluten-free bread of your choice.
Finally, if you enjoy a stronger cheese flavor, feel free to experiment with other types of cheese in addition to or instead of Gruyère and mozzarella.
Grilled Vegetable Niçoise Salad
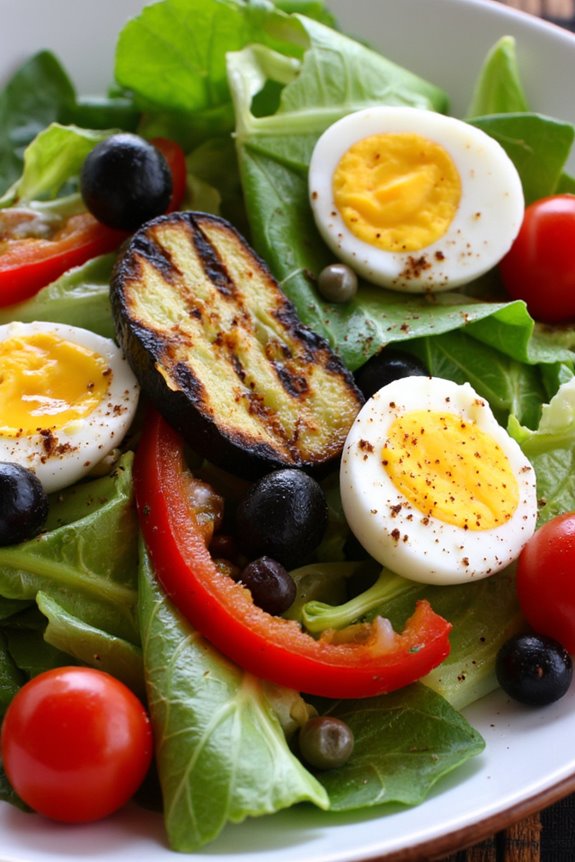
The Grilled Vegetable Niçoise Salad is a delightful vegetarian twist on the classic French dish. Traditionally, Niçoise salad includes tuna and anchovies, but this version centers around the vibrant flavors of grilled vegetables and fresh herbs. The combination of charred vegetables, crisp greens, and a tangy vinaigrette creates a harmonious balance that’s both satisfying and invigorating.
This salad is perfect for a light lunch or a hearty side dish and is sure to please both vegetarians and meat-eaters alike. Incorporating seasonal vegetables adds a depth of flavor that’s both earthy and sweet, while the addition of olives and capers provides a briny contrast. The salad is finished with a simple Dijon mustard vinaigrette that enhances the natural flavors without overpowering them.
This dish not only celebrates the essence of a traditional Niçoise salad but also showcases the versatility and richness of vegetables. Perfect for serving 4-6 people, this recipe will become a staple in your collection of French bistro-inspired meals.
Ingredients:
- 1 pound of baby potatoes, halved
- 1 pound of green beans, trimmed
- 1 red bell pepper, sliced
- 1 yellow bell pepper, sliced
- 1 zucchini, sliced into rounds
- 1 red onion, sliced into rings
- 1 cup cherry tomatoes, halved
- 1/2 cup Kalamata olives, pitted
- 2 tablespoons capers
- 6 cups mixed salad greens
- 4 hard-boiled eggs, quartered
- Olive oil for grilling
- Salt and pepper to taste
For the vinaigrette:
- 1/4 cup olive oil
- 2 tablespoons red wine vinegar
- 1 tablespoon Dijon mustard
- 1 garlic clove, minced
- Salt and pepper to taste
Cooking Instructions:
- Prepare the Vegetables: Preheat your grill to medium-high heat. Toss the baby potatoes with a bit of olive oil, salt, and pepper. Place them on a grill-safe pan and grill for approximately 20 minutes, turning occasionally, until tender and slightly charred.
- Grill the Vegetables: While the potatoes are grilling, coat the green beans, red and yellow bell peppers, zucchini, and red onion with olive oil, salt, and pepper. Place the vegetables directly on the grill and cook for about 5-7 minutes on each side or until they’re tender and have grill marks.
- Make the Vinaigrette: In a small bowl, whisk together the olive oil, red wine vinegar, Dijon mustard, minced garlic, salt, and pepper until well combined. Adjust the seasoning to taste.
- Assemble the Salad: On a large serving platter, arrange the mixed salad greens as a base. Layer the grilled vegetables, cherry tomatoes, olives, capers, and hard-boiled egg quarters over the greens.
- Dress the Salad: Drizzle the Dijon mustard vinaigrette over the assembled salad. Gently toss the salad to guarantee the dressing is evenly distributed. Serve immediately.
Extra Tips:
To enhance the flavor, consider marinating the vegetables in olive oil, garlic, and herbs for about 30 minutes before grilling. This step will add an extra layer of taste to the dish.
Be sure to keep an eye on the vegetables while grilling to prevent them from overcooking and becoming too soft. You can also add other seasonal vegetables like asparagus or radishes to vary the flavors. If you prefer a spicier kick, add a pinch of red pepper flakes to the vinaigrette.
This salad is best enjoyed fresh but can be stored in the refrigerator for up to a day if needed.
Classic Quiche Lorraine With Spinach

Quiche Lorraine is a quintessential French dish that brings together the richness of cream, the savory touch of cheese, and the comforting crunch of a buttery crust. Traditionally, Quiche Lorraine is made with bacon, but this vegetarian version incorporates fresh spinach to add a vibrant and healthy twist. The result is a creamy and flavorful dish that’s perfect for brunch, lunch, or a light dinner. This vegetarian quiche retains the classic flavors while offering a delightful alternative for those seeking a meat-free option.
The key to making this quiche a standout is using fresh ingredients and taking care with each step of the preparation. From the flaky homemade pastry shell to the creamy custard filling, every element contributes to the overall taste and texture. The spinach not only provides a pop of color but also adds a nutritional boost, making this dish both delicious and wholesome.
Whether you’re a seasoned cook or a beginner, this recipe is straightforward and rewarding, guaranteeing a delightful meal for your family or guests.
Ingredients (serves 4-6):
- 1 pre-made pie crust or homemade pastry shell
- 2 tablespoons unsalted butter
- 1 small onion, finely chopped
- 2 cups fresh spinach, washed and chopped
- 4 large eggs
- 1 1/2 cups heavy cream
- 1 cup grated Gruyère cheese
- 1/4 teaspoon ground nutmeg
- Salt and pepper to taste
Instructions:
- Prepare the Pie Crust: Preheat your oven to 375°F (190°C). If you’re using a pre-made pie crust, roll it out and fit it into a 9-inch tart pan. Press it firmly against the edges and trim any excess dough. Prick the base with a fork to prevent it from puffing up during baking. Line the crust with parchment paper and fill it with pie weights or dry beans. Bake for 10 minutes, then remove the weights and parchment, and bake for an additional 5 minutes until lightly golden. Set aside to cool.
- Cook the Spinach and Onion: In a skillet over medium heat, melt the butter. Add the chopped onion and sauté until it becomes translucent, about 5 minutes. Add the chopped spinach to the skillet and cook until wilted, about 2-3 minutes. Remove from heat and let it cool slightly.
- Make the Custard Filling: In a large mixing bowl, whisk together the eggs, heavy cream, nutmeg, salt, and pepper until well combined. Add the grated Gruyère cheese and the cooked spinach-onion mixture. Stir everything together until evenly mixed.
- Assemble the Quiche: Pour the custard filling into the pre-baked pie crust, spreading it evenly with a spatula. Confirm the spinach and cheese are well distributed throughout the filling.
- Bake the Quiche: Place the quiche in the oven and bake for 30-35 minutes, or until the filling is set and the top is lightly browned. To check for doneness, insert a knife in the center; it should come out clean. Allow the quiche to cool slightly before slicing and serving.
Extra Tips: For a flakier crust, consider using a homemade pastry shell, which allows for control over the ingredients and texture. If you want an extra cheesy flavor, sprinkle some additional Gruyère on top before baking. The quiche can be prepared a day in advance and reheated in the oven before serving, which makes it an excellent choice for entertaining. To add more flavor, consider incorporating herbs like thyme or chives into the custard mixture.
Provençal Stuffed Bell Peppers
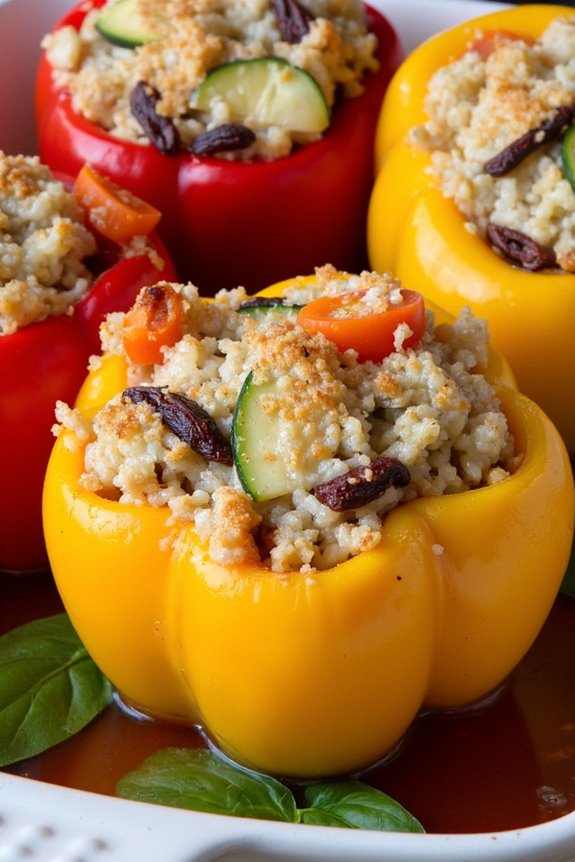
Provençal Stuffed Bell Peppers are a delightful vegetarian dish that brings the flavors of the French countryside straight to your table. This recipe combines vibrant bell peppers with a savory filling of rice, vegetables, and aromatic herbs typical of the Provence region, such as thyme and rosemary. The dish isn’t only visually appealing with its array of colorful peppers, but it’s also a nutritious and satisfying option for a main course. Perfect for family dinners or a simple yet elegant dinner party, these stuffed peppers offer a taste of France that can be enjoyed by everyone, including those following a vegetarian diet.
The heart of this dish lies in its flavor-packed filling. The rice is cooked until tender and then mixed with a medley of sautéed onions, garlic, zucchini, and carrots, creating a rich and hearty base. Adding fresh herbs like basil and parsley enhances the filling with fresh, earthy notes, while sun-dried tomatoes and a hint of capers give it a vibrant and tangy kick.
Once the peppers are generously stuffed, they’re baked to perfection, allowing the flavors to meld together beautifully, resulting in a dish that’s both comforting and full of character.
Ingredients for 4-6 servings:
- 6 large bell peppers (red, yellow, or orange)
- 1 cup uncooked long-grain rice
- 2 tablespoons olive oil
- 1 large onion, finely chopped
- 3 cloves garlic, minced
- 1 zucchini, diced
- 2 carrots, diced
- 1/2 cup sun-dried tomatoes, chopped
- 1/4 cup capers
- 1 teaspoon dried thyme
- 1 teaspoon dried rosemary
- Salt and pepper to taste
- 1/4 cup fresh basil, chopped
- 1/4 cup fresh parsley, chopped
- 1/2 cup grated Parmesan cheese (optional)
- 1 cup vegetable broth
Cooking Instructions:
- Prepare the Peppers: Preheat your oven to 375°F (190°C). Cut the tops off the bell peppers and remove the seeds and membranes inside. Lightly season the insides with salt and set them aside in a baking dish.
- Cook the Rice: In a medium saucepan, cook the rice according to the package instructions. Once cooked, fluff it with a fork and set aside.
- Sauté the Vegetables: Heat olive oil in a large skillet over medium heat. Add the chopped onion and garlic, sautéing until the onion becomes translucent. Stir in the zucchini and carrots, cooking until they’re softened, about 5-7 minutes.
- Combine the Filling: In the same skillet, add the sun-dried tomatoes, capers, thyme, rosemary, salt, and pepper. Cook for an additional 2 minutes. Remove from heat and mix in the cooked rice, fresh basil, and parsley. If using, stir in the Parmesan cheese for added richness.
- Stuff the Peppers: Generously fill each prepared bell pepper with the rice and vegetable mixture. Place them upright in the baking dish.
- Bake the Peppers: Pour the vegetable broth into the baking dish around the peppers. Cover the dish with aluminum foil and bake in the preheated oven for 30 minutes. Remove the foil and bake for an additional 15 minutes, allowing the tops to slightly brown and the peppers to become tender.
- Serve and Enjoy: Once cooked, remove the peppers from the oven and let them cool slightly before serving. Garnish with additional fresh herbs if desired.
Extra Tips:
When selecting bell peppers, choose ones that are similar in size so they cook evenly. Feel free to vary the vegetables based on what’s in season or what you have on hand, such as substituting eggplant for zucchini.
For added flavor, consider adding a sprinkle of feta or goat cheese on top of the peppers before serving. If you prefer a little heat, a pinch of red pepper flakes can be mixed into the filling. This dish can also be prepared in advance and reheated, making it convenient for busy evenings.
Mushroom Bourguignon
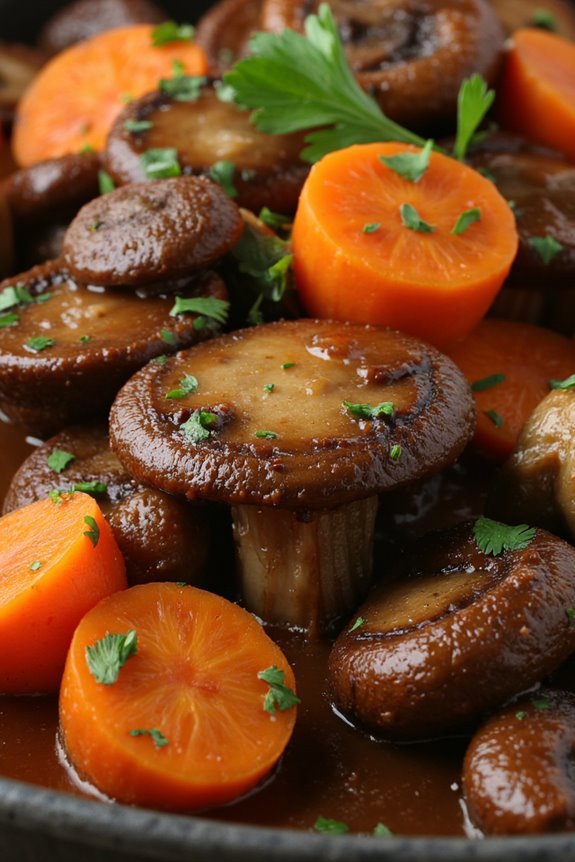
Mushroom Bourguignon is a delightful vegetarian twist on the classic French beef dish, offering a rich and savory experience that captures the essence of a traditional bistro meal. This recipe highlights the earthy flavors of mushrooms combined with aromatic vegetables, simmered in a velvety red wine-based sauce.
It’s a perfect dish for a cozy dinner, and it’s sure to impress both vegetarians and meat-lovers alike with its robust taste and satisfying texture. This version of Mushroom Bourguignon is designed to serve 4-6 people, making it ideal for family gatherings or intimate dinner parties.
The dish is best served over a bed of creamy mashed potatoes or al dente pasta, helping to soak up the delicious sauce. With just a handful of fresh ingredients and a bit of patience, you’ll be able to recreate this classic French comfort food in your own kitchen.
Ingredients:
- 2 tablespoons olive oil
- 2 tablespoons butter
- 1 pound cremini or button mushrooms, quartered
- 1 large yellow onion, finely chopped
- 2 carrots, sliced into rounds
- 3 cloves garlic, minced
- 1 cup red wine
- 2 cups vegetable broth
- 2 tablespoons tomato paste
- 1 teaspoon fresh thyme
- 1 bay leaf
- Salt and pepper to taste
- 1 tablespoon all-purpose flour
- 2 tablespoons fresh parsley, chopped
Cooking Instructions:
1. Prepare the Ingredients:
Begin by washing and quartering the mushrooms. Chop the onion finely, slice the carrots into rounds, and mince the garlic. Having all your ingredients prepped will streamline the cooking process.
2. Sauté the Vegetables:
In a large pot or Dutch oven, heat the olive oil and butter over medium-high heat. Add the mushrooms and sauté until they begin to brown, about 5-7 minutes. Remove the mushrooms from the pot and set them aside.
3. Cook the Aromatics:
In the same pot, add the onions and carrots. Sauté until the onions are translucent and the carrots are beginning to soften, around 5 minutes. Stir in the garlic and cook for an additional minute until fragrant.
4. Deglaze and Simmer:
Pour in the red wine to deglaze the pot, scraping up any brown bits from the bottom. Allow the wine to simmer for about 2-3 minutes. Then, add the vegetable broth, tomato paste, thyme, bay leaf, and the reserved mushrooms. Stir well to combine.
5. Simmer the Bourguignon:
Bring the mixture to a boil, then reduce the heat to low and let it simmer uncovered for about 20-25 minutes. This will allow the flavors to meld and the sauce to reduce slightly.
6. Thicken the Sauce:
In a small bowl, mix the all-purpose flour with a few tablespoons of the sauce from the pot to create a smooth paste. Stir this paste back into the pot to thicken the sauce. Let it cook for another 5 minutes.
7. Season and Serve:
Remove the bay leaf and season the dish with salt and pepper to taste. Sprinkle with fresh parsley before serving. Pair the Mushroom Bourguignon with mashed potatoes or pasta for the ultimate dining experience.
Extra Tips:
For a deeper flavor, consider using a mix of different mushroom varieties, such as shiitake or portobello, alongside the cremini. If you prefer a thicker sauce, you can add more flour or reduce the sauce longer.
Adjust the seasoning based on your taste preferences and feel free to add a splash of soy sauce for an umami boost. Enjoy this dish with a glass of the red wine you used in cooking for a perfectly paired meal.
Leek and Potato Gratin
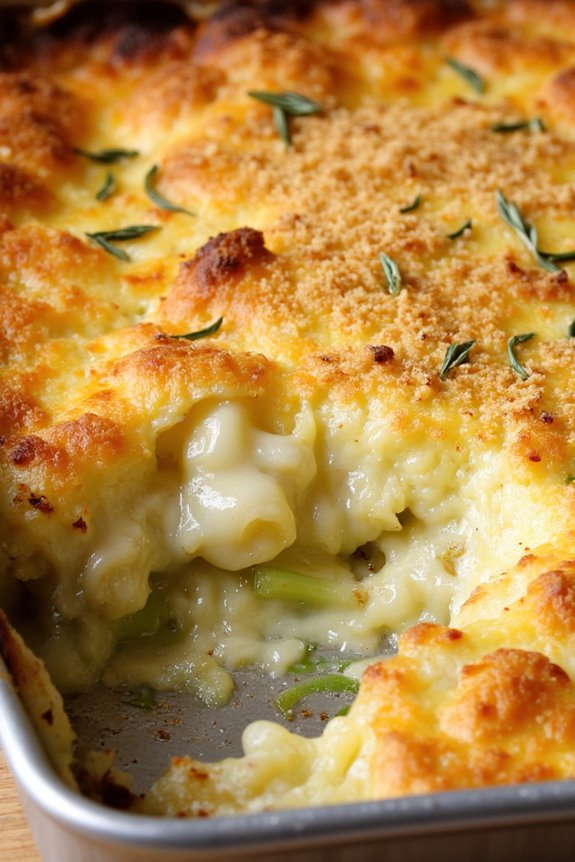
Indulge in the comforting and savory flavors of a classic French bistro dish with this vegetarian Leek and Potato Gratin. This dish combines the earthy flavors of leeks with the creamy texture of potatoes, all enveloped in a rich, cheesy sauce. Perfect for a cozy dinner at home, this gratin can be served as a main course alongside a fresh green salad, or as a decadent side dish to accompany your favorite vegetarian entrees.
The Leek and Potato Gratin is a versatile dish that can be adapted to suit your taste preferences. For instance, you can add a touch of nutmeg for warmth, or top it with breadcrumbs for extra crunch. The key to achieving a perfect gratin lies in the balance between the creamy sauce and the tender layers of potatoes and leeks. This recipe is designed to serve 4-6 people, making it ideal for family dinners or small gatherings.
Ingredients (serving size: 4-6 people):
- 3 large leeks, cleaned and sliced
- 4 large potatoes, peeled and thinly sliced
- 2 cloves garlic, minced
- 2 tablespoons butter
- 1 tablespoon olive oil
- 1 cup heavy cream
- 1 cup milk
- 1 1/2 cups grated Gruyère cheese
- Salt and pepper to taste
- 1/4 teaspoon ground nutmeg (optional)
- 1/2 cup breadcrumbs (optional)
- 1 tablespoon chopped fresh thyme or 1 teaspoon dried thyme
Cooking Instructions:
- Preheat the Oven: Begin by preheating your oven to 375°F (190°C). This guarantees that your gratin will cook evenly.
- Prepare the Leeks: In a large frying pan, heat the olive oil and butter over medium heat. Add the sliced leeks and minced garlic, sautéing them until soft and fragrant, about 5 minutes. Season with a pinch of salt and pepper, then remove from heat.
- Layer the Ingredients: Grease a 9×13 inch baking dish with butter. Arrange a layer of potato slices at the bottom, followed by a layer of sautéed leeks. Repeat the process, layering potatoes and leeks until all are used, finishing with a layer of potatoes on top.
- Prepare the Cream Mixture: In a small saucepan over medium heat, combine the heavy cream and milk. Heat until warm but not boiling. Stir in the ground nutmeg (if using), salt, pepper, and half of the grated Gruyère cheese. Mix until the cheese is melted and the mixture is smooth.
- Assemble the Gratin: Pour the cream mixture evenly over the layered potatoes and leeks. Sprinkle the remaining Gruyère cheese on top.
- Add Breadcrumbs and Bake: If using, evenly distribute breadcrumbs over the top for a crispy finish. Sprinkle with fresh or dried thyme. Cover the dish with foil and place it in the oven.
- Bake the Gratin: Bake for 45 minutes covered, then remove the foil and bake for an additional 15-20 minutes, or until the top is golden brown and the potatoes are tender when pierced with a fork.
- Let it Rest: Once baked, remove from the oven and let the gratin rest for about 10 minutes before serving. This will help it set and make it easier to serve.
Extra Tips:
For a more intense flavor, consider adding a layer of caramelized onions between the potato and leek layers. If you prefer a lighter dish, substitute the heavy cream with half-and-half or a plant-based alternative.
To guarantee even cooking, try to slice the potatoes uniformly, using a mandoline if available. Finally, for an added touch of elegance, garnish the finished gratin with a sprinkle of fresh herbs such as parsley or chives just before serving.
Warm Lentil Salad With Dijon Vinaigrette
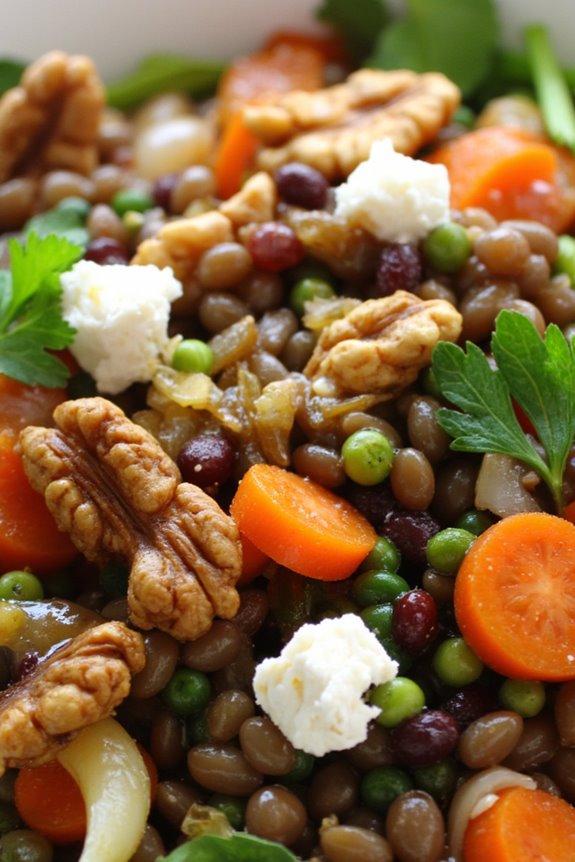
Warm Lentil Salad With Dijon Vinaigrette is a delightful French bistro classic that brings together the earthy flavors of lentils with the tangy zest of a Dijon vinaigrette. This salad is a perfect combination of nutrition and taste, offering a hearty dish that’s both filling and satisfying.
Lentils, rich in protein and fiber, are elevated by the aromatic blend of herbs and a sharp dressing that ties all the flavors together. This vegetarian recipe is perfect for a cozy meal at home or as an impressive dish for entertaining guests.
The salad can be served warm, making it ideal for cooler weather, yet it’s versatile enough to be enjoyed any time of the year. The Dijon vinaigrette, with its balance of mustard and vinegar, cuts through the richness of the lentils and vegetables, providing a revitalizing contrast.
Serve this salad as a main course or a side dish for 4-6 people, and watch it become a favorite in your culinary repertoire.
Ingredients:
- 1 1/2 cups green or French lentils, rinsed and drained
- 4 cups water
- 2 bay leaves
- 1 medium carrot, finely diced
- 1 medium onion, finely chopped
- 2 cloves garlic, minced
- 3 tablespoons olive oil, divided
- 2 tablespoons Dijon mustard
- 3 tablespoons red wine vinegar
- 1 teaspoon honey
- Salt and freshly ground black pepper, to taste
- 1/4 cup fresh parsley, chopped
- 1/4 cup walnuts, toasted and roughly chopped (optional)
- 1/4 cup crumbled feta cheese (optional)
Cooking Instructions:
- Cook the Lentils: In a medium saucepan, combine the lentils, water, and bay leaves. Bring to a boil over high heat, then reduce the heat to low and simmer for about 20-25 minutes, or until the lentils are tender but not mushy. Drain the lentils and discard the bay leaves.
- Prepare the Vegetables: While the lentils are cooking, heat 1 tablespoon of olive oil in a large skillet over medium heat. Add the chopped onion and carrot, and sauté for 5-7 minutes, or until the vegetables are soft and the onion is translucent. Add the minced garlic and cook for another minute until fragrant.
- Make the Vinaigrette: In a small bowl, whisk together the remaining 2 tablespoons of olive oil, Dijon mustard, red wine vinegar, and honey. Season with salt and pepper to taste.
- Combine Ingredients: In a large mixing bowl, combine the cooked lentils, sautéed vegetables, and chopped parsley. Pour the Dijon vinaigrette over the mixture and toss gently to combine, ensuring the lentils and vegetables are coated with the dressing.
- Serve: Transfer the salad to a serving platter or individual plates. If using, sprinkle the toasted walnuts and crumbled feta cheese over the top. Serve the salad warm for the best flavor.
Extra Tips:
For the best results, use French green lentils, also known as lentilles du Puy, as they hold their shape well during cooking.
If you prefer a more pronounced tang in your vinaigrette, adjust the amount of red wine vinegar to suit your taste.
Toasting the walnuts enhances their flavor and adds a nice crunch to the salad, so don’t skip this step if you’re including them.
Finally, this salad can be made ahead of time and gently reheated, making it perfect for meal prep or entertaining.
Herb-Crusted Goat Cheese Medallions
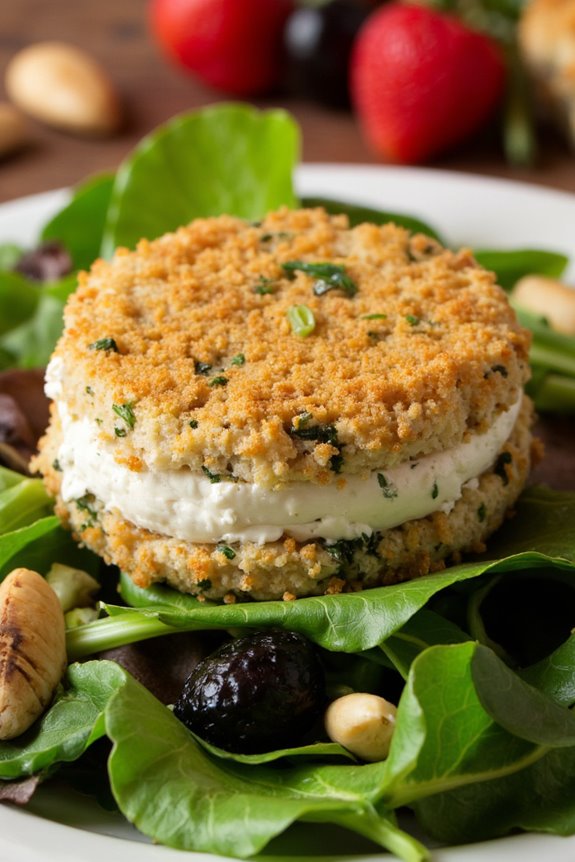
Herb-Crusted Goat Cheese Medallions are a delightful and elegant appetizer or salad topping that perfectly captures the essence of French bistro cuisine.
These medallions boast a creamy interior with a crispy, flavorful herb crust that complements the tanginess of the goat cheese. Perfect for vegetarians, this dish isn’t only delicious but also quick and easy to prepare, making it an ideal choice for a sophisticated dinner party or a cozy night in.
The medallions can be paired with a simple green salad or served on a platter with a selection of fresh fruits and nuts.
To create this dish, start by selecting a high-quality goat cheese, which will be the star of the recipe. The cheese is sliced into medallions and coated in a mixture of fresh herbs and breadcrumbs, creating a crust that’s both aromatic and crunchy.
The medallions are then lightly pan-fried until golden brown, resulting in a perfect balance of textures and flavors. This recipe serves 4-6 people and is sure to impress your guests with its simplicity and elegance.
Ingredients for 4-6 servings:
- 8 oz goat cheese log
- 1/2 cup fresh parsley, finely chopped
- 1/4 cup fresh chives, finely chopped
- 1 tablespoon fresh thyme leaves
- 1 cup panko breadcrumbs
- Salt and pepper to taste
- 1 large egg
- 2 tablespoons milk
- 1/4 cup all-purpose flour
- 2 tablespoons olive oil
- Mixed greens or salad of choice, for serving
Cooking Instructions:
- Prepare the Goat Cheese: Start by slicing the goat cheese log into 1/2-inch thick medallions using a sharp knife. If the cheese sticks, wiping the knife blade with a damp towel between cuts can help achieve clean slices.
- Prepare the Herb Mixture: In a shallow dish, combine the finely chopped parsley, chives, thyme, panko breadcrumbs, salt, and pepper. Mix well until the herbs are evenly distributed throughout the breadcrumbs.
- Set Up Breading Station: In a separate shallow dish, whisk together the egg and milk. In a third dish, place the all-purpose flour. Arrange the dishes in a line for easy access – flour, egg mixture, then breadcrumb mixture.
- Coat the Medallions: Lightly coat each goat cheese medallion in flour, shaking off any excess. Dip each medallion into the egg mixture, ensuring it’s completely covered, then press into the herb-breadcrumb mixture, covering all sides.
- Pan-Fry the Medallions: Heat the olive oil in a non-stick skillet over medium heat. Once the oil is hot, carefully place the coated medallions into the skillet. Cook for about 2-3 minutes on each side, or until the crust is golden brown.
- Serve: Remove the medallions from the skillet and drain on a paper towel. Serve immediately on a bed of mixed greens or alongside a fresh salad of your choice.
Extra Tips:
For best results, make sure the goat cheese is well-chilled before slicing to prevent crumbling.
The combination of herbs can be adjusted to your preference; for example, basil or rosemary can be added for an extra flavor dimension.
If preparing ahead of time, the medallions can be breaded and refrigerated for up to 24 hours before frying.
Finally, use a spatula to carefully flip the medallions to keep the crust intact while cooking. Enjoy the medallions warm for the creamiest texture.
Cauliflower Au Gratin
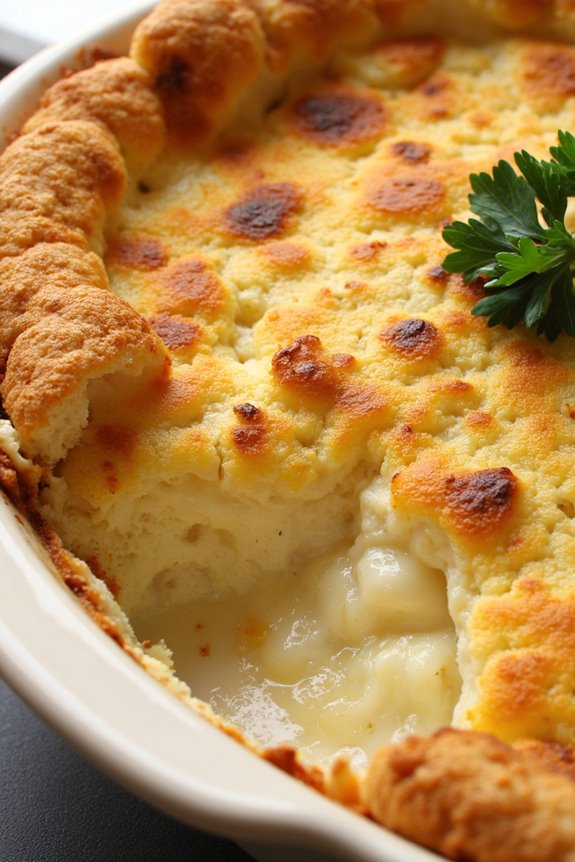
Cauliflower Au Gratin is a delectable French bistro classic that combines the creamy richness of cheese with the subtle earthiness of cauliflower. This vegetarian dish is perfect as a comforting side or a main course, offering a medley of flavors and textures that are both elegant and satisfying.
The dish is traditionally baked until golden and bubbly, creating a crusty top layer that gives way to a tender, cheesy interior. This dish is perfect for serving 4-6 people, making it an ideal choice for a dinner party or a cozy family meal.
By using a combination of different cheeses, such as Gruyère and Parmesan, you can create a depth of flavor that’s both indulgent and sophisticated. The addition of nutmeg and garlic enhances the savory profile, while the cream and milk guarantee a smooth, luscious consistency throughout.
Ingredients for Cauliflower Au Gratin (Serves 4-6):
- 1 large head of cauliflower, cut into florets
- 2 tablespoons unsalted butter
- 2 cloves garlic, minced
- 2 tablespoons all-purpose flour
- 1 cup whole milk
- 1 cup heavy cream
- 1/4 teaspoon ground nutmeg
- Salt and freshly ground black pepper, to taste
- 1 cup grated Gruyère cheese
- 1/2 cup grated Parmesan cheese
- 1/4 cup breadcrumbs
- 1 tablespoon chopped fresh parsley, for garnish
Cooking Instructions:
- Preheat and Prepare Cauliflower: Preheat your oven to 375°F (190°C). Bring a large pot of salted water to a boil. Add the cauliflower florets and cook until just tender, about 5 minutes. Drain the cauliflower and set aside.
- Make the Béchamel Sauce: In a medium saucepan, melt the butter over medium heat. Add the minced garlic and sauté until fragrant, about 1 minute. Stir in the flour and cook for another minute to form a roux. Gradually whisk in the milk and heavy cream, guaranteeing there are no lumps. Continue to cook, stirring constantly, until the mixture thickens, about 5 minutes.
- Season and Add Cheese: Remove the saucepan from heat and stir in the nutmeg, salt, and pepper. Add the Gruyère cheese and half of the Parmesan cheese, stirring until the cheeses are fully melted and the sauce is smooth.
- Assemble the Dish: In a baking dish, arrange the cauliflower florets evenly. Pour the cheese sauce over the cauliflower, guaranteeing all pieces are well-coated. Mix the breadcrumbs with the remaining Parmesan cheese and sprinkle over the top.
- Bake the Gratin: Place the baking dish in the preheated oven and bake for 25-30 minutes, or until the top is golden brown and the sauce is bubbly.
- Garnish and Serve: Remove from the oven and let cool for a few minutes. Garnish with chopped parsley before serving.
Extra Tips: For a deeper flavor, you can roast the cauliflower florets in the oven with a drizzle of olive oil before adding them to the dish. This will enhance the nutty taste of the cauliflower and give the dish an extra layer of complexity.
If you prefer a crustier top, consider broiling the gratin for the last few minutes of baking. Always taste the sauce before assembling to adjust seasoning as necessary, guaranteeing a well-balanced, flavorful dish.
Baked Camembert With Rosemary and Garlic
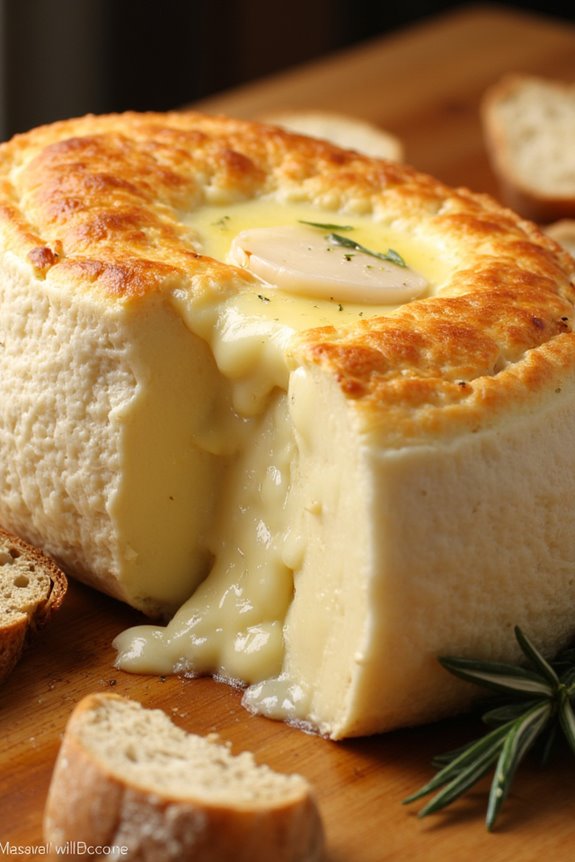
Baked Camembert with Rosemary and Garlic is a delightful, creamy appetizer that brings a touch of French culinary elegance to your table. Perfect for a cozy night in or as a crowd-pleasing party starter, this dish combines the rich, decadent flavor of Camembert cheese with the aromatic notes of fresh rosemary and the subtle warmth of roasted garlic. The result is a gooey, fragrant cheese that pairs beautifully with crusty bread or crisp crackers.
This vegetarian dish isn’t only delicious but also incredibly easy to prepare, making it an excellent choice for both novice cooks and experienced chefs alike. The preparation time is minimal, allowing you to focus on setting the perfect ambiance for your meal. Whether you’re serving it at a gathering or enjoying it as a comforting treat at home, Baked Camembert with Rosemary and Garlic is sure to impress.
Ingredients (Serves 4-6):
- 1 whole Camembert cheese wheel (250g)
- 2 cloves garlic, thinly sliced
- 2-3 sprigs fresh rosemary
- 1 tablespoon olive oil
- Freshly ground black pepper
- Crusty bread or crackers, for serving
Instructions:
- Preheat the Oven: Start by preheating your oven to 180°C (350°F). This guarantees that the cheese will bake evenly and reach the perfect gooey texture.
- Prepare the Camembert: Unwrap the Camembert from its packaging and place it back into its wooden box, discarding any plastic wrapping. If your Camembert doesn’t come in a wooden box, place it in a small round baking dish that fits it snugly.
- Score the Cheese: Using a sharp knife, score the top of the Camembert in a crisscross pattern, creating small diamond shapes on the surface. This allows the flavors of the garlic and rosemary to penetrate the cheese as it bakes.
- Add Garlic and Rosemary: Insert the slices of garlic and small sprigs of rosemary into the cuts on top of the cheese. This will infuse the cheese with flavor as it bakes.
- Season and Drizzle: Drizzle the olive oil over the top of the cheese and season with freshly ground black pepper to taste. This adds an extra layer of flavor and helps the cheese to develop a beautiful golden crust.
- Bake the Camembert: Place the cheese in the preheated oven and bake for 15-20 minutes, or until the cheese is soft and gooey in the center. Keep an eye on it to make certain it doesn’t overcook or burn.
- Serve: Once baked, remove the cheese from the oven and allow it to cool slightly for a minute or two. Serve immediately with slices of crusty bread or crackers for dipping.
Extra Tips:
To elevate your Baked Camembert with Rosemary and Garlic, consider experimenting with additional toppings such as honey, nuts, or dried fruit for extra texture and flavor.
If you prefer a stronger flavor, swap out Camembert for Brie or another soft, ripened cheese. Remember to serve the baked cheese promptly, as it’s best enjoyed warm and gooey.
If you find the cheese cooling down too quickly, you can keep it warm by placing it back in the oven for a few minutes before serving.
Caramelized Shallot and Gruyère Tart

Caramelized Shallot and Gruyère Tart is a savory delight that perfectly encapsulates the essence of a French bistro experience, yet remains completely vegetarian. This dish combines the sweet and rich flavors of caramelized shallots with the nutty and creamy profile of Gruyère cheese, all encased in a buttery, flaky tart crust.
It’s a sophisticated dish that’s surprisingly simple to prepare, making it an ideal choice for both casual dinners and special occasions. The key to this tart is the caramelization of the shallots, which enhances their natural sweetness and adds depth to the overall flavor.
Gruyère cheese, a staple in French cuisine, melts beautifully, creating a luscious layer that complements the shallots perfectly. Together, these ingredients come together to create a tart that’s both elegant and comforting. Prepare this dish for a serving size of 4-6 people and enjoy the delightful balance of flavors and textures that make this tart a true bistro favorite.
Ingredients:
- 1 sheet of store-bought puff pastry or homemade tart crust
- 5-6 large shallots, thinly sliced
- 2 tablespoons unsalted butter
- 1 tablespoon olive oil
- 1 teaspoon sugar
- Salt and freshly ground black pepper, to taste
- 1 cup grated Gruyère cheese
- 2 large eggs
- 1/2 cup heavy cream
- 1/4 teaspoon nutmeg
- Fresh thyme leaves for garnish
Instructions:
- Prepare the Crust: Preheat your oven to 375°F (190°C). Roll out the puff pastry or tart crust and fit it into a 9-inch tart pan. Trim the edges if necessary. Prick the base with a fork to prevent it from puffing up during baking. Line with parchment paper and fill with pie weights or dried beans. Bake for 10 minutes, then remove the weights and parchment paper. Bake for an additional 5 minutes until lightly golden. Set aside to cool.
- Caramelize the Shallots: In a large skillet over medium heat, melt the butter with the olive oil. Add the sliced shallots and cook, stirring occasionally, until they begin to soften, about 5 minutes. Sprinkle with sugar, salt, and pepper, and continue to cook until the shallots are golden brown and caramelized, about 15-20 minutes. Remove from heat and let cool slightly.
- Prepare the Filling: In a mixing bowl, whisk together the eggs, heavy cream, and nutmeg. Season with salt and pepper to taste. Stir in the grated Gruyère cheese.
- Assemble the Tart: Spread the caramelized shallots evenly over the prepared tart crust. Pour the egg and cheese mixture over the shallots, ensuring even distribution.
- Bake the Tart: Place the tart in the preheated oven and bake for 25-30 minutes, or until the filling is set and the top is golden brown. Remove from the oven and let cool slightly before serving.
- Garnish and Serve: Garnish with fresh thyme leaves. Serve warm or at room temperature.
Extra Tips:
For best results, make sure that the shallots are cooked low and slow to achieve a deep caramelization without burning. If using store-bought puff pastry, allow it to thaw in the refrigerator overnight to prevent it from becoming too soft and difficult to handle.
Feel free to experiment with additional herbs such as rosemary or chives to add more layers of flavor to the tart. This dish pairs beautifully with a simple green salad and a glass of white wine for a complete French bistro experience.
Roasted Beet and Walnut Salad
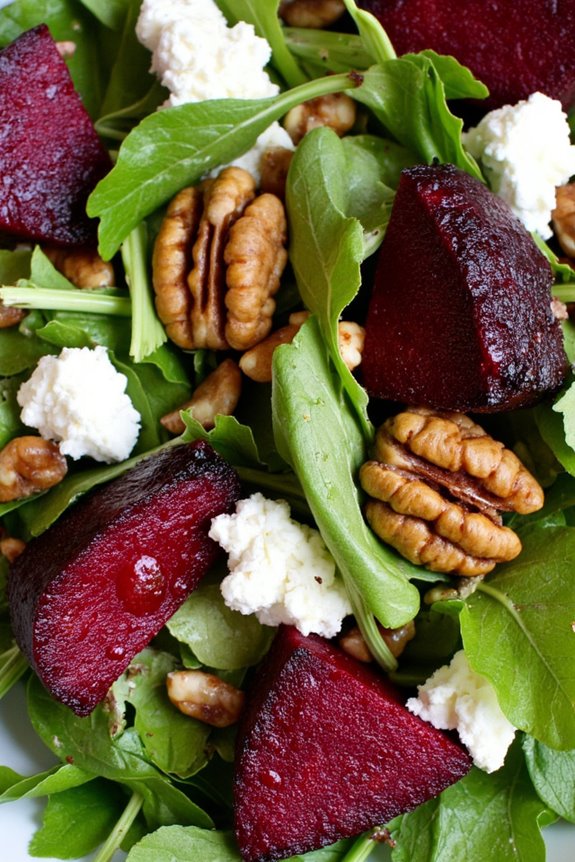
A delightful French bistro-inspired vegetarian dish, the Roasted Beet and Walnut Salad combines earthy, roasted beets with the rich, nutty flavor of toasted walnuts. The salad is complemented by creamy goat cheese and a light vinaigrette that brings all the flavors together.
This salad is perfect for a light lunch or as a starter to a larger meal, offering a vibrant contrast of flavors and textures that will impress any guest. The subtle sweetness of the beets pairs beautifully with the tangy goat cheese, while the walnuts add a satisfying crunch.
This dish isn’t only visually stunning but also packed with nutrients, making it a healthy choice for any occasion. The addition of fresh greens, such as arugula or mixed baby greens, adds a peppery note that balances the flavors. This recipe serves 4-6 people, making it ideal for small gatherings or family meals.
Ingredients for 4-6 Servings:
- 4 medium-sized beets
- 1 tablespoon olive oil
- Salt and pepper to taste
- 1 cup walnuts
- 6 cups mixed baby greens or arugula
- 4 ounces goat cheese, crumbled
- 1 tablespoon fresh lemon juice
- 1 tablespoon balsamic vinegar
- 1 teaspoon Dijon mustard
- 3 tablespoons extra virgin olive oil
- 1 clove garlic, minced
Cooking Instructions:
- Prepare the Beets: Preheat your oven to 400°F (200°C). Wash and scrub the beets thoroughly. Wrap each beet individually in aluminum foil, drizzling with a touch of olive oil and a pinch of salt and pepper before sealing them.
- Roast the Beets: Place the wrapped beets on a baking sheet and roast for about 45-60 minutes, or until they’re tender when pierced with a fork. Once done, remove the beets from the oven and allow them to cool slightly before peeling. Cut them into bite-sized wedges.
- Toast the Walnuts: While the beets are roasting, spread the walnuts on a separate baking sheet. Toast them in the oven for about 8-10 minutes, stirring halfway, until they’re fragrant and lightly browned. Remove from the oven and let them cool.
- Prepare the Dressing: In a small bowl, whisk together the lemon juice, balsamic vinegar, Dijon mustard, minced garlic, and extra virgin olive oil. Season with salt and pepper to taste.
- Assemble the Salad: In a large salad bowl, combine the mixed greens with the roasted beet wedges and toasted walnuts. Drizzle the dressing over the salad and toss gently to combine.
- Add the Goat Cheese: Sprinkle the crumbled goat cheese over the top of the salad just before serving to guarantee it remains creamy and distinct.
Extra Tips:
When selecting beets, choose those that are firm and free from blemishes for the best flavor and texture. You can prepare the beets and walnuts in advance and store them separately in airtight containers in the refrigerator. This will save time when assembling the salad later.
Feel free to experiment with different types of goat cheese; a herbed variation can add an extra layer of flavor. Finally, if you prefer a vegan option, replace goat cheese with a plant-based alternative or omit it entirely.
Tarte Tatin With Apples and Thyme

Tarte Tatin With Apples and Thyme is a delightful and elegant dish that brings a touch of French cuisine to your table. This vegetarian recipe combines the sweet and tart flavors of apples with the aromatic freshness of thyme, all enveloped in a buttery, flaky pastry. Perfect for brunch or as a dessert, this tarte tatin offers a wonderful balance of textures and tastes, making it a showstopper for any occasion.
The inversion of the tarte after baking reveals a beautifully caramelized top that’s sure to impress your guests. This classic French bistro recipe is traditionally made with apples, but the addition of thyme elevates its flavor profile, creating a sophisticated yet comforting dish. The apples are cooked gently in sugar and butter until they reach a golden caramel hue, then covered with a layer of puff pastry and baked to perfection.
When served warm with a dollop of crème fraîche or vanilla ice cream, Tarte Tatin With Apples and Thyme becomes a truly indulgent treat.
Ingredients (serves 4-6):
- 6 medium-sized apples, peeled, cored, and quartered
- 1 cup granulated sugar
- 1/2 cup unsalted butter
- 1 teaspoon fresh thyme leaves
- 1 sheet puff pastry, thawed
- 1 tablespoon lemon juice
- 1/4 teaspoon salt
- All-purpose flour, for dusting
Cooking Instructions:
- Prepare the apples: Preheat your oven to 375°F (190°C). Peel, core, and quarter the apples. Toss them with lemon juice and a pinch of salt to prevent browning and to enhance flavor.
- Caramelize the sugar: In a 10-inch oven-safe skillet, melt the butter over medium heat. Stir in the sugar and cook until it dissolves and turns a light amber color, about 5-7 minutes. Stir constantly to avoid burning.
- Add apples and thyme: Carefully arrange the apple quarters in the caramel in a circular pattern, ensuring that they’re snugly fitted. Sprinkle the thyme leaves over the apples. Cook the apples in the caramel for about 10 minutes, turning them occasionally, until they soften slightly and are well coated with the caramel.
- Prepare the pastry: On a lightly floured surface, roll out the puff pastry to about 1/8-inch thickness. Cut the pastry into a circle slightly larger than your skillet.
- Assemble the tarte: Remove the skillet from the heat. Drape the puff pastry over the apples, tucking the edges down inside the skillet to encase the apples fully.
- Bake: Transfer the skillet to the preheated oven and bake for 30-35 minutes, until the pastry is golden brown and puffed.
- Invert and serve: Allow the tarte to cool in the skillet for 5 minutes. Carefully invert it onto a serving platter by placing the platter over the skillet and flipping it over. Be cautious as the caramel is hot. Serve warm with a dollop of crème fraîche or a scoop of vanilla ice cream.
Extra Tips:
When preparing Tarte Tatin With Apples and Thyme, selecting the right type of apples is essential. Opt for firm varieties like Granny Smith or Honeycrisp, which hold their shape well during cooking.
Make sure your puff pastry is cold but pliable when working with it, as this will help achieve a flaky crust. If you notice the caramel is too runny when you invert the tarte, allow it to cool slightly longer before flipping.
This dish can be made a few hours in advance and reheated gently in the oven before serving for added convenience.