

When I think of French cuisine, I often imagine elaborate meals that take hours to prepare. But did you know you can create authentic French dishes in under 30 minutes? From a comforting bowl of French onion soup to a vibrant ratatouille, these quick recipes bring the taste of France to your table without the fuss. Let’s explore some delightful options that will impress your family and friends. Get ready to enjoy a little piece of France in no time at all!
Classic Coq Au Vin
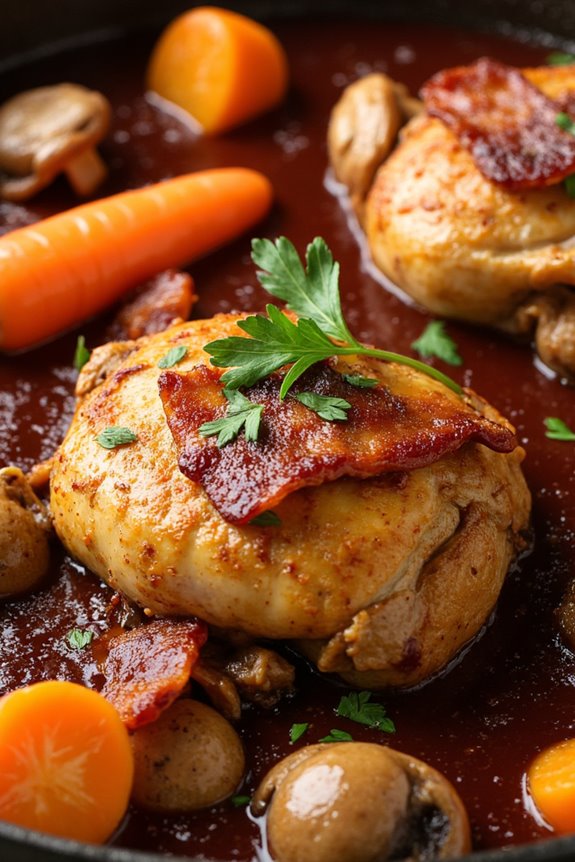
Coq Au Vin is a traditional French dish that translates to “rooster in wine.” This classic recipe showcases the rich flavors of tender chicken, slow-cooked in a luscious wine sauce, along with aromatic vegetables and herbs. The dish is known for its deep, complex flavors, making it a perfect centerpiece for a cozy dinner with family or friends.
Although the name suggests rooster, most recipes today use chicken, which is more accessible and equally delicious.
Cooking Coq Au Vin may seem challenging, but it’s actually quite straightforward. The key lies in using quality ingredients and allowing sufficient time for the chicken to absorb the wine’s rich flavors. This dish is best prepared a few hours ahead or even the day before, as the flavors develop beautifully overnight.
Serve it with crusty bread or creamy mashed potatoes to soak up the delightful sauce, and you’ll have a meal that impresses everyone at the table.
Ingredients (Serves 4-6)
- 4-6 chicken thighs (bone-in, skin-on)
- Salt and black pepper (to taste)
- 2 tablespoons olive oil
- 4 ounces bacon or pancetta, diced
- 1 large onion, chopped
- 2-3 cloves garlic, minced
- 2 cups mushrooms, quartered
- 2 cups carrots, sliced
- 2 cups red wine (preferably Burgundy or Pinot Noir)
- 2 cups chicken broth
- 2 tablespoons tomato paste
- 1 bouquet garni (a bundle of herbs, typically thyme, bay leaf, and parsley)
- 2 tablespoons all-purpose flour (optional, for thickening)
- Fresh parsley (for garnish)
Cooking Instructions
- Prepare the Chicken: Season the chicken thighs generously with salt and black pepper. This step is essential as it enhances the flavor of the meat during cooking.
- Brown the Bacon: In a large Dutch oven or heavy pot, heat the olive oil over medium heat. Add the diced bacon or pancetta and cook until crispy, about 5-7 minutes. Remove the bacon with a slotted spoon and set aside, leaving the rendered fat in the pot.
- Sear the Chicken: In the same pot, add the seasoned chicken thighs skin-side down. Sear for about 5 minutes on each side until golden brown. This step locks in the juices and adds depth to the dish. Once browned, remove the chicken from the pot and set aside.
- Sauté the Vegetables: Add the chopped onion to the pot and sauté for about 3-4 minutes until translucent. Then, add the garlic, mushrooms, and carrots. Cook for another 5-7 minutes until the vegetables are slightly softened.
- Deglaze and Combine: Pour in the red wine, scraping the bottom of the pot to release any browned bits. This adds even more flavor to the sauce. Stir in the chicken broth and tomato paste, mixing well.
- Add Chicken and Simmer: Return the chicken and the reserved bacon to the pot. Add the bouquet garni, making sure it’s submerged in the liquid. Bring the mixture to a gentle simmer, cover the pot, and let it cook for about 1.5 to 2 hours, or until the chicken is tender and the flavors meld together.
- Thicken the Sauce (Optional): If you prefer a thicker sauce, you can mix the flour with a little water to create a slurry and stir it into the sauce during the final 15 minutes of cooking. This will help it achieve a rich consistency.
- Serve: Once cooked, remove the bouquet garni and discard it. Plate the Coq Au Vin and garnish with freshly chopped parsley. Serve with crusty bread or mashed potatoes to soak up the delicious sauce.
Extra Tips
For the best results, choose a good quality red wine, as it greatly impacts the flavor of the dish. If possible, prepare the Coq Au Vin a day in advance; the flavors will deepen and improve overnight.
When reheating, do so gently to maintain the chicken’s tenderness. Experiment with adding different vegetables such as pearl onions or parsnips for added variety.
Finally, don’t rush the simmering process; allowing the dish to cook low and slow will yield the most flavorful results. Enjoy your culinary journey into classic French cuisine!
Quick Ratatouille

Ratatouille is a classic French dish that embodies the essence of Mediterranean cooking. This vibrant vegetable stew isn’t only delicious but also incredibly easy to prepare, making it an ideal choice for a quick dinner.
With its colorful medley of vegetables, ratatouille can be served on its own, as a side dish, or over grains like rice or quinoa, providing versatility to your meal.
This quick version of ratatouille utilizes fresh seasonal vegetables, allowing you to capture the flavors of summer in a matter of minutes. The key is to chop the vegetables uniformly to guarantee even cooking, while a splash of olive oil and a hint of fresh herbs elevate the dish.
Perfect for a weeknight dinner, this ratatouille recipe is sure to impress your family or guests without requiring hours in the kitchen.
Ingredients (Serves 4-6):
- 1 medium eggplant, diced
- 2 medium zucchinis, sliced
- 1 bell pepper (red or yellow), chopped
- 1 medium onion, diced
- 2 cloves garlic, minced
- 4 medium tomatoes, diced (or 1 can of diced tomatoes)
- 1/4 cup olive oil
- 1 teaspoon dried thyme
- 1 teaspoon dried basil
- Salt and pepper, to taste
- Fresh basil leaves, for garnish (optional)
Cooking Instructions:
- Prepare the Vegetables: Start by washing and chopping all your vegetables into uniform pieces. Dice the eggplant, zucchinis, bell pepper, and onion. Mince the garlic and dice the tomatoes. This preparation is essential for even cooking and a pleasing presentation.
- Sauté the Aromatics: In a large skillet or Dutch oven, heat the olive oil over medium heat. Add the diced onion and sauté for about 3-4 minutes, or until the onion becomes translucent. Then, add the minced garlic and cook for an additional 1-2 minutes until fragrant, being careful not to burn it.
- Add the Vegetables: Incorporate the diced eggplant, zucchinis, and bell pepper into the skillet. Stir well to coat the vegetables with the oil and aromatics. Cook for about 5-7 minutes, stirring occasionally, until they start to soften.
- Incorporate the Tomatoes and Seasonings: Add the diced tomatoes (or canned tomatoes, if using) into the skillet. Stir in the dried thyme and basil, then season with salt and pepper to taste. Bring the mixture to a simmer, reduce the heat to low, and cover the skillet. Let it cook for about 15-20 minutes, stirring occasionally, until the vegetables are tender.
- Adjust Seasoning and Serve: Once the ratatouille is cooked through, taste and adjust the seasoning if necessary. Serve hot, garnished with fresh basil leaves for an extra pop of flavor. This dish pairs beautifully with crusty bread or over a bed of rice.
Extra Tips:
For added depth of flavor, consider roasting the vegetables before adding them to the skillet. Simply toss them in olive oil and seasonings, spread them on a baking sheet, and roast at 400°F (200°C) for about 20 minutes.
Additionally, feel free to customize the vegetable selection based on what you have on hand; ratatouille is versatile and can include other vegetables such as mushrooms or squash. Enjoy experimenting with different herbs to find your favorite flavor profile!
French Onion Soup
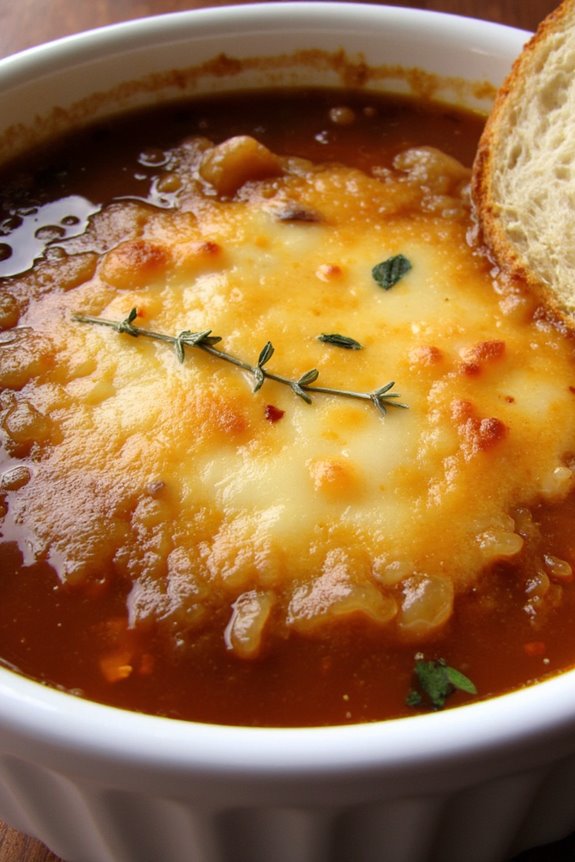
French Onion Soup is a classic dish that epitomizes comfort food with its rich flavors and hearty texture. Originating from the streets of Paris, it has become a beloved staple in French cuisine. This savory soup is characterized by its deep caramelized onion flavor, enhanced by a rich beef broth and topped with gooey melted cheese and crusty bread. Perfect for a quick dinner, it embodies the essence of French cooking while being relatively simple to prepare.
To make French Onion Soup, patience is key, particularly when caramelizing the onions. This step develops the soup’s signature sweetness and depth of flavor, so don’t rush it! Serve this delightful dish as an appetizer or a light meal, and pair it with a crisp salad or a glass of red wine for a truly satisfying experience.
Ingredients (Serves 4-6 people)
- 4 large onions, thinly sliced
- 4 tablespoons unsalted butter
- 1 tablespoon olive oil
- 1 teaspoon sugar
- 4 cups beef broth (preferably low-sodium)
- 1 cup dry white wine
- 2 teaspoons fresh thyme leaves (or 1 teaspoon dried thyme)
- 1 bay leaf
- Salt and freshly ground black pepper, to taste
- 8 slices of French baguette
- 2 cups grated Gruyère cheese (or a mix of Gruyère and Emmental)
Cooking Instructions
- Caramelize the Onions: In a large, heavy-bottomed pot, melt the butter with the olive oil over medium heat. Add the sliced onions and sprinkle with sugar. Cook the onions, stirring occasionally, until they’re soft and golden brown, about 25-30 minutes. The sugar helps enhance the caramelization process, bringing out the natural sweetness of the onions.
- Add Broth and Wine: Once the onions are caramelized, add the white wine to the pot. Increase the heat and bring to a boil, scraping the bottom of the pot to deglaze and incorporate any flavorful bits that may have stuck. After the wine has reduced by half, add the beef broth, thyme, bay leaf, salt, and pepper. Bring the mixture to a simmer, then reduce the heat to low and let it cook for an additional 30 minutes to allow the flavors to meld together.
- Prepare the Bread: While the soup is simmering, preheat your oven to 400°F (200°C). Arrange the slices of French baguette on a baking sheet and toast them in the oven for about 8-10 minutes, or until golden and crispy. This step will guarantee that the bread holds its texture when placed in the soup.
- Assemble and Serve: Once the soup is ready, remove the bay leaf and ladle the soup into oven-safe bowls. Place a slice of toasted baguette on top of each bowl and generously sprinkle the grated Gruyère cheese over the bread. Place the bowls on a baking sheet and broil in the oven for 3-5 minutes, or until the cheese is bubbly and golden brown. Be sure to keep an eye on them to prevent burning.
- Garnish and Enjoy: Carefully remove the bowls from the oven (they will be hot!) and let them cool slightly before serving. You can garnish with additional thyme leaves if desired. Serve the French Onion Soup hot, and enjoy the melty cheese and rich broth!
Extra Tips
For an even deeper flavor, consider using a combination of beef and chicken broth. Feel free to experiment with different types of cheese; Comté or even a sharp cheddar can add a unique twist. Additionally, you can prepare the soup in advance and store it in the refrigerator; just reheat it on the stove before adding the bread and cheese for the final broiling step. Enjoy your homemade French Onion Soup!
Creamy Garlic Shrimp

Looking for a quick and delicious French-inspired dinner? Creamy Garlic Shrimp is the perfect solution for busy weeknights or whenever you need a satisfying meal in a hurry. This dish combines succulent shrimp with a rich, creamy sauce infused with garlic and herbs, creating a delightful blend of flavors that will impress your family or guests.
Served over pasta, rice, or with crusty bread to soak up the sauce, this dish isn’t only simple to make but also incredibly satisfying.
The beauty of Creamy Garlic Shrimp lies in its simplicity. With just a handful of ingredients, you can whip up a gourmet meal that feels indulgent yet is quick enough for a weeknight dinner. The key to this dish is to use fresh shrimp and high-quality ingredients to elevate the flavors.
Whether you’re an experienced cook or a beginner, this recipe will guide you through every step to guarantee a delicious outcome.
Ingredients (Serves 4-6)
- 1 pound large shrimp, peeled and deveined
- 4 tablespoons unsalted butter
- 4 cloves garlic, minced
- 1 cup heavy cream
- 1 cup chicken broth
- 1/2 cup grated Parmesan cheese
- 1 tablespoon fresh parsley, chopped
- Salt and pepper to taste
- 1/2 teaspoon red pepper flakes (optional)
- Cooked pasta or rice, for serving
Cooking Instructions
1. Prepare the Shrimp: Confirm that the shrimp are peeled and deveined. Rinse them under cold water and pat them dry with paper towels. This step is essential to guarantee the shrimp sear nicely and don’t become watery in the sauce.
2. Sauté the Shrimp: In a large skillet, melt 2 tablespoons of butter over medium-high heat. Once hot, add the shrimp in a single layer. Cook for about 1-2 minutes on each side until they turn pink and opaque. Remove the shrimp from the skillet and set aside.
Be careful not to overcook the shrimp as they can become rubbery.
3. Make the Garlic Sauce: In the same skillet, add the remaining 2 tablespoons of butter and minced garlic. Sauté for about 1 minute until the garlic is fragrant, being careful not to let it burn. This step builds the foundational flavor of the sauce.
4. Add Cream and Broth: Pour in the heavy cream and chicken broth, stirring to combine. Bring the mixture to a gentle simmer. Allow it to cook for about 3-4 minutes, stirring occasionally, until the sauce slightly thickens.
5. Incorporate Cheese and Seasonings: Stir in the grated Parmesan cheese until melted and smooth. Season the sauce with salt, pepper, and red pepper flakes if using. This step adds depth to the sauce and balances the creaminess with a touch of heat.
6. Combine Shrimp and Sauce: Return the cooked shrimp to the skillet, coating them in the creamy sauce. Allow everything to cook together for an additional 2-3 minutes to guarantee the shrimp are heated through and absorb some of the sauce’s flavors.
7. Serve: Remove the skillet from heat and stir in the chopped parsley for a fresh finish. Serve the creamy garlic shrimp over your choice of pasta or rice, and enjoy the rich flavors of this delightful dish.
Extra Tips
To elevate your Creamy Garlic Shrimp, consider adding a splash of white wine to the sauce for a more complex flavor profile.
Additionally, using fresh herbs such as thyme or basil can enhance the dish even further. Serve with a crisp green salad or steamed vegetables on the side for a complete meal.
If you want to make this dish ahead of time, prepare the sauce and shrimp separately, then combine them just before serving to maintain the shrimp’s texture. Enjoy your delicious French-inspired dinner!
Baked Camembert With Herbs
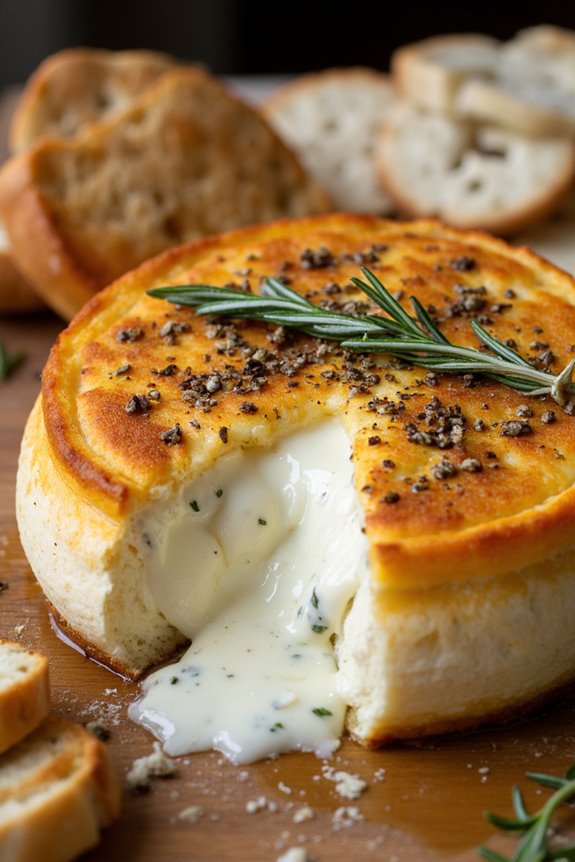
Baked Camembert with Herbs is a simple yet elegant dish that makes for a perfect quick French dinner. The creamy texture of the Camembert cheese, infused with aromatic herbs, creates a delightful appetizer or a light main course that pairs beautifully with crusty bread or crackers.
This dish isn’t only easy to prepare but also offers an impressive presentation, making it suitable for both family dinners and special occasions.
To prepare this dish, you’ll need a wheel of Camembert cheese, fresh herbs, and a few pantry staples. Once baked, the cheese becomes wonderfully gooey, inviting you to scoop it up with your favorite accompaniments.
Whether you’re hosting a casual get-together or enjoying a cozy evening at home, Baked Camembert with Herbs is sure to warm your heart and please your palate.
Ingredients (serves 4-6):
- 1 wheel of Camembert cheese (about 250g)
- 2 tablespoons fresh rosemary, chopped
- 2 tablespoons fresh thyme, chopped
- 1 clove garlic, minced
- 2 tablespoons olive oil
- Freshly ground black pepper, to taste
- Crusty bread or crackers, for serving
- Optional: honey or fig jam, for drizzling
Cooking Instructions:
1. Preheat the Oven: Begin by preheating your oven to 180°C (350°F). This guarantees that the cheese will melt evenly and achieve that perfect gooey texture.
2. Prepare the Camembert: Take the wheel of Camembert out of its packaging and place it in a small, oven-safe dish. If the cheese comes in a wooden box, you can leave it in there, just make sure it’s oven-safe.
3. Season the Cheese: In a small bowl, combine the chopped rosemary, thyme, minced garlic, and olive oil. Mix well until the herbs are evenly coated in oil. Pour this mixture over the top of the Camembert, making sure to cover it generously.
Sprinkle freshly ground black pepper on top for added flavor.
4. Bake the Cheese: Place the prepared Camembert in the preheated oven and bake for approximately 15-20 minutes, or until the cheese is soft and bubbling. Keep an eye on it to avoid overcooking, as you want the cheese to retain its shape.
5. Serve: Once baked, carefully remove the Camembert from the oven. Let it sit for a couple of minutes before serving. Accompany the warm cheese with slices of crusty bread or crackers for dipping.
For an extra touch, drizzle some honey or fig jam on top just before serving.
Extra Tips:
For the best results, use a high-quality Camembert cheese, as the flavor will greatly enhance the dish.
Feel free to experiment with different herbs like oregano or basil, depending on your preference. Additionally, serving the baked Camembert with assorted sides like roasted vegetables or a fresh salad can elevate the meal.
Enjoy your delightful French dinner experience!
Spinach and Cheese Quiche

Spinach and Cheese Quiche is a classic French dish that combines a buttery, flaky crust with a rich and savory filling made from fresh spinach, creamy cheese, and eggs. Perfect for a quick dinner, this quiche can be enjoyed warm or at room temperature, making it an ideal option for entertaining or meal prep.
Pair it with a crisp salad for a complete meal that’s both satisfying and delicious. This versatile dish allows for substitutions and variations, so feel free to mix in your favorite ingredients, such as mushrooms, sun-dried tomatoes, or different types of cheese.
Whether you’re a seasoned chef or a beginner in the kitchen, this Spinach and Cheese Quiche recipe is straightforward and rewarding, bringing a touch of French elegance to your dining table.
Ingredients (Serves 4-6)
- 1 pre-made pie crust (9-inch)
- 2 cups fresh spinach, chopped
- 1 cup shredded cheese (Gruyère, cheddar, or your choice)
- 4 large eggs
- 1 cup heavy cream or whole milk
- 1/2 teaspoon salt
- 1/4 teaspoon black pepper
- 1/4 teaspoon nutmeg (optional)
- 1 tablespoon olive oil or butter (for sautéing spinach)
- 1/2 onion, finely chopped (optional)
Cooking Instructions
- Preheat the Oven: Start by preheating your oven to 375°F (190°C). This guarantees that your quiche bakes evenly and achieves a golden brown crust.
- Prepare the Pie Crust: Place the pre-made pie crust into a 9-inch pie dish, pressing it gently against the sides and bottom. If desired, use a fork to poke holes in the bottom of the crust to prevent bubbling during baking. Set aside.
- Sauté the Spinach: In a skillet, heat olive oil or butter over medium heat. Add the chopped onion (if using) and sauté until translucent, about 3-4 minutes. Then, add the chopped spinach and cook until wilted, about 2-3 minutes. Remove from heat and let cool slightly.
- Mix the Filling: In a mixing bowl, whisk together the eggs, heavy cream (or milk), salt, pepper, and nutmeg (if using). Make sure the mixture is well combined and creamy.
- Combine Ingredients: Stir the sautéed spinach and onion mixture into the egg mixture. Then, gently fold in the shredded cheese until evenly distributed.
- Fill the Pie Crust: Pour the filling mixture into the prepared pie crust, spreading it evenly. Be careful not to overfill; leave a little space at the top.
- Bake the Quiche: Place the quiche in the preheated oven and bake for 35-40 minutes, or until the center is set and the top is lightly golden. You can check for doneness by inserting a knife in the center; it should come out clean.
- Cool and Serve: Once baked, remove the quiche from the oven and allow it to cool for about 10-15 minutes. This will help it set further and make it easier to slice. Serve warm or at room temperature.
Extra Tips
For a perfect Spinach and Cheese Quiche, consider using fresh ingredients for the best flavor, especially with the cheese. If you’re short on time, you can use frozen spinach; just be sure to thaw and drain it well to avoid excess moisture in the quiche.
Additionally, quiche is an excellent dish for customization, so feel free to experiment with different vegetables, herbs, or cheeses to suit your taste preferences. Enjoy your culinary creation!
Dijon Mustard Chicken

Dijon Mustard Chicken is a delicious and quick French dinner option that combines the tangy flavor of Dijon mustard with juicy chicken. This dish is perfect for busy weeknights or when you want to impress guests without spending hours in the kitchen.
The creamy mustard sauce adds a delightful richness to the chicken, making it a satisfying meal served alongside your favorite sides. In under 30 minutes, you can whip up this delightful dish. Pair it with some steamed vegetables or a fresh salad, and you have a complete meal that’s sure to please everyone at the table.
The combination of Dijon mustard, garlic, and cream creates a flavorful sauce that coats the chicken beautifully, guaranteeing every bite is packed with taste.
Ingredients (Serves 4-6):
- 4-6 boneless, skinless chicken breasts
- 2 tablespoons Dijon mustard
- 1 cup heavy cream
- 2 tablespoons olive oil
- 2 cloves garlic, minced
- 1 teaspoon dried thyme
- Salt and pepper, to taste
- Fresh parsley, chopped (for garnish)
Cooking Instructions:
- Prepare the Chicken: Start by seasoning the chicken breasts with salt and pepper on both sides. This helps to enhance the flavor of the chicken while it cooks.
- Heat the Oil: In a large skillet, heat the olive oil over medium-high heat. Once the oil is hot, carefully add the seasoned chicken breasts to the pan. Cook for about 5-7 minutes on each side, or until the chicken is golden brown and cooked through. Use a meat thermometer to verify the internal temperature reaches 165°F (75°C).
- Make the Sauce: Once the chicken is cooked, remove it from the skillet and set it aside on a plate. In the same skillet, add the minced garlic and sauté for about 1 minute until fragrant. Be careful not to burn the garlic.
- Add Mustard and Cream: Lower the heat to medium and stir in the Dijon mustard and heavy cream. Mix well to combine. Allow the sauce to simmer for about 3-4 minutes, stirring occasionally, until it thickens slightly.
- Combine Chicken with Sauce: Return the chicken to the skillet, coating it with the creamy mustard sauce. Let it simmer for an additional 2-3 minutes to absorb the flavors.
- Serve and Garnish: Once the chicken is well coated and heated through, remove it from the heat. Serve on a platter, drizzled with the remaining sauce and garnished with fresh chopped parsley.
Extra Tips:
When cooking Dijon Mustard Chicken, you can customize the dish by adding vegetables such as mushrooms or spinach to the sauce for extra flavor and nutrition.
For a lighter version, you can substitute the heavy cream with Greek yogurt or a lower-fat alternative. Additionally, feel free to experiment with different herbs, such as rosemary or tarragon, to give the sauce a unique twist.
Serve with crusty bread to soak up the delicious sauce!
Fast Beef Bourguignon
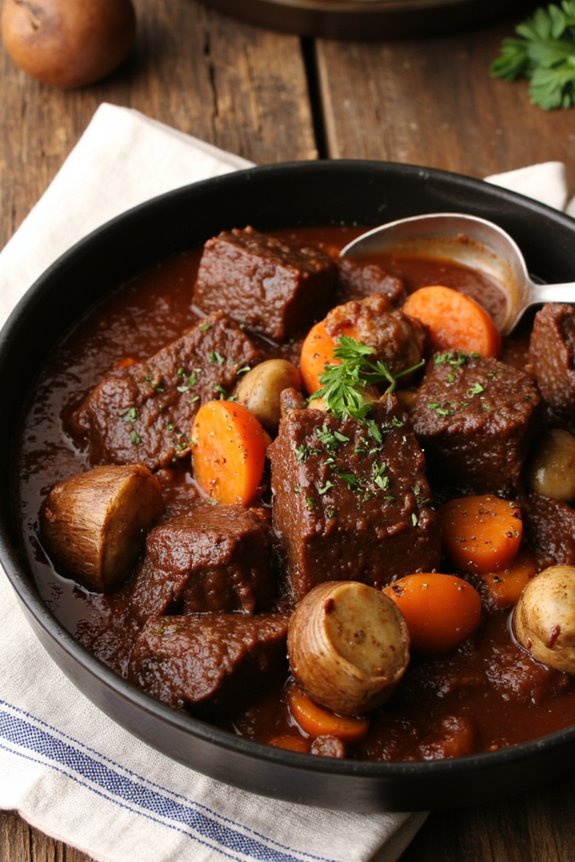
Fast Beef Bourguignon is a quicker take on the classic French dish that features tender beef braised in red wine, alongside aromatic vegetables and herbs. This version maintains the essence of the traditional recipe while markedly reducing the cooking time, making it ideal for a weeknight dinner.
With rich flavors and hearty ingredients, this dish is sure to impress your family or guests without requiring hours of preparation.
To make this Fast Beef Bourguignon, you’ll use a pressure cooker or an instant pot to achieve that deep, complex flavor in a fraction of the time. The key is to sear the beef well, which adds depth to the sauce, followed by the addition of red wine, broth, and vegetables. This not only creates a delicious meal but also fills your kitchen with an irresistible aroma.
Ingredients (Serves 4-6):
- 2 lbs beef chuck, cut into 1-inch cubes
- 2 tablespoons olive oil
- 1 large onion, chopped
- 2 carrots, sliced
- 3 cloves garlic, minced
- 2 cups red wine (preferably Burgundy)
- 1 cup beef broth
- 2 tablespoons tomato paste
- 1 teaspoon dried thyme
- 2 bay leaves
- Salt and pepper to taste
- 8 oz button mushrooms, quartered
- Fresh parsley, chopped (for garnish)
Cooking Instructions:
- Sear the Beef: In a pressure cooker, heat the olive oil over medium-high heat. Add the beef cubes in batches, ensuring not to overcrowd the pot. Sear until browned on all sides, about 5-7 minutes. This step is essential for developing flavors.
- Sauté the Vegetables: Once the beef is browned, remove it from the pot and set aside. In the same pot, add the chopped onion and carrots. Sauté for about 5 minutes until the onions are translucent. Add minced garlic and cook for another minute until fragrant.
- Deglaze the Pot: Pour in the red wine, scraping the bottom of the pot with a wooden spoon to remove any browned bits. This adds depth to the sauce. Bring the wine to a boil and let it simmer for about 2-3 minutes.
- Add the Remaining Ingredients: Stir in the beef broth, tomato paste, thyme, bay leaves, and the seared beef. Season with salt and pepper to taste. Add the quartered mushrooms on top without stirring.
- Pressure Cook: Close the lid of the pressure cooker and set it to high pressure. Cook for 35 minutes. Allow the pressure to release naturally for about 10 minutes, then perform a quick release for any remaining pressure.
- Serve: Once cooked, carefully remove the bay leaves. Serve the beef bourguignon hot, garnished with fresh parsley, alongside crusty bread or over mashed potatoes to soak up the delicious sauce.
Extra Tips:
For an even more robust flavor, consider marinating the beef in red wine for a few hours or overnight prior to cooking.
If you don’t have a pressure cooker, you can still make this dish in a Dutch oven; just extend the simmering time to about 2 to 3 hours on low heat.
Additionally, feel free to add other vegetables such as peas or pearl onions for extra texture and flavor. Enjoy your Fast Beef Bourguignon with a glass of the same red wine used in cooking for a complete dining experience!
Provencal Vegetable Tart
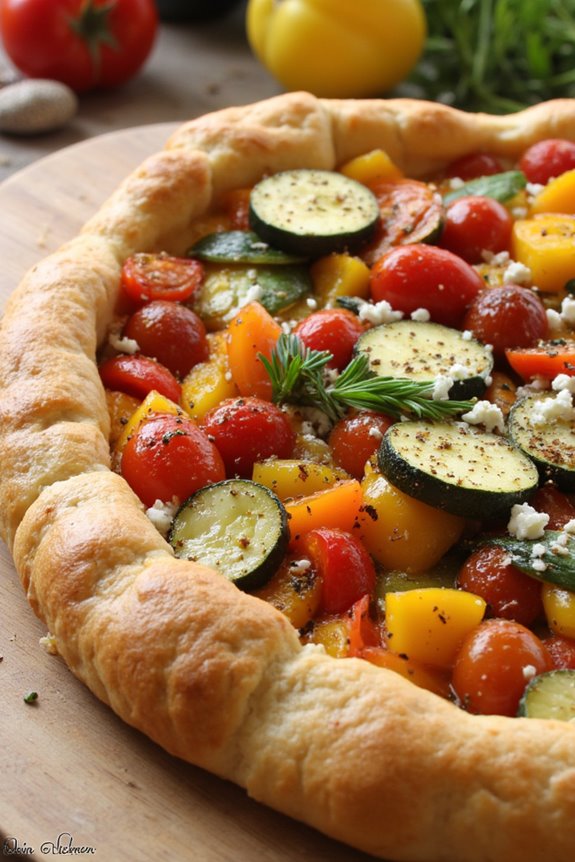
If you’re looking for a delightful quick dinner that embodies the flavors of the South of France, the Provencal Vegetable Tart is an excellent choice. This dish features a flaky pastry crust filled with a colorful array of fresh vegetables such as zucchini, bell peppers, and tomatoes, all seasoned with aromatic herbs de Provence. Not only is it visually appealing, but it also offers a wonderful balance of textures and flavors, making it a satisfying meal for both vegetarians and meat-lovers alike.
Serve it warm or at room temperature, and you have a versatile dish that’s perfect for any occasion.
Creating this tart is easier than you might think, thanks to the use of store-bought pastry dough. This means you can focus on preparing the vegetables and crafting a delicious filling. The Provencal Vegetable Tart can be paired with a simple green salad, making it a complete meal that feels gourmet without the fuss.
Whether you’re entertaining guests or enjoying a quiet family dinner, this dish is sure to impress.
Ingredients (Serves 4-6)
- 1 sheet of puff pastry (thawed if frozen)
- 1 medium zucchini, sliced
- 1 red bell pepper, diced
- 1 yellow bell pepper, diced
- 1 cup cherry tomatoes, halved
- 1 small onion, thinly sliced
- 2 cloves garlic, minced
- 2 tablespoons olive oil
- 1 teaspoon dried herbs de Provence
- Salt and pepper to taste
- 1 cup crumbled feta cheese (optional)
- 1 egg (for egg wash, optional)
Cooking Instructions
1. Preheat the Oven: Begin by preheating your oven to 400°F (200°C). This guarantees that your tart cooks evenly and achieves a perfect golden-brown crust.
2. Prepare the Vegetables: In a large skillet over medium heat, add the olive oil. Once heated, add the sliced onion and garlic, sautéing until they become translucent and fragrant, about 2-3 minutes.
Then, add the zucchini, red and yellow bell peppers. Cook for another 5-7 minutes until they soften. Finally, stir in the cherry tomatoes and season the mixture with herbs de Provence, salt, and pepper. Cook for an additional 2-3 minutes, then remove from heat and let it cool slightly.
3. Roll Out the Pastry: On a lightly floured surface, roll out the puff pastry into a rectangle or circle, depending on your tart pan’s shape. Aim for about 1/8 inch thick. Gently transfer the pastry to a greased tart pan, pressing it into the edges and trimming any excess.
4. Fill the Tart: Spoon the vegetable mixture into the prepared pastry shell, spreading it out evenly. If you’d like, sprinkle crumbled feta cheese on top for added flavor and creaminess.
5. Bake the Tart: If using an egg wash, beat the egg and brush it along the edges of the pastry for a shiny finish. Place the tart in the preheated oven and bake for 25-30 minutes, or until the pastry is puffed and golden brown.
6. Serve: Once baked, allow the tart to cool for a few minutes before slicing. Serve warm or at room temperature, garnished with fresh herbs if desired.
Extra Tips
To elevate the flavors of your Provencal Vegetable Tart, consider adding a splash of balsamic vinegar to the vegetables while sautéing, which enhances their natural sweetness.
Additionally, feel free to experiment with seasonal vegetables or herbs based on what’s available. If you have leftovers, they can be stored in the refrigerator and make for a delicious lunch the next day. Enjoy your culinary adventure in French cuisine!
Lemon Herb Chicken Salad

If you’re looking for a delightful and quick French dinner option, the Lemon Herb Chicken Salad is an excellent choice. This dish combines the vibrant flavors of fresh herbs and zesty lemon with tender chicken, making it perfect for a light yet satisfying meal. Not only is it invigorating, but it’s also a great way to incorporate lean protein and vegetables into your diet.
Plus, it requires minimal cooking time, making it suitable for busy weeknights or casual gatherings.
This salad can easily be customized based on your preferences or what you have on hand. Feel free to add other ingredients like avocado, nuts, or different types of greens to make it your own. Serve it with a crusty baguette or over a bed of mixed greens for a complete meal that’s sure to please everyone at the dinner table.
Ingredients (Serves 4-6):
- 2 large boneless, skinless chicken breasts
- 1/4 cup olive oil
- 2 tablespoons fresh lemon juice
- Zest of 1 lemon
- 2 teaspoons Dijon mustard
- 1 tablespoon fresh thyme leaves (or 1 teaspoon dried thyme)
- 1 tablespoon fresh parsley, chopped
- Salt and pepper to taste
- 6 cups mixed salad greens (such as arugula, spinach, and romaine)
- 1 cup cherry tomatoes, halved
- 1/2 cucumber, sliced
- 1/4 red onion, thinly sliced
- Optional: crumbled feta cheese or goat cheese for topping
Cooking Instructions:
- Prepare the Chicken: Start by preheating your grill or stovetop grill pan over medium-high heat. While it heats, season the chicken breasts with salt and pepper on both sides. This simple seasoning will enhance the chicken’s natural flavors.
- Make the Marinade: In a small bowl, whisk together the olive oil, lemon juice, lemon zest, Dijon mustard, thyme, and parsley. This marinade will infuse the chicken with a bright and herby flavor. Reserve a small amount for drizzling over the salad later.
- Marinate the Chicken: Place the seasoned chicken breasts in a shallow dish or a resealable plastic bag, and pour the marinade over them. Make sure the chicken is well coated. Let it marinate for at least 15-20 minutes to absorb the flavors. If you’re short on time, even a 5-minute marinade will add some zest.
- Cook the Chicken: Once the grill is hot, place the marinated chicken breasts on it. Cook for about 6-7 minutes on each side, or until the internal temperature reaches 165°F (75°C). This will ensure that the chicken is cooked through and juicy. Remove the chicken from the grill and let it rest for a few minutes before slicing.
- Prepare the Salad: In a large salad bowl, combine the mixed greens, cherry tomatoes, cucumber, and red onion. Toss gently to mix the vegetables evenly.
- Slice the Chicken: After the chicken has rested, slice it into thin strips. This will make it easier to distribute over the salad.
- Assemble the Salad: Top the salad with the sliced chicken and drizzle the reserved marinade over the top. If desired, sprinkle with crumbled feta or goat cheese for added flavor. Toss the salad lightly to combine everything.
- Serve: Divide the salad among plates and serve immediately as an invigorating dinner option.
Extra Tips: When cooking the chicken, make sure not to overcrowd the grill or pan, as this can prevent proper browning. If you have leftovers, the salad can be stored in the refrigerator for up to a day, but it’s best to keep the dressing separate until you’re ready to serve to prevent wilting the greens.
Consider adding toasted nuts or seeds for an extra crunch and nutrition boost!
Simple Bouillabaisse
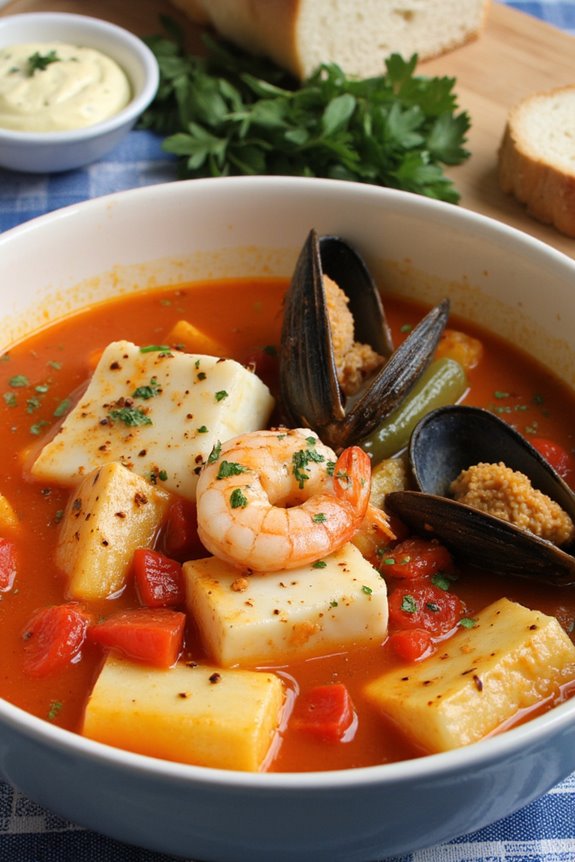
Bouillabaisse is a traditional Provençal fish stew that captures the essence of the Mediterranean with its fragrant broth and variety of seafood. Originating from the port city of Marseille, this dish is a celebration of fresh fish and shellfish, paired with aromatic herbs and spices. A bowl of bouillabaisse offers not only a delightful culinary experience but also a rich history, as fishermen would prepare this stew using their daily catch and leftover fish.
Cooking bouillabaisse may sound complex, but it’s quite manageable with a bit of preparation. The key to a delicious bouillabaisse lies in the quality of the seafood and the depth of the broth. A good bouillabaisse will reflect the flavors of the sea, enhanced by garlic, saffron, and herbs. Serve this dish with a side of crusty bread and aïoli for a truly authentic experience.
Ingredients (Serves 4-6):
- 2 tablespoons olive oil
- 1 onion, diced
- 2 leeks, sliced
- 2 cloves garlic, minced
- 1 teaspoon saffron threads
- 1 teaspoon fennel seeds
- 1 bay leaf
- 6 cups fish stock
- 1 can (14 oz) diced tomatoes
- 1 pound firm white fish (such as cod or haddock), cut into chunks
- 1 pound mussels, cleaned
- 1 pound shrimp, peeled and deveined
- Salt and pepper to taste
- Fresh parsley, chopped for garnish
- Crusty bread and aïoli for serving
Cooking Instructions:
- Sauté Vegetables: In a large pot, heat the olive oil over medium heat. Add the diced onion and sliced leeks. Sauté for about 5 minutes, or until the vegetables are softened and translucent. This step builds the base flavor for your bouillabaisse.
- Add Aromatics: Stir in the minced garlic, saffron threads, fennel seeds, and bay leaf. Cook for an additional 2 minutes, allowing the spices to release their aroma. This will infuse the broth with rich, aromatic flavors.
- Prepare the Broth: Pour in the fish stock and add the diced tomatoes. Bring the mixture to a simmer, then reduce the heat to low and let it cook for about 10-15 minutes. This simmering time allows the flavors to meld together, creating a robust broth.
- Add Seafood: Gently add the chunks of white fish, mussels, and shrimp to the pot. Cover and cook for about 5-7 minutes, or until the mussels have opened and the fish is cooked through. Be careful not to overcook the seafood, as it can become tough.
- Season and Serve: Taste the bouillabaisse and season with salt and pepper as needed. Once the seafood is cooked, remove from heat and discard any mussels that didn’t open. Ladle the bouillabaisse into bowls and garnish with fresh parsley. Serve hot with crusty bread and a dollop of aïoli on the side.
Extra Tips:
For an extra depth of flavor, consider adding a splash of white wine to the broth after sautéing the vegetables.
Also, feel free to customize the seafood based on what’s fresh and available; clams, squid, or even lobster can be excellent additions to your bouillabaisse.
Remember to serve the dish immediately for the best experience, as the freshness of the seafood is key.