

When I think of a perfect morning, I can’t help but picture a spread of French brunch recipes. Flaky croissants and the savory aroma of quiche make my heart sing. From delicate crêpes to sweet French toast, each dish adds a touch of elegance. These recipes are sure to transform an ordinary breakfast into something truly special. Let’s explore these charming ideas that will transport you to a quaint Parisian café.
Classic Croissants

Croissants are a fundamental French pastry, known for their flaky, buttery layers and crescent shape. Originating from Austria, the recipe was brought to France in the 19th century, where it was adapted and perfected. Making croissants from scratch requires time and patience, but the result is a delightful treat that’s well worth the effort. Freshly baked croissants are perfect for a cozy brunch, served with jam, butter, or even as a base for a sandwich.
The dough for classic croissants is fundamentally a laminated dough, which means it involves folding butter into the dough multiple times to create layers. This process is what gives croissants their characteristic airy texture. While the recipe may seem intimidating, breaking it down into manageable steps will help you create these delicious pastries at home. With a little practice, you’ll be able to impress your guests with your baking skills.
Ingredients (Serves 4-6)
- 4 cups all-purpose flour
- 1 tablespoon granulated sugar
- 2 teaspoons salt
- 1 packet (2 ¼ teaspoons) active dry yeast
- 1 ½ cups unsalted butter (cold)
- 1 ½ cups whole milk (warm)
- 1 egg (for egg wash)
Cooking Instructions
- Prepare the Dough: In a large mixing bowl, combine the flour, sugar, salt, and yeast. Make sure the salt and yeast don’t come into direct contact at this stage, as it may inhibit the yeast’s ability to rise. Gradually add the warm milk to the dry ingredients and mix until a shaggy dough forms. Knead the dough gently for about 3-5 minutes until it comes together. Wrap it in plastic wrap and refrigerate for at least 30 minutes.
- Prepare the Butter Block: While the dough is chilling, prepare the butter block. Place the cold unsalted butter between two sheets of parchment paper. Using a rolling pin, pound and roll the butter into a rectangle about ½ inch thick. Make sure the butter remains cold and firm. Once shaped, refrigerate the butter block for another 15-20 minutes.
- Laminate the Dough: After the dough has chilled, roll it out on a lightly floured surface into a rectangle that’s about 10×20 inches. Place the chilled butter block in the center of the dough and fold the dough over the butter, encasing it completely. Seal the edges to prevent the butter from leaking out.
- Roll and Fold: Roll the dough out again into a rectangle, about 10×20 inches. Then, perform a “double turn” by folding the dough into thirds, like a letter. Wrap it in plastic wrap and refrigerate for 30 minutes. Repeat this rolling and folding process two more times for a total of three turns, chilling the dough in between each turn.
- Cut and Shape the Croissants: Once the final turn is complete, roll the dough out into a large rectangle (about 10×30 inches). Cut the dough into triangles with a base of about 5 inches. Starting from the base, roll each triangle tightly towards the tip to form the croissant shape. Place them on a baking sheet lined with parchment paper.
- Proof the Croissants: Cover the shaped croissants with a kitchen towel and let them rise in a warm place for about 1-2 hours, or until they’ve doubled in size. During this time, preheat your oven to 375°F (190°C).
- Bake the Croissants: In a small bowl, beat the egg and brush the egg wash over the tops of the croissants for a golden finish. Bake in the preheated oven for 15-20 minutes, or until they’re puffed and golden brown. Allow them to cool slightly before serving.
Extra Tips
To achieve the best results when making croissants, confirm that all ingredients are as cold as possible, especially the butter. This helps maintain the layers and creates the desired flakiness.
Additionally, don’t rush the proofing time; allowing the croissants to rise properly is vital for light and airy pastries. If you find the dough becoming too warm during the rolling process, pop it back in the refrigerator for a few minutes to maintain the integrity of the butter layers.
Enjoy your freshly baked croissants with a cup of coffee or tea for an authentic French brunch experience!
Quiche Lorraine

Quiche Lorraine is a classic French dish that brings a touch of elegance to any brunch table. With its flaky crust and savory filling of eggs, cream, cheese, and crispy bacon, this dish isn’t only delicious but also versatile. It can be served warm or at room temperature, making it perfect for gatherings and celebrations.
The combination of rich flavors and textures makes Quiche Lorraine a beloved choice for both casual and formal occasions. To create the perfect Quiche Lorraine, it’s essential to use fresh, high-quality ingredients. The balance between the creamy custard filling and the salty, crispy bacon is what makes this quiche stand out.
Whether you’re entertaining guests or enjoying a quiet Sunday brunch with family, this dish is sure to impress. Let’s explore the recipe and bring a taste of France to your kitchen!
Ingredients (Serves 4-6)
- 1 pie crust (store-bought or homemade)
- 6 large eggs
- 1 cup heavy cream
- 1 cup whole milk
- 1 cup shredded Gruyère cheese
- 6 slices of bacon, cooked and crumbled
- 1 small onion, finely chopped
- 1 teaspoon salt
- 1/2 teaspoon black pepper
- 1/4 teaspoon nutmeg
- Fresh parsley for garnish (optional)
Cooking Instructions
- Preheat the Oven: Begin by preheating your oven to 375°F (190°C). This guarantees that the quiche will cook evenly and develop a nice golden crust.
- Prepare the Pie Crust: If using a store-bought pie crust, place it in a 9-inch pie dish and prick the bottom with a fork to prevent bubbling. If making a homemade crust, roll it out and fit it into the dish. Pre-bake the crust for about 10 minutes until lightly golden. Remove it from the oven and set aside to cool slightly.
- Cook the Bacon and Onion: In a skillet over medium heat, cook the bacon until crispy. Use a slotted spoon to transfer the bacon to a paper towel-lined plate to drain excess grease. In the same skillet, add the chopped onion and sauté until soft and translucent, about 5 minutes. Remove from heat and let cool.
- Mix the Custard: In a large mixing bowl, whisk together the eggs, heavy cream, milk, salt, pepper, and nutmeg until fully combined. This mixture will create the creamy filling for your quiche.
- Combine Ingredients: Stir the crumbled bacon, sautéed onion, and shredded Gruyère cheese into the egg mixture. Make sure everything is evenly distributed to guarantee each slice has a delightful mix of flavors.
- Pour Filling into Crust: Carefully pour the egg mixture into the prepared pie crust, filling it almost to the top. Be cautious not to overfill, as it may overflow during baking.
- Bake the Quiche: Place the quiche in the preheated oven and bake for 35-40 minutes or until the center is set and the top is lightly browned. A knife inserted into the center should come out clean.
- Cool and Serve: Once baked, remove the quiche from the oven and let it cool for at least 10 minutes before slicing. This resting time allows the filling to firm up slightly, making it easier to cut.
Extra Tips
To enhance the flavor of your Quiche Lorraine, consider adding fresh herbs such as thyme or chives to the egg mixture for an aromatic touch. Additionally, feel free to experiment with different types of cheese or incorporate vegetables like spinach or mushrooms for added nutrition.
For a deeper flavor, you can also use a mix of cream and sour cream. Serve your quiche with a simple side salad for a complete meal that’s sure to impress!
Ratatouille Tart

Ratatouille Tart is a delightful and visually stunning dish that captures the essence of French cuisine. This savory tart features a flaky pastry crust filled with a medley of vibrant vegetables, including zucchini, eggplant, and bell peppers, all simmered in a rich tomato sauce. Perfect for a weekend brunch or a casual gathering, this dish not only pleases the palate but also serves as a beautiful centerpiece at your table.
Making a Ratatouille Tart is an opportunity to showcase seasonal vegetables and bring together layers of flavor. The combination of fresh herbs and the buttery, crumbly crust elevates the dish, while the colorful arrangement of vegetables makes it a feast for the eyes. Whether served warm or at room temperature, this tart is sure to impress your guests and leave them craving more.
Ingredients (serving size: 4-6 people)
- 1 pre-made pie crust (9-inch)
- 1 medium eggplant, thinly sliced
- 1 medium zucchini, thinly sliced
- 1 medium yellow squash, thinly sliced
- 1 red bell pepper, thinly sliced
- 1 yellow bell pepper, thinly sliced
- 1 cup cherry tomatoes, halved
- 2 cups tomato sauce (homemade or store-bought)
- 1 tablespoon olive oil
- 2 cloves garlic, minced
- 1 teaspoon fresh thyme leaves
- 1 teaspoon fresh basil, chopped
- Salt and pepper to taste
- 1 cup shredded mozzarella cheese (optional)
- Fresh basil leaves for garnish (optional)
Cooking Instructions
- Preheat the Oven: Start by preheating your oven to 375°F (190°C). This will guarantee that your tart bakes evenly and achieves a golden-brown crust.
- Prepare the Pie Crust: Roll out the pre-made pie crust and fit it into a 9-inch tart pan. Trim any excess dough and prick the bottom with a fork to prevent it from puffing up during baking. Place the crust in the refrigerator while you prepare the filling.
- Sauté the Vegetables: In a large skillet, heat the olive oil over medium heat. Add the minced garlic and sauté for about 1 minute until fragrant. Then, add the sliced eggplant, zucchini, yellow squash, and bell peppers. Cook for 5-7 minutes, stirring occasionally until the vegetables are slightly tender. Season with salt, pepper, thyme, and basil.
- Add the Tomato Sauce: Once the vegetables are cooked, stir in the tomato sauce and let it simmer for another 2-3 minutes. This allows the flavors to meld together. Remove from heat and let the mixture cool slightly.
- Assemble the Tart: Take the prepared pie crust from the refrigerator. Spread an even layer of the sautéed vegetable mixture over the crust. For an extra touch, arrange the halved cherry tomatoes on top in a decorative pattern. If desired, sprinkle the shredded mozzarella cheese over the top.
- Bake the Tart: Place the tart in the preheated oven and bake for 30-35 minutes, or until the crust is golden brown and the cheese is bubbly and melted.
- Cool and Serve: Once baked, remove the tart from the oven and allow it to cool for about 10 minutes before slicing. Garnish with fresh basil leaves if desired, and serve warm or at room temperature.
Extra Tips
For a more robust flavor, consider adding a splash of balsamic vinegar to the sautéed vegetables before adding the tomato sauce. You can also experiment with different herbs such as oregano or rosemary for a unique twist.
If you’re short on time, you can use a store-bought tomato sauce, but for a homemade touch, simmer crushed tomatoes with garlic and herbs for a richer taste. Enjoy your Ratatouille Tart with a side salad or a glass of crisp white wine for a truly elegant brunch experience!
Crêpes With Lemon and Sugar

Crêpes are a classic French dish that can be enjoyed for breakfast, brunch, or dessert. They’re incredibly versatile and can be filled or topped with a variety of ingredients. The simplicity of crêpes allows the delicate flavor of the batter to shine through, making them perfect for a light yet satisfying meal.
When paired with a sprinkle of sugar and a drizzle of fresh lemon juice, the result is a delightful combination of sweetness and tang that’s sure to impress your guests.
Making crêpes may seem intimidating at first, but with a few simple steps, you can achieve restaurant-quality results right in your own kitchen. This recipe for Crêpes With Lemon and Sugar serves 4-6 people and is a wonderful way to elevate your brunch experience. Whether you choose to serve them plain or with a side of fresh fruit, these crêpes are bound to be a hit at your table.
Ingredients (serves 4-6 people):
- 1 cup all-purpose flour
- 2 large eggs
- 1 1/2 cups milk
- 2 tablespoons melted butter
- 1 tablespoon sugar
- 1/4 teaspoon salt
- Zest of 1 lemon
- Fresh lemon juice (to taste)
- Additional sugar for sprinkling
Cooking Instructions:
1. Prepare the batter: In a large mixing bowl, whisk together the flour, eggs, milk, melted butter, sugar, salt, and lemon zest until the mixture is smooth and free of lumps. The batter should be thin; if it seems too thick, add a bit more milk to achieve the desired consistency.
Let the batter rest for at least 30 minutes at room temperature. This resting period allows the gluten to relax, resulting in tender crêpes.
2. Heat the pan: Preheat a non-stick skillet or crêpe pan over medium heat. You can lightly grease the surface with a small amount of butter or oil to prevent sticking, but be cautious not to add too much, as crêpes are meant to be light and delicate.
3. Cook the crêpes: Once the pan is hot, pour a small ladleful (about 1/4 cup) of batter into the center of the pan. Quickly swirl the pan to spread the batter evenly into a thin layer.
Cook for about 1-2 minutes or until the edges start to lift and the bottom is lightly golden.
4. Flip the crêpe: Use a spatula to gently lift the edge of the crêpe and then carefully flip it over. Cook for an additional 1 minute on the other side until it’s golden and cooked through.
Transfer the crêpe to a plate and cover it with a clean kitchen towel to keep it warm while you repeat the process with the remaining batter.
5. Serve: Once all the crêpes are cooked, serve them warm with a generous squeeze of fresh lemon juice and a sprinkle of sugar on top. You can fold them, roll them up, or stack them for a beautiful presentation.
Extra Tips:
For an even more flavorful crêpe experience, consider adding a touch of vanilla extract to the batter or experimenting with different fillings such as Nutella, fresh berries, or whipped cream.
If you’re preparing a large batch, you can keep the cooked crêpes warm in a low oven (around 200°F) until you’re ready to serve. Remember, the key to perfect crêpes is to maintain an even heat and not overcrowd the pan, allowing each crêpe to cook evenly and achieve that delightful, tender texture.
Enjoy your elegant brunch!
French Toast With Berries
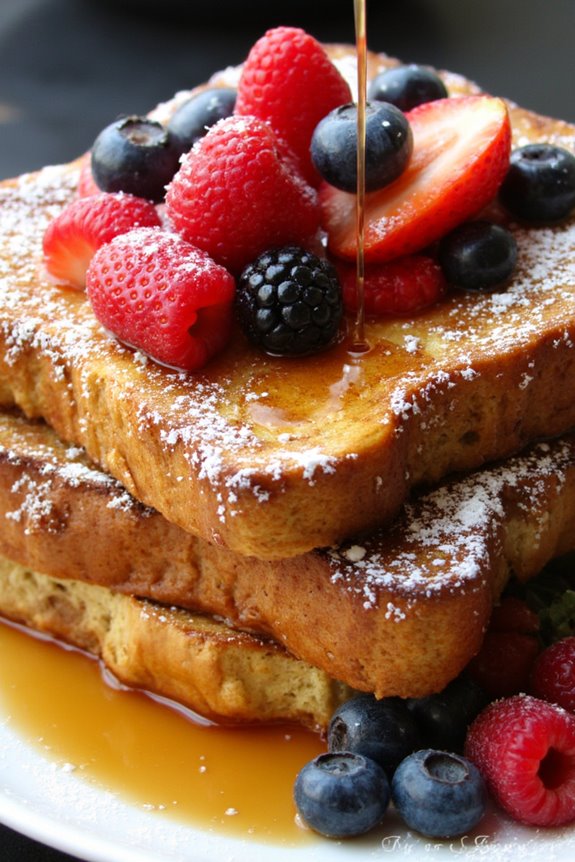
Indulging in a decadent plate of French Toast With Berries is a delightful way to elevate your brunch experience. This classic dish combines the rich, custardy flavor of bread soaked in a sweet egg mixture with the freshness of seasonal berries. It’s perfect for gatherings, family breakfasts, or simply treating yourself on a lazy weekend morning. The addition of berries not only enhances the dish’s visual appeal but also adds a burst of flavor and nutrition.
To create the perfect French Toast, start with high-quality bread, such as brioche or challah, which will absorb the custard beautifully while maintaining a fluffy interior. Pair this with a mix of juicy berries like strawberries, blueberries, and raspberries for a colorful topping that adds both sweetness and tang. Drizzle with maple syrup or a dusting of powdered sugar, and you have yourself a brunch dish that’s as elegant as it’s delicious.
Ingredients (Serves 4-6)
- 8 slices of brioche or challah bread
- 4 large eggs
- 1 cup whole milk
- 1 teaspoon vanilla extract
- 1 teaspoon ground cinnamon
- 2 tablespoons sugar
- Pinch of salt
- 2 tablespoons unsalted butter (for cooking)
- 2 cups mixed fresh berries (strawberries, blueberries, raspberries)
- Maple syrup (for serving)
- Powdered sugar (optional, for dusting)
Cooking Instructions
- Prepare the Egg Mixture: In a large mixing bowl, whisk together the eggs, milk, vanilla extract, cinnamon, sugar, and a pinch of salt until well combined. This mixture will be the custard that flavors the bread.
- Soak the Bread: Dip each slice of brioche or challah into the egg mixture, allowing it to soak for about 15-20 seconds on each side. Make sure the bread is well-coated but not overly soggy, as you want it to maintain its structure during cooking.
- Preheat the Pan: In a large skillet or griddle, melt 1 tablespoon of butter over medium heat. Confirm the butter is hot and bubbling but not burning before adding the soaked bread.
- Cook the French Toast: Place the soaked bread slices in the hot skillet, making sure not to overcrowd the pan. Cook for about 3-4 minutes on each side or until golden brown and crispy. Repeat this process with the remaining slices, adding more butter as needed.
- Prepare the Berries: While the French toast is cooking, rinse the mixed fresh berries under cold water and pat them dry. You can leave them whole or slice them, depending on your preference.
- Serve: Once cooked, transfer the French toast to a serving platter. Top with the mixed berries, drizzle with maple syrup, and if desired, dust with powdered sugar for an elegant finish.
Extra Tips
For an extra layer of flavor, consider adding a splash of orange zest or a hint of nutmeg to the egg mixture. If you have time, allow the soaked bread to rest for a few minutes before cooking to help the custard fully absorb.
This recipe can also be easily doubled for larger gatherings, and any leftovers can be stored in the refrigerator and reheated in the toaster for a quick breakfast treat.
Savory Galette With Spinach and Cheese

A savory galette is a delightful way to showcase the flavors of fresh ingredients, making it a perfect addition to any elegant French brunch. This rustic dish features a flaky, buttery crust that envelops a delicious filling of sautéed spinach and a blend of cheeses.
The beauty of a galette lies in its free-form shape, allowing for a casual presentation that feels inviting and homey, yet sophisticated. To enhance the flavors, you can choose a combination of cheeses such as goat cheese, feta, or Gruyère, each adding its own unique character to the filling.
Pair this galette with a light salad or a glass of sparkling wine for a truly indulgent brunch experience that will impress your guests. The preparation may seem a bit involved, but the end result is well worth the effort.
Ingredients (serving size: 4-6 people)
- 1 ½ cups all-purpose flour
- ½ teaspoon salt
- 1/2 cup unsalted butter, cold and cubed
- 1/4 cup ice water
- 2 cups fresh spinach, chopped
- 1 cup ricotta cheese
- 1/2 cup grated Gruyère cheese (or cheese of your choice)
- 1 clove garlic, minced
- 1 egg, beaten (for egg wash)
- Freshly cracked black pepper, to taste
- Optional: pinch of nutmeg
Cooking Instructions
1. Prepare the Dough: In a large mixing bowl, combine the all-purpose flour and salt. Add the cold, cubed butter and use a pastry cutter or your fingers to blend until the mixture resembles coarse crumbs.
Gradually add the ice water, mixing until the dough holds together. Shape the dough into a disc, wrap it in plastic wrap, and refrigerate for at least 30 minutes.
2. Sauté the Spinach: In a skillet over medium heat, add a drizzle of olive oil and minced garlic. Sauté for about 1 minute until fragrant.
Add the chopped spinach and cook until wilted, about 3-4 minutes. Remove from heat and let it cool slightly.
3. Make the Filling: In a mixing bowl, combine the sautéed spinach, ricotta cheese, Gruyère cheese, freshly cracked black pepper, and a pinch of nutmeg if desired.
Mix well until all ingredients are combined evenly.
4. Roll Out the Dough: Preheat your oven to 400°F (200°C). On a lightly floured surface, roll out the chilled dough into a large circle, about 12 inches in diameter.
Transfer the dough onto a parchment-lined baking sheet.
5. Assemble the Galette: Spoon the spinach and cheese filling into the center of the dough, leaving a 2-inch border around the edges.
Carefully fold the edges of the dough over the filling, pleating it as you go to create a rustic look. Brush the exposed crust with the beaten egg for a golden finish.
6. Bake: Place the galette in the preheated oven and Bake for 30-35 minutes, or until the crust is golden brown and the filling is bubbly.
7. Serve: Allow the galette to cool for a few minutes before slicing it into wedges.
Serve warm, either on its own or alongside a fresh salad.
Extra Tips
When making the dough, it’s essential to keep the butter cold, as this will create a flakier crust.
If you’re short on time, you can also use store-bought pie dough as a shortcut. Feel free to customize the filling with other vegetables or herbs you have on hand.
This dish is versatile and can be enjoyed warm or at room temperature, making it ideal for brunch gatherings.
Pain Perdu (Lost Bread)
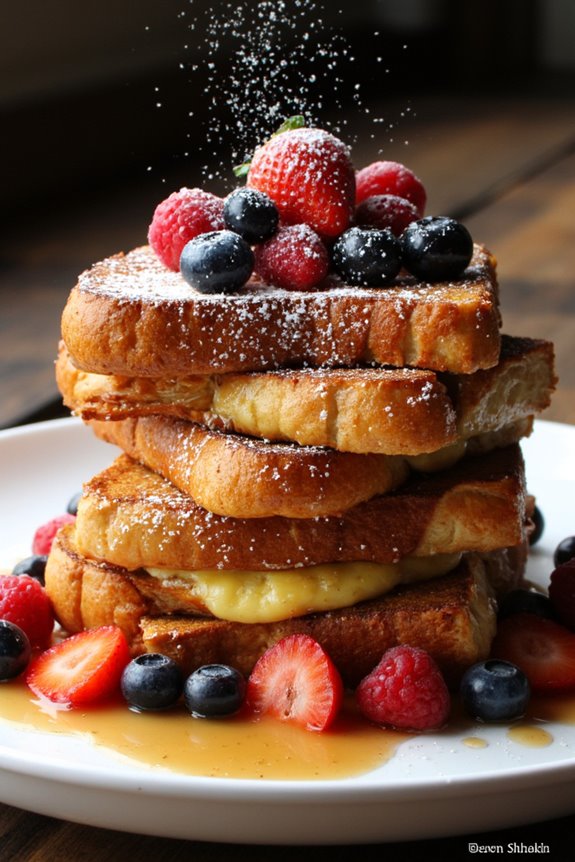
Pain Perdu, often referred to as French toast, is a delightful dish that transforms stale bread into a decadent breakfast or brunch treat. The name “Pain Perdu” translates to “lost bread,” a fitting title for a recipe designed to use up leftover or day-old bread that might otherwise go to waste.
This elegant dish is simple to prepare and can be customized with various toppings, making it a versatile option for any brunch gathering. Traditionally, Pain Perdu is made with thick slices of brioche or challah, which absorb the rich custard mixture of eggs, milk, and vanilla.
Once cooked, the bread is golden brown and perfectly crispy on the outside while remaining soft and custardy on the inside. Served warm and topped with powdered sugar, maple syrup, or fresh fruits, Pain Perdu is sure to impress your guests and leave them asking for seconds.
Ingredients (serving size: 4-6 people)
- 6 large eggs
- 1 cup whole milk
- 1 teaspoon vanilla extract
- 1 tablespoon granulated sugar
- 1/2 teaspoon ground cinnamon
- 1/4 teaspoon salt
- 8 slices of brioche or challah bread (about 1-inch thick)
- 4 tablespoons unsalted butter
- Powdered sugar (for serving)
- Maple syrup (for serving)
- Fresh berries or fruit slices (for serving, optional)
Cooking Instructions
- Prepare the Custard Mixture: In a large bowl, whisk together the eggs, whole milk, vanilla extract, granulated sugar, ground cinnamon, and salt until well combined. This custard mixture is what’ll soak into the bread and give it a rich flavor.
- Soak the Bread: Place the slices of bread in a shallow dish or a large plate. Pour the custard mixture over the bread, making sure each slice is generously coated. Allow the bread to soak for about 5 minutes on each side, ensuring that it absorbs the custard without becoming too soggy.
- Heat the Pan: In a large skillet or frying pan, melt 2 tablespoons of unsalted butter over medium heat. Make sure the butter is bubbling but not browning, as you want to avoid burnt flavors. If necessary, adjust the heat to maintain a steady temperature.
- Cook the Bread: Once the butter is melted, carefully add the soaked bread slices to the pan. Cook for about 3-4 minutes on one side until it’s golden brown, then flip and cook for an additional 3-4 minutes on the other side. You may need to work in batches depending on the size of your pan.
- Repeat with Remaining Bread: After cooking the first batch, wipe out the pan if there are any burnt bits, add the remaining 2 tablespoons of butter, and repeat the cooking process with the remaining bread slices.
- Serve: Once all the bread is cooked, transfer the Pain Perdu to a serving platter. Dust with powdered sugar and serve warm with maple syrup and fresh berries or fruit slices on the side.
Extra Tips
For the best flavor and texture, use day-old bread that’s slightly stale; it will absorb the custard mixture better without falling apart. Feel free to experiment with different types of bread, such as sourdough or even gluten-free varieties.
For added indulgence, consider incorporating flavors like orange zest or almond extract into your custard mixture. Finally, serving your Pain Perdu with a dollop of whipped cream or a scoop of yogurt can elevate the dish even further!
Tarte Tatin
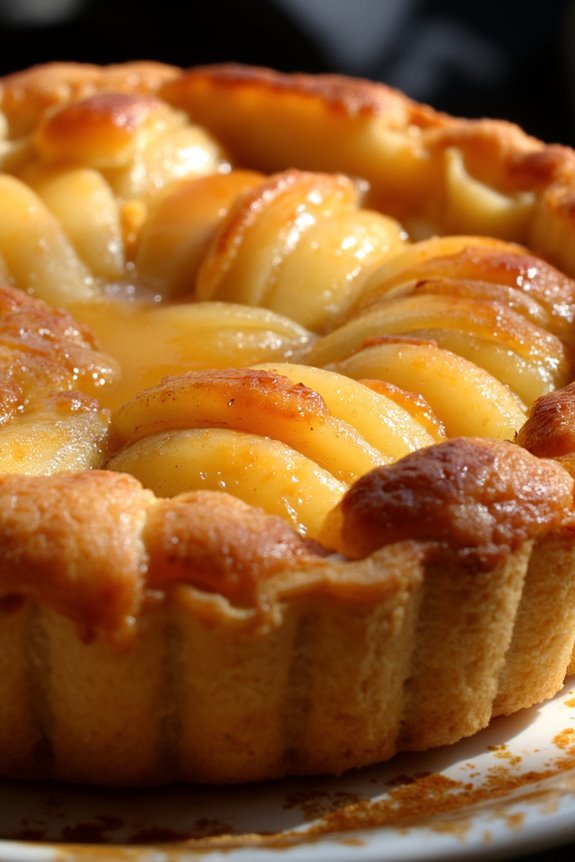
Tarte Tatin is a classic French upside-down caramelized apple tart that’s certain to impress your brunch guests with its elegance and delightful flavors. Originating from the Loire Valley, this dish combines the sweetness of apples with a rich, buttery pastry, making it a perfect centerpiece for any brunch table.
The beauty of Tarte Tatin lies in its seemingly simple preparation which yields a stunning dessert that’s both visually appealing and deliciously satisfying.
Creating this dish involves caramelizing the apples in butter and sugar before covering them with a layer of pastry and baking until golden brown. The result is a luscious tart with perfectly tender apples that can be served warm or at room temperature, often accompanied by a dollop of crème fraîche or a scoop of vanilla ice cream.
Whether you’re hosting a special occasion or simply want to treat yourself, Tarte Tatin is a delightful way to celebrate the flavors of French cuisine.
Ingredients (Serves 4-6):
- 6 medium-sized apples (such as Granny Smith or Honeycrisp)
- 1 cup granulated sugar
- 1/2 cup unsalted butter
- 1 teaspoon vanilla extract
- 1/2 teaspoon cinnamon (optional)
- 1 sheet of puff pastry (thawed if frozen)
- Pinch of salt
- Crème fraîche or vanilla ice cream for serving (optional)
Cooking Instructions:
- Prep the Apples: Begin by peeling, coring, and slicing the apples into quarters. This guarantees they’ll cook evenly and be easy to serve once the tart is finished.
- Make the Caramel: In a 9-inch cast-iron skillet or oven-safe pan, melt the butter over medium heat. Add the granulated sugar and stir continuously until the mixture turns a light golden color and begins to bubble. Be careful not to let it burn.
- Caramelize the Apples: Once the sugar has caramelized, arrange the apple quarters in the skillet, standing them upright in concentric circles. Sprinkle the vanilla extract, cinnamon (if using), and a pinch of salt over the apples. Cook for about 10-15 minutes, occasionally basting the apples with the caramel, until they’re tender and have absorbed some of the caramel flavor.
- Prepare the Puff Pastry: Roll out the puff pastry on a lightly floured surface to fit the diameter of your skillet. Once the apples are ready, carefully place the puff pastry over the apples, tucking in the edges around the sides of the skillet.
- Bake the Tart: Preheat your oven to 375°F (190°C). Place the skillet in the oven and bake for approximately 25-30 minutes, or until the pastry is golden brown and puffed.
- Invert the Tart: Once baked, remove the skillet from the oven and let it cool for about 5 minutes. Place a large plate over the skillet and carefully invert the tart onto the plate. Tap the skillet gently to release the apples if needed.
- Serve: Slice the Tarte Tatin into wedges and serve warm or at room temperature, adding a dollop of crème fraîche or a scoop of vanilla ice cream for an extra indulgent treat.
Extra Tips:
When making Tarte Tatin, it’s important to choose apples that hold their shape during baking, like Granny Smith or Honeycrisp.
Additionally, watch the caramel closely as it can go from perfect to burnt quickly. If you prefer a more complex flavor, consider adding a splash of calvados or brandy to the caramel for a subtle depth.
Finally, allowing the tart to cool slightly before inverting will help prevent the apples from sticking to the pan. Enjoy your beautifully presented French brunch dish!
Boule De Pain (French Bread)
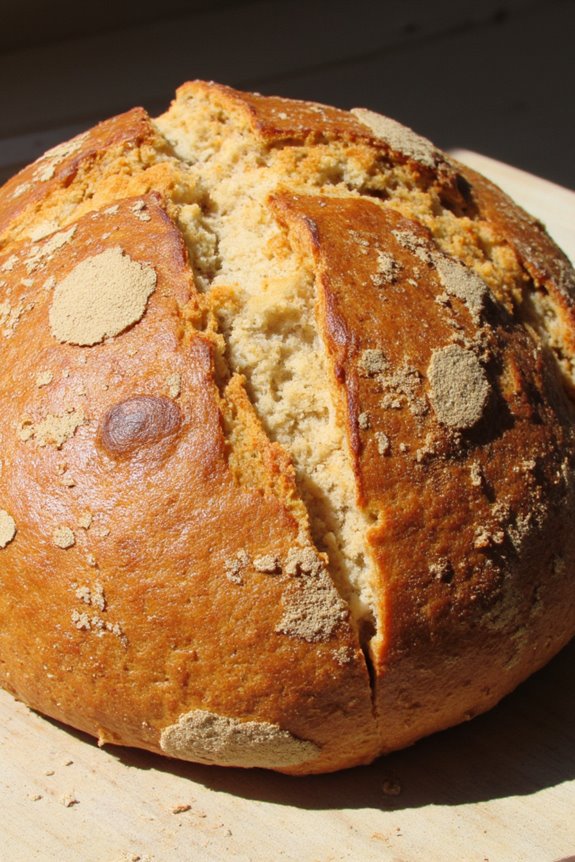
Boule De Pain, or French Bread, is a staple in French cuisine that embodies simplicity and elegance. This round loaf is often characterized by its golden crust and airy interior, making it the perfect complement to any brunch spread.
Whether served with butter, jam, or alongside a hearty soup, this bread is sure to impress your guests with its rustic charm and delightful flavor. Baking Boule De Pain at home allows you to experience the joy of creating something so fundamental yet so satisfying.
The process of making Boule De Pain may seem intimidating at first, but with a few key ingredients and some patience, you can produce a stunning loaf that rivals those found in a Parisian bakery. The use of high-quality flour, water, salt, and yeast is essential to achieving the perfect texture and taste.
The long fermentation process allows the flavors to develop fully, giving this bread its characteristic taste and aroma.
Ingredients (Serves 4-6):
- 4 cups all-purpose flour
- 1 ½ cups warm water (about 110°F or 43°C)
- 2 teaspoons active dry yeast
- 2 teaspoons salt
- 1 tablespoon sugar
- 1 tablespoon olive oil (optional, for greasing)
Instructions:
- Activate the Yeast: In a small bowl, combine the warm water and sugar, then sprinkle the active dry yeast on top. Let it sit for about 5-10 minutes until it becomes frothy. This step guarantees that the yeast is alive and will help the bread rise properly.
- Mix the Ingredients: In a large mixing bowl, combine the flour and salt. Make a well in the center and pour in the activated yeast mixture. Use a wooden spoon or your hands to mix the ingredients until a shaggy dough forms.
- Knead the Dough: Transfer the dough to a lightly floured surface and knead it for about 10 minutes. You want to develop the gluten, which gives the bread structure. The dough should become smooth and elastic. If it feels too sticky, add a little more flour as needed.
- First Rise: Place the kneaded dough in a lightly greased bowl, cover it with a clean kitchen towel or plastic wrap, and let it rise in a warm place for 1-2 hours, or until it has doubled in size. This fermentation process allows the flavors to develop.
- Shape the Dough: After the first rise, gently punch down the dough to release the air. Turn it out onto a floured surface and shape it into a round loaf by folding the edges toward the center and then flipping it seam side down.
- Second Rise: Place the shaped dough onto a baking sheet lined with parchment paper. Cover it again and let it rise for another 30-60 minutes until it has puffed up.
- Preheat the Oven: While the dough is undergoing its second rise, preheat your oven to 450°F (230°C). A hot oven will help create a crispy crust.
- Score and Bake: Before baking, use a sharp knife or a bread lame to score a cross or a few slashes on the top of the loaf. This allows steam to escape and gives the bread its characteristic look. Bake the bread for 25-30 minutes until the crust is golden brown and it sounds hollow when tapped on the bottom.
- Cool: Once baked, remove the bread from the oven and let it cool on a wire rack for at least 30 minutes before slicing. This cooling period helps set the crumb and enhances the texture.
Extra Tips:
For an even more flavorful loaf, consider adding herbs or spices to the dough while mixing. Additionally, using a baking stone in the oven can help create a better crust.
If you want a crustier bread, place a shallow pan of water in the oven while baking to create steam. Finally, always allow your Boule De Pain to cool completely before slicing to preserve the texture and flavor of the bread. Enjoy your delightful homemade French bread!
Choux À La Crème (Cream Puffs)

Choux À La Crème, commonly known as cream puffs, are a delightful French pastry that can elevate any brunch gathering. These light, airy pastries are made from choux pastry, which is unique for its ability to puff up in the oven, creating a hollow shell that can be filled with various creams.
The versatility of cream puffs allows them to be served with sweet fillings such as whipped cream, pastry cream, or even chocolate ganache, making them an irresistible treat for guests.
Making Choux À La Crème may seem intimidating, but with a little patience and practice, you can master this classic French technique. The end result is a delicate pastry that isn’t only visually stunning but also deliciously satisfying.
Whether you choose to fill them with a classic vanilla pastry cream or a rich chocolate mousse, these cream puffs are sure to impress at your next brunch.
Ingredients (Serves 4-6)
- 1 cup all-purpose flour
- 1/2 cup unsalted butter
- 1 cup water
- 4 large eggs
- 1/4 teaspoon salt
- 1 tablespoon granulated sugar
- 1 cup heavy cream
- 1 tablespoon powdered sugar
- 1 teaspoon vanilla extract
- Optional: melted chocolate or caramel for drizzling
Cooking Instructions
1. Preheat the Oven: Begin by preheating your oven to 425°F (220°C). This high temperature is essential for the choux pastry to puff up properly.
2. Prepare the Choux Pastry: In a medium saucepan, combine the water, butter, salt, and granulated sugar. Bring the mixture to a boil over medium heat. Once the butter has melted and the mixture is boiling, remove it from the heat and quickly stir in the flour using a wooden spoon.
Mix vigorously until the dough forms a ball and pulls away from the sides of the pan.
3. Incorporate the Eggs: Allow the dough to cool for about 5 minutes. Then, add the eggs one at a time, mixing well after each addition until the dough is smooth and glossy. The dough should be thick but still pipeable.
4. Pipe the Pastries: Line a baking sheet with parchment paper. Using a piping bag fitted with a round tip, pipe about 1-inch rounds of the choux pastry onto the prepared baking sheet, spacing them about 2 inches apart.
You can also use a spoon if you don’t have a piping bag, but piping will give you a more uniform shape.
5. Bake the Choux Pastry: Place the baking sheet in the preheated oven and bake for 20-25 minutes, or until the cream puffs are golden brown and puffed up. Avoid opening the oven door during the first 15 minutes of baking to guarantee they rise properly.
6. Cool the Pastries: Once baked, remove the cream puffs from the oven and let them cool on a wire rack. Once completely cool, use a small knife to pierce the bottom of each puff to allow steam to escape, which prevents them from becoming soggy.
7. Make the Whipped Cream Filling: In a large mixing bowl, combine the heavy cream, powdered sugar, and vanilla extract. Using an electric mixer, whip the cream until soft peaks form.
8. Fill the Cream Puffs: Transfer the whipped cream to a piping bag and fill each cooled cream puff through the hole you made in the bottom. You can also slice them in half and spoon the cream in if you prefer.
9. Serve and Enjoy: Arrange the filled cream puffs on a serving platter. Drizzle with melted chocolate or caramel if desired. Serve immediately for the best texture.
Extra Tips
When making Choux À La Crème, make sure that your ingredients are at room temperature for better emulsification, especially the eggs.
If you want to add some flavor to the whipped cream, consider infusing it with citrus zest or a splash of liqueur. Additionally, you can experiment with different fillings such as flavored pastry creams or even ice cream for a revitalizing twist.
Remember not to skip the step of piercing the cream puffs after baking, as this is key to maintaining their crispiness!
Café Au Lait

Café Au Lait is a classic French coffee beverage that combines rich brewed coffee with steamed milk, creating a harmonious blend of flavors that’s perfect for brunch. This delicious drink isn’t only comforting but also incredibly simple to prepare.
Traditionally enjoyed in cafés throughout France, Café Au Lait can elevate your brunch experience, making it feel as if you’ve been transported to a quaint Parisian café.
To prepare this delightful drink, you’ll need freshly brewed coffee and warm milk. The balance between the strong, bold flavor of the coffee and the creaminess of the milk is key to achieving the perfect Café Au Lait. This recipe serves 4-6 people, making it an ideal choice for gatherings or family brunches.
Ingredients:
- 4 cups brewed coffee (preferably strong)
- 2 cups whole milk
- Sugar (to taste)
- Optional: cocoa powder or cinnamon for garnish
Instructions:
- Brew the Coffee: Start by brewing 4 cups of strong coffee using your preferred method, whether it be a French press, drip coffee maker, or pour-over. A robust coffee will provide a wonderful base for your Café Au Lait, so choose your favorite dark roast for the best flavor.
- Heat the Milk: In a small saucepan, gently heat 2 cups of whole milk over medium-low heat. Stir the milk occasionally to prevent it from scorching. Heat until it’s steaming but not boiling, as boiling can lead to a burnt taste and an undesirable texture.
- Froth the Milk (Optional): If you prefer a frothy texture, you can use a milk frother or whisk to froth the heated milk. This step is optional, but frothing adds a delightful airy quality to the drink and enhances the overall experience.
- Combine Coffee and Milk: In a large heatproof pitcher or individual mugs, pour equal parts brewed coffee and steamed milk. For example, if you want a total of 6 cups of beverage, pour 3 cups of coffee and 3 cups of milk. Adjust the ratios according to your taste preferences, leaning towards more coffee for a stronger flavor or more milk for a creamier texture.
- Sweeten to Taste: Add sugar to the mixture according to your preference. Stir well to guarantee the sugar dissolves completely, and you can also sprinkle a little cocoa powder or cinnamon on top for an added touch of flavor and presentation.
- Serve: Pour the Café Au Lait into cups or mugs, and serve hot. You can accompany it with croissants, pastries, or other brunch delights for a truly elegant French experience.
Extra Tips:
For the best results, use high-quality, freshly ground coffee beans to brew your coffee.
If you don’t have a frother, you can shake the heated milk in a jar with a tight lid for about 30 seconds to create froth.
Additionally, feel free to experiment with different types of milk, such as almond or oat milk, for a dairy-free version of this delightful drink. Enjoy your Café Au Lait alongside your favorite brunch dishes for a truly delightful meal!