

When it comes to family dinners, finding recipes that are simple to prepare and bring everyone together can be a challenge.
French cuisine offers a delightful array of dishes like cheesy Croque Monsieur and colorful ratatouille, perfect for pleasing both kids and adults.
Picture the joy of cooking together and sharing these tasty meals with your loved ones.
Let’s explore these family-friendly recipes that will make dinner time something special.
I hope you’re inspired to try these delightful French meals with your family.
Croque Monsieur

Croque Monsieur is a classic French dish that has won the hearts of many with its rich flavors and comforting texture. This delicious sandwich consists of layers of ham and Gruyère cheese, all enveloped in perfectly toasted bread, making it an ideal option for a family-friendly dinner.
With its origins tracing back to Parisian cafés, Croque Monsieur isn’t just a meal, but an experience that brings a taste of France to your dining table. Whether you’re planning a casual family night or looking to impress guests, this indulgent creation is bound to delight.
To make Croque Monsieur, you’ll need to balance the savory flavors of the cheese and ham with the crispy, buttery bread that serves as its foundation. As you prepare this dish, you’ll discover the joy of layering ingredients, creating a satisfying contrast between the gooey cheese and the crunchy exterior.
Pair it with a simple green salad or some roasted vegetables for a complete meal that’s both satisfying and easy to prepare, making it a perfect fit for families.
Ingredients (Serves 4-6)
- 8 slices of white bread (preferably a good quality sandwich bread)
- 8 slices of ham (preferably Black Forest or French ham)
- 1 ½ cups grated Gruyère cheese (plus extra for topping)
- 4 tablespoons unsalted butter (softened)
- 2 tablespoons all-purpose flour
- 2 cups milk
- 1 tablespoon Dijon mustard
- Salt and pepper to taste
- Fresh parsley (for garnish, optional)
Cooking Instructions
1. Make the Béchamel Sauce****: In a medium saucepan over medium heat, melt 4 tablespoons of butter. Once melted, add 2 tablespoons of flour, whisking continuously for about 1-2 minutes until the mixture is golden and bubbly. Gradually pour in 2 cups of milk while whisking to avoid lumps.
Continue to cook, stirring occasionally, until the sauce thickens and coats the back of a spoon. Season with salt, pepper, and Dijon mustard. Set aside.
2. Assemble the Sandwiches: Lay out 4 slices of bread on a clean surface. Place a slice of ham on each slice of bread, followed by a generous sprinkle of grated Gruyère cheese. Top with the remaining 4 slices of bread to create sandwiches.
3. Prepare for Cooking: Preheat your oven to 400°F (200°C). In a large skillet over medium heat, melt 2 tablespoons of butter. Once hot, place the assembled sandwiches in the skillet. Cook each sandwich for about 2-3 minutes on each side until they’re golden brown and crispy.
4. Add the Béchamel Sauce and Bake: Transfer the sandwiches to a baking sheet. Spoon the prepared béchamel sauce generously over the top of each sandwich, then sprinkle with additional Gruyère cheese.
Place the baking sheet in the preheated oven and bake for about 10-15 minutes, or until the cheese is melted and bubbly.
5. Serve and Garnish: Once baked, remove the Croque Monsieur from the oven and let them cool for a minute. Cut each sandwich in half, garnish with fresh parsley if desired, and serve immediately.
Extra Tips
For an elevated twist on the classic Croque Monsieur, consider adding a layer of sautéed mushrooms or spinach between the ham and cheese for added flavor and nutrition.
Additionally, using a mix of cheeses, such as Emmental or mozzarella, can enhance the creaminess of the dish. Remember to keep an eye on the sandwiches while they bake to guarantee the cheese doesn’t burn, and serve them hot for the best experience. Enjoy your delightful meal!
Ratatouille
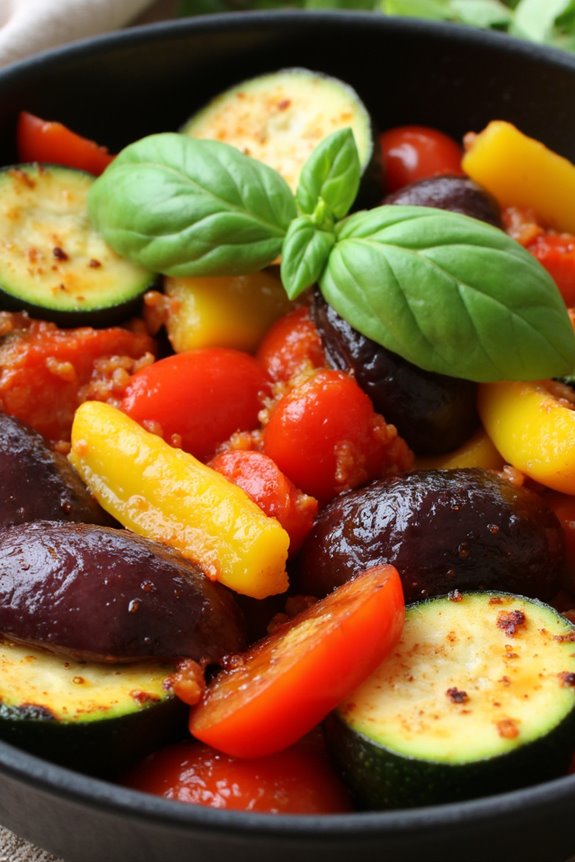
Ratatouille is a traditional Provençal dish that beautifully showcases the vibrant flavors of summer vegetables. This rustic vegetable stew isn’t only visually stunning but also packed with nutrients, making it a perfect family-friendly option for dinner.
The dish typically consists of eggplant, zucchini, bell peppers, tomatoes, and onions, all simmered together with aromatic herbs. Served warm or at room temperature, ratatouille can be enjoyed on its own, as a side dish, or even as a topping for crusty bread.
The origins of ratatouille date back to the 18th century and have evolved over time, becoming a symbol of French culinary tradition. Each region in France adds its own twist to the dish, but the core ingredients remain consistent.
Making ratatouille is an excellent opportunity for families to come together in the kitchen, allowing everyone to participate in preparing the fresh vegetables and enjoying the delightful aromas as they cook.
Ingredients (Serves 4-6)
- 1 medium eggplant, diced
- 2 medium zucchinis, sliced
- 1 large bell pepper, chopped (any color)
- 1 large onion, diced
- 3 cloves garlic, minced
- 4 medium tomatoes, diced (or 1 can of diced tomatoes)
- 1/4 cup olive oil
- 1 teaspoon dried thyme
- 1 teaspoon dried basil
- Salt and pepper to taste
- Fresh basil leaves for garnish (optional)
Cooking Instructions
- Prepare the Vegetables: Begin by washing and prepping all the vegetables. Dice the eggplant, slice the zucchinis, chop the bell pepper, and dice the onion. Mince the garlic and set aside. This step is essential as it guarantees even cooking and flavor distribution throughout the dish.
- Sauté the Aromatics: In a large skillet or Dutch oven, heat the olive oil over medium heat. Add the diced onion and minced garlic to the pan. Sauté for about 3-5 minutes until the onions are translucent and fragrant. This step builds the base flavor of the ratatouille.
- Add the Eggplant: Incorporate the diced eggplant into the skillet, stirring occasionally. Cook for about 5-7 minutes until the eggplant begins to soften. Eggplant absorbs oil, so be sure to stir it well and allow it to cook down.
- Incorporate Remaining Vegetables: Add the sliced zucchinis and chopped bell pepper to the skillet. Continue to cook for another 5 minutes, stirring occasionally to prevent sticking. This guarantees that all the vegetables start to soften and meld together.
- Stir in Tomatoes and Seasonings: Add the diced tomatoes (or canned tomatoes) to the skillet, along with the dried thyme and basil. Season with salt and pepper to taste. Stir everything together and bring the mixture to a gentle simmer.
- Simmer the Ratatouille: Reduce the heat to low, cover the skillet, and let the ratatouille simmer for 20-30 minutes. Stir occasionally, allowing the flavors to combine and the vegetables to become tender. The slow cooking process enhances the dish’s flavor and texture.
- Serve and Garnish: Once cooked, taste and adjust the seasoning if necessary. Remove from heat and let it sit for a few minutes before serving. Garnish with fresh basil leaves for an extra burst of flavor and color.
Extra Tips
When making ratatouille, feel free to experiment with different vegetables based on what’s in season or available in your pantry. For instance, you can add squash or carrots for added sweetness.
If time allows, preparing the dish a day in advance can enhance the flavors even more, as they’ve time to meld together. Ratatouille is also a versatile dish; serve it hot, warm, or even cold, and don’t hesitate to pair it with crusty bread or over grains like quinoa or rice for a heartier meal.
Quiche Lorraine

Quiche Lorraine is a classic French dish that’s both hearty and delightful, making it an excellent choice for family dinners. This savory custard tart features a flaky crust filled with a rich mixture of eggs, cream, cheese, and crispy bacon, creating a blend of flavors and textures that’s sure to please everyone at the table.
Originating from the Lorraine region in France, this dish is versatile and can be served hot or at room temperature, making it perfect for any occasion.
Making Quiche Lorraine isn’t only satisfying but also straightforward. With a few simple ingredients and steps, you can create a dish that looks and tastes gourmet. Whether you’re serving it for breakfast, brunch, or dinner, this quiche can be enjoyed with a side salad or some fresh fruit for a well-rounded meal.
Let’s plunge into the ingredients and the cooking process to bring this delightful dish to your family table.
Ingredients (Serves 4-6)
- 1 pre-made pie crust (9-inch)
- 6 slices of bacon, chopped
- 1 cup shredded Gruyère cheese
- 4 large eggs
- 1 cup heavy cream
- 1/2 cup milk
- 1/4 teaspoon nutmeg
- 1/2 teaspoon salt
- 1/4 teaspoon black pepper
- Fresh parsley (optional, for garnish)
Cooking Instructions
- Preheat the Oven: Start by preheating your oven to 375°F (190°C). This guarantees that your quiche will bake evenly and become beautifully golden brown.
- Prepare the Pie Crust: Place the pre-made pie crust into a 9-inch tart or pie pan, pressing it gently into the edges. If you prefer a crispier crust, you can pre-bake it for about 10 minutes before adding the filling.
- Cook the Bacon: In a skillet over medium heat, cook the chopped bacon until it’s crispy. This should take about 5-7 minutes. Once cooked, transfer the bacon to a paper towel-lined plate to drain excess grease.
- Combine Cheese and Bacon: In a mixing bowl, add the cooked bacon and shredded Gruyère cheese. Mix them together and then spread the mixture evenly over the bottom of the prepared crust.
- Make the Egg Mixture: In another large bowl, whisk together the eggs, heavy cream, milk, nutmeg, salt, and black pepper until well blended. This mixture will create the creamy filling of your quiche.
- Pour the Mixture: Carefully pour the egg mixture over the cheese and bacon in the crust. Make sure it’s evenly distributed.
- Bake the Quiche: Place the quiche in the preheated oven and bake for 30-35 minutes, or until the filling is set and the top is lightly golden. You can check for doneness by inserting a knife into the center; it should come out clean.
- Cool and Serve: Once baked, remove the quiche from the oven and allow it to cool for about 10 minutes before slicing. This cooling time helps the filling set further.
Extra Tips
When preparing Quiche Lorraine, feel free to customize it by adding vegetables such as spinach or mushrooms for extra flavor and nutrition.
If you want to make it ahead of time, you can prepare the quiche a day in advance and store it in the refrigerator. Just reheat it gently in the oven before serving.
Finally, consider experimenting with different cheeses or herbs to create your unique twist on this classic recipe!
French Onion Soup
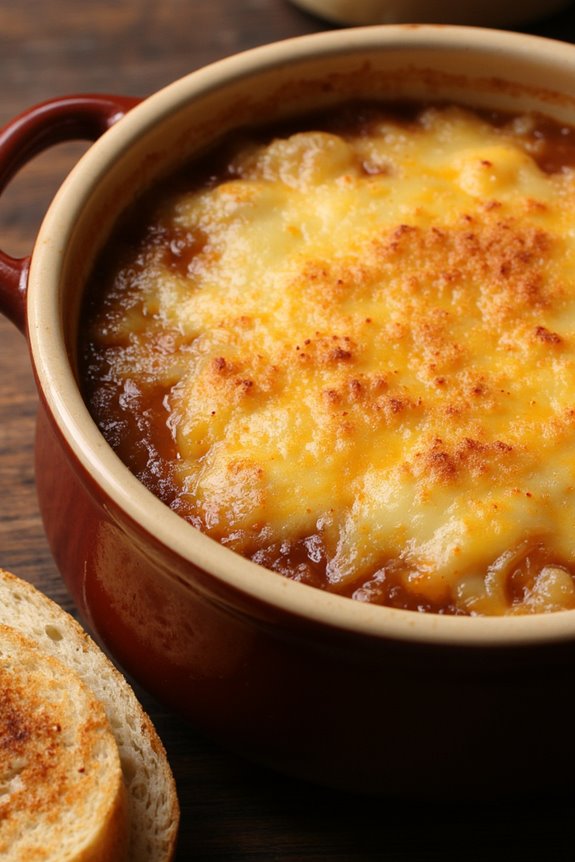
French Onion Soup is a classic dish that originated in France and has become a beloved staple in kitchens around the world. With its rich, savory flavor profile, this comforting soup is perfect for family dinners or cozy gatherings. Made with sweet caramelized onions, hearty beef broth, and topped with gooey melted cheese, it’s a dish that warms both the heart and the stomach. The simplicity of the ingredients belies the depth of flavor that can be achieved with a little patience and care.
The beauty of French Onion Soup lies not just in its taste but also in its presentation. Typically served in individual crocks, this soup is finished with a generous layer of crusty bread and melted cheese, creating a delightful combination of textures. It’s a dish that invites everyone to dig in, making it an excellent choice for family dinners. Whether you’re hosting a special occasion or simply enjoying a quiet evening at home, this French classic is sure to please both adults and kids alike.
Ingredients (Serves 4-6):
- 4 large yellow onions, thinly sliced
- 4 tablespoons unsalted butter
- 1 tablespoon olive oil
- 1 teaspoon sugar
- 4 cups beef broth (preferably homemade or low-sodium)
- 1 cup dry white wine (optional)
- 2 tablespoons all-purpose flour
- 1 bay leaf
- 2-3 sprigs of fresh thyme (or 1 teaspoon dried thyme)
- Salt and pepper to taste
- Baguette or crusty bread, sliced
- 2 cups grated Gruyère cheese (or a mix of Gruyère and mozzarella)
Cooking Instructions:
- Caramelize the Onions: In a large heavy-bottomed pot or Dutch oven, melt the butter and olive oil over medium heat. Add the thinly sliced onions and stir to coat. Cook the onions slowly, stirring occasionally, for about 30-40 minutes until they’re deeply caramelized and golden brown. This step is essential, as the sweetness of the onions develops during this time.
- Add Sugar and Flour: Once the onions are caramelized, sprinkle the sugar over them to enhance their sweetness. Stir in the flour and cook for an additional 2-3 minutes to eliminate the raw flour taste, creating a roux that will help thicken the soup.
- Deglaze with Wine: If using, pour in the white wine, scraping the bottom of the pot to release any stuck bits. Allow the wine to simmer for about 5 minutes until it has reduced slightly. This step adds a layer of complexity to the flavor of the soup.
- Add Broth and Seasonings: Gradually add the beef broth while stirring. Add the bay leaf, thyme, and season with salt and pepper. Bring the soup to a gentle simmer and let it cook uncovered for 20-30 minutes to allow the flavors to meld together.
- Prepare the Bread and Cheese Topping: While the soup simmers, preheat your oven to 350°F (175°C). Place sliced baguette on a baking sheet and toast it in the oven for about 10 minutes until golden and crispy.
- Assemble and Broil: Remove the bay leaf and thyme sprigs from the soup. Ladle the soup into oven-safe bowls or crocks, top each with a slice of toasted baguette, and sprinkle generously with grated Gruyère cheese. Place the bowls under the broiler for 2-3 minutes until the cheese is bubbly and golden.
- Serve: Carefully remove the crocks from the oven (they will be hot!), and let them cool for a minute before serving. Enjoy your warm and comforting French Onion Soup!
Extra Tips:
For an even richer flavor, consider using a combination of beef and chicken broth. You can also add a splash of balsamic vinegar or Worcestershire sauce for an additional depth of flavor.
Make sure to keep an eye on the onions while caramelizing them; patience is key in achieving that perfect golden color. If you don’t have Gruyère cheese, feel free to mix and match with other cheeses such as Swiss or provolone. Enjoy your culinary adventure!
Chicken Provencal

Chicken Provencal is a delightful dish that brings the vibrant flavors of the South of France to your dinner table. This dish features tender chicken pieces simmered in a savory sauce made with tomatoes, olives, herbs, and garlic, capturing the essence of Provencal cuisine. It’s perfect for a family gathering or a cozy dinner with loved ones, and it pairs beautifully with crusty bread or a side of rice to soak up the delicious sauce.
The beauty of Chicken Provencal lies in its simplicity and the use of fresh ingredients that celebrate the flavors of the region. As the chicken cooks, the aromatic herbs infuse the dish, creating a mouthwatering aroma that will have everyone enthusiastically anticipating dinner. This recipe isn’t only family-friendly but also offers a healthy balance of protein and vegetables, making it an excellent choice for any night of the week.
Ingredients (serving size: 4-6 people)
- 4-6 bone-in, skin-on chicken thighs
- 1 tablespoon olive oil
- 1 large onion, chopped
- 4 cloves garlic, minced
- 1 can (14 oz) diced tomatoes
- 1 cup chicken broth
- 1 cup Kalamata olives, pitted and halved
- 1 tablespoon fresh thyme leaves (or 1 teaspoon dried thyme)
- 1 tablespoon fresh rosemary, chopped (or 1 teaspoon dried rosemary)
- Salt and pepper, to taste
- 1 tablespoon red wine vinegar
- Fresh parsley, chopped (for garnish)
Cooking Instructions
- Prepare the Chicken: Start by patting the chicken thighs dry with paper towels. This will help achieve a nice golden brown color when searing. Season both sides generously with salt and pepper.
- Sear the Chicken: In a large skillet or Dutch oven, heat the olive oil over medium-high heat. Once hot, add the chicken thighs skin-side down. Sear them for about 5-7 minutes, or until the skin is crispy and golden brown. Flip the chicken and cook for another 5 minutes. Remove the chicken from the pan and set it aside.
- Sauté the Aromatics: In the same skillet, add the chopped onion and sauté for about 5 minutes until translucent. Then add the minced garlic and sauté for an additional minute until fragrant but not browned.
- Add the Rest of the Ingredients: Pour in the diced tomatoes (with juices) and chicken broth, stirring to combine. Add the olives, thyme, rosemary, and red wine vinegar. Bring the mixture to a gentle simmer.
- Simmer the Chicken: Return the seared chicken thighs to the skillet, nestling them into the sauce. Cover the skillet and reduce the heat to low. Let it simmer for about 30-35 minutes, or until the chicken is cooked through and tender.
- Finish and Serve: Once cooked, taste the sauce and adjust the seasoning with more salt and pepper if needed. Sprinkle fresh parsley on top before serving. Enjoy your Chicken Provencal with crusty bread or a side of rice to soak up the delicious sauce!
Extra Tips
For an even deeper flavor, consider marinating the chicken in olive oil, garlic, and herbs for a few hours or overnight before cooking. This will infuse the meat with additional taste.
Feel free to customize the dish by adding other vegetables like bell peppers or zucchini for extra nutrition. If you prefer a lighter version, you can use boneless, skinless chicken breasts, though the cooking time may need to be adjusted.
Enjoy your culinary journey to Provence!
Beef Bourguignon
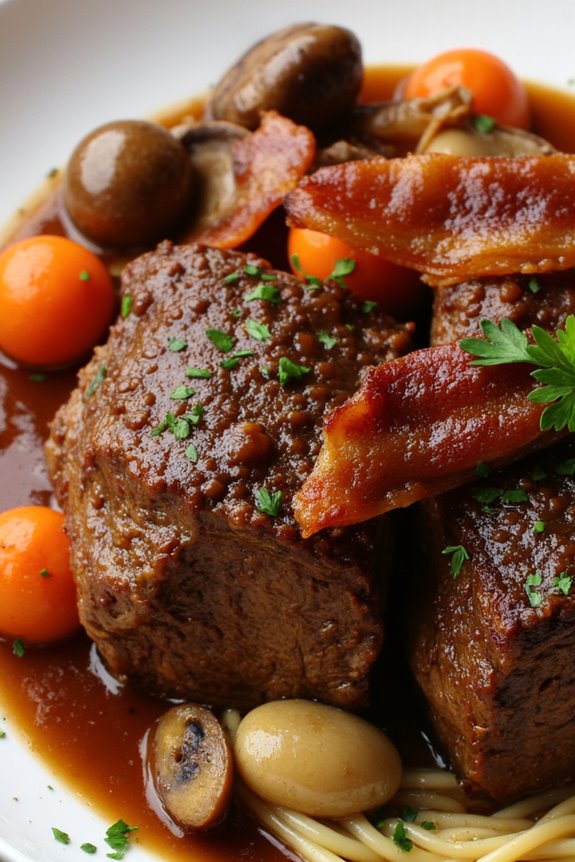
Beef Bourguignon is a classic French dish that embodies the rich flavors of slow-cooked beef, aromatic vegetables, and a robust red wine sauce. Originating from the Burgundy region of France, this hearty stew is perfect for a family dinner, as it warms the soul and brings everyone together around the table.
It’s a dish that requires patience, but the results are well worth the effort, resulting in tender beef that melts in your mouth and a sauce that’s deeply satisfying.
This dish isn’t only delicious but also versatile. You can serve Beef Bourguignon with a variety of sides, such as creamy mashed potatoes, crusty bread, or even buttered noodles. The cooking process involves browning the beef, sautéing the vegetables, and allowing everything to simmer slowly, developing the deep, complex flavors that this dish is known for.
With a little time and love, you can create a memorable meal that will transport your family to the charming bistros of France.
Ingredients (serves 4-6):
- 2 lbs beef chuck, cut into 1-inch cubes
- Salt and pepper, to taste
- 3 tablespoons olive oil
- 1 large onion, chopped
- 2 carrots, sliced
- 2 cloves garlic, minced
- 2 tablespoons tomato paste
- 1 bouquet garni (a bundle of herbs, typically thyme, bay leaf, and parsley)
- 4 cups red wine (preferably Burgundy)
- 2 cups beef broth
- 8 oz mushrooms, quartered
- 4 oz bacon, diced
- 2 tablespoons all-purpose flour
- Fresh parsley, chopped (for garnish)
Cooking Instructions:
- Prepare the Beef: Season the beef cubes generously with salt and pepper. This step is essential as it enhances the flavor of the meat during cooking.
- Brown the Beef: In a large Dutch oven or heavy pot, heat 2 tablespoons of olive oil over medium-high heat. Add the beef in batches, ensuring not to overcrowd the pot. Brown the beef on all sides, about 5-7 minutes per batch. This step develops a rich flavor and color that will enhance the stew.
- Sauté the Vegetables: Once all the beef is browned and removed from the pot, add the remaining tablespoon of olive oil. Sauté the chopped onion and sliced carrots in the same pot for about 5 minutes until they begin to soften. Add the minced garlic and tomato paste, stirring for an additional minute to release the flavors.
- Combine Ingredients: Return the browned beef to the pot and sprinkle the flour over the top. Mix well to coat the meat with flour, which will help thicken the sauce later. Add the bouquet garni, red wine, and beef broth. Stir to combine all the ingredients, scraping up any browned bits from the bottom of the pot.
- Simmer: Bring the mixture to a gentle simmer, then reduce the heat to low. Cover the pot and let it simmer for 1.5 to 2 hours, stirring occasionally, until the beef is tender and the flavors have melded together beautifully.
- Add the Mushrooms and Bacon: In a separate skillet, cook the diced bacon until crispy. Remove the bacon and set aside, then add the quartered mushrooms to the same skillet. Sauté the mushrooms for about 5 minutes until they’re golden brown. Add them to the stew along with the cooked bacon during the last 30 minutes of simmering.
- Finish and Serve: Once the beef is tender and the sauce has thickened, taste and adjust seasoning if needed. Remove the bouquet garni before serving. Garnish with fresh chopped parsley and serve hot with your choice of sides.
Extra Tips:
When making Beef Bourguignon, it’s important to use a good quality red wine, as it greatly impacts the flavor of the sauce.
Don’t rush the browning process; taking your time to brown the beef and vegetables will add depth to the dish. Additionally, for the best results, consider preparing the dish a day in advance; the flavors will deepen and improve overnight, making it even more delicious when reheated.
Enjoy your culinary journey into French cuisine!
Creamy Macaroni and Cheese
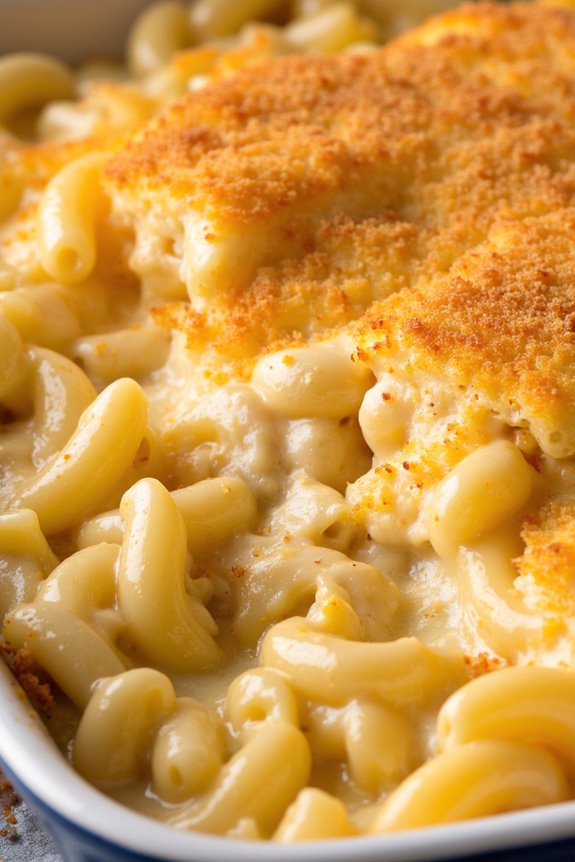
Creamy Macaroni and Cheese is a delightful twist on a classic comfort food that’s sure to please the whole family. This dish combines al dente macaroni pasta with a rich and creamy cheese sauce, creating a velvety texture that’s both satisfying and indulgent.
Whether served as a main course or a side dish, this recipe is perfect for family dinners or gatherings, and it can be customized with various add-ins to suit your taste.
The beauty of Creamy Macaroni and Cheese lies in its simplicity and versatility. With just a handful of ingredients, you can create a dish that’s both comforting and delicious. You can experiment with different types of cheeses, add vegetables, or even incorporate proteins like chicken or bacon for a heartier meal.
This dish isn’t only easy to prepare but also a great way to introduce kids to cooking, as they can help with mixing ingredients and stirring the sauce.
Ingredients (Serves 4-6):
- 2 cups elbow macaroni
- 2 cups shredded sharp cheddar cheese
- 1 cup shredded mozzarella cheese
- 1/2 cup grated Parmesan cheese
- 3 cups milk
- 1/4 cup unsalted butter
- 1/4 cup all-purpose flour
- 1 teaspoon garlic powder
- 1 teaspoon onion powder
- Salt and pepper to taste
- Optional breadcrumbs for topping
Cooking Instructions:
- Cook the Macaroni: In a large pot, bring salted water to a boil. Add the elbow macaroni and cook according to the package instructions until al dente. Drain the pasta and set aside.
- Make the Cheese Sauce: In the same pot, melt the butter over medium heat. Once melted, whisk in the flour to create a roux, cooking for about 1-2 minutes until it turns a light golden color.
- Add Milk: Gradually pour in the milk while continuously whisking to prevent lumps. Cook the mixture for about 5-7 minutes, stirring frequently, until it thickens slightly.
- Incorporate the Cheeses: Lower the heat and add the shredded cheddar, mozzarella, and Parmesan cheeses to the thickened milk mixture. Stir continuously until all the cheese is melted and the sauce is smooth. Add the garlic powder, onion powder, salt, and pepper to taste.
- Combine Pasta and Sauce: Gently fold the cooked macaroni into the cheese sauce until well coated. If desired, you can transfer the mixture to a baking dish for an added layer of flavor.
- Optional Topping: If you prefer a crispy topping, sprinkle breadcrumbs over the macaroni and cheese mixture. You can also add a little extra cheese on top for a gooey finish.
- Bake (if desired): Preheat your oven to 350°F (175°C). If you added breadcrumbs, bake for about 20-25 minutes until the top is golden and bubbling.
- Serve: Remove from the oven and let it cool for a few minutes before serving. Enjoy your creamy, cheesy masterpiece!
Extra Tips:
For an even creamier texture, consider adding a splash of cream or sour cream to the cheese sauce. You can also mix in cooked vegetables like broccoli or peas for added nutrition and color.
If you’re feeling adventurous, try different cheese combinations, such as Gouda or Gruyère, to elevate the flavor profile. Additionally, if you have leftovers, they can be reheated in the oven or microwave, but adding a little milk while reheating will help restore the creaminess.
Enjoy this family-friendly meal!
Tarte Tatin
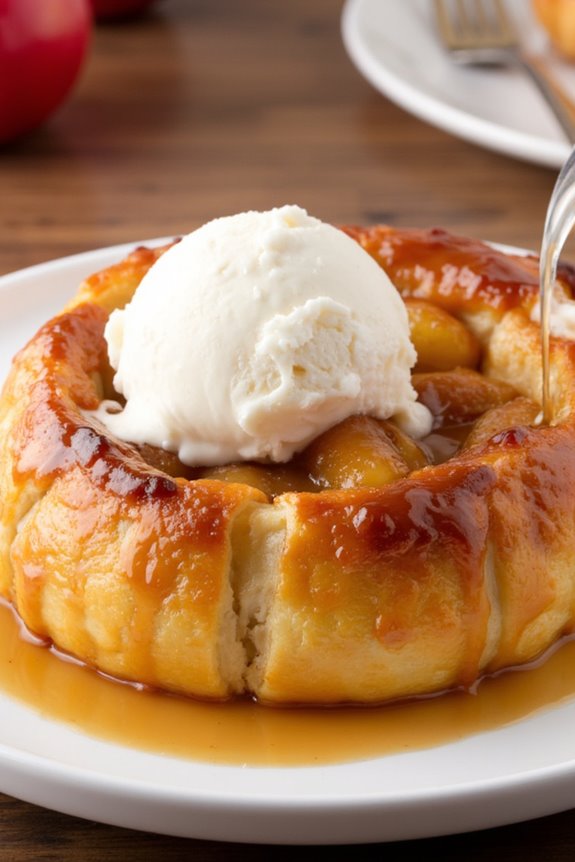
Tarte Tatin is a classic French dessert that transforms simple ingredients into an extraordinary sweet treat. Originating from the Loire Valley, this upside-down caramelized apple tart is a delightful combination of buttery pastry and tender, sweet apples, making it a perfect ending to any family-friendly French dinner.
The dish’s unique preparation method, where the apples are cooked in caramel before being topped with pastry and baked, creates a beautiful contrast of textures and flavors that will impress your guests and satisfy your sweet tooth.
This dish can be easily adapted to suit your family’s preferences, such as using pears or other fruits if desired. Tarte Tatin is best served warm with a dollop of crème fraîche or a scoop of vanilla ice cream, providing a lovely balance to the rich caramel flavors.
Whether you’re hosting a dinner party or enjoying a cozy family meal, Tarte Tatin is sure to be a hit with both children and adults alike.
Ingredients (Serves 4-6):
- 6 medium apples (such as Granny Smith or Honeycrisp)
- 100g (1/2 cup) unsalted butter
- 150g (3/4 cup) granulated sugar
- 1 teaspoon vanilla extract
- 1 teaspoon ground cinnamon (optional)
- 1 sheet of puff pastry (thawed if frozen)
- A pinch of salt
Cooking Instructions:
- Prepare the Apples: Start by peeling, coring, and quartering the apples. This will guarantee that they cook evenly and make for easy serving later. You can use a mix of sweet and tart apples for a more complex flavor.
- Make the Caramel: In a 9-inch cast-iron skillet or oven-safe pan, melt the unsalted butter over medium heat. Once melted, add the granulated sugar, vanilla extract, and a pinch of salt. Stir gently until the mixture begins to bubble and turns into a golden caramel. Be careful not to let it burn.
- Add the Apples: Carefully arrange the apple quarters in the skillet, packing them tightly in the caramel. Cook for about 10-15 minutes, turning the apples occasionally until they begin to soften and caramelize. If using ground cinnamon, sprinkle it over the apples during this step for added flavor.
- Prepare the Puff Pastry: While the apples are caramelizing, roll out the sheet of puff pastry on a lightly floured surface until it’s slightly larger than the skillet. This will allow the pastry to cover the apples completely.
- Assemble the Tart: Once the apples are caramelized, remove the skillet from heat. Lay the puff pastry over the apples, tucking the edges down around the apples. This will create a seal, preventing the juices from escaping during baking.
- Bake: Preheat your oven to 190°C (375°F). Place the skillet in the oven and bake for about 25-30 minutes, or until the pastry is golden brown and puffed up.
- Cool and Invert: Remove the skillet from the oven and let it cool for about 5 minutes. Carefully place a large serving plate upside down over the skillet, and with a swift motion, flip the skillet to release the tart onto the plate. Be cautious as the caramel may still be hot.
- Serve: Allow the Tarte Tatin to cool slightly before slicing. Serve warm with crème fraîche or vanilla ice cream for a truly indulgent experience.
Extra Tips:
To ascertain your Tarte Tatin is a success, use a mix of sweet and tart apples for a balanced flavor. Avoid overcooking the apples during the caramelization process, as they’ll continue to soften in the oven.
If you want to add a touch of sophistication, consider sprinkling some chopped nuts, like walnuts or pecans, over the apples before adding the puff pastry for added texture and flavor.
Finally, make sure to serve the tart warm for the best taste experience!
Coq Au Vin
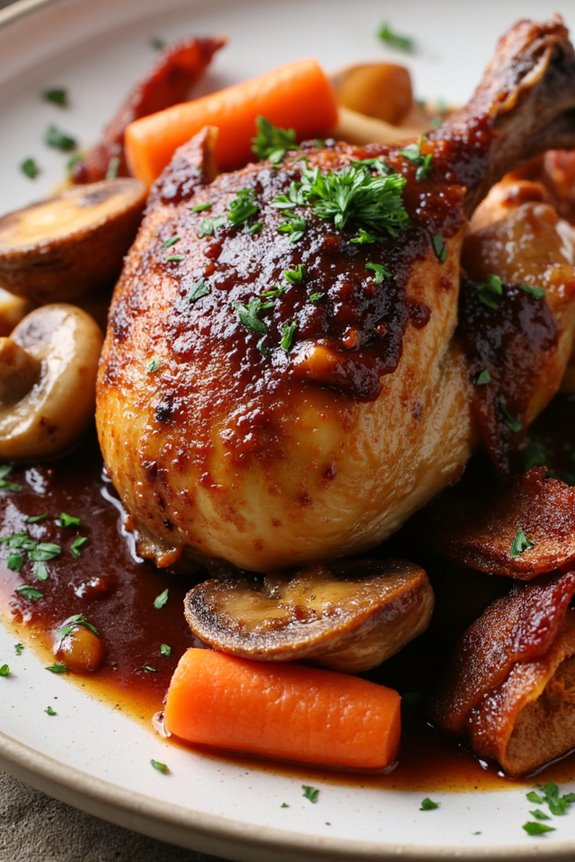
Coq Au Vin, a classic French dish, is a delightful way to bring comfort and flavor to your family dinner table. This recipe, which translates to “rooster in wine,” traditionally uses chicken braised slowly in red wine along with mushrooms, lardons, and aromatic vegetables. The result is a rich, hearty meal that beautifully captures the essence of French country cooking, making it perfect for family gatherings or a cozy weeknight dinner.
The dish isn’t only flavorful but also provides an opportunity to introduce your family to the joys of French cuisine. With its tender chicken and a deeply flavored sauce, Coq Au Vin is sure to please everyone at the table. Paired with a side of crusty bread or creamy mashed potatoes, this dish transforms a simple dinner into a memorable occasion.
Ingredients (Serves 4-6):
- 4-6 chicken thighs and drumsticks (bone-in, skin-on)
- 4 ounces lardons or thick-cut bacon, diced
- 2 cups red wine (preferably Burgundy or Pinot Noir)
- 1 cup chicken broth
- 1 tablespoon tomato paste
- 1 medium onion, chopped
- 2 cloves garlic, minced
- 2 cups mushrooms, quartered
- 2 carrots, sliced
- 2 tablespoons all-purpose flour
- 2 tablespoons olive oil
- 1 tablespoon fresh thyme leaves or 1 teaspoon dried thyme
- 2 bay leaves
- Salt and pepper to taste
- Fresh parsley, chopped (for garnish)
Cooking Instructions:
- Marinate the Chicken: In a large bowl, combine the chicken pieces with the red wine, thyme, and bay leaves. Cover and let marinate for at least 2 hours or overnight in the refrigerator. This step infuses the chicken with rich flavor.
- Prepare the Ingredients: Remove the chicken from the marinade and pat dry with paper towels. Strain the marinade, reserving the liquid and discarding the herbs. Set the marinade aside for later use.
- Brown the Bacon: In a large Dutch oven or heavy pot, heat the olive oil over medium heat. Add the lardons or diced bacon, cooking until crispy and browned. This adds a savory depth to the dish.
- Sear the Chicken: Increase the heat to medium-high and brown the chicken pieces in the bacon fat until golden on all sides, about 5-7 minutes. You may need to do this in batches. Once browned, remove the chicken and set aside.
- Sauté Vegetables: In the same pot, add the chopped onion, carrots, and garlic. Sauté until the onions are translucent, about 3-5 minutes. Stir in the mushrooms and cook until they begin to soften.
- Make the Sauce: Sprinkle the flour over the vegetable mixture and stir to coat. Cook for another minute to cook off the raw flour taste. Then, add the reserved marinade and chicken broth, scraping any browned bits from the bottom of the pot.
- Combine and Simmer: Return the chicken to the pot, ensuring it’s submerged in the sauce. Bring the mixture to a simmer, then reduce the heat to low. Cover and cook for about 1 hour, until the chicken is tender and fully cooked.
- Final Touches: Once cooked, remove the chicken pieces and keep warm. Increase the heat to medium and let the sauce bubble uncovered for about 10-15 minutes to thicken. Season with salt and pepper to taste.
- Serve: Plate the chicken and spoon the thickened sauce, vegetables, and bacon over the top. Garnish with fresh parsley before serving.
Extra Tips:
For the best flavor, choose a good quality red wine that you’d enjoy drinking, as it greatly impacts the dish’s taste. You can also add pearl onions for an extra layer of flavor and texture.
When serving, consider pairing the dish with a simple green salad and a glass of the same wine used in cooking for a complete French dining experience. Enjoy your culinary journey with Coq Au Vin!
Bouillabaisse
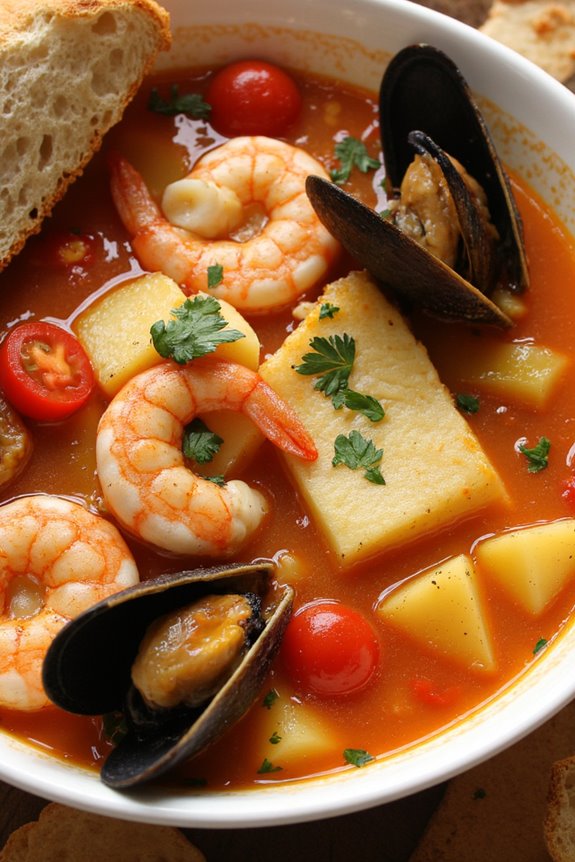
Bouillabaisse is a traditional Provençal fish stew that hails from the port city of Marseille. This delightful dish is a celebration of the Mediterranean’s bountiful seafood, combining various types of fish and shellfish with aromatic herbs and spices. The name “bouillabaisse” comes from the method of preparation, which involves boiling the fish and shellfish in a flavorful broth.
It’s a perfect family-friendly meal, allowing for creativity in choosing the seafood and vegetables according to your family’s tastes.
Preparing bouillabaisse at home can be a rewarding experience, as the dish not only showcases fresh ingredients but also fills your kitchen with warm, inviting aromas. You can serve it with a side of crusty bread and a dollop of rouille—a spicy garlic mayonnaise that adds a touch of richness to the dish.
Gather your family around the table and enjoy a taste of southern France in the comfort of your own home.
Ingredients (serves 4-6):
- 1 lb of firm white fish fillets (like cod or halibut)
- 1 lb of mussels, cleaned and debearded
- 1 lb of shrimp, peeled and deveined
- 1 medium onion, finely chopped
- 2 cloves of garlic, minced
- 1 medium tomato, diced
- 1 medium potato, diced
- 4 cups of fish stock
- 1 cup of dry white wine
- 1 tablespoon of saffron threads
- 1 teaspoon of fennel seeds
- 1 teaspoon of paprika
- 1 bay leaf
- 2 tablespoons of olive oil
- Salt and pepper, to taste
- Fresh parsley, chopped (for garnish)
- Crusty bread (for serving)
- Rouille (optional)
Cooking Instructions:
- Prepare the Broth: In a large pot, heat the olive oil over medium heat. Add the chopped onion and minced garlic, sautéing until the onion is translucent and fragrant, about 5 minutes. This step builds the foundation of flavor for your bouillabaisse.
- Add Vegetables: Stir in the diced tomato and potato, cooking for another 3-4 minutes. The tomato will add acidity and depth, while the potato will provide substance to the dish.
- Add Liquids and Seasonings: Pour in the fish stock and white wine. Stir in the saffron, fennel seeds, paprika, and bay leaf. Bring the mixture to a gentle boil, then reduce the heat to simmer for about 10 minutes. This allows the flavors to meld together beautifully.
- Cook the Fish: Add the fish fillets to the pot and simmer for 5 minutes. Follow this by adding the mussels and shrimp. Cover the pot and cook for an additional 5-7 minutes, or until the mussels have opened and the shrimp are pink and opaque. Make sure to discard any mussels that remain closed after cooking.
- Season and Serve: Taste the broth and adjust the seasoning with salt and pepper as needed. Remove the bay leaf before serving. Ladle the bouillabaisse into bowls, garnish with fresh parsley, and serve with crusty bread and rouille on the side.
Extra Tips:
For a truly authentic bouillabaisse, try to use a variety of seafood, such as squid or scallops, to enhance the complexity of flavors.
If you can’t find fresh fish, frozen seafood works well too—just verify it’s fully thawed before cooking. Additionally, allowing the stew to sit for a few minutes before serving will help the flavors develop even further.
Don’t hesitate to experiment with the spices based on your family’s preferences!
Vegetable Crepes

Vegetable crepes are a delightful and versatile dish that can please the entire family. These thin French pancakes are filled with a colorful medley of sautéed vegetables, making them not only delicious but also nutritious.
Whether served as a main course or as a light dinner option, vegetable crepes can be easily customized to include your family’s favorite ingredients, making them a perfect choice for a family-friendly French dinner.
The process of making crepes may seem intimidating, but with a little practice, you’ll be flipping them like a pro. The key to perfect crepes lies in achieving the right batter consistency and cooking them on a well-heated skillet.
Pair these crepes with a side salad or a light sauce for added flavor, and you have a wonderfully satisfying meal that both kids and adults will enjoy.
Ingredients (serves 4-6):
- 1 cup all-purpose flour
- 2 large eggs
- 1 ½ cups milk
- 2 tablespoons melted butter (plus extra for cooking)
- ½ teaspoon salt
- 1 zucchini, diced
- 1 bell pepper (any color), diced
- 1 cup spinach, chopped
- 1 small onion, diced
- 2 cloves garlic, minced
- 1 teaspoon dried thyme
- 1 cup shredded cheese (such as mozzarella or cheddar)
Cooking Instructions:
1. Prepare the Crepe Batter: In a large mixing bowl, whisk together the flour and salt. In a separate bowl, beat the eggs and then mix in the milk and melted butter. Gradually add the wet ingredients to the dry ingredients, whisking until smooth. The batter should be thin and free of lumps. Let the batter rest for at least 30 minutes at room temperature.
2. Cook the Vegetables: In a large skillet over medium heat, add a tablespoon of butter. Once melted, add the onion and garlic, sautéing until the onion is translucent.
Next, add the diced zucchini and bell pepper, cooking until they’re tender, about 5-7 minutes. Finally, add the chopped spinach and thyme, stirring until the spinach is wilted. Remove the skillet from heat and set aside.
3. Cook the Crepes: Heat a non-stick skillet or crepe pan over medium heat and lightly grease it with butter. Pour about ¼ cup of the batter into the center of the pan, quickly swirling it around to evenly coat the bottom.
Cook for about 1-2 minutes, or until the edges begin to lift and the bottom is lightly golden. Flip the crepe and cook for another minute until golden. Repeat this process with the remaining batter, stacking the cooked crepes on a plate.
4. Assemble the Crepes: Once all crepes are cooked, lay one crepe flat on a plate. Spoon a portion of the sautéed vegetable mixture onto one half of the crepe, sprinkle with cheese, and fold the crepe over to enclose the filling.
You can also roll them up if you prefer. Repeat with the remaining crepes and filling.
5. Serve: Serve the filled crepes warm, garnished with additional cheese or fresh herbs if desired. A light salad on the side adds an invigorating touch to the meal.
Extra Tips:
For an extra flavor boost, consider adding some herbs or spices to the vegetable mixture, such as basil or oregano.
You can also experiment with different types of cheese or add cooked chicken or tofu for added protein. If you have leftover crepes, they can be stored in the refrigerator for a couple of days and reheated in a skillet or microwave. Enjoy your delicious vegetable crepes!
Salade Niçoise
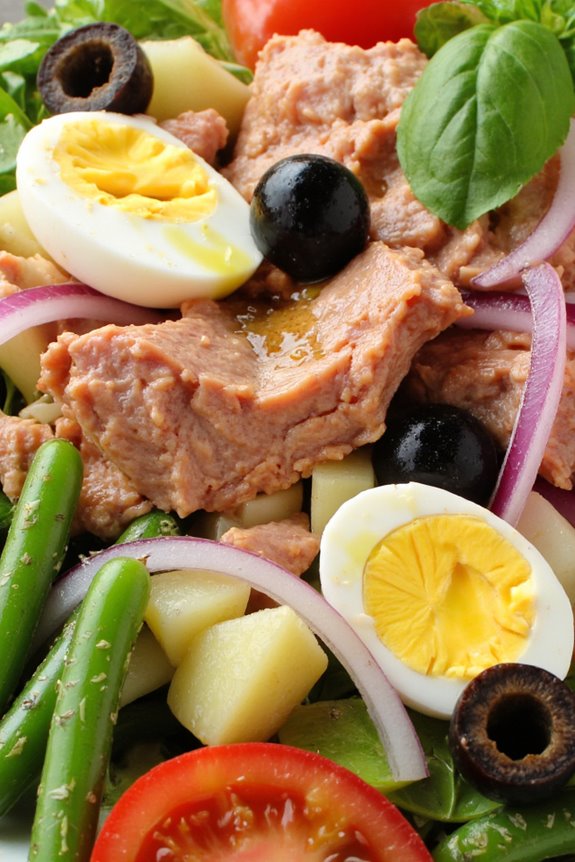
Salade Niçoise is a classic French salad that hails from the sunny region of Nice on the French Riviera. This vibrant dish isn’t just a salad; it’s a celebration of fresh ingredients, combining garden vegetables, eggs, olives, and tuna for a wholesome and fulfilling meal.
The beauty of Salade Niçoise lies in its versatility—you can adjust the components based on what’s in season or your personal preferences, making it a perfect family-friendly dinner option. When served chilled, this salad isn’t only invigorating but also packed with protein and nutrients, making it a great choice for a light yet satisfying dinner.
It’s perfect for warm evenings or when you want to enjoy a taste of France at home. Whether you’re looking to impress guests or simply want a delicious meal to enjoy with your family, Salade Niçoise is sure to be a hit at the dinner table.
Ingredients (Serves 4-6):
- 4 cups mixed salad greens (such as arugula, romaine, or spinach)
- 2 cups green beans, trimmed and cut into 1-inch pieces
- 2 medium tomatoes, diced
- 1 cup cooked potatoes, diced (preferably waxy potatoes)
- 1 can (5-7 oz) tuna in olive oil, drained
- 4 hard-boiled eggs, peeled and quartered
- 1/2 cup Kalamata olives, pitted and halved
- 1/4 cup red onion, thinly sliced
- 1/4 cup extra-virgin olive oil
- 2 tablespoons red wine vinegar
- Salt and pepper to taste
- Fresh basil leaves for garnish (optional)
Cooking Instructions:
- Prepare the Vegetables: Begin by washing and preparing your vegetables. Trim the ends off the green beans and cut them into 1-inch pieces. Dice the tomatoes and set them aside. If you haven’t already, boil the potatoes until fork-tender, cool, and then dice them into bite-sized pieces.
- Blanch the Green Beans: In a large pot of salted boiling water, add the green beans and cook for about 3-4 minutes until they’re bright green and tender-crisp. Drain and immediately transfer them to a bowl of ice water to stop the cooking process. Once cooled, drain again and set aside.
- Prepare the Salad Base: In a large serving bowl or platter, layer the mixed salad greens evenly across the bottom. This will serve as the base for your Salade Niçoise.
- Assemble the Salad: On top of the greens, arrange the green beans, diced tomatoes, diced potatoes, and tuna. Make sure to distribute these ingredients evenly to create a colorful presentation.
- Add the Eggs and Olives: Carefully place the quartered hard-boiled eggs on top of the salad, along with the halved olives and slices of red onion. This will add layers of flavor and texture to your dish.
- Dress the Salad: In a small bowl, whisk together the olive oil, red wine vinegar, salt, and pepper. Drizzle the dressing over the assembled salad just before serving, ensuring it lightly coats all the ingredients.
- Garnish and Serve: If desired, scatter fresh basil leaves over the top for added flavor and a touch of color. Serve the salad immediately, allowing everyone to enjoy the freshness of each component.
Extra Tips:
For a truly authentic touch, consider using high-quality canned tuna packed in olive oil, as it enhances the flavor of the salad. Additionally, feel free to customize your Salade Niçoise by adding other ingredients like capers, artichoke hearts, or even anchovies for a more robust taste.
This dish is also excellent as a make-ahead option; simply store the salad components separately and assemble it just before serving to keep everything fresh and crisp. Enjoy the delightful taste of the French Riviera from the comfort of your home!
Garlic Butter Shrimp

Garlic Butter Shrimp is a delightful French-inspired dish that brings the fresh, vibrant flavors of the sea right to your dinner table. This dish isn’t only quick to prepare but also a crowd-pleaser, making it perfect for a family meal or entertaining guests. The combination of succulent shrimp, rich garlic butter, and a hint of fresh herbs creates a mouthwatering experience that everyone will love.
Serve it over a bed of rice, pasta, or with crusty bread to soak up the delicious sauce.
The beauty of Garlic Butter Shrimp lies in its simplicity and speed. With just a few ingredients, you can create a restaurant-quality dish in under 30 minutes. It’s an excellent way to introduce your family to seafood if they’re not regular consumers, as the flavors are familiar and comforting.
Let’s plunge into this easy recipe that serves 4-6 people.
Ingredients
- 1 pound large shrimp, peeled and deveined
- 6 tablespoons unsalted butter
- 4 cloves garlic, minced
- 1 teaspoon paprika
- Salt and pepper to taste
- 2 tablespoons fresh parsley, chopped
- 1 tablespoon lemon juice
- Optional: lemon wedges for serving
Cooking Instructions
- Prepare the Shrimp: Start by rinsing the shrimp under cold water and patting them dry with paper towels. This helps to remove any excess moisture, guaranteeing that the shrimp sear nicely in the pan.
- Melt the Butter: In a large skillet, melt the unsalted butter over medium heat. Allow it to foam slightly, then add the minced garlic. Cook the garlic for about 1-2 minutes until it becomes fragrant, but be careful not to let it burn, as burnt garlic can turn bitter.
- Cook the Shrimp: Add the shrimp to the skillet in a single layer. Sprinkle the paprika, salt, and pepper over the shrimp. Cook for 2-3 minutes on one side until the shrimp turn pink and opaque. Flip the shrimp over and cook for an additional 2-3 minutes on the other side.
- Add Fresh Ingredients: Once the shrimp are cooked through, remove the skillet from heat. Stir in the chopped parsley and lemon juice, mixing well to combine all the flavors.
- Serve: Transfer the Garlic Butter Shrimp to a serving dish or individual plates. If desired, garnish with additional parsley and serve with lemon wedges on the side. Pair with rice or pasta to soak up the delicious garlic butter sauce.
Extra Tips
For the best results, use fresh shrimp when possible, as frozen shrimp can sometimes lack flavor. If you’re using frozen shrimp, make sure to fully thaw them beforehand to guarantee even cooking.
Additionally, feel free to customize this dish by adding a pinch of red pepper flakes for a little heat or experimenting with different herbs like thyme or basil for added flavor. Enjoy your Garlic Butter Shrimp with a revitalizing salad or roasted vegetables for a well-rounded meal.
Crêpes Suzette

Crêpes Suzette is a classic French dessert that combines thin, delicate crêpes with a delectable orange sauce. This dish not only dazzles with its presentation but also enchants with its vibrant flavors and aromas. Traditionally served flambéed, Crêpes Suzette is perfect for special occasions or as an impressive finish to a family dinner. With a few simple ingredients and a bit of technique, you can bring this elegant dish to your table.
Making Crêpes Suzette requires a bit of practice, especially when it comes to cooking the crêpes to guarantee they’re thin and evenly cooked. However, the results are well worth the effort. The crêpes are often filled with a sweet orange butter sauce and garnished with zest for an extra burst of flavor. Whether you’re entertaining guests or simply treating your family, this dessert will surely become a favorite.
Ingredients (Serves 4-6)
- For the crêpes:
- 1 cup all-purpose flour
- 2 large eggs
- 1 1/4 cups whole milk
- 2 tablespoons melted butter
- 1 tablespoon sugar
- A pinch of salt
- For the Suzette sauce:
- 1/2 cup unsalted butter
- 1/2 cup granulated sugar
- 1/4 cup freshly squeezed orange juice
- Zest of 1 orange
- 1/4 cup Grand Marnier or orange liqueur (optional)
- Additional orange zest for garnish
Cooking Instructions
- Prepare the crêpe batter: In a mixing bowl, combine the flour, sugar, and a pinch of salt. In another bowl, whisk together the eggs and milk. Gradually pour the egg mixture into the flour, whisking continuously until you have a smooth batter. Stir in the melted butter. Let the batter rest for at least 30 minutes at room temperature to allow the gluten to relax.
- Cook the crêpes: Heat a non-stick skillet over medium heat and lightly grease it with butter. Pour about 1/4 cup of the crêpe batter into the skillet, swirling the pan to spread the batter evenly. Cook for about 1-2 minutes until the edges begin to lift and the bottom is lightly golden. Carefully flip the crêpe and cook for another 1 minute on the other side. Repeat with the remaining batter, stacking the cooked crêpes on a plate and covering them with a clean kitchen towel to keep warm.
- Make the Suzette sauce: In a large skillet, melt the butter over medium heat. Add the sugar and orange zest, stirring until the sugar is dissolved and the mixture is bubbling. Pour in the orange juice and stir to combine. Let it simmer for a couple of minutes until slightly thickened.
- Combine the crêpes with the sauce: Fold each crêpe into quarters and place them in the skillet with the Suzette sauce. Coat the crêpes in the sauce, allowing them to warm through for about 1-2 minutes.
- Flambé (optional): If you’re feeling adventurous, carefully add the Grand Marnier to the skillet and ignite with a long lighter. Allow the flames to subside as the alcohol burns off, which will enhance the flavor of the sauce.
- Serve: Transfer the crêpes to serving plates and drizzle with the remaining sauce. Garnish with additional orange zest for a beautiful presentation.
Extra Tips
When making Crêpes Suzette, it’s important to confirm your skillet is at the right temperature; too hot and the crêpes will burn, too cold and they won’t cook properly. Always keep an eye on the cooking process, as crêpes cook quickly.
If you’re not comfortable flambéing, simply serve the crêpes without this step; they’ll still be delicious. Additionally, you can prepare the crêpes ahead of time and reheat them in the sauce just before serving, making this dish manageable even during busy dinner parties. Enjoy your culinary creation!