

Weeknights can be chaotic, but dinner doesn’t have to be. French cuisine might sound fancy, but it’s surprisingly manageable with the right recipes. I’ve found a selection of fast and easy dishes that bring the essence of France to your table. From savory tarts to elegant soups, these recipes will transform your routine dinners. Ready to explore what’s cooking?
Ratatouille Tart
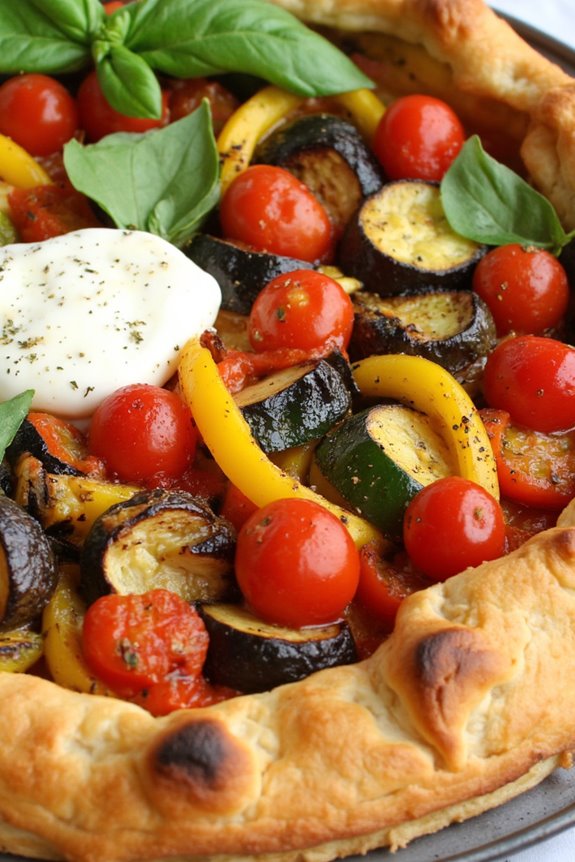
Ratatouille Tart is a delightful twist on the classic French ratatouille, combining the vibrant flavors of summer vegetables with a crispy, flaky crust. This dish isn’t only visually stunning but also allows you to embrace the rich tastes of vegetables like eggplant, zucchini, and bell peppers. Perfect for a weeknight dinner, this tart is simple to prepare and can be served warm or at room temperature, making it an ideal option for gatherings or meal prep.
To create a Ratatouille Tart, you’ll need a good-quality pie crust, which can be homemade or store-bought for convenience. The filling is a medley of sautéed vegetables seasoned with aromatic herbs that bring the dish to life. As the tart bakes, the flavors meld together, creating a comforting and satisfying meal that captures the essence of French cooking.
Ingredients (Serves 4-6):
- 1 pre-made pie crust (9-inch)
- 1 medium eggplant, diced
- 1 medium zucchini, sliced
- 1 red bell pepper, diced
- 1 yellow bell pepper, diced
- 1 small onion, chopped
- 2 cloves garlic, minced
- 1 cup cherry tomatoes, halved
- 2 tablespoons olive oil
- 1 teaspoon dried thyme
- 1 teaspoon dried oregano
- Salt and pepper, to taste
- 1 cup shredded mozzarella cheese (optional)
- Fresh basil, for garnish
Cooking Instructions:
- Preheat the Oven: Begin by preheating your oven to 375°F (190°C). This guarantees that the tart will bake evenly and achieve a golden-brown crust.
- Prepare the Vegetables: In a large skillet, heat the olive oil over medium heat. Add the chopped onion and minced garlic. Sauté for about 2-3 minutes until the onion becomes translucent and fragrant.
- Cook the Vegetables: Add the diced eggplant, zucchini, red bell pepper, and yellow bell pepper to the skillet. Season with salt, pepper, thyme, and oregano. Cook for about 8-10 minutes, stirring occasionally until the vegetables are tender but not mushy.
- Incorporate Tomatoes: Stir in the halved cherry tomatoes and cook for an additional 2-3 minutes until they soften. Remove the skillet from heat and allow the mixture to cool slightly.
- Assemble the Tart: Roll out the pie crust and fit it into a 9-inch tart pan or pie dish. If desired, sprinkle a thin layer of shredded mozzarella cheese on the bottom of the crust. Pour the sautéed vegetable mixture into the crust, spreading it evenly.
- Bake the Tart: Place the tart in the preheated oven and bake for 25-30 minutes or until the crust is golden and the vegetables are bubbly. If using cheese, it should be melted and slightly browned.
- Cool and Serve: Once baked, remove the tart from the oven and let it cool for about 10 minutes. Garnish with fresh basil before slicing and serving.
Extra Tips:
When making Ratatouille Tart, feel free to customize the vegetables based on what you have on hand or according to the season. You can also add a layer of ricotta cheese for a creamier texture or incorporate other herbs like rosemary or parsley for added flavor.
If you prefer a crunchier base, blind bake the crust for 5-10 minutes before adding the filling. This dish pairs wonderfully with a light salad or a glass of rosé, making it perfect for a relaxed evening meal.
Quiche Lorraine

Quiche Lorraine is a classic French dish that combines a flaky pastry crust with a rich and creamy custard filling, infused with savory flavors. Traditionally, it hails from the Lorraine region of France and is known for its delicious combination of eggs, cream, cheese, and crispy bacon or lardons.
This versatile dish can be enjoyed warm or cold, making it perfect for a weeknight dinner or a leisurely brunch with friends and family.
Making Quiche Lorraine is easier than it seems and can be customized to suit various tastes. Whether you prefer a lighter version with vegetables or stick to the classic bacon filling, this dish is sure to captivate.
Pair it with a simple green salad for a complete meal that’s both satisfying and elegant.
Ingredients (serving size: 4-6 people)
- 1 pre-made pie crust (9-inch)
- 6 large eggs
- 1 cup heavy cream
- 1 cup whole milk
- 1 cup shredded Gruyère cheese
- 6 ounces bacon or lardons, cooked and chopped
- 1/2 teaspoon salt
- 1/4 teaspoon black pepper
- 1/4 teaspoon nutmeg (optional)
- Chopped fresh chives or parsley for garnish (optional)
Cooking Instructions
- Preheat the Oven: Begin by preheating your oven to 375°F (190°C). This guarantees that the quiche cooks evenly and the crust becomes golden and flaky.
- Prepare the Pie Crust: Take the pre-made pie crust and carefully place it into a 9-inch pie dish, pressing it down gently to fit the shape. Trim any excess dough hanging over the edges. Use a fork to poke holes in the bottom of the crust to prevent it from bubbling while baking.
- Pre-bake the Crust: Place the crust in the preheated oven and bake for about 10 minutes, until it’s lightly golden. This step helps to prevent a soggy bottom once the filling is added. Remove from the oven and set aside to cool slightly.
- Prepare the Filling: In a mixing bowl, whisk together the eggs, heavy cream, and whole milk until well combined. Add salt, black pepper, and nutmeg if you choose to use it. This mixture will create the custard base of the quiche.
- Assemble the Quiche: Spread the cooked and chopped bacon evenly over the bottom of the pre-baked crust. Then, sprinkle the shredded Gruyère cheese over the bacon. Pour the egg and cream mixture over the cheese and bacon, ensuring it’s evenly distributed.
- Bake the Quiche: Carefully place the assembled quiche back into the oven and bake for 35-40 minutes, or until the filling is set and the top is lightly browned. You can check for doneness by inserting a knife in the center; it should come out clean.
- Cool and Serve: Once baked, remove the quiche from the oven and let it cool for about 10 minutes before slicing. This allows the filling to set further. Garnish with chopped chives or parsley if desired, and serve warm or at room temperature.
Extra Tips
For an added touch of flavor, consider sautéing some diced onions or leeks along with the bacon before adding them to the quiche.
You can also experiment with different cheeses such as cheddar or feta for a unique twist. If you’re looking to make this dish ahead of time, it can be prepared in advance and reheated, making it a convenient option for busy weeknights.
Enjoy your Quiche Lorraine!
Coq Au Vin With a Twist
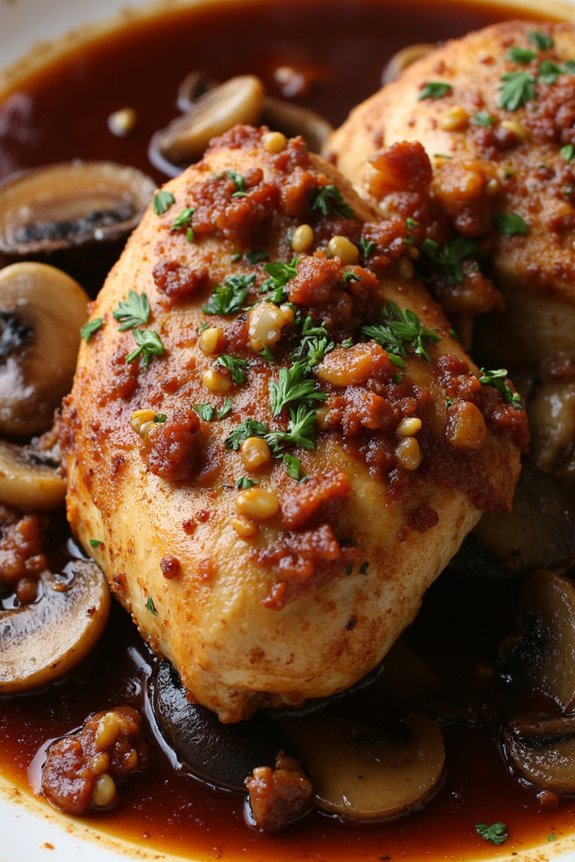
Coq Au Vin is a classic French dish that embodies the heart and soul of rustic cooking. Traditionally, it features chicken braised slowly in red wine, which infuses the meat with deep flavors and tenderizes it beautifully. In this delightful twist on the classic recipe, we incorporate a splash of brandy and a medley of mushrooms to elevate the dish, adding complexity and richness that will leave your taste buds dancing.
Perfect for a weeknight dinner, this variation is both comforting and sophisticated, making it a great choice for family meals or when entertaining friends.
Cooking Coq Au Vin With a Twist isn’t only about following the recipe but also about savoring the process. The aroma of garlic, thyme, and wine simmering together will fill your kitchen and create an inviting atmosphere. This dish pairs beautifully with a side of crusty bread or creamy mashed potatoes, allowing you to soak up the luscious sauce.
Let’s plunge into this easy yet impressive recipe that will surely become a favorite in your weeknight rotation.
Ingredients (Serves 4-6):
- 4 bone-in chicken thighs
- 4 bone-in chicken drumsticks
- 4 slices of bacon, chopped
- 1 medium onion, diced
- 3 cloves of garlic, minced
- 2 cups of red wine (preferably Burgundy)
- 1 cup of chicken broth
- 1/2 cup of brandy
- 2 cups of mixed mushrooms (e.g., cremini, shiitake, button), sliced
- 2 tablespoons of tomato paste
- 2 teaspoons of dried thyme
- 1 bay leaf
- Salt and pepper, to taste
- 2 tablespoons of olive oil
- Chopped parsley, for garnish
Cooking Instructions:
- Prepare the Chicken: Season the chicken thighs and drumsticks with salt and pepper. In a large Dutch oven, heat the olive oil over medium-high heat. Add the chicken skin-side down and sear until golden brown, about 5-7 minutes. Turn the chicken and sear the other side for another 5 minutes. Remove the chicken and set aside.
- Cook the Bacon: In the same pot, add the chopped bacon and cook until crispy, about 4-5 minutes. Use a slotted spoon to remove the bacon and let it drain on a paper towel. Leave the rendered fat in the pot.
- Sauté the Vegetables: Add the diced onion and sliced mushrooms to the pot. Sauté for about 5 minutes until the onions are translucent and the mushrooms are browned. Stir in the minced garlic and cook for an additional 1 minute until fragrant.
- Deglaze with Brandy: Carefully pour in the brandy, scraping the bottom of the pot to release any browned bits. Allow the brandy to simmer for about 2-3 minutes until slightly reduced.
- Add Remaining Ingredients: Stir in the red wine, chicken broth, tomato paste, thyme, bay leaf, and the crispy bacon. Return the chicken to the pot, ensuring it’s submerged in the liquid.
- Simmer: Bring the mixture to a gentle simmer, then cover and reduce the heat to low. Cook for 30-40 minutes until the chicken is tender and cooked through, reaching an internal temperature of 165°F (74°C).
- Serve: Once cooked, remove the bay leaf and taste the sauce, adjusting seasoning with salt and pepper as needed. Garnish with chopped parsley before serving. Enjoy your Coq Au Vin With a Twist with a side of crusty bread or creamy mashed potatoes!
Extra Tips:
When making Coq Au Vin With a Twist, don’t hesitate to use different types of mushrooms or even add in vegetables like carrots or pearl onions for added texture and flavor.
Allowing the dish to rest for a few minutes after cooking can help the flavors meld together even more beautifully. If you have leftovers, the taste improves the next day, making it an excellent dish for meal prep!
French Onion Soup
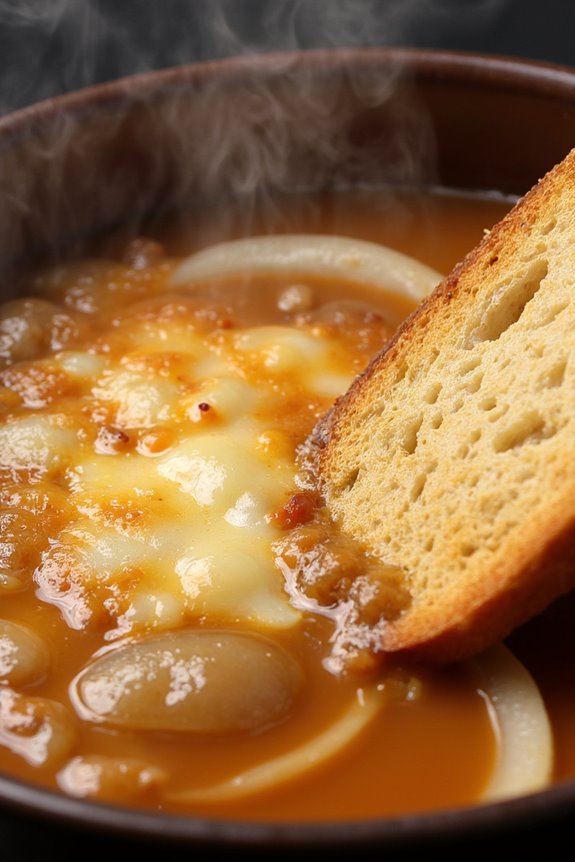
French Onion Soup is a classic dish that embodies the essence of comfort food with its rich flavors and warm, inviting aroma. This delightful soup is made with sweet caramelized onions, savory beef broth, and topped with crusty bread and melted cheese, making it a perfect meal for a weeknight dinner.
Traditionally served as a starter in French cuisine, it has become a popular dish worldwide, celebrated for its simplicity and depth of flavor.
To create the perfect French Onion Soup, patience is key, especially when it comes to caramelizing the onions. This process brings out the natural sweetness of the onions, creating a deep golden hue that’s vital for the soup’s overall taste.
The combination of fresh herbs, a splash of white wine, and a generous topping of Gruyère cheese transforms this humble soup into a delectable dish that’s sure to impress family and friends.
Ingredients (Serves 4-6):
- 4 large yellow onions, thinly sliced
- 4 tablespoons unsalted butter
- 1 tablespoon olive oil
- 1 teaspoon salt
- 1 teaspoon sugar
- 4 cups beef broth (or vegetable broth for a vegetarian option)
- 1 cup dry white wine (such as Sauvignon Blanc)
- 2 cloves garlic, minced
- 1 bay leaf
- 1 teaspoon fresh thyme (or ½ teaspoon dried thyme)
- Freshly ground black pepper, to taste
- 6 slices of French baguette, toasted
- 1 ½ cups Gruyère cheese, grated
Cooking Instructions:
1. Caramelize the Onions: In a large pot or Dutch oven, heat the butter and olive oil over medium heat. Add the sliced onions, salt, and sugar. Stir to coat the onions and then reduce the heat to low.
Cook the onions, stirring occasionally, for about 30-40 minutes until they become deeply caramelized and golden brown. This slow cooking is essential for developing the rich flavor of the soup.
2. Add Garlic and Wine: Once the onions are caramelized, add the minced garlic and cook for an additional minute until fragrant. Then, pour in the white wine, scraping up any browned bits from the bottom of the pot.
Increase the heat and let the wine simmer for about 5 minutes until it reduces slightly.
3. Incorporate Broth and Herbs: Add the beef broth, bay leaf, thyme, and black pepper to the pot. Bring the mixture to a simmer and let it cook for 20-25 minutes to allow the flavors to meld together.
Taste and adjust seasoning with additional salt and pepper as needed.
4. Prepare the Toppings: While the soup is simmering, preheat your oven to 400°F (200°C). Arrange the toasted slices of baguette on a baking sheet and top each slice generously with grated Gruyère cheese.
Bake for about 5-7 minutes until the cheese is bubbly and golden.
5. Serve: To serve, ladle the hot soup into bowls, and float a cheesy baguette slice on top of each serving.
Optionally, you can place the bowls under the broiler for a minute to achieve an even more golden and bubbly cheese topping. Enjoy your rich and flavorful French Onion Soup!
Extra Tips:
For an extra depth of flavor, consider adding a splash of balsamic vinegar or a teaspoon of Worcestershire sauce to the soup while it’s simmering.
You can also experiment with different types of cheese; Swiss or a blend of cheeses can work well too. If you prefer a vegetarian version, simply substitute the beef broth with vegetable broth and skip the Worcestershire sauce.
Finally, make sure to use good quality bread for the topping, as it plays a significant role in the overall texture and enjoyment of the dish.
One-Pan Chicken Provencal
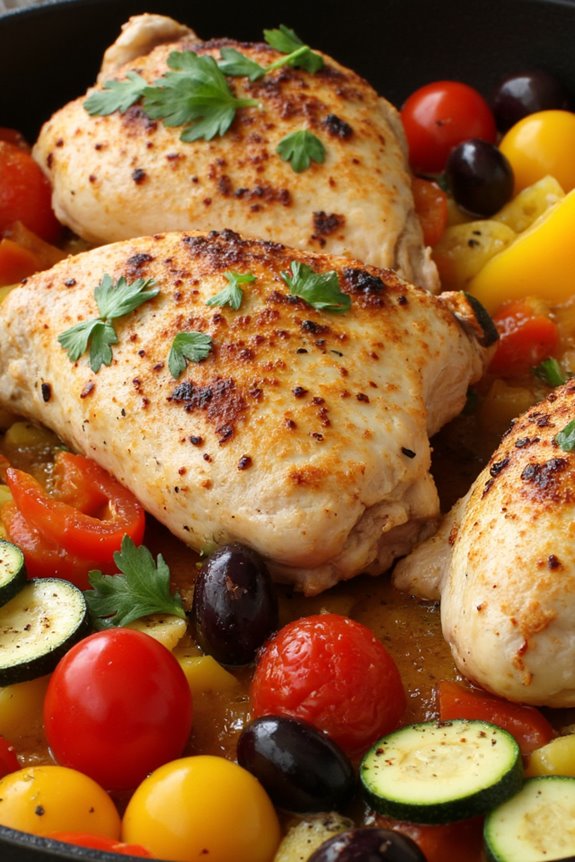
One-Pan Chicken Provencal is a delightful dish that captures the essence of Southern France with its vibrant flavors and simple preparation. This recipe highlights the harmony of tender chicken, fresh vegetables, herbs de Provence, and olives, all cooked together in one pan for an easy weeknight meal.
The beauty of this dish lies not only in its taste but also in its convenience, making it perfect for busy evenings when you want something special without the hassle of extensive cleanup.
This dish is a wonderful way to bring a taste of the French countryside to your dining table. The combination of juicy chicken thighs, aromatic garlic, and sweet bell peppers, paired with the briny olives, creates a well-rounded meal that’s satisfying and nutritious.
Serve it with crusty bread to soak up the delicious sauce, and you’ll have a culinary experience that transports you straight to Provence.
Ingredients (Serves 4-6):
- 6 bone-in, skin-on chicken thighs
- 2 tablespoons olive oil
- 1 medium onion, sliced
- 3 cloves garlic, minced
- 1 red bell pepper, sliced
- 1 yellow bell pepper, sliced
- 1 zucchini, sliced
- 1 cup cherry tomatoes, halved
- 1 cup pitted olives (preferably Kalamata or green)
- 1 teaspoon dried herbs de Provence
- Salt and pepper to taste
- Fresh parsley, chopped (for garnish)
Cooking Instructions:
1. Preheat the oven: Start by preheating your oven to 400°F (200°C). This guarantees that your chicken cooks evenly and achieves a crispy skin.
2. Prepare the chicken: Pat the chicken thighs dry with paper towels and season both sides generously with salt, pepper, and half of the herbs de Provence. This step helps to enhance the flavor of the chicken and guarantees a crispy texture.
3. Sear the chicken: In a large, oven-safe skillet, heat the olive oil over medium-high heat. Once hot, add the chicken thighs, skin-side down, and sear for about 5-7 minutes until they’re golden brown.
Flip the chicken and sear the other side for another 5 minutes. This step adds depth of flavor through caramelization.
4. Add the vegetables: Remove the chicken from the pan and set it aside on a plate. In the same skillet, add the sliced onion and cook for 2-3 minutes until softened.
Then add the minced garlic, red and yellow bell peppers, and zucchini, cooking for another 3-4 minutes until just tender.
5. Combine ingredients: Stir in the cherry tomatoes, olives, and the remaining herbs de Provence, mixing everything together.
Place the seared chicken thighs back on top of the vegetable mixture in the skillet.
6. Bake the dish: Transfer the skillet to the preheated oven and bake for 25-30 minutes or until the chicken is fully cooked and reaches an internal temperature of 165°F (74°C).
The vegetables should be tender and the juices should be bubbling.
7. Garnish and serve: Once cooked, remove the skillet from the oven and let it rest for a few minutes.
Garnish with freshly chopped parsley before serving. This dish is best enjoyed warm, alongside some crusty bread or over rice.
Extra Tips:
For an extra burst of flavor, consider marinating the chicken in olive oil, garlic, and herbs de Provence for a few hours before cooking.
This will enhance the taste even further and guarantee the chicken is juicy. Additionally, feel free to swap in seasonal vegetables based on what you have on hand, such as eggplant or asparagus.
Don’t forget to scrape up any browned bits from the bottom of the pan while cooking the vegetables, as they add a wonderful depth of flavor to the dish.
Creamy Garlic Mushroom Pasta
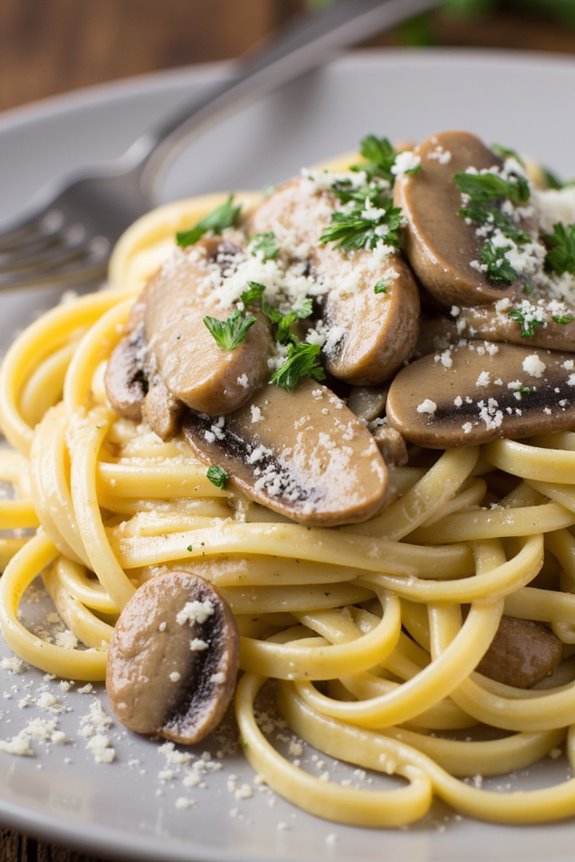
Indulging in a comforting bowl of Creamy Garlic Mushroom Pasta is a fantastic way to elevate your weeknight dinner. This dish combines the earthy flavors of sautéed mushrooms with the aromatic essence of garlic, all enveloped in a luscious cream sauce. It’s a simple yet satisfying meal that requires minimal effort and is certain to please everyone at the table.
Whether you’re looking to impress guests or simply enjoy a cozy night in, this pasta dish brings a taste of French cuisine right to your home.
The beauty of Creamy Garlic Mushroom Pasta lies not only in its rich flavors but also in its versatility. You can use any type of pasta you have on hand, and feel free to add vegetables or protein to customize it to your liking. This recipe serves 4-6 people, making it perfect for family dinners or meal prepping for the week.
With just a handful of ingredients and a few simple steps, you can create a delightful dinner that feels gourmet but is easy enough for any home cook.
Ingredients:
- 12 oz spaghetti or fettuccine
- 2 tablespoons olive oil
- 1 tablespoon butter
- 8 oz mushrooms, sliced (cremini or button)
- 4 cloves garlic, minced
- 1 teaspoon dried thyme
- 1 cup heavy cream
- ½ cup grated Parmesan cheese
- Salt and pepper to taste
- Fresh parsley, chopped (for garnish)
Cooking Instructions:
- Cook the Pasta: Begin by bringing a large pot of salted water to a boil. Add the pasta and cook according to package instructions until al dente. Reserve about a cup of the pasta cooking water, then drain the pasta and set it aside.
- Sauté the Mushrooms: In a large skillet, heat the olive oil and butter over medium heat. Once the butter has melted, add the sliced mushrooms. Sauté them for about 5-7 minutes until they’re browned and have released their moisture. Stir occasionally to guarantee even cooking.
- Add Garlic and Thyme: Once the mushrooms are nicely browned, add the minced garlic and dried thyme to the skillet. Cook for an additional 1-2 minutes, stirring continuously to prevent the garlic from burning.
- Make the Cream Sauce: Pour in the heavy cream and bring the mixture to a gentle simmer. Reduce the heat to low and stir in the grated Parmesan cheese until it melts and the sauce thickens slightly. If the sauce appears too thick, add a bit of the reserved pasta water to reach your desired consistency.
- Combine Pasta and Sauce: Add the cooked pasta to the skillet and toss to coat it evenly with the creamy mushroom sauce. Season with salt and pepper to taste. If necessary, add more pasta water to help the sauce adhere to the pasta.
- Serve: Once everything is combined and heated through, remove from heat. Serve the pasta in bowls, garnished with freshly chopped parsley and additional Parmesan cheese if desired.
Extra Tips: For a more robust flavor, consider adding a splash of white wine to the mushrooms before adding the cream. This will enhance the overall taste of the dish. Additionally, you can mix in cooked chicken or spinach for added protein and nutrients.
Don’t forget to taste and adjust the seasoning before serving, as the saltiness of the Parmesan can vary. Enjoy your culinary creation!
Beef Bourguignon Skillet
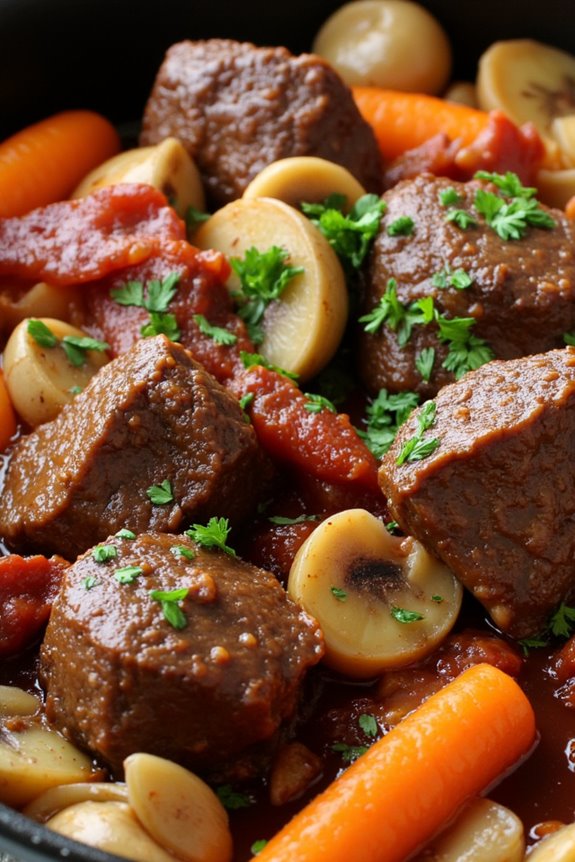
Beef Bourguignon, a classic French dish, is a hearty and flavorful stew that captures the essence of French comfort food. Traditionally slow-cooked, this version is adapted for a weeknight meal, utilizing a skillet for quicker preparation without sacrificing the depth of flavor. The combination of tender beef, rich red wine, aromatic vegetables, and fragrant herbs creates a dish that’s sure to impress your family or guests, making it perfect for a cozy dinner at home.
This Beef Bourguignon Skillet isn’t only simple to make but also allows you to enjoy the robust flavors of the classic dish in a fraction of the time. The technique of browning the beef first enhances the savory notes, while the wine sauce simmers down to a luscious glaze that coats the meat and vegetables. Serve it with crusty bread or over creamy mashed potatoes to soak up every bit of the delicious sauce.
Ingredients (Serves 4-6):
- 2 lbs beef chuck, cut into 1-inch cubes
- 4 slices of bacon, chopped
- 1 large onion, diced
- 2 carrots, sliced
- 2 cloves garlic, minced
- 2 cups mushrooms, quartered
- 1 cup red wine (preferably Burgundy)
- 1 cup beef broth
- 2 tablespoons tomato paste
- 1 tablespoon fresh thyme leaves or 1 teaspoon dried thyme
- 2 bay leaves
- Salt and pepper to taste
- 2 tablespoons olive oil
- Fresh parsley, chopped (for garnish)
Cooking Instructions:
- Brown the Bacon: In a large skillet over medium heat, add the chopped bacon and cook until crispy. This will take about 5-7 minutes. Remove the bacon from the skillet and set it aside, leaving the rendered fat in the pan.
- Sear the Beef: Increase the heat to medium-high. Season the beef cubes with salt and pepper, and add them to the skillet in batches, ensuring not to overcrowd the pan. Sear the beef on all sides until browned, about 8-10 minutes. Remove the beef and place it aside with the bacon.
- Sauté the Vegetables: In the same skillet, add the diced onion and sliced carrots. Sauté for about 5 minutes until the onion becomes translucent. Add the minced garlic and quartered mushrooms, cooking for an additional 3-4 minutes until the mushrooms soften.
- Deglaze the Pan: Pour in the red wine, scraping up any browned bits from the bottom of the skillet. Bring the mixture to a simmer and let it reduce by half, approximately 5-7 minutes.
- Simmer the Stew: Return the beef and bacon to the skillet. Stir in the beef broth, tomato paste, thyme, and bay leaves. Bring the mixture to a gentle simmer, cover, and reduce the heat to low. Let it cook for about 30-40 minutes, stirring occasionally, until the beef is tender.
- Finish and Serve: Once the beef is tender, remove the bay leaves and adjust the seasoning with salt and pepper to taste. Sprinkle with fresh parsley before serving. Enjoy your Beef Bourguignon Skillet with crusty bread or over mashed potatoes.
Extra Tips:
For the best flavor, choose a good quality red wine, as it will greatly enhance the richness of the sauce. If you want to add more depth, consider adding a splash of brandy or cognac after deglazing the pan.
Additionally, feel free to customize the vegetables to your liking; adding peas or green beans can introduce a nice pop of color and freshness. This dish can also be made ahead of time and reheated, as the flavors only get better with a little time.
Salmon En Papillote
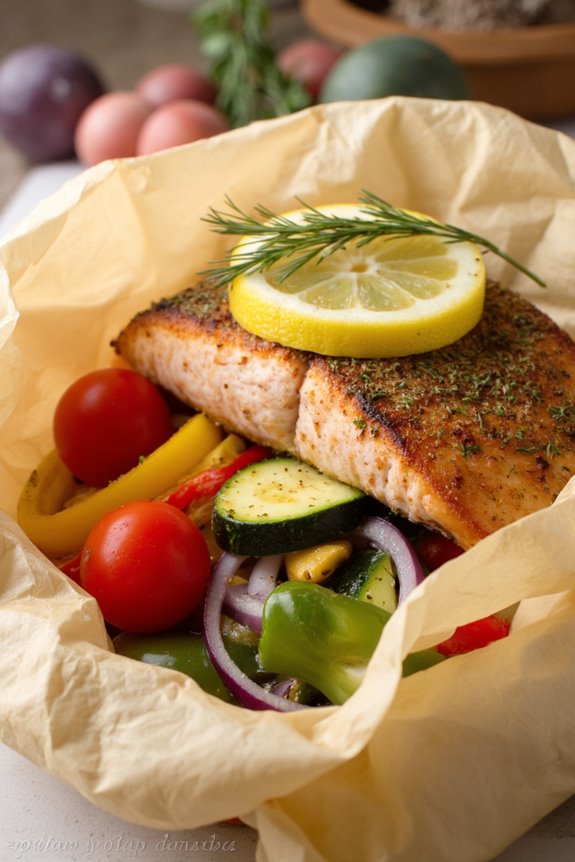
Salmon En Papillote is a classic French dish that translates to “salmon in parchment.” This method of cooking allows the fish to steam in its own juices, resulting in a moist, flavorful, and delicate meal. The parchment packet also infuses the salmon with the aromas of the accompanying vegetables and herbs, making it an elegant yet simple option for a weeknight dinner.
Not only is this dish delicious, but it’s also a healthy choice, packed with omega-3 fatty acids from the salmon and an array of vitamins and minerals from the vegetables.
Preparing Salmon En Papillote is straightforward and can be customized based on what vegetables you have on hand or your personal preferences. This dish is often served with a side of rice or crusty bread to soak up the flavorful juices. The presentation is impressive when you serve it in the parchment paper, making it perfect for both family meals and more formal occasions.
Ingredients (Serves 4-6):
- 4-6 salmon fillets (about 6 ounces each)
- 1 cup cherry tomatoes, halved
- 1 zucchini, thinly sliced
- 1 bell pepper (any color), sliced
- 1 small red onion, thinly sliced
- 2 cloves garlic, minced
- 1 lemon, thinly sliced
- 4 tablespoons olive oil
- Salt and pepper, to taste
- Fresh herbs (such as dill or parsley), for garnish
- Parchment paper (enough to create packets for each fillet)
Cooking Instructions:
- Preheat the oven: Start by preheating your oven to 400°F (200°C). This guarantees that the salmon will cook evenly and thoroughly once placed in the oven.
- Prepare the parchment paper: Cut the parchment paper into rectangular pieces, approximately 12×15 inches in size. Each piece should be large enough to hold a portion of salmon and the accompanying vegetables while allowing enough space to fold and seal the packet.
- Arrange the ingredients: On one half of each parchment piece, place a salmon fillet. Top it with a handful of cherry tomatoes, zucchini slices, bell pepper slices, red onion, and minced garlic. Season with salt, pepper, and drizzle with olive oil. Place a couple of lemon slices on top of the vegetables and salmon.
- Seal the packets: Fold the other half of the parchment over the salmon and vegetables. Starting at one end, crimp the edges of the parchment together tightly, creating a sealed packet. Make sure there are no openings for steam to escape, as this is essential for the cooking process.
- Bake: Place the sealed packets on a baking sheet and transfer to the preheated oven. Bake for about 15-20 minutes, or until the salmon is cooked through and flakes easily with a fork.
- Serve: Carefully cut open the packets (be cautious of the hot steam) and transfer the contents to plates. Garnish with fresh herbs to enhance the presentation and flavor.
Extra Tips:
When cooking Salmon En Papillote, feel free to experiment with different vegetables and herbs based on your taste preferences or what you have available. Asparagus, carrots, or even thinly sliced potatoes can be excellent additions.
Additionally, adding a splash of white wine or a pat of butter inside the packet can elevate the flavors even further. Make sure not to overcrowd the packets, as this can prevent even cooking. Enjoy this delightful dish with a simple salad or steamed rice for a complete meal.
Croque Monsieur

The Croque Monsieur is a quintessential French bistro sandwich that features layers of delectable ingredients, making it a beloved comfort food. Traditionally made with ham and Gruyère cheese, this dish is elevated with a creamy béchamel sauce that adds richness and flavor. It’s perfect for a weeknight meal, providing both satisfaction and elegance in a simple presentation.
Whether served with a side salad or accompanied by a bowl of soup, the Croque Monsieur is versatile and easy to prepare. This recipe will make 4-6 servings, allowing you to share this delightful dish with family or friends. With its crispy exterior and gooey, cheesy interior, it’s sure to become a favorite in your weekly dinner rotation.
Ingredients:
- 8 slices of sturdy white bread (like Pain de Mie or sourdough)
- 8 slices of cooked ham
- 1 ½ cups grated Gruyère cheese
- 2 tablespoons unsalted butter (for spreading)
- 2 tablespoons all-purpose flour
- 2 cups whole milk
- 1 teaspoon Dijon mustard
- Salt and black pepper to taste
- Freshly grated nutmeg (optional)
Cooking Instructions:
1. Prepare the Béchamel Sauce:
In a medium saucepan over medium heat, melt 2 tablespoons of unsalted butter. Once melted, add 2 tablespoons of all-purpose flour, whisking continuously for about 2-3 minutes to create a roux. Gradually add the 2 cups of whole milk while whisking to avoid lumps.
Continue cooking and stirring until the sauce thickens, about 5-7 minutes. Stir in 1 teaspoon of Dijon mustard, and season with salt, black pepper, and a pinch of freshly grated nutmeg if desired. Set the béchamel sauce aside.
2. Assemble the Sandwiches:
Preheat your oven to 400°F (200°C). Take 4 slices of bread and spread a thin layer of the prepared béchamel sauce on each slice. Layer 2 slices of cooked ham on top of the béchamel, followed by a generous amount of grated Gruyère cheese.
Top with the remaining 4 slices of bread, pressing down gently to create a sandwich.
3. Prepare for Baking:
Spread the remaining béchamel sauce generously over the top of each sandwich. Sprinkle the remaining grated Gruyère cheese on top, ensuring an even layer covers the sandwiches for that perfect melt and crust.
4. Bake the Sandwiches:
Place the assembled sandwiches on a baking sheet lined with parchment paper. Bake in the preheated oven for about 15-20 minutes or until the cheese is bubbling and golden brown.
For an extra crispy top, you can broil the sandwiches for an additional 2-3 minutes, watching closely to prevent burning.
5. Serve:
Remove the Croque Monsieur from the oven and allow them to cool for a minute before slicing. Serve hot alongside a simple green salad or a bowl of soup for a complete meal.
Extra Tips:
When making Croque Monsieur, feel free to experiment with different types of cheese, such as Emmental or even cheddar, for a unique flavor twist.
Additionally, you can add sautéed mushrooms, spinach, or even a fried egg on top for a Croque Madame variation. Make sure to use thick slices of bread for a sturdier sandwich that holds up well to the béchamel and cheese.
Finally, if you have any leftover béchamel sauce, it can be stored in the refrigerator and used later for pasta dishes or as a creamy base for vegetables.
Niçoise Salad
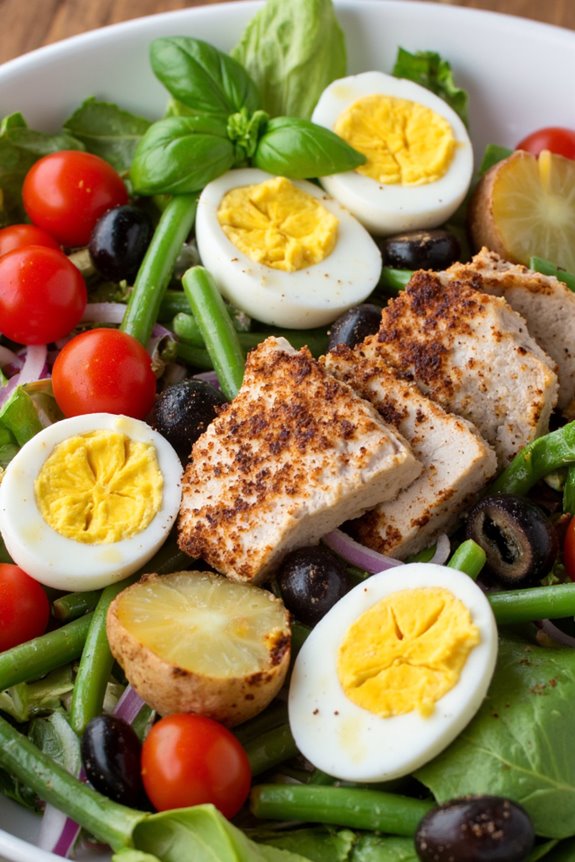
Niçoise Salad is a classic French dish that hails from the sunny region of Nice. This vibrant salad isn’t only visually appealing but also packed with flavors and nutrients, making it a perfect choice for a weeknight dinner. Traditionally, it features fresh vegetables, hard-boiled eggs, tuna, and olives, all drizzled with a tangy vinaigrette. The beauty of Niçoise Salad lies in its versatility; you can easily customize it to suit your taste preferences or what you have available in your pantry.
This invigorating salad is a delightful celebration of Mediterranean ingredients, offering a burst of colors and textures. Perfect for warm evenings, it can be served as a light main course or a side dish. Whether you’re hosting friends or enjoying a quiet family dinner, Niçoise Salad is sure to impress with its simplicity and elegance.
Ingredients (Serves 4-6):
- 4 cups mixed salad greens (e.g., arugula, romaine, or butter lettuce)
- 1 cup cherry tomatoes, halved
- 1 cup green beans, trimmed and blanched
- 3 medium potatoes, boiled and cut into wedges
- 4 hard-boiled eggs, peeled and quartered
- 1 can (5 oz) tuna in olive oil, drained
- 1/2 cup black olives (preferably Niçoise or Kalamata)
- 1/4 cup red onion, thinly sliced
- 1/4 cup extra virgin olive oil
- 2 tablespoons red wine vinegar
- 1 teaspoon Dijon mustard
- Salt and pepper to taste
- Fresh basil leaves for garnish (optional)
Cooking Instructions:
1. Prepare the Ingredients: Start by boiling the potatoes until fork-tender, about 15-20 minutes. Once cooked, drain and let them cool before cutting them into wedges.
In the meantime, blanch the green beans in boiling water for about 3-4 minutes until bright green and tender-crisp, then immediately transfer them to ice water to stop the cooking process.
2. Hard-Boil the Eggs: Place the eggs in a pot and cover them with cold water. Bring the water to a boil, then cover the pot and remove it from the heat. Let the eggs sit in the hot water for about 9-12 minutes, depending on your desired doneness.
Once done, transfer the eggs to ice water to cool before peeling and quartering them.
3. Make the Dressing: In a small bowl, whisk together the extra virgin olive oil, red wine vinegar, Dijon mustard, salt, and pepper until well combined. Adjust the seasoning to taste.
4. Assemble the Salad: In a large serving bowl or platter, layer the mixed salad greens as the base. Arrange the cherry tomatoes, green beans, potato wedges, hard-boiled eggs, tuna, and black olives on top of the greens in an appealing manner.
5. Drizzle and Serve: Pour the dressing over the assembled salad, ensuring even coverage. If desired, garnish with fresh basil leaves. Serve immediately and enjoy the delightful flavors of your homemade Niçoise Salad!
Extra Tips:
When preparing Niçoise Salad, feel free to experiment with the ingredients based on your preferences. You can substitute the tuna with grilled chicken or chickpeas for a vegetarian option.
Additionally, using farm-fresh vegetables will enhance the flavor and nutritional value of your salad. To save time, you can prep the ingredients ahead of time and assemble the salad just before serving. Enjoy your culinary journey through the south of France!
Tarte Tatin

Tarte Tatin is a classic French dessert that beautifully showcases the rich flavors of caramelized apples. This upside-down pastry is both simple and exquisite, making it an ideal choice for a weeknight treat or a special occasion. The dish originated from the Tatin sisters in the late 19th century and has since become a beloved staple in French cuisine.
With its buttery, flaky crust and sweet, tangy apple filling, Tarte Tatin is bound to impress anyone who takes a bite. Making Tarte Tatin may seem intimidating at first, but with a little patience and attention, you can create a stunning dessert that dazzles both the eyes and the palate.
The process involves caramelizing the apples, preparing a simple pastry, and then baking it all together in one pan. The result is a beautifully golden tart that’s best served warm, perhaps with a dollop of whipped cream or a scoop of vanilla ice cream. Gather your ingredients and get ready to indulge in this delightful French treat!
Ingredients (Serves 4-6):
- 6 medium apples (such as Granny Smith or Honeycrisp)
- 1 cup granulated sugar
- 1/2 cup unsalted butter (1 stick)
- 1 teaspoon vanilla extract
- 1 teaspoon ground cinnamon
- 1 pre-made puff pastry sheet (thawed if frozen)
- Pinch of salt
- Optional: whipped cream or vanilla ice cream for serving
Cooking Instructions:
- Prepare the Apples: Start by peeling, coring, and quartering the apples. This guarantees they cook evenly and are easy to eat. Set them aside in a bowl.
- Make the Caramel: In a large, oven-safe skillet, melt the butter over medium heat. Once melted, add the sugar and a pinch of salt. Stir until the mixture begins to bubble and turn a light golden brown, about 5-7 minutes. Be careful not to let it burn, as caramel can go from perfect to burnt quickly.
- Add the Apples: Carefully add the quartered apples to the skillet, arranging them in a circular pattern. Sprinkle with cinnamon and vanilla extract. Cook the apples in the caramel for about 15-20 minutes, turning occasionally until they’re tender and well-coated with caramel.
- Preheat the Oven: While the apples are cooking, preheat your oven to 375°F (190°C). This allows the oven to be ready for baking once the apples are caramelized.
- Prepare the Pastry: Roll out the puff pastry sheet on a lightly floured surface to fit over the skillet. It should be slightly larger than the skillet’s diameter. This will create a nice crust over the apples.
- Assemble the Tart: Once the apples are caramelized, remove the skillet from the heat. Carefully place the rolled-out puff pastry over the apples, tucking the edges down around the apples. This helps to form a seal during baking.
- Bake the Tart: Transfer the skillet to the preheated oven and bake for 25-30 minutes or until the pastry is golden brown and puffed up.
- Invert the Tart: After baking, remove the skillet from the oven and let it cool for about 5 minutes. Carefully invert the tart onto a large serving plate. Be cautious, as the caramel will be hot!
- Serve: Allow the Tarte Tatin to cool slightly before slicing. Serve warm with whipped cream or vanilla ice cream, if desired.
Extra Tips:
When making Tarte Tatin, choosing the right apple is essential for achieving the perfect balance of sweetness and tartness. Additionally, don’t rush the caramelization process; allowing the apples to soak in the caramel for a while enhances their flavor and texture.
If you’re short on time, you can also use a store-bought pie crust instead of puff pastry, although the flaky texture of puff pastry truly elevates the dish. Finally, make sure to let the tart cool slightly before inverting it to avoid any spills or burns from the hot caramel. Enjoy your delicious Tarte Tatin!
Vegetable Cassoulet
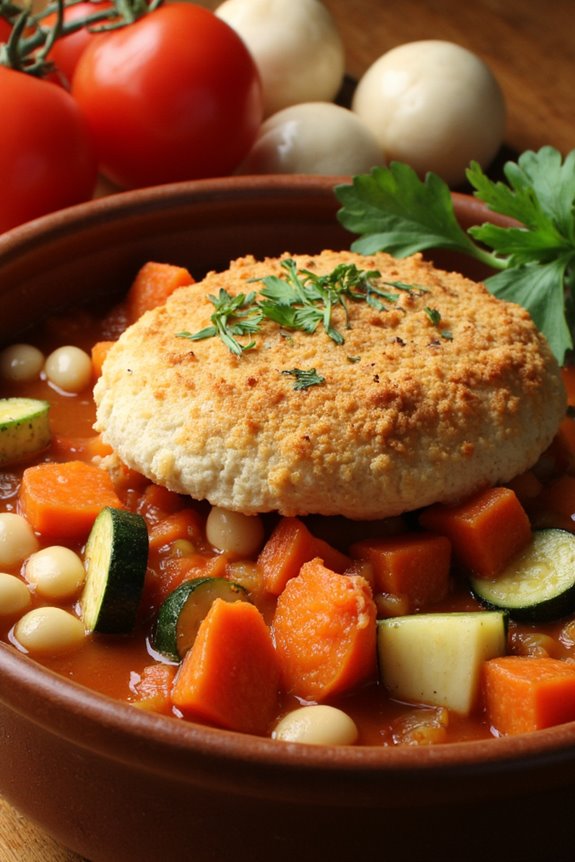
Vegetable Cassoulet is a hearty and satisfying dish that brings the comforting flavors of traditional French cuisine to your weeknight dinner table. This rustic stew is packed with a variety of vegetables, beans, and aromatic herbs, creating a deliciously rich and flavorful meal that’s sure to please vegetarians and meat-eaters alike.
With its origins in the southwest of France, cassoulet is typically slow-cooked and developed over time, but this recipe simplifies the process for a quicker weeknight preparation. Incorporating seasonal vegetables makes this dish versatile and adaptable to whatever you have on hand.
The combination of white beans and a medley of carrots, zucchini, and tomatoes brings both color and nutrition to the table, while the herby, garlicky broth ties everything together beautifully. Serve this Vegetable Cassoulet with crusty bread or a side salad for a complete meal that feels like a warm hug on a plate.
Ingredients (serving size: 4-6 people):
- 2 tablespoons olive oil
- 1 onion, diced
- 3 cloves garlic, minced
- 3 carrots, sliced
- 2 zucchinis, diced
- 1 bell pepper, diced
- 1 can (14 oz) diced tomatoes, with juices
- 1 can (15 oz) white beans, drained and rinsed
- 2 cups vegetable broth
- 1 tablespoon fresh thyme leaves (or 1 teaspoon dried thyme)
- 1 bay leaf
- Salt and pepper, to taste
- 1 cup breadcrumbs (optional)
- Fresh parsley, for garnish
Cooking Instructions:
- Sauté the Vegetables: In a large pot or Dutch oven, heat the olive oil over medium heat. Add the diced onion and cook until it becomes translucent, about 5 minutes. Stir in the minced garlic and cook for an additional minute until fragrant, being careful not to burn it.
- Add the Root Vegetables: Next, add the sliced carrots and cook for another 3-4 minutes, stirring occasionally. The carrots should start to soften slightly before you add the other vegetables.
- Incorporate Remaining Vegetables: Add the diced zucchini and bell pepper to the pot. Continue to sauté for an additional 5 minutes, allowing the vegetables to soften and mingle their flavors.
- Stir in Tomatoes and Beans: Pour in the canned diced tomatoes with their juices and the white beans. Stir to combine all the ingredients, ensuring they’re evenly distributed in the pot.
- Add Broth and Seasonings: Pour in the vegetable broth and add the fresh thyme, bay leaf, salt, and pepper. Bring the mixture to a gentle simmer, then cover the pot and let it cook for about 20-25 minutes. This will allow the flavors to meld together beautifully.
- Final Touches: After the stew has simmered, taste and adjust the seasoning if necessary. If you prefer a crispy topping, you can sprinkle breadcrumbs over the top and broil the cassoulet in the oven for about 5 minutes until golden brown.
- Serve: Remove the bay leaf before serving. Garnish with fresh parsley and serve hot, accompanied by crusty bread or a side salad.
Extra Tips:
To enhance the flavor of your Vegetable Cassoulet, consider adding a splash of white wine during the sautéing step for a deeper taste. You can also customize the vegetables according to what’s in season or what you have on hand; leeks, eggplant, or spinach are excellent additions.
For a protein boost, feel free to mix in some cooked lentils or chickpeas. This dish also stores well, making it a great option for meal prep or leftovers!
Chocolate Mousse

Chocolate mousse is a classic French dessert that’s both indulgent and deceptively simple to make. This creamy, airy treat is perfect for a weeknight dinner when you want to impress your family or guests without spending hours in the kitchen. The combination of rich chocolate and fluffy whipped cream gives this dessert its signature texture, making it a delightful way to end any meal.
Plus, the ingredients are often pantry staples, making it an accessible option for those spontaneous dessert cravings.
To create a truly exceptional chocolate mousse, it’s crucial to use high-quality chocolate, as it plays a significant role in the flavor of the dish. This recipe also incorporates eggs and sugar to create a light and airy mousse that melts in your mouth. With just a few steps, you can whip up this elegant dessert that will leave everyone asking for seconds.
Ingredients (Serves 4-6):
- 8 ounces dark chocolate (70% cocoa or higher)
- 3 large eggs, separated
- 1/4 cup granulated sugar
- 1 cup heavy cream
- 1 teaspoon vanilla extract
- A pinch of salt
- Optional: whipped cream and chocolate shavings for garnish
Instructions:
- Melt the Chocolate: Begin by breaking the dark chocolate into small pieces and placing them in a heatproof bowl. Set this bowl over a saucepan of simmering water, ensuring that the bowl doesn’t touch the water (this is known as a double boiler). Stir the chocolate gently until it’s completely melted and smooth. Remove from heat and allow to cool slightly.
- Prepare the Egg Yolks: In a separate mixing bowl, whisk the egg yolks and half of the granulated sugar together until the mixture is pale and thick. Gradually add the melted chocolate to the egg yolk mixture, stirring continuously until well combined.
- Beat the Egg Whites: In another clean mixing bowl, add a pinch of salt to the egg whites and beat them with a hand mixer or stand mixer on medium speed until they form soft peaks. Gradually add the remaining sugar and continue beating until stiff peaks form.
- Whip the Cream: In a separate bowl, whip the heavy cream and vanilla extract until it holds soft peaks. Be careful not to overwhip; you want the cream to be fluffy but still pourable.
- Combine the Mixtures: Gently fold the beaten egg whites into the chocolate mixture in three additions, being careful not to deflate the air incorporated into the egg whites. Once combined, fold in the whipped cream until just blended, ensuring that the mixture remains light and airy.
- Chill and Serve: Spoon the chocolate mousse into individual serving dishes or one large bowl. Refrigerate for at least 2 hours, or until set. Before serving, you can add a dollop of whipped cream and sprinkle chocolate shavings on top for a decorative touch.
Extra Tips:
When making chocolate mousse, it’s vital to use fresh eggs, as they’re a key component of the dish. If you’re concerned about using raw eggs, you can look for pasteurized eggs at the store.
Additionally, feel free to experiment with flavors by adding a splash of orange liqueur or espresso powder to the chocolate mixture for a unique twist. Remember, the quality of your chocolate will directly impact the taste of your mousse, so choose a brand that you enjoy eating on its own!