

Hello lovely readers!
Appetizers are my absolute favorite way to kick off any gathering, creating just the right mood for the meal to come.
French cuisine is such a treasure trove of easy and stunning options that are sure to wow your guests.
Think Classic French Onion Soup Bites or Mini Quiches Lorraine, each a delightful treat for the senses.
I’m thrilled to share these recipes with you, starting with a few that are bound to impress.
Classic French Onion Soup Bites

Classic French Onion Soup Bites are a delightful twist on the traditional French onion soup, perfect for entertaining or as a comforting appetizer. These bites capture the rich, savory flavors of caramelized onions, aromatic herbs, and melted cheese, all served on a crispy bread base. They’re easy to prepare and will impress your guests with their gourmet touch while still being simple enough for a home cook.
To make these delectable bites, you’ll start by slowly caramelizing onions until they’re golden brown and sweet. This process brings out the natural sugars in the onions, creating a depth of flavor that’s signature to French onion soup. Once the onions are ready, they’re combined with beef broth and a splash of white wine, then spooned onto toasted bread slices, topped with Gruyère cheese, and baked until bubbly and golden. Enjoy these bites as a perfect introduction to any meal or as a standalone snack!
Ingredients (Serves 4-6):
- 4 large onions, thinly sliced
- 3 tablespoons unsalted butter
- 2 tablespoons olive oil
- 1 teaspoon salt
- 1 teaspoon sugar
- 4 cups beef broth
- 1/2 cup dry white wine
- 1 teaspoon fresh thyme leaves
- 1 baguette, sliced into 1/2-inch pieces
- 1 1/2 cups shredded Gruyère cheese
- Freshly ground black pepper, to taste
Cooking Instructions:
- Caramelize the Onions: In a large skillet, melt the butter and olive oil over medium heat. Add the sliced onions, salt, and sugar. Cook, stirring occasionally, for about 30-40 minutes until the onions are beautifully caramelized and golden brown. This slow cooking process is key to developing the sweet flavor of the onions.
- Add Broth and Wine: Once the onions are caramelized, pour in the beef broth and white wine. Stir in the fresh thyme leaves and season with black pepper. Bring the mixture to a simmer and cook for an additional 10-15 minutes, allowing the flavors to meld together. Remove from heat and set aside.
- Prepare the Baguette Slices: Preheat your oven to 400°F (200°C). Arrange the baguette slices on a baking sheet and toast them in the oven for about 5-7 minutes, until lightly golden and crispy. This will help the bread hold up against the soup mixture.
- Assemble the Bites: Spoon a generous amount of the caramelized onion mixture onto each toasted baguette slice. Top each bite with a handful of shredded Gruyère cheese, covering the onions completely.
- Bake Until Golden: Return the baking sheet to the oven and bake for an additional 10-15 minutes, or until the cheese is melted, bubbly, and golden brown. Keep an eye on them to prevent burning.
- Serve Warm: Remove from the oven and allow to cool for a minute before serving. These bites are best enjoyed warm, allowing the cheese to pull and the flavors to shine.
Extra Tips: For an extra depth of flavor, consider adding a splash of sherry or cognac to the onion mixture after caramelization for a sophisticated twist. If you prefer a vegetarian version, feel free to substitute vegetable broth for the beef broth. Finally, you can make the onion mixture ahead of time and assemble the bites right before your guests arrive for easy entertaining!
Mini Quiches Lorraine

Mini Quiches Lorraine are a delightful French appetizer that brings a touch of elegance to any gathering. These bite-sized treats aren’t only easy to prepare but also versatile, allowing you to customize the filling to suit your taste. Traditionally filled with a savory mixture of eggs, cream, cheese, and bacon, Mini Quiches Lorraine are perfect for brunches, parties, or as a quick snack. The creamy filling pairs beautifully with a flaky crust, making them irresistible to guests.
Making Mini Quiches Lorraine is straightforward and requires minimal ingredients. They can be made ahead of time and warmed before serving, which is ideal for entertaining. You can use store-bought pastry shells or make your own for an added touch. With their rich flavor and delicate texture, these mini quiches are sure to captivate your family and friends.
Ingredients (Serves 4-6)
- 1 package of pre-made pastry shells (12 shells)
- 4 large eggs
- 1 cup heavy cream
- 1 cup shredded Gruyère cheese
- 6 slices of bacon, cooked and crumbled
- 1 small onion, finely chopped
- Salt and pepper to taste
- Fresh parsley, chopped (for garnish)
Cooking Instructions
- Preheat the Oven: Start by preheating your oven to 375°F (190°C). This guarantees that the mini quiches cook evenly and develop a lovely golden color.
- Prepare the Filling: In a medium-sized bowl, whisk together the eggs and heavy cream until well combined. Season with salt and pepper to taste. This mixture will be the base for your quiches.
- Cook the Bacon and Onions: In a skillet over medium heat, cook the chopped onion until translucent, about 5 minutes. Add the crumbled bacon and sauté for another minute. This step enhances the flavors of the filling.
- Assemble the Quiches: Place the pre-made pastry shells on a baking sheet. Evenly distribute the bacon and onion mixture among the shells. Then, sprinkle the shredded Gruyère cheese on top of the bacon and onions.
- Add the Egg Mixture: Carefully pour the egg and cream mixture into each pastry shell, filling them about three-quarters full. This allows room for the quiches to puff up as they bake.
- Bake the Quiches: Place the baking sheet in the preheated oven and bake for 20-25 minutes, or until the quiches are set and lightly golden on top. The filling should be firm but still slightly jiggly in the middle.
- Cool and Serve: Remove the mini quiches from the oven and let them cool for a few minutes. Garnish with chopped parsley before serving. These can be enjoyed warm or at room temperature.
Extra Tips
For an extra layer of flavor, consider adding herbs such as thyme or chives to the egg mixture. You can also experiment with different cheeses like cheddar or feta, or add vegetables like spinach or mushrooms to enhance the filling.
If you have leftovers, they can be stored in the refrigerator and reheated in the oven for a quick snack later. Enjoy your Mini Quiches Lorraine and the compliments that come with them!
Ratatouille Tartlets
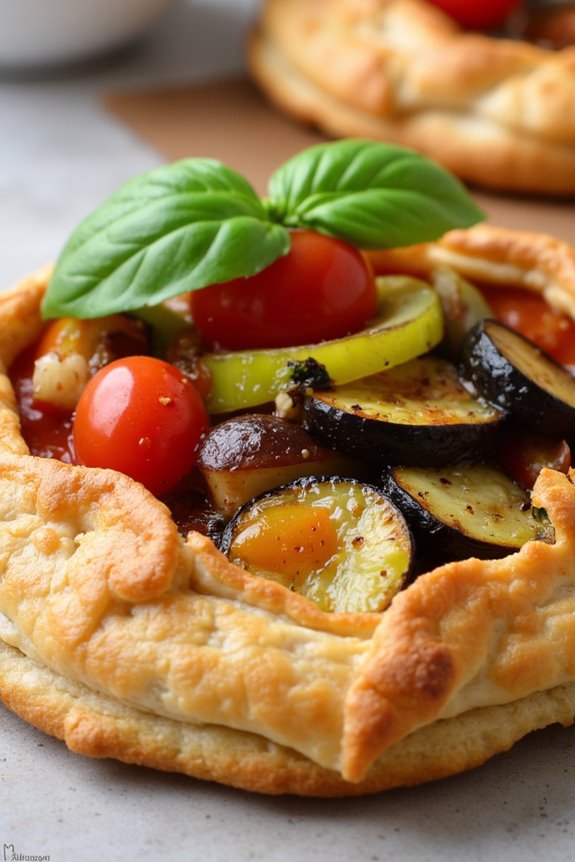
Ratatouille Tartlets are a delightful French appetizer that combines the vibrant flavors of classic Ratatouille with the flaky texture of pastry. This dish is perfect for entertaining, as it presents beautifully and offers a taste of Provence in every bite. The combination of sautéed vegetables, aromatic herbs, and a buttery crust makes these tartlets a crowd-pleaser that can be enjoyed warm or at room temperature.
Creating Ratatouille Tartlets is an excellent way to showcase seasonal vegetables and is a versatile recipe that can be adjusted to suit personal preferences. The tartlets aren’t only visually appealing but also packed with flavor, making them a great choice for parties, picnics, or a simple family dinner. Serve them alongside a fresh salad or a glass of chilled white wine for a complete culinary experience.
Ingredients (serves 4-6 people):
- 1 sheet of puff pastry, thawed
- 1 medium eggplant, diced
- 1 zucchini, diced
- 1 bell pepper (red or yellow), diced
- 1 small onion, finely chopped
- 2 cloves garlic, minced
- 1 cup cherry tomatoes, halved
- 2 tablespoons olive oil
- 1 teaspoon dried thyme
- 1 teaspoon dried oregano
- Salt and pepper, to taste
- 1 egg, beaten (for egg wash)
- Fresh basil leaves, for garnish (optional)
Cooking Instructions:
1. Preheat the Oven: Begin by preheating your oven to 400°F (200°C). This guarantees that the pastry will become golden and flaky as soon as it goes into the oven.
2. Prepare the Vegetables: In a large skillet, heat the olive oil over medium heat. Add the chopped onion and garlic, sautéing until they turn translucent and fragrant, about 3-4 minutes.
Then, add the diced eggplant, zucchini, and bell pepper. Cook for an additional 5-7 minutes, stirring occasionally until the vegetables are tender.
3. Add Flavor: Stir in the halved cherry tomatoes, dried thyme, oregano, salt, and pepper. Cook for another 2-3 minutes until the tomatoes start to soften. Remove the skillet from heat and allow the mixture to cool slightly.
4. Roll Out the Pastry: On a lightly floured surface, roll out the thawed puff pastry into a rectangle about 1/8 inch thick. Cut the pastry into small squares or circles, depending on the shape of your tartlet molds. You should have enough pastry for 4-6 tartlets.
5. Assemble the Tartlets: Place the pastry squares or circles into the tartlet molds, pressing them gently to fit. Fill each mold with a generous amount of the ratatouille mixture, guaranteeing even distribution.
6. Egg Wash: Brush the edges of the pastry with the beaten egg. This will give the tartlets a beautiful golden color when baked.
7. Bake: Place the tartlets in the preheated oven and bake for 20-25 minutes, or until the pastry is puffed and golden brown. Keep an eye on them to prevent burning.
8. Garnish and Serve: Once baked, remove the tartlets from the oven and let them cool for a few minutes. Garnish with fresh basil leaves before serving.
Extra Tips:
For added depth of flavor, consider roasting the vegetables before adding them to the tartlets, as this enhances their sweetness and richness.
You can also experiment with different herbs or add cheese, such as goat cheese or feta, for a creamier texture. If you have leftover ratatouille, it can be stored in the refrigerator for up to three days, making it a great make-ahead option. Enjoy these delightful Ratatouille Tartlets warm or at room temperature!
Gougères (Cheese Puffs)

Gougères are delightful French cheese puffs that are light, airy, and utterly delicious. Originating from the Burgundy region, these savory treats are made from choux pastry, which is the same base used for eclairs and cream puffs.
What sets gougères apart is the addition of cheese, usually Gruyère, which gives them a rich flavor and an appealing golden-brown crust. Perfect as appetizers or snacks, they’re bound to impress your guests with their elegant appearance and exquisite taste.
Making gougères is a straightforward process that doesn’t require advanced culinary skills, making them an ideal choice for both novice and experienced cooks. The key to achieving the perfect texture lies in the method of combining ingredients and baking them properly.
With a little practice, you’ll be able to whip up a batch of these cheesy delights without breaking a sweat, guaranteeing a delightful addition to any gathering.
Ingredients (Serves 4-6):
- 1 cup water
- ½ cup unsalted butter
- 1 teaspoon salt
- 1 cup all-purpose flour
- 4 large eggs
- 1 cup grated Gruyère cheese
- ¼ teaspoon black pepper (optional)
- ¼ teaspoon nutmeg (optional)
Cooking Instructions:
1. Prepare the Oven and Baking Sheet: Preheat your oven to 400°F (200°C). Line a baking sheet with parchment paper to prevent the gougères from sticking.
2. Make the Choux Pastry: In a medium saucepan, combine the water, butter, and salt. Bring the mixture to a boil over medium heat, making sure that the butter is fully melted.
Once boiling, remove the saucepan from the heat and quickly add the flour, stirring vigorously with a wooden spoon until the mixture forms a smooth ball and pulls away from the sides of the pan.
3. Incorporate the Eggs****: Allow the dough to cool for a couple of minutes. Then, add the eggs one at a time, mixing well after each addition. The dough will initially look separated but will come together to form a glossy and smooth batter.
This step is vital as it gives the gougères their rise during baking.
4. Add the Cheese and Seasoning: Once the eggs are fully incorporated, stir in the grated Gruyère cheese, along with black pepper and nutmeg, if using. Mix until the cheese is evenly distributed throughout the dough.
5. Pipe the Dough: Transfer the dough to a piping bag fitted with a large round tip. Alternatively, you can use a spoon to drop tablespoonfuls of the mixture onto the prepared baking sheet, spacing them about 2 inches apart to allow for expansion during baking.
6. Bake the Gougères: Place the baking sheet in the preheated oven and bake for 20-25 minutes, or until the gougères are puffed and golden brown.
Avoid opening the oven door during the first 15 minutes to guarantee they rise properly.
7. Cool and Serve: Once baked, remove the gougères from the oven and allow them to cool slightly on a wire rack. Serve warm or at room temperature, and enjoy!
Extra Tips:
For the best results, make certain that the butter is fully melted and incorporated before adding the flour to avoid lumps.
If you want to experiment, try mixing different cheeses like cheddar or parmesan for varied flavors. Additionally, to keep the gougères from deflating, be sure to let them cool in the oven with the door slightly ajar for a few minutes before transferring them to a cooling rack.
This step helps maintain their light and airy texture. Enjoy your homemade gougères at your next gathering!
Smoked Salmon Rillettes
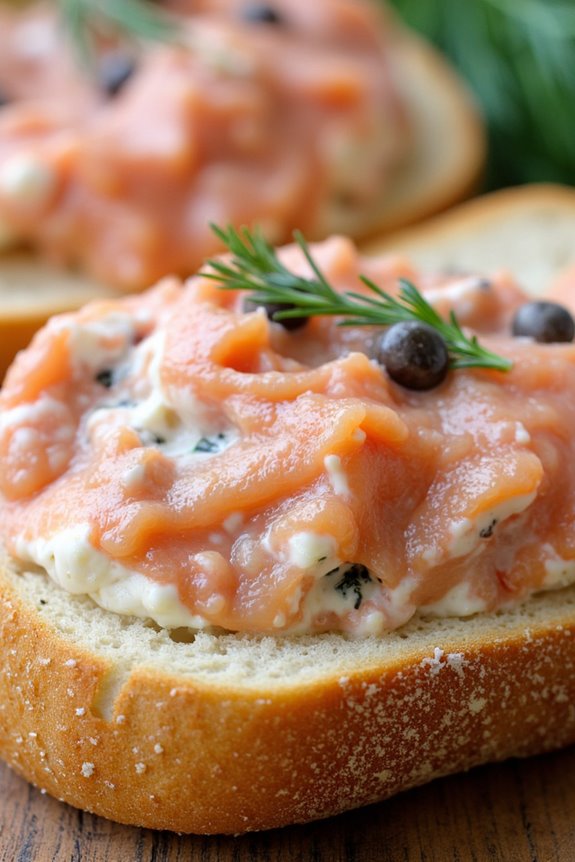
Smoked Salmon Rillettes is a delightful French appetizer that combines creamy textures with the rich, savory flavor of smoked salmon. This dish is a perfect addition to any gathering or dinner party, offering a sophisticated yet simple option that can be enjoyed on crusty bread or crackers.
The rillettes are easy to prepare and can be made a day in advance, allowing the flavors to meld beautifully overnight. The base of this dish consists of smoked salmon, cream cheese, and a hint of fresh herbs, creating a luscious spread that’s both indulgent and invigorating.
Whether you’re hosting a cocktail party or simply enjoying a casual evening with friends, Smoked Salmon Rillettes is sure to impress your guests and elevate your appetizer offerings.
Ingredients (Serves 4-6 people):
- 8 oz smoked salmon, chopped
- 4 oz cream cheese, softened
- 2 tbsp unsalted butter, softened
- 1 tbsp fresh dill, chopped (or 1 tsp dried dill)
- 1 tbsp capers, rinsed and coarsely chopped
- 1 tbsp lemon juice
- Salt and pepper, to taste
- Fresh baguette or crackers, for serving
Cooking Instructions:
- Prepare the Ingredients: Start by gathering all your ingredients. Chop the smoked salmon into small pieces, soften the cream cheese and butter at room temperature, and finely chop the fresh dill and capers. This will make the mixing process easier and guarantee a smooth texture.
- Mix the Base: In a medium-sized mixing bowl, combine the softened cream cheese and unsalted butter. Use a fork or a hand mixer to blend them together until smooth and creamy. This will create a rich base for your rillettes.
- Incorporate the Salmon and Flavorings: Add the chopped smoked salmon, fresh dill, capers, and lemon juice to the cream cheese mixture. Gently fold everything together using a spatula or spoon. Be careful not to overmix; you want to keep some of the texture of the salmon intact.
- Season the Mixture: Taste the rillettes and season with salt and pepper as needed. Remember that smoked salmon can be salty, so adjust the seasoning accordingly.
- Chill and Serve: Transfer the rillettes to a serving dish or individual ramekins. Cover with plastic wrap and refrigerate for at least 1 hour to allow the flavors to meld. Serve chilled with slices of fresh baguette or crackers for spreading.
Extra Tips:
For a more flavorful rillettes, consider adding a splash of Worcestershire sauce or a pinch of smoked paprika to the mixture.
Additionally, if you want to impress your guests even further, you can garnish the rillettes with extra dill or capers just before serving. This dish can also be made ahead of time and stored in the refrigerator for up to two days, making it a convenient option for entertaining.
Caprese Salad Skewers With a French Twist
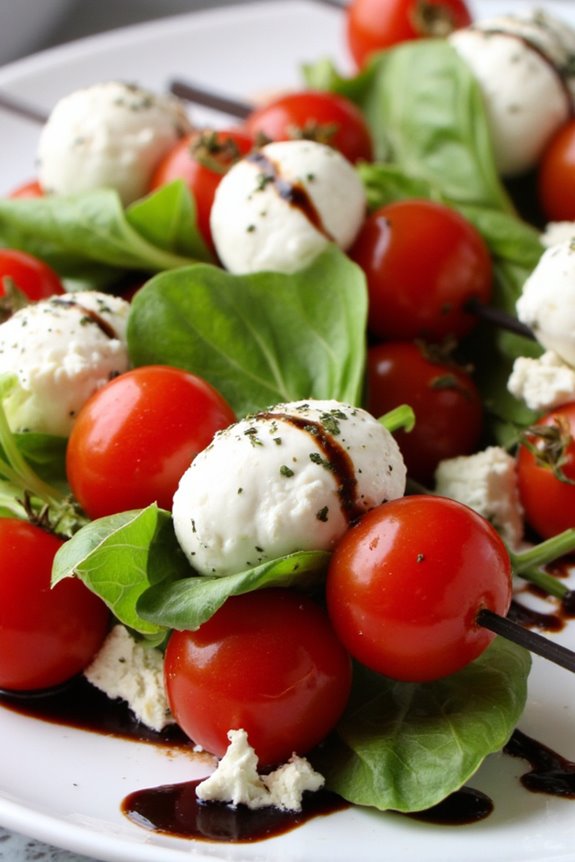
Caprese Salad Skewers are a delightful way to enjoy the classic Italian flavors of fresh mozzarella, basil, and ripe tomatoes, all while adding a French twist to the presentation and ingredients. This easy appetizer is perfect for gatherings, picnics, or a light starter for a dinner party. By incorporating French elements like herbed goat cheese and a drizzle of balsamic reduction, you elevate the traditional Caprese into something uniquely delicious and visually stunning.
The beauty of Caprese Salad Skewers lies not only in their vibrant colors but also in their simplicity. They require minimal prep and can be assembled in no time, making them an ideal choice for those who want to impress guests without spending hours in the kitchen. The combination of creamy goat cheese, fresh basil, and juicy tomatoes on skewers makes for an elegant presentation that’s sure to wow your friends and family.
Ingredients (Serves 4-6):
- 24 cherry tomatoes
- 12 ounces fresh mozzarella balls (bocconcini)
- 8 ounces herbed goat cheese
- 24 fresh basil leaves
- 12 wooden skewers (6 inches long)
- Balsamic reduction (store-bought or homemade, for drizzling)
- Salt and pepper to taste
- Olive oil (optional, for drizzling)
Cooking Instructions:
- Prepare the Ingredients: Wash the cherry tomatoes and basil leaves under cold water. Pat them dry with a paper towel. If using larger mozzarella balls, cut them into smaller pieces that are similar in size to the cherry tomatoes. Crumble or cut the herbed goat cheese into small pieces, about the size of the mozzarella.
- Assemble the Skewers: Take a wooden skewer and start by threading on a cherry tomato, followed by a basil leaf, then a mozzarella ball, and finally a piece of herbed goat cheese. Repeat this process until all the ingredients are used up, usually about 4-5 items per skewer. Make sure to leave a little space at each end of the skewer for easy handling.
- Season the Skewers: Once all the skewers are assembled, place them on a serving platter. Drizzle a light amount of olive oil over the skewers if desired, then sprinkle with salt and pepper to taste. This enhances the flavors and adds a touch of sophistication.
- Add the Finishing Touch: Drizzle balsamic reduction over the skewers just before serving. This not only adds a beautiful glossy finish but also a sweet and tangy flavor that complements the fresh ingredients perfectly.
- Serve and Enjoy: Allow the skewers to sit for a few minutes to let the flavors meld together, then serve them at room temperature. They’re great as finger food, and guests can easily grab one while mingling.
Extra Tips:
When preparing Caprese Salad Skewers With a French Twist, consider adding a variety of colors by mixing in different types of tomatoes, such as yellow or heirloom tomatoes. For an even bolder flavor, you can introduce a touch of pesto or a sprinkle of herbes de Provence to the goat cheese.
If preparing in advance, keep the skewers refrigerated and drizzle the balsamic reduction just before serving to maintain the freshness of the ingredients. Enjoy this delightful appetizer at your next gathering!
Endive Boats With Roquefort and Pear
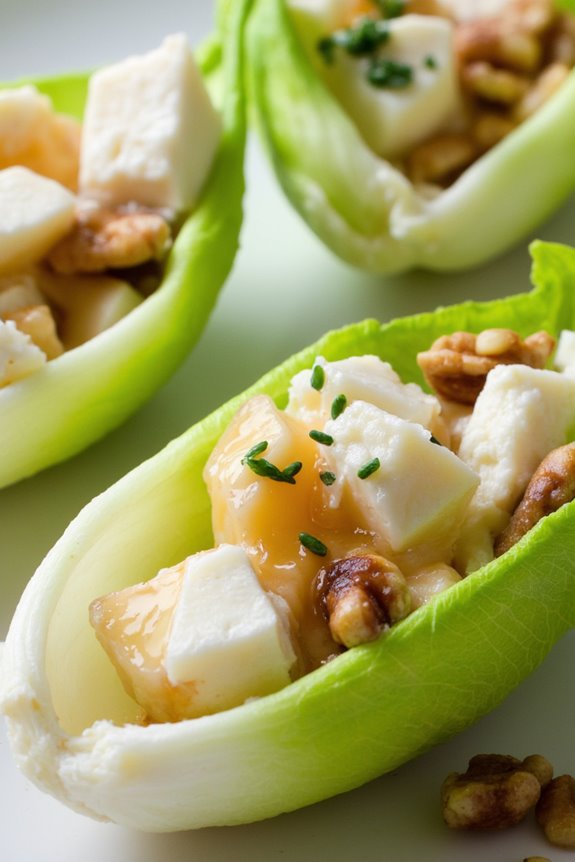
Endive boats with Roquefort and pear is a delightful French appetizer that combines the crispness of endive leaves with the creamy richness of Roquefort cheese, complemented by the sweetness of ripe pears. This dish isn’t only visually appealing but also offers a satisfying contrast of flavors and textures that will impress your guests at any gathering.
Perfect for a holiday party or a casual get-together, these endive boats are easy to prepare and serve as a sophisticated finger food.
To create this elegant appetizer, you’ll need fresh endive leaves as the base, which serve as the “boats” for the filling. The combination of crumbled Roquefort cheese and diced pear creates a harmonious blend of salty and sweet, while a drizzle of honey adds a touch of indulgence. This dish can be made in advance, making it a convenient option for entertaining. Serve them chilled for the best flavor experience.
Ingredients (Serves 4-6)
- 2 large heads of endive
- 100 grams (about 3.5 ounces) of Roquefort cheese, crumbled
- 1 ripe pear, diced
- 2 tablespoons of walnuts, chopped (optional)
- 1 tablespoon of honey
- Freshly ground black pepper, to taste
- Fresh parsley or chives, for garnish (optional)
Instructions
- Prepare the Endive Leaves: Start by rinsing the endive heads under cold water to remove any dirt. Pat them dry with a clean towel. Carefully separate the leaves, keeping them intact as they’ll serve as the boats. You’ll need about 12-16 leaves to hold the filling.
- Make the Filling: In a medium bowl, combine the crumbled Roquefort cheese, diced pear, and chopped walnuts (if using). Gently fold the ingredients together to avoid mashing the pear. Add the honey and a pinch of freshly ground black pepper to enhance the flavors, mixing until everything is evenly coated.
- Assemble the Boats: Take one endive leaf at a time and spoon a generous amount of the cheese and pear mixture into the center of the leaf. You can fill each leaf according to your preference, but aim for about a tablespoon of filling per leaf.
- Garnish and Serve: Once all the leaves are filled, arrange them on a serving platter. If desired, sprinkle some chopped fresh parsley or chives on top for a pop of color and added flavor.
- Chill and Enjoy: For the best taste, refrigerate the endive boats for about 15-20 minutes before serving. This will allow the flavors to meld together and the appetizer to be nice and cool.
Extra Tips
When making endive boats with Roquefort and pear, choose a ripe pear that has a bit of give when gently pressed; this guarantees a perfect balance of sweetness.
If you’re preparing this appetizer ahead of time, consider storing the filling and endive leaves separately until you’re ready to serve to maintain the crispness of the endive.
Finally, feel free to experiment with different cheeses or nuts based on your preferences!
Pâté En Croûte (Pâté in Pastry)
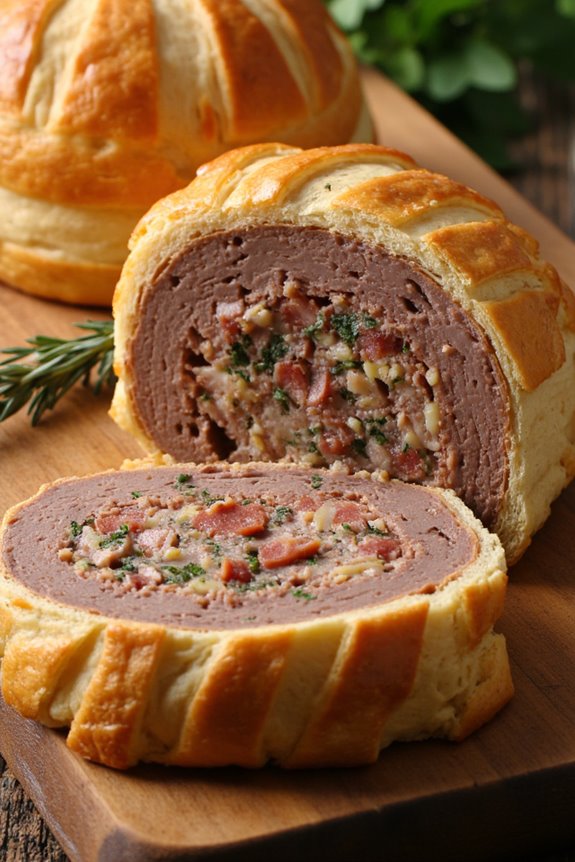
Pâté en Croûte is a classic French dish that marries the richness of a meat pâté with the flaky, buttery goodness of pastry. Traditionally served as an appetizer, this dish isn’t only a feast for the palate but also a visual delight, making it a perfect addition to any gathering or festive occasion.
The combination of flavors and textures in the pâté—often including meats, herbs, and spices—encased in a golden pastry crust is sure to impress your guests.
Making Pâté En Croûte may seem intimidating, but with a little preparation and attention to detail, you can create a stunning centerpiece for your appetizer table. This dish can be made ahead of time and served cold or at room temperature, allowing you to enjoy the event without being tied to the kitchen.
Let’s explore the ingredients and the steps needed to prepare this delightful French appetizer for 4-6 people.
Ingredients:
- 1 sheet of puff pastry (thawed if frozen)
- 1 pound ground pork
- 1/2 pound ground beef
- 1/4 pound chicken liver, cleaned
- 1/2 cup diced bacon
- 1 small onion, finely chopped
- 2 cloves garlic, minced
- 1/4 cup fresh parsley, chopped
- 1 tablespoon fresh thyme leaves
- 1 tablespoon Dijon mustard
- 1 tablespoon brandy or cognac
- Salt and pepper to taste
- 1 egg (for egg wash)
Cooking Instructions:
1. Prepare the Filling: In a large skillet over medium heat, cook the diced bacon until crispy. Remove the bacon and drain on paper towels, leaving a bit of fat in the skillet.
Add the chopped onion and minced garlic to the skillet and sauté until translucent, about 5 minutes. Set aside to cool.
2. Mix the Meat: In a large mixing bowl, combine the ground pork, ground beef, cleaned chicken liver, cooked bacon, sautéed onion and garlic, fresh parsley, thyme, Dijon mustard, brandy, salt, and pepper.
Mix thoroughly until all ingredients are well incorporated.
3. Roll Out the Pastry: On a lightly floured surface, roll out the sheet of puff pastry to a rectangle large enough to completely encase your meat mixture. Aim for about 1/8-inch thickness.
4. Assemble the Pâté: Place the meat mixture in the center of the rolled-out pastry. Fold the pastry over the filling, pinching the seams to seal it well.
You can use a fork to crimp the edges for a decorative touch.
5. Prepare for Baking: Preheat your oven to 375°F (190°C). Transfer the wrapped pâté onto a baking sheet lined with parchment paper.
Beat the egg and brush it over the surface of the pastry to give it a golden color when baked.
6. Bake the Pâté: Place the pâté in the preheated oven and bake for about 45-50 minutes, or until the pastry is golden brown and the internal temperature of the meat reaches at least 160°F (70°C).
7. Cool and Serve: Once baked, remove the pâté from the oven and let it cool for at least 20 minutes before slicing.
This will help the filling set and make for cleaner slices.
Extra Tips:
When preparing Pâté En Croûte, consider making it a day ahead of time. This allows the flavors to meld and improves the taste.
Additionally, feel free to customize the filling by adding your favorite herbs or other meats like duck or game. If you’re feeling adventurous, you can also incorporate dried fruits or nuts for added texture and flavor.
Remember to serve it with a tangy mustard or a chutney for an additional layer of flavor that will elevate your appetizer experience. Enjoy!
Truffle Mushroom Crostini
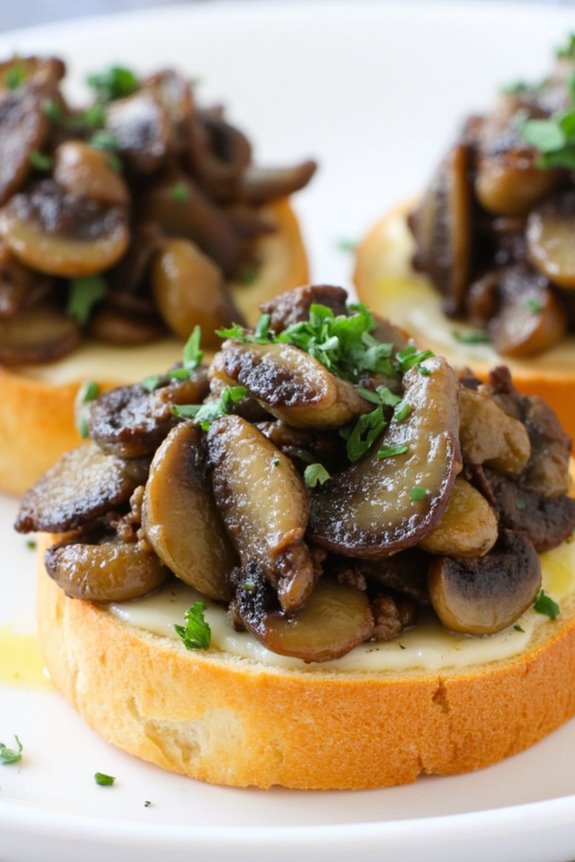
Truffle Mushroom Crostini is a delightful French appetizer that combines the earthy flavors of mushrooms with the luxurious aroma of truffle oil, all served on a crispy slice of toasted bread. This dish is perfect for entertaining guests or simply enjoying as a sophisticated snack.
The combination of sautéed mushrooms, garlic, and truffle oil creates a rich and savory topping that pairs wonderfully with the crunch of the crostini, making it an instant crowd-pleaser.
Preparing Truffle Mushroom Crostini is easy and quick, allowing you to whip them up in no time. With just a few high-quality ingredients, you can create an elegant appetizer that showcases the depth of flavor that mushrooms can offer.
Whether you’re hosting a dinner party, a casual gathering, or simply indulging on a cozy night in, these crostinis are bound to impress with their delicious flavor and sophisticated presentation.
Ingredients (serving size: 4-6 people)
- 1 baguette, sliced into 1/2-inch thick pieces
- 2 cups mixed mushrooms (such as cremini, shiitake, and button), finely chopped
- 2 tablespoons olive oil
- 2 tablespoons unsalted butter
- 2 cloves garlic, minced
- 1 tablespoon fresh thyme, chopped (or 1 teaspoon dried thyme)
- 1 tablespoon truffle oil
- Salt and pepper, to taste
- Grated Parmesan cheese, for serving (optional)
- Fresh parsley, chopped, for garnish (optional)
Cooking Instructions
1. Prepare the Baguette: Preheat your oven to 400°F (200°C). Arrange the sliced baguette pieces on a baking sheet. Brush lightly with olive oil on both sides and season with a pinch of salt.
Bake in the preheated oven for about 8-10 minutes or until they’re golden and crispy. Set aside to cool.
2. Sauté the Mushrooms: In a large skillet, heat the olive oil and butter over medium heat. Once the butter is melted and bubbly, add the minced garlic and sauté for about 30 seconds until fragrant.
3. Add the Mushrooms: Add the finely chopped mixed mushrooms to the skillet. Sauté for about 5-7 minutes, stirring occasionally, until the mushrooms are browned and have released their moisture.
4. Season the Mixture: Once the mushrooms are cooked, stir in the chopped fresh thyme, truffle oil, salt, and pepper. Taste the mixture and adjust the seasoning if necessary. Remove from heat.
5. Assemble the Crostini: Spoon a generous amount of the mushroom mixture onto each toasted baguette slice. If desired, sprinkle some grated Parmesan cheese on top.
6. Garnish and Serve: Transfer the crostini to a serving platter and garnish with freshly chopped parsley. Serve immediately while still warm.
Extra Tips
For an added layer of flavor, consider using a mix of different types of mushrooms to enhance the dish’s complexity.
If you want to elevate the richness, you can drizzle more truffle oil on top of the crostini just before serving. Make sure to serve these immediately after assembling to guarantee the baguette remains crispy.
Additionally, feel free to experiment with herbs, such as rosemary or chives, for a different twist on this classic appetizer. Enjoy your Truffle Mushroom Crostini!
Provençal Tomato Tarts

Provençal Tomato Tarts are a delightful French appetizer that perfectly captures the essence of Mediterranean cooking. The combination of fresh, juicy tomatoes, fragrant herbs, and a flaky pastry crust creates a harmonious balance of flavors that’s both vibrant and comforting.
These tarts aren’t only visually appealing but also easy to prepare, making them an ideal choice for gatherings or a casual dinner at home. The dish is versatile; you can use a variety of tomatoes, such as heirloom, cherry, or even sun-dried, depending on what you have on hand.
The addition of herbs like thyme and basil enhances the flavors, while a sprinkle of cheese adds a delicious creamy texture. As you bake these tarts, your kitchen will be filled with the delightful aroma of Provence, inviting everyone to the table.
Ingredients (Serves 4-6)
- 1 sheet of puff pastry (thawed)
- 4 medium ripe tomatoes (sliced)
- 1 cup of grated mozzarella cheese
- 1/2 cup of grated Parmesan cheese
- 2 tablespoons of olive oil
- 2 teaspoons of fresh thyme (or 1 teaspoon dried thyme)
- 1 teaspoon of fresh basil (or 1/2 teaspoon dried basil)
- Salt and pepper to taste
- 1 egg (beaten, for egg wash)
Cooking Instructions
1. Preheat the Oven: Begin by preheating your oven to 400°F (200°C). This guarantees that your tarts will bake evenly and become golden brown and crispy.
2. Prepare the Puff Pastry: Roll out the thawed puff pastry on a lightly floured surface to smooth out any creases. Next, cut the pastry into rectangles or circles, depending on your preferred shape for the tarts.
Transfer the cut pastry to a baking sheet lined with parchment paper.
3. Add Cheese: Sprinkle the grated mozzarella cheese evenly over the pastry bases, leaving a small border around the edges. This cheese layer acts as a barrier to prevent the pastry from getting soggy once the tomatoes are added.
4. Layer the Tomatoes: Arrange the sliced tomatoes over the cheese in an overlapping pattern. Confirm that the tomatoes are evenly distributed to provide uniform flavor in every bite.
5. Season the Tarts: Drizzle the olive oil over the tomatoes and sprinkle with fresh thyme, basil, salt, and pepper. This step enhances the overall flavor profile and adds that signature Provençal taste.
6. Brush the Edges: Use the beaten egg to brush the edges of the pastry. This will give your tarts a beautiful golden color as they bake in the oven.
7. Bake the Tarts: Place the baking sheet in the preheated oven and bake for 20-25 minutes, or until the pastry is puffed and golden brown, and the tomatoes are tender.
8. Cool and Serve: Once baked, remove the tarts from the oven and allow them to cool for a few minutes before slicing. Serve warm or at room temperature as an appetizer.
Extra Tips
When making Provençal Tomato Tarts, consider using heirloom tomatoes for a variety of colors and flavors, which will make your dish even more visually appealing.
Additionally, you can experiment with different types of cheese such as goat cheese or feta for a tangier taste. For a crispy crust, make sure to pre-bake the pastry for 5-7 minutes before adding the cheese and tomatoes if you want to avoid any sogginess.
Enjoy your culinary journey through the flavors of Provence!
Escargots De Bourgogne (Snails in Garlic Butter)

Escargots de Bourgogne, or snails in garlic butter, is a classic French appetizer that’s both luxurious and surprisingly easy to prepare. This dish is often associated with fine dining and is a staple in French cuisine, particularly in the Burgundy region. The snails are typically baked in their shells with a rich mixture of garlic, parsley, and butter, which enhances their natural flavor while providing a decadent taste experience.
Served warm and often accompanied by crusty bread, this dish is perfect for impressing guests at dinner parties or enjoying a special occasion.
To prepare escargots de Bourgogne, the most important element is the garlic butter. A combination of fresh herbs and high-quality butter creates a fragrant and flavorful base that complements the snails beautifully. While the thought of cooking snails may be intimidating for some, they’re readily available in cans or jars, making them accessible for home cooks. By following this simple recipe, you’ll be able to savor this delightful French delicacy in no time.
Ingredients (Serves 4-6):
- 1 can or jar of escargots (approximately 24-30 snails)
- 1/2 cup unsalted butter, softened
- 4 cloves of garlic, minced
- 2 tablespoons fresh parsley, finely chopped
- 1 tablespoon fresh thyme, finely chopped
- 1 teaspoon salt
- 1/2 teaspoon black pepper
- 1/4 cup white wine (optional)
- 12-18 escargot shells (if using shells)
- Fresh baguette (for serving)
Instructions:
- Prepare the Garlic Butter: In a medium mixing bowl, combine the softened butter, minced garlic, chopped parsley, thyme, salt, and black pepper. If you wish to add white wine for extra flavor, incorporate it at this stage. Mix well until all ingredients are evenly combined. This garlic butter will be the star of the dish.
- Preheat the Oven: Preheat your oven to 375°F (190°C). This guarantees that the escargots will cook evenly and the garlic butter will melt beautifully.
- Prep the Snails: If using escargot shells, rinse them thoroughly under running water. If using canned or jarred snails, drain and rinse them as well. This step is important to remove any residual brine or flavor from the can.
- Fill the Shells: If you’re using shells, place one snail in each shell. Then, using a small spoon or a pastry bag, fill each shell generously with the prepared garlic butter mixture. Make sure the garlic butter fills the shell around the snail completely.
- Arrange and Bake: Place the filled shells upright in a baking dish. If you don’t have shells, simply place the snails in a small oven-safe dish and spoon the garlic butter over them. Bake in the preheated oven for about 12-15 minutes, or until the butter is bubbling and the tops are slightly golden.
- Serve: Carefully remove the baking dish from the oven. Allow the escargots to cool for a minute before serving. Serve hot, accompanied by slices of fresh baguette to soak up the delicious garlic butter.
Extra Tips:
When cooking escargots, it’s essential to not overcook them, as they can become tough and chewy. If you’re new to handling snails, feel free to use pre-cooked or canned options, which are widely available and still provide a delightful taste.
Additionally, experimenting with different herbs or adding a splash of lemon juice can elevate the flavor profile further. Don’t forget to serve with plenty of bread – it’s the perfect accompaniment for savoring the leftover garlic butter!