

I recently embarked on a delightful journey, exploring 13 flawless gluten-free French dessert recipes. I’m excited to share my sweet discoveries with you. Picture enjoying a delicate mille-feuille or a rich chocolate soufflé without any gluten concerns. Every recipe captures the essence of French patisserie while accommodating dietary needs. Get ready to indulge in their irresistible textures and flavors!
Gluten-Free Mille-Feuille
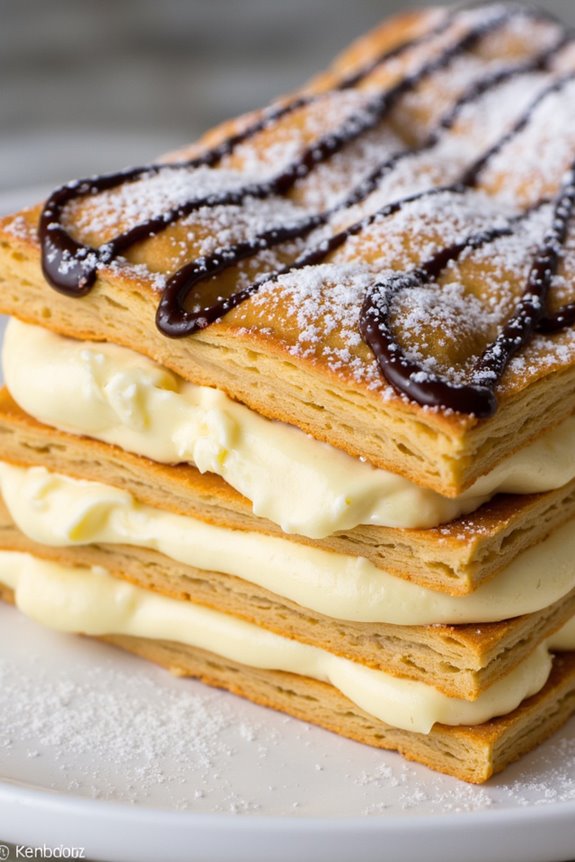
Gluten-Free Mille-Feuille, also known as Napoleon, is a classic French dessert known for its delicate layers of puff pastry and rich pastry cream. Traditionally, this dessert can be quite challenging for those with gluten sensitivities due to its wheat-based components. However, with a few thoughtful substitutions, you can create a gluten-free version that maintains all the decadence and texture of the original.
By using gluten-free puff pastry and guaranteeing all other ingredients are gluten-free, you can indulge in this elegant treat without worry.
Creating the perfect Gluten-Free Mille-Feuille involves a balance of flaky, buttery pastry and creamy, smooth filling. The key to success is in the preparation and assembly. The gluten-free puff pastry should be baked to a golden crisp, while the pastry cream needs to be rich and flavorful, ideally with notes of vanilla.
Once assembled, the final touch is a light dusting of powdered sugar, or perhaps a drizzle of chocolate glaze, to add a touch of sweetness and visual appeal. This recipe serves 4-6 people, making it perfect for a small gathering or special occasion.
Ingredients
- 1 package gluten-free puff pastry (enough for 3 layers, approximately 12×9 inches each)
- 2 cups whole milk
- 1 vanilla bean or 2 teaspoons vanilla extract
- 4 large egg yolks
- 1/2 cup granulated sugar
- 1/4 cup cornstarch
- 2 tablespoons unsalted butter
- Powdered sugar for dusting
- Optional: chocolate glaze (melted chocolate or prepared gluten-free chocolate sauce)
Instructions
- Prepare the Puff Pastry:
- Preheat your oven to 400°F (200°C). Roll out the gluten-free puff pastry to 1/8-inch thickness. Cut into three equal-sized rectangles (approximately 12×9 inches each).
- Place the pastry on a baking sheet lined with parchment paper. Prick the surface with a fork to prevent puffing during baking.
- Bake for 15-20 minutes or until golden brown and crisp. Let cool completely on a wire rack.
- Make the Pastry Cream:
- In a medium saucepan, heat the milk and vanilla bean (split and scraped) over medium heat until just simmering. If using vanilla extract, add it later.
- In a mixing bowl, whisk the egg yolks with sugar until pale and thick. Add cornstarch and whisk until smooth.
- Gradually pour the hot milk into the egg mixture, whisking constantly. Return the mixture to the saucepan and cook over medium heat, stirring continuously, until thickened and boiling.
- Remove from heat and stir in butter and vanilla extract (if using). Transfer to a bowl, cover with plastic wrap to prevent a skin from forming, and cool completely.
- Assemble the Mille-Feuille:
- Place one layer of baked puff pastry on a serving platter. Spread half of the pastry cream evenly over the top.
- Repeat with the second layer of puff pastry and the remaining pastry cream. Top with the final layer of puff pastry.
- Dust the top with powdered sugar. If desired, drizzle with chocolate glaze.
- Chill and Serve:
- Refrigerate the assembled Mille-Feuille for at least 1 hour to set. Slice with a sharp knife to serve.
Extra Tips
When rolling out the gluten-free puff pastry, work quickly to prevent it from getting too warm, as this can affect its texture when baked.
If the pastry becomes too soft, chill it in the refrigerator for a few minutes before continuing. Confirm the pastry cream is completely cooled before assembling the layers to prevent it from melting the puff pastry.
For a more polished look, use a serrated knife to slice the assembled Mille-Feuille, cleaning the blade between cuts to maintain clean edges.
Crème Brûlée With a Twist

Indulge in the classic French dessert Crème Brûlée with a delightful twist that keeps it gluten-free and irresistibly delicious. This luxurious dessert is known for its creamy custard base and perfectly caramelized sugar top, which creates a symphony of textures that dance on the palate.
Our version adds a subtle hint of vanilla and a splash of orange zest, elevating the traditional flavors to new heights. Whether you’re hosting a dinner party or simply treating yourself, this Crème Brûlée with a Twist is bound to impress.
With its smooth, velvety texture and the satisfying crack of caramelized sugar, this dessert offers a perfect end to any meal. While it may seem complicated, Crème Brûlée is surprisingly straightforward to prepare. The key lies in patience and attention to detail, allowing the rich flavors to meld and the sugar topping to achieve the perfect crunch.
Follow this simple recipe to create a gluten-free masterpiece that serves 4-6 people, delighting your guests with a sophisticated and delectable treat.
Ingredients:
- 2 cups heavy cream
- 1 vanilla bean, split and seeds scraped (or 1 teaspoon vanilla extract)
- Zest of 1 orange
- 5 large egg yolks
- 1/2 cup granulated sugar, plus extra for topping
- A pinch of salt
Instructions:
- Preheat the Oven and Prepare the Ramekins: Preheat your oven to 325°F (160°C). Place 4-6 ramekins in a baking dish with high sides, guaranteeing they aren’t touching each other.
- Infuse the Cream: In a medium saucepan, combine the heavy cream, vanilla bean and seeds (or vanilla extract), and orange zest. Heat over medium heat until it just begins to simmer. Remove from heat and let it steep for about 10 minutes, allowing the flavors to meld.
- Mix the Egg Yolks and Sugar: In a separate bowl, whisk the egg yolks, 1/2 cup of sugar, and a pinch of salt until the mixture becomes pale and thick.
- Combine and Strain: Slowly pour the warm cream mixture into the egg yolk mixture, whisking constantly to prevent the eggs from curdling. Once combined, strain the mixture through a fine-mesh sieve into a large measuring cup or bowl to remove the zest and vanilla bean.
- Fill the Ramekins and Bake: Pour the custard evenly into the ramekins. Place the baking dish in the oven and carefully pour hot water into the dish until it reaches halfway up the sides of the ramekins. Bake for 35-40 minutes, or until the custards are set but still slightly jiggly in the center.
- Chill the Custards: Once baked, remove the ramekins from the water bath and let them cool to room temperature. Cover each with plastic wrap and refrigerate for at least 4 hours, or overnight for best results.
- Caramelize the Sugar: Just before serving, sprinkle an even layer of granulated sugar over each custard. Using a kitchen torch, melt the sugar until it forms a golden-brown caramelized layer. Alternatively, place the ramekins under a broiler for a few minutes, watching closely to prevent burning.
Extra Tips:
For the best results, use a kitchen torch to caramelize the sugar, as it provides more control over the process and guarantees an even caramelization. If you don’t have a torch, the broiler method works, but be sure to keep a close eye to avoid burning.
Additionally, allow the custard to chill thoroughly to achieve the signature smooth texture. If you prefer a stronger vanilla flavor, consider using a whole vanilla bean over the extract.
Enjoy your gluten-free Crème Brûlée with a Twist as a delightful end to any meal.
Flourless Chocolate Soufflé
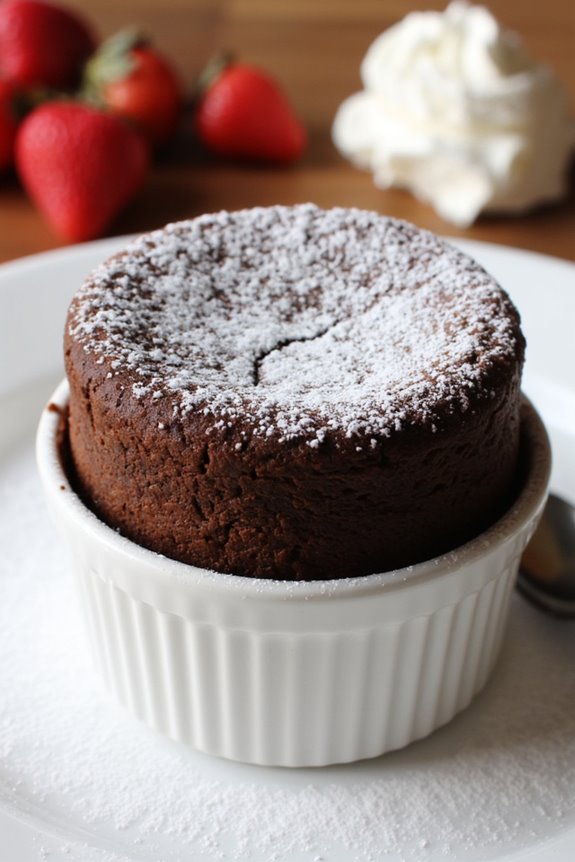
Flourless Chocolate Soufflé is a delicate and rich dessert that showcases the lusciousness of chocolate without the need for flour, making it perfect for those following a gluten-free diet. This classic French dessert is known for its airy, melt-in-your-mouth texture and intense chocolate flavor.
The soufflé’s dramatic rise in the oven and its slightly gooey center make it a showstopping end to any meal. Despite its elegant appearance, a flourless chocolate soufflé is straightforward to prepare and can be a delightful treat for family and friends.
By focusing on the quality of ingredients, you can achieve a soufflé that’s both decadent and light. The key to a successful soufflé lies in properly beating the egg whites to stiff peaks and gently folding them into the chocolate mixture.
When done correctly, this results in a dessert that has a beautifully risen top with a rich, molten interior. Whether you’re hosting a dinner party or simply indulging your sweet tooth, this flourless chocolate soufflé is bound to impress.
Ingredients for 4-6 people:
- 8 ounces (225g) high-quality dark chocolate, chopped
- 6 large eggs, separated
- 1/2 cup (100g) granulated sugar, divided
- 1 teaspoon vanilla extract
- 1/4 teaspoon cream of tartar
- Butter, for greasing ramekins
- Cocoa powder or sugar, for dusting ramekins
Cooking Instructions:
- Preheat and Prepare Ramekins: Preheat your oven to 375°F (190°C). Grease 4 to 6 ramekins (depending on their size) with butter and dust them with cocoa powder or sugar to prevent sticking. Set the ramekins on a baking sheet.
- Melt Chocolate: In a heatproof bowl, set over a pot of simmering water (or use a double boiler), melt the chopped dark chocolate, stirring occasionally until smooth. Remove from heat and let it cool slightly.
- Beat Egg Yolks: In a separate bowl, whisk together the egg yolks and half of the sugar (1/4 cup or 50g) until the mixture is pale and creamy. Add the vanilla extract and whisk to combine.
- Combine Chocolate and Yolks: Gently fold the melted chocolate into the egg yolk mixture, making certain it’s well combined.
- Beat Egg Whites: In a clean mixing bowl, beat the egg whites and cream of tartar on medium speed until soft peaks form. Gradually add the remaining sugar and continue to beat until stiff, glossy peaks form.
- Fold Whites into Chocolate Mixture: Carefully fold one-third of the beaten egg whites into the chocolate mixture to lighten it. Then gently fold in the remaining egg whites until just combined, being careful not to deflate the mixture.
- Fill and Bake Soufflés: Divide the soufflé mixture evenly among the prepared ramekins, filling each nearly to the top. Run your thumb around the inside edge of each ramekin to help the soufflés rise evenly. Bake for 12-15 minutes, or until the soufflés have risen and have a slight wobble in the center.
- Serve Immediately: Serve the soufflés straight from the oven as they’ll begin to deflate after a few minutes. Optionally, dust with powdered sugar or serve with a side of whipped cream or fresh berries.
Extra Tips: To guarantee your soufflé rises perfectly, make sure all mixing bowls and utensils are clean and free of any grease before beating the egg whites. This prevents the whites from deflating and guarantees they reach full volume.
Also, avoid opening the oven door during baking, as sudden changes in temperature can cause the soufflés to collapse. Finally, using high-quality chocolate will greatly enhance the flavor of your soufflé, so choose a chocolate with at least 70% cocoa content for the best results.
Almond Flour Madeleines
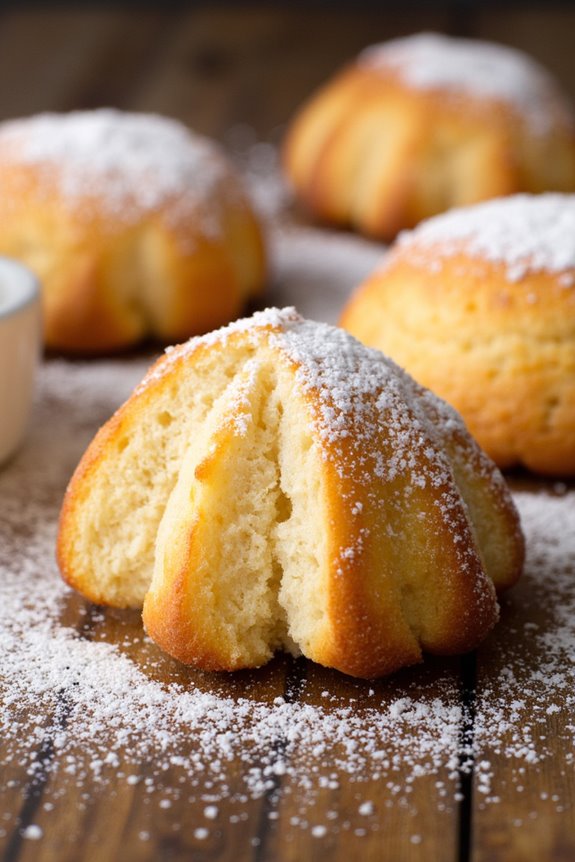
Madeleines are a classic French dessert, characterized by their delicate shell-like shape and tender crumb. Traditionally made with wheat flour, this gluten-free version uses almond flour, providing a nutty flavor and moist texture that pairs beautifully with a hint of vanilla and lemon zest. Whether you’re serving them as a sweet conclusion to a meal or as a delightful afternoon tea treat, these Almond Flour Madeleines are bound to impress.
The process of making Madeleines is a beautiful dance of flavors and textures, starting with a simple batter that transforms into airy, golden cakes with a signature hump. The use of almond flour not only makes these little cakes gluten-free but also adds a unique richness to the taste. Preparing these Madeleines is a rewarding experience, as they bake quickly and yield an elegant dessert that looks as good as it tastes.
Ingredients (Serves 4-6):
- 1 cup almond flour
- 1/2 cup granulated sugar
- 1/4 teaspoon salt
- 1/4 teaspoon baking powder
- 2 large eggs
- 1 teaspoon vanilla extract
- Zest of 1 lemon
- 1/2 cup unsalted butter, melted and cooled
- Powdered sugar for dusting (optional)
Cooking Instructions:
- Preheat the Oven: Preheat your oven to 375°F (190°C). Grease a madeleine pan with butter or non-stick cooking spray to guarantee the cakes release easily once baked.
- Prepare the Dry Ingredients: In a medium bowl, whisk together the almond flour, granulated sugar, salt, and baking powder. This helps to evenly distribute the ingredients and break up any lumps in the almond flour.
- Mix Wet Ingredients: In a separate bowl, beat the eggs until frothy. Add the vanilla extract and lemon zest, mixing until combined. Gradually incorporate the melted butter, whisking continuously to create a smooth mixture.
- Combine Ingredients: Slowly add the dry ingredients to the wet mixture, folding gently with a spatula until just combined. Be careful not to overmix, as this can lead to dense Madeleines.
- Chill the Batter: Cover the bowl with plastic wrap and refrigerate the batter for at least 1 hour. Chilling helps the batter thicken and contributes to the characteristic hump of the Madeleines.
- Fill the Pan: Once chilled, spoon the batter into the prepared madeleine pan, filling each mold about 3/4 full. The batter will spread out and rise as it bakes.
- Bake the Madeleines: Place the pan in the preheated oven and bake for 10-12 minutes or until the edges are golden brown and the centers spring back when lightly touched.
- Cool and Serve: Remove the pan from the oven and let the Madeleines cool in the pan for a few minutes before transferring them to a wire rack. Dust with powdered sugar before serving if desired.
Extra Tips:
For the best results, confirm that all ingredients are at room temperature before starting, as this helps the batter to mix more evenly. If you don’t have a madeleine pan, you can try using a mini muffin tin, though the shape will differ.
Additionally, Madeleines are best enjoyed fresh, but they can be stored in an airtight container for up to two days. To refresh them, simply warm them in the oven for a few minutes before serving.
Gluten-Free Paris-Brest

The Paris-Brest is a classic French dessert named after a famous bicycle race between Paris and Brest. Traditionally made with a ring of choux pastry filled with a rich praline cream, this dessert is known for its light and airy texture combined with a luscious filling. For those who are gluten intolerant, this gluten-free version of the Paris-Brest offers the same delicate and indulgent experience without compromising on flavor or texture.
This recipe is perfect for special occasions or when you simply want to impress your guests with a sophisticated dessert that caters to dietary needs.
Creating a gluten-free Paris-Brest involves a few key substitutions to the traditional recipe. By using a gluten-free flour blend, you can achieve a choux pastry that’s just as light and crisp as the classic version. The praline cream, a smooth and nutty filling, pairs beautifully with the pastry, creating a harmonious balance of flavors and textures.
This recipe serves 4-6 people, making it ideal for a small gathering or a family treat.
Ingredients:
- 1 cup gluten-free all-purpose flour
- 1 cup water
- 1/2 cup unsalted butter
- 1/4 teaspoon salt
- 4 large eggs
- 1/2 cup whole milk
- 1/2 cup heavy cream
- 1/2 cup granulated sugar
- 1/2 cup finely ground hazelnuts
- 1 tablespoon cornstarch
- 1 teaspoon vanilla extract
- 1/4 teaspoon xanthan gum (optional)
- Powdered sugar, for dusting
Instructions:
- Prepare the choux pastry: Preheat your oven to 400°F (200°C). In a medium saucepan, combine the water, butter, and salt. Bring to a boil over medium heat, stirring until the butter melts completely. Remove from heat and add the gluten-free flour all at once. Stir vigorously with a wooden spoon until the mixture forms a ball and pulls away from the sides of the pan.
- Incorporate the eggs: Allow the dough to cool slightly. Add eggs one at a time, beating well after each addition until the dough is smooth and glossy. If using xanthan gum, mix it in at this stage.
- Shape and bake the pastry: Transfer the dough to a piping bag fitted with a large star tip. On a parchment-lined baking sheet, pipe a ring approximately 8 inches in diameter. Pipe another ring inside the first one, and then a third on top of the first two. Bake for 30-35 minutes or until the pastry is golden brown and crisp. Allow it to cool completely on a wire rack.
- Make the praline cream: In a medium saucepan, combine milk, heavy cream, and sugar. Cook over medium heat until the mixture is hot but not boiling. In a separate bowl, whisk together the cornstarch and a small amount of the hot milk mixture to form a slurry. Pour the slurry back into the saucepan and cook, stirring constantly, until the mixture thickens. Remove from heat and stir in vanilla extract and ground hazelnuts. Let it cool, then refrigerate until set.
- Assemble the Paris-Brest: Once the pastry is cooled, slice it horizontally into two halves. Fill the bottom half with the praline cream using a piping bag. Place the top half of the pastry over the cream. Dust the Paris-Brest with powdered sugar before serving.
Extra Tips:
When making the choux pastry, it’s essential to guarantee that the dough isn’t too hot when adding the eggs, as this could cause them to cook and scramble. Allow the dough to cool slightly before incorporating the eggs for best results.
If you find the dough too thick, an additional egg can be added to achieve the desired consistency. For added texture and flavor, you can sprinkle sliced almonds on top of the choux pastry before baking.
This gluten-free Paris-Brest can be made a day in advance and stored in the refrigerator, allowing the flavors to meld beautifully before serving.
Lemon Tart With Almond Crust
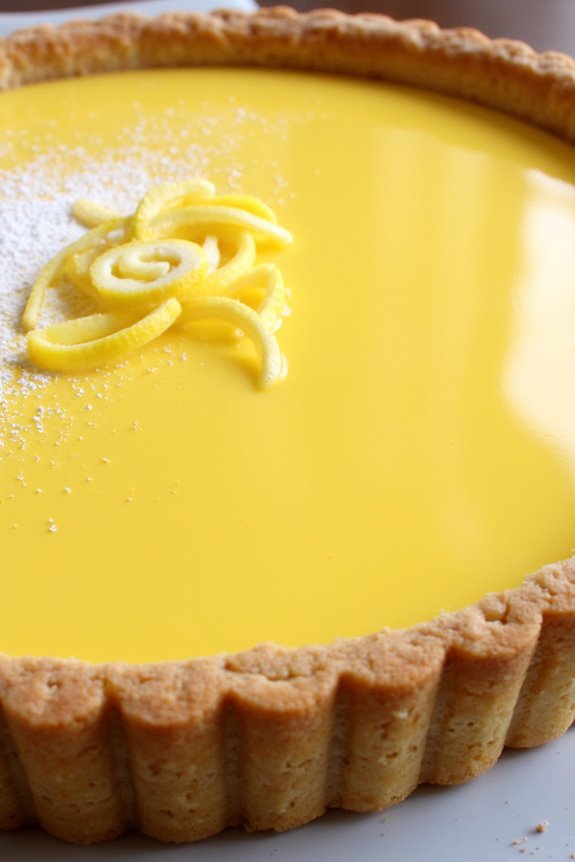
Lemon Tart With Almond Crust is a delightful gluten-free French dessert that combines the zesty brightness of lemons with the rich, nutty flavor of an almond crust. This tart is perfect for those who love a balance of sweet and tangy flavors, and it makes a stunning centerpiece for any dessert table.
The crust, made from almond flour, provides a satisfying crunch, while the lemon filling offers a silky, smooth texture. This recipe is designed to serve 4-6 people, making it an ideal choice for small gatherings or as a special treat for your family.
The beauty of a Lemon Tart With Almond Crust lies in its simplicity and elegance. With just a few high-quality ingredients, you can create a dessert that looks and tastes like it came from a French patisserie.
This recipe will guide you through the steps to achieve a perfectly baked almond crust and a luscious lemon filling. Whether you’re a seasoned baker or a beginner, this recipe is straightforward and rewarding, guaranteeing you end up with a tart that’s as delicious as it’s beautiful.
Ingredients (serves 4-6):
- 1 1/2 cups almond flour
- 1/4 cup sugar
- 1/4 teaspoon salt
- 1/4 cup unsalted butter, melted
- 2 large eggs
- 1/2 cup fresh lemon juice
- 1 tablespoon lemon zest
- 1/2 cup sugar
- 1/4 cup heavy cream
- Powdered sugar, for dusting (optional)
Cooking Instructions:
- Prepare the Almond Crust:
- Preheat your oven to 350°F (175°C).
- In a mixing bowl, combine the almond flour, 1/4 cup sugar, and salt.
- Add the melted butter and mix until the ingredients are fully combined and the mixture resembles wet sand.
- Press the mixture evenly into the bottom and sides of a 9-inch tart pan.
- Bake the crust for 10-12 minutes or until it’s lightly golden. Remove from oven and let it cool.
- Make the Lemon Filling:
- In another bowl, whisk together the eggs, fresh lemon juice, lemon zest, 1/2 cup sugar, and heavy cream until smooth.
- Pour the lemon mixture into the cooled almond crust.
- Bake the tart for 25-30 minutes or until the filling is set and slightly jiggles in the center.
- Allow the tart to cool to room temperature, then refrigerate for at least 1 hour before serving.
- Serve:
- Once chilled, remove the tart from the refrigerator.
- Dust with powdered sugar if desired.
- Slice and serve, enjoying the invigorating taste of lemon paired with the nutty almond crust.
Extra Tips:
When making this Lemon Tart With Almond Crust, confirm all ingredients are at room temperature before starting, especially the eggs and butter. This helps the ingredients blend more smoothly and results in a better texture.
Feel free to adjust the lemon zest and juice according to your taste preference; more zest will intensify the lemon flavor. If you don’t have a tart pan, a pie dish can be used as an alternative.
Also, for a more sophisticated presentation, you can garnish the tart with fresh berries or edible flowers. Enjoy your gluten-free baking adventure!
Classic French Macarons

French macarons are exquisite and delicate cookies that have captured the hearts and taste buds of dessert lovers around the world. Originating from France, these gluten-free delights are made with meringue and almond flour, giving them a light, airy texture with a crisp shell and a chewy interior.
Macarons are known for their vibrant colors and endless flavor combinations, making them perfect for any occasion, from elegant afternoon teas to festive celebrations. Although they can seem intimidating to make, with a little practice and patience, you can master the art of creating these classic French confections right in your own kitchen.
To guarantee your gluten-free French macarons are a success, it’s important to understand the techniques involved in making them. The key to a perfect macaron lies in the precision of ingredients and the specific steps of preparing the meringue and batter.
With this recipe, you’ll be guided through each detail of the process, assuring your macarons have the perfect texture and taste. This recipe serves 4 to 6 people, providing enough macarons to share with friends and family or to enjoy as a delightful treat for yourself.
Ingredients:
- 1 cup almond flour
- 1 3/4 cups powdered sugar
- 3 large egg whites, at room temperature
- 1/4 cup granulated sugar
- 1/2 teaspoon vanilla extract
- Pinch of salt
- Food coloring (optional)
- 1 cup buttercream or ganache for filling
Instructions:
- Prepare the Dry Ingredients: Sift the almond flour and powdered sugar together into a large mixing bowl. This step is essential to guarantee there are no lumps and the mixture is fine and smooth.
- Beat the Egg Whites: In a clean, dry mixing bowl, whisk the egg whites and a pinch of salt until they form soft peaks. Gradually add the granulated sugar, continuing to whisk until the mixture is glossy and forms stiff peaks. Add the vanilla extract and food coloring, if using, and mix until just combined.
- Fold in Dry Ingredients: Gently fold the almond flour and powdered sugar mixture into the meringue in batches. Use a spatula to carefully fold, making sure you don’t deflate the meringue. The batter should be smooth and shiny, with a “lava-like” consistency that flows slowly when lifted.
- Pipe the Macarons: Transfer the batter into a piping bag fitted with a round tip. Line baking sheets with parchment paper or silicone mats, and pipe small circles (about 1 inch in diameter) onto the sheets, spacing them about an inch apart.
- Rest the Macarons: Allow the piped macarons to sit at room temperature for 30-60 minutes, or until a skin forms on their surface. You should be able to gently touch them without any batter sticking to your finger.
- Bake the Macarons: Preheat the oven to 300°F (150°C). Bake the macarons for 15-18 minutes, rotating the baking sheets halfway through. The macarons are done when they’ve risen, and the ‘feet’ have formed at the base.
- Cool and Fill: Let the macarons cool completely on the baking sheets before removing them. Once cooled, pair the shells by size and fill with buttercream or ganache. Gently sandwich the pairs together.
Extra Tips:
Achieving the perfect macaron requires precision and practice. Make sure your mixing bowl and utensils are completely clean and free of any grease, as this can affect the meringue.
Using aged egg whites at room temperature can also improve the stability of your meringue. If you’re new to making macarons, consider using a template under the parchment paper to help pipe uniform circles.
Finally, humidity can affect the drying and baking process, so choose a dry day for baking or use a dehumidifier in the kitchen if needed. Enjoy your homemade gluten-free French macarons with a cup of tea or coffee for a delightful experience.
Vanilla Bean Panna Cotta
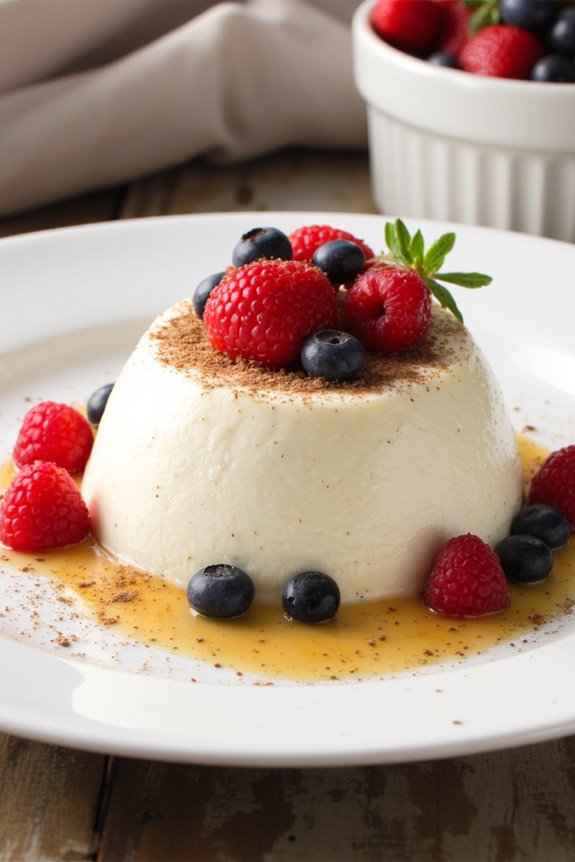
Vanilla Bean Panna Cotta is a classic Italian dessert that has found a beloved place in French cuisine due to its simplicity and elegance.
It’s a creamy, custard-like treat that’s made without the need for an oven, which makes it perfect for those who want to impress guests with minimal effort. The smooth, silky texture of panna cotta is achieved by combining cream, sugar, and gelatin, making it an ideal canvas for the rich and aromatic flavor of vanilla beans.
This version is gluten-free, allowing everyone at the table to indulge without worry.
The beauty of Vanilla Bean Panna Cotta lies in its versatility and the ability to garnish with a variety of toppings like fresh berries, caramel, or chocolate shavings, depending on your preference.
The key to a perfect panna cotta is in the balance of flavors and texture—silky, smooth, and fragrant with vanilla. This recipe is designed to serve 4-6 people, making it an excellent choice for both intimate gatherings and larger dinner parties.
Ingredients:
- 2 cups heavy cream
- 1 cup whole milk
- 1/2 cup granulated sugar
- 1 vanilla bean, split lengthwise
- 2 1/2 teaspoons unflavored gelatin
- 3 tablespoons cold water
- 1 pinch of salt
Instructions:
- Prep the Gelatin: In a small bowl, sprinkle the gelatin over the cold water and let it sit for about 5 minutes to bloom. This step is essential as it allows the gelatin to dissolve evenly later on.
- Heat the Cream Mixture: In a medium saucepan, combine the heavy cream, milk, and sugar. Scrape the seeds from the vanilla bean into the mixture and add the pod as well. Stir occasionally over medium heat until the sugar is dissolved, and the mixture is hot but not boiling.
- Dissolve the Gelatin: Remove the saucepan from heat and discard the vanilla pod. Stir in the bloomed gelatin until fully dissolved. This guarantees the panna cotta will set properly.
- Strain and Pour: Strain the mixture through a fine mesh sieve into a large measuring cup or a bowl with a spout to remove any undissolved gelatin or vanilla bean pieces. Pour the mixture evenly into ramekins or dessert glasses.
- Chill: Cover each ramekin with plastic wrap, making sure it doesn’t touch the surface of the panna cotta. Refrigerate for at least 4 hours, or until set. Overnight chilling is best for the best texture.
- Serve: Once set, you can serve the panna cotta directly in the ramekins, or for a fancier presentation, gently run a knife around the edges and invert onto plates. Garnish with your choice of toppings before serving.
Extra Tips:
For a deeper vanilla flavor, you can infuse the cream mixture with the vanilla bean longer before adding the gelatin.
Be sure to taste the mixture and adjust the sugar if necessary, especially if you plan to serve with sweet toppings.
If you find your panna cotta isn’t setting as firmly as you’d like, you can increase the gelatin slightly, but be cautious as too much can lead to a rubbery texture.
Finally, make sure to allow enough time for chilling, as this is when the panna cotta achieves its signature creamy consistency.
Gluten-Free Tarte Tatin
The Gluten-Free Tarte Tatin is a classic French dessert that has been beautifully adapted to accommodate those who are sensitive to gluten. Traditionally made with a buttery, flaky pastry, this version uses a gluten-free crust that still delivers the rich, caramelized goodness that the original is known for.
The dessert consists of apples caramelized in sugar and butter, then baked with the pastry on top. Once baked, the tarte is inverted to reveal golden, caramel-coated apples sitting atop a crisp crust. This elegant dessert is perfect for any occasion and will delight both gluten-free and gluten-tolerant guests alike.
Creating a perfect Gluten-Free Tarte Tatin requires attention to detail and care in preparation. The key to a successful tarte is choosing the right apples that will hold their shape while baking, as well as creating a caramel that’s neither too dark nor too light.
The gluten-free pastry should be tender and not overly crumbly. Served warm with a dollop of crème fraîche or a scoop of vanilla ice cream, this dessert is destined to impress and satisfy any sweet tooth.
Ingredients for 4-6 servings:
- 5-6 medium apples (such as Granny Smith or Honeycrisp)
- 1 cup granulated sugar
- 1/2 cup unsalted butter
- 1 teaspoon vanilla extract
- 1 tablespoon lemon juice
- 1/4 teaspoon ground cinnamon
- Pinch of salt
- 1 pre-made gluten-free pie crust (or homemade equivalent)
- Optional: crème fraîche or vanilla ice cream for serving
Cooking Instructions:
- Preheat and Prepare Apples: Preheat your oven to 375°F (190°C). Peel, core, and quarter the apples. Toss them in a bowl with lemon juice, vanilla extract, cinnamon, and a pinch of salt to prevent browning and add flavor.
- Make Caramel: In a heavy, oven-proof skillet (preferably cast-iron), melt the butter over medium heat. Add the sugar and stir until it dissolves. Continue to cook without stirring until the mixture turns a deep amber color, about 8-10 minutes. Be cautious not to burn the caramel.
- Arrange Apples: Carefully arrange the apple quarters in the caramel in a circular pattern, rounded side down. Pack them tightly as they’ll shrink during baking. Cook the apples in the caramel for about 5 minutes.
- Add Crust: Roll out the gluten-free pie crust to fit the size of your skillet. Drape it over the apples and tuck in the edges around the apples to encase them.
- Bake: Transfer the skillet to the preheated oven and bake for 25-30 minutes, or until the crust is golden brown and the apples are tender.
- Invert Tarte: Let the tarte cool in the skillet for about 5 minutes. Carefully place a serving plate over the skillet and swiftly invert the tarte onto the plate. Be cautious of hot caramel that might spill.
- Serve: Let it cool slightly before serving. Enjoy with crème fraîche or a scoop of vanilla ice cream if desired.
Extra Tips:
When making the caramel, keep a close eye on it as it can quickly change from perfect to burnt.
Using apples that are firm and tart will provide the best texture and flavor for your tarte. If making your own gluten-free crust, guarantee it’s well-chilled before rolling out to prevent sticking and crumbling.
Finally, when inverting the tarte, perform the action swiftly and confidently to minimize any potential spillage of hot caramel.
Hazelnut Dacquoise

Hazelnut Dacquoise is a classic French dessert that features layers of crispy hazelnut meringue and rich, creamy filling. This gluten-free delicacy is perfect for those who need to avoid gluten but still crave a sophisticated and indulgent treat.
The dacquoise layers are made by folding ground hazelnuts into a meringue mixture, which is then baked to a crisp, creating a delightful contrast with the smoothness of the filling. Typically, a buttercream or ganache is used to sandwich the layers, offering a luscious complement to the nutty, crunchy meringue.
Ideal for a dinner party or special occasion, this dessert not only looks impressive but also tastes exquisite. Its delicate yet complex flavors make it a memorable way to end a meal. While it may seem intimidating to prepare, with a bit of patience and precision, you can create a Hazelnut Dacquoise that rivals those found in the finest French patisseries.
Here’s a guide to making this dessert for a serving size of 4-6 people.
Ingredients:
- 1 cup hazelnuts
- 1 1/4 cups powdered sugar
- 1/2 cup granulated sugar
- 4 large egg whites
- 1/4 teaspoon cream of tartar
- 1 teaspoon vanilla extract
- 1 cup heavy cream
- 4 ounces dark chocolate, chopped
- 1 tablespoon unsalted butter
Cooking Instructions:
- Prepare the Hazelnuts: Preheat your oven to 350°F (175°C). Spread the hazelnuts on a baking sheet and roast for about 10 minutes until they’re lightly browned and fragrant. Allow them to cool, then rub them with a clean towel to remove the skins. Grind the hazelnuts in a food processor with 1/4 cup of powdered sugar until they’re finely ground.
- Make the Meringue: Lower the oven temperature to 300°F (150°C). Line two baking sheets with parchment paper. In a clean, dry bowl, beat the egg whites with the cream of tartar until soft peaks form. Gradually add the granulated sugar, continuing to beat until stiff, glossy peaks form. Gently fold in the remaining powdered sugar and ground hazelnuts along with the vanilla extract.
- Bake the Dacquoise Layers: Divide the meringue mixture into two or three equal portions depending on how many layers you desire. Spread each portion into a circle on the parchment-lined baking sheets. Bake for about 30-35 minutes until the meringue is dry and crisp. Cool completely on wire racks.
- Prepare the Chocolate Ganache: In a small saucepan, heat the heavy cream over medium heat until it just begins to simmer. Remove from heat and add the chopped chocolate and butter. Let sit for a minute, then stir until the chocolate and butter are completely melted and the mixture is smooth. Allow the ganache to cool slightly until it thickens enough to spread.
- Assemble the Dacquoise: Place one meringue layer on a serving plate. Spread a layer of ganache over it. Place the next meringue layer on top, and repeat the process until all layers are used, finishing with ganache on top. If desired, garnish with whole or chopped hazelnuts.
Extra Tips:
When making the meringue, make sure that your mixing bowl and beaters are completely clean and free from any grease, as any fat can prevent the egg whites from whipping properly.
To guarantee even layers, you can draw circles on the parchment paper as a guide before spreading the meringue. If you prefer a thicker filling, you can double the ganache recipe and use it generously between the layers.
Allow the assembled dacquoise to chill in the refrigerator for at least an hour before serving to let the flavors meld together.
Pistachio Financiers
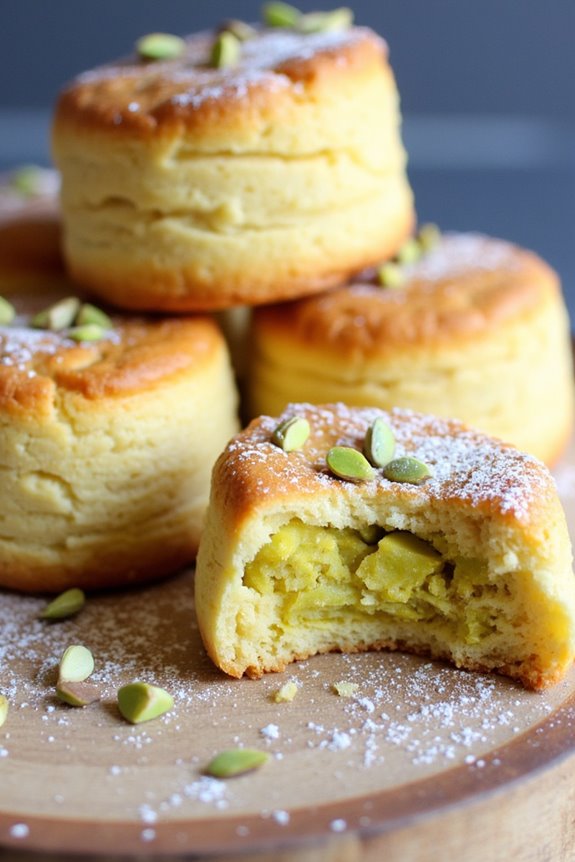
Pistachio Financiers are a delightful gluten-free French treat that offer a rich, nutty flavor with a subtle sweetness. These small almond cakes, traditionally made with almond flour, get a unique twist with the addition of ground pistachios. Perfect for a sophisticated afternoon tea or a light dessert, the pistachio financiers are golden brown with a slightly crisp exterior and a soft, moist interior.
The use of gluten-free flour guarantees that those with dietary restrictions can enjoy these elegant pastries without compromising on taste or texture.
The recipe for Pistachio Financiers is simple yet elegant, requiring only a few ingredients and minimal effort, making it ideal for both novice bakers and seasoned pastry enthusiasts. With their charming appearance and delectable flavor profile, these small cakes are sure to impress guests and satisfy sweet cravings.
Prepared in small rectangular molds, financiers are traditionally shaped to resemble bars of gold, and they live up to their name with their rich and buttery taste. This recipe serves 4-6 people, perfect for a small gathering or as a treat throughout the week.
Ingredients for Pistachio Financiers (serving size: 4-6 people)
- 100 grams unsalted butter
- 80 grams ground pistachios
- 40 grams almond flour
- 150 grams powdered sugar
- 60 grams gluten-free all-purpose flour
- 4 large egg whites
- 1/2 teaspoon vanilla extract
- A pinch of salt
- Pistachio nuts, chopped (for garnish)
Cooking Instructions
- Prepare the Butter: Begin by preheating your oven to 350°F (175°C). Melt the unsalted butter in a small saucepan over medium heat. Cook until it turns a light brown color and has a nutty aroma, creating a beurre noisette or brown butter. Remove from heat and let it cool slightly.
- Mix the Dry Ingredients: In a medium-sized mixing bowl, combine the ground pistachios, almond flour, powdered sugar, gluten-free all-purpose flour, and a pinch of salt. Mix well until all dry ingredients are thoroughly combined.
- Whisk the Egg Whites: In a separate bowl, lightly whisk the egg whites until they become frothy. You don’t need to whip them to stiff peaks; just verify they’re incorporated and slightly foamy.
- Combine Ingredients: Gradually add the egg whites to the dry ingredients, mixing gently until a smooth batter forms. Add the vanilla extract and cooled brown butter, stirring until the batter is uniform and all components are well incorporated.
- Prepare the Molds: Grease a financier mold or small rectangular baking molds with butter or non-stick cooking spray. Spoon the batter into each mold, filling them about three-quarters full.
- Bake: Place the filled molds in the preheated oven and bake for 12-15 minutes, or until the financiers are golden brown and a toothpick inserted into the center comes out clean.
- Cool and Garnish: Allow the financiers to cool in the molds for a few minutes before transferring them to a wire rack to cool completely. Once cooled, garnish with chopped pistachio nuts.
Extra Tips
For the best flavor, use raw and unsalted pistachios when making the ground pistachios. If you don’t have a financier mold, mini muffin tins work well as an alternative.
The key to achieving the perfect texture isn’t to overmix the batter, as this can lead to a denser cake. Additionally, keeping a close eye on the butter as it browns is vital to prevent it from burning, which can impart a bitter taste.
Raspberry Clafoutis
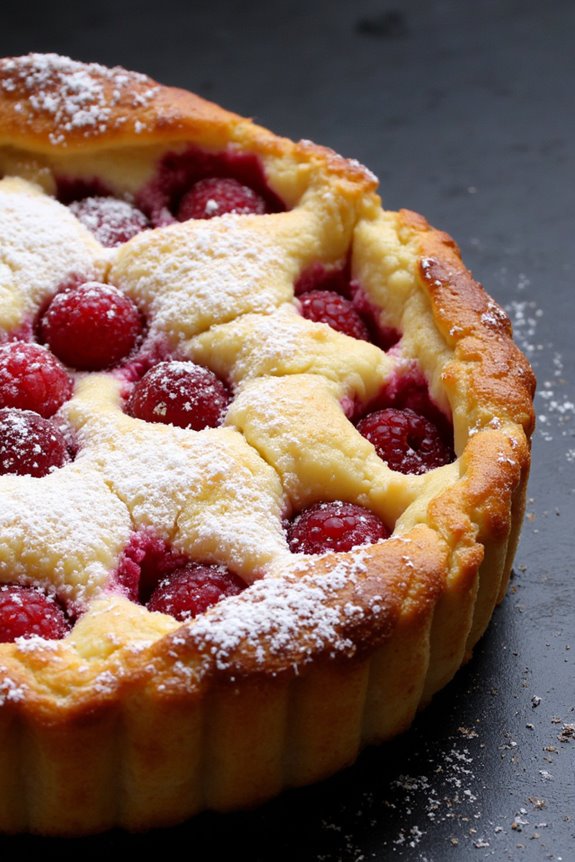
Raspberry Clafoutis is a delightful French dessert that combines the tangy sweetness of raspberries with a creamy, custard-like batter. Originating from the Limousin region of France, a traditional clafoutis is made with cherries, but this gluten-free version uses raspberries for a fresh twist.
It’s an easy-to-make dish that brings a touch of elegance to any meal, perfect for those who are avoiding gluten but still crave a taste of classic French cuisine.
The beauty of Raspberry Clafoutis lies in its simplicity and versatility. It can be served warm or cold, making it suitable for any occasion, whether it’s a brunch or an after-dinner treat. The combination of sweet raspberries and the soft, flan-like interior is complemented by a hint of vanilla, creating a dessert that’s both satisfying and light.
While it may look sophisticated, this recipe is quite straightforward, making it an ideal choice for both novice and experienced bakers.
Ingredients (Serves 4-6):
- 1 cup fresh raspberries
- 3 large eggs
- 1/2 cup granulated sugar
- 1 cup almond flour
- 1 cup whole milk
- 1 teaspoon vanilla extract
- 1/4 teaspoon salt
- 1 tablespoon butter (for greasing the baking dish)
- Powdered sugar (for dusting, optional)
Instructions:
- Preheat the Oven: Start by preheating your oven to 350°F (175°C). This guarantees that the oven is at the right temperature when you’re ready to bake, leading to an evenly cooked clafoutis.
- Prepare the Baking Dish: Grease a 9-inch round baking dish with the butter. This will help prevent the clafoutis from sticking to the dish and allow for easy serving.
- Mix the Batter: In a large mixing bowl, whisk together the eggs and granulated sugar until the mixture is pale and slightly frothy. This step helps to incorporate air, which will give your clafoutis a light texture.
- Add Dry Ingredients: Gradually add the almond flour and salt to the egg mixture, whisking continuously to avoid lumps. Almond flour is used here to keep the recipe gluten-free while still providing a rich texture.
- Incorporate the Milk and Vanilla: Slowly pour in the milk and vanilla extract, whisking until the batter is smooth and well combined. The milk should be at room temperature to guarantee it blends evenly with the other ingredients.
- Assemble the Clafoutis: Pour the batter into the prepared baking dish. Evenly distribute the fresh raspberries over the top, gently pressing them into the batter. This helps the raspberries to sink slightly, guaranteeing every bite has a burst of fruitiness.
- Bake: Place the dish in the preheated oven and bake for 35-40 minutes, or until the clafoutis is set and lightly golden around the edges. A toothpick inserted into the center should come out clean.
- Cool and Serve: Allow the clafoutis to cool for at least 10 minutes before dusting with powdered sugar, if desired. Serve warm or at room temperature, depending on your preference.
Extra Tips:
For a deeper flavor, consider adding a splash of raspberry liqueur or a pinch of cinnamon to the batter. If you prefer a sweeter dessert, increase the amount of sugar slightly.
It’s also important to use fresh raspberries for the best texture and flavor; however, if fresh raspberries aren’t available, frozen ones can be used—just make sure they’re well-drained to prevent excess moisture in the clafoutis.
Flourless Chocolate Cake
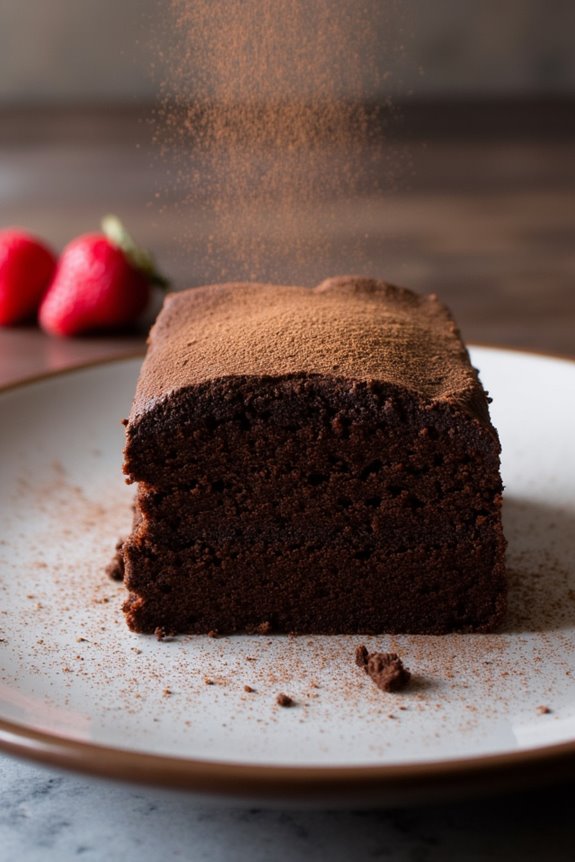
Indulge in the decadence of a Flourless Chocolate Cake, a French-inspired dessert that’s as rich in flavor as it’s simple to make. This gluten-free delight is perfect for those with dietary restrictions, or anyone who simply wants to enjoy a dense, velvety chocolate dessert. The absence of flour allows the flavors of the chocolate and butter to shine, resulting in a cake that’s moist, rich, and perfect for any occasion.
This cake isn’t only a showstopper regarding taste but also in its ease of preparation. With just a handful of ingredients, you can create a dessert that will leave your guests in awe. Whether you serve it plain or with a dusting of powdered sugar, a dollop of whipped cream, or fresh berries, this Flourless Chocolate Cake is sure to become a favorite in your dessert repertoire.
Ingredients for 4-6 servings:
- 200g dark chocolate (at least 70% cocoa)
- 100g unsalted butter
- 150g granulated sugar
- 3 large eggs
- 1 teaspoon vanilla extract
- A pinch of salt
- Cocoa powder or powdered sugar (for dusting)
Cooking Instructions:
- Prepare the Oven and Pan: Preheat your oven to 350°F (175°C). Grease a 9-inch round cake pan and line the bottom with parchment paper to prevent sticking.
- Melt Chocolate and Butter: In a heatproof bowl, combine the dark chocolate and butter. Set the bowl over a pot of simmering water (double boiler method), stirring occasionally until both are melted and smooth. Remove from heat and let it cool slightly.
- Mix Eggs and Sugar: In a separate bowl, whisk the granulated sugar with the eggs until well combined and slightly frothy. Mix in the vanilla extract and a pinch of salt.
- Combine Mixtures: Gradually fold the melted chocolate mixture into the egg mixture, stirring gently until the batter is smooth and uniform.
- Bake the Cake: Pour the batter into the prepared cake pan. Bake in the preheated oven for 25-30 minutes. The cake should have a set top but a slightly soft center.
- Cool and Serve: Let the cake cool in the pan for about 10 minutes, then transfer it to a wire rack to cool completely. Dust with cocoa powder or powdered sugar before serving.
Extra Tips:
For the best results, use high-quality chocolate as it’s the star ingredient of this cake. When melting the chocolate and butter, take care to do it slowly to avoid scorching the chocolate, which can affect the taste and texture.
If you prefer a more intense chocolate flavor, you can increase the cocoa percentage of the chocolate used. This cake is perfect when served slightly warm, but it also holds its structure well when chilled, allowing you to prepare it in advance and store it in the refrigerator.