

Baking French pastries for the first time can feel like embarking on a grand adventure. It might seem daunting to create something as delicate as a croissant, but with a bit of patience and the right guidance, you’ll find it’s more accessible than you thought. Picture the aroma of buttery layers filling your kitchen. The satisfaction of biting into a perfectly crisp palmier is within reach. Are you ready to elevate your baking journey?
Classic Croissants: Mastering Buttery Layers

There’s nothing like the satisfaction of biting into a homemade croissant with its flaky, buttery layers melting in your mouth. Mastering the art of making classic croissants may seem challenging at first, but with patience and the right technique, you can achieve bakery-worthy results in your own kitchen.
The key lies in laminating the dough, a process where butter is folded into the dough multiple times to create those beautiful layers. While it requires time and precision, the reward is a batch of golden-brown croissants that are perfect for breakfast or a delightful treat any time of the day.
To make croissants for 4-6 people, you’ll need to start with a basic yeasted dough enriched with milk and sugar, then incorporate a generous amount of butter through the lamination process. After a series of folds and rests, you’ll shape the dough into iconic crescent forms and allow them to rise before baking.
This recipe requires some planning ahead, as the dough needs ample resting time to develop flavor and guarantee the butter stays cold for ideal flakiness.
Ingredients:
- 4 cups all-purpose flour
- 1/2 cup warm water (110°F/45°C)
- 1 cup warm whole milk (110°F/45°C)
- 1/4 cup granulated sugar
- 2 teaspoons salt
- 1 tablespoon active dry yeast
- 1 cup unsalted butter, cold
- 1 egg (for egg wash)
- 1 tablespoon water (for egg wash)
Instructions:
1. Prepare the Yeast Mixture: In a small bowl, combine the warm water with the active dry yeast and a pinch of sugar. Let it sit for about 5 minutes until it becomes frothy, indicating that the yeast is active.
2. Make the Dough: In a large mixing bowl, combine the flour, sugar, and salt. Add the yeast mixture and warm milk, then mix until a dough forms. Knead the dough on a floured surface for about 10 minutes until it becomes smooth and elastic.
Place the dough in a lightly oiled bowl, cover it with plastic wrap, and let it rise in a warm place for 1-2 hours, or until doubled in size.
3. Prepare the Butter Block: While the dough is rising, cut the cold butter into slices and arrange them on a piece of parchment paper to form a 6-inch square. Place another piece of parchment paper on top and gently pound the butter with a rolling pin to flatten it.
Refrigerate the butter block to keep it firm.
4. Incorporate the Butter: Once the dough has risen, punch it down and roll it out into a 12-inch square on a lightly floured surface. Place the cold butter block diagonally in the center of the dough square. Fold the corners of the dough over the butter, encasing it completely.
5. Laminating the Dough: Roll the dough into a 20×10 inch rectangle. Fold the top third of the dough down to the center, then fold the bottom third up, like folding a letter. Rotate the dough 90 degrees and roll it out again into a 20×10 inch rectangle.
Repeat the folding process. Wrap the dough in plastic wrap and refrigerate for at least 30 minutes. Repeat the rolling and folding process two more times, chilling between folds.
6. Shape the Croissants: After the final rest, roll the dough into a 24×12 inch rectangle. Cut the dough into triangles with a base of about 4 inches. Gently stretch each triangle, then roll it up from the base towards the tip, tucking the tip under the croissant.
Curve the ends to form a crescent shape. Place the croissants on a parchment-lined baking sheet.
7. Proof the Croissants: Cover the croissants loosely with plastic wrap and let them rise at room temperature for 1-2 hours, until they’re puffy and have almost doubled in size.
8. Bake the Croissants: Preheat your oven to 400°F (200°C). In a small bowl, whisk together the egg and tablespoon of water to make the egg wash. Brush the croissants with the egg wash, then bake for 15-20 minutes, or until golden brown and crisp.
Cool slightly on a wire rack before serving.
Extra Tips:
While making croissants, it’s essential to keep the butter cold and work quickly to maintain the layers. If at any point the butter starts to melt or leak through the dough, chill it in the refrigerator.
Additionally, verify your workspace is cool and lightly floured to prevent sticking. Patience is key, so allow the dough to rest whenever needed to avoid overworking it, which can lead to tough croissants.
Finally, practice makes perfect, so don’t be discouraged if your first batch isn’t flawless; each attempt will improve your skills and confidence.
Simple Madeleines: A Bite of French Elegance
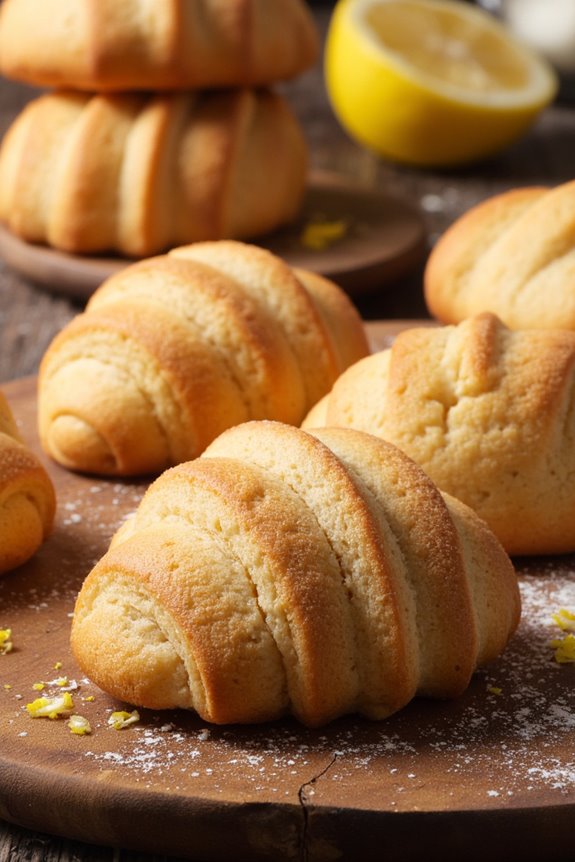
Madeleines are a quintessential French treat that exude elegance with their delicate shell-like shape and subtle buttery flavor. Originating from the Lorraine region, these small sponge cakes have become a celebrated pastry worldwide. Perfect for a sophisticated afternoon tea or a delightful dessert, madeleines offer a taste of France that’s both simple and luxurious. Their tender crumb, slight crispiness on the outside, and the hint of lemon zest make them a universally loved confection.
Making these sweet treats at home is surprisingly simple and requires only a few basic ingredients. The key to achieving the classic madeleine shape and texture lies in the special shell-shaped mold and the proper technique of combining the ingredients. In this recipe, we’ll guide you through the process of making 24 madeleines, perfect for serving 4-6 people. With a bit of patience and attention to detail, you’ll master the art of baking these elegant pastries and impress your family and friends.
Ingredients for 24 Madeleines (Serving Size: 4-6 people):
- 2/3 cup all-purpose flour
- 1/2 teaspoon baking powder
- 1/4 teaspoon salt
- 2 large eggs, at room temperature
- 1/2 cup granulated sugar
- 1 teaspoon vanilla extract
- 1 teaspoon lemon zest
- 1/2 cup unsalted butter, melted and cooled slightly
- Powdered sugar, for dusting (optional)
Cooking Instructions:
1. Preheat and Prepare the Molds:
Preheat your oven to 375°F (190°C). Grease the madeleine molds with butter and dust lightly with flour, tapping out any excess. This guarantees that the madeleines will release easily once baked.
2. Mix Dry Ingredients:
In a small bowl, whisk together the flour, baking powder, and salt. Set aside. This step guarantees that the leavening agent is evenly distributed in the batter.
3. Beat Eggs and Sugar:
In a large mixing bowl, beat the eggs and granulated sugar using an electric mixer on high speed until the mixture is thick, pale, and forms ribbons when the beaters are lifted. This usually takes about 5 minutes.
4. Add Flavorings and Combine:
Gently fold in the vanilla extract and lemon zest using a spatula. Gradually fold in the flour mixture until just combined, being careful not to deflate the batter.
5. Incorporate Butter:
Drizzle the melted butter into the batter, folding gently until fully incorporated. The batter should be smooth and shiny.
6. Chill the Batter:
Cover the bowl with plastic wrap and refrigerate the batter for at least 30 minutes. This helps firm up the batter and results in the classic madeleine hump during baking.
7. Fill and Bake:
Spoon the chilled batter into the prepared molds, filling each well about three-quarters full. Bake for 10-12 minutes, or until the edges are golden brown and the centers spring back when lightly pressed.
8. Cool and Serve:
Remove the madeleines from the oven and let them cool in the molds for a few minutes. Then, gently turn them out onto a wire rack to cool completely. Dust with powdered sugar before serving, if desired.
Extra Tips:
To achieve the characteristic hump of a madeleine, it’s important to chill the batter before baking. This allows the batter to firm up and helps create the classic shape. Using room temperature eggs will also aid in creating a light and airy batter.
If you don’t have a madeleine mold, mini muffin tins can be used as a substitute, although they’ll lack the signature shell shape. Ultimately, madeleines are best enjoyed slightly warm on the day they’re baked, so plan to serve them shortly after cooling.
Flaky Palmiers: a Crisp Treat With a Sweet Twist
Flaky Palmiers are a delightful French pastry that combines the crispiness of puff pastry with a sweet, caramelized sugar coating. Often referred to as “elephant ears” due to their distinctive shape, these treats are perfect for an afternoon snack or a charming addition to a tea party. The key to achieving the perfect palmiers lies in the folding technique, which creates the iconic layers and crispy texture.
This recipe is surprisingly simple, requiring minimal ingredients and effort. The dough’s lamination, achieved by folding, allows the sugar to melt and caramelize between the layers, resulting in a deliciously sweet and flaky pastry. With just a few steps, you can create a classic French dessert that will impress your family and friends. This recipe serves 4-6 people, making it ideal for a small gathering or a delightful indulgence for yourself.
Ingredients for Flaky Palmiers (serving size: 4-6 people):
- 1 sheet of puff pastry (pre-made, thawed if frozen)
- 1/2 cup granulated sugar
- 1/4 cup brown sugar
- 1 teaspoon ground cinnamon (optional)
- A pinch of salt
Instructions:
- Prepare the Work Surface: Lightly sprinkle a clean work surface with some of the granulated sugar. This prevents the dough from sticking and adds a sweet coating to the bottom of the palmiers.
- Roll Out the Puff Pastry: Lay the thawed puff pastry sheet on the sugared surface. Sprinkle the top of the pastry with the remaining granulated sugar, brown sugar, cinnamon (if using), and a pinch of salt. Using a rolling pin, gently roll out the pastry to press the sugar mixture into the dough and create a slightly larger rectangle.
- Fold the Dough: To create the classic palmier shape, start by folding the shorter sides of the rectangle towards the center, about one-third of the way. Then fold each side again towards the center, meeting in the middle. Finally, fold one half over the other, creating a long, narrow log.
- Chill the Dough: Wrap the folded dough in plastic wrap and refrigerate for about 30 minutes. Chilling the dough helps it firm up, making it easier to slice and hold its shape during baking.
- Preheat the Oven: While the dough is chilling, preheat your oven to 400°F (200°C). Line a baking sheet with parchment paper.
- Slice and Bake: Remove the dough from the fridge and unwrap it. Using a sharp knife, slice the dough into 1/2-inch thick pieces. Place each piece cut-side up on the prepared baking sheet, leaving space between each palmier. Bake for 12-15 minutes or until golden brown and caramelized.
- Cool and Serve: Allow the palmiers to cool on the baking sheet for a few minutes before transferring them to a wire rack to cool completely. Serve warm or at room temperature.
Extra Tips:
To guarantee your palmiers turn out perfectly flaky, make sure the puff pastry is well chilled before slicing. This helps the layers maintain their structure during baking.
Additionally, if you prefer a more caramelized finish, sprinkle a little extra sugar on top of the palmiers before baking. For a savory twist, consider adding finely grated parmesan or herbs instead of the sugar and cinnamon.
Enjoy the process and don’t be afraid to experiment with different flavors!
Beginner’s Eclairs: Choux Pastry Made Easy
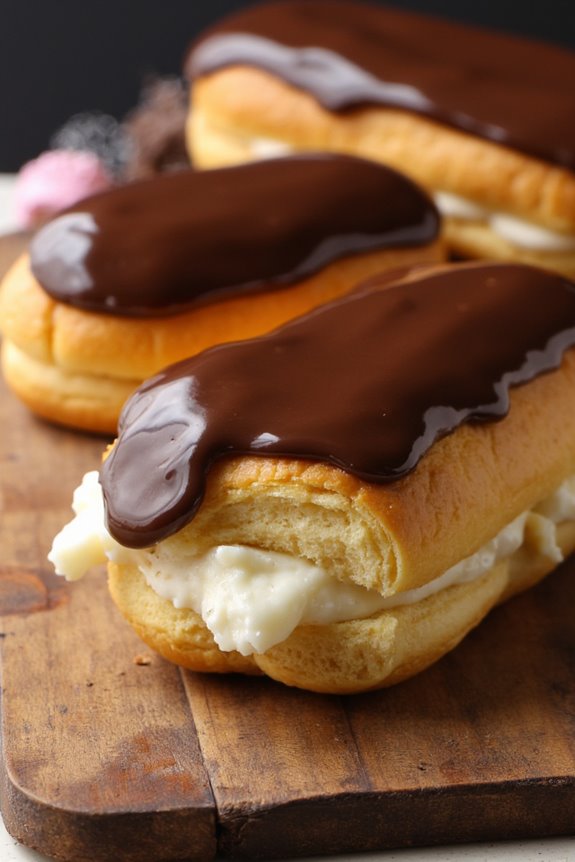
Eclairs are a classic French pastry that may seem intimidating to make, but with the right guidance, even beginners can achieve delicious results. This recipe simplifies the process of making choux pastry, the delicate dough used to create these airy, cream-filled delights. Our step-by-step instructions will guide you through each stage, guaranteeing you achieve perfect eclairs with a crisp shell and a creamy filling.
Whether you’re preparing them for a special occasion or just a delightful treat, these eclairs will surely impress. The key to successful eclairs is mastering the choux pastry. This versatile dough puffs up beautifully in the oven, creating hollow centers perfect for filling with rich pastry cream.
Once you’ve conquered the choux, the rest is a breeze. This recipe yields enough eclairs to serve 4-6 people, with each bite offering a harmonious blend of textures and flavors. So, gather your ingredients and let’s get started on creating these delectable treats.
Ingredients (Serves 4-6):
- 1/2 cup (120ml) water
- 1/2 cup (120ml) milk
- 1/2 cup (113g) unsalted butter
- 1 tablespoon granulated sugar
- 1/4 teaspoon salt
- 1 cup (125g) all-purpose flour
- 4 large eggs
- 1 cup (240ml) heavy cream
- 1/2 cup (60g) powdered sugar
- 1 teaspoon vanilla extract
- 1/2 cup (100g) semi-sweet chocolate chips
Cooking Instructions:
- Prepare the Choux Pastry: In a medium saucepan over medium heat, combine water, milk, butter, sugar, and salt. Stir occasionally until the butter melts and the mixture begins to boil.
- Add the Flour: Reduce the heat to low and add the flour all at once. Stir vigorously with a wooden spoon until the mixture forms a smooth ball and pulls away from the sides of the pan, about 2-3 minutes.
- Cool the Dough: Remove the dough from heat and let it cool slightly for 5 minutes. This prevents the eggs from cooking when added.
- Incorporate the Eggs: Add the eggs one at a time, mixing well after each addition until the dough is smooth and glossy. The dough should be thick but pipeable.
- Pipe the Eclairs: Preheat the oven to 400°F (200°C). Transfer the choux pastry to a piping bag fitted with a large round tip. Pipe 4-inch long strips onto a baking sheet lined with parchment paper, leaving space between each.
- Bake the Eclairs: Bake in the preheated oven for 20 minutes, then reduce the temperature to 350°F (175°C) and bake for an additional 10-15 minutes until golden and crisp. Allow them to cool completely on a wire rack.
- Prepare the Filling: In a mixing bowl, whip the heavy cream, powdered sugar, and vanilla extract until stiff peaks form. Transfer to a clean piping bag.
- Fill the Eclairs: Once cooled, use a small sharp knife to make a small hole at one end of each eclair. Fill with the whipped cream mixture.
- Make the Chocolate Glaze: Melt the chocolate chips in a heatproof bowl over simmering water. Stir until smooth, then drizzle or spread over the filled eclairs.
Extra Tips:
To guarantee your choux pastry rises perfectly, avoid opening the oven door during the initial baking period, as this can cause the eclairs to deflate. If the dough is too stiff and difficult to pipe, you can add a little more beaten egg until it reaches the correct consistency.
For an extra touch of flavor, consider adding a pinch of espresso powder to the chocolate glaze to enhance the chocolate’s richness. Enjoy your homemade eclairs fresh for the best taste and texture!
Pain Au Chocolat: a Chocolate Lover’s Delight
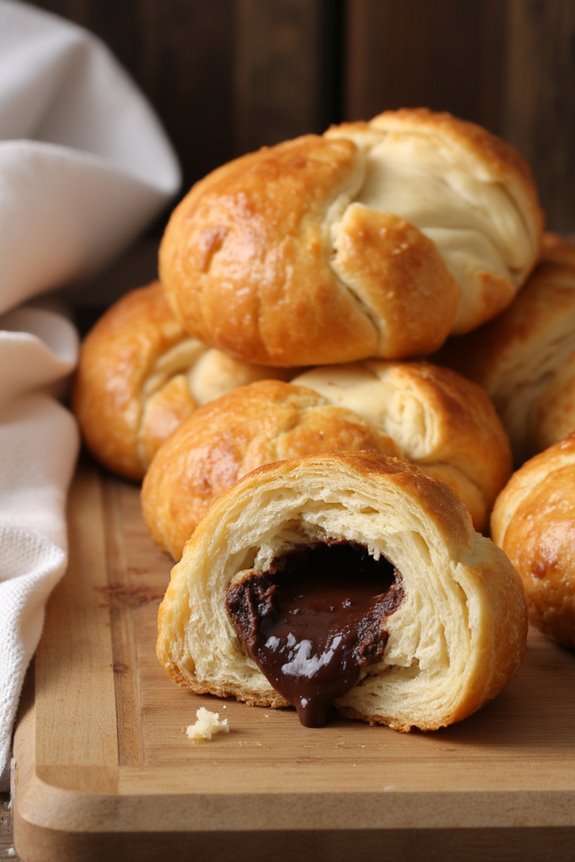
Pain Au Chocolat: A Chocolate Lover’s Delight is a classic French pastry that combines the buttery goodness of a croissant with a rich, decadent chocolate filling. This delightful pastry is perfect for breakfast, brunch, or a sweet treat any time of the day.
Pain au chocolat is surprisingly simple to make at home, especially with the use of store-bought puff pastry, which helps to cut down on preparation time while still delivering delicious results. The key to creating the perfect Pain Au Chocolat is to use high-quality chocolate and guarantee that the puff pastry is rolled out evenly for a uniform rise.
This recipe will guide you through making Pain Au Chocolat for a serving size of 4-6 people. The ingredients are easy to find, and the steps are straightforward, making it an ideal recipe even for beginner bakers. Once you try making these delightful pastries at home, you’ll never want to go back to store-bought versions again.
The aroma of freshly baked Pain Au Chocolat will fill your kitchen, and the taste will transport you straight to a charming Parisian café.
Ingredients (for 4-6 people):
- 1 package of store-bought puff pastry (2 sheets)
- 100g of dark chocolate (at least 60% cocoa)
- 1 egg
- 1 tablespoon of milk
- A pinch of salt
Cooking Instructions:
- Prepare the Puff Pastry: Thaw the puff pastry sheets according to the package instructions. Once thawed, lightly flour your work surface and roll out each sheet to smooth any creases and to guarantee uniform thickness.
- Cut the Pastry: Cut each sheet into 4 equal rectangles, giving you a total of 8 rectangles. These will form the base of your Pain Au Chocolat.
- Add the Chocolate: Break the dark chocolate into small bars or pieces. Place a piece of chocolate at one end of each rectangle, leaving a small border around the edges.
- Roll the Pastries: Starting from the end with the chocolate, gently roll the pastry over the chocolate piece until you reach the other end. Guarantee that the seam is on the bottom to prevent it from unrolling during baking.
- Prepare the Egg Wash: In a small bowl, whisk together the egg, milk, and a pinch of salt to create an egg wash. This will give your pastries a beautiful golden color.
- Brush with Egg Wash: Place the rolled pastries onto a baking sheet lined with parchment paper. Brush the tops and sides of each pastry with the egg wash, guaranteeing an even coat.
- Preheat the Oven: Preheat your oven to 200°C (400°F).
- Bake: Once the oven is preheated, bake the pastries for 15-20 minutes or until they’re puffed up and golden brown.
- Cool and Serve: Remove the pastries from the oven and let them cool slightly on a wire rack. Serve warm, enjoying the gooey chocolate interior and flaky exterior.
Extra Tips: To enhance the flavor of your Pain Au Chocolat, consider using different types of chocolate such as milk or white chocolate for variety. If you prefer a sweeter taste, you can add a sprinkle of sugar on top of the pastries before baking.
Additionally, if you’re feeling adventurous, you can add a sprinkle of chopped nuts or a dash of sea salt over the chocolate before rolling the pastries for an added crunch and flavor contrast.
Remember to keep an eye on the pastries while baking, as oven temperatures can vary and you want to avoid over-browning the delicate pastry. Enjoy your homemade Pain Au Chocolat fresh out of the oven for the best experience.
Perfect Profiteroles: Light and Airy Puffs
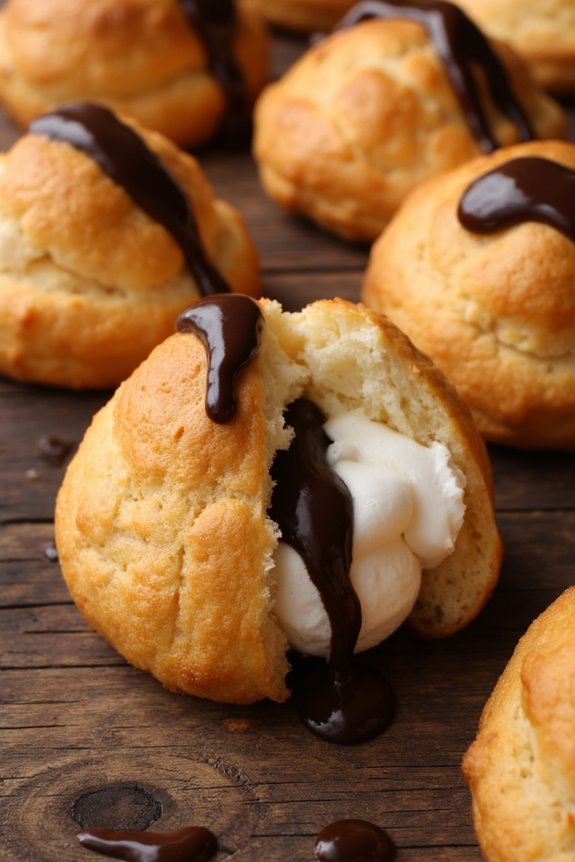
Profiteroles are a classic French dessert that’s both delightful and versatile. These light and airy puffs are made from choux pastry and can be filled with a variety of delicious fillings, such as whipped cream, custard, or ice cream. The crispy exterior of the pastry contrasts beautifully with the smooth and creamy filling, making profiteroles a favorite treat for any occasion.
With a few simple ingredients and steps, you can create this elegant dessert in your own kitchen and impress family and friends.
To achieve the perfect profiteroles, it’s important to follow the steps carefully to guarantee the right texture and flavor. The choux pastry is made by cooking a dough mixture on the stovetop, then baking it until it puffs up and becomes golden brown. Once baked, the puffs can be filled with your choice of filling and drizzled with chocolate sauce for an extra touch of indulgence. This recipe serves 4-6 people, providing plenty of profiteroles to share.
Ingredients:
- 1 cup water
- 1/2 cup unsalted butter
- 1/4 teaspoon salt
- 1 cup all-purpose flour
- 4 large eggs
- 1 cup heavy cream
- 2 tablespoons powdered sugar
- 1 teaspoon vanilla extract
- 1 cup chocolate sauce
Cooking Instructions:
- Preheat the Oven: Begin by preheating your oven to 400°F (200°C). Line a baking sheet with parchment paper and set it aside.
- Prepare the Choux Pastry: In a medium saucepan over medium heat, combine the water, butter, and salt. Bring the mixture to a boil, confirming the butter is fully melted.
- Incorporate the Flour: Remove the saucepan from heat and add the flour all at once, stirring vigorously with a wooden spoon until the mixture forms a ball and pulls away from the sides of the pan.
- Cool the Dough: Allow the dough to cool for about 5 minutes. This will prevent the eggs from cooking when added.
- Add the Eggs: Beat the eggs into the dough one at a time, stirring well after each addition until the dough is smooth and glossy.
- Pipe the Dough: Transfer the dough to a piping bag fitted with a large round tip. Pipe small rounds onto the prepared baking sheet, about 1 1/2 inches apart.
- Bake the Puffs: Bake in the preheated oven for 20-25 minutes, or until the puffs are golden brown and firm to the touch. Avoid opening the oven door during baking to guarantee they rise properly.
- Cool the Puffs: Once baked, remove the puffs from the oven and allow them to cool completely on a wire rack.
- Prepare the Filling: In a mixing bowl, whip the heavy cream with powdered sugar and vanilla extract until soft peaks form.
- Fill the Profiteroles: Cut a small slit in the side of each puff and pipe the whipped cream filling into the center using a piping bag.
- Finish with Chocolate Sauce: Drizzle the filled profiteroles with chocolate sauce before serving.
Extra Tips:
For the best results, make sure your ingredients are at room temperature before you begin. This helps the dough to come together more smoothly.
When piping the dough onto the baking sheet, try to keep the shapes uniform in size for even baking. If you prefer a firmer filling, consider refrigerating the whipped cream for a few minutes before piping.
And finally, profiteroles are best enjoyed fresh, but they can also be stored in an airtight container in the refrigerator for up to two days.
Tarte Tatin: A Caramelized Apple Wonder

Tarte Tatin is a classic French dessert that’s both simple and indulgent. This upside-down caramelized apple tart is known for its rich, buttery crust and gooey, sweet apple filling. Legend has it that Tarte Tatin was created by accident by the Tatin sisters in the 1880s, who owned a hotel in France. They were attempting to make a traditional apple pie but ended up with this delightful variation, now loved by pastry enthusiasts all over the world.
The beauty of this dish lies in its simplicity, making it the perfect dessert for a cozy dinner or a sophisticated gathering.
This Tarte Tatin recipe involves caramelizing apples in a skillet with sugar and butter before covering them with a flaky pastry crust and baking until golden. Once baked, the tart is flipped upside-down to reveal the beautifully caramelized apples. This dessert serves 4-6 people and is best enjoyed warm, perhaps with a scoop of vanilla ice cream or a dollop of crème fraîche. Preparing this dish requires just a handful of ingredients, but the result is an impressive dessert that’s sure to please your guests.
Ingredients for Tarte Tatin (serves 4-6):
- 6 large apples (Granny Smith or Golden Delicious recommended)
- 1 cup granulated sugar
- 1/4 cup unsalted butter
- 1 sheet puff pastry (thawed if frozen)
- 1 teaspoon vanilla extract
- A pinch of salt
- Flour, for dusting
Cooking Instructions:
- Prepare the Apples: Peel, core, and quarter the apples. Set aside while you prepare the caramel.
- Make the Caramel: Place a 10-inch ovenproof skillet over medium heat. Add the sugar and allow it to melt slowly, stirring occasionally, until it becomes a golden-brown caramel. Be careful not to burn it.
- Add Butter and Apples: Once the sugar has caramelized, reduce the heat to low and stir in the butter until it melts and combines with the caramel. Add the vanilla extract and a pinch of salt. Arrange the apple quarters in the skillet, rounded side down. Pack them tightly, as they’ll shrink during cooking.
- Cook the Apples: Allow the apples to cook in the caramel on low heat for about 10-15 minutes, gently turning them halfway through to guarantee they’re well-coated in caramel.
- Prepare the Pastry: While the apples are cooking, roll out the puff pastry on a lightly floured surface to about 1/8 inch thick. Cut a circle slightly larger than the skillet’s diameter.
- Assemble the Tarte Tatin: Preheat your oven to 375°F (190°C). Carefully drape the puff pastry over the apples in the skillet, tucking the edges down the sides. Make a few small slits in the pastry to allow steam to escape.
- Bake the Tart: Transfer the skillet to the preheated oven and bake for 25-30 minutes, or until the pastry is puffed and golden brown.
- Invert the Tart: Once baked, let the tart cool in the skillet for a few minutes. Then, place a large plate over the skillet and carefully invert the tart onto the plate. Be cautious of the hot caramel.
Extra Tips:
When selecting apples for your Tarte Tatin, opt for varieties that hold their shape well during cooking, like Granny Smith or Golden Delicious. Confirm the caramel has a deep amber color before adding the apples for the best flavor, but be vigilant to prevent burning.
If you don’t have an ovenproof skillet, you can caramelize the apples in a regular pan and then transfer them to a baking dish before adding the pastry. Remember, practice makes perfect with this elegant dessert, so don’t be discouraged if your first attempt isn’t flawless. Enjoy the process and the delicious results!
Easy Macarons: Achieving the Perfect Crunch
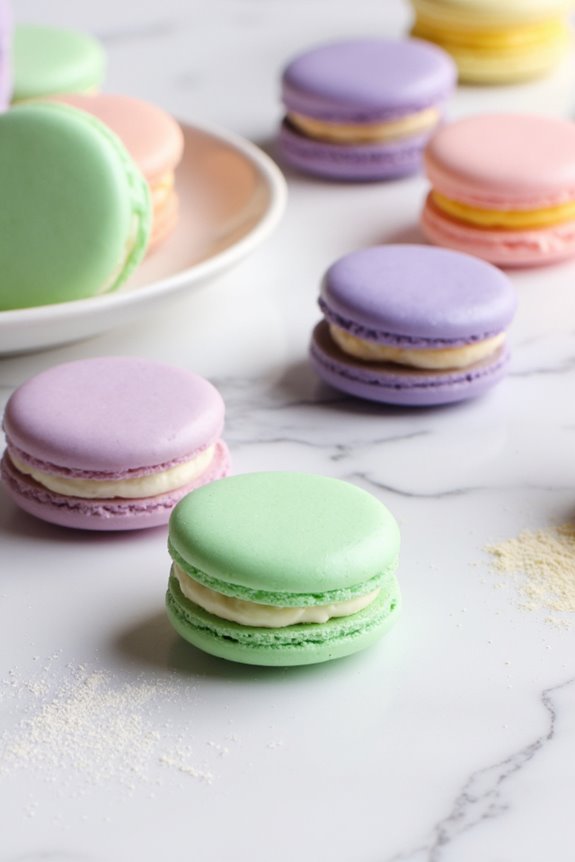
Macarons, the classic French confection, are beloved for their delicate, crisp shells and chewy interiors. While they might seem intimidating to make, this easy macaron recipe will guide you through the process to achieve that perfect crunch. With just a few simple ingredients, you can create these delicious treats in the comfort of your own home.
Whether you’re an experienced baker or a beginner, this recipe will help you master the art of macaron making. To guarantee your macarons come out perfectly, it’s essential to follow the recipe closely and pay attention to details, especially when it comes to the mixing and baking stages. The key to the perfect macaron lies in achieving the right consistency of the batter and maintaining precise oven temperatures.
Once you’ve made your first batch, you can experiment with flavors and fillings to create a variety of delicious macarons that will impress your family and friends.
Ingredients for 4-6 servings:
- 120 grams almond flour
- 200 grams powdered sugar
- 3 large egg whites, at room temperature
- 1/4 teaspoon cream of tartar
- 50 grams granulated sugar
- Food coloring (optional)
- Filling of choice (e.g., buttercream, ganache, or jam)
Cooking Instructions:
- Prepare the Dry Ingredients: Sift the almond flour and powdered sugar together into a large bowl. This guarantees there are no lumps and creates a smooth batter.
- Whip the Egg Whites: In a clean, dry bowl, whisk the egg whites on medium speed until foamy. Add the cream of tartar and continue to whisk until soft peaks form.
- Add Sugar Gradually: Gradually add the granulated sugar, a little at a time, while continuing to whisk. Increase the speed to high and whisk until stiff peaks form. If using food coloring, add it at this stage.
- Combine Dry Ingredients with Meringue: Gently fold the dry ingredients into the egg whites in three additions. Use a spatula to fold the mixture, being careful not to deflate the meringue. The batter should be smooth and form a thick ribbon when lifted.
- Pipe the Macarons: Transfer the batter to a piping bag fitted with a round tip. Pipe small circles (about 1 inch in diameter) onto a baking sheet lined with parchment paper or a silicone mat, spacing them about an inch apart.
- Let the Macarons Rest: Tap the baking sheet on the counter to release any air bubbles. Let the macarons sit at room temperature for 30-60 minutes, or until a skin forms on the surface (they shouldn’t stick to your finger when touched gently).
- Bake the Macarons: Preheat the oven to 300°F (150°C). Bake the macarons for 15-18 minutes, turning the sheet halfway through baking. They should have risen and developed a “foot” or frill around the base.
- Cool and Fill: Allow the macarons to cool completely on the baking sheet before gently removing them. Once cool, pair similar-sized shells together and fill with your chosen filling.
Extra Tips:
For the best results, use room temperature egg whites as they whip up to a greater volume. Make sure all your equipment is clean and free of grease to achieve peak meringue.
If you live in a humid environment, allow extra drying time for the macarons before baking. Experiment with different fillings and food colorings to create a variety of flavors and designs.
Finally, store the macarons in an airtight container in the fridge for up to 3 days to keep them fresh and flavorful.
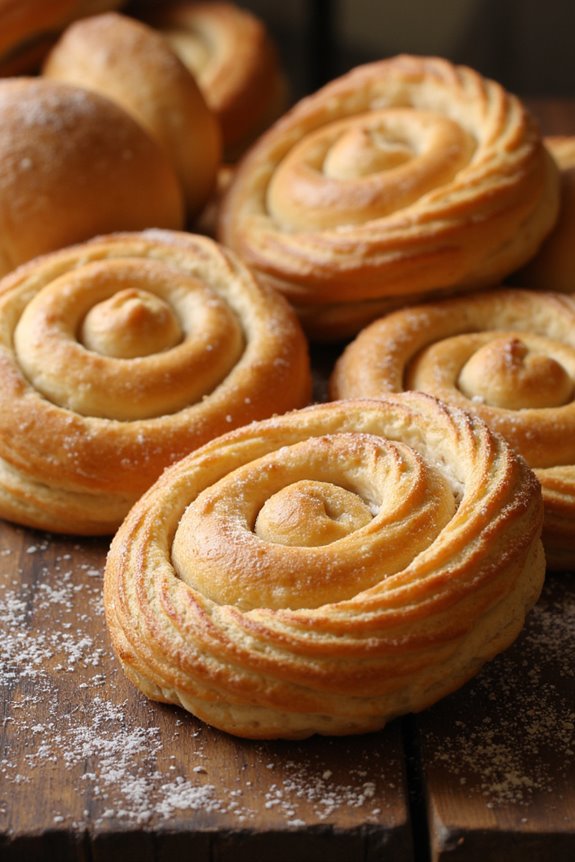
Quick Mille-Feuille: Layers of Creamy Indulgence
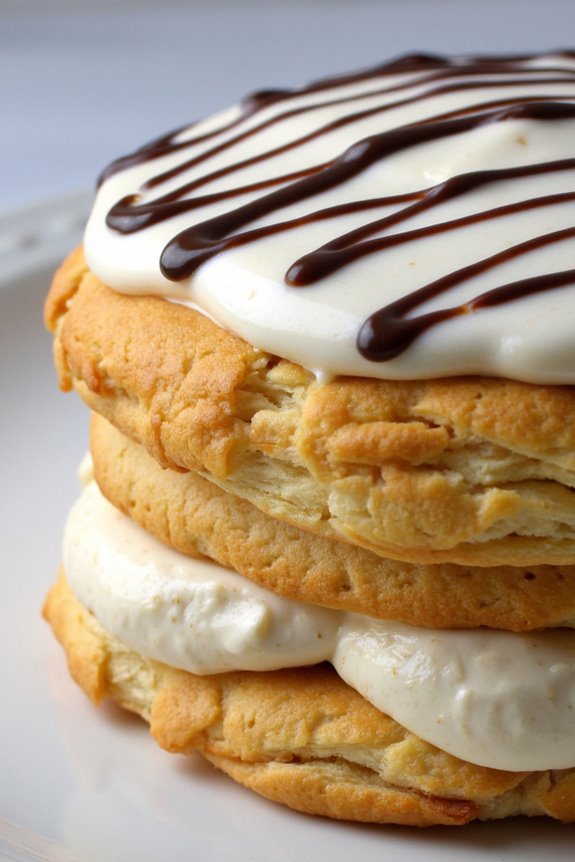
Mille-feuille, also known as Napoleon, is a classic French pastry that translates to “a thousand sheets.” Traditionally, this delightful dessert consists of layers of crisp puff pastry filled with rich pastry cream and topped with a glossy icing.
While it may seem intricate, this Quick Mille-Feuille recipe simplifies the process, allowing you to enjoy its luxurious flavors without spending hours in the kitchen. Perfect for a special occasion or a sweet indulgence, this recipe serves 4-6 people and can be prepared in under an hour.
The secret to this quick version lies in using pre-made puff pastry, which cuts down on preparation time considerably while still delivering a satisfyingly crispy texture. The creamy filling is a simple pastry cream, enhanced with a touch of vanilla for an added depth of flavor. The finishing touch is a classic icing on top, complemented by a drizzle of chocolate or a dusting of powdered sugar.
With a few simple techniques, you can create a stunning dessert that looks as impressive as it tastes.
Ingredients (serves 4-6):
- 2 sheets of pre-made puff pastry
- 2 cups whole milk
- 1/2 cup granulated sugar
- 1/4 cup all-purpose flour
- 4 large egg yolks
- 1 teaspoon vanilla extract
- 1/2 cup powdered sugar
- 2 tablespoons water
- 1/4 cup dark chocolate chips (optional for decoration)
Cooking Instructions:
1. Preheat the Oven: Begin by preheating your oven to 400°F (200°C). Line a baking sheet with parchment paper for easy cleanup.
2. Bake the Puff Pastry: Unroll the sheets of puff pastry onto the prepared baking sheet. Prick the surface with a fork to prevent it from puffing too much. Place another sheet of parchment paper over the pastry, and weigh it down with another baking sheet. Bake for 15-20 minutes or until golden brown and crisp. Remove from oven and let it cool completely.
3. Prepare the Pastry Cream: In a medium saucepan, heat the milk over medium heat until it starts to simmer. Meanwhile, in a separate bowl, whisk together the sugar, flour, and egg yolks until smooth.
Slowly pour the hot milk into the egg mixture, whisking constantly to avoid curdling. Return the mixture to the saucepan and cook over medium heat, stirring constantly until the cream thickens. Remove from heat and stir in the vanilla extract. Cool the pastry cream completely by transferring it to a bowl and covering it with plastic wrap directly on the surface to prevent a skin from forming.
4. Assemble the Mille-Feuille: Once the pastry and cream are cooled, cut the puff pastry into equal rectangles. Spread a generous layer of pastry cream over one rectangle, top with another rectangle, and repeat, ending with a layer of pastry on top.
5. Prepare the Icing: Combine the powdered sugar and water in a small bowl to create a smooth icing. Spread the icing over the top layer of the pastry. Melt the chocolate chips in a microwave or a double boiler, then drizzle over the icing in a decorative pattern.
6. Chill and Serve: Refrigerate the assembled mille-feuille for at least 30 minutes to allow the cream to set. Cut into slices and serve cold for the best texture and flavor.
Extra Tips:
To guarantee that your mille-feuille stays crisp, it’s important to assemble it close to serving time. The puff pastry can absorb moisture from the cream if left to sit for too long, which may lead to a soggy dessert.
Additionally, when cutting your mille-feuille, use a sharp serrated knife and a gentle sawing motion to maintain the integrity of the layers. If you’re feeling adventurous, try adding some fresh berries between the layers for a burst of freshness and color. Enjoy this decadent treat with a cup of coffee or tea for a perfect French-inspired experience.
Rustic Galette Des Rois: a Festive Tradition
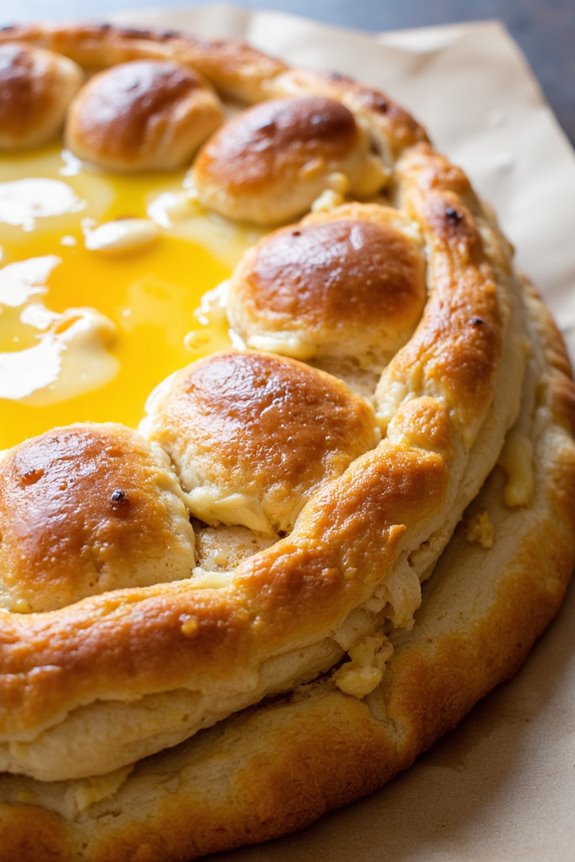
Rustic Galette Des Rois is a festive and delicious French pastry traditionally enjoyed during the Epiphany celebration. This delightful dessert is a rustic take on the classic Galette des Rois, known for its flaky puff pastry and sweet almond cream filling, also called frangipane. The rustic version embraces a more casual, homemade aesthetic, making it perfect for any occasion.
Whether you’re celebrating with family or simply indulging in a sweet treat, this galette offers a taste of French tradition with a charming twist.
The rustic Galette Des Rois isn’t only visually appealing but also incredibly flavorful. The combination of buttery, flaky pastry and creamy almond filling creates a harmonious balance that’s sure to impress. As per tradition, a small trinket or “fève” is often hidden inside the galette, and the person who finds it’s crowned “king” or “queen” for the day. While this step is optional, it adds an element of fun to the dining experience.
Let’s plunge into creating this delightful pastry, perfect for serving 4-6 people.
Ingredients:
- 1 sheet of puff pastry
- 100g unsalted butter, softened
- 100g caster sugar
- 2 large eggs
- 100g almond flour
- 1 teaspoon vanilla extract
- 1 tablespoon all-purpose flour
- 1 egg (for egg wash)
- 1 fève or small trinket (optional)
Instructions:
- Prepare the Frangipane Filling: In a large mixing bowl, cream together the softened butter and caster sugar until light and fluffy. Add the two large eggs, one at a time, mixing well after each addition. Stir in the almond flour, vanilla extract, and all-purpose flour until the mixture is smooth and well combined.
- Prepare the Puff Pastry: Roll out the sheet of puff pastry on a lightly floured surface to smooth any creases. Cut two circles from the sheet, one slightly larger than the other. The larger circle will form the base, and the smaller circle will be the top.
- Assemble the Galette: Place the larger circle of puff pastry on a lined baking sheet. Spread the frangipane filling over the pastry, leaving a 1-inch border around the edges. If using a fève, hide it within the filling. Brush the border with a little water to help seal the pastry.
- Seal the Galette: Place the smaller circle of pastry over the filling, pressing the edges firmly to seal. Use a fork to crimp the edges decoratively.
- Decorate and Bake: Beat the remaining egg to create an egg wash and brush it over the top of the galette. Use a sharp knife to lightly score the top with a decorative pattern, being careful not to cut through the pastry. Refrigerate the galette for 30 minutes to help it hold its shape.
- Bake the Galette: Preheat your oven to 200°C (400°F). Bake the galette for 25-30 minutes, or until the pastry is golden brown and puffed. Allow the galette to cool slightly before serving.
Extra Tips:
For the best results, make sure that your puff pastry remains cold until ready to bake; this helps achieve the classic flaky texture.
If you don’t have almond flour, you can grind blanched almonds in a food processor as a substitute. Additionally, remember to let the galette cool slightly before cutting to keep the filling intact. This dessert can be enjoyed warm or at room temperature, making it versatile for any gathering.
Lemon Tart: Zesty and Refreshing

The Lemon Tart is a classic French dessert that combines the bright, tangy flavor of fresh lemons with a buttery, flaky crust. This zesty and invigorating tart is a perfect balance of sweet and tart, making it an ideal dessert for any occasion.
Whether you’re hosting a dinner party or simply treating yourself to a delightful dessert, the Lemon Tart is sure to impress with its vibrant flavor and elegant presentation.
Creating a Lemon Tart may seem intimidating, but with the right recipe, it’s quite simple. The key is to use fresh lemons to guarantee the filling has a rich, authentic taste. The tart crust is typically made from a sweet shortcrust pastry, which provides a tender, crumbly base that complements the luscious lemon filling. The result is a dessert that’s not only beautiful to look at but also a joy to eat.
Ingredients for Lemon Tart (Serves 4-6):
- 1 1/2 cups all-purpose flour
- 1/2 cup unsalted butter, chilled and diced
- 1/4 cup granulated sugar
- 1/4 teaspoon salt
- 1/4 cup cold water
- 4 large eggs
- 1 cup granulated sugar
- 1/2 cup freshly squeezed lemon juice (about 3-4 lemons)
- 1 tablespoon lemon zest
- 1/2 cup heavy cream
- Powdered sugar, for dusting (optional)
Cooking Instructions:
- Prepare the Tart Crust:
- In a large mixing bowl, combine the all-purpose flour, chilled unsalted butter, granulated sugar, and salt. Use a pastry cutter or your fingers to mix until the mixture resembles coarse crumbs.
- Gradually add cold water, a tablespoon at a time, until the dough comes together. Form the dough into a ball, wrap in plastic wrap, and refrigerate for at least 30 minutes.
- Preheat and Roll:
- Preheat your oven to 350°F (175°C). Remove the dough from the refrigerator and roll it out on a lightly floured surface to fit a 9-inch tart pan.
- Press the rolled dough into the tart pan, trimming the edges. Prick the bottom with a fork to prevent puffing.
- Blind Bake the Crust:
- Line the tart crust with parchment paper and fill it with pie weights or dried beans. Bake in the preheated oven for 15 minutes.
- Remove the parchment paper and weights, and bake for an additional 5-7 minutes until lightly golden. Allow it to cool.
- Make the Lemon Filling:
- In a medium bowl, whisk together the eggs and granulated sugar until smooth. Stir in the freshly squeezed lemon juice, lemon zest, and heavy cream until fully combined.
- Bake the Tart:
- Pour the lemon filling into the pre-baked tart crust. Carefully transfer to the oven and bake for 25-30 minutes, or until the filling is set and slightly jiggles in the center.
- Remove from the oven and let it cool to room temperature. For best results, chill in the refrigerator for at least 2 hours before serving.
- Serve:
- Dust the top of the tart with powdered sugar before serving, if desired. Slice and enjoy!
Extra Tips:
For a perfect Lemon Tart, make sure that your butter is well-chilled before making the crust; this will help create a flaky texture.
When zesting lemons, be careful to avoid the white pith, which can add bitterness. If you prefer a sweeter tart, you can increase the sugar in the filling slightly.
Always allow the tart to chill thoroughly before serving; this will help the filling to set properly and make slicing easier.
Raspberry Clafoutis: A Classic French Dessert

Raspberry Clafoutis is a delightful and classic French dessert that combines the tangy sweetness of raspberries with a rich, custard-like batter. Originating from the Limousin region of France, clafoutis is traditionally made with cherries, but the raspberry variation offers a fresh and vibrant twist.
This dessert is perfect for those who appreciate the balance of tart fruit and creamy textures, and it can be served warm or at room temperature, making it a versatile option for any occasion.
Making Raspberry Clafoutis is surprisingly simple, requiring just a few basic ingredients that come together in a seamless blend of flavors. The batter, similar to that of a crepe or pancake, is poured over the raspberries in a baking dish, and as it bakes, it forms a soft, custardy filling with a slightly crisp top.
This recipe is designed for a serving size of 4-6 people, making it an ideal choice for a small gathering or family dinner.
Ingredients:
- 1 cup fresh raspberries
- 3 large eggs
- 1 cup whole milk
- 1/2 cup granulated sugar
- 1/2 cup all-purpose flour
- 1 tablespoon unsalted butter, melted
- 1 teaspoon vanilla extract
- 1/4 teaspoon salt
- Powdered sugar, for dusting
Cooking Instructions:
- Preheat and Prepare: Preheat your oven to 350°F (175°C). Grease a 9-inch round or square baking dish with butter to prevent sticking.
- Mix the Batter: In a medium-sized bowl, whisk together the eggs and granulated sugar until the mixture is pale and frothy. Add the milk, melted butter, vanilla extract, and salt, and whisk until combined. Gradually add the flour, whisking until you have a smooth batter with no lumps.
- Arrange the Raspberries: Spread the raspberries evenly across the bottom of the prepared baking dish. Verify the raspberries are evenly distributed to provide a consistent flavor in every bite.
- Pour the Batter: Carefully pour the batter over the raspberries, making sure the fruit is evenly covered. The batter will rise slightly during baking, so leave a little space at the top of the dish.
- Bake the Clafoutis: Place the dish in the preheated oven and bake for 35-40 minutes, or until the clafoutis is set and a toothpick inserted into the center comes out clean. The top should be golden brown.
- Cool and Serve: Allow the clafoutis to cool slightly before dusting with powdered sugar. Serve warm or at room temperature, cutting into wedges or squares.
Extra Tips: For the best results, use fresh, ripe raspberries; however, if fresh raspberries aren’t available, frozen raspberries can be used as a substitute. Just be sure to thaw and drain them well to prevent excess moisture.
To add a subtle almond flavor, consider incorporating a teaspoon of almond extract along with the vanilla extract. Clafoutis can be stored in the refrigerator for up to 2 days, though it’s best enjoyed fresh. If reheating, do so gently in the oven to maintain its delicate texture.
Pâte À Choux Swans: an Elegant Baking Project
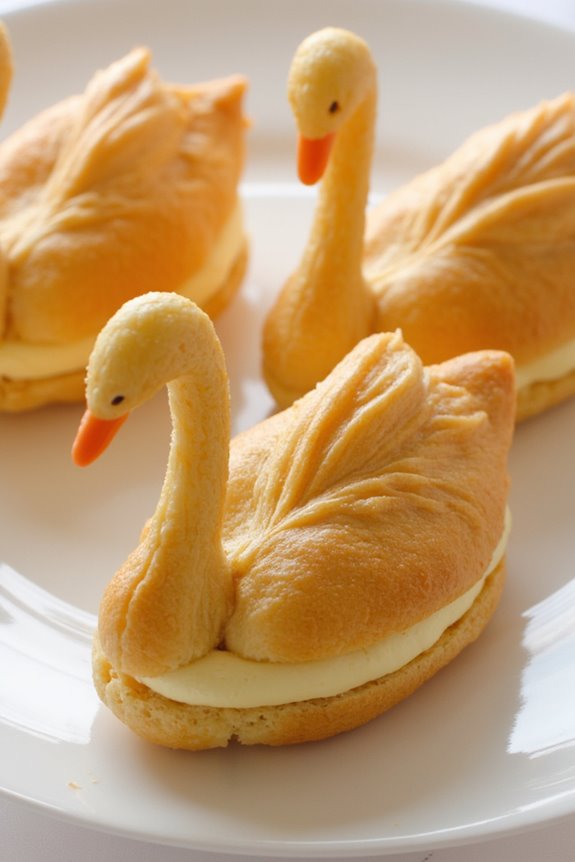
Pâte À Choux Swans are a delightful and elegant French pastry that serves as a stunning centerpiece for any dessert table. These delicate, swan-shaped pastries are made from pâte à choux, a versatile dough that puffs up beautifully when baked. The light and airy texture of the pâte à choux pairs wonderfully with the creamy filling, creating a dessert that’s both visually impressive and deliciously indulgent.
Creating these swans may seem intimidating, but with careful attention to detail and a bit of practice, you can master this sophisticated baking project. Ideal for special occasions, Pâte À Choux Swans aren’t only a feast for the eyes but also a treat for the taste buds. The process of shaping the swans involves a bit of artistry and patience, making it a fun and rewarding baking challenge.
By following this detailed recipe, you can create 4-6 elegant swans that will surely impress your family and friends. Whether you’re a seasoned baker or a novice, this recipe will guide you through each step to guarantee success.
Ingredients (Serves 4-6 people):
- 1 cup water
- 1/2 cup unsalted butter
- 1 cup all-purpose flour
- 4 large eggs
- 1/4 teaspoon salt
- 1 tablespoon granulated sugar
- 1 cup heavy cream
- 2 tablespoons powdered sugar
- 1 teaspoon vanilla extract
Instructions:
- Prepare the Pâte À Choux Dough: Preheat your oven to 425°F (220°C). In a medium saucepan, combine water, unsalted butter, granulated sugar, and salt over medium heat. Bring the mixture to a boil, making sure the butter is fully melted.
- Incorporate the Flour: Reduce the heat to low, add the all-purpose flour all at once, and stir vigorously with a wooden spoon until the mixture forms a ball and pulls away from the sides of the pan. Continue cooking for another 2 minutes to remove excess moisture.
- Add the Eggs: Remove the pan from the heat and let the dough cool slightly. Add the eggs one at a time, mixing well after each addition until the dough is smooth and glossy.
- Shape the Swans: Transfer the dough to a piping bag fitted with a large round tip. On a parchment-lined baking sheet, pipe oval-shaped bodies for the swans. For the necks, pipe S-shaped curves using a small round tip.
- Bake the Pâte À Choux: Bake in the preheated oven for 15 minutes, then reduce the temperature to 375°F (190°C) and bake for another 10-15 minutes until golden brown and puffed. Allow them to cool completely on a wire rack.
- Prepare the Cream Filling: In a mixing bowl, whip the heavy cream, powdered sugar, and vanilla extract until stiff peaks form.
- Assemble the Swans: Slice the top third off each cooled body horizontally. Fill the bottom halves with the whipped cream. Cut the top third in half lengthwise to form the wings. Insert the neck into the body and arrange the wings on either side.
Extra Tips:
When shaping the swans, make certain the oven is fully preheated before baking to achieve the best puff. Don’t open the oven door during the initial stages of baking, as this may cause the choux to deflate.
For even baking, place the baking sheets on the middle rack of the oven and rotate them halfway through the baking time. To make the assembly process easier, you can prepare the pâte à choux and the cream filling in advance.
The assembled swans are best enjoyed on the day they’re made, as the choux can become soggy if left for too long.