

When I think of coastal dining, French seafood recipes always come to mind. The flavors are fresh and vibrant, reminiscent of sunny seaside escapes. Imagine a classic Bouillabaisse simmering on the stove or a perfectly grilled fish paired with ratatouille. Each recipe in this collection brings the essence of the sea right into your kitchen. If you’re ready to explore these delightful dishes, you’re in for a treat that will elevate your culinary experience.
Classic Bouillabaisse
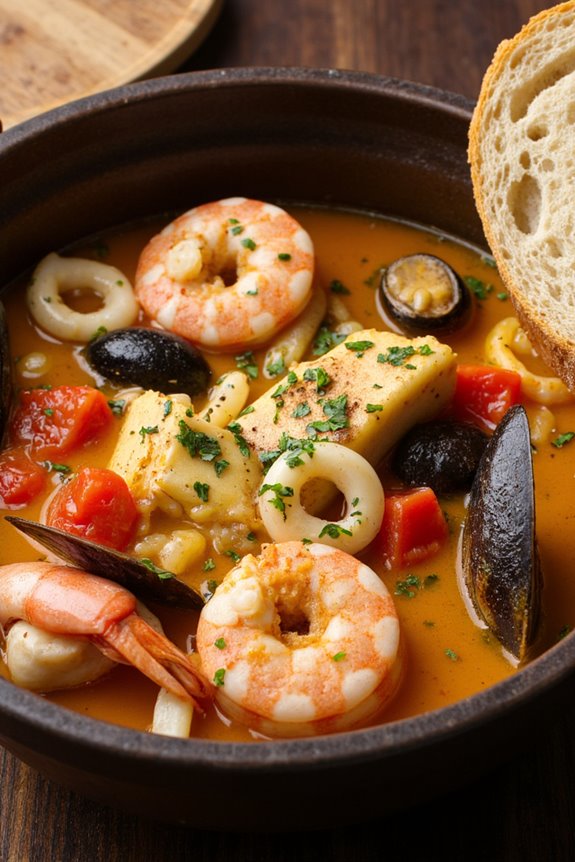
Bouillabaisse is a traditional Provençal fish stew that originated in the port city of Marseille. This aromatic dish is a celebration of the Mediterranean, bringing together a variety of fish and shellfish, infused with the flavors of saffron, garlic, and herbs. The name “bouillabaisse” comes from the method of cooking, where the broth is first brought to a boil (“bouillir”) and then simmered. Each family may have its own version, but the essence of this dish lies in its rich, flavorful broth and the freshness of its seafood.
To make a classic bouillabaisse, it’s important to select a variety of fish and shellfish for balanced flavor and texture. The dish is often served with a side of rouille, a garlicky mayonnaise, spread on crusty bread. This recipe will guide you through creating a hearty bouillabaisse that serves 4-6 people, perfect for a family gathering or a special occasion. Gather your ingredients and prepare to enjoy a taste of the French coast right in your home.
Ingredients
- 1 lb (450g) white fish fillets (such as cod or haddock)
- 1 lb (450g) mussels, scrubbed and debearded
- 1 lb (450g) shrimp, peeled and deveined
- 1/2 lb (225g) squid, cleaned and sliced into rings
- 1 onion, finely chopped
- 2 leeks, white part only, sliced
- 4 cloves garlic, minced
- 2 medium tomatoes, diced
- 1/2 teaspoon saffron threads
- 1 tablespoon tomato paste
- 1/4 cup olive oil
- 1 teaspoon dried thyme
- 1 bay leaf
- 6 cups fish stock or water
- Salt and pepper to taste
- Fresh parsley, chopped (for garnish)
- Crusty bread (for serving)
- Rouille (optional, for serving)
Cooking Instructions
- Prepare the Base: In a large pot, heat the olive oil over medium heat. Add the chopped onion and leeks, cooking until they’re soft and translucent, about 5-7 minutes. Stir in the minced garlic and cook for another minute, being careful not to let it brown.
- Add Tomatoes and Flavors: Incorporate the diced tomatoes and tomato paste into the pot, stirring well. Cook for another 2-3 minutes until the tomatoes start to break down. Add the saffron threads, thyme, bay leaf, salt, and pepper, mixing everything together.
- Create the Broth: Pour in the fish stock or water, bringing the mixture to a boil. Once boiling, reduce the heat and let it simmer for about 15-20 minutes, allowing the flavors to meld together.
- Cook the Seafood: After the broth has simmered, add the white fish fillets to the pot first, followed by the squid. Allow them to cook for about 5 minutes. Then, add the mussels and shrimp, cooking for an additional 5-7 minutes, or until the mussels open and the shrimp turn pink.
- Final Touches: Taste the broth and adjust the seasoning with more salt and pepper if needed. Remove the bay leaf before serving.
- Serve: Ladle the bouillabaisse into bowls and garnish with chopped parsley. Serve hot alongside crusty bread and rouille if desired.
Extra Tips
For the best flavor, use the freshest seafood available, and don’t hesitate to customize the types of fish based on your preferences or what’s in season.
Allowing the bouillabaisse to simmer gently is key to developing a rich broth, so avoid boiling it vigorously after adding the seafood. You can also enhance the dish by adding more herbs such as fennel or a splash of white wine for depth.
Enjoy your bouillabaisse with a glass of chilled white wine for an authentic French dining experience!
Shrimp Provençale
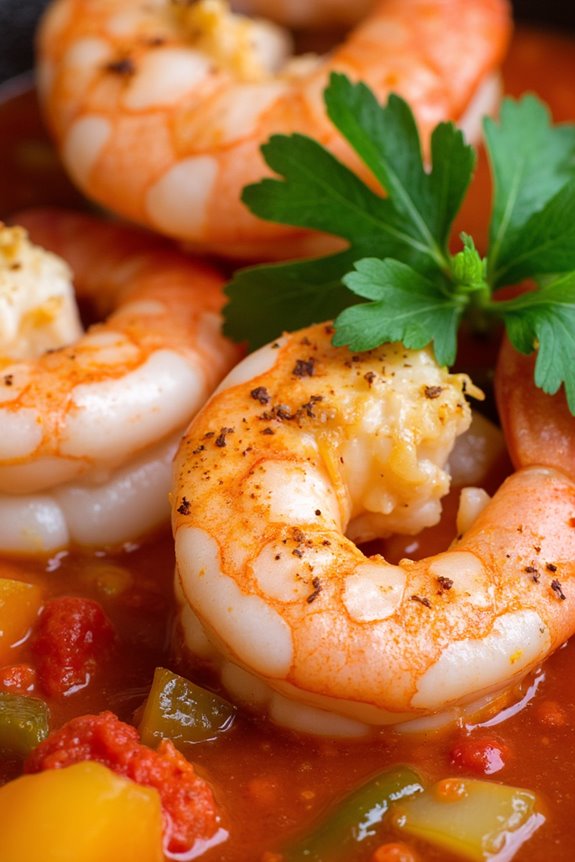
Shrimp Provençale is a classic French dish that beautifully captures the vibrant flavors of the Mediterranean. Originating from the Provence region, this recipe showcases succulent shrimp sautéed in a fragrant sauce made from fresh tomatoes, garlic, and herbs. The dish not only highlights the natural sweetness of the shrimp but also brings together the aromatic essence of the region’s herbs and spices, making it a delightful experience for the senses.
Preparing Shrimp Provençale is relatively simple, yet the result is an impressive dish that’s perfect for entertaining or a cozy family dinner. Paired with crusty bread or over a bed of rice or pasta, this dish offers a satisfying meal that’s both flavorful and visually appealing. The key to achieving the best results lies in using fresh ingredients to allow the essence of Provence to shine through.
Ingredients (Serves 4-6):
- 1 pound large shrimp, peeled and deveined
- 3 tablespoons olive oil
- 4 cloves garlic, minced
- 1 medium onion, diced
- 1 bell pepper, diced (red or yellow)
- 1 can (14.5 ounces) diced tomatoes, drained
- 1 teaspoon dried oregano
- 1 teaspoon dried thyme
- 1/2 teaspoon red pepper flakes (optional)
- Salt and pepper to taste
- 1/4 cup fresh parsley, chopped (for garnish)
- Juice of 1 lemon
Cooking Instructions:
- Sauté Aromatics: In a large skillet, heat the olive oil over medium heat. Add the diced onion and bell pepper, cooking for about 5 minutes until they become soft and translucent. Stir in the minced garlic and cook for an additional 1-2 minutes, ensuring the garlic doesn’t burn.
- Add Tomatoes and Herbs: Stir in the drained diced tomatoes, dried oregano, dried thyme, and red pepper flakes if using. Season the mixture with salt and pepper to taste. Allow it to simmer for about 5-7 minutes, letting the flavors meld and the sauce thicken slightly.
- Cook the Shrimp: Add the shrimp to the skillet, stirring gently to coat them in the tomato mixture. Cook for about 3-5 minutes, or until the shrimp turn pink and opaque. Be careful not to overcook the shrimp, as they can become tough.
- Finish and Serve: Remove the skillet from heat, and squeeze fresh lemon juice over the shrimp mixture. Give it a final stir to combine and adjust seasoning if necessary. Transfer the Shrimp Provençale to a serving platter and garnish with freshly chopped parsley.
- Pair and Enjoy: Serve Shrimp Provençale immediately with crusty bread, over pasta, or alongside a light salad for a complete meal.
Extra Tips: When preparing Shrimp Provençale, using fresh and high-quality shrimp will greatly enhance the dish’s flavor. If possible, opt for shrimp that are wild-caught rather than farmed.
Additionally, feel free to customize the dish by adding other vegetables such as zucchini or spinach for added nutrition and flavor. Finally, for an even deeper flavor, consider marinating the shrimp in olive oil, garlic, and herbs for a short time before cooking.
Garlic Butter Mussels

Garlic Butter Mussels are a classic French seafood dish that showcases the delicate flavors of fresh mussels in a rich, aromatic garlic butter sauce. This dish isn’t only simple to prepare but also a delightful way to elevate any dining experience, whether it’s a casual family meal or a special occasion.
The combination of garlic, fresh herbs, and white wine creates a luxurious broth that pairs perfectly with crusty bread for soaking up every delicious drop.
To prepare Garlic Butter Mussels, it’s vital to start with fresh mussels, as their flavor and texture are key to the dish’s success. Cleaning the mussels properly is also essential to guarantee you enjoy the clean, briny taste without any grit. This recipe serves 4-6 people and is sure to impress your guests with its vibrant flavors and elegant presentation.
Ingredients:
- 2 pounds fresh mussels, cleaned and debearded
- 4 tablespoons unsalted butter
- 4 cloves garlic, minced
- 1/2 cup dry white wine
- 1/4 cup fresh parsley, chopped
- 1 tablespoon lemon juice
- Salt and pepper to taste
- Crusty bread, for serving
Cooking Instructions:
- Prepare the Mussels: Start by rinsing the mussels under cold water. Scrub the shells with a brush to remove any dirt or sand. Discard any mussels that are open and don’t close when tapped. Remove the beards (the fibrous strands) by pulling them towards the hinge of the shell.
- Melt the Butter: In a large pot or Dutch oven, melt the unsalted butter over medium heat. Allow it to melt completely, but don’t let it brown, as you want to maintain its rich flavor for the sauce.
- Sauté the Garlic: Once the butter has melted, add the minced garlic to the pot. Sauté for about 1-2 minutes until the garlic becomes fragrant and lightly golden, being careful not to burn it as this can impart a bitter taste.
- Add Wine and Simmer: Pour in the dry white wine and bring the mixture to a simmer. Allow it to cook for about 2-3 minutes to let the alcohol evaporate and the flavors meld together.
- Cook the Mussels: Add the cleaned mussels to the pot. Cover with a lid and cook for about 5-7 minutes, shaking the pot occasionally. The mussels will open up as they cook; discard any that remain closed after cooking.
- Finish with Herbs and Seasoning: Once the mussels are fully cooked, remove the pot from heat. Stir in the chopped parsley and lemon juice, and season with salt and pepper to taste. Give it a gentle toss to make sure the mussels are well-coated in the garlic butter sauce.
- Serve: Ladle the mussels into bowls, making sure to include plenty of the garlic butter sauce. Serve immediately with crusty bread on the side for dipping.
Extra Tips:
To enhance the flavor of your Garlic Butter Mussels, consider adding a pinch of red pepper flakes for a subtle kick or swapping out the parsley for fresh basil or thyme.
Always verify your mussels are fresh, as this will greatly impact the dish’s overall quality. If you have any leftovers, they can be stored in an airtight container in the refrigerator, but they’re best enjoyed fresh. Enjoy your culinary adventure in French seafood cooking!
Ratatouille With Grilled Fish
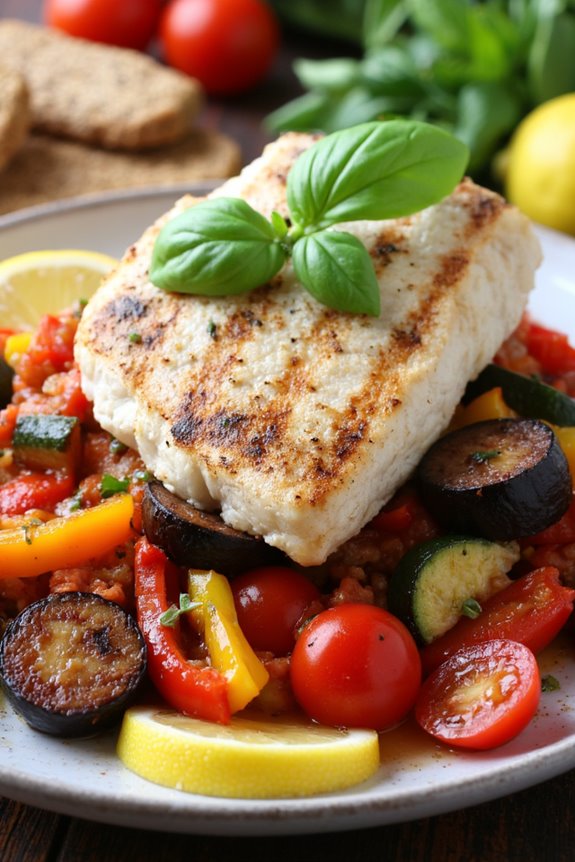
Ratatouille with Grilled Fish is a delightful dish that marries the rich flavors of traditional French ratatouille with the fresh, light taste of perfectly grilled fish. This dish not only highlights the vibrant vegetables of summer, such as zucchini, eggplant, and bell peppers, but also brings a protein element that elevates the meal. The combination isn’t just a feast for the stomach but also for the eyes, showcasing the beautiful colors of the ingredients.
This recipe is perfect for a casual dinner with family or a sophisticated gathering with friends. The ratatouille can be prepared in advance, allowing the flavors to deepen, while the fish can be grilled just before serving for a fresh and flaky texture. This approach guarantees that each component of the dish is at its best when served, making it a memorable dining experience.
Ingredients (Serves 4-6):
- 2 medium zucchinis, diced
- 1 medium eggplant, diced
- 1 red bell pepper, chopped
- 1 yellow bell pepper, chopped
- 1 medium onion, chopped
- 3 cloves garlic, minced
- 4 medium tomatoes, diced
- 1 teaspoon dried thyme
- 1 teaspoon dried basil
- Salt and pepper, to taste
- 4-6 fish fillets (such as cod, tilapia, or salmon)
- 2 tablespoons olive oil
- Fresh basil for garnish (optional)
- Lemon wedges for serving
Cooking Instructions:
- Prepare the Ratatouille: In a large skillet, heat 2 tablespoons of olive oil over medium heat. Add the chopped onion and minced garlic, and sauté for about 3-4 minutes until the onion becomes translucent and fragrant. This step builds the base flavor for the ratatouille.
- Add the Vegetables: Stir in the diced eggplant, zucchini, and bell peppers. Cook for about 5-7 minutes, stirring occasionally, until the vegetables start to soften. This process helps to develop the flavors and soften the vegetables, preparing them for the next steps.
- Incorporate the Tomatoes and Herbs: Add the diced tomatoes, dried thyme, dried basil, salt, and pepper to the skillet. Mix well and bring to a simmer. Let the ratatouille cook for about 15-20 minutes on low heat, stirring occasionally. This allows the vegetables to meld together and the sauce to thicken.
- Prepare the Fish: While the ratatouille is simmering, heat a grill or grill pan over medium-high heat. Season the fish fillets with salt, pepper, and a drizzle of olive oil. Once the grill is hot, place the fish fillets on it and cook for about 4-5 minutes on each side, or until the fish flakes easily with a fork. This technique gives the fish a nice char and enhances its flavor.
- Serve the Dish: Once both the ratatouille and fish are cooked, plate a generous scoop of ratatouille on each dish and place a grilled fish fillet on top. Garnish with fresh basil and serve with lemon wedges on the side for added zest. This presentation highlights the fresh ingredients and creates an inviting meal.
Extra Tips:
When making Ratatouille with Grilled Fish, feel free to customize the vegetables based on what you have on hand or what’s in season. Adding vegetables like squash or carrots can provide additional flavors.
For the fish, consider marinating it briefly in lemon juice and herbs for an extra layer of taste. Finally, if you’re preparing the ratatouille ahead of time, reheat it gently so as not to lose the integrity of the vegetables, and always serve the fish fresh off the grill for the best texture.
Salmon En Papillote
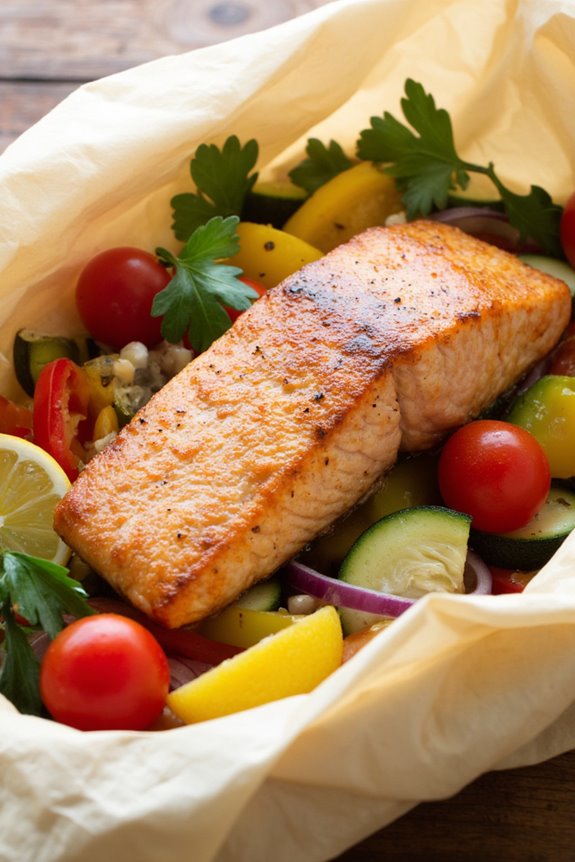
Salmon En Papillote is a classic French technique that translates to “salmon in paper.” This delightful dish not only captures the essence of fresh salmon but also allows for a medley of flavors to meld together beautifully. Cooking salmon in parchment paper guarantees that it steams in its own juices, preserving moisture and enhancing the natural taste. The result is a tender, flaky fish that’s infused with aromatic herbs and vegetables, making it a perfect choice for a healthy and elegant meal.
This method is versatile, allowing you to customize the ingredients based on your preferences or seasonal availability. Whether you choose to pair the salmon with vibrant seasonal vegetables, fragrant herbs, or a splash of citrus, the cooking technique remains the same. Salmon En Papillote isn’t only easy to prepare but also makes for an impressive presentation when served directly from the parchment paper at the table.
Ingredients (serving size: 4-6 people):
- 4-6 salmon fillets (about 6 ounces each)
- 2 cups of cherry tomatoes, halved
- 1 cup of thinly sliced zucchini
- 1 cup of thinly sliced bell peppers (red, yellow, or green)
- 1 cup of thinly sliced red onion
- 3 cloves of garlic, minced
- 1 lemon, thinly sliced
- 1/4 cup of fresh parsley, chopped
- 1/4 cup of olive oil
- Salt and pepper to taste
- Parchment paper (enough to create individual packets)
Cooking Instructions:
- Preheat the Oven: Begin by preheating your oven to 400°F (200°C). This temperature allows the salmon to cook evenly while guaranteeing the vegetables also become tender without losing their vibrant color.
- Prepare the Parchment Paper: Cut large rectangles of parchment paper (about 12×16 inches) for each serving. Fold each rectangle in half and then open it up to create a crease. This crease will help you know where to place your ingredients.
- Assemble the Ingredients: On one side of the parchment paper, layer the cherry tomatoes, zucchini, bell peppers, and red onion. Sprinkle them with minced garlic, salt, and pepper. Place a salmon fillet on top of the vegetables.
- Add Flavor and Seal: Drizzle olive oil over the salmon and top with lemon slices and chopped parsley. Fold the parchment over the salmon and vegetables, making sure to seal the edges tightly by folding them over several times. This will create a packet that traps steam inside.
- Bake the Salmon: Place the sealed parchment packets on a baking sheet and bake in the preheated oven for about 15-20 minutes. The cooking time may vary depending on the thickness of the salmon fillets.
- Check for Doneness: After the cooking time, carefully open one packet to check if the salmon flakes easily with a fork. If it does, your dish is ready to serve. If not, reseal the packet and return it to the oven for an additional 5 minutes.
- Serve: Once cooked, carefully remove the packets from the oven. Allow them to rest for a minute before serving. Present the packets on plates, letting diners open them to enjoy the aromatic steam and flavors.
Extra Tips: When preparing Salmon En Papillote, feel free to get creative with the vegetables and herbs you use. Seasonal produce, such as asparagus in spring or root vegetables in winter, can add variety.
Additionally, you can infuse the packets with flavors by incorporating different herbs like thyme or dill, or even a splash of white wine for added depth. Remember to monitor the cooking time closely to avoid overcooking the salmon, resulting in a dry texture. Enjoy the process and the delightful aromas that fill your kitchen!
Seafood Paella
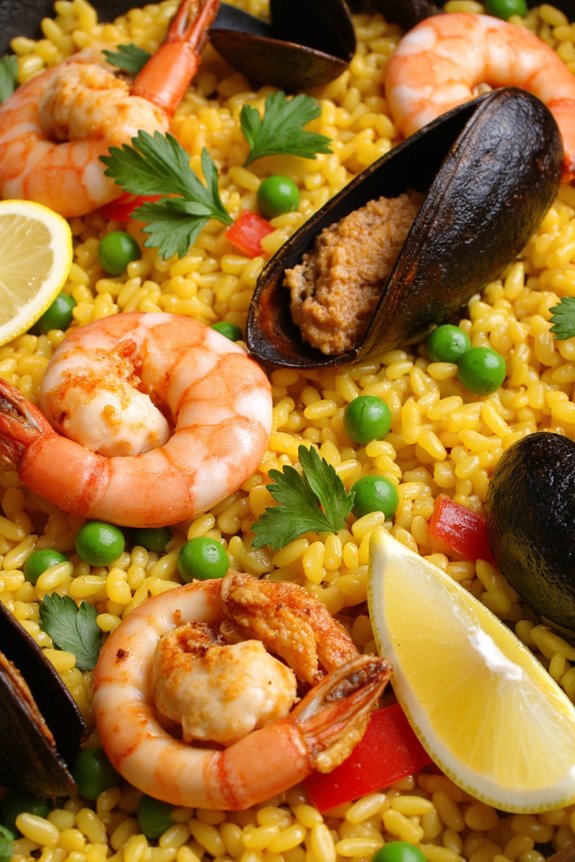
Seafood Paella is a vibrant and flavorful dish that hails from the coastal regions of Spain, particularly Valencia. This iconic rice dish is known for its saffron-infused rice, which gives it a beautiful golden hue, and a variety of fresh seafood that brings the ocean’s bounty to your table. The combination of flavors from shrimp, mussels, and calamari, along with aromatic spices and vegetables, makes Seafood Paella a delightful centerpiece for any gathering.
It’s perfect for family dinners or a special occasion, showcasing not only the beauty of seafood but also the art of Spanish cooking. Cooking Seafood Paella might seem intimidating at first, but with the right ingredients and a bit of patience, you can create a dish that rivals those served in seaside restaurants.
The key to a superb paella lies in the layering of flavors and the technique of cooking the rice to achieve a deliciously crispy bottom layer, known as “socarrat.” Gather your ingredients, roll up your sleeves, and get ready to impress your guests with this stunning and delicious dish!
Ingredients (Serves 4-6)
- 2 cups Bomba rice (or Arborio rice)
- 4 cups fish stock
- 1/2 teaspoon saffron threads
- 1 lb shrimp, peeled and deveined
- 1 lb mussels, cleaned and debearded
- 1 lb calamari, cleaned and sliced into rings
- 1 medium onion, finely chopped
- 4 cloves garlic, minced
- 1 red bell pepper, diced
- 2 tomatoes, diced
- 1 cup peas (fresh or frozen)
- 1 teaspoon smoked paprika
- 1/4 cup olive oil
- Salt and pepper to taste
- 1 lemon, cut into wedges for serving
- Fresh parsley, chopped for garnish
Cooking Instructions
- Prepare the Stock: In a saucepan, heat the fish stock and infuse it with saffron. Allow it to simmer gently so the flavors meld. This will serve as the flavorful base for your paella.
- Sauté the Vegetables: In a large paella pan or wide skillet, heat the olive oil over medium heat. Add the chopped onion and sauté until translucent. Then, add the minced garlic and diced red bell pepper, cooking until softened. This forms the aromatic base of the dish.
- Add the Tomatoes and Spices: Stir in the diced tomatoes and smoked paprika, cooking for an additional 2-3 minutes until the tomatoes break down slightly. This step adds acidity and depth to the flavor profile.
- Incorporate the Rice: Add the Bomba rice to the pan, stirring to coat the grains with the oil and vegetable mixture. Toast the rice for about 2 minutes, allowing it to absorb the flavors and prepare it for cooking.
- Combine with the Stock: Pour in the saffron-infused fish stock, bringing the mixture to a boil. Season with salt and pepper. Once boiling, reduce the heat to a simmer and don’t stir the rice anymore. This helps develop the socarrat.
- Add the Seafood: After about 10 minutes of simmering, gently place the shrimp, mussels, and calamari on top of the rice. Press them slightly into the rice to confirm they cook evenly.
- Cook Until Done: Continue to simmer for another 10-15 minutes, or until the rice is tender and has absorbed most of the liquid. If the rice is still hard and there’s no liquid left, add a bit more stock or water.
- Rest Before Serving: Once cooked, remove the pan from heat and cover it with a clean kitchen towel or aluminum foil. Let it rest for about 5-10 minutes to allow the flavors to meld and the rice to finish cooking.
- Garnish and Serve: Fluff the paella gently with a fork, then sprinkle with fresh parsley and serve with lemon wedges on the side for squeezing over the top.
Extra Tips
For an authentic touch, consider using a traditional paella pan, which allows for even cooking and the formation of the coveted socarrat. If you can find it, use seafood that’s in season and locally sourced for the best flavor.
Additionally, feel free to customize your paella by adding ingredients like chorizo or a variety of fresh fish to suit your taste. Finally, remember that paella is best enjoyed fresh, so try to serve it right after cooking for a superb experience!
French Fish Tacos
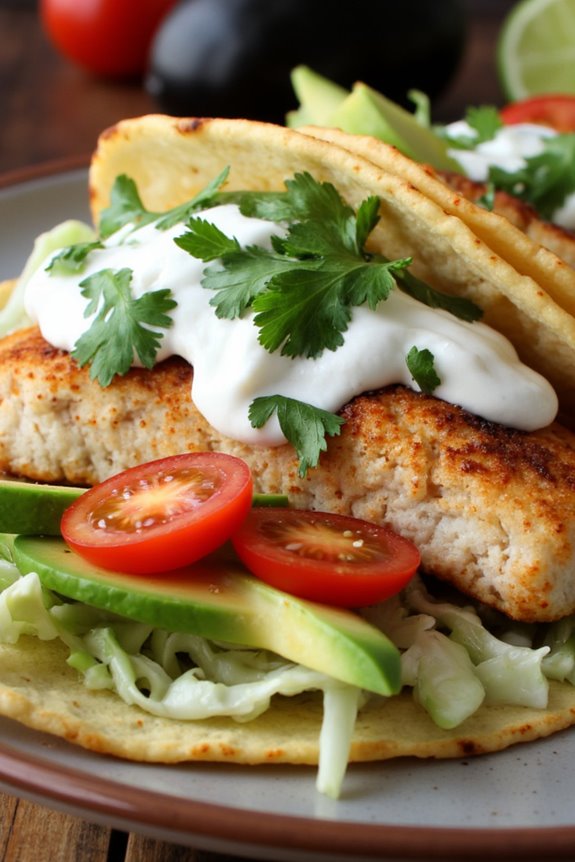
French Fish Tacos are a delightful fusion of traditional French cuisine and the vibrant flavors of Mexican street food. This unique dish combines flaky white fish with zesty toppings and a creamy sauce, all wrapped in warm tortillas. The recipe embraces the rich culinary heritage of France while celebrating the casual, fun nature of tacos, making it perfect for a family dinner or a casual gathering with friends.
The key to making these tacos truly special lies in the freshness of the fish and the quality of the ingredients used for the toppings and sauce. With a touch of French flair, you can elevate the humble taco into a gourmet experience that will leave your guests asking for seconds. So, gather your ingredients and get ready to impress everyone with this delicious French take on tacos!
Ingredients (Serves 4-6):
- 1 lb (450 g) white fish fillets (such as cod or sole)
- 2 tablespoons olive oil
- 1 teaspoon smoked paprika
- 1 teaspoon garlic powder
- Salt and pepper, to taste
- 8 small flour or corn tortillas
- 1 cup shredded cabbage
- 1 ripe avocado, sliced
- 1/2 cup cherry tomatoes, halved
- 1/4 cup fresh cilantro, chopped
- 1/2 cup crème fraîche or sour cream
- Juice of 1 lime
Cooking Instructions:
- Prepare the Fish: Start by rinsing the fish fillets under cold water and patting them dry with paper towels. This step is important to remove any excess moisture, allowing the fish to sear properly. Cut the fish into strips, about 1-inch wide for easy handling and eating.
- Season the Fish: In a mixing bowl, combine the olive oil, smoked paprika, garlic powder, salt, and pepper. Add the fish strips to the bowl, ensuring they’re evenly coated in the seasoning mixture. Let the fish marinate for about 10 minutes to absorb the flavors.
- Cook the Fish: Heat a non-stick skillet over medium-high heat. Once hot, add the seasoned fish strips to the pan in a single layer. Cook for approximately 3-4 minutes on each side, or until the fish is golden brown and cooked through. Use a spatula to carefully flip the fish, ensuring it doesn’t break apart. Remove from heat and let it rest.
- Warm the Tortillas: In a separate skillet or directly over a flame, warm the tortillas for about 30 seconds on each side until they’re pliable and slightly toasted. This step enhances the flavor and texture of the tortillas, making them more enjoyable to eat.
- Assemble the Tacos: On each tortilla, place a few strips of the cooked fish. Top with shredded cabbage, avocado slices, cherry tomatoes, and fresh cilantro. Drizzle with crème fraîche or sour cream and finish with a squeeze of lime juice for a revitalizing touch.
- Serve and Enjoy: Arrange the assembled tacos on a platter and serve immediately. Encourage your guests to customize their tacos with additional toppings or sauces as desired.
Extra Tips:
When preparing French Fish Tacos, consider adding a touch of Dijon mustard to the crème fraîche or sour cream for a hint of sharpness that complements the fish beautifully.
Additionally, feel free to experiment with different types of fish or toppings based on your preferences. For a crunchier texture, you can add pickled red onions or radishes. Enjoy your culinary adventure with these delicious tacos!
Clam Chowder À La Française
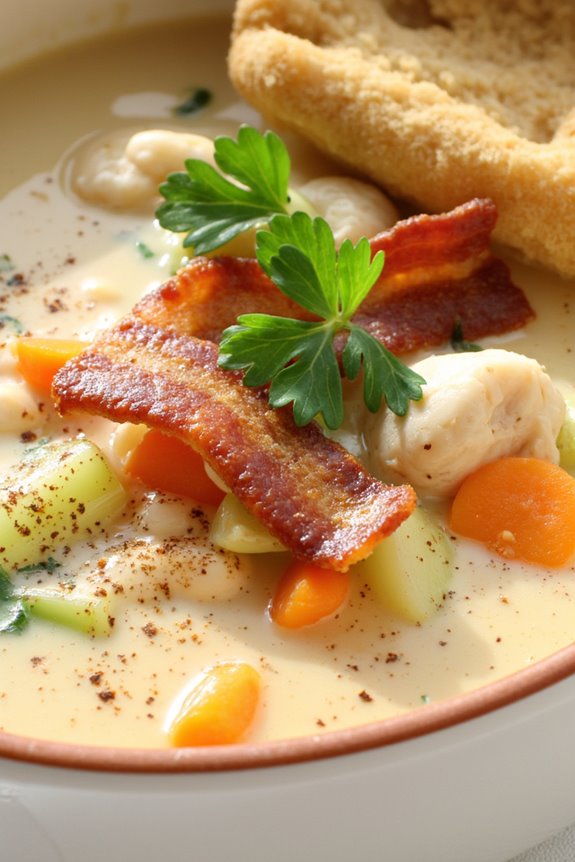
Clam Chowder À La Française is a delightful twist on the traditional clam chowder, infusing classic French culinary techniques and flavors into this beloved seafood dish. This recipe showcases the natural sweetness of clams, complemented by aromatic vegetables, fragrant herbs, and a splash of white wine, resulting in a creamy, rich chowder that’s perfect for any occasion.
Whether you’re hosting a dinner party or looking to warm up on a chilly evening, this chowder invites the taste of the sea right to your table.
To create this delicious clam chowder, you’ll need fresh, high-quality ingredients, which will elevate the dish to new heights. The combination of tender clams, creamy broth, and a hint of herbs not only tantalizes your taste buds but also brings a touch of elegance to a comforting classic.
With a few simple steps, you can master this recipe and impress your family and friends with your culinary skills.
Ingredients (Serves 4-6)
- 2 pounds fresh clams (such as littlenecks or cherrystones)
- 4 slices of bacon, diced
- 1 medium onion, finely chopped
- 2 stalks celery, finely chopped
- 1 medium carrot, finely chopped
- 2 cloves garlic, minced
- 1 cup dry white wine
- 4 cups fish stock or clam juice
- 2 medium potatoes, peeled and diced
- 1 cup heavy cream
- 2 tablespoons fresh thyme, chopped (or 1 tablespoon dried thyme)
- Salt and pepper, to taste
- Chopped fresh parsley, for garnish
Cooking Instructions
- Prepare the Clams: Rinse the clams thoroughly under cold water to remove any sand and grit. Discard any clams that are open and don’t close when tapped. Set aside.
- Cook the Bacon: In a large pot, over medium heat, add the diced bacon. Cook until the bacon is crispy and has rendered its fat, about 5-7 minutes. Remove the bacon with a slotted spoon and place it on a paper towel to drain, leaving the bacon fat in the pot.
- Sauté the Vegetables: In the same pot, add the chopped onion, celery, and carrot. Sauté the vegetables in the bacon fat for about 5 minutes or until they’re softened. Add the minced garlic and cook for an additional minute until fragrant.
- Deglaze with Wine: Pour in the dry white wine, scraping the bottom of the pot to release any browned bits. Allow the wine to simmer for 2-3 minutes until it reduces slightly.
- Add Stock and Potatoes: Add the fish stock (or clam juice) and diced potatoes to the pot. Bring the mixture to a gentle boil, then reduce the heat and let it simmer until the potatoes are tender, about 10-15 minutes.
- Add Clams and Cream: Stir in the prepared clams and heavy cream. Cook for another 5-7 minutes, or until the clams have opened. Discard any clams that remain closed.
- Season and Serve: Stir in the chopped thyme, and season the chowder with salt and pepper to taste. Serve hot, garnished with the crispy bacon and chopped parsley.
Extra Tips
For the best flavor, use fresh clams and quality fish stock or clam juice. You can also enhance the chowder by adding a splash of lemon juice or a pinch of cayenne pepper for a bit of heat.
If you prefer a thicker chowder, consider mashing some of the cooked potatoes before adding the clams and cream. To make this dish ahead of time, prepare the chowder without the clams and cream, then add them just before serving to maintain the freshness of the seafood.
Enjoy your culinary creation!
Tuna Niçoise Salad
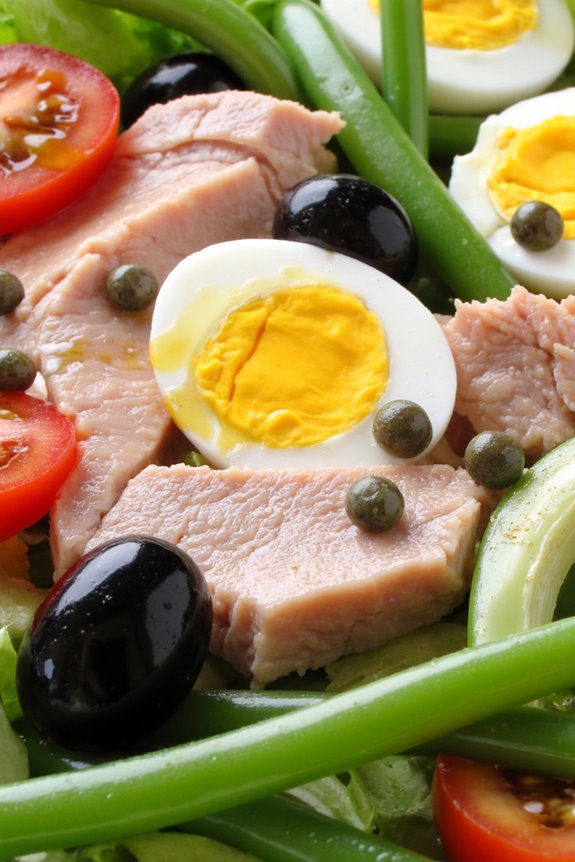
Tuna Niçoise Salad is a classic French dish that beautifully combines the flavors of fresh vegetables, tuna, and hard-boiled eggs, all dressed with a zesty vinaigrette. Originating from the Mediterranean city of Nice, this salad isn’t only delicious but also colorful and packed with nutrients, making it a perfect meal for warm weather or a light lunch.
The combination of ingredients can be adjusted according to personal preferences, but the essence of the dish remains the same – a harmonious blend of fresh produce and savory tuna. This salad isn’t only visually appealing but also versatile; it can be served as a starter or as a main course.
The key to a perfect Tuna Niçoise Salad lies in using high-quality ingredients, particularly the tuna, which can be fresh or canned, depending on availability. The addition of olives and capers brings a distinctive brininess to the dish, while the vibrant flavors of the vegetables provide freshness and crunch.
Ingredients (Serves 4-6)
- 1 lb fresh green beans, trimmed
- 4 medium tomatoes, cut into wedges
- 1/2 cup black olives, preferably Niçoise or Kalamata
- 1/4 cup capers, rinsed
- 4 hard-boiled eggs, peeled and quartered
- 2 cans (5 oz each) of high-quality tuna in olive oil, drained
- 4 cups mixed salad greens (e.g., arugula, frisée, or romaine)
- 1/4 cup extra-virgin olive oil
- 2 tablespoons red wine vinegar
- 1 teaspoon Dijon mustard
- Salt and freshly ground pepper to taste
Cooking Instructions
1. Prepare the Green Beans: Bring a pot of salted water to a boil. Add the trimmed green beans and cook for 3-4 minutes until they’re bright green and tender-crisp.
Immediately transfer them to a bowl of ice water to stop the cooking process. Once cooled, drain and set aside.
2. Prepare the Eggs: In a small saucepan, bring water to a boil and gently add the eggs. Boil for about 9-12 minutes for hard-boiled eggs.
Once done, transfer them to an ice bath to cool. Once cooled, peel and quarter the eggs.
3. Assemble the Vegetables: In a large salad bowl or platter, arrange the mixed salad greens as the base.
Top with the blanched green beans, tomato wedges, black olives, and capers.
4. Add the Tuna: Flake the drained tuna over the salad, distributing it evenly.
You can use fresh grilled tuna for a gourmet touch if desired.
5. Dress the Salad: In a small bowl, whisk together the olive oil, red wine vinegar, Dijon mustard, salt, and pepper until emulsified.
Drizzle the dressing over the salad just before serving.
6. Garnish and Serve: Carefully add the quartered hard-boiled eggs on top of the salad for a beautiful presentation.
Serve immediately, allowing guests to mix the salad themselves for a more interactive dining experience.
Extra Tips
To enhance the flavors of your Tuna Niçoise Salad, consider using fresh herbs like basil or parsley to sprinkle on top for an aromatic touch.
If you prefer a more substantial meal, you can add boiled potatoes or even some crusty French bread on the side. Always taste and adjust your dressing to suit your palate, as the balance of acidity and oil is essential in achieving the perfect flavor.
For added convenience, you can make the vinaigrette in advance and store it in the refrigerator for up to a week. Enjoy your delightful Mediterranean experience!
Prawn and Fennel Salad

Prawn and Fennel Salad is a delightful dish that perfectly embodies the light, fresh flavors of French cuisine. The combination of succulent prawns and the anise-like flavor of fennel creates a revitalizing salad that’s perfect for warm weather or as an elegant starter for a dinner party. The vibrant colors and textures won’t only please the palate but also the eye, making it a favorite among seafood lovers.
This salad is incredibly versatile; it can be served on its own as a light meal or paired with crusty bread for a more filling option. The addition of zesty lemon vinaigrette brings together all the flavors, enhancing the sweetness of the prawns and the crunchiness of the fennel. Whether you’re a seasoned cook or a beginner in the kitchen, this recipe is straightforward and sure to impress your guests.
Ingredients (serving size: 4-6 people)
- 500g large prawns, peeled and deveined
- 1 large bulb of fennel, thinly sliced
- 2 cups mixed salad greens (e.g., arugula, spinach, or lettuce)
- 1/4 cup red onion, thinly sliced
- 1/4 cup fresh parsley, chopped
- 1/4 cup olive oil
- 2 tablespoons lemon juice
- 1 teaspoon Dijon mustard
- Salt and pepper to taste
- Lemon wedges for serving
Cooking Instructions
- Prepare the Prawns: In a large pot of salted boiling water, cook the prawns for about 2-3 minutes or until they turn pink and opaque. Avoid overcooking, as this can make the prawns tough. Once cooked, drain and immediately transfer them to a bowl of ice water to stop the cooking process. After a few minutes, drain again and set aside.
- Slice the Fennel: While the prawns are cooling, take your fennel bulb and slice it thinly using a sharp knife or a mandoline. The goal is to achieve thin, even slices that will add a nice crunch to the salad.
- Make the Vinaigrette: In a small bowl, whisk together the olive oil, lemon juice, Dijon mustard, salt, and pepper. Adjust the seasoning to your taste, ensuring a nice balance of acidity and richness. This vinaigrette will enhance the flavors of the salad.
- Assemble the Salad: In a large salad bowl, combine the mixed salad greens, sliced fennel, red onion, and chopped parsley. Add the cooled prawns to the bowl. Drizzle the prepared vinaigrette over the salad and gently toss everything together until well combined, ensuring that the ingredients are evenly coated.
- Serve: Transfer the salad to a serving platter or individual plates. Garnish with lemon wedges on the side for an extra burst of revitalization. Enjoy your Prawn and Fennel Salad immediately for the best texture and flavor.
Extra Tips
When preparing the Prawn and Fennel Salad, consider marinating the prawns in olive oil, lemon juice, and garlic for an hour before cooking for added flavor. Additionally, you can substitute the fennel with other crunchy vegetables like celery or cucumber if fennel isn’t available.
For a spicy kick, add a sprinkle of red pepper flakes to the vinaigrette. This salad is best enjoyed fresh but can be stored in the refrigerator for a short time if needed.
Sole Meunière
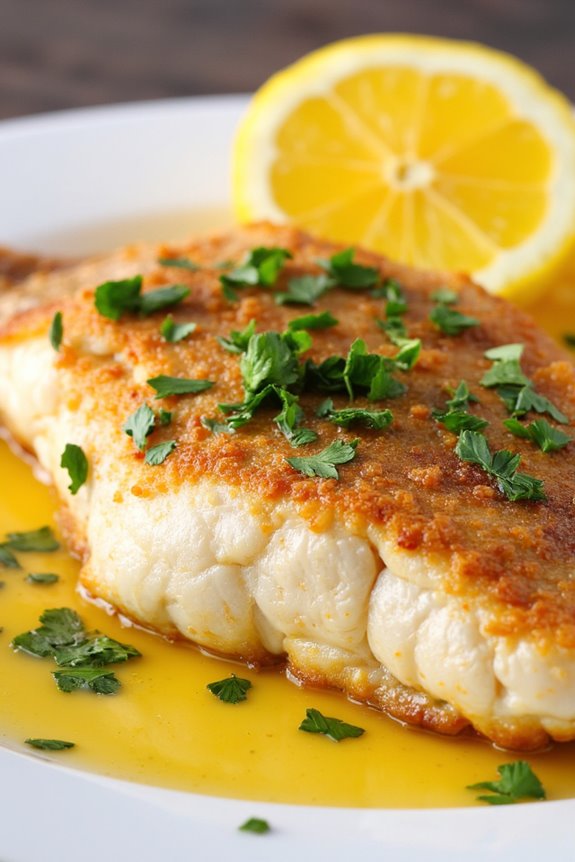
Sole Meunière is a classic French seafood dish that epitomizes the simplicity and elegance of French cuisine. This dish features sole fish that’s lightly dusted with flour, pan-fried in butter, and finished with a squeeze of fresh lemon juice, making it a delightful option for seafood lovers. The name “meunière” translates to “miller’s wife,” referring to the traditional method of cooking that involves using flour, which is reminiscent of the milling process.
With its delicate flavor and flaky texture, Sole Meunière isn’t only a staple in French bistros but also a dish that’s surprisingly easy to prepare at home. Cooking Sole Meunière allows the natural taste of the fish to shine through while incorporating rich buttery notes. The beauty of this dish lies in its straightforward preparation and the high-quality ingredients used.
Fresh sole fillets are preferred, as they’ve a mild flavor that pairs perfectly with the nutty aroma of browned butter. Serve this dish with a side of seasonal vegetables or a light salad for a complete meal that will impress family and friends alike.
Ingredients (serving size: 4-6 people):
- 4-6 sole fillets (about 6 ounces each)
- 1 cup all-purpose flour
- 1/2 cup unsalted butter
- 2 tablespoons fresh lemon juice
- 1/4 cup fresh parsley, chopped
- Salt, to taste
- Pepper, to taste
- Lemon wedges, for serving
Cooking Instructions:
- Prepare the Fish: Rinse the sole fillets under cold water and pat them dry with paper towels. Season both sides with salt and pepper to enhance the flavor. This initial seasoning is essential for bringing out the natural taste of the fish.
- Dredge in Flour: Place the all-purpose flour in a shallow dish. Lightly coat each sole fillet in the flour, shaking off any excess. This step will create a light crust when the fish is cooked and help achieve that signature golden-brown color.
- Heat the Butter: In a large skillet, melt the unsalted butter over medium heat. Allow the butter to foam and then turn slightly golden, being careful not to let it burn. The browned butter will impart a rich, nutty flavor to the dish.
- Cook the Sole Fillets: Add the dredged sole fillets to the skillet in a single layer, cooking in batches if necessary. Fry the fillets for about 2-3 minutes on each side, or until they’re golden brown and cooked through. Use a spatula to gently flip the fillets to avoid breaking them.
- Add Lemon Juice and Parsley: Once the sole is cooked, remove it from the skillet and transfer to a serving platter. In the same skillet, add fresh lemon juice and chopped parsley, stirring to combine. Pour this sauce over the cooked sole fillets for added flavor.
- Serve: Garnish with lemon wedges on the side for an extra burst of freshness. Serve immediately while the fish is hot, and enjoy the exquisite flavors of this classic French dish.
Extra Tips:
When making Sole Meunière, using fresh and high-quality fish is key to achieving the best flavor and texture. If you’re unable to find sole, you can substitute it with other flat fish such as flounder or plaice.
Be careful not to overcrowd the pan while cooking, as this can lower the temperature of the skillet and lead to steaming rather than frying. Finally, feel free to customize the dish by adding capers or a splash of white wine to the sauce for an additional layer of flavor. Enjoy your culinary journey into French cuisine!
Octopus Salad With Lemon Vinaigrette
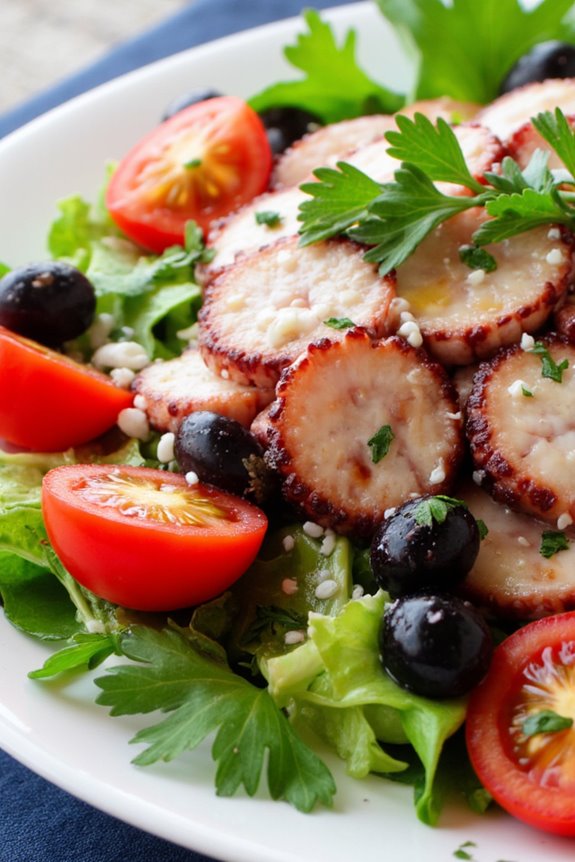
Octopus salad is a delightful dish that showcases the tender, flavorful meat of octopus, paired with a bright and zesty lemon vinaigrette. This invigorating salad is a staple in coastal regions of France, where seafood is abundant and celebrated. The combination of fresh vegetables and aromatic herbs enhances the natural taste of the octopus, making this dish perfect for a light lunch or as an appetizer for a dinner party.
Preparing octopus may seem challenging, but with the right techniques, it can be a rewarding experience. The key is to verify that the octopus is cooked to perfection, resulting in a tender texture that will melt in your mouth. This recipe will guide you through the process of cooking the octopus and creating a vibrant salad that’s sure to impress your guests.
Ingredients (Serves 4-6):
- 2 pounds octopus, cleaned
- 1 large onion, quartered
- 2 cloves garlic, crushed
- 1 bay leaf
- 1 lemon (zested and juiced)
- 1/4 cup olive oil
- 1 tablespoon Dijon mustard
- Salt and black pepper to taste
- 4 cups mixed salad greens
- 1 cup cherry tomatoes, halved
- 1/2 cup Kalamata olives, pitted and halved
- Fresh parsley, chopped for garnish
Cooking Instructions:
- Prepare the Octopus: Begin by bringing a large pot of salted water to a boil. Add the quartered onion, crushed garlic, and bay leaf to the pot. This will infuse the water with flavor as the octopus cooks. Once the water is boiling, carefully add the cleaned octopus, making sure it’s fully submerged.
- Cook the Octopus: Reduce the heat to a simmer and cover the pot. Cook the octopus for approximately 45 minutes to 1 hour, or until it’s tender. You can check for doneness by piercing the thickest part of the tentacle with a fork; it should be easy to pierce but not falling apart.
- Cool and Slice the Octopus: Once cooked, remove the octopus from the pot and let it cool slightly. After it has cooled enough to handle, slice the tentacles into bite-sized pieces. Set aside while you prepare the vinaigrette.
- Make the Lemon Vinaigrette: In a small bowl, whisk together the lemon juice, lemon zest, olive oil, Dijon mustard, salt, and black pepper until well combined. Taste and adjust seasoning as necessary.
- Assemble the Salad: In a large mixing bowl, combine the mixed salad greens, cherry tomatoes, Kalamata olives, and the sliced octopus. Drizzle the lemon vinaigrette over the salad and gently toss everything together to guarantee the ingredients are well coated.
- Serve: Transfer the salad to a serving platter or individual plates. Garnish with freshly chopped parsley for an added touch of color and flavor. Enjoy your octopus salad immediately!
Extra Tips:
When cooking octopus, consider freezing it beforehand; this helps to tenderize the meat.
Also, if you prefer a more intense flavor, marinate the sliced octopus in the lemon vinaigrette for about 30 minutes before serving.
This dish can be served cold or at room temperature, making it versatile for any occasion. Don’t forget to pair it with a crisp white wine for a true French dining experience!
Cod With Tomato and Olive Sauce
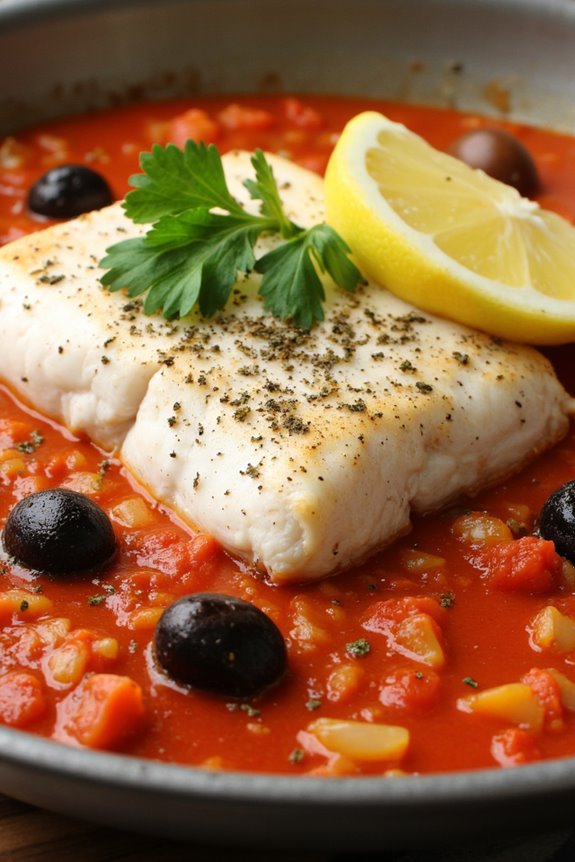
Cod with Tomato and Olive Sauce is a delightful seafood dish that brings the flavors of the Mediterranean right to your kitchen. The flaky, tender cod pairs beautifully with a bright, savory sauce made from fresh tomatoes and briny olives, creating a meal that’s both satisfying and healthy. This recipe is simple enough for a weeknight dinner but elegant enough to serve at a dinner party, making it a versatile choice for various occasions.
This dish can be served alongside crusty bread, rice, or a fresh salad, allowing you to soak up all the delicious sauce. With just a handful of ingredients, you can create a flavorful masterpiece that highlights the natural taste of the fish. Whether you’re a seasoned cook or a beginner, Cod with Tomato and Olive Sauce is sure to impress everyone at the table.
Ingredients (Serves 4-6):
- 4-6 pieces of cod fillets (about 6 ounces each)
- 2 tablespoons olive oil
- 1 medium onion, finely chopped
- 3 cloves garlic, minced
- 1 can (14 ounces) diced tomatoes, with juice
- 1 cup pitted black olives, sliced
- 1 teaspoon dried oregano
- 1 teaspoon dried basil
- Salt and pepper to taste
- Fresh parsley, chopped (for garnish)
- Lemon wedges (for serving)
Cooking Instructions:
- Prepare the Cod: Pat the cod fillets dry with paper towels and season both sides with salt and pepper. This step is essential as it enhances the flavor of the fish and guarantees a better texture when cooked.
- Heat the Oil: In a large skillet, heat the olive oil over medium heat. Once the oil is shimmering, it’s time to add the aromatics. Be careful not to overheat the oil to avoid burning.
- Sauté the Aromatics: Add the chopped onion to the skillet and sauté for about 5 minutes, or until it’s soft and translucent. Then add the minced garlic and sauté for an additional minute, until fragrant. This step builds the foundation of flavor for the sauce.
- Add Tomatoes and Olives: Pour in the diced tomatoes with their juice and add the sliced olives, oregano, and basil. Stir well to combine, and let the mixture simmer for about 10 minutes, allowing the flavors to meld together.
- Cook the Cod: Carefully place the seasoned cod fillets into the skillet, spooning some sauce over the top. Cover the skillet and let the cod cook for about 8-10 minutes, or until the fish flakes easily with a fork. This gentle cooking method helps retain the moisture in the fish.
- Final Touches: Once the fish is cooked, taste the sauce and adjust the seasoning with additional salt and pepper if needed. Sprinkle freshly chopped parsley over the dish for a pop of color and freshness.
- Serve: Transfer the cod fillets to serving plates, spoon the tomato and olive sauce generously over the top, and serve with lemon wedges on the side for a bright finish.
Extra Tips:
When preparing Cod with Tomato and Olive Sauce, choose fresh cod fillets for the best flavor and texture, but frozen cod can work as well if thawed properly. For added depth, consider incorporating a splash of white wine into the sauce as it simmers.
Additionally, you can customize the dish by adding other vegetables such as bell peppers or capers for extra flavor. Remember to serve the dish immediately to enjoy the cod at its best, and don’t forget that crusty bread is perfect for soaking up the delicious sauce!
Crêpes With Seafood Filling
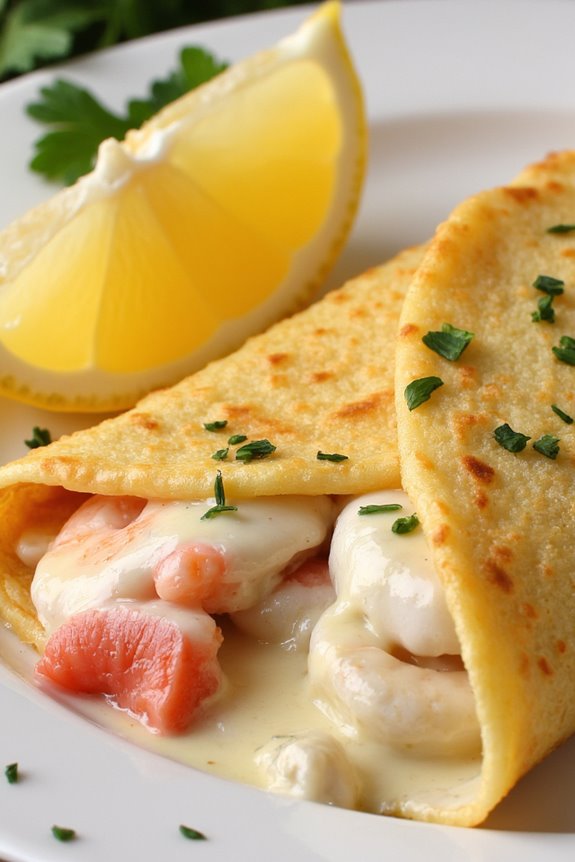
Crêpes with seafood filling is a delightful and savory dish that showcases the rich culinary traditions of France. These thin pancakes are incredibly versatile and can be filled with a variety of ingredients, but the seafood filling elevates them to a whole new level. Combining fresh seafood with aromatic herbs and a creamy sauce, this dish isn’t only delicious but also visually appealing, making it perfect for a gourmet meal to impress family and friends.
Making crêpes from scratch is easier than it may seem, and once you master the technique, you can experiment with different fillings to suit your taste. The seafood filling can include shrimp, crab, and scallops, which are all lightly sautéed and combined with a creamy béchamel sauce. Serve these crêpes with a sprinkle of fresh herbs and a side of green salad for a complete and satisfying meal.
Ingredients (Serving Size: 4-6 people)
- 2 cups all-purpose flour
- 4 large eggs
- 2 ½ cups milk
- 1 tablespoon melted butter (plus more for cooking)
- ½ teaspoon salt
- 1 pound mixed seafood (shrimp, scallops, crab)
- 1 tablespoon olive oil
- 2 cloves garlic, minced
- 1 small onion, finely chopped
- 1 cup heavy cream
- ½ cup grated Gruyère cheese
- 1 tablespoon fresh parsley, chopped (for garnish)
- Lemon wedges (for serving)
Cooking Instructions
- Prepare the Crêpe Batter: In a mixing bowl, combine the flour and salt. Make a well in the center and add the eggs. Gradually whisk in the milk until the batter is smooth and free of lumps. Finally, stir in the melted butter. Let the batter rest for about 30 minutes at room temperature to allow the flour to hydrate.
- Cook the Crêpes: Heat a non-stick skillet over medium heat and add a small amount of butter. Pour in about ¼ cup of the crêpe batter, swirling the pan to create a thin, even layer. Cook for 1-2 minutes until the edges begin to lift and the bottom is lightly golden. Flip the crêpe and cook for another minute on the other side. Transfer to a plate and repeat with the remaining batter, stacking the crêpes and covering them with a kitchen towel to keep warm.
- Make the Seafood Filling: In a large skillet, heat olive oil over medium heat. Add the chopped onion and sauté until translucent, about 3 minutes. Add the minced garlic and cook for another minute. Then, stir in the mixed seafood and cook until just opaque, about 4-5 minutes. Remove from heat and set aside.
- Prepare the Sauce: In a saucepan, heat the heavy cream over medium heat until it begins to simmer. Gradually stir in the grated Gruyère cheese until melted and smooth. Season with salt and pepper to taste.
- Assemble the Crêpes: Place a crêpe on a plate and spoon a portion of the seafood filling down the center. Drizzle some of the cheese sauce over the seafood, then fold the crêpe over to enclose the filling. Repeat with the remaining crêpes and filling.
- Serve: Plate the filled crêpes and drizzle with more cheese sauce. Garnish with chopped parsley and serve with lemon wedges on the side for an extra burst of flavor.
Extra Tips
For an added depth of flavor, consider seasoning the seafood filling with a splash of white wine or a pinch of cayenne pepper for a little kick. You can also customize the filling by adding sautéed vegetables like spinach or mushrooms.
If you have leftover crêpes or filling, they can be stored in the refrigerator and reheated for a quick meal later in the week. Enjoy your crêpes with a crisp white wine for a truly authentic French experience!