

I’ve come across a lovely collection of French vegetarian recipes that truly capture the essence of a Provençal summer. Picture yourself enjoying a classic Ratatouille or a refreshing Niçoise Salad, each filled with the flavors of sun-kissed produce and aromatic herbs. These dishes are not only delicious but also highlight the beauty of plant-based cooking. Curious about how these recipes can add a touch of sunshine to your summer meals?
Classic Provençal Ratatouille
Ratatouille is a classic French vegetable medley that celebrates the bounty of summer produce. Originating from the Provence region, this dish is a vibrant, colorful combination of eggplant, zucchini, bell peppers, and tomatoes, all simmered together with aromatic herbs.
It serves as a versatile accompaniment to various dishes or can stand alone as a hearty vegetarian main course. The secret to an excellent ratatouille lies in the freshness of the vegetables and the slow, loving cooking process that allows each ingredient to shine.
This recipe for Classic Provençal Ratatouille serves 4-6 people, making it perfect for a family meal or a gathering with friends. The key to achieving the perfect ratatouille is to cook each vegetable separately at first, which helps to maintain their distinct flavors and textures. Then, they’re brought together in one pot to meld into a harmonious and delicious dish that epitomizes the essence of summer dining.
Ingredients for 4-6 servings:
- 1 large eggplant
- 2 zucchinis
- 1 red bell pepper
- 1 yellow bell pepper
- 1 large onion
- 4 ripe tomatoes
- 4 cloves garlic
- 1/4 cup olive oil
- 1 teaspoon dried thyme
- 1 teaspoon dried rosemary
- 1 bay leaf
- Salt and pepper to taste
- Fresh basil for garnish (optional)
Cooking Instructions:
- Prepare the Vegetables: Begin by washing all the vegetables. Cut the eggplant and zucchinis into 1/2-inch cubes. Deseed the bell peppers and chop them into similar-sized pieces. Dice the onion and finely chop the garlic.
- Cook the Eggplant: In a large pan, heat 2 tablespoons of olive oil over medium heat. Add the eggplant cubes and cook until they’re golden brown and tender, about 10 minutes. Remove from the pan and set aside.
- Sauté the Zucchini: In the same pan, add another tablespoon of olive oil if necessary. Add the zucchini cubes and cook until they’re slightly browned, about 5 minutes. Remove from the pan and set aside with the eggplant.
- Cook the Bell Peppers and Onion: Add the remaining olive oil to the pan. Sauté the chopped onion and bell peppers until they become soft, about 8 minutes. Add the garlic and cook for an additional minute until fragrant.
- Combine and Simmer: Return the eggplant and zucchini to the pan. Add the diced tomatoes, thyme, rosemary, bay leaf, salt, and pepper. Stir well to combine all the ingredients.
- Simmer the Ratatouille: Cover the pan and let the ratatouille simmer over low heat for 30-40 minutes, stirring occasionally. This will allow the flavors to meld beautifully together. Adjust seasoning to taste.
- Finish and Serve: Remove the bay leaf before serving. Garnish with fresh basil if desired. Serve hot as a side dish or as a main course with crusty bread or rice.
Extra Tips:
For a richer flavor, consider roasting the vegetables in the oven before combining them in the pan, as this enhances their natural sweetness.
If you prefer a chunkier ratatouille, be mindful not to over-stir the vegetables during the simmering process to maintain their shape. Ratatouille can also be made a day in advance, as the flavors deepen and improve with time; simply reheat gently before serving.
Refreshing Niçoise Salad
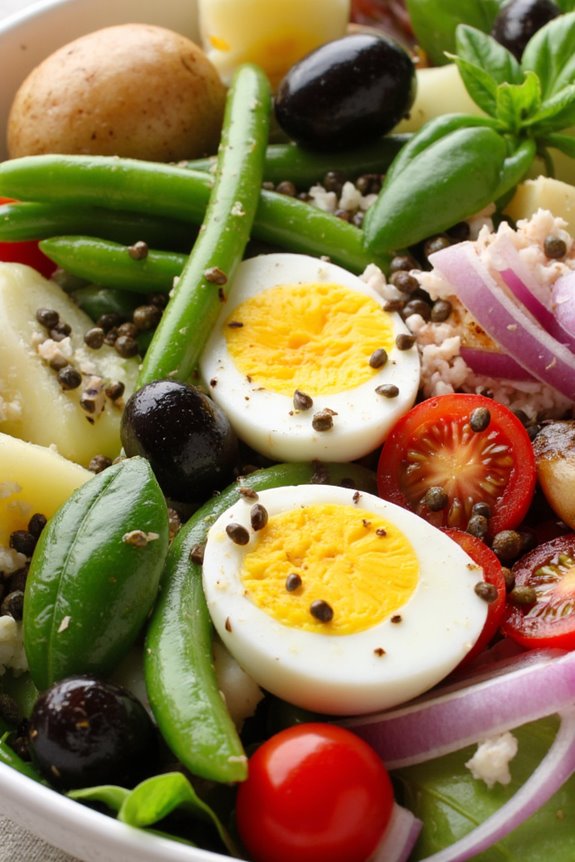
The Niçoise Salad is a classic French dish that embodies the freshness and vibrancy of summer. Traditionally, this salad includes ingredients such as tuna and anchovies, but for a vegetarian twist, those are omitted in favor of more vegetables and plant-based proteins, making it both hearty and invigorating.
This version of the Niçoise Salad celebrates the flavors of seasonal produce, capturing the essence of a sunny day in the French Riviera. With its combination of crisp greens, tender potatoes, juicy tomatoes, and a tangy vinaigrette, this recipe is perfect for a light lunch or as a side dish for dinner.
Preparing a Niçoise Salad involves selecting fresh, high-quality ingredients that will bring out the best flavors. The salad is typically composed of a bed of mixed greens adorned with a variety of vegetables such as green beans, cherry tomatoes, and olives.
To add texture and substance, baby potatoes and hard-boiled eggs are included. A homemade vinaigrette, made with olive oil, vinegar, mustard, and herbs, ties all the components together, resulting in a dish that’s both visually appealing and delicious.
Whether you’re enjoying it at home or bringing it to a summer gathering, this vegetarian Niçoise Salad will surely be a crowd-pleaser.
Ingredients for 4-6 servings:
- 500g baby potatoes
- 200g green beans
- 4 large eggs
- 200g cherry tomatoes
- 1 small red onion
- 100g mixed salad greens
- 100g black olives
- 2 tablespoons capers
For the vinaigrette:
- 1/4 cup olive oil
- 2 tablespoons red wine vinegar
- 1 teaspoon Dijon mustard
- 1 clove garlic, minced
- Salt and pepper to taste
- Fresh basil leaves for garnish
Cooking Instructions:
- Prepare the potatoes: Wash the baby potatoes thoroughly and place them in a pot of salted water. Bring to a boil and cook for about 15-20 minutes, or until they’re tender when pierced with a fork. Drain and set aside to cool slightly before slicing them in half.
- Cook the green beans: While the potatoes are cooking, trim the ends of the green beans. Blanch them in boiling water for about 3-4 minutes until tender-crisp. Immediately transfer them into a bowl of ice water to stop the cooking process and preserve their bright green color. Drain and set aside.
- Boil the eggs: Place the eggs in a pot of water and bring to a boil. Once boiling, reduce the heat and simmer for 10 minutes. Remove the eggs and place them in a bowl of cold water to cool. Peel and quarter each egg once they’re cool enough to handle.
- Prepare the vegetables: Halve the cherry tomatoes and thinly slice the red onion. Arrange them along with the salad greens on a large serving platter.
- Assemble the salad: Add the cooled potatoes, green beans, black olives, and capers to the platter. Incorporate the quartered eggs evenly across the salad.
- Make the vinaigrette: In a small bowl, whisk together the olive oil, red wine vinegar, Dijon mustard, minced garlic, salt, and pepper until well combined. Drizzle the vinaigrette over the assembled salad.
- Garnish and serve: Finish the salad by garnishing with fresh basil leaves. Serve immediately and enjoy the invigorating flavors of this vegetarian Niçoise Salad.
Extra Tips:
For the best results, use fresh, seasonal ingredients to enhance the flavors of your Niçoise Salad. If you prefer a creamier dressing, consider adding a tablespoon of Greek yogurt or sour cream to the vinaigrette.
Additionally, feel free to customize your salad by adding other vegetables such as bell peppers or artichoke hearts. When serving, make certain that each plate has a balanced mix of ingredients for a complete taste experience.
Tomato Tarte Tatin

Tomato Tarte Tatin is a delightful twist on the traditional French upside-down tart, ideal for a light summer meal. This savory version highlights the natural sweetness of ripe tomatoes, enhanced by the caramelization process, creating a beautifully glossy and flavorful topping.
The tender, buttery puff pastry provides a perfect base, offering a delightful contrast to the juicy tomatoes. This dish is perfect for vegetarians and serves as a stunning centerpiece for any summer gathering.
The key to a perfect Tomato Tarte Tatin lies in the quality of the tomatoes and the balance of flavors. Opt for ripe heirloom or cherry tomatoes for their vibrant colors and sweet taste. Fresh thyme adds a wonderful aromatic note, while a touch of balsamic vinegar enhances the tart’s overall richness.
This recipe serves 4-6 people, making it an ideal dish for sharing with friends and family.
Ingredients:
- 1 sheet puff pastry, thawed
- 2 tablespoons olive oil
- 2 tablespoons balsamic vinegar
- 3 tablespoons sugar
- 1 teaspoon salt
- 1 teaspoon freshly ground black pepper
- 2 pounds mixed heirloom or cherry tomatoes, halved
- 2 tablespoons fresh thyme leaves
- 1/4 cup grated Parmesan cheese (optional)
Instructions:
- Preheat and Prepare: Preheat your oven to 400°F (200°C). Roll out the thawed puff pastry on a floured surface to fit your skillet or baking dish and set aside.
- Caramelize the Sugar: Heat a 10-inch ovenproof skillet over medium heat. Add the olive oil, then sprinkle the sugar evenly across the skillet. Cook until the sugar starts to melt and caramelize, about 3-4 minutes.
- Add Tomatoes: Arrange the tomato halves cut side down in the skillet. Make certain they’re packed tightly. Sprinkle the salt, pepper, and fresh thyme over the tomatoes. Drizzle with balsamic vinegar. Cook for about 5 minutes until the tomatoes begin to soften slightly.
- Add Puff Pastry: Carefully place the puff pastry over the tomatoes, tucking the edges into the skillet. Use a fork to prick the pastry to allow steam to escape during baking.
- Bake the Tart: Transfer the skillet to the preheated oven. Bake for 25-30 minutes, or until the pastry is golden brown and puffed.
- Invert the Tart: Once done, remove the skillet from the oven and let it cool for 5 minutes. Carefully invert the tart onto a serving plate, ensuring the tomatoes remain intact.
- Finish and Serve: Optionally sprinkle with grated Parmesan cheese. Slice and serve warm or at room temperature.
Extra Tips:
For the best results, make sure the tomatoes are well-drained if they’re particularly juicy, as excess liquid can make the tart soggy.
If using cherry tomatoes, you mightn’t need to cut them if they’re small enough. When inverting the tart, place a large plate over the skillet and flip it confidently to avoid any mishaps.
This tart can be served as an appetizer, main dish, or even a side. Feel free to experiment with additional herbs such as basil or oregano for added flavor.
Provençal Stuffed Vegetables

The key to this dish lies in the freshness of its ingredients and the aromatic blend of Provençal herbs such as thyme, rosemary, and basil, which infuse the vegetables with a distinct Mediterranean flavor.
Served either as a main course or a side dish, Provençal Stuffed Vegetables aren’t only visually stunning but also bursting with nutrients and flavor. This recipe serves 4-6 people, making it ideal for a family dinner or a small gathering with friends.
Ingredients (serving size: 4-6 people):
- 2 medium zucchinis
- 2 medium tomatoes
- 2 medium bell peppers (any color)
- 1 medium eggplant
- 1 cup breadcrumbs
- 1 cup grated cheese (such as Gruyère or Parmesan)
- 2 cloves garlic, minced
- 1 small onion, finely chopped
- 2 tablespoons olive oil
- 1 tablespoon fresh thyme, chopped
- 1 tablespoon fresh basil, chopped
- 1 tablespoon fresh rosemary, chopped
- Salt and pepper to taste
Cooking Instructions:
- Preheat and Prepare Vegetables: Preheat your oven to 375°F (190°C). Begin by washing all the vegetables thoroughly. Cut the zucchinis and eggplant in half lengthwise. Hollow out the center of each half using a spoon, leaving a thin wall of flesh. Cut the tops off the bell peppers and remove the seeds. Slice the tops off the tomatoes and scoop out the pulp, reserving it for later use. Arrange all the prepared vegetables on a baking sheet or in a baking dish.
- Prepare Stuffing Mixture: In a large mixing bowl, combine the breadcrumbs, grated cheese, minced garlic, chopped onion, olive oil, and the reserved tomato pulp. Add the fresh thyme, basil, and rosemary. Season the mixture with salt and pepper to taste. Mix everything well until you have a uniform stuffing mixture.
- Stuff the Vegetables: Using a spoon, fill each vegetable cavity generously with the stuffing mixture. Press the stuffing down gently to guarantee it’s compact and fills the space completely.
- Bake the Vegetables: Drizzle a little olive oil over the stuffed vegetables. Place the baking sheet or dish in the preheated oven and bake for about 30-35 minutes, or until the vegetables are tender and the tops are golden brown and crispy.
- Serve: Once baked, remove the vegetables from the oven and allow them to cool for a few minutes. Serve warm, garnished with a sprinkle of fresh herbs if desired.
Extra Tips: For a richer flavor, consider adding finely chopped sun-dried tomatoes or olives to the stuffing mixture. If you prefer a spicier kick, a pinch of red pepper flakes can be added as well.
Make sure not to over-bake the vegetables to avoid them becoming too soft; they should retain some firmness to hold the stuffing well. Enjoy this dish with a side of crusty bread or a fresh green salad for a complete meal.
Herbed Goat Cheese Tart

Indulge in the flavors of summer with a delightful Herbed Goat Cheese Tart that perfectly represents the essence of French vegetarian cuisine. This tart combines the creamy texture of goat cheese with the freshness of seasonal herbs, all encased in a flaky pastry crust. It’s a versatile dish that can be served as a main course for a light lunch or as an elegant appetizer.
The balance of tangy goat cheese, aromatic herbs, and buttery pastry will surely impress your guests and make it a standout dish at any gathering. The Herbed Goat Cheese Tart isn’t only flavorful but also visually appealing with its vibrant green herbs and golden crust.
It’s an excellent option for those seeking a vegetarian dish that’s both satisfying and sophisticated. This recipe is designed to serve 4-6 people, making it a perfect choice for a small get-together or a family meal. Prepare this tart with fresh ingredients to experience the rich, garden-fresh taste that embodies the best of summer produce.
Ingredients (for 4-6 servings):
- 1 sheet of puff pastry, thawed
- 8 ounces of goat cheese, softened
- 1/2 cup heavy cream
- 2 large eggs
- 1 tablespoon fresh thyme leaves
- 1 tablespoon fresh chives, chopped
- 1 tablespoon fresh basil, chopped
- Salt and pepper to taste
- 1 tablespoon olive oil
- 1 tablespoon Dijon mustard
- 1/4 cup grated Parmesan cheese
Cooking Instructions:
- Preheat and Prepare: Preheat your oven to 400°F (200°C). Unroll the puff pastry onto a lightly floured surface and gently roll it out to fit a 9-inch tart pan with a removable bottom. Carefully press the pastry into the pan, trimming any excess dough. Prick the base with a fork and refrigerate for 15 minutes to firm up the pastry.
- Blind Bake the Pastry: Once chilled, line the pastry with parchment paper and fill with pie weights or dried beans. Blind bake in the preheated oven for 12 minutes. Remove the weights and parchment, then bake for an additional 5 minutes until lightly golden. Remove from the oven and set aside to cool slightly.
- Prepare the Filling: In a medium bowl, whisk together the goat cheese, heavy cream, and eggs until smooth. Add the chopped thyme, chives, and basil, and season with salt and pepper to taste. Stir in the olive oil and Dijon mustard for added flavor.
- Assemble the Tart: Pour the goat cheese mixture into the prepared pastry shell, spreading it evenly. Sprinkle the grated Parmesan cheese over the top for a lovely golden finish.
- Bake the Tart: Return the tart to the oven and bake for about 25-30 minutes, or until the filling is set and the top is golden brown. Once baked, remove the tart from the oven and allow it to cool slightly before serving.
- Serve: Slice the tart into wedges and serve warm or at room temperature. Pair it with a simple green salad for a complete and invigorating meal.
Extra Tips:
For the best results, confirm the goat cheese is softened before mixing to achieve a smooth, creamy filling. Fresh herbs are vital to imparting a vibrant flavor, but if fresh herbs are unavailable, you can substitute with dried herbs (use a third of the quantity).
When blind baking, confirm the pastry is well-chilled to prevent shrinkage. If you prefer a more rustic look, skip the tart pan and fold the edges of the pastry over the filling for a free-form galette. Enjoy this tart as a versatile dish that can be adapted with various herbs or even include some seasonal vegetables like zucchini or tomatoes.
Zucchini and Mint Soup
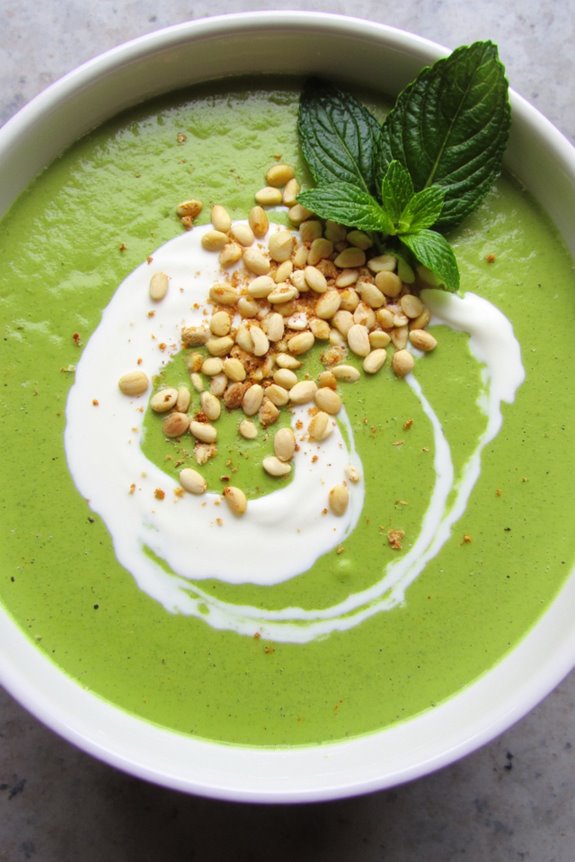
Zucchini and Mint Soup is a revitalizing and vibrant dish perfect for the warm summer months. This French-inspired vegetarian recipe isn’t only simple to make but also elegantly combines the subtle flavors of zucchini with the freshness of mint. The soup is light yet flavorful, making it an ideal starter or light meal for a summer gathering.
For those who appreciate a bit of elegance in their meals, this soup can be served either hot or chilled, adding versatility to your menu options. The creamy texture of the soup is achieved without the addition of cream, making it a healthier choice that doesn’t compromise on taste. The mint accentuates the natural sweetness of the zucchini, providing a unique twist that’s sure to delight your taste buds.
Garnishing with a dollop of Greek yogurt or a sprinkle of toasted pine nuts can elevate the presentation and add a touch of sophistication. Whether you’re a seasoned chef or a home cook, this recipe is straightforward and requires minimal ingredients, allowing the flavors to shine through.
Ingredients (Serving Size: 4-6 people):
- 3 medium zucchinis, chopped
- 1 medium onion, finely chopped
- 2 garlic cloves, minced
- 4 cups vegetable broth
- 1 tablespoon olive oil
- Salt and pepper to taste
- 1/4 cup fresh mint leaves, chopped
- Juice of half a lemon
- Optional: Greek yogurt and toasted pine nuts for garnish
Cooking Instructions:
- Prepare the Ingredients: Begin by washing the zucchinis thoroughly. Chop them into small cubes for quicker cooking. Finely chop the onion and mince the garlic cloves.
- Sauté the Aromatics: In a large pot, heat the olive oil over medium heat. Add the chopped onion and garlic, sautéing them until the onion becomes translucent and fragrant, about 3-5 minutes.
- Cook the Zucchini: Add the chopped zucchini to the pot and stir well to coat with the onion and garlic mixture. Cook for another 5 minutes, stirring occasionally, until the zucchini starts to soften.
- Simmer the Soup: Pour in the vegetable broth and bring the mixture to a gentle boil. Reduce the heat and let it simmer for about 15-20 minutes, or until the zucchini is tender.
- Blend the Soup: Remove the pot from the heat and allow the soup to cool slightly. Using an immersion blender, blend the soup until smooth and creamy. Alternatively, transfer the soup in batches to a countertop blender and blend until smooth.
- Season and Add Mint: Return the blended soup to the pot. Stir in the chopped mint leaves and lemon juice. Season with salt and pepper to taste. Reheat gently if serving warm.
- Serve: Ladle the soup into bowls. If desired, add a dollop of Greek yogurt and sprinkle with toasted pine nuts for garnish.
Extra Tips:
For a richer flavor, consider roasting the zucchinis before adding them to the soup. This can add a depth of flavor that enhances the natural sweetness of the zucchini.
When blending hot liquids, always be cautious to prevent splattering. If you prefer a thicker consistency, you can reduce the amount of broth slightly or add a small potato to the mix for a heartier texture.
Always taste and adjust the seasoning before serving to verify the flavors are balanced and pleasing to your palate.
Olive Tapenade Crostini
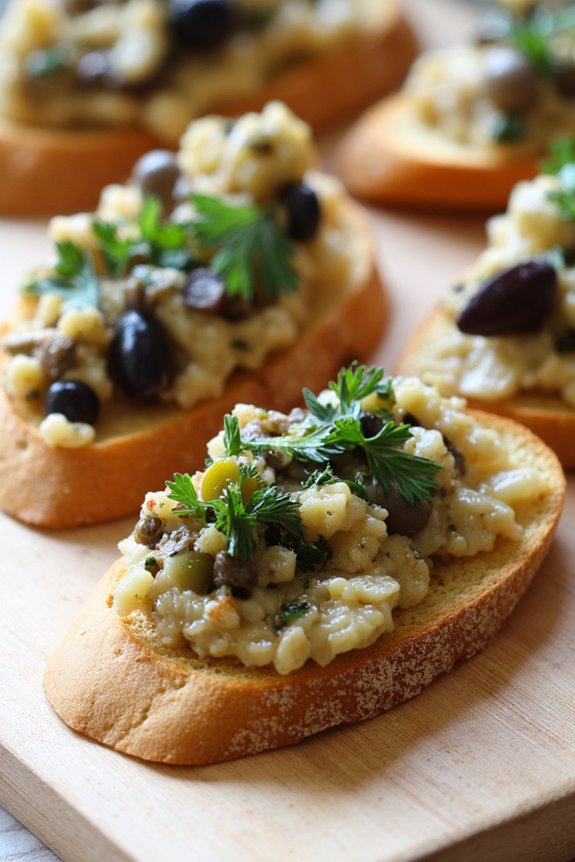
Olive Tapenade Crostini is a perfect dish for a summer gathering, combining the rich flavors of olives, capers, and fresh herbs on a crispy, toasted baguette. This recipe is a classic example of how simple ingredients can come together to create a delightful appetizer that’s both vegetarian and packed with flavor.
The tapenade offers a savory depth that pairs beautifully with the light and crunchy crostini, making it an ideal starter or snack for any occasion. This dish isn’t only delicious but also quick and easy to prepare, making it an excellent choice for entertaining.
The combination of black and green olives adds complexity to the tapenade, while garlic and lemon juice bring a revitalizing zing. Spread generously over homemade crostini, the tapenade is sure to impress your guests with its vibrant taste and sophisticated presentation.
Ingredients for 4-6 servings:
- 1 cup pitted black olives
- 1 cup pitted green olives
- 2 tablespoons capers, drained
- 2 cloves garlic, minced
- 3 tablespoons fresh lemon juice
- 1/4 cup extra virgin olive oil
- 2 tablespoons fresh parsley, chopped
- 1 tablespoon fresh thyme leaves
- Salt and pepper to taste
- 1 French baguette
- 2 tablespoons olive oil (for brushing)
Instructions:
- Prepare the Tapenade: In a food processor, combine the black olives, green olives, capers, and minced garlic. Pulse until the mixture is coarsely chopped but not pureed, maintaining a slightly chunky texture.
- Add Seasonings: Add the lemon juice, extra virgin olive oil, parsley, and thyme to the olive mixture. Pulse again until all ingredients are well combined. Taste and season with salt and pepper as needed, keeping in mind that olives and capers are naturally salty.
- Slice the Baguette: Preheat your oven to 350°F (175°C). Slice the baguette into 1/2-inch thick rounds. You should have enough slices for about 4-6 servings.
- Prepare the Crostini: Arrange the baguette slices on a baking sheet. Lightly brush each slice with olive oil to guarantee they toast evenly and achieve a golden-brown color.
- Toast the Crostini: Place the baking sheet in the preheated oven and bake for about 10-12 minutes or until the slices are crisp and lightly browned. Remove from the oven and let them cool slightly.
- Assemble the Crostini: Once the crostini have cooled slightly, generously spread the olive tapenade over each slice. Arrange on a serving platter and garnish with additional chopped parsley if desired.
Extra Tips:
For a variation in texture, you can add a handful of toasted pine nuts into the tapenade mixture before serving. For a touch of heat, consider adding a pinch of crushed red pepper flakes when making the tapenade.
If you’re short on time, store-bought crostini or crackers can be used as a substitute for homemade baguette slices. The tapenade can be prepared a day in advance and stored in the refrigerator, allowing flavors to meld and intensify. Just remember to bring it to room temperature before serving for the best taste experience.
Warm Lentil Salad With Mustard Vinaigrette
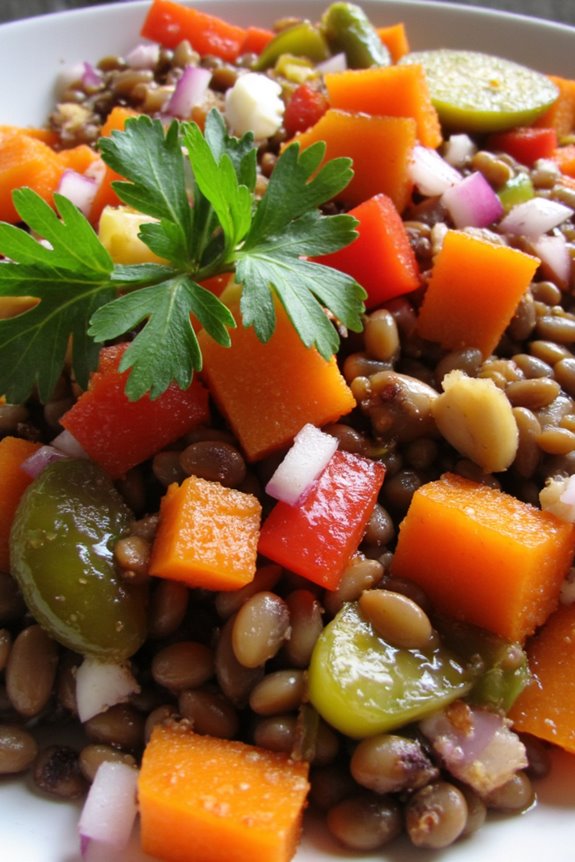
This Warm Lentil Salad With Mustard Vinaigrette is a delightful dish that encapsulates the vibrant flavors of a French summer. It’s a perfect blend of earthy lentils, fresh vegetables, and a tangy mustard vinaigrette, creating a wholesome and satisfying meal. The salad isn’t only nutritious but also incredibly versatile, making it a great option for a light lunch or a hearty side dish.
The warmth of the lentils combined with the crispness of the vegetables and the zing of the mustard dressing makes it a perfect addition to any summer menu. The recipe is designed to serve 4-6 people, ensuring that you have enough to share with family and friends. Best of all, it’s simple to prepare, allowing you to spend less time in the kitchen and more time enjoying the beautiful summer weather.
The lentils provide a rich source of protein and fiber, while the vinaigrette adds a burst of flavor that elevates the entire dish. Whether you’re a seasoned cook or a beginner, this recipe is straightforward and rewarding.
Ingredients (serving size: 4-6 people):
- 1 ½ cups green or brown lentils
- 4 cups water
- 1 bay leaf
- 1 medium carrot, diced
- 1 small red onion, finely chopped
- 1 bell pepper, diced
- 2 cloves garlic, minced
- 1 tablespoon olive oil
- 1 tablespoon red wine vinegar
- 2 tablespoons Dijon mustard
- 1 tablespoon whole grain mustard
- 3 tablespoons extra-virgin olive oil
- Salt and pepper to taste
- Fresh parsley, chopped (for garnish)
Cooking Instructions:
- Rinse and Cook Lentils:
- Begin by rinsing the lentils under cold water to remove any debris. In a large pot, combine the lentils, water, and bay leaf. Bring to a boil over medium-high heat, then reduce the heat to low and simmer for about 20-25 minutes, or until the lentils are tender but not mushy. Drain any excess water and set aside, discarding the bay leaf.
- Prepare Vegetables:
- While the lentils are cooking, prepare the vegetables. Dice the carrot and bell pepper, finely chop the red onion, and mince the garlic.
- Sauté Vegetables:
- In a skillet, heat 1 tablespoon of olive oil over medium heat. Add the diced carrot, onion, and garlic, and sauté for about 5 minutes until the vegetables are softened. Add the diced bell pepper and cook for an additional 3 minutes, ensuring all vegetables are tender.
- Make Mustard Vinaigrette:
- In a small bowl, whisk together the red wine vinegar, Dijon mustard, whole grain mustard, and extra-virgin olive oil. Season the mixture with salt and pepper to taste.
- Combine Salad:
- In a large bowl, combine the cooked lentils and sautéed vegetables. Pour the mustard vinaigrette over the lentil mixture and gently toss to coat everything evenly.
- Serve:
- Transfer the warm lentil salad to a serving dish and garnish with freshly chopped parsley. Serve immediately while warm for the best flavor experience.
Extra Tips:
To enhance the flavors of your Warm Lentil Salad With Mustard Vinaigrette, consider using high-quality Dijon and whole grain mustard, as they’ll contribute notably to the overall taste of the dish. If you prefer a bit of heat, you can add a pinch of red pepper flakes or a dash of cayenne pepper to the vinaigrette.
Additionally, feel free to experiment with different vegetables such as cherry tomatoes or zucchini for added variety. This salad can also be served cold, making it a versatile option for picnics or potlucks.
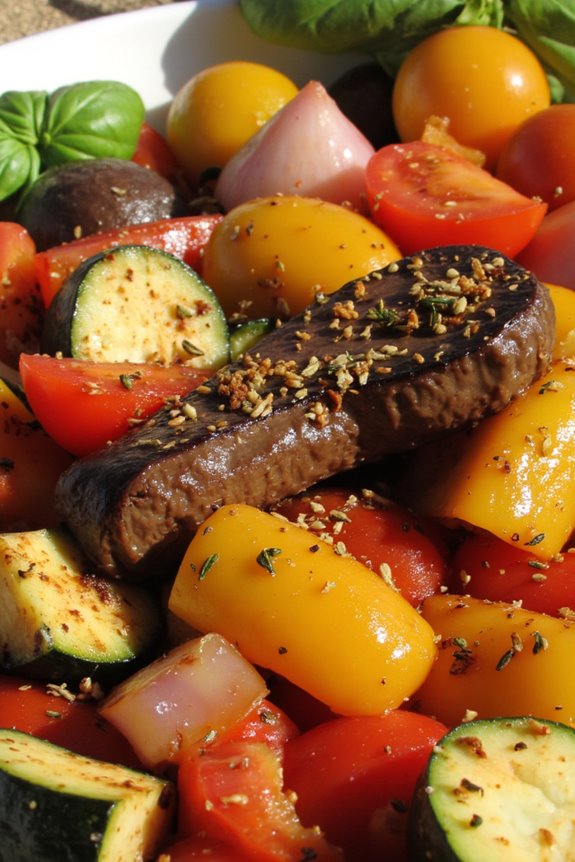
Grilled Vegetable Tian
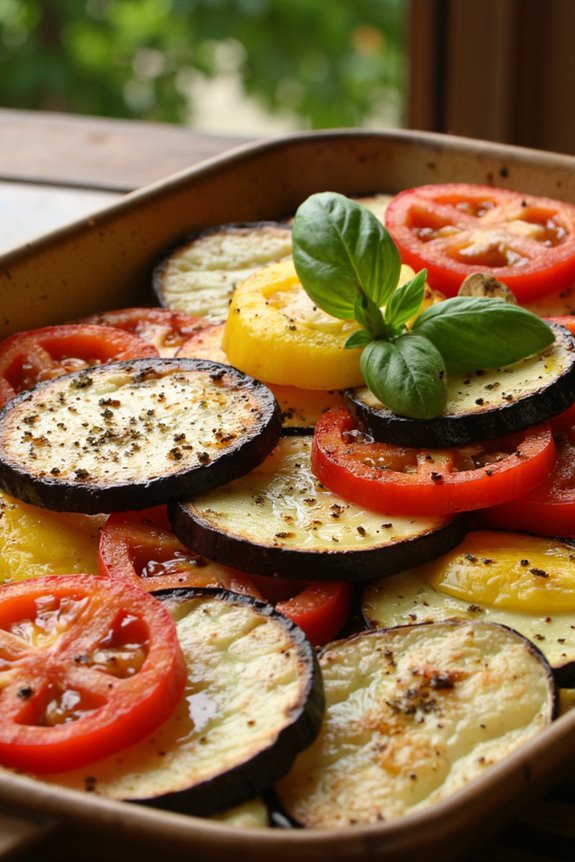
Grilled Vegetable Tian is a delightful French vegetarian dish that brings together the vibrant flavors of summer vegetables. This colorful dish is perfect for a light lunch or as a side for a more substantial meal.
Originating from the Provence region, a tian is traditionally a baked vegetable dish, but this grilled version adds a smoky depth to the vegetables, enhancing their natural sweetness. The mix of zucchini, eggplant, tomatoes, and bell peppers, layered with aromatic herbs, creates a visually appealing and deliciously fragrant dish that truly celebrates the bounty of summer produce.
Cooking a Grilled Vegetable Tian is an easy yet rewarding process. The vegetables are thinly sliced and arranged in a baking dish to form a beautiful, layered pattern. Before grilling, a drizzle of olive oil and a sprinkle of herbs de Provence create a robust flavor profile that complements the dish’s simplicity.
The grilling process caramelizes the vegetables, allowing them to develop a rich, savory taste while maintaining their freshness and color. It’s a versatile dish that can be adjusted based on your favorite seasonal vegetables or herbs.
Ingredients for 4-6 servings:
- 2 medium zucchini
- 2 medium eggplants
- 4 medium tomatoes
- 1 red bell pepper
- 1 yellow bell pepper
- 4 tablespoons olive oil
- 2 teaspoons herbes de Provence
- 2 cloves garlic, minced
- Salt and black pepper, to taste
- Fresh basil leaves, for garnish (optional)
Cooking Instructions:
- Prepare the Vegetables: Wash all the vegetables thoroughly. Slice zucchini, eggplants, and tomatoes into 1/4 inch thick rounds. Cut the bell peppers into thin strips, removing the seeds and stem.
- Preheat the Grill: Preheat your grill to medium-high heat. If using an oven, preheat it to 400°F (200°C).
- Arrange the Vegetables: Lightly grease a large, shallow baking dish with olive oil. Arrange the vegetable slices in an alternating pattern, slightly overlapping them. For example, place a slice of zucchini, followed by eggplant, tomato, and bell pepper, and repeat until the dish is full.
- Season the Vegetables: Drizzle the arranged vegetables with olive oil. Sprinkle evenly with herbes de Provence, minced garlic, salt, and black pepper.
- Grill or Bake: Place the dish on the preheated grill. Cover and grill for about 20-25 minutes, or until the vegetables are tender and starting to brown. If baking, place in the preheated oven and bake for 25-30 minutes.
- Garnish and Serve: Once cooked, remove the dish from the grill or oven. Allow it to cool slightly before garnishing with fresh basil leaves, if using. Serve warm as a stand-alone dish or alongside your favorite main course.
Extra Tips:
For the best results, choose vegetables that are similar in size to guarantee even cooking. If you have time, let the sliced eggplant sit with a sprinkle of salt for about 15 minutes before rinsing and patting dry. This process helps to remove any bitterness.
Feel free to experiment with additional herbs or spices according to your taste preferences. A sprinkle of grated Parmesan or a drizzle of balsamic reduction can also add a delightful twist to the finished dish.
Provençal Chickpea Socca

Provençal Chickpea Socca is a delightful and savory dish that originates from the sun-drenched region of Provence in the south of France. This gluten-free, vegan flatbread is made primarily from chickpea flour, making it a nutritious and satisfying option for those looking to enjoy a light yet filling meal. The socca is traditionally cooked in a wood-fired oven, resulting in a crispy exterior and a soft, slightly chewy interior, but it can easily be made at home using a standard oven or stovetop.
With its simple yet delicious flavor profile, Provençal Chickpea Socca can be served as a standalone dish or as a base for a variety of toppings, making it a versatile addition to any summer meal.
The key to a successful socca lies in its batter, which is incredibly easy to prepare. The combination of chickpea flour, water, olive oil, and a touch of salt creates a smooth mixture that can be customized with herbs and spices to suit your taste.
Once the batter is ready, it needs to rest for at least 30 minutes to allow the flavors to meld and the flour to fully hydrate. This step is vital for achieving the perfect texture. When cooked to perfection, socca emerges from the oven or pan with a golden color and an irresistible aroma that captures the essence of Provençal cooking.
Ingredients for 4-6 servings:
- 1 cup chickpea flour
- 1 cup water
- 3 tablespoons olive oil, plus extra for cooking
- 1 teaspoon salt
- 1/2 teaspoon freshly ground black pepper
- 1 teaspoon fresh rosemary, chopped (optional)
- 1 teaspoon thyme, chopped (optional)
- 1/4 cup grated Parmesan cheese (optional, for a non-vegan version)
Cooking Instructions:
- Prepare the Batter: In a large mixing bowl, whisk together the chickpea flour, water, 3 tablespoons of olive oil, and salt until you achieve a smooth, lump-free batter. Add in the black pepper and any optional herbs you desire, such as rosemary or thyme, for additional flavor. Let the batter rest at room temperature for at least 30 minutes to an hour.
- Preheat the Oven or Pan: If using an oven, preheat to 450°F (230°C) with a large cast-iron skillet or pizza stone inside. For stovetop cooking, heat a heavy-bottomed pan over medium-high heat until hot.
- Cook the Socca: Once the oven or pan is preheated, carefully remove the skillet (if using the oven) and add a tablespoon of olive oil, swirling to coat the bottom evenly. Pour in the socca batter to form a thin layer, about 1/8 to 1/4 inch thick. Return the skillet to the oven or cook on the stovetop.
- Bake or Fry the Socca: If baking, cook the socca in the oven for 8-12 minutes, or until the edges are crispy and the top is set and golden brown. For stovetop, cook for about 4-6 minutes on one side, then flip and cook for another 2-3 minutes on the other side until golden.
- Serve the Socca: Remove the socca from the oven or pan and transfer it to a cutting board. If desired, sprinkle with Parmesan cheese while still hot to allow it to melt. Cut into wedges and serve immediately, either plain or with your choice of toppings.
Extra Tips: For the best results, make sure your pan or oven is well-preheated, as this helps achieve the characteristic crispy edges of the socca. Experiment with different herbs and spices to customize the flavor to your liking.
Socca is best enjoyed fresh and hot, but if you have leftovers, they can be reheated briefly in the oven or on a stovetop to regain some of their original crispiness. For added texture and flavor, consider serving your socca with a side of fresh salad or a selection of Mediterranean dips.
Eggplant Provençale

Eggplant Provençale is a delightful vegetarian dish that captures the essence of the French summer with its aromatic herbs and rich flavors. This dish combines the robust taste of eggplants with a medley of fresh vegetables and herbs, all simmered to perfection. It’s a versatile recipe that can be served as a main course or a side dish, perfect for a warm evening meal.
The Provençale sauce, made with ripe tomatoes, garlic, and olive oil, infuses the eggplant with a tangy and savory zest that’s truly irresistible. Originating from the Provence region of France, Eggplant Provençale is a reflection of the simplicity and elegance of French cuisine.
The key to this dish lies in the quality of its ingredients; fresh, vibrant produce is crucial to achieving the authentic Provençale flavor. Whether you’re a seasoned cook or a beginner, this recipe is straightforward and offers a rewarding culinary experience. Enjoy the taste of summer with this exquisite vegetarian dish that’s sure to impress your friends and family.
Ingredients (serves 4-6):
- 2 large eggplants
- 4 ripe tomatoes
- 2 bell peppers (red or yellow)
- 1 large onion
- 3 cloves garlic
- 1/4 cup olive oil
- 1 teaspoon dried thyme
- 1 teaspoon dried oregano
- 1/2 cup fresh basil leaves
- Salt and pepper to taste
- Optional: 1/4 cup grated Parmesan cheese
Cooking Instructions:
- Prepare the Vegetables: Start by washing all the vegetables. Cut the eggplants into 1-inch cubes and sprinkle them with salt. Let them sit for about 20 minutes to draw out any bitterness. Rinse the eggplant cubes and pat them dry with a paper towel. Dice the tomatoes, chop the bell peppers into small pieces, and finely chop the onion and garlic.
- Cook the Eggplants: In a large skillet or saucepan, heat half of the olive oil over medium heat. Add the eggplant cubes and cook them until they’re golden brown and tender, about 8-10 minutes. Stir occasionally to prevent sticking. Once cooked, remove the eggplants from the pan and set them aside.
- Sauté the Aromatics: In the same skillet, add the remaining olive oil. Sauté the chopped onion and garlic until the onion becomes translucent and fragrant, about 3-4 minutes.
- Add the Vegetables: Add the chopped bell peppers and tomatoes to the skillet with the onions and garlic. Stir in the dried thyme and oregano, and season with salt and pepper to taste. Cook the mixture over medium heat for about 10 minutes, until the tomatoes break down and the peppers soften.
- Combine and Simmer: Return the cooked eggplants to the skillet. Mix well to combine all the ingredients. Reduce the heat to low, cover the skillet, and let the mixture simmer for an additional 15-20 minutes. Stir occasionally to guarantee even cooking.
- Finish with Basil: Just before serving, stir in the fresh basil leaves. If desired, sprinkle with grated Parmesan cheese for an added touch of flavor.
Extra Tips:
When preparing Eggplant Provençale, it’s important to let the eggplant sit with salt to remove any bitterness and enhance its flavor. Be sure not to overcrowd the pan when cooking the eggplants, as this will guarantee they brown evenly.
Additionally, try to use fresh, ripe tomatoes for the sauce; they’ll provide a richer and more authentic Provençale taste. If you prefer a spicier dish, consider adding a pinch of red pepper flakes. Enjoy your Eggplant Provençale with crusty bread or over a bed of couscous for a complete meal.
Courgette and Lemon Risotto
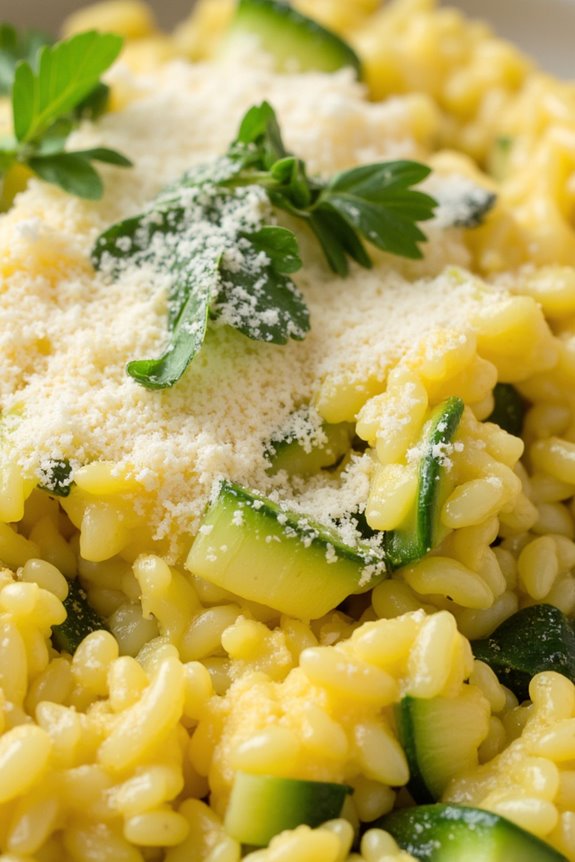
This Courgette and Lemon Risotto is a delightful summer dish that brings together the fresh flavors of tender courgettes and zesty lemons. Perfect for a light lunch or dinner, this vegetarian risotto is both creamy and satisfying without being heavy. The subtle sweetness of the courgettes is nicely balanced by the tangy lemon, creating a dish that’s both invigorating and comforting.
Ideal for when the courgettes are at their peak, this dish showcases the simplicity and elegance of French vegetarian cuisine. This recipe is designed to serve 4-6 people, making it perfect for a family meal or a small gathering with friends. The risotto is prepared with arborio rice, which absorbs the broth beautifully, resulting in a creamy texture. A touch of Parmesan cheese adds richness, while fresh herbs enhance the dish’s natural flavors.
Follow the steps below to create a perfect Courgette and Lemon Risotto that will impress even the most discerning of palates.
Ingredients:
- 2 tablespoons olive oil
- 1 onion, finely chopped
- 2 garlic cloves, minced
- 1 ½ cups arborio rice
- 4 cups vegetable broth
- 2 medium courgettes, diced
- Zest and juice of 1 lemon
- ½ cup grated Parmesan cheese
- Salt and freshly ground black pepper, to taste
- 2 tablespoons butter
- Fresh basil or parsley, chopped, for garnish
Instructions:
- Prepare Ingredients: Begin by gathering and preparing all your ingredients. Chop the onion and garlic, dice the courgettes, and zest and juice the lemon. This will streamline the cooking process.
- Sauté the Aromatics: In a large pan, heat the olive oil over medium heat. Add the chopped onion and garlic, sautéing them until they become translucent and fragrant, which should take about 3-4 minutes.
- Toast the Rice: Add the arborio rice to the pan, stirring it continuously for about 2 minutes. This toasting step is essential for developing the risotto’s nutty flavor.
- Add the Broth Gradually: Start by adding one ladleful of vegetable broth to the rice, stirring frequently. Allow the liquid to be absorbed before adding another ladleful. Continue this process until the rice is tender and creamy, which should take approximately 18-20 minutes.
- Incorporate the Courgettes: When the rice is nearly done, stir in the diced courgettes. Cook for an additional 5 minutes, allowing the courgettes to become tender while the rice finishes cooking.
- Finish with Lemon and Cheese: Once the rice is fully cooked, remove the pan from heat. Stir in the lemon zest, lemon juice, Parmesan cheese, and butter. Season with salt and pepper to taste.
- Garnish and Serve: Transfer the risotto to serving bowls or plates. Garnish with fresh basil or parsley for a pop of color and an herbal note.
Extra Tips:
For the best results, use a high-quality vegetable broth, as it will greatly impact the flavor of your risotto. Keep the broth warm in a separate pot while cooking the risotto to maintain a consistent temperature.
Stir the risotto often to release the starches from the rice, which contributes to the creamy texture. If the risotto becomes too thick, simply add a little more broth or water to achieve your desired consistency. Finally, adjust the seasoning to your preference, as the natural sweetness of the courgettes and the tanginess of the lemon can vary.
Summer Berry Clafoutis

Summer Berry Clafoutis is a delightful French dessert that perfectly captures the essence of summer with its combination of fresh, juicy berries and a creamy, custard-like batter.
Originating from the Limousin region of France, traditional clafoutis is usually made with cherries, but this summer version incorporates a variety of seasonal berries for a revitalizing twist. It’s an easy-to-make dessert that can be served warm or at room temperature, making it ideal for summer gatherings or as a light after-dinner treat.
The texture of clafoutis is somewhere between a flan and a pancake, with a hint of sweetness that pairs beautifully with the tartness of the berries. The batter, enriched with eggs and milk, creates a sumptuous base for the berries, which burst with flavor as they bake.
This recipe is perfect for those who want to enjoy the abundant berry harvest of the season in a simple yet elegant dessert. Serve it with a dusting of powdered sugar or a dollop of whipped cream to elevate its presentation.
Ingredients for 4-6 servings:
- 1 cup fresh strawberries, hulled and halved
- 1 cup fresh blueberries
- 1 cup fresh raspberries
- 3 large eggs
- 1 cup whole milk
- 1/2 cup granulated sugar
- 1 tablespoon vanilla extract
- 1/2 cup all-purpose flour
- 1/4 teaspoon salt
- Butter for greasing the baking dish
- Powdered sugar for dusting
Cooking Instructions:
- Prepare the Oven and Dish: Preheat your oven to 350°F (175°C). Generously butter a 9-inch round baking dish to guarantee the clafoutis doesn’t stick and is easy to serve.
- Arrange the Berries: Evenly distribute the strawberries, blueberries, and raspberries in the buttered baking dish. Confirm the berries are spread out to prevent clumping and to allow even baking.
- Make the Batter: In a mixing bowl, whisk together the eggs, milk, and granulated sugar until well combined. Add in the vanilla extract, then gradually whisk in the flour and salt until you have a smooth batter with no lumps.
- Combine and Bake: Pour the batter over the berries in the prepared baking dish. The batter should just cover the fruit. Place the baking dish in the preheated oven and bake for about 35-40 minutes, or until the clafoutis is puffed, set in the middle, and golden brown around the edges.
- Cool and Serve: Remove the clafoutis from the oven and allow it to cool slightly. It will deflate a bit as it cools, which is normal. Dust with powdered sugar before serving, and optionally, add a dollop of whipped cream.
Extra Tips:
For the best flavor, use berries that are ripe and in season. If fresh berries aren’t available, you can use frozen berries; just make sure to thaw and drain them well to avoid excess moisture.
To add an extra layer of flavor, consider adding a teaspoon of citrus zest (such as lemon or orange) to the batter. Clafoutis is a versatile dessert that can be adapted with different fruits, such as stone fruits like peaches or plums, depending on what’s in season.