

When it comes to creating a memorable dining experience, appetizers truly set the tone. I’ve gathered 10 stunning French appetizer recipes that not only taste exquisite but also bring a touch of sophistication to your table. From the savory essence of classic French onion soup bites to the decadent flavors of pâté en croûte, these dishes are sure to leave a lasting impression. Let’s explore how each one can enhance your mealtime gatherings.
Classic French Onion Soup Bites

Classic French Onion Soup Bites are an elegant twist on the beloved traditional French onion soup. This appetizer captures the rich, savory flavors of caramelized onions and melted cheese, all nestled within a crispy pastry shell. Perfect for entertaining, these bite-sized treats are sure to impress guests at any gathering or dinner party. Not only are they delicious, but they also provide a fun and interactive way to enjoy a classic dish in a new form.
The preparation of these bites involves a few key steps, including caramelizing the onions to develop their sweetness and flavor. Once the onions are perfectly caramelized, they’re combined with a rich broth and a touch of sherry, then spooned into pastry shells and topped with gooey cheese. These bites are baked until golden and bubbly, making them an irresistible appetizer that will have everyone coming back for more.
Ingredients (Serves 4-6)
- 2 large yellow onions, thinly sliced
- 2 tablespoons unsalted butter
- 1 tablespoon olive oil
- 1 teaspoon sugar
- Salt and pepper, to taste
- 1 cup beef or vegetable broth
- 1/4 cup dry sherry (optional)
- 1 teaspoon fresh thyme leaves (or 1/4 teaspoon dried thyme)
- 1 package of puff pastry (2 sheets), thawed
- 1 cup shredded Gruyère cheese
- Fresh parsley, chopped (for garnish)
Cooking Instructions
- Caramelize the Onions: In a large skillet, heat the butter and olive oil over medium heat. Add the sliced onions and sprinkle with sugar, salt, and pepper. Cook the onions for about 25-30 minutes, stirring occasionally, until they’re golden brown and caramelized. This process enhances their sweetness and depth of flavor.
- Add Broth and Seasoning: Once the onions are caramelized, pour in the beef or vegetable broth and sherry (if using). Stir in the thyme and bring the mixture to a simmer. Allow it to cook for an additional 5-10 minutes, letting the flavors meld together. Taste and adjust seasoning with salt and pepper as desired.
- Prepare the Puff Pastry: Preheat your oven to 400°F (200°C). Roll out the puff pastry sheets on a lightly floured surface. Cut them into squares (about 3 inches), ensuring you have enough squares to fit into your mini muffin tin.
- Assemble the Bites: Lightly grease the mini muffin tin. Place each puff pastry square into the muffin cups, pressing them down gently. Spoon a generous amount of the caramelized onion mixture into each pastry shell, filling them about three-quarters full. Top each with a sprinkle of shredded Gruyère cheese.
- Bake the Bites: Bake the assembled bites in the preheated oven for 15-20 minutes, or until the pastry is golden brown and the cheese is bubbly and melted. Keep an eye on them to prevent burning.
- Garnish and Serve: Remove the bites from the oven and let them cool slightly. Carefully lift them out of the muffin tin and place them on a serving platter. Garnish with fresh parsley before serving.
Extra Tips
For an extra layer of flavor, consider adding a splash of balsamic vinegar during the caramelization process or experimenting with different types of cheese, such as Fontina or a sharp cheddar. Confirm the puff pastry is fully thawed before rolling it out to achieve the best texture.
These bites are best enjoyed fresh from the oven, but they can be reheated in the oven if needed. Enjoy your Classic French Onion Soup Bites!
Mini Quiches Lorraine

Mini Quiches Lorraine are a delightful French appetizer that brings a touch of elegance to any gathering. These bite-sized treats are filled with a rich mixture of eggs, cream, cheese, and crispy bacon, all encased in a flaky pastry crust. They’re perfect for brunch, parties, or as a savory snack, and can be easily customized with your favorite ingredients.
Making Mini Quiches Lorraine is a great way to showcase your culinary skills while impressing your guests. They aren’t only visually appealing but also incredibly delicious. These mini quiches can be prepared in advance and served warm or at room temperature, making them a convenient option for busy hosts.
Let’s plunge into the recipe and get started on creating these scrumptious little bites!
Ingredients (serving size: 4-6 people):
- 1 sheet of puff pastry (thawed)
- 4 large eggs
- 1 cup heavy cream
- 1 cup grated Gruyère cheese
- 4 oz bacon, cooked and crumbled
- 1/2 cup finely chopped onion
- 1/4 teaspoon salt
- 1/4 teaspoon black pepper
- 1/4 teaspoon nutmeg
- Fresh parsley for garnish (optional)
Cooking Instructions:
- Preheat the Oven: Begin by preheating your oven to 375°F (190°C). This guarantees that the pastry will bake evenly and the quiches will set properly while cooking.
- Prepare the Pastry: Roll out the puff pastry on a lightly floured surface to about 1/8 inch thick. Cut out circles using a round cookie cutter or a glass, approximately 3 inches in diameter. You’ll need enough circles to line a muffin tin.
- Line the Muffin Tin: Gently press the pastry circles into the cups of a greased muffin tin, making sure to push them down into the bottom and up the sides to create a small crust for each quiche.
- Cook the Bacon and Onions: In a skillet over medium heat, cook the crumbled bacon until crispy. Remove it from the skillet and drain on paper towels. In the same skillet, add the chopped onions and sauté until they’re soft and translucent, about 5 minutes.
- Make the Filling: In a mixing bowl, whisk together the eggs, heavy cream, salt, black pepper, and nutmeg until well combined. Stir in the cooked bacon, sautéed onions, and grated Gruyère cheese.
- Fill the Pastry Shells: Carefully pour the egg mixture into each pastry-lined muffin cup, filling them about 3/4 full to allow room for expansion while baking.
- Bake the Quiches: Place the muffin tin in the preheated oven and bake for 20-25 minutes, or until the quiches are puffed and golden brown on top.
- Cool and Serve: Once baked, remove the muffin tin from the oven and allow the mini quiches to cool for a few minutes before gently removing them. They can be served warm or at room temperature, garnished with fresh parsley if desired.
Extra Tips:
When preparing Mini Quiches Lorraine, feel free to experiment with different fillings such as spinach, mushrooms, or other cheeses. For a richer flavor, consider using a combination of cheeses.
Additionally, you can make the quiches in advance and store them in the refrigerator. Simply reheat them in the oven for a few minutes before serving to bring back their delicious texture.
Enjoy your cooking and the delightful compliments from your guests!
Ratatouille Tartlets
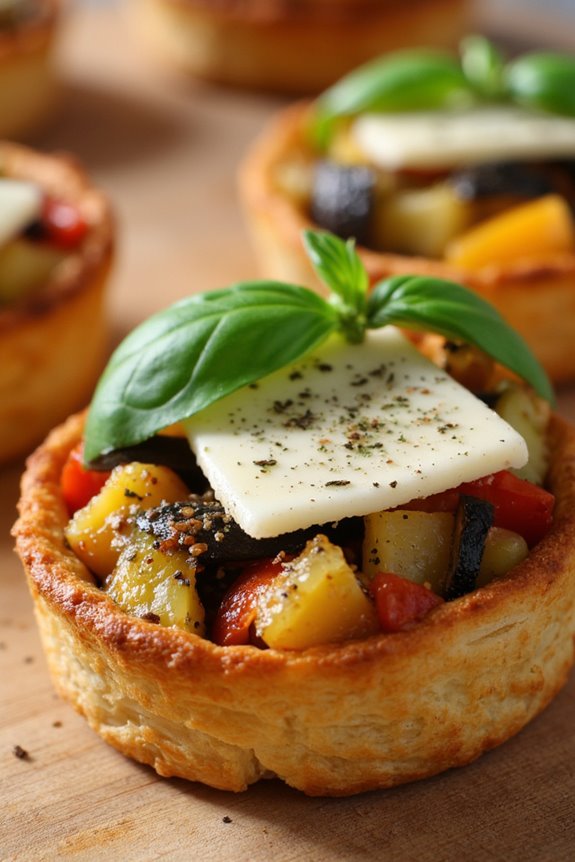
Ratatouille Tartlets are a delightful and elegant appetizer that beautifully showcases the vibrant flavors of classic Provençal cuisine. These mini tarts combine a flaky pastry shell filled with a medley of sautéed vegetables including zucchini, eggplant, and bell peppers, all seasoned with aromatic herbs.
Perfect for entertaining, they can be prepared ahead of time and baked just before serving, making them an ideal option for dinner parties or casual gatherings. The combination of fresh vegetables and herbs creates a colorful presentation that’s as pleasing to the eye as it’s to the palate.
Whether served warm or at room temperature, these tartlets are sure to impress your guests and introduce them to the rich culinary traditions of France. With a light and crispy crust, and a savory filling, Ratatouille Tartlets aren’t only delicious but also a wonderful way to incorporate seasonal produce into your meal.
Ingredients (Serves 4-6)
- 1 sheet of puff pastry, thawed
- 1 medium zucchini, diced
- 1 small eggplant, diced
- 1 red bell pepper, diced
- 1 yellow bell pepper, diced
- 1 small onion, finely chopped
- 2 cloves garlic, minced
- 1 teaspoon dried thyme
- 1 teaspoon dried oregano
- 1/4 cup olive oil
- Salt and pepper, to taste
- 1/2 cup grated Parmesan cheese
- Fresh basil leaves, for garnish (optional)
Cooking Instructions
1. Preheat the Oven: Begin by preheating your oven to 400°F (200°C). This guarantees that the tartlets bake evenly and achieve a golden, flaky texture.
2. Prepare the Puff Pastry: Roll out the thawed puff pastry on a lightly floured surface to a thickness of about 1/8 inch. Cut the pastry into circles that are slightly larger than your tartlet molds. Press the circles into the molds, trimming any excess pastry hanging over the edges. Prick the bottom of each pastry shell with a fork to prevent puffing during baking.
3. Sauté the Vegetables: In a large skillet, heat the olive oil over medium heat. Add the chopped onion and sauté until translucent, about 3-4 minutes.
Then, add the minced garlic, diced zucchini, eggplant, and bell peppers. Season with salt, pepper, thyme, and oregano. Cook for about 8-10 minutes, stirring occasionally, until the vegetables are tender. Remove from heat and let cool slightly.
4. Assemble the Tartlets: Spoon the sautéed vegetable mixture into each prepared puff pastry shell. Make sure to fill them generously but avoid overfilling. Sprinkle grated Parmesan cheese on top of the vegetables for added flavor.
5. Bake the Tartlets: Place the filled tartlet molds on a baking sheet and transfer them to the preheated oven. Bake for 20-25 minutes or until the pastry is golden brown and crisp. Keep an eye on them to avoid burning.
6. Garnish and Serve: Once baked, remove the tartlets from the oven and let them cool for a few minutes. Garnish with fresh basil leaves if desired, then serve warm or at room temperature.
Extra Tips
When making Ratatouille Tartlets, feel free to experiment with different vegetables based on what’s in season or your personal preferences.
You can also add a layer of ricotta or goat cheese to the bottom of the tart shells before adding the vegetable mixture for an extra creamy texture. Additionally, these tartlets can be made ahead and stored in the refrigerator; simply reheat them in the oven before serving for a quick and impressive appetizer.
Gougères With Cheese

Gougères are delightful French cheese puffs made from choux pastry, which is the same dough used for éclairs and cream puffs. These savory bites are airy, light, and packed with flavor, making them a perfect appetizer for any gathering. They can be served warm or at room temperature and are sure to impress your guests with their elegant appearance and delicious taste.
The addition of cheese gives these puffs a rich, savory quality that pairs beautifully with a variety of dipping sauces or can be enjoyed on their own. Making gougères is simpler than it might seem, and with just a few ingredients, you can create a sophisticated snack that elevates any occasion.
The secret to achieving that perfect puff is guaranteeing the dough is well-mixed and properly baked. Once you’ve mastered this classic French recipe, you can experiment with different cheeses and spices to create your own unique twist on this traditional dish.
Ingredients (serving size: 4-6 people):
- 1 cup water
- ½ cup unsalted butter
- 1 teaspoon salt
- 1 cup all-purpose flour
- 4 large eggs
- 1 cup grated cheese (such as Gruyère or cheddar)
- ¼ teaspoon black pepper
- ¼ teaspoon garlic powder (optional)
- ¼ teaspoon cayenne pepper (optional)
Cooking Instructions:
1. Preheat the Oven: Begin by preheating your oven to 425°F (220°C). This high temperature is essential for creating the steam necessary for the gougères to rise properly.
2. Make the Choux Pastry: In a medium saucepan, combine the water, butter, and salt. Bring the mixture to a boil over medium heat, stirring occasionally until the butter has completely melted. Once boiling, remove the pan from heat and add the flour all at once.
Stir vigorously with a wooden spoon until the mixture forms a smooth ball of dough that pulls away from the sides of the pan.
3. Incorporate the Eggs: Allow the dough to cool for a few minutes, then add the eggs one at a time, mixing well after each addition. The dough will initially appear separated but will come together as you mix.
Continue mixing until the dough is smooth and glossy.
4. Add Cheese and Seasonings: Fold in the grated cheese, black pepper, garlic powder, and cayenne pepper if using. Confirm the cheese is evenly distributed throughout the dough for maximum flavor.
5. Pipe or Scoop the Dough: Line a baking sheet with parchment paper. Using a pastry bag fitted with a large round tip or a spoon, pipe or scoop small mounds of dough (about 1 tablespoon each) onto the prepared baking sheet, spacing them about 2 inches apart.
6. Bake the Gougères: Place the baking sheet in the preheated oven and bake for about 20-25 minutes, or until the gougères are puffed up and golden brown. Avoid opening the oven door during baking, as this can cause them to deflate.
7. Cool and Serve: Once baked, remove the gougères from the oven and let them cool slightly on a wire rack. Serve warm or at room temperature.
Extra Tips: To enhance the flavor of your gougères, feel free to experiment with different types of cheese or add herbs like thyme or chives to the dough.
For an even richer taste, consider brushing the tops with an egg wash (a mixture of beaten egg and water) before baking. Finally, confirm your dough is well-mixed before piping, as this will help achieve the perfect rise and texture. Enjoy your delicious gougères as a standout appetizer at your next gathering!
Smoked Salmon Rillettes
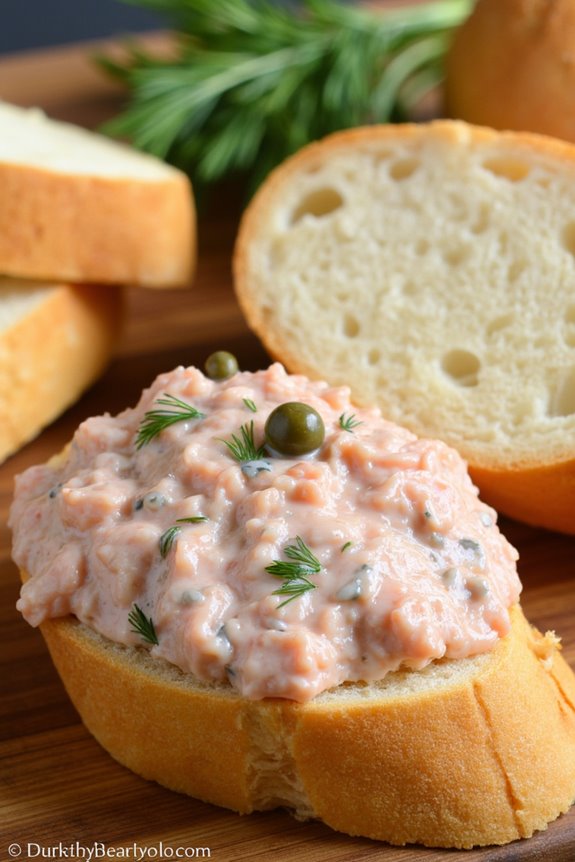
Smoked Salmon Rillettes is a delightful French appetizer that beautifully combines the rich, smoky flavors of salmon with creamy, buttery textures. Traditionally, rillettes are a spread made from meat, but this seafood version is a revitalizing twist that’s perfect for gatherings.
This dish is incredibly easy to prepare and can be made ahead of time, allowing the flavors to meld beautifully. Served on crusty bread or crackers, it’s sure to impress your guests with its elegant presentation and exquisite taste.
This appetizer captures the essence of French cuisine with its simplicity and sophistication, showcasing how a few high-quality ingredients can create a luxurious dish. The rillettes are creamy, aromatic, and slightly tangy, with the fresh dill adding a burst of flavor that complements the smoked salmon perfectly.
It’s the ideal choice for brunch, cocktail parties, or as part of a charcuterie board, making it a versatile addition to your culinary repertoire.
Ingredients (serving size: 4-6 people)
- 8 ounces smoked salmon, chopped
- 4 ounces cream cheese, softened
- 2 tablespoons unsalted butter, softened
- 1 tablespoon fresh lemon juice
- 1 tablespoon capers, drained and chopped
- 2 tablespoons fresh dill, chopped
- Salt and pepper, to taste
- Baguette or crackers, for serving
Cooking Instructions
- Prepare the Ingredients: Begin by gathering all your ingredients. Make sure the cream cheese and butter are softened to room temperature, which will make it easier to blend into a smooth mixture.
- Mix the Base: In a medium mixing bowl, combine the softened cream cheese and unsalted butter. Using a fork or a hand mixer, mix until the mixture is creamy and smooth with no lumps. This will create a rich and airy base for your rillettes.
- Incorporate the Salmon: Add the chopped smoked salmon to the cream cheese mixture. Gently fold the salmon in using a spatula, being careful not to break it down too much—some texture is good for the rillettes.
- Add Flavors: Incorporate the fresh lemon juice, chopped capers, dill, and a pinch of salt and pepper to the mixture. Stir everything together until well combined. Taste and adjust seasoning if necessary, adding more salt or pepper according to your preference.
- Chill the Rillettes: Transfer the mixture to a serving dish or an airtight container. Cover it with plastic wrap, pressing it down directly onto the surface of the rillettes to prevent oxidation. Refrigerate for at least 2 hours, or overnight if possible, to allow the flavors to meld together.
- Serve: When ready to serve, remove the rillettes from the refrigerator and let them sit at room temperature for about 15 minutes. This will help soften the mixture for easier spreading. Serve with slices of baguette or crackers on the side.
Extra Tips
When making Smoked Salmon Rillettes, feel free to experiment with additional flavors such as horseradish for a kick or finely chopped red onion for added crunch.
Always make sure your smoked salmon is fresh and of high quality, as it’s the star ingredient in this dish. For an even more decadent touch, you can garnish the rillettes with extra dill or a few capers before serving.
Enjoy your culinary creation with a glass of chilled white wine for the ultimate French experience!
Pâté En Croûte
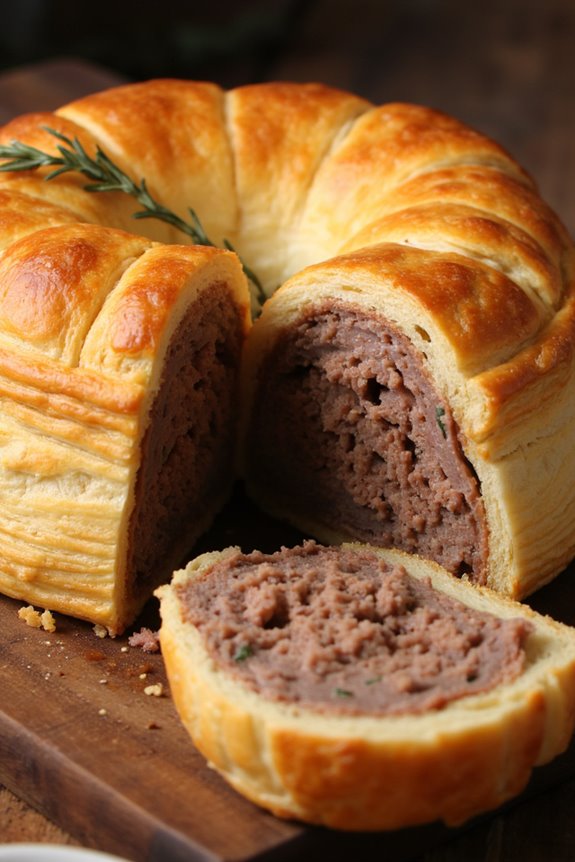
Pâté en croûte is a classic French dish that combines the rich flavors of meat and spices with a flaky pastry crust, making it a delightful appetizer for any gathering. This dish isn’t only a feast for the palate but also for the eyes, as it’s often beautifully decorated and presented.
Traditionally, pâté en croûte is filled with a mixture of ground meats, such as pork and veal, along with herbs and spices, encased in a buttery pastry that bakes to a golden perfection.
Preparing pâté en croûte requires some time and effort, but the results are well worth it. Whether you’re hosting a dinner party or looking to impress guests with a gourmet touch, this dish will surely elevate your appetizer game. It can be served warm or cold and pairs wonderfully with pickles, mustard, or a light salad, making it an ideal choice for any occasion.
Ingredients (Serves 4-6)
- 1 lb ground pork
- 1/2 lb ground veal
- 1/2 lb diced bacon
- 1/2 cup chopped onions
- 1/4 cup chopped fresh parsley
- 2 cloves garlic, minced
- 2 tsp fresh thyme leaves
- 1/2 tsp nutmeg
- 1 tsp salt
- 1/2 tsp black pepper
- 1/4 cup cognac or brandy
- 1/2 cup heavy cream
- 1 sheet puff pastry (thawed)
- 1 egg (beaten, for egg wash)
Cooking Instructions
1. Preheat the Oven: Start by preheating your oven to 375°F (190°C). This guarantees that your pâté en croûte bakes evenly and achieves a beautiful golden color.
2. Prepare the Filling: In a large skillet over medium heat, cook the diced bacon until crispy. Remove from the skillet and set aside. In the same skillet, add the chopped onions and garlic, cooking until they’re softened and translucent.
In a large mixing bowl, combine the ground pork, ground veal, cooked bacon, parsley, thyme, nutmeg, salt, pepper, cognac, and heavy cream. Mix well until all ingredients are evenly incorporated.
3. Roll Out the Pastry: On a lightly floured surface, roll out the puff pastry into a rectangle large enough to cover a loaf pan. Make sure the pastry is about 1/4 inch thick to allow for proper baking and flakiness.
4. Assemble the Pâté: Line the loaf pan with the rolled-out pastry, leaving enough overhang to cover the top once filled. Spoon the meat mixture into the pastry-lined pan, pressing down gently to eliminate any air pockets. Fold the overhanging pastry over the filling to create a seal, confirming no filling is exposed.
5. Apply the Egg Wash: Brush the top of the pastry with the beaten egg. This will create a beautiful golden crust as it bakes.
6. Bake the Pâté: Place the loaf pan in the preheated oven and bake for approximately 45-50 minutes, or until the pastry is golden brown and the internal temperature of the filling reaches 160°F (70°C).
7. Cool and Serve: Remove the pâté en croûte from the oven and allow it to cool in the pan for about 10 minutes. Once cooled, carefully remove it from the pan and let it cool completely on a wire rack. You can serve it warm or refrigerate it to serve cold.
Extra Tips
When preparing pâté en croûte, consider adding a layer of gelatin to the filling for added moisture and flavor. You can also experiment with different meats or seasonings to customize the dish to your taste.
Make sure to chill the pastry before rolling it out; this helps keep it flaky during baking. Finally, serve your pâté en croûte with a selection of mustards and pickles for a truly authentic French experience. Enjoy!
Cheese and Charcuterie Board
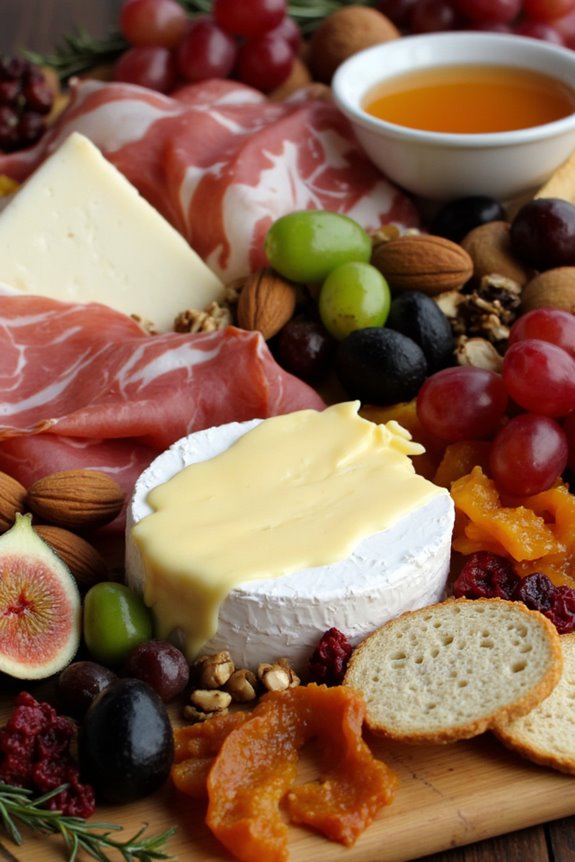
A Cheese and Charcuterie Board is a delightful way to start any French meal, offering a variety of flavors and textures that can cater to everyone’s palate. This appetizer showcases a selection of cheeses, cured meats, fruits, nuts, and accompaniments, all beautifully arranged to create an enticing presentation. It’s not only a feast for the taste buds but also a visual treat, making it perfect for gatherings or intimate dinners.
Creating a Cheese and Charcuterie Board is as much about the ingredients as it’s about the presentation. The beauty lies in the combination of flavors and colors, as well as the opportunity for guests to mix and match their favorites. You can personalize your board based on seasonal ingredients or your own preferences, guaranteeing that each bite is a unique experience. Whether you prefer soft and creamy cheeses or sharp and aged varieties, the possibilities are endless.
Ingredients (Serving size: 4-6 people):
- 3-4 varieties of cheese (e.g., Brie, Comté, Roquefort, Cheddar)
- 3-4 varieties of cured meats (e.g., prosciutto, salami, chorizo, pâté)
- 1 cup of mixed nuts (e.g., almonds, walnuts, pistachios)
- 1 cup of fresh fruit (e.g., grapes, figs, apple slices, berries)
- 1/2 cup of dried fruits (e.g., apricots, cranberries)
- 1/2 cup of olives (e.g., green and black)
- 1 baguette or a selection of artisan crackers
- 1 jar of honey or fig jam
- Fresh herbs for garnish (e.g., rosemary, thyme)
Cooking Instructions:
- Select Your Board: Start by choosing a large wooden or marble board that will serve as the base for your cheese and charcuterie arrangement. Make sure it’s clean and dry to create an appealing presentation.
- Arrange the Cheeses: Begin by placing the cheeses on the board. Cut some of the cheeses into wedges or slices for easy serving. Leave some whole to encourage guests to cut their own pieces. Think about varying the heights and placing the cheeses in different sections of the board for visual appeal.
- Add the Cured Meats: Next, arrange the cured meats around the cheeses. You can fold or roll the slices to add texture and dimension. Like the cheeses, place them in different areas to create a balanced look. Contemplate using small bowls for pâté or spreads.
- Incorporate Fruits and Nuts: Fill the remaining spaces on the board with fresh and dried fruits and a mix of nuts. Scatter them around the cheeses and meats to create a colorful and inviting display. Use grapes, figs, or apple slices for freshness, while dried apricots add a chewy texture.
- Include Accompaniments: Add olives and any other accompaniments to enhance the flavor profile of the board. Place them in small bowls or scatter them around to guarantee every guest has access to them.
- Finish with Bread and Garnish: Finally, add the baguette slices or crackers to one side of the board. Drizzle honey or spoon fig jam into small bowls and place them on the board. Finish with fresh herbs for a touch of color and aroma.
- Serve and Enjoy: Once everything is arranged, your Cheese and Charcuterie Board is ready to be served. Encourage guests to mix and match the flavors, creating their ideal bite.
Extra Tips: When assembling your Cheese and Charcuterie Board, remember to reflect on textures and flavors. A good balance of creamy, sharp, sweet, and salty elements will make your board irresistible.
Additionally, don’t be afraid to get creative with seasonal ingredients or personal favorites. The key is to create an inviting atmosphere where guests feel excited to explore the flavors you’ve curated.
Finally, if preparing ahead of time, cover the board with plastic wrap and refrigerate, allowing you to remove it shortly before serving to maintain freshness.
Crispy Endive Salad With Roquefort
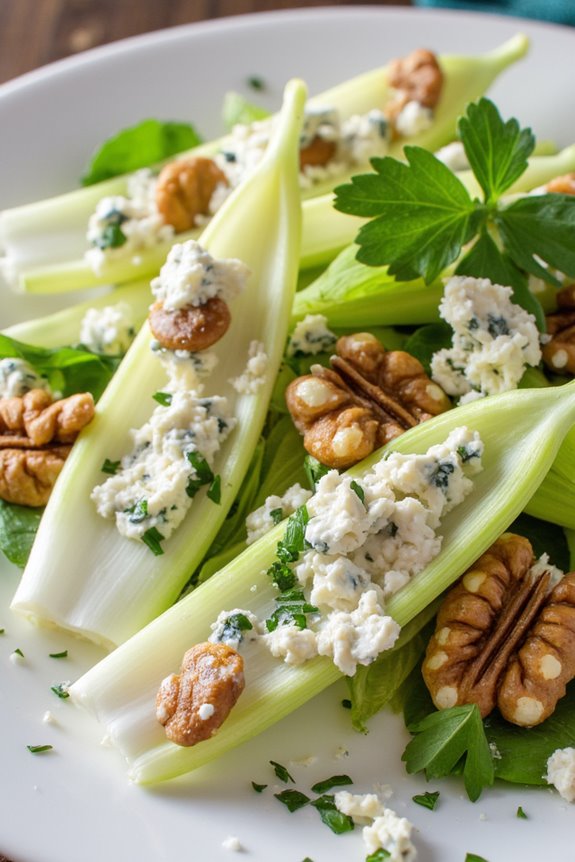
Crispy Endive Salad with Roquefort is a delightful French appetizer that brings together the invigorating crunch of endive, the rich creaminess of Roquefort cheese, and a tangy vinaigrette that ties everything together beautifully.
This dish isn’t only visually appealing but also a harmonious blend of flavors and textures, making it perfect for a dinner party or a casual gathering. The slightly bitter taste of endive is beautifully balanced by the savory notes of Roquefort, while the vinaigrette adds a zesty punch, elevating this salad to another level.
To prepare this salad, you’ll need to select fresh, crisp endives and high-quality Roquefort cheese. The salad is simple to put together, focusing on the freshness of the ingredients to shine through. With a preparation time of just 15 minutes, you can whip up this sophisticated appetizer with ease, impressing your guests with minimal effort.
Ingredients (Serves 4-6):
- 4 medium endives
- 100g Roquefort cheese, crumbled
- 1/2 cup walnuts, toasted and roughly chopped
- 1/4 cup fresh parsley, chopped
- 1/4 cup olive oil
- 2 tablespoons red wine vinegar
- 1 teaspoon Dijon mustard
- Salt and pepper to taste
Cooking Instructions:
- Prepare the Endives: Begin by washing the endives under cold water to remove any dirt. Trim off the base of each endive and remove any damaged outer leaves. Cut the endives into thin slices or tear them into bite-sized pieces, then place them in a large salad bowl.
- Make the Vinaigrette: In a small bowl, whisk together the olive oil, red wine vinegar, Dijon mustard, salt, and pepper until well combined. This vinaigrette will serve as the dressing for your salad, so adjust the seasoning to your taste.
- Assemble the Salad: Add the crumbled Roquefort cheese, toasted walnuts, and chopped parsley to the bowl with the endives. Drizzle the vinaigrette over the salad and gently toss everything together to guarantee that the endives are well coated with the dressing, and the cheese and nuts are evenly distributed.
- Serve Immediately: Serve the salad immediately while the endives are still crisp. For added presentation, consider garnishing with a few extra crumbles of Roquefort and a sprinkle of freshly cracked black pepper.
Extra Tips:
When preparing the Crispy Endive Salad with Roquefort, it’s crucial to select endives that are firm and tightly packed for the best texture.
Toasting the walnuts enhances their flavor, but be careful not to overdo it, as burnt nuts can impart a bitter taste. If you prefer a milder cheese, you can substitute Roquefort with a softer blue cheese or even goat cheese.
This salad is best enjoyed fresh, so try to prepare it just before serving to maintain the crispness of the endives.
Escargots De Bourgogne
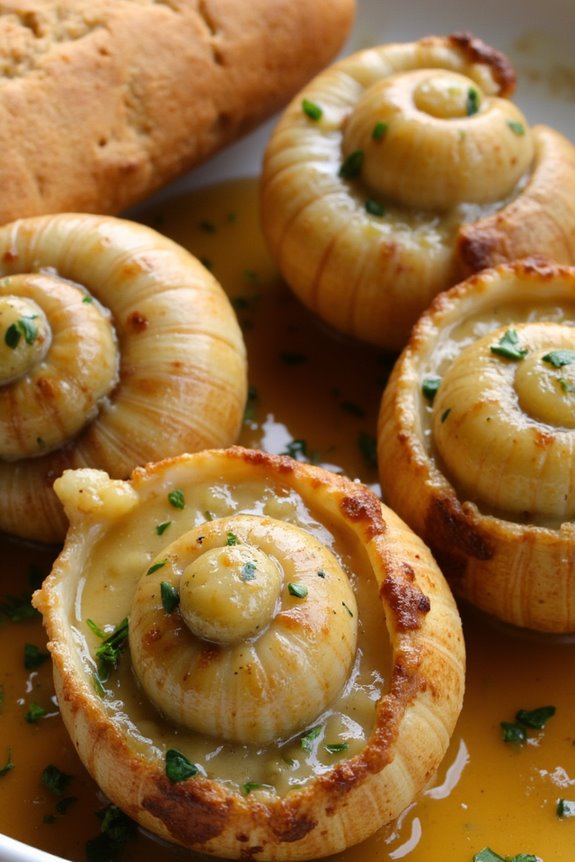
Escargots De Bourgogne is a classic French appetizer that showcases the rich culinary traditions of the Burgundy region. This dish features snails cooked in a flavorful garlic and herb butter, making them a delectable treat that’s both elegant and indulgent. The combination of fresh parsley, garlic, and butter creates a fragrant sauce that perfectly complements the tender snails, making this dish a favorite among food enthusiasts.
While escargots may seem intimidating to prepare, they’re quite simple and quick to cook, making them a perfect choice for entertaining guests or enjoying a special evening at home. Traditionally served in their shells, these snails are often accompanied by crusty French bread, which is perfect for soaking up the delicious herb-infused butter. So roll up your sleeves and get ready to impress with this delightful French delicacy!
Ingredients (Serves 4-6)
- 24 escargots (canned or fresh)
- 1/2 cup unsalted butter, softened
- 4 cloves garlic, minced
- 1/4 cup fresh parsley, finely chopped
- 1 teaspoon fresh thyme, chopped
- 1/2 teaspoon salt
- 1/4 teaspoon black pepper
- 1/4 teaspoon cayenne pepper (optional)
- 1 tablespoon lemon juice
- 12-24 escargot shells (if using canned snails)
Cooking Instructions
- Preheat the Oven: Begin by preheating your oven to 375°F (190°C). This temperature is ideal for baking the escargots and guaranteeing the butter melts and infuses the flavors beautifully.
- Prepare the Herb Butter: In a medium bowl, combine the softened butter, minced garlic, chopped parsley, thyme, salt, black pepper, cayenne pepper (if using), and lemon juice. Mix well until all ingredients are fully incorporated, creating a flavorful herb butter.
- Prepare the Escargots: If using canned escargots, drain and rinse them under cold water to remove any preservatives. If using fresh snails, guarantee they’re properly cleaned and prepped. If using shells, make sure they’re clean and ready for use.
- Fill the Shells: If using shells, place one escargot in each shell and add a generous portion of the herb butter on top of each snail. Use a small spoon or knife to guarantee the butter fills the shell and surrounds the snail. If not using shells, place the escargots in a small baking dish and top with the herb butter.
- Bake: Transfer the prepared escargots (in shells or in a baking dish) to the preheated oven. Bake for approximately 10-12 minutes, or until the butter is bubbling and the edges of the butter begin to brown slightly.
- Serve: Once cooked, carefully remove the escargots from the oven. Serve immediately in a warm dish, garnished with additional parsley if desired, and provide crusty French bread on the side for dipping into the delicious garlic butter.
Extra Tips
When preparing Escargots De Bourgogne, make sure to use high-quality butter and fresh herbs for the best flavor. If you can’t find escargot shells, you can use small ramekins or a baking dish instead.
If you’re feeling adventurous, try adding a splash of white wine or a pinch of Parmesan cheese to the herb butter for an extra layer of flavor. Finally, don’t hesitate to adjust the amount of garlic or herbs to suit your taste preferences—cooking is all about making the dish your own!
Tarte Flambée (Flammekueche)

Tarte Flambée, also known as Flammekueche, is a traditional dish from the Alsace region of France and is similar to a thin-crust pizza. This delightful appetizer features a crispy base topped with a luscious mixture of crème fraîche, onions, and lardons, all baked to perfection.
It’s a dish that embodies the rustic flavors of French cuisine and is perfect for gatherings, as it can be easily shared among friends and family.
The key to a successful Tarte Flambée lies in the quality of its ingredients and the technique used to achieve that quintessential crispy crust. The dough is rolled out very thinly, guaranteeing a delightful crunch, while the toppings are kept simple yet flavorful.
This recipe will guide you through the steps to create a mouthwatering Tarte Flambée that serves 4-6 people, making it a fantastic addition to any meal or as an appetizer at your next dinner party.
Ingredients:
- 250g all-purpose flour
- 1/2 teaspoon salt
- 125ml water
- 2 tablespoons olive oil
- 200g crème fraîche
- 150g lardons (or diced bacon)
- 1 large onion, thinly sliced
- Freshly ground black pepper
- Fresh parsley, chopped (for garnish)
Cooking Instructions:
1. Prepare the Dough: In a mixing bowl, combine the all-purpose flour and salt. Gradually add the water and olive oil, mixing until a soft dough forms. Knead the dough on a floured surface for about 5 minutes until smooth.
Wrap it in plastic wrap and let it rest for at least 30 minutes at room temperature.
2. Preheat the Oven: While the dough is resting, preheat your oven to its highest setting (around 250°C/482°F). If you have a pizza stone, place it in the oven to heat up as well; this will help achieve a crispy base.
3. Roll Out the Dough: Once the dough has rested, divide it into two equal portions. On a lightly floured surface, roll out each portion as thinly as possible, ideally to about 1/8 inch thick.
Transfer the rolled-out dough to a baking sheet or a pizza peel if using a pizza stone.
4. Prepare the Toppings: Spread a generous layer of crème fraîche evenly over the surface of the rolled-out dough, leaving a small border around the edges. Scatter the thinly sliced onions and lardons evenly on top.
Season with freshly ground black pepper to taste.
5. Bake the Tarte Flambée: Carefully transfer the baking sheet or pizza peel into the preheated oven (or onto the pizza stone if using). Bake for 10-15 minutes, or until the edges are golden brown and crispy, and the lardons are cooked through.
6. Garnish and Serve: Once baked, remove the Tarte Flambée from the oven and let it cool for a minute. Sprinkle with freshly chopped parsley for added flavor and color.
Cut into squares or wedges and serve immediately.
Extra Tips:
For the best results, verify that your oven is thoroughly preheated to achieve that desirable crispy crust.
You can also experiment with toppings by adding different cheeses like Gruyère or even mushrooms for a unique twist. If you prefer a vegetarian version, simply omit the lardons and add more vegetables such as bell peppers or zucchini.
Serve your Tarte Flambée warm alongside a revitalizing salad or a glass of white wine for a delightful French-inspired appetizer experience.