

I’ve found a wonderful way to enjoy desserts without the guilt, and I’m thrilled to share these 10 healthy French dessert recipes with you. From light lemon soufflés to decadent dark chocolate avocado mousse, there’s a sweet treat for everyone. Each bite is pure bliss and health-conscious. Ready to transform your dessert experience? Let’s embark on this sweet journey together!
Light Lemon Soufflé
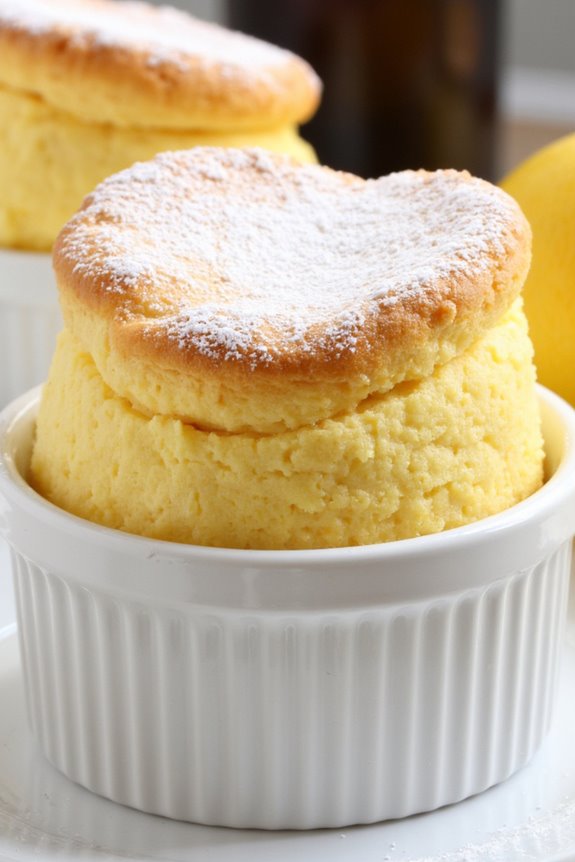
Indulge in a delightful and airy Light Lemon Soufflé, a classic French dessert that’s both invigorating and guilt-free. This soufflé embodies the perfect balance of tangy lemon flavor and a cloud-like texture, making it an ideal finish to any meal. Not only does it tantalize your taste buds, but its lightness guarantees you enjoy a sweet treat without the heaviness of traditional desserts.
Creating this Light Lemon Soufflé involves whisking egg whites to perfection and gently folding them into a zesty lemon mixture. With its vibrant flavor and delicate structure, this soufflé is best enjoyed fresh out of the oven when it’s at its tallest and fluffiest. Whether you’re hosting a dinner party or simply treating yourself to something special, this recipe promises to impress with its simplicity and sophistication.
Ingredients (Serves 4-6):
- 3 tablespoons unsalted butter (plus extra for greasing)
- 3 tablespoons all-purpose flour
- 1 cup whole milk
- 1/4 cup granulated sugar (plus extra for dusting ramekins)
- 3 large eggs, separated
- Zest of 2 lemons
- 1/4 cup freshly squeezed lemon juice
- 1/2 teaspoon vanilla extract
- Pinch of salt
- Powdered sugar for dusting (optional)
Cooking Instructions:
- Prepare the Ramekins: Preheat your oven to 375°F (190°C). Grease 4-6 ramekins with butter and dust them with granulated sugar to prevent sticking. This will help the soufflé rise evenly and develop a beautiful crust.
- Make the Base: In a small saucepan over medium heat, melt the butter. Once melted, whisk in the flour to form a roux, cooking for about 1 minute until it’s golden. Gradually add the milk, whisking constantly until the mixture thickens and becomes smooth.
- Combine Sugar and Yolks: Remove the saucepan from heat and whisk in the granulated sugar, lemon zest, lemon juice, and vanilla extract. Add the egg yolks one at a time, mixing well after each addition until the mixture is completely smooth.
- Beat the Egg Whites: In a separate clean, dry bowl, beat the egg whites with a pinch of salt until stiff peaks form. Confirm there’s no yolk in your whites, as this can prevent them from whipping properly.
- Fold the Mixtures: Gently fold one-third of the egg whites into the lemon mixture to lighten it. Carefully fold in the remaining egg whites, being cautious not to deflate them. The mixture should be light and airy.
- Fill the Ramekins: Spoon the soufflé mixture into the prepared ramekins, filling them to the top. Smooth the tops with a spatula and run your thumb around the inside rim to help them rise evenly.
- Bake: Place the ramekins on a baking sheet and bake for 15-18 minutes, until the soufflés have risen and are golden brown on top. Avoid opening the oven door during baking, as this can cause the soufflés to collapse.
- Serve Immediately: Once done, remove the soufflés from the oven and dust with powdered sugar if desired. Serve them immediately while they’re still puffed up and warm.
Extra Tips: To achieve the perfect Light Lemon Soufflé, confirm all your ingredients are at room temperature, especially the eggs, as this helps them whip to their fullest potential. Use fresh lemons for the juice and zest for the best flavor.
Timing is vital with soufflés; they start to deflate as they cool, so plan to serve them directly from the oven for maximum impact. Additionally, practice gentle folding techniques to maintain the airiness of the beaten egg whites, as this is key to the soufflé’s rise.
Almond Flour Madeleines
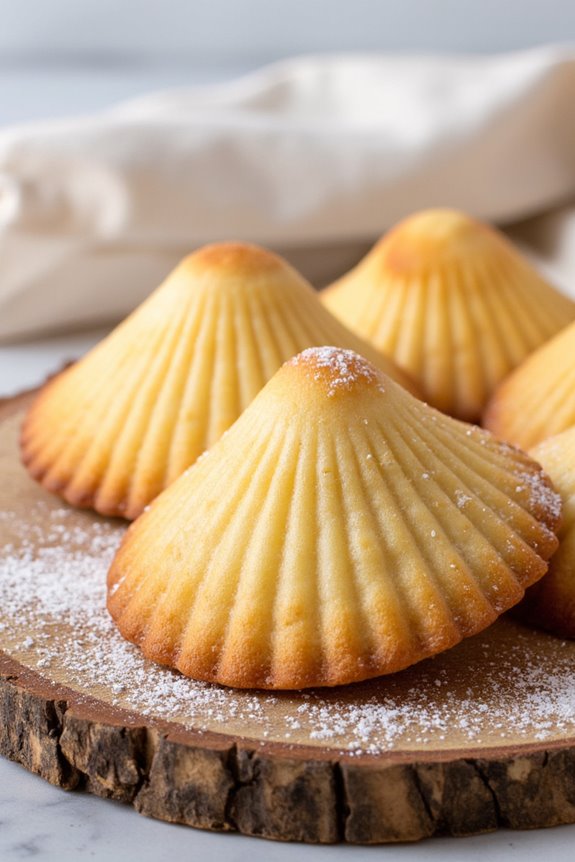
Almond Flour Madeleines are delicate, buttery French cookies with a unique, shell-like shape that makes them as beautiful as they’re delicious. These delightful treats are often enjoyed with a cup of tea or coffee, and their light, airy texture makes them a perfect dessert for those who want something sweet without the guilt.
Made with almond flour, these madeleines aren’t only gluten-free but also have a subtle nutty flavor that pairs wonderfully with the traditional hints of vanilla and lemon zest.
This recipe is designed for a serving size of 4-6 people, producing approximately 12-18 madeleines depending on the size of your madeleine mold. With a few simple ingredients and an easy-to-follow method, you can enjoy these French classics in the comfort of your own home.
Whether you’re baking these for a special occasion or simply to satisfy a sweet craving, these Almond Flour Madeleines are bound to impress.
Ingredients:
- 1 cup almond flour
- 1/2 cup granulated sugar
- 2 large eggs
- 1 teaspoon vanilla extract
- 1 tablespoon lemon zest
- 1/4 teaspoon salt
- 1/2 teaspoon baking powder
- 1/2 cup unsalted butter, melted and cooled
- Powdered sugar for dusting (optional)
Instructions:
- Prepare the Baking Mold: Preheat your oven to 375°F (190°C). Grease a madeleine mold with butter or non-stick spray and lightly dust with almond flour to prevent sticking. Set aside.
- Mix the Dry Ingredients: In a medium bowl, whisk together the almond flour, baking powder, and salt. This will guarantee that the baking powder is evenly distributed throughout the batter.
- Combine Wet Ingredients: In a separate large bowl, beat the eggs and sugar together using an electric mixer on medium speed for about 5 minutes, or until the mixture becomes pale and thick. This aerates the eggs, giving the madeleines their signature light texture.
- Add Flavorings: Gently fold the vanilla extract and lemon zest into the egg mixture, taking care not to deflate it.
- Incorporate Dry Ingredients: Gradually fold the dry ingredients into the egg mixture. It’s important to do this gently to maintain the airy batter.
- Add Melted Butter: Slowly drizzle the melted and cooled butter into the batter, folding it in carefully until fully incorporated. This is vital for achieving a tender crumb.
- Fill the Mold: Spoon the batter into the prepared madeleine mold, filling each cavity about 3/4 full to allow room for the madeleines to rise.
- Bake: Place the mold in the preheated oven and bake for 10-12 minutes, or until the edges are golden brown and the centers spring back when touched.
- Cool and Serve: Remove the madeleines from the oven and let them cool in the mold for a few minutes before gently removing them. Allow them to cool completely on a wire rack. Dust with powdered sugar if desired before serving.
Extra Tips:
To achieve the best texture and flavor, verify that all your ingredients are at room temperature before starting. This helps in achieving a smooth batter and an even bake.
If you want a more pronounced lemon flavor, you can add a teaspoon of lemon juice along with the zest. Also, be gentle when folding ingredients to keep the batter light and airy, guaranteeing the characteristic hump of the madeleine forms during baking.
Finally, madeleines are best enjoyed fresh but can be stored in an airtight container for up to two days.
Raspberry Yogurt Parfait

Indulge in the delightful elegance of a Raspberry Yogurt Parfait, a healthy French-inspired dessert that’s sure to satisfy your sweet tooth without compromising on nutrition.
This parfait layers creamy yogurt with the tangy sweetness of fresh raspberries and a delightful crunch from granola, creating a harmonious balance of flavors and textures. Ideal for a quick dessert or a revitalizing morning treat, this dish will bring a touch of sophistication to your table.
Preparing a Raspberry Yogurt Parfait is as simple as it’s delicious. With no need for baking or complicated techniques, this recipe can be effortlessly whipped up in a matter of minutes. Perfect for serving 4-6 people, this dessert guarantees everyone gets a taste of its rejuvenating and healthy goodness.
Whether you’re planning a family gathering or a casual dinner with friends, this parfait is sure to impress.
Ingredients for 4-6 servings:
- 3 cups of Greek yogurt (plain or vanilla)
- 2 cups of fresh raspberries
- 1 cup of granola
- 2 tablespoons of honey
- 1 teaspoon of vanilla extract
- Mint leaves for garnish (optional)
Instructions:
- Prepare the Yogurt Mixture: In a medium-sized bowl, combine the Greek yogurt, honey, and vanilla extract. Stir until the mixture is smooth and the honey is fully incorporated.
- Layer the Parfait: Take 4-6 serving glasses or bowls. Begin with a layer of the yogurt mixture at the bottom of each glass. Follow this with a layer of fresh raspberries, ensuring they cover the yogurt evenly. Next, add a layer of granola for that satisfying crunch.
- Repeat Layers: Add another layer of the yogurt mixture over the granola, followed by more raspberries. Repeat the layers until the glasses are filled, finishing with a final sprinkle of granola on top.
- Garnish and Serve: For a touch of color and freshness, add a few mint leaves to the top of each parfait. Serve immediately for the best taste and texture, or refrigerate for up to an hour if you prefer it chilled.
Extra Tips:
To elevate the flavor of your Raspberry Yogurt Parfait, consider using a mix of different berries such as blueberries or blackberries for added variety.
If you prefer a sweeter parfait, adjust the honey to taste or replace it with maple syrup for a different flavor profile.
For those who enjoy a nutty crunch, you can also add a handful of chopped nuts such as almonds or walnuts to the granola layers.
Finally, if you’re preparing this dessert ahead of time, hold off on adding the granola until just before serving to keep it crisp. Enjoy this delightful treat as a guilt-free dessert or a nutritious breakfast option!
Dark Chocolate Avocado Mousse
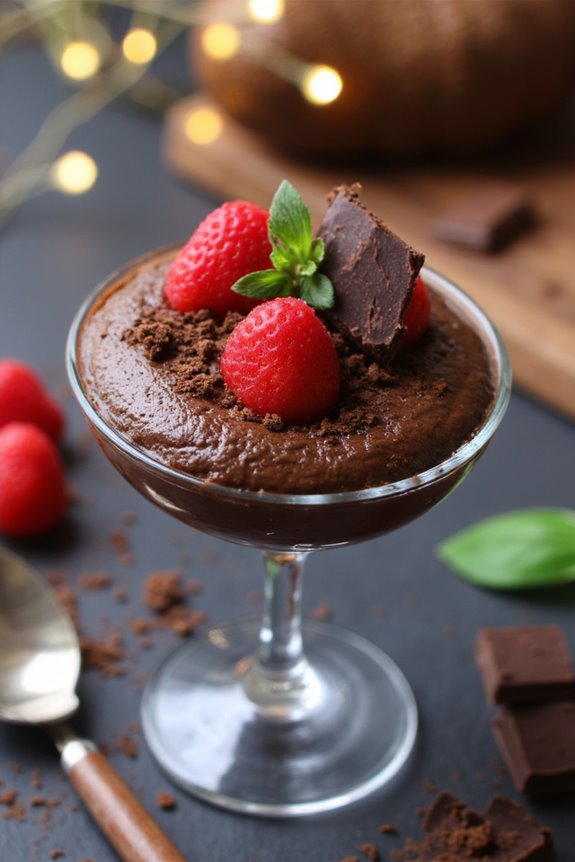
Dark Chocolate Avocado Mousse is a rich and creamy dessert that combines the indulgence of dark chocolate with the smooth, buttery texture of avocados. This healthy French-inspired dessert isn’t only delicious but also packed with nutrients, making it a guilt-free treat.
The avocados provide a silky base for the mousse, while the dark chocolate adds depth and richness, perfectly complemented by a hint of sweetness from natural sweeteners. This dessert is perfect for those who want to enjoy a decadent treat without compromising on health.
The mousse is also incredibly easy to make, requiring only a handful of ingredients and minimal preparation time. It’s a great choice for dinner parties or special occasions, as it can be prepared in advance and garnished just before serving for an elegant presentation.
Ingredients for 4-6 servings:
- 3 ripe avocados
- 1 cup dark chocolate chips (at least 70% cacao)
- 1/4 cup unsweetened cocoa powder
- 1/4 cup maple syrup or honey
- 1/4 cup almond milk or any milk of choice
- 1 teaspoon vanilla extract
- A pinch of salt
- Fresh berries or dark chocolate shavings for garnish (optional)
Cooking Instructions:
- Prepare the Chocolate: Begin by melting the dark chocolate chips. You can do this by placing them in a heatproof bowl over a pot of simmering water, stirring occasionally until completely melted. Alternatively, microwave the chocolate in 30-second intervals, stirring in between, until smooth.
- Blend the Avocados: Cut the avocados in half, remove the pits, and scoop the flesh into a food processor or blender. Blend until the avocado is completely smooth and free of any lumps.
- Combine Ingredients: Add the melted chocolate, cocoa powder, maple syrup, almond milk, vanilla extract, and a pinch of salt to the avocado in the blender. Blend the mixture until it’s smooth and creamy, scraping down the sides as needed to confirm all ingredients are well incorporated.
- Adjust Consistency: Check the consistency of the mousse. If it’s too thick, add a bit more almond milk, one tablespoon at a time, blending after each addition until the desired consistency is achieved.
- Chill the Mousse: Transfer the mousse into individual serving dishes or a large serving bowl. Cover with plastic wrap and refrigerate for at least 1-2 hours to allow the flavors to meld and the mousse to firm up.
- Serve and Garnish: Before serving, garnish the mousse with fresh berries or dark chocolate shavings for an extra touch of elegance. Enjoy chilled.
Extra Tips:
When selecting avocados for this recipe, make sure they’re ripe but not overripe, as they’ll provide the best texture and flavor. If you prefer a sweeter mousse, you can adjust the amount of maple syrup or honey to taste.
Additionally, feel free to experiment with different toppings such as chopped nuts, coconut flakes, or a sprinkle of sea salt to enhance the flavor profile. This mousse can be stored in the refrigerator for up to two days, making it a convenient make-ahead dessert option.
Honey-Sweetened Crème Brûlée
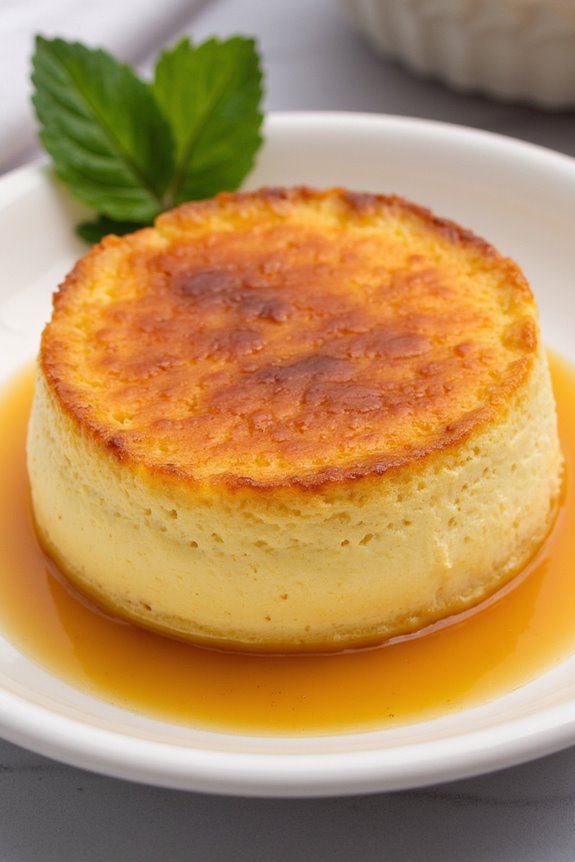
Crème brûlée is a classic French dessert known for its rich, creamy custard base topped with a contrasting layer of hard caramel. In this honey-sweetened version, we replace the traditional sugar with honey to add a subtle floral sweetness and a bit of complexity to the flavor profile. This healthier take on a beloved dessert maintains all the decadence with a touch of natural sweetness, making it a perfect choice for anyone looking to indulge without going overboard on refined sugars.
The preparation of honey-sweetened crème brûlée involves creating a smooth custard, using just a few simple ingredients, before baking and chilling it to perfection. Once the custard is set, a thin layer of honey caramel is torched on top, creating the signature crackly finish. This recipe serves 4-6 people, offering an elegant dessert option for dinner parties or a special treat for a cozy night in.
Ingredients (Serves 4-6):
- 2 cups heavy cream
- 1/2 cup honey
- 5 large egg yolks
- 1 teaspoon vanilla extract
- 1/4 teaspoon salt
- 1/4 cup honey (for caramelizing the top)
Instructions:
- Preheat the Oven: Preheat your oven to 325°F (160°C). Place a kitchen towel in the bottom of a baking dish large enough to hold 4-6 ramekins.
- Prepare the Custard Mixture: In a medium saucepan, combine the heavy cream and honey. Heat over medium heat, stirring occasionally, until the mixture is hot but not boiling. Remove from heat.
- Whisk the Egg Yolks: In a separate bowl, whisk the egg yolks, vanilla extract, and salt until well combined and slightly thickened.
- Combine Cream and Egg Mixture: Gradually add the hot cream mixture to the egg yolks, whisking constantly to prevent the eggs from cooking. Strain the mixture through a fine-mesh sieve into a clean bowl to remove any cooked egg bits.
- Fill the Ramekins: Divide the custard mixture evenly among the ramekins. Place the baking dish on the oven rack and carefully pour enough hot water into the baking dish to come halfway up the sides of the ramekins.
- Bake the Custards: Bake for 30-35 minutes, or until the custards are set but still slightly jiggly in the center. Remove the ramekins from the water bath and let cool to room temperature. Refrigerate for at least 2 hours, or until well chilled.
- Caramelize the Topping: Just before serving, drizzle a thin layer of honey over the top of each custard. Use a kitchen torch to caramelize the honey until it forms a hard, crackly surface.
Extra Tips:
For the best results, make sure that the cream is hot but not boiling when you mix it with the egg yolks, as boiling might cause the eggs to curdle. A kitchen torch is ideal for caramelizing the honey topping, giving you more control over the caramelization process compared to a broiler. If you don’t have a torch, you can use a broiler, but keep a close eye on the custards to avoid burning.
Allow the crème brûlée to chill thoroughly before caramelizing the top, as a well-chilled custard will help achieve the perfect textural contrast.
Whole Wheat Galettes With Fresh Berries
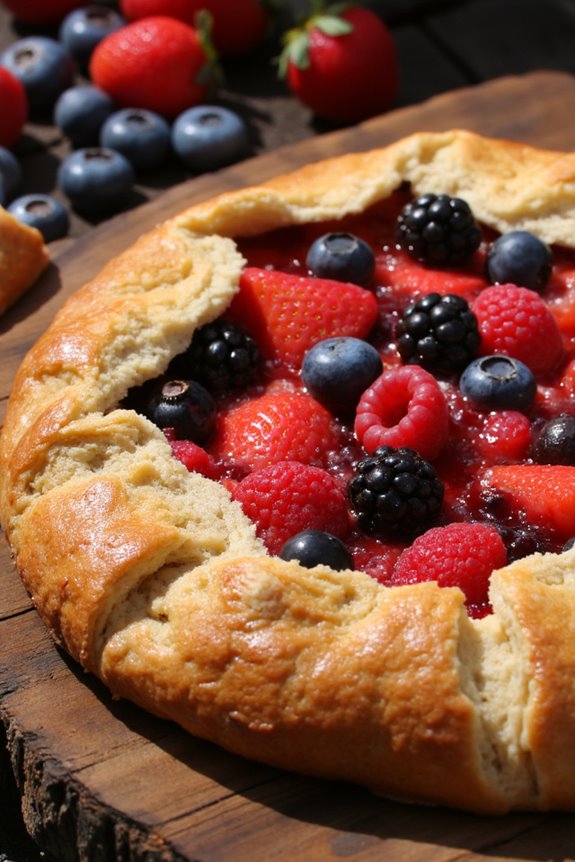
Whole wheat galettes with fresh berries are a delightful and healthy French dessert that combines the rustic charm of a galette with the natural sweetness of fresh berries. These simple yet elegant pastries are perfect for a summer gathering or a cozy family meal. By using whole wheat flour, you add a wholesome twist to this classic dish, while the vibrant berries bring a burst of color and flavor to the table.
The galette’s golden, flaky crust encases the juicy filling, creating a dessert that’s both visually stunning and satisfyingly delicious. This recipe is designed to serve 4-6 people, making it perfect for sharing with friends and family. The dough is easy to make and can be prepared ahead of time, allowing you to focus on assembling the galettes just before baking.
The choice of berries is flexible, allowing you to use whatever is in season or your personal favorites. Whether it’s strawberries, blueberries, raspberries, or a mix, the result is always a treat to behold and taste.
Ingredients for Whole Wheat Galettes With Fresh Berries (Serves 4-6):
- 1 1/2 cups whole wheat flour
- 1/2 cup all-purpose flour
- 1 tablespoon sugar
- 1/2 teaspoon salt
- 1/2 cup unsalted butter, chilled and diced
- 1/4 cup ice water
- 2 cups mixed fresh berries (e.g., strawberries, blueberries, raspberries)
- 2 tablespoons sugar (for the filling)
- 1 tablespoon cornstarch
- 1 teaspoon lemon zest
- 1 egg, beaten (for egg wash)
- Optional: whipped cream or vanilla ice cream for serving
Cooking Instructions:
1. Prepare the Dough: In a large bowl, combine the whole wheat flour, all-purpose flour, sugar, and salt. Add the chilled, diced butter and use your fingers or a pastry cutter to work it into the flour mixture until it resembles coarse crumbs. Gradually add the ice water, one tablespoon at a time, mixing until the dough comes together.
Form the dough into a disk, wrap it in plastic wrap, and refrigerate for at least 30 minutes.
2. Preheat the Oven: Preheat your oven to 400°F (200°C). Line a baking sheet with parchment paper.
3. Prepare the Filling: In a medium bowl, gently toss the fresh berries with sugar, cornstarch, and lemon zest. Set aside to allow the flavors to meld while you roll out the dough.
4. Roll Out the Dough: On a lightly floured surface, roll the chilled dough into a large circle about 1/8 inch thick. Transfer the rolled dough to the prepared baking sheet.
5. Assemble the Galette: Spoon the berry mixture into the center of the dough, leaving a 2-inch border around the edges. Fold the edges of the dough over the filling, pleating as necessary to create a rustic edge. Brush the dough with the beaten egg to give it a golden finish.
6. Bake the Galette: Place the galette in the preheated oven and bake for 25-30 minutes, or until the crust is golden brown and the filling is bubbly. Remove from the oven and allow it to cool slightly before serving.
7. Serve: Slice the galette into wedges and serve warm or at room temperature, optionally with a dollop of whipped cream or a scoop of vanilla ice cream.
Extra Tips:
For the best results, verify your butter is well-chilled before incorporating it into the flour mixture to create a flakier crust. If your dough feels too sticky or difficult to handle, lightly dust your rolling surface and rolling pin with flour.
Feel free to experiment with different berries or add a sprinkle of cinnamon or nutmeg to the filling for added depth of flavor. Finally, if you’re in a rush, you can prepare the dough a day in advance and refrigerate it until ready to use.
Low-Sugar Tarte Tatin

Tarte Tatin is a classic French dessert that traditionally features caramelized apples and a buttery pastry. In this healthier version, we reduce the sugar content without sacrificing the rich, sweet flavor that makes this dish so beloved. By using naturally sweet apples and a touch of honey or maple syrup, we create a caramel-like topping that perfectly complements the flaky crust. This Low-Sugar Tarte Tatin is a delightful way to enjoy a French culinary favorite while keeping your sugar intake in check.
Perfect for a cozy dinner party or a special family gathering, this tarte showcases the beauty of simple ingredients coming together to create a sophisticated dessert. The key to success lies in choosing the right type of apple; you want a variety that holds its shape during baking, such as Granny Smith or Honeycrisp. Paired with a whole wheat pastry crust, this tarte not only offers a healthier take but also adds a subtle nuttiness that enhances the overall flavor profile.
Ingredients for 4-6 servings:
- 6 medium apples (Granny Smith or Honeycrisp)
- 1/4 cup unsalted butter
- 1/4 cup honey or maple syrup
- 1 teaspoon vanilla extract
- 1 teaspoon ground cinnamon
- 1/4 teaspoon ground nutmeg
- 1/4 teaspoon salt
- 1 sheet of whole wheat puff pastry, thawed
Cooking Instructions:
- Preheat the Oven: Start by preheating your oven to 375°F (190°C) to make sure it’s ready for baking the tarte.
- Prepare the Apples: Peel, core, and slice the apples into quarters. Make sure the slices are uniform for even cooking.
- Create the Caramel Base: In a heavy, oven-safe skillet, melt the butter over medium heat. Once melted, add the honey or maple syrup, vanilla extract, cinnamon, nutmeg, and salt. Stir until the mixture begins to bubble and the ingredients are well combined.
- Caramelize the Apples: Carefully add the apple slices to the skillet, arranging them in a circular pattern. Cook for 10-15 minutes, turning occasionally, until the apples are tender and the sauce thickens slightly.
- Prepare the Pastry: Roll out the puff pastry on a lightly floured surface to remove any creases. It should be large enough to cover the skillet with some overhang.
- Assemble the Tarte: Remove the skillet from the heat and lay the puff pastry over the apples, tucking the edges down around the inside of the skillet.
- Bake the Tarte: Place the skillet in the preheated oven and bake for 25-30 minutes, or until the pastry is golden brown and puffed.
- Cool and Invert: Allow the tarte to cool for 5-10 minutes. Carefully invert the tarte onto a serving plate, so the caramelized apples are on top.
Extra Tips:
When making a Low-Sugar Tarte Tatin, the quality of the apples is paramount. Choose firm, crisp apples that can withstand cooking without turning mushy. If you prefer a more complex flavor, you can add a splash of lemon juice to the caramel mixture for a hint of acidity.
Make sure the skillet handle is oven-safe, or wrap it with foil for protection. Finally, don’t rush the cooling process; allowing the tarte to sit for a few minutes before inverting helps the caramel set, reducing the risk of spills. Enjoy this delightful dessert with a dollop of Greek yogurt or crème fraîche for an added touch of indulgence.
Vegan Chocolate-Dipped Strawberries

Indulge in a guilt-free, elegant treat with these Vegan Chocolate-Dipped Strawberries, a perfect fusion of rich dark chocolate and the natural sweetness of fresh strawberries. This dessert isn’t only visually appealing but also incredibly easy to prepare, making it a go-to option for any occasion, from a romantic dinner to a simple family gathering.
The combination of creamy, melt-in-your-mouth chocolate and the juicy, tangy strawberries is sure to tantalize your taste buds, proving that healthy desserts can be both delicious and indulgent.
These vegan chocolate-dipped strawberries are a healthier alternative to traditional chocolate-covered treats, as they’re made with simple, wholesome ingredients. The recipe requires minimal preparation and cooking time, allowing you to quickly whip up a delightful dessert that everyone will enjoy.
Whether you’re vegan or simply looking to incorporate more plant-based options into your diet, these chocolate-dipped strawberries are a must-try. Plus, the recipe is versatile and can be easily adapted to suit your personal preferences, guaranteeing a satisfying sweet treat every time.
Ingredients for 4-6 servings:
- 2 cups fresh strawberries, washed and dried
- 1 cup vegan dark chocolate chips
- 1 tablespoon coconut oil
- 1 teaspoon vanilla extract (optional)
- 1/4 cup crushed nuts (almonds, pistachios, or walnuts) or shredded coconut (optional)
Instructions:
- Prepare the Strawberries: Begin by thoroughly washing the strawberries. Pat them dry with a clean kitchen towel or paper towel to guarantee there’s no moisture on the surface, as this will help the chocolate adhere better.
- Melt the Chocolate: In a small saucepan, combine the vegan dark chocolate chips and coconut oil. Place the saucepan over low heat, stirring continuously until the chocolate is completely melted and smooth. Be careful not to overheat to prevent burning.
- Add Flavor (Optional): If desired, stir in the vanilla extract to the melted chocolate for an extra layer of flavor. Mix well to combine.
- Dip the Strawberries: Hold each strawberry by the stem and dip it into the melted chocolate, guaranteeing it’s evenly coated. Allow any excess chocolate to drip off before placing the strawberry on a parchment-lined baking sheet.
- Add Toppings (Optional): Immediately after dipping, sprinkle the strawberries with crushed nuts or shredded coconut if using. This step should be done while the chocolate is still wet to guarantee the toppings stick.
- Chill the Strawberries: Once all the strawberries have been dipped and topped, place the baking sheet in the refrigerator for about 20-30 minutes, or until the chocolate has completely set.
- Serve and Enjoy: Once the chocolate is firm, transfer the strawberries to a serving platter and enjoy. These are best served fresh but can be stored in the refrigerator for up to two days.
Extra Tips:
For the best results, choose ripe but firm strawberries, as they hold up better when dipped in chocolate. If you’re looking for a more decadent experience, consider using a higher cocoa percentage vegan dark chocolate for a richer taste.
Additionally, make certain all ingredients are at room temperature before starting, as this helps the chocolate melt evenly. If you wish to be creative, try drizzling a contrasting chocolate, such as white or milk alternative, over the dipped strawberries for a decorative touch.
Gluten-Free Clafoutis With Cherries
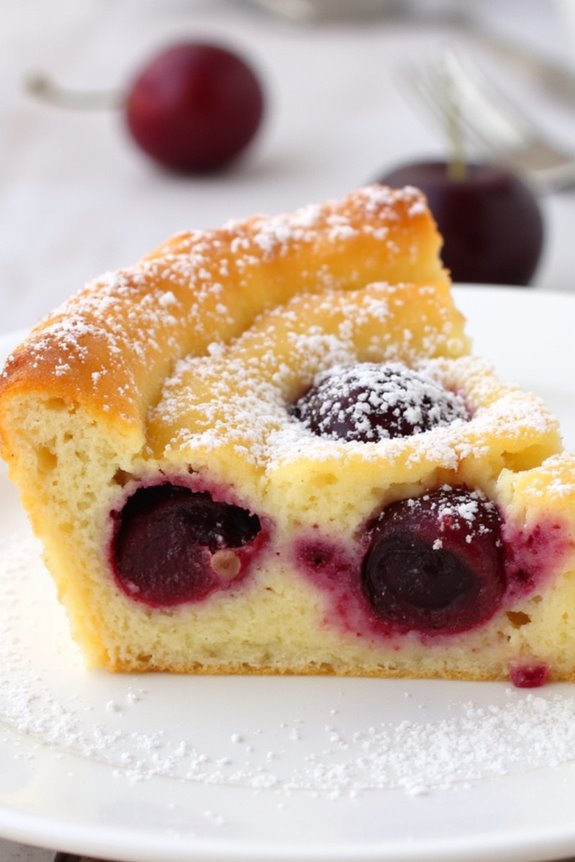
Indulge in a delightful and healthy French dessert with this recipe for Gluten-Free Clafoutis with Cherries. Clafoutis is a classic French dessert traditionally made with black cherries, arranged in a buttered dish and covered with a thick flan-like batter. This gluten-free version guarantees that even those with dietary restrictions can enjoy its rich and satisfying flavors.
The cherries provide a burst of sweetness that perfectly complements the custard-like texture of the clafoutis, resulting in a dessert that’s both comforting and elegant. Perfect for a family gathering or a special occasion, this Gluten-Free Clafoutis with Cherries serves 4-6 people and is simple to prepare.
Whether you’re a seasoned baker or a novice in the kitchen, you’ll find the process straightforward and rewarding. The key to a great clafoutis is choosing ripe, juicy cherries and using a good-quality gluten-free flour to guarantee the batter sets nicely.
Once baked, the clafoutis will have a beautiful golden-brown top with a soft and tender interior, studded with luscious cherries.
Ingredients:
- 1 cup almond flour
- 1/4 cup coconut flour
- 1/2 cup granulated sugar
- 1/4 teaspoon salt
- 3 large eggs
- 1 cup almond milk
- 1 teaspoon vanilla extract
- 1/2 teaspoon almond extract
- 1 tablespoon unsalted butter (for greasing)
- 2 cups pitted fresh cherries
- Powdered sugar (for dusting, optional)
Instructions:
- Preheat and Prepare the Baking Dish: Preheat your oven to 350°F (175°C). Grease a 9-inch baking dish or a cast-iron skillet with unsalted butter to prevent sticking.
- Mix Dry Ingredients: In a medium mixing bowl, whisk together the almond flour, coconut flour, granulated sugar, and salt until well combined.
- Combine Wet Ingredients: In a separate large bowl, whisk the eggs until they’re light and frothy. Add the almond milk, vanilla extract, and almond extract, mixing until all wet ingredients are blended smoothly.
- Create the Batter: Gradually add the dry ingredients into the wet ingredients, whisking continuously until you achieve a smooth batter. Make sure there are no lumps.
- Arrange Cherries: Spread the pitted cherries evenly across the bottom of the prepared baking dish or skillet.
- Pour the Batter: Carefully pour the batter over the cherries, ensuring they’re evenly covered.
- Bake the Clafoutis: Place the baking dish in the preheated oven and bake for 35-40 minutes, or until the clafoutis is set and the top is golden brown.
- Cool and Serve: Remove from the oven and let it cool slightly. Dust with powdered sugar before serving, if desired. The clafoutis can be served warm or at room temperature.
Extra Tips: When selecting cherries for your clafoutis, opt for fresh, ripe ones to maximize sweetness and flavor. If fresh cherries aren’t available, frozen cherries can be used, but be sure to thaw and drain them well to avoid excess moisture in the batter.
Additionally, guarantee your almond flour is finely ground for the best texture in your clafoutis. This dessert pairs beautifully with a dollop of whipped cream or a scoop of vanilla ice cream for an added touch of indulgence.
No-Bake Coconut Macarons
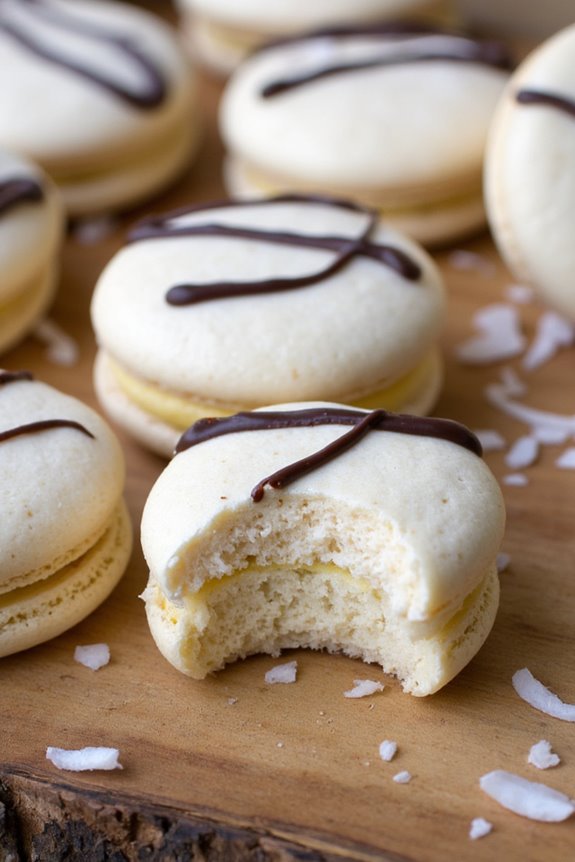
No-bake coconut macarons are a delightful and healthy French-inspired dessert that combines the tropical flavor of coconut with the elegance of a classic macaron. These macarons are perfect for anyone looking to enjoy a sweet treat without spending too much time in the kitchen. With a soft, chewy texture and a hint of natural sweetness, they make for a guilt-free indulgence.
This recipe is especially great for warmer months when you want to avoid turning on the oven, yet still want to impress family and friends with a delicious homemade dessert.
These macarons are made with simple ingredients and require minimal effort, making them an ideal choice for both novice and experienced bakers. The combination of shredded coconut, almond flour, and a touch of honey creates a harmonious blend of flavors that are sure to please any palate.
The no-bake aspect of the recipe guarantees that the macarons retain their light, airy quality, while the coconut adds a revitalizing twist to the traditional French pastry. Prepare to enjoy these scrumptious no-bake coconut macarons, which are perfect for serving 4-6 people, at your next gathering or as a delightful treat for yourself.
Ingredients for 4-6 servings:
- 1 1/2 cups unsweetened shredded coconut
- 1/2 cup almond flour
- 1/3 cup honey
- 1/4 cup coconut oil, melted
- 1 teaspoon vanilla extract
- 1/4 teaspoon salt
- Optional: melted dark chocolate for drizzling
Cooking Instructions:
- Prepare the Ingredients: Start by gathering all the necessary ingredients and measuring them carefully. This will guarantee a smooth cooking process. If you choose to drizzle dark chocolate over the macarons, melt the chocolate in a heatproof bowl over simmering water or in short bursts in the microwave.
- Mix the Dry Ingredients: In a large mixing bowl, combine the unsweetened shredded coconut, almond flour, and salt. Stir the ingredients together until they’re well incorporated.
- Add the Wet Ingredients: In a separate bowl, mix together the melted coconut oil, honey, and vanilla extract. Stir until the honey is fully dissolved into the mixture.
- Combine the Mixtures: Pour the wet ingredients into the bowl with the dry ingredients. Use a spatula to mix everything together until a sticky dough forms. Guarantee that the coconut and almond flour are evenly coated with the honey and oil mixture.
- Shape the Macarons: Using your hands or a small cookie scoop, form small balls from the dough. Press each ball gently to give it the traditional macaron shape. Place them on a parchment-lined baking sheet for easy removal later.
- Refrigerate the Macarons: Once all the macarons are shaped, place the baking sheet in the refrigerator. Allow the macarons to chill for at least 30 minutes. This helps them firm up and makes them easier to handle.
- Optional Chocolate Drizzle: If you’re adding a chocolate drizzle, remove the macarons from the refrigerator after they’ve set. Using a spoon or piping bag, drizzle the melted dark chocolate over the top of each macaron. Return them to the fridge for another 10 minutes to let the chocolate harden.
- Serve and Enjoy: Once the macarons have set, they’re ready to be served. Enjoy them as a delightful dessert or snack.
Extra Tips:
For best results, make sure to use high-quality ingredients, especially the coconut and almond flour. Guarantee that the shredded coconut is unsweetened to maintain the healthy aspect of the recipe.
If you prefer a sweeter macaron, you can adjust the amount of honey to taste. Additionally, these macarons can be stored in an airtight container in the refrigerator for up to a week, making them a convenient make-ahead dessert option.
Enjoy experimenting with different flavor variations by adding a pinch of cinnamon or a splash of almond extract for an extra twist.