

I’m thrilled to share a collection of light and easy French recipes that feel bright and balanced. These dishes focus on fresh, wholesome ingredients that nourish the body. Think vibrant Ratatouille Salad or comforting French Vegetable Soup. Each recipe offers a delightful twist on classic French cuisine, making healthy eating feel indulgent. Ready to explore these delicious options?
Ratatouille Salad

Ratatouille Salad is a delightful and healthy twist on the traditional French dish, ratatouille. This salad takes the essence of the classic ratatouille—made with a medley of summer vegetables—and transforms it into a invigorating, vibrant dish that can be enjoyed on its own or as a side.
Perfect for warm weather dining, this salad showcases the rich flavors of zucchini, eggplant, and bell peppers, all while being light and nutritious.
The beauty of Ratatouille Salad lies not only in its colorful presentation but also in its versatility. You can serve it as a main course for lunch or as a side dish alongside grilled meats or fish. This dish is also a fantastic way to utilize fresh garden vegetables during the summer months when they’re at their peak flavor.
With a drizzle of olive oil and a sprinkle of herbs, every bite is a celebration of the Mediterranean.
Ingredients (Serves 4-6):
- 1 medium eggplant, diced
- 2 medium zucchini, diced
- 1 red bell pepper, diced
- 1 yellow bell pepper, diced
- 1 medium onion, diced
- 3 cloves garlic, minced
- 1 cup cherry tomatoes, halved
- 1/4 cup extra virgin olive oil
- 2 tablespoons balsamic vinegar
- 1 teaspoon dried thyme
- 1 teaspoon dried oregano
- Salt and pepper to taste
- Fresh basil leaves for garnish
Cooking Instructions:
1. Prepare the Vegetables: Start by washing and dicing the eggplant, zucchini, red and yellow bell peppers, and onion into uniform pieces. This guarantees even cooking and makes for a visually appealing salad. Mince the garlic and halve the cherry tomatoes.
2. Sauté the Vegetables: In a large skillet, heat 2 tablespoons of olive oil over medium heat. Add the diced eggplant first, as it takes the longest to cook. Sauté for about 5 minutes until it begins to soften.
Next, add the zucchini, bell peppers, and onion, cooking for another 5-7 minutes until all the vegetables are tender but still vibrant in color.
3. Add Garlic and Tomatoes: Once the vegetables are cooked, stir in the minced garlic and cherry tomatoes. Cook for an additional 2-3 minutes, allowing the garlic to become fragrant and the tomatoes to soften slightly.
4. Season the Salad: Remove the skillet from heat. In a small bowl, whisk together the remaining olive oil, balsamic vinegar, dried thyme, oregano, salt, and pepper. Pour this dressing over the sautéed vegetables and toss gently to combine, guaranteeing all the vegetables are coated with the dressing and flavors are well distributed.
5. Serve and Garnish****: Allow the salad to cool for a few minutes before transferring it to a serving dish. Garnish with fresh basil leaves for a burst of color and flavor. Serve warm or chilled, as desired.
Extra Tips:
For an added layer of flavor, try roasting the vegetables in the oven instead of sautéing them. Simply toss the diced vegetables with olive oil, herbs, salt, and pepper, and roast at 400°F (200°C) for about 20-25 minutes until tender and slightly caramelized.
This method enhances the natural sweetness of the vegetables and provides a delightful texture. Additionally, feel free to customize the salad with your favorite herbs or add a sprinkle of feta cheese for a creamy contrast. Enjoy your Ratatouille Salad!
Quinoa Tabbouleh
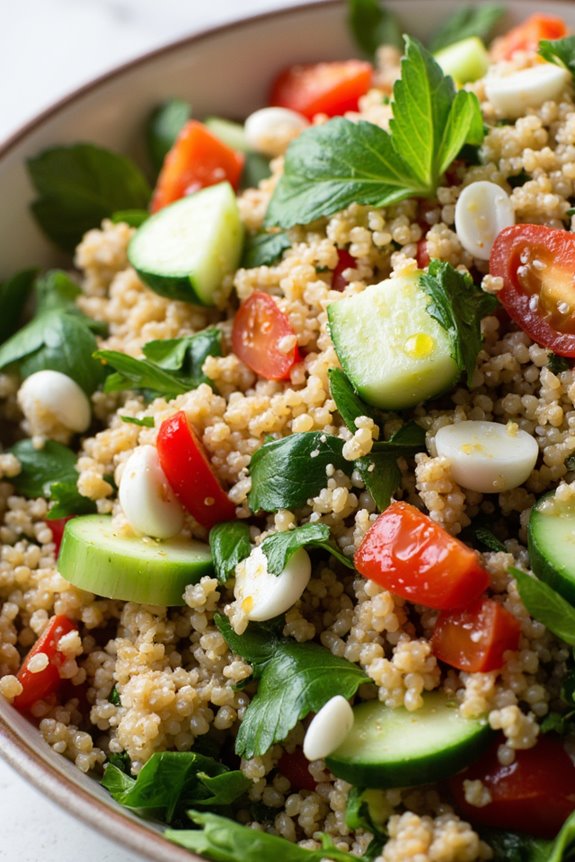
Quinoa Tabbouleh is a revitalizing twist on the classic Middle Eastern salad traditionally made with bulgur wheat. This vibrant dish isn’t only packed with nutrients but also bursts with fresh flavors, making it a perfect side dish or light lunch option. The combination of protein-rich quinoa, fresh herbs, and crisp vegetables creates a delightful and healthy meal that’s both satisfying and nourishing.
This recipe highlights the versatility of quinoa, which serves as a great base for the dish, absorbing the flavors of the other ingredients while providing a gluten-free alternative to bulgur. Rich in fiber and vitamins, Quinoa Tabbouleh can be enjoyed on its own or paired with grilled meats or fish for a balanced meal.
Let’s explore the ingredients and steps to create this delicious dish!
Ingredients (Serves 4-6):
- 1 cup quinoa
- 2 cups water
- 1 cup fresh parsley, finely chopped
- ½ cup fresh mint leaves, finely chopped
- 1 medium cucumber, diced
- 2 medium tomatoes, diced
- 4 green onions, finely sliced
- ¼ cup olive oil
- ¼ cup fresh lemon juice
- Salt and pepper, to taste
Cooking Instructions:
- Rinse the Quinoa: Begin by rinsing the quinoa under cold water in a fine mesh strainer. This step is essential as it removes the natural coating called saponin, which can give the quinoa a bitter taste. Rinse the quinoa for about 1-2 minutes until the water runs clear.
- Cook the Quinoa: In a medium saucepan, combine the rinsed quinoa and water. Bring the mixture to a boil over medium-high heat. Once it reaches a boil, reduce the heat to low, cover the saucepan, and let it simmer for about 15 minutes or until the quinoa has absorbed all the water. Remove from heat and let it sit, covered, for an additional 5 minutes.
- Fluff and Cool the Quinoa: After letting it rest, remove the lid and fluff the quinoa with a fork to separate the grains. Allow it to cool to room temperature; you can spread it out on a baking sheet to speed up the cooling process if desired.
- Prepare the Vegetables and Herbs: While the quinoa is cooling, prepare the fresh ingredients. Finely chop the parsley and mint, and dice the cucumber and tomatoes. Slice the green onions and set all the vegetables and herbs aside in a large mixing bowl.
- Combine Ingredients: Once the quinoa has cooled, add it to the bowl with the chopped vegetables and herbs. Drizzle the olive oil and lemon juice over the mixture, and season with salt and pepper to taste.
- Toss and Serve: Gently toss all the ingredients together until well combined. Taste and adjust seasoning if necessary. Serve immediately or refrigerate for 30 minutes to allow the flavors to meld together.
Extra Tips:
For an extra burst of flavor, consider adding a pinch of cumin or paprika to the dressing. You can also experiment with other vegetables like bell peppers or radishes for added crunch and color.
Quinoa Tabbouleh is best enjoyed fresh but can be stored in an airtight container in the refrigerator for up to 3 days. Just give it a good stir before serving, as the ingredients may settle. Enjoy your healthy and vibrant creation!
Grilled Lemon Herb Chicken

Grilled Lemon Herb Chicken is a delightful dish that captures the essence of French cuisine while prioritizing health and flavor. The combination of zesty lemon, fresh herbs, and perfectly grilled chicken creates a dish that’s both vibrant and satisfying. This recipe is perfect for a family dinner, a summer barbecue, or any occasion where you want to impress your guests with minimal effort.
The marinade is what makes this chicken truly special. By marinating the chicken in a mixture of lemon juice, olive oil, and herbs, you allow the flavors to penetrate the meat, resulting in juicy and aromatic chicken. Pair it with a fresh salad or grilled vegetables for a complete meal that embodies the light and fresh spirit of French cooking.
Ingredients (serving size: 4-6 people):
- 4 to 6 boneless, skinless chicken breasts
- 1/4 cup fresh lemon juice
- 1/4 cup olive oil
- 2 cloves garlic, minced
- 2 tablespoons fresh thyme, chopped
- 2 tablespoons fresh rosemary, chopped
- 1 teaspoon Dijon mustard
- Salt and pepper to taste
- Lemon wedges (for serving)
- Fresh parsley, chopped (for garnish)
Cooking Instructions:
- Prepare the Marinade: In a medium bowl, whisk together the fresh lemon juice, olive oil, minced garlic, chopped thyme, chopped rosemary, Dijon mustard, salt, and pepper until well combined. This mixture will serve as both a marinade and a flavor enhancer for the chicken.
- Marinate the Chicken: Place the chicken breasts in a large resealable plastic bag or a shallow dish. Pour the marinade over the chicken, making certain that each piece is well coated. Seal the bag or cover the dish and refrigerate for at least 30 minutes, or preferably for 2-4 hours. This step allows the chicken to absorb the flavors of the marinade.
- Preheat the Grill: While the chicken is marinating, preheat your grill to medium-high heat. This guarantees that the chicken will cook evenly and develop nice grill marks.
- Grill the Chicken: Once the grill is hot, remove the chicken from the marinade and let any excess marinade drip off. Place the chicken breasts on the grill and cook for about 6-7 minutes on one side. Flip the chicken and grill for an additional 6-7 minutes, or until the internal temperature reaches 165°F (75°C). Avoid pressing down on the chicken while grilling to retain its juices.
- Rest and Serve: After grilling, remove the chicken from the grill and let it rest for about 5 minutes. This allows the juices to redistribute within the meat, making sure it remains moist. Serve the grilled chicken with lemon wedges and a sprinkle of fresh parsley for an added touch of color and flavor.
- Enjoy: Pair your grilled lemon herb chicken with a fresh salad, roasted vegetables, or crusty French bread for a complete meal that’s satisfying and nutritious.
Extra Tips:
For the best flavor, marinate the chicken overnight if you have the time. This will enhance the taste even further.
Additionally, feel free to experiment with different herbs such as basil or oregano, depending on your preference. Always verify your grill is clean and preheated for ideal results.
If you don’t have a grill, this recipe can be easily adapted for a grill pan or baked in the oven at 375°F (190°C) for about 25-30 minutes. Enjoy your culinary adventure with this healthy French recipe!
French Vegetable Soup
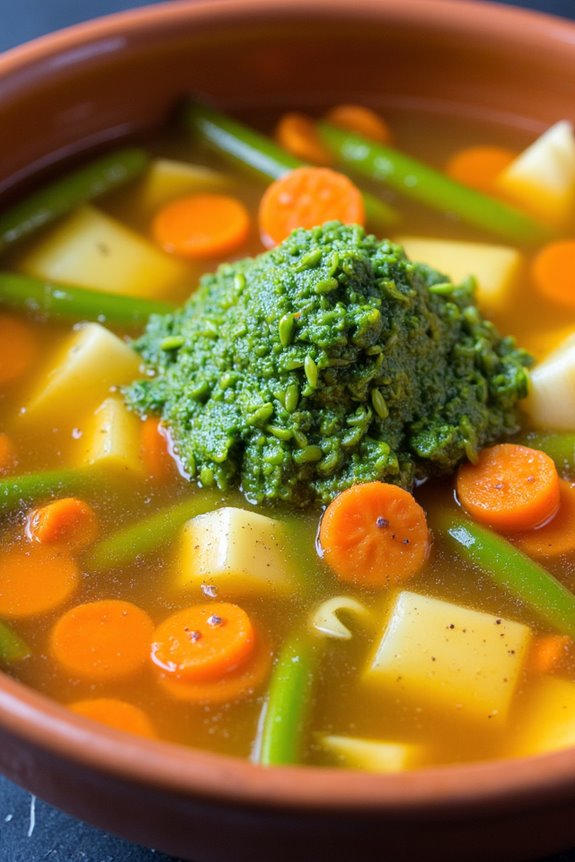
French Vegetable Soup, or “Soupe au Pistou,” is a delightful dish that embodies the essence of French country cooking. This vegetable-rich soup isn’t only hearty and comforting but also packed with nutrients, making it a perfect choice for those who prioritize health without sacrificing flavor.
The soup is characterized by a medley of fresh vegetables, aromatic herbs, and a drizzle of pistou, which is a basil sauce similar to pesto. This vibrant soup can be enjoyed as an appetizer or as a main dish alongside crusty bread.
Preparing French Vegetable Soup is an opportunity to utilize seasonal vegetables, guaranteeing the freshest flavors. It’s a versatile recipe, allowing you to incorporate whatever vegetables you have on hand. This soup is a fantastic way to warm up during chilly evenings or as a light meal any time of the year.
With rich flavors and a variety of textures, it’s sure to impress family and friends alike.
Ingredients (Serves 4-6)
- 2 tablespoons olive oil
- 1 large onion, diced
- 2 cloves garlic, minced
- 2 medium carrots, diced
- 2 stalks celery, diced
- 1 medium zucchini, diced
- 1 medium potato, peeled and diced
- 1 cup green beans, trimmed and cut into 1-inch pieces
- 1 can (14 oz) diced tomatoes, undrained
- 6 cups vegetable broth
- 1 teaspoon dried thyme
- 1 bay leaf
- Salt and pepper to taste
- 1 cup fresh basil leaves
- 1 tablespoon pine nuts (optional)
- Grated Parmesan cheese (for serving, optional)
Cooking Instructions
- Sauté the Aromatics: In a large pot, heat the olive oil over medium heat. Add the diced onion and sauté until it becomes translucent, about 5 minutes. Then, add the minced garlic and cook for an additional minute until fragrant, being careful not to let it brown.
- Add the Vegetables: Stir in the diced carrots and celery, cooking for about 5 minutes until they begin to soften. Next, add the zucchini, potato, and green beans, cooking for another 3-4 minutes. This step helps to build layers of flavor in the soup.
- Incorporate Tomatoes and Broth: Pour in the undrained diced tomatoes along with the vegetable broth. Stir well to combine all the ingredients. Add the dried thyme, bay leaf, and season with salt and pepper to taste.
- Simmer the Soup: Bring the soup to a gentle boil, then reduce the heat to low and let it simmer uncovered for 20-25 minutes, or until all the vegetables are tender. Stir occasionally to prevent sticking and facilitate even cooking.
- Prepare the Pistou: While the soup is simmering, prepare the pistou by blending fresh basil leaves, pine nuts (if using), and a drizzle of olive oil in a food processor until smooth. Season with salt to taste.
- Serve the Soup: Once the vegetables are tender, remove the bay leaf from the soup. Ladle the soup into bowls and top each serving with a spoonful of pistou. Optionally, sprinkle with grated Parmesan cheese for an extra layer of flavor.
Extra Tips
When making French Vegetable Soup, feel free to experiment with different vegetables based on what you have available or in season.
Adding leafy greens like spinach or kale in the last few minutes of cooking can enhance the nutritional value. For a heartier soup, consider adding cooked beans or lentils. Additionally, if you prefer a thicker consistency, you can blend a portion of the soup and then mix it back in.
Enjoy the process of cooking and make this recipe your own!
Spinach and Goat Cheese Tart

This Spinach and Goat Cheese Tart is a delightful dish that combines the earthy flavors of fresh spinach with the creamy tang of goat cheese, all nestled in a flaky pastry crust. It’s an elegant yet simple dish that can be served as a main course or a side, making it perfect for brunch, lunch, or a light dinner. Not only is it delicious, but this tart is also packed with nutrients, making it a healthy choice for any meal.
Preparing this tart is a straightforward process that allows the fresh ingredients to shine. With a buttery crust and a savory filling, it’s sure to impress your family and friends without requiring hours in the kitchen. Serve it warm or at room temperature, and pair it with a crisp green salad for a complete meal. Let’s explore the ingredients and cooking instructions for this delicious Spinach and Goat Cheese Tart.
Ingredients (Serves 4-6):
- 1 pre-made pie crust (store-bought or homemade)
- 4 cups fresh spinach, washed and chopped
- 1 cup crumbled goat cheese
- 3 large eggs
- 1 cup heavy cream
- 1 small onion, finely chopped
- 2 cloves garlic, minced
- 2 tablespoons olive oil
- Salt and pepper, to taste
- 1/4 teaspoon nutmeg (optional)
Cooking Instructions:
1. Preheat the Oven: Begin by preheating your oven to 375°F (190°C). This guarantees that the oven is at the right temperature when the tart is ready to bake.
2. Cook the Spinach: In a large skillet, heat the olive oil over medium heat. Add the chopped onion and minced garlic, sautéing until the onion is translucent, about 3-4 minutes.
Then add the chopped spinach and cook until wilted, about 2-3 minutes. Season with salt, pepper, and nutmeg if using. Remove from heat and let cool slightly.
3. Prepare the Filling: In a mixing bowl, whisk together the eggs and heavy cream until well combined. Stir in the crumbled goat cheese and the cooked spinach mixture until evenly distributed.
Taste and adjust the seasoning if necessary.
4. Assemble the Tart: Roll out the pie crust and fit it into a tart pan or a pie dish, trimming any excess dough. Pour the spinach and goat cheese filling into the crust, spreading it evenly.
5. Bake the Tart: Place the tart in the preheated oven and bake for 30-35 minutes, or until the filling is set and the top is lightly golden. The edges of the crust should also be a golden brown.
6. Cool and Serve: Once baked, remove the tart from the oven and allow it to cool for about 10 minutes before slicing. This will help the filling set further, making it easier to cut.
Extra Tips: For an added depth of flavor, consider adding herbs such as thyme or basil to the filling. You can also substitute the goat cheese with feta or ricotta if preferred.
If you want to make this dish ahead of time, you can prepare the tart up to the baking step, refrigerate it, and bake it just before serving. Enjoy your healthy French creation!
Zucchini Noodles With Pesto

Zucchini noodles, also known as “zoodles,” are a fantastic alternative to traditional pasta, offering a lighter and healthier option for those looking to reduce carbohydrate intake without compromising on flavor. This dish pairs perfectly with a fresh homemade pesto, which is vibrant and aromatic, making it a delightful addition to your culinary repertoire.
The combination of tender zucchini noodles and rich pesto creates a satisfying meal that isn’t only delicious but also packed with nutrients.
This recipe for Zucchini Noodles with Pesto serves 4-6 people and can be prepared in less than 30 minutes. Whether you’re hosting a dinner party or simply enjoying a meal at home, this dish is sure to impress your guests and family alike. It’s versatile, allowing you to add in your favorite proteins or vegetables to customize it to your taste.
Ingredients:
- 4 medium zucchinis
- 2 cups fresh basil leaves
- 1/2 cup pine nuts (or walnuts)
- 1/2 cup grated Parmesan cheese
- 3 cloves garlic, minced
- 1/2 cup extra virgin olive oil
- Salt and pepper to taste
- Cherry tomatoes, halved (for garnish, optional)
Cooking Instructions:
1. Prepare the Zucchini Noodles: Start by washing the zucchinis thoroughly. Using a spiralizer, julienne peeler, or mandoline, create the zucchini noodles by slicing them into thin strips resembling pasta. Set them aside in a colander to drain any excess moisture while you prepare the pesto.
2. Make the Pesto: In a food processor, combine the fresh basil leaves, pine nuts, grated Parmesan cheese, and minced garlic. Pulse the ingredients together until they’re finely chopped.
Then, while the processor is running, slowly drizzle in the extra virgin olive oil until the mixture becomes smooth and creamy. Season with salt and pepper to taste.
3. Cook the Zoodles: In a large skillet or frying pan, heat a drizzle of olive oil over medium heat. Add the zucchini noodles and sauté for about 3-5 minutes, stirring gently. You want them to be tender but still retain some crunch; avoid overcooking to prevent them from becoming mushy.
4. Combine Noodles and Pesto: Once the zucchini noodles are cooked to your liking, remove them from the heat and transfer them to a large mixing bowl. Add the prepared pesto to the noodles and toss well to coat evenly. Confirm all the zoodles are covered with the vibrant pesto.
5. Serve and Garnish: Divide the zucchini noodles among plates or bowls. If desired, top with halved cherry tomatoes for a pop of color and extra flavor. Serve immediately while warm.
Extra Tips:
When preparing Zucchini Noodles with Pesto, it’s crucial to choose firm, fresh zucchinis to guarantee the best texture. If you find the zoodles release too much moisture while cooking, you can sprinkle a little salt on them before sautéing to draw out excess water, then pat them dry with a paper towel.
Feel free to customize the pesto by adding ingredients like lemon juice for brightness or different nuts for a unique flavor profile. You can also make the pesto ahead of time and store it in the refrigerator for up to a week, making meal prep even easier!
Lightened-Up Coq Au Vin
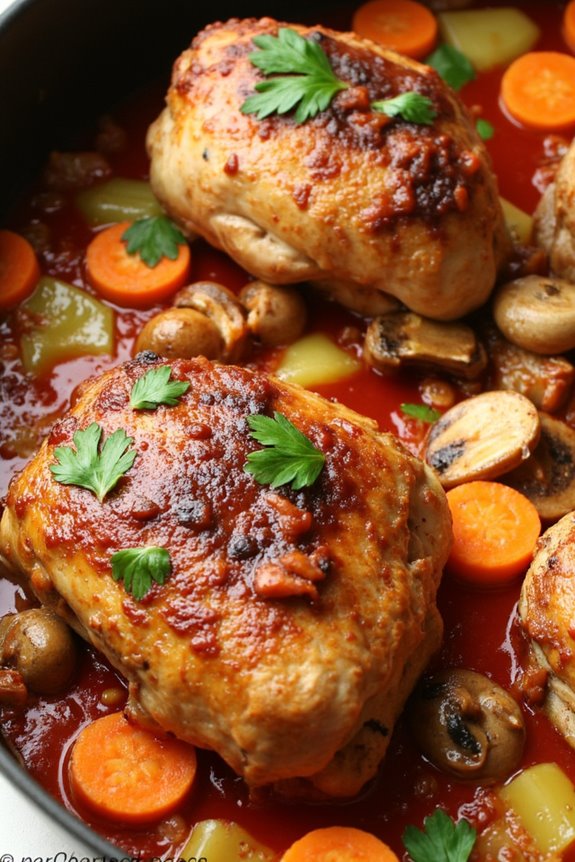
Coq Au Vin is a classic French dish that translates to “Rooster in Wine.” Traditionally, it’s a rich and hearty stew featuring chicken, wine, mushrooms, and a medley of vegetables. While the original version is undeniably delicious, it can also be quite heavy and calorie-dense. This lightened-up version retains all the comforting flavors and aromas of the classic dish but swaps out some of the heavier ingredients for lighter alternatives, making it a healthier option without sacrificing taste.
In this recipe, we use skinless chicken thighs, which are just as flavorful but lower in fat than their skin-on counterparts. We also incorporate plenty of fresh vegetables and herbs to add depth to the dish while reducing the amount of added fats. The result is a vibrant, satisfying meal that can be enjoyed guilt-free, perfect for a family dinner or a cozy gathering with friends.
Ingredients (Serves 4-6)
- 2 lbs skinless chicken thighs
- 2 cups red wine (preferably Pinot Noir)
- 1 cup low-sodium chicken broth
- 1 tablespoon olive oil
- 4 slices of turkey bacon, chopped
- 1 large onion, diced
- 3 cloves garlic, minced
- 2 cups button mushrooms, sliced
- 2 large carrots, sliced
- 2 stalks celery, diced
- 2 tablespoons tomato paste
- 1 teaspoon dried thyme
- 1 teaspoon dried rosemary
- 1 bay leaf
- Salt and pepper to taste
- Fresh parsley for garnish
Cooking Instructions
- Marinate the Chicken: In a large bowl, combine the chicken thighs with red wine, thyme, rosemary, and bay leaf. Cover and refrigerate for at least 2 hours, or preferably overnight. This marination allows the chicken to soak up the flavors and tenderize.
- Cook the Bacon: In a large, heavy-bottomed pot, heat the olive oil over medium heat. Add the chopped turkey bacon and cook until crispy, about 5 minutes. Remove the bacon with a slotted spoon and set aside, leaving the rendered fat in the pot.
- Sauté the Vegetables: In the same pot, add the diced onion, garlic, carrots, and celery to the bacon fat. Sauté until the vegetables are softened and fragrant, about 5-7 minutes. Stir occasionally to prevent sticking.
- Brown the Chicken: Remove the marinated chicken from the refrigerator and pat it dry with paper towels. In the same pot, add the marinated chicken (reserve the marinade) and brown it on all sides for about 4-5 minutes. This step enhances flavor through caramelization.
- Add the Mushrooms: Once the chicken is browned, add the sliced mushrooms to the pot. Cook for another 3-4 minutes until the mushrooms have released their moisture and are tender.
- Combine Ingredients: Stir in the tomato paste and reserved marinade, scraping up any browned bits from the bottom of the pot. Then, add the chicken broth and the cooked bacon. Bring everything to a gentle simmer.
- Simmer the Stew: Cover the pot and simmer on low heat for about 30-40 minutes, or until the chicken is cooked through and tender. Adjust seasoning with salt and pepper to taste.
- Serve: Once cooked, remove the bay leaf and discard. Ladle the Coq Au Vin into bowls, garnish with fresh parsley, and serve warm with crusty bread or over whole-grain pasta.
Extra Tips
When preparing Lightened-Up Coq Au Vin, feel free to experiment with different vegetables based on what you have on hand or what’s in season. Adding peas or green beans can add vibrant color and texture to the dish.
Additionally, if you prefer a thicker sauce, you can dissolve a tablespoon of cornstarch in a little cold water and stir it into the simmering stew for a few minutes until thickened. Enjoy your healthier take on this French classic!
Endive and Apple Salad
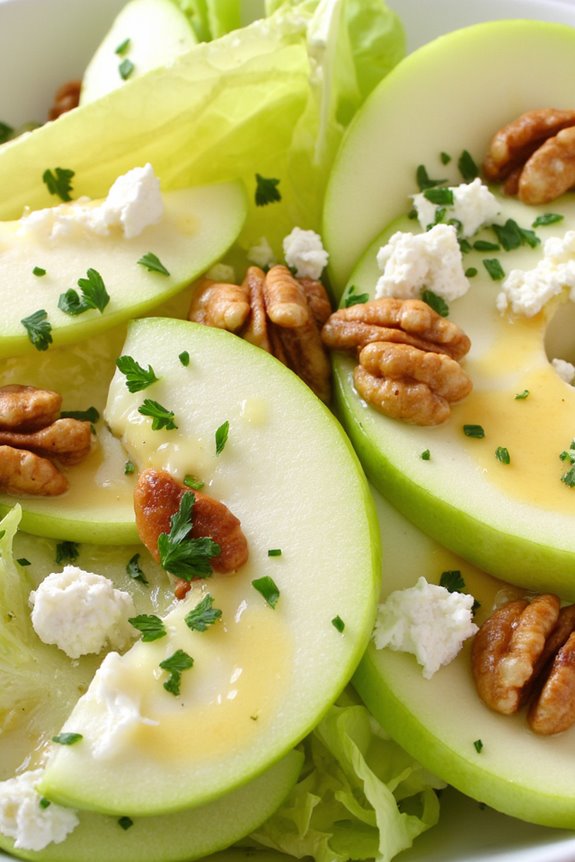
Endive and Apple Salad is a revitalizing and vibrant dish that showcases the delightful crunch of fresh endive paired with the sweet and tart flavors of crisp apples. This salad isn’t only visually appealing but also packed with nutrients, making it a perfect starter or side dish for any meal. It highlights the classic French culinary approach of combining simple yet high-quality ingredients to create something truly special.
In this recipe, the bitterness of the endive is balanced by the sweetness of the apples and the creaminess of a light dressing. The addition of nuts offers a satisfying crunch, while the fresh herbs bring a burst of flavor. This is a salad that celebrates the harmony of flavors and textures, making it a great addition to your healthy French recipe collection.
Ingredients (serving size: 4-6 people):
- 4 medium endives, chopped
- 2 medium apples, cored and sliced (preferably a tart variety like Granny Smith)
- 1 cup walnuts, toasted and roughly chopped
- 1/2 cup crumbled goat cheese or feta cheese
- 1/4 cup olive oil
- 2 tablespoons apple cider vinegar
- 1 tablespoon Dijon mustard
- 1 tablespoon honey
- Salt and pepper to taste
- Fresh parsley or chives for garnish
Cooking Instructions:
- Prepare the Endive: Start by washing the endives thoroughly under cold running water. Remove any wilted or discolored outer leaves. Cut the endives into 1-inch pieces and place them in a large salad bowl. The endive serves as the base of your salad, providing a slightly bitter yet crunchy texture.
- Slice the Apples: Next, wash and core the apples. Slice them into thin wedges or bite-sized pieces. If you prefer, you can leave the skin on for added color and nutrients. Add the apple slices to the bowl with the endive. The apples add a sweet and crisp contrast to the bitterness of the endive.
- Toast the Walnuts: In a dry skillet over medium heat, add the walnuts and toast them for about 5 minutes, stirring frequently until they become fragrant and golden brown. Be careful not to burn them. Once toasted, remove from heat and let them cool slightly before adding them to the salad. This step enhances the nutty flavor and adds a delicious crunch.
- Prepare the Dressing: In a small bowl, combine the olive oil, apple cider vinegar, Dijon mustard, honey, salt, and pepper. Whisk these ingredients together until well blended and emulsified. This dressing will bring all the flavors together and add a creamy yet light texture to the salad.
- Combine the Salad: Drizzle the dressing over the endive, apple, and walnuts in the salad bowl. Toss gently to combine all the ingredients, ensuring that the dressing coats everything evenly. Be gentle to maintain the integrity of the apples and endives.
- Add Cheese and Garnish: Finally, sprinkle the crumbled goat cheese or feta cheese over the top of the salad. Garnish with freshly chopped parsley or chives for an added burst of freshness and color. Serve immediately for the best texture and flavor.
Extra Tips: For added flavor, consider incorporating thinly sliced red onions or a handful of dried cranberries to balance the sweetness and tartness in the salad. If you want a more substantial meal, you can add grilled chicken or shrimp on top to make it a complete dish. Always taste the salad before serving to adjust the seasoning or dressing according to your preference. Enjoy this delightful dish as part of a healthy French-inspired meal!
Baked Salmon With Mustard Crust

Baked Salmon With Mustard Crust is a delightful and healthy dish that showcases the flaky texture of salmon paired with a flavorful mustard topping. This recipe not only brings out the rich taste of the fish but also adds a zesty kick that complements it beautifully. Ideal for a weeknight dinner or a special occasion, this dish is both easy to prepare and impressive to serve.
The mustard crust gives the salmon an appealing golden finish while sealing in moisture, guaranteeing a tender and juicy result. Accompanied by seasonal vegetables or a light salad, this dish embodies the essence of French cuisine—simple yet sophisticated. Perfect for serving 4-6 people, it’s a great option for families or gatherings, allowing everyone to enjoy a healthy meal without sacrificing flavor.
Ingredients (Serves 4-6)
- 4-6 salmon fillets (about 6 oz each)
- 2 tablespoons Dijon mustard
- 1 tablespoon whole grain mustard
- 2 tablespoons honey
- 1 tablespoon olive oil
- 1 teaspoon fresh dill (or ½ teaspoon dried dill)
- 1 teaspoon garlic powder
- Salt and pepper to taste
- Lemon wedges (for serving)
Cooking Instructions
- Preheat the Oven: Start by preheating your oven to 400°F (200°C). This temperature is ideal for baking salmon, allowing it to cook evenly and develop a nice crust.
- Prepare the Baking Dish: Lightly grease a baking dish with a bit of olive oil or cooking spray. This will prevent the salmon from sticking and make for easier cleanup.
- Make the Mustard Mixture: In a small bowl, combine the Dijon mustard, whole grain mustard, honey, olive oil, fresh dill, garlic powder, salt, and pepper. Mix well until all the ingredients are well blended and smooth. This mixture will serve as the flavorful crust for the salmon.
- Prepare the Salmon: Place the salmon fillets skin-side down in the prepared baking dish. Use a paper towel to pat them dry and season with a little salt and pepper.
- Apply the Mustard Mixture: Spread a generous layer of the mustard mixture over the top of each salmon fillet. Make sure to cover them evenly to guarantee that every bite is packed with flavor.
- Bake the Salmon: Place the baking dish in the preheated oven and bake the salmon for about 12-15 minutes, or until the fish flakes easily with a fork and reaches an internal temperature of 145°F (63°C). The mustard crust should turn lightly golden and caramelized.
- Serve: Remove the salmon from the oven and allow it to rest for a couple of minutes. Serve the baked salmon with lemon wedges on the side for added zest, and enjoy it with your choice of sides, such as roasted vegetables or a fresh salad.
Extra Tips
When cooking Baked Salmon With Mustard Crust, it’s essential to choose fresh, high-quality salmon for the best flavor and texture. If you prefer a bit more crunch, you can incorporate some breadcrumbs or crushed nuts into the mustard mixture for added texture.
Additionally, feel free to experiment with different herbs or spices to customize the flavor profile to your liking. Always keep an eye on the salmon while it bakes, as cooking times may vary based on the thickness of the fillets. Enjoy your culinary creation!
French Lentil Salad
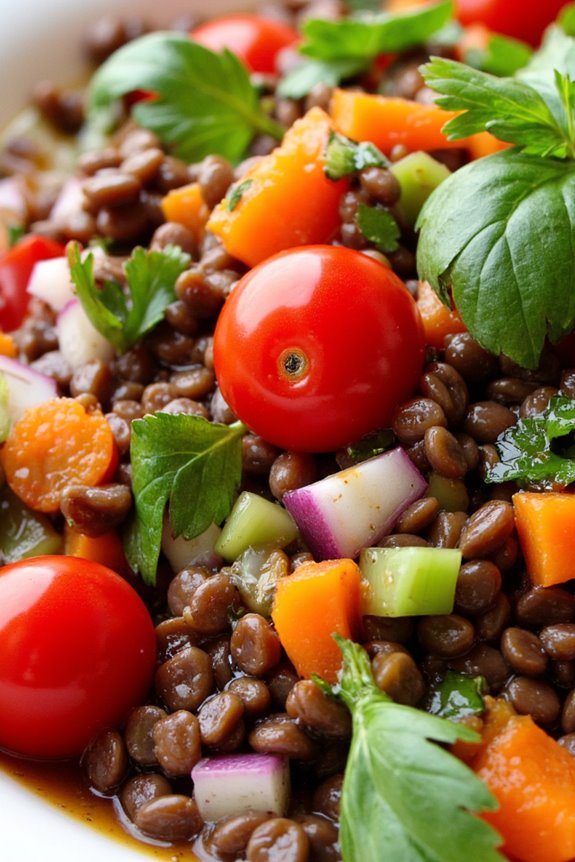
French Lentil Salad is a nutritious and hearty dish that showcases the earthy flavors of lentils combined with vibrant vegetables and a tangy dressing. This salad isn’t only visually appealing but also packed with protein, fiber, and essential nutrients, making it a perfect dish for a light lunch or a side at dinner.
The use of French green lentils, known for their firm texture and ability to hold their shape during cooking, elevates this salad to a gourmet level, bringing a taste of France right to your kitchen.
Making French Lentil Salad is simple and allows for versatility based on your preferences. You can easily customize the ingredients by adding your favorite vegetables or herbs. This dish is best served slightly warm or at room temperature, allowing the flavors to meld beautifully.
The combination of lentils, fresh vegetables, and a zesty vinaigrette makes for a rejuvenating and satisfying meal that can be enjoyed any time of the year.
Ingredients (Serves 4-6)
- 1 cup French green lentils
- 4 cups water or vegetable broth
- 1 small red onion, finely chopped
- 1 carrot, diced
- 1 celery stalk, diced
- 1 bell pepper, diced (any color)
- 1 cup cherry tomatoes, halved
- ¼ cup fresh parsley, chopped
- ¼ cup fresh basil, chopped
- 3 tablespoons red wine vinegar
- 5 tablespoons olive oil
- Salt and pepper, to taste
Cooking Instructions
1. Rinse and Cook the Lentils: Begin by rinsing the lentils thoroughly under cold water to remove any impurities. In a medium saucepan, combine the rinsed lentils and water or vegetable broth. Bring it to a boil, then reduce the heat and simmer uncovered for about 25-30 minutes, or until the lentils are tender but still firm.
Drain any excess liquid and set aside to cool.
2. Prepare the Vegetables: While the lentils are cooking, prepare the vegetables. Dice the red onion, carrot, celery, and bell pepper into small, uniform pieces. Halve the cherry tomatoes and chop the parsley and basil.
This guarantees that all the ingredients are ready to mix into the salad once the lentils are cooked.
3. Make the Dressing: In a small bowl, whisk together the red wine vinegar, olive oil, salt, and pepper to create a simple vinaigrette. Adjust the seasoning according to your taste preferences.
This dressing will add a delightful tang to the salad.
4. Combine Ingredients: In a large mixing bowl, combine the cooked lentils with the prepared vegetables and herbs. Pour the vinaigrette over the mixture and gently toss everything together until well combined.
Confirm that the lentils and vegetables are evenly coated with the dressing for maximum flavor.
5. Chill and Serve: Allow the salad to sit for at least 15-20 minutes at room temperature or refrigerate for up to an hour to let the flavors meld. Serve the French Lentil Salad warm or chilled, garnishing with extra herbs if desired.
Extra Tips
For added flavor and nutritional benefits, consider including other ingredients such as diced avocados, crumbled feta cheese, or even roasted vegetables.
You can also experiment with different types of vinegar or citrus juices for the dressing to suit your palate. This salad can be made ahead of time and stored in the refrigerator for up to three days, making it a convenient option for meal prep or entertaining guests.
Enjoy the robustness of this healthy French dish!
Ratatouille-Stuffed Peppers
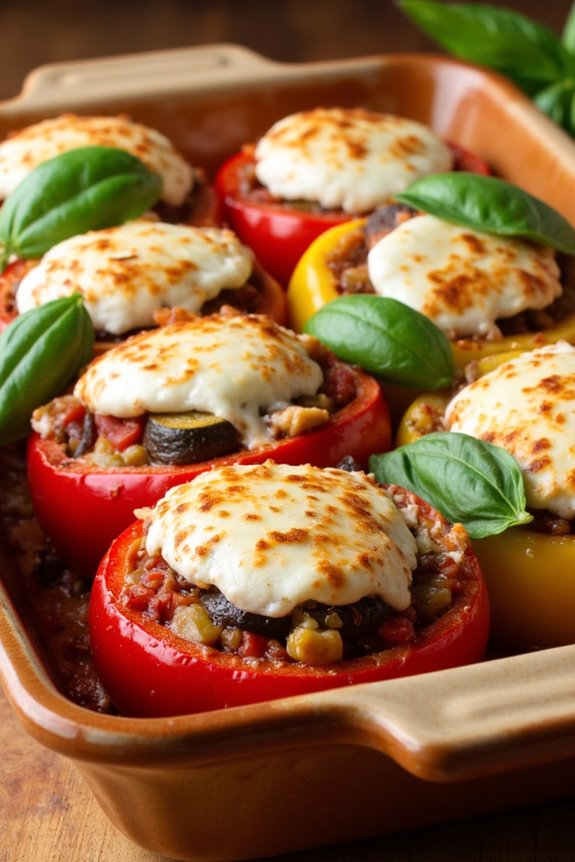
Ratatouille-Stuffed Peppers are a delightful and nutritious dish that brings the flavors of the French countryside right to your dining table. This dish combines the colorful and aromatic ingredients of ratatouille, which includes eggplant, zucchini, bell peppers, and tomatoes, and incorporates them into bell peppers that serve as a vessel for this delicious medley.
Not only does this recipe celebrate the vibrant vegetables of the season, but it also provides a wholesome and filling meal that can be easily tailored to your taste. As an added bonus, Ratatouille-Stuffed Peppers are a great way to incorporate more vegetables into your diet while enjoying a classic French recipe.
Whether you’re hosting a dinner party or looking for a simple family meal, this dish is sure to impress. Plus, the stuffed peppers can be prepared ahead of time and baked just before serving, making them a convenient option for busy weeknights.
Ingredients (serves 4-6):
- 4 large bell peppers (any color)
- 1 medium eggplant, diced
- 1 medium zucchini, diced
- 1 medium yellow onion, chopped
- 2 cloves garlic, minced
- 2 cups diced tomatoes (canned or fresh)
- 1 teaspoon dried thyme
- 1 teaspoon dried basil
- Salt and pepper to taste
- 1 cup cooked quinoa or rice
- 1 cup shredded mozzarella cheese (optional)
- Fresh basil leaves for garnish (optional)
Cooking Instructions:
1. Preheat the Oven: Begin by preheating your oven to 375°F (190°C). This guarantees that your peppers will bake evenly and thoroughly once stuffed.
2. Prepare the Peppers: While the oven is heating, prepare your bell peppers. Slice the tops off the peppers and remove the seeds and membranes. Set the tops aside for later use. Lightly drizzle the outside of the peppers with olive oil and place them upright in a baking dish.
3. Sauté the Vegetables: In a large skillet, heat a tablespoon of olive oil over medium heat. Add the chopped onion and minced garlic, sautéing until the onions are translucent and fragrant, about 2-3 minutes.
Next, add the diced eggplant and zucchini, cooking for another 5-7 minutes until they begin to soften.
4. Add the Tomatoes and Seasonings**: Stir in the diced tomatoes, dried thyme, dried basil, salt, and pepper. Allow the mixture to simmer for about 10 minutes, letting the flavors meld** together and the vegetables become tender.
5. Combine with Quinoa or Rice: Once the vegetable mixture is ready, stir in the cooked quinoa or rice until everything is well combined. This will add substance to the filling and make the dish more filling.
6. Stuff the Peppers: Carefully spoon the ratatouille mixture into each bell pepper, packing it tightly. If desired, sprinkle shredded mozzarella cheese on top of each stuffed pepper for a cheesy finish.
7. Bake: Cover the baking dish with aluminum foil and place it in the preheated oven. Bake for 30 minutes. After 30 minutes, remove the foil and bake for an additional 10-15 minutes, or until the peppers are tender and the cheese is bubbly and golden.
8. Garnish and Serve: Once cooked, remove the stuffed peppers from the oven and let them cool for a few minutes. Garnish with fresh basil leaves before serving.
Extra Tips:
For a variation of flavors, consider adding different herbs such as oregano or parsley to the ratatouille filling. You can also substitute the quinoa or rice with farro or couscous for a different texture.
If you have leftover filling, it can be enjoyed as a side dish or over a bed of greens for a light salad. Finally, these stuffed peppers are freezer-friendly; simply cool them completely before freezing, and reheat in the oven when ready to enjoy!
Herbed Cauliflower Purée
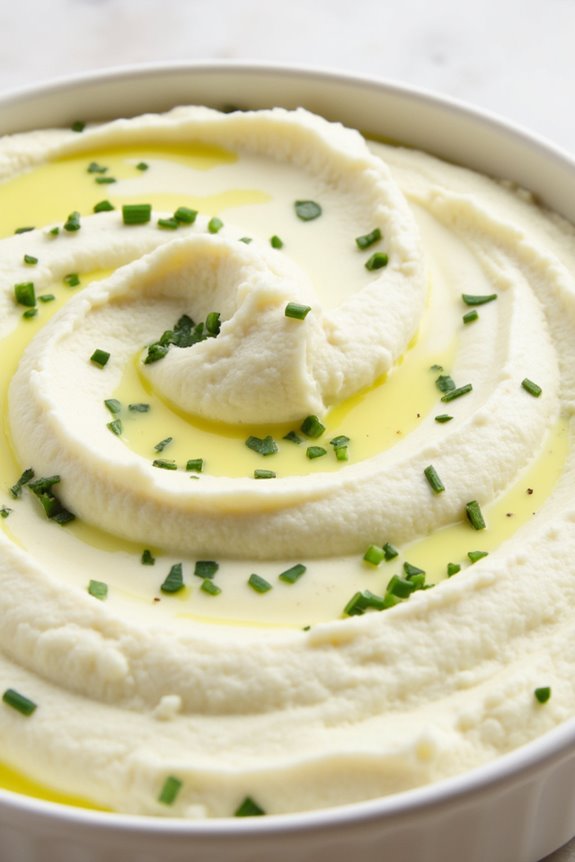
Herbed Cauliflower Purée is a delightful and nutritious alternative to traditional mashed potatoes. This creamy dish combines the subtle flavors of cauliflower with a medley of fresh herbs, creating a light yet satisfying side that pairs beautifully with a variety of main courses. Not only is it a healthier option, but it also boasts a rich texture that can elevate any meal, making it a perfect addition to your culinary repertoire.
This purée is simple to prepare and can be customized with your favorite herbs and spices. Whether you’re looking for a side dish for a family dinner or a fancy gathering, Herbed Cauliflower Purée is sure to impress your guests while keeping things healthy. With its elegant presentation and vibrant taste, it’s a wonderful way to enjoy the benefits of vegetables without sacrificing flavor.
Ingredients (serving size: 4-6 people)
- 1 large head of cauliflower, cut into florets
- 2 tablespoons olive oil
- 1 cup vegetable or chicken broth
- 2 cloves garlic, minced
- ½ cup fresh herbs (such as parsley, chives, or thyme), finely chopped
- Salt and pepper to taste
- ¼ cup heavy cream (optional for extra creaminess)
Cooking Instructions
- Prepare the Cauliflower: Begin by washing and cutting the cauliflower into small florets. This will help it cook evenly and create a smoother purée. Make sure to discard the leaves and stem.
- Cook the Cauliflower: In a large pot, bring the vegetable or chicken broth to a gentle boil over medium heat. Add the cauliflower florets and minced garlic. Reduce the heat to a simmer and cover the pot. Cook for about 10-15 minutes or until the cauliflower is tender and easily pierced with a fork.
- Drain and Blend: Once the cauliflower is cooked, carefully drain any excess liquid from the pot. Transfer the cauliflower and garlic to a blender or food processor. If you prefer a creamier texture, add the optional heavy cream at this stage.
- Add Herbs and Seasoning: Add the finely chopped fresh herbs, olive oil, salt, and pepper to the blender. Blend until you achieve a smooth and creamy consistency. You may need to scrape down the sides or add a little more broth or olive oil if the mixture is too thick.
- Taste and Adjust: Taste the purée and adjust the seasoning as necessary. If you desire a stronger flavor, feel free to add more herbs or a pinch more salt and pepper.
- Serve: Transfer the Herbed Cauliflower Purée to a serving dish. Garnish with additional herbs if desired and serve warm alongside your favorite main dishes.
Extra Tips
For an extra layer of flavor, consider roasting the cauliflower before blending. Simply toss the florets with olive oil, salt, and pepper, and roast them in the oven at 425°F (220°C) for about 25-30 minutes until they’re golden and caramelized.
This method enhances the natural sweetness of the cauliflower and gives the purée a deeper flavor profile. Additionally, feel free to experiment with different herbs or add a sprinkle of nutmeg for an aromatic touch. Enjoy your healthy French cooking!
Fresh Fruit Tart With Yogurt Filling

Indulging in a Fresh Fruit Tart with Yogurt Filling is a delightful way to enjoy seasonal fruits while keeping things light and healthy. This recipe combines a buttery tart crust with a creamy yogurt filling and is topped with an array of fresh fruits. It’s perfect for a summer dessert, an afternoon treat, or even a light breakfast. The vibrant colors of the fruit not only make for an appealing presentation but also provide a burst of flavor and essential nutrients.
The yogurt filling is a healthier alternative to traditional pastry creams, offering a tangy and creamy base that complements the sweetness of the fruits. You can customize the tart with your favorite fruits or whatever is in season, such as strawberries, blueberries, kiwis, or peaches. This recipe serves 4-6 people, making it an excellent choice for small gatherings or family celebrations.
Ingredients (Serves 4-6)
- 1 pre-made tart shell (9-inch)
- 1 cup plain Greek yogurt
- 1/4 cup honey or maple syrup
- 1 teaspoon vanilla extract
- 1 cup mixed fresh fruits (e.g., strawberries, blueberries, kiwi, peaches)
- 1 tablespoon fresh mint leaves (for garnish, optional)
Cooking Instructions
- Prepare the Tart Shell: If you’re using a pre-made tart shell, make certain it’s thawed and ready for use. If making from scratch, prepare the tart dough, press it into a tart pan, and bake according to the recipe instructions until golden brown. Allow it to cool completely before filling.
- Make the Yogurt Filling: In a medium mixing bowl, combine the Greek yogurt, honey (or maple syrup), and vanilla extract. Whisk these ingredients together until smooth and well combined. Taste the mixture and adjust the sweetness if necessary.
- Assemble the Tart: Once the tart shell is completely cooled, spoon the yogurt filling into the shell. Use a spatula to spread it evenly across the bottom, creating a smooth layer. Be careful not to overfill, as you’ll be adding fruit on top.
- Top with Fresh Fruits: Rinse and slice the fresh fruits as desired. Arrange the fruits on top of the yogurt filling in a visually appealing manner. You can create patterns or simply scatter them for a more casual look.
- Chill and Serve: Place the assembled tart in the refrigerator for at least 30 minutes to allow the flavors to meld and the filling to set slightly. When ready to serve, garnish with fresh mint leaves if desired, slice, and enjoy!
Extra Tips
When preparing your Fresh Fruit Tart with Yogurt Filling, consider using a mixture of fruits to enhance the flavor and texture of the dish. Opt for ripe, seasonal fruits for the best taste and presentation.
Additionally, you can experiment with different yogurt flavors, such as vanilla or coconut, to add a unique twist. Remember to keep the tart refrigerated until serving to maintain its freshness and prevent the fruits from wilting. Enjoy your healthy and delicious dessert!