

When it comes to French cuisine, finding that sweet spot between indulgence and health is a journey many of us are on. I’ve curated 13 light and healthy dinner recipes that achieve this balance beautifully. From vibrant Ratatouille to succulent Grilled Lemon Herb Chicken, these dishes embrace fresh ingredients without losing any of their delicious flavors. If you’ve ever thought healthy meals couldn’t be satisfying, these options are set to change your mind. Let’s redefine what it means to eat well with these delightful recipes.
Ratatouille With Quinoa
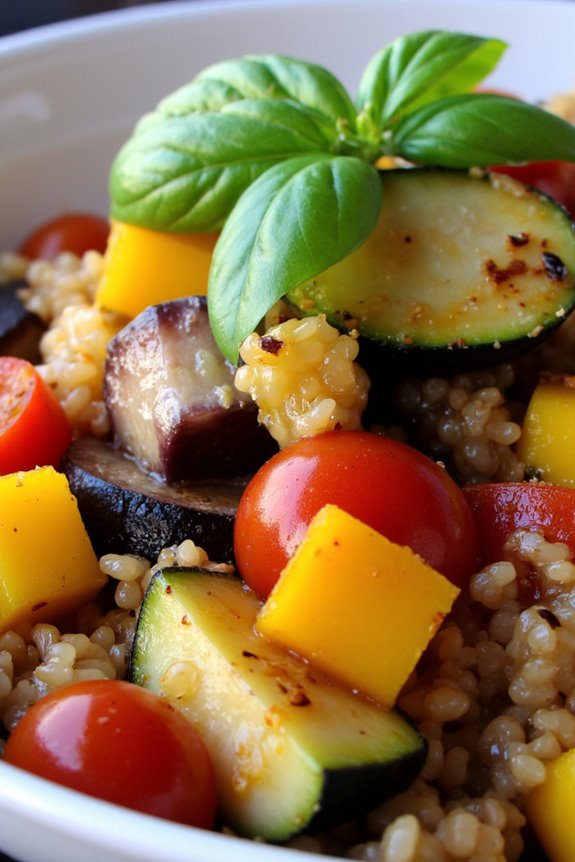
Ratatouille is a traditional French Provençal vegetable stew that celebrates the vibrant flavors of summer vegetables. It typically includes ingredients like eggplant, zucchini, bell peppers, tomatoes, and herbs, creating a hearty and nutritious dish. In this recipe, we incorporate quinoa, a protein-rich grain that complements the vegetables beautifully, making it a wholesome meal perfect for any dinner table.
This Healthy French Dinner Recipe isn’t only delicious but also packs a punch of nutrients, making it a fantastic option for those looking to enjoy a balanced meal.
Cooking Ratatouille with quinoa can be a delightful experience as you witness the transformation of fresh vegetables into a succulent dish. This recipe is simple yet effective, allowing the natural flavors of the ingredients to shine through. The combination of the earthy quinoa and the rich, sautéed vegetables won’t only satisfy your hunger but also leave you feeling nourished and energized.
Let’s explore the ingredients and steps needed to create this delightful dish that serves 4-6 people.
Ingredients:
- 1 cup quinoa, rinsed
- 2 cups vegetable broth or water
- 1 medium eggplant, diced
- 1 medium zucchini, diced
- 1 medium yellow squash, diced
- 1 red bell pepper, diced
- 1 yellow bell pepper, diced
- 1 onion, chopped
- 3 cloves garlic, minced
- 1 can (14 oz) diced tomatoes, drained
- 2 tablespoons olive oil
- 1 teaspoon dried thyme
- 1 teaspoon dried basil
- Salt and pepper to taste
- Fresh basil leaves for garnish (optional)
Cooking Instructions:
- Prepare the quinoa: In a medium saucepan, combine the rinsed quinoa and vegetable broth (or water). Bring it to a boil over medium-high heat, then reduce the heat to low, cover, and simmer for about 15 minutes or until the quinoa is fluffy and all the liquid is absorbed. Remove from heat and let it sit covered for 5 minutes before fluffing with a fork.
- Sauté the vegetables: In a large skillet or Dutch oven, heat the olive oil over medium heat. Add the chopped onion and sauté for about 3-4 minutes until it becomes translucent. Then, add the minced garlic and cook for an additional 1 minute until fragrant.
- Add the eggplant: Stir in the diced eggplant and cook for about 5-7 minutes, stirring occasionally until it starts to soften. This step is essential as it helps to release the moisture from the eggplant, making it tender.
- Incorporate the remaining vegetables: Add the diced zucchini, yellow squash, red and yellow bell peppers to the skillet. Season with salt, pepper, thyme, and basil. Cook for another 8-10 minutes, stirring occasionally, until all the vegetables are tender and well combined.
- Mix in the tomatoes: Once the vegetables are tender, stir in the drained diced tomatoes. Let the mixture cook for an additional 5 minutes to allow the flavors to meld together.
- Combine with quinoa: Gently fold the cooked quinoa into the vegetable mixture, ensuring everything is well mixed. Taste and adjust seasoning if necessary.
- Serve: Remove from heat, and if desired, garnish with fresh basil leaves before serving. Enjoy your healthy Ratatouille with Quinoa warm.
Extra Tips: When preparing Ratatouille with quinoa, feel free to customize the vegetables based on what you have on hand or your personal preferences. You can also add a splash of balsamic vinegar for a tangy kick or top with a sprinkle of feta cheese for added flavor.
This dish can be made ahead of time and reheated, making it a great option for meal prep. Additionally, the leftovers can be enjoyed cold as a salad or as a filling for wraps the next day.
Grilled Lemon Herb Chicken

Grilled Lemon Herb Chicken is a delightful and healthy dish that brings the vibrant flavors of the Mediterranean right to your dinner table. This recipe features succulent chicken marinated in a zesty blend of lemon juice, fresh herbs, and garlic, offering a rejuvenating taste that pairs beautifully with a variety of side dishes. Not only is it simple to prepare, but grilling the chicken enhances its natural flavors while keeping it moist and tender.
This dish is perfect for a family dinner or when entertaining guests, as it can be served alongside grilled vegetables, a fresh salad, or fluffy couscous. With just a few fresh ingredients and minimal prep time, you can create a meal that’s both satisfying and nutritious. Let’s explore the ingredients and instructions to whip up this delicious Grilled Lemon Herb Chicken!
Ingredients (Serves 4-6)
- 4 boneless, skinless chicken breasts
- 1/4 cup fresh lemon juice
- 1/4 cup olive oil
- 4 cloves garlic, minced
- 2 tablespoons fresh parsley, chopped
- 2 tablespoons fresh thyme, chopped
- 1 tablespoon fresh rosemary, chopped
- 1 teaspoon salt
- 1/2 teaspoon black pepper
- Lemon wedges (for serving)
Cooking Instructions
- Prepare the Marinade: In a medium bowl, combine the lemon juice, olive oil, minced garlic, chopped parsley, thyme, rosemary, salt, and black pepper. Whisk the ingredients together until they’re well blended. This marinade will infuse your chicken with flavor and help to tenderize the meat.
- Marinate the Chicken: Place the chicken breasts in a large resealable plastic bag or a shallow dish. Pour the marinade over the chicken, making sure each piece is thoroughly coated. Seal the bag or cover the dish and refrigerate for at least 1 hour, or up to 4 hours for maximum flavor. This step is vital as it allows the chicken to absorb the aromatic herbs and zesty lemon.
- Preheat the Grill: While the chicken is marinating, preheat your grill to medium-high heat. Make sure the grill grates are clean and lightly oiled to prevent sticking. A good pre-heating guarantees even cooking and beautiful grill marks on the chicken.
- Grill the Chicken: Remove the chicken from the marinade and let any excess drip off. Place the chicken on the hot grill and cook for 6-7 minutes on one side without moving it, allowing it to develop a nice sear. Flip the chicken and grill for an additional 5-6 minutes or until the internal temperature reaches 165°F (75°C). Cooking times may vary based on the thickness of the chicken breasts.
- Rest and Serve: Once cooked, remove the chicken from the grill and let it rest for 5 minutes to allow the juices to redistribute. This step is important for keeping the chicken moist and flavorful. Serve the grilled chicken with lemon wedges for an extra burst of citrus flavor.
Extra Tips
To enhance the flavor of your Grilled Lemon Herb Chicken even further, consider adding a splash of white wine to the marinade for added depth. Additionally, you can experiment with different herbs based on your preference—basil and oregano also make great substitutes.
For a more complete meal, pair the chicken with a light quinoa salad or grilled asparagus to keep the meal healthy and delicious. Enjoy your culinary creation!
French Onion Soup With Whole Wheat Bread
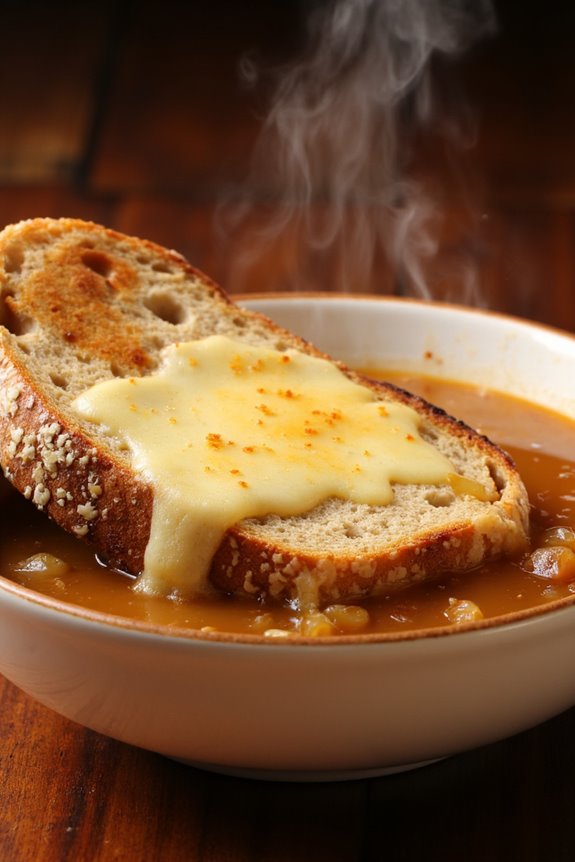
French onion soup is a classic dish that brings warmth and comfort to the dinner table. This version embraces health by incorporating whole wheat bread, which not only adds fiber but also enhances the flavor of the soup. The rich, caramelized onions paired with a savory broth create a delightful base, while the melted cheese on top adds a touch of indulgence. By using whole wheat bread instead of traditional white, you can enjoy this French favorite with a healthier twist, making it perfect for a cozy dinner with family or friends.
The beauty of French onion soup lies in its simplicity and the depth of flavor achieved through slow cooking. As the onions caramelize, they develop a sweet and savory profile that enhances the broth. Topped with a generous slice of whole wheat bread and a sprinkle of cheese, this dish is both satisfying and nourishing. Whether served as a starter or a main course, it’s a wonderful way to enjoy a taste of France while keeping your meal balanced and health-conscious.
Ingredients (Serves 4-6):
- 4 large onions, thinly sliced
- 4 tablespoons olive oil
- 4 cups low-sodium beef or vegetable broth
- 1 cup dry white wine (optional)
- 1 teaspoon sugar
- 2 teaspoons fresh thyme leaves (or 1 teaspoon dried thyme)
- Salt and pepper, to taste
- 4-6 slices of whole wheat bread
- 1 cup shredded Gruyère cheese (or a cheese of your choice)
Cooking Instructions:
- Caramelize the Onions: In a large, heavy-bottomed pot, heat the olive oil over medium heat. Add the sliced onions and a pinch of salt. Cook the onions slowly, stirring occasionally, for about 25-30 minutes, or until they become golden brown and caramelized. This step is essential for developing the deep flavor of the soup, so be patient and resist the urge to crank up the heat.
- Add Sugar and Thyme: Once the onions are caramelized, stir in the sugar and thyme. Cooking the sugar with the onions helps to enhance their sweetness further. Allow this mixture to cook for an additional 2-3 minutes until fragrant.
- Deglaze the Pot: If using white wine, pour it into the pot and scrape any browned bits off the bottom with a wooden spoon. This adds extra flavor to the soup and helps to lift the caramelized bits that contribute to its richness. Allow the wine to simmer for about 5 minutes to reduce slightly.
- Add Broth: Pour in the beef or vegetable broth and bring the mixture to a simmer. Season with salt and pepper to taste. Let it simmer for about 20-25 minutes, allowing the flavors to meld together beautifully.
- Prepare the Bread and Cheese: While the soup is simmering, preheat your oven to 350°F (175°C). Arrange the slices of whole wheat bread on a baking sheet and toast them in the oven for about 10 minutes, or until they’re lightly golden.
- Assemble and Broil: Once the soup is ready, ladle it into oven-safe bowls. Place a slice of toasted whole wheat bread on top of each bowl and sprinkle with shredded Gruyère cheese. Place the bowls under the broiler for 2-3 minutes, or until the cheese is bubbly and golden brown. Keep an eye on them to prevent burning.
- Serve: Carefully remove the bowls from the oven (they will be hot!) and let them cool slightly before serving. Enjoy your healthy French onion soup with whole wheat bread!
Extra Tips:
When making French onion soup, the key to achieving the best flavor is in the caramelization of the onions, so take your time with this step. If you prefer a vegetarian option, opt for vegetable broth instead of beef broth.
Additionally, feel free to experiment with different types of cheese; while Gruyère is traditional, you could also try mozzarella or a dairy-free cheese for a healthier alternative. For a bit of added richness, a splash of balsamic vinegar can also elevate the flavor profile. Enjoy your culinary journey to France!
Baked Cod With Tomatoes and Olives
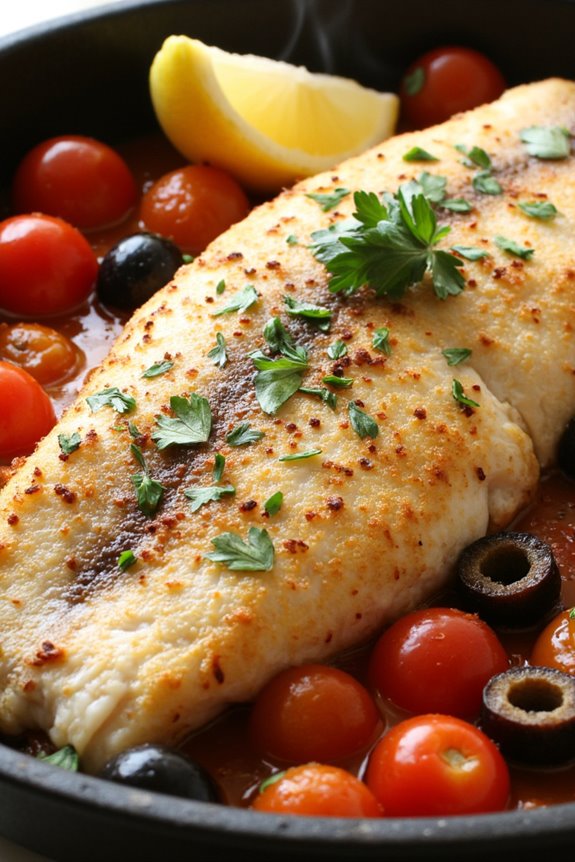
Baked Cod with Tomatoes and Olives is a delightful dish that beautifully combines the flavors of the Mediterranean in a healthy and satisfying way. This recipe features tender cod fillets baked to perfection with juicy tomatoes and briny olives, making it a perfect choice for a light dinner.
It’s not only delicious but also packed with nutrients, offering a great source of protein and omega-3 fatty acids from the fish, as well as vitamins and minerals from the vegetables.
This dish is simple to prepare, making it an excellent option for weeknight dinners or special occasions. The vibrant colors and aromas will transport you straight to the sunny shores of France, where fresh seafood is a staple. Serve it alongside a salad, some crusty whole-grain bread, or a side of steamed vegetables to complete the meal.
Ingredients (Serves 4-6):
- 4-6 cod fillets (6 ounces each)
- 2 cups cherry tomatoes, halved
- 1 cup pitted black olives, sliced
- 4 cloves garlic, minced
- 1/4 cup olive oil
- 1 teaspoon dried oregano
- 1 teaspoon salt
- 1/2 teaspoon black pepper
- 1/4 teaspoon red pepper flakes (optional)
- 1/4 cup fresh parsley, chopped (for garnish)
- Lemon wedges (for serving)
Cooking Instructions:
- Preheat the Oven: Start by preheating your oven to 400°F (200°C). This guarantees that the cod will cook evenly and helps to lock in moisture.
- Prepare the Baking Dish: Take a large baking dish and lightly grease it with a tablespoon of olive oil to prevent the fish from sticking. This also adds extra flavor to the dish.
- Combine Vegetables and Olives: In a mixing bowl, combine the halved cherry tomatoes, sliced olives, minced garlic, oregano, salt, black pepper, and red pepper flakes (if using). Drizzle with the remaining olive oil and toss everything together until well coated.
- Arrange the Cod Fillets: Place the cod fillets in the prepared baking dish and arrange the tomato and olive mixture on top of the fish. Make sure to distribute the vegetables evenly so that every bite contains a burst of flavor.
- Bake the Dish: Place the baking dish in the preheated oven and bake for about 20-25 minutes, or until the cod is cooked through and flakes easily with a fork. The tomatoes should be soft and juicy, creating a delicious sauce.
- Garnish and Serve: Once done, remove the dish from the oven and let it cool for a few minutes. Garnish with freshly chopped parsley and serve with lemon wedges on the side for an added zesty flavor.
Extra Tips:
For an extra layer of flavor, consider marinating the cod fillets in olive oil, lemon juice, and herbs for about 30 minutes before baking.
You can also experiment with different types of olives, such as green or Kalamata, to suit your taste preferences. Additionally, serving the dish with a side of whole-grain couscous or quinoa can provide a hearty and nutritious complement to the meal.
Chicken Provençal
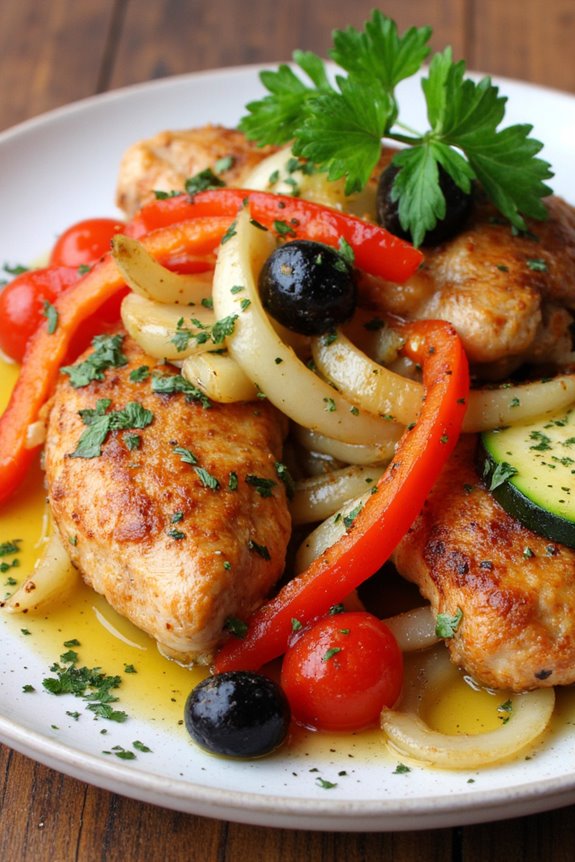
Chicken Provençal is a classic dish that embodies the vibrant flavors of the Mediterranean. Originating from the Provence region of France, this dish typically features chicken simmered with a medley of fresh vegetables, aromatic herbs, and a splash of olive oil, creating a healthy yet indulgent meal. The combination of tomatoes, olives, and herbs gives the chicken a delightful taste that’s both comforting and invigorating, making it a perfect dinner option for family gatherings or special occasions.
To make this dish, you’ll want to use high-quality ingredients to guarantee the best flavor and texture. Serving Chicken Provençal alongside a crisp salad or some whole-grain bread can elevate the meal further, providing a wholesome and satisfying dining experience. Whether you’re cooking for your family or entertaining friends, this dish is sure to impress with its rustic charm and mouthwatering taste.
Ingredients (Serves 4-6):
- 4 bone-in, skin-on chicken thighs
- 2 tablespoons olive oil
- 1 medium onion, diced
- 3 cloves garlic, minced
- 1 bell pepper, diced (red or yellow)
- 1 zucchini, sliced
- 1 cup cherry tomatoes, halved
- 1 cup pitted black olives, halved
- 1 teaspoon dried thyme
- 1 teaspoon dried oregano
- 1 teaspoon salt
- ½ teaspoon black pepper
- 1 cup chicken broth
- Fresh parsley, chopped for garnish
Cooking Instructions:
- Prepare the Chicken: Start by patting the chicken thighs dry with paper towels. This step is significant as it helps achieve a crispy skin when searing. Season the chicken generously with salt and pepper on both sides.
- Sear the Chicken: In a large skillet or Dutch oven, heat the olive oil over medium-high heat. Once the oil is shimmering, carefully place the chicken thighs skin-side down in the skillet. Sear for about 5-7 minutes until the skin is golden brown and crispy. Flip the chicken and cook for an additional 5 minutes on the other side. Once done, remove the chicken from the skillet and set aside.
- Sauté the Vegetables: In the same skillet, add the diced onion and bell pepper. Sauté for about 3-4 minutes until the onion is translucent. Then, add the minced garlic and zucchini, cooking for another 2 minutes until fragrant.
- Add Tomatoes and Olives: Stir in the halved cherry tomatoes and black olives, followed by the dried thyme and oregano. Mix everything well and allow it to cook for about 2 minutes to combine the flavors.
- Return the Chicken and Add Broth: Nestle the seared chicken thighs back into the skillet among the vegetables. Pour in the chicken broth, making sure the chicken is partially submerged. Bring the mixture to a gentle simmer.
- Simmer the Dish: Cover the skillet and reduce the heat to low. Let the chicken cook for 30-35 minutes, or until it reaches an internal temperature of 165°F (75°C) and is tender. If you prefer a thicker sauce, uncover the dish during the last 10 minutes to allow some of the liquid to evaporate.
- Serve and Garnish: Once cooked, remove the skillet from heat. Transfer the chicken and vegetables to a serving platter and garnish with freshly chopped parsley before serving.
Extra Tips:
For a deeper flavor, consider marinating the chicken in olive oil, garlic, and herbs for a few hours before cooking. This not only enhances the taste but also helps tenderize the meat.
Additionally, feel free to customize the vegetables based on what you have on hand—green beans or eggplant can be excellent substitutes. Serve with a good crusty bread to soak up the delicious sauce, making it a truly satisfying meal!
Vegetable Tarte Tatin
Vegetable Tarte Tatin is a delightful and healthy twist on the classic French dessert that’s typically made with apples. This savory version features a medley of seasonal vegetables, caramelized to perfection, and encased in a golden, flaky pastry. It’s an elegant dish that can be served as a main course or as a side alongside a crisp salad. The combination of flavors from the roasted vegetables and the buttery pastry creates a tantalizing experience for the palate.
Preparing this dish is a great way to showcase fresh, local vegetables, making it a perfect option for a healthy French dinner. The caramelization of the vegetables enhances their natural sweetness while adding a rich depth of flavor. Whether you’re entertaining guests or enjoying a family meal, Vegetable Tarte Tatin is sure to impress with its beautiful presentation and scrumptious taste.
Ingredients (serves 4-6):
- 1 sheet of puff pastry
- 2 tablespoons olive oil
- 1 medium onion, thinly sliced
- 2 medium zucchini, sliced into rounds
- 1 red bell pepper, sliced into strips
- 1 yellow bell pepper, sliced into strips
- 1 cup cherry tomatoes, halved
- 2 cloves garlic, minced
- 1 tablespoon balsamic vinegar
- Salt and pepper, to taste
- Fresh thyme, for garnish
Cooking Instructions:
- Preheat the Oven: Begin by preheating your oven to 400°F (200°C). This guarantees that the pastry will puff up nicely and the vegetables will roast evenly.
- Sauté the Vegetables: In a large oven-safe skillet, heat the olive oil over medium heat. Add the sliced onion and sauté for about 2-3 minutes until it begins to soften. Then, add the zucchini, bell peppers, and garlic. Sauté for an additional 5-7 minutes, stirring occasionally, until the vegetables are tender and slightly caramelized.
- Season the Mixture: Once the vegetables are cooked, stir in the cherry tomatoes, balsamic vinegar, salt, and pepper. Cook for another 2 minutes, allowing the flavors to meld together. Remove the skillet from heat.
- Prepare the Pastry: Roll out the puff pastry on a lightly floured surface to guarantee it fits over the vegetables in the skillet. Place the pastry over the vegetable mixture, tucking the edges down around the vegetables.
- Bake the Tarte Tatin: Place the skillet in the preheated oven and bake for 25-30 minutes, or until the pastry is golden brown and puffed.
- Invert and Serve: Once baked, carefully remove the skillet from the oven. Let it cool for a few minutes, then place a large serving plate on top of the skillet and invert it, allowing the tart to fall onto the plate. Garnish with fresh thyme before serving.
Extra Tips:
For added flavor, consider experimenting with different vegetables based on what’s in season, such as mushrooms or asparagus. You can also sprinkle some cheese, like goat cheese or feta, on top of the vegetables before adding the pastry for a richer taste.
Make sure to handle the puff pastry gently to avoid tearing it, and allow the tart to cool slightly before inverting for a cleaner presentation. Enjoy this delicious dish warm or at room temperature!
Zucchini Noodles With Pesto
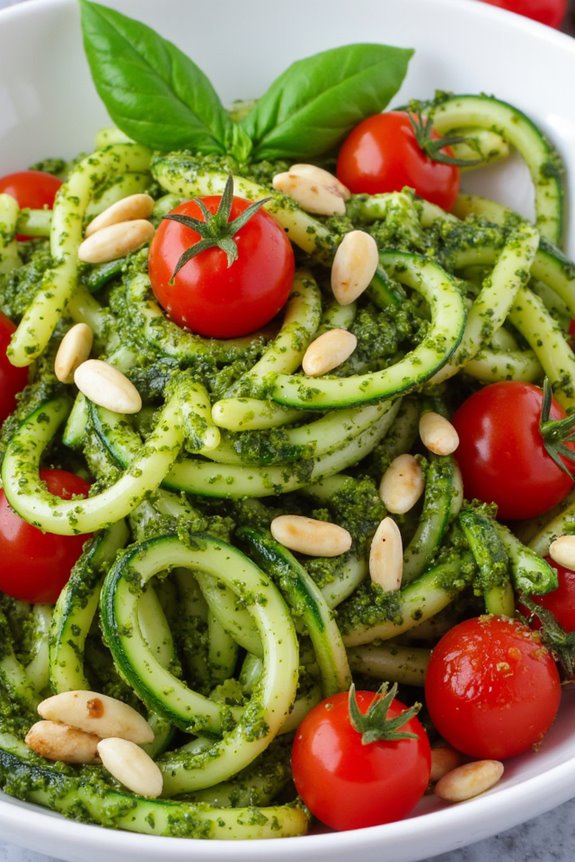
Zucchini Noodles with Pesto is a delightful and healthy alternative to traditional pasta dishes, perfect for a light French dinner. This dish not only embraces the fresh flavors of summer vegetables but also showcases the vibrant and aromatic taste of homemade pesto. With zucchini’s natural crunch and the rich, herbaceous notes of pesto, this recipe is sure to impress your family and friends while keeping your meal nutritious and low-carb.
The beauty of Zucchini Noodles with Pesto lies in its simplicity. It requires minimal ingredients and can be prepared in under 30 minutes, making it an excellent choice for a busy weeknight dinner or a leisurely weekend meal. The addition of cherry tomatoes and pine nuts adds texture and flavor, making every bite a rejuvenating experience. So, grab your spiralizer and let’s get cooking!
Ingredients (Serves 4-6):
- 4 medium-sized zucchinis
- 2 cups fresh basil leaves
- 1/2 cup grated Parmesan cheese
- 1/3 cup pine nuts (lightly toasted)
- 2-3 cloves garlic, minced
- 1/2 cup extra virgin olive oil
- Salt and pepper to taste
- 1 cup cherry tomatoes, halved (optional)
- Fresh basil leaves for garnish (optional)
Cooking Instructions:
1. Prepare the Zucchini Noodles: Start by washing the zucchinis thoroughly. Using a spiralizer, create long, thin strands of zucchini, resembling spaghetti. If you don’t have a spiralizer, you can use a julienne peeler or a vegetable peeler to create ribbon-like noodles.
Place the zucchini noodles in a colander and sprinkle with a pinch of salt to help draw out excess moisture. Let them sit for about 10 minutes.
2. Make the Pesto: While the zucchini is draining, prepare the pesto. In a food processor, combine the fresh basil leaves, grated Parmesan cheese, toasted pine nuts, and minced garlic. Pulse until the mixture is finely chopped.
With the processor running, slowly drizzle in the extra virgin olive oil until the pesto is smooth and creamy. Season with salt and pepper to taste, making adjustments as needed.
3. Cook the Zucchini Noodles: After the zucchini noodles have rested, heat a large skillet over medium heat. Add a splash of olive oil and once it’s hot, add the zucchini noodles.
Sauté for about 2-3 minutes, just until they’re tender but still al dente. Avoid overcooking, as you want to maintain some crunch.
4. Combine and Serve: Remove the skillet from heat and add the prepared pesto to the zucchini noodles. Toss until the noodles are evenly coated with the pesto.
If using, fold in the halved cherry tomatoes for added flavor and color. Serve immediately, garnishing with additional basil leaves and a sprinkle of Parmesan cheese if desired.
Extra Tips:
For added protein, consider tossing in some cooked chicken or shrimp to the dish. You can also customize your pesto by adding other herbs like parsley or arugula for a different flavor profile.
If you prefer a creamier sauce, blend in a spoonful of cream cheese or Greek yogurt to the pesto. Finally, make sure to serve the dish right away, as zucchini noodles tend to release moisture over time, which can make the dish watery. Enjoy your healthy and delicious Zucchini Noodles with Pesto!
Lentil Salad With Goat Cheese
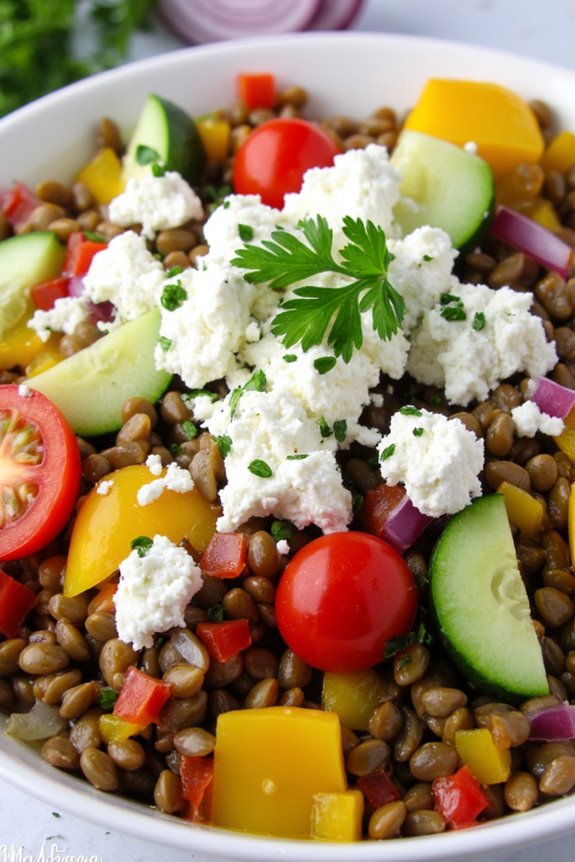
Lentil Salad With Goat Cheese is a delightful and nutritious dish that beautifully combines the earthy flavors of lentils with the creamy tang of goat cheese. This salad isn’t only satisfying but also packed with protein and fiber, making it an ideal choice for a healthy French dinner.
The vibrant colors and textures of the ingredients bring a touch of elegance to the table, and it’s easy to prepare, which is perfect for entertaining guests or enjoying a cozy meal at home.
This salad can be served warm or chilled, making it versatile for any occasion. The addition of fresh vegetables, herbs, and a zesty vinaigrette elevates the dish, ensuring that every bite is bursting with flavor.
Whether you’re a seasoned cook or just starting in the kitchen, this Lentil Salad With Goat Cheese will impress everyone around the dinner table.
Ingredients (Serves 4-6)
- 1 cup green or brown lentils, rinsed
- 3 cups water or vegetable broth
- 1 medium red onion, finely chopped
- 1 bell pepper, diced (any color)
- 1 cup cherry tomatoes, halved
- 1 cucumber, diced
- 4 ounces goat cheese, crumbled
- 1/4 cup fresh parsley, chopped
- 1/4 cup olive oil
- 2 tablespoons red wine vinegar
- 1 teaspoon Dijon mustard
- Salt and pepper to taste
Cooking Instructions
- Cook the Lentils: In a medium-sized pot, combine the rinsed lentils and water or vegetable broth. Bring to a boil over medium-high heat, then reduce the heat to low and let it simmer for about 20-25 minutes or until the lentils are tender but not mushy. Drain any excess liquid and set aside to cool.
- Prepare the Vegetables: While the lentils are cooking, chop the red onion, bell pepper, cucumber, and cherry tomatoes. Make sure to cut them into uniform sizes for even distribution in the salad. Place all the chopped vegetables in a large mixing bowl.
- Make the Vinaigrette: In a small bowl, whisk together the olive oil, red wine vinegar, Dijon mustard, salt, and pepper until well combined. This vinaigrette will add a flavorful punch to the salad.
- Combine Ingredients: Once the lentils have cooled slightly, add them to the bowl of chopped vegetables. Pour the vinaigrette over the lentil and vegetable mixture, and gently toss everything together until well coated.
- Add Goat Cheese and Herbs: Finally, sprinkle the crumbled goat cheese and chopped parsley on top of the salad. Toss gently to incorporate without breaking the cheese too much, ensuring that it’s evenly distributed throughout the salad.
- Serve: You can serve the salad immediately for a warm dish or refrigerate it for about 30 minutes to allow the flavors to meld. If serving cold, give it a gentle toss before plating.
Extra Tips
When preparing the Lentil Salad With Goat Cheese, consider adding some extra crunch by incorporating nuts such as walnuts or almonds.
You can also customize the vegetables based on seasonal availability or personal preference. For a heartier meal, serve this salad alongside grilled chicken or fish.
If you’re making it ahead of time, store the salad without the goat cheese and add it just before serving to maintain its freshness. Enjoy your healthy and delicious French dinner!
Seared Salmon With Asparagus
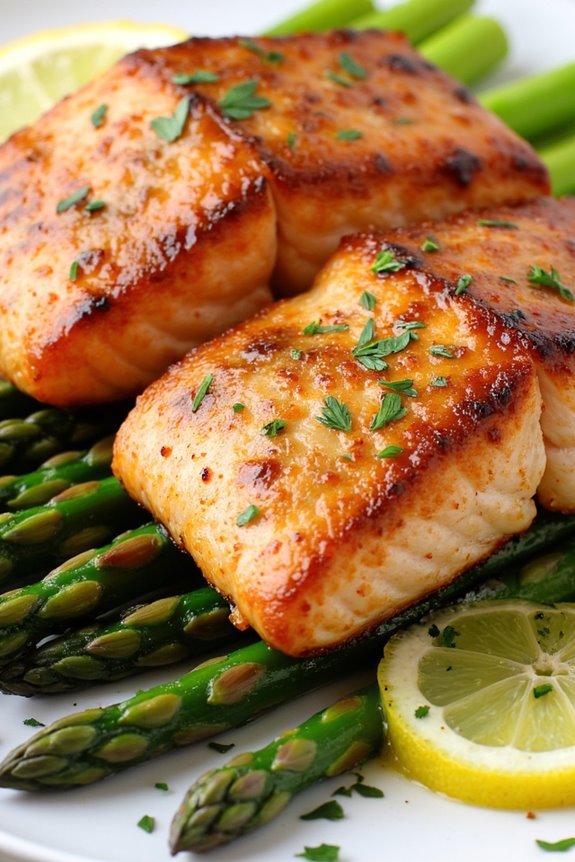
Seared Salmon with Asparagus is a classic French dish that perfectly balances flavor and health. The rich, buttery taste of the salmon is complemented by the crispiness of the asparagus, making it a delightful meal that isn’t only delicious but also nutrient-packed.
This dish is simple to prepare and can elevate any dinner table with its elegant presentation and wholesome ingredients.
Cooking seared salmon is all about technique. With the right methods, you can achieve a perfectly crispy skin while keeping the fish tender and moist on the inside. The asparagus, seasoned and cooked to perfection, adds a delightful crunch and vibrant color to the plate.
This dish is perfect for a weeknight dinner or a special occasion, and it pairs beautifully with a light white wine for an authentic French dining experience.
Ingredients (serving size: 4-6 people)
- 4-6 salmon fillets (about 6 ounces each)
- 1 pound fresh asparagus, trimmed
- 2 tablespoons olive oil
- 2 cloves garlic, minced
- Salt and pepper to taste
- 1 lemon (zest and juice)
- Fresh parsley, chopped (for garnish)
Cooking Instructions
1. Prepare the Ingredients: Start by gathering all the ingredients. Rinse the salmon fillets under cold water and pat them dry with paper towels. Trim the tough ends of the asparagus and set aside. Mince the garlic and zest the lemon, preparing everything for quick and easy cooking.
2. Season the Salmon: In a small bowl, mix together salt, pepper, and lemon zest. Rub this mixture generously over both sides of each salmon fillet. This will enhance the flavor of the fish while it cooks.
3. Cook the Asparagus: Heat 1 tablespoon of olive oil in a large skillet over medium heat. Add the trimmed asparagus, season with salt and pepper, and sauté for about 4-5 minutes until they’re bright green and tender-crisp.
Add the minced garlic in the last minute of cooking to prevent burning. Remove the asparagus from the skillet and set aside.
4. Sear the Salmon: In the same skillet, add another tablespoon of olive oil and increase the heat to medium-high. Once the oil is hot, carefully place the salmon fillets skin-side down into the skillet. Cook for about 4-5 minutes until the skin is crispy and golden brown.
Flip the fillets and cook for another 3-4 minutes, or until the salmon is cooked through and flakes easily with a fork.
5. Finish and Serve: Return the sautéed asparagus to the skillet with the salmon for the last minute of cooking to warm it through. Squeeze fresh lemon juice over the salmon and asparagus before serving.
Plate the dish and garnish with chopped parsley for a pop of color.
Extra Tips
For the best results, let the salmon sit at room temperature for about 15 minutes before cooking to guarantee even cooking.
If you prefer your salmon more well-done, simply cook it for an additional minute or two. It’s also a great idea to experiment with different seasonings, such as dill or thyme, to complement the flavors of the fish and asparagus.
Enjoy your healthy French dinner!
Ratatouille Stuffed Peppers
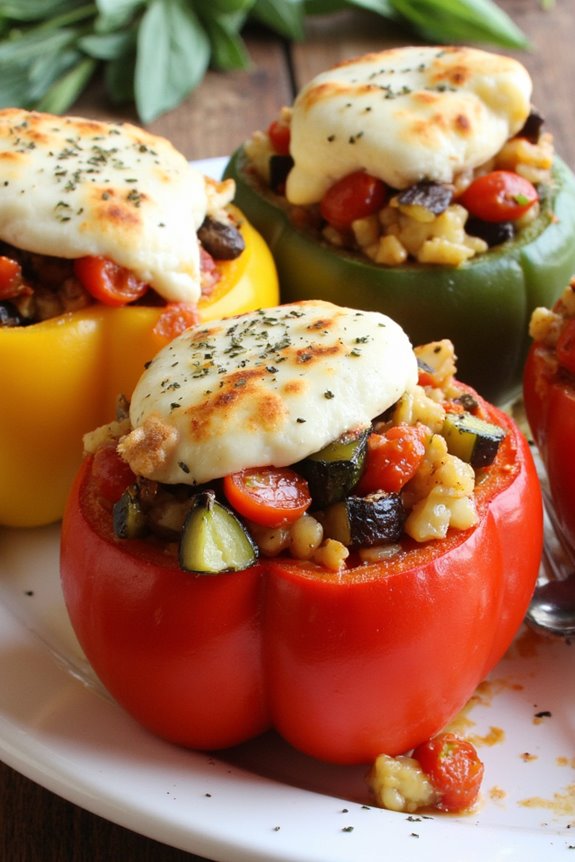
Ratatouille Stuffed Peppers are a vibrant and flavorful dish that captures the essence of traditional French cooking while being both healthy and satisfying. This recipe takes the classic ratatouille—a medley of vegetables such as zucchini, eggplant, bell peppers, and tomatoes—and transforms it into a delightful filling for bell peppers. Not only does this dish highlight the natural flavors of fresh produce, but it also offers a colorful presentation that’s certain to impress your family and friends.
Cooking Ratatouille Stuffed Peppers is a wonderful way to enjoy seasonal vegetables and can easily be customized with your favorite herbs and spices. This dish is perfect for a hearty dinner and can be served alongside a simple green salad or crusty whole-grain bread. With its nutritious ingredients and appealing appearance, Ratatouille Stuffed Peppers is a fantastic way to bring a taste of France into your home kitchen.
Ingredients (Serves 4-6):
- 4 large bell peppers (any color)
- 1 medium eggplant, diced
- 1 medium zucchini, diced
- 1 medium yellow squash, diced
- 1 cup cherry tomatoes, halved
- 1 small onion, diced
- 2 cloves garlic, minced
- 2 tablespoons olive oil
- 1 teaspoon dried thyme
- 1 teaspoon dried basil
- Salt and pepper to taste
- 1 cup cooked quinoa or rice (optional, for added texture)
- 1 cup shredded mozzarella cheese (optional, for topping)
Cooking Instructions:
- Preheat the Oven: Start by preheating your oven to 375°F (190°C). This guarantees that your stuffed peppers will cook evenly and thoroughly once they’re placed inside.
- Prepare the Bell Peppers: While the oven is heating, wash the bell peppers and slice the tops off. Remove the seeds and membranes from the inside, making sure to keep the peppers intact. Set them aside.
- Sauté the Vegetables: In a large skillet, heat the olive oil over medium heat. Add the diced onion and garlic, sautéing until the onion becomes translucent. This should take about 3-4 minutes.
- Add Remaining Vegetables: To the skillet, add the diced eggplant, zucchini, yellow squash, and cherry tomatoes. Sprinkle in the dried thyme, dried basil, salt, and pepper. Cook for about 7-10 minutes, stirring occasionally, until the vegetables are tender and have released their juices.
- Combine with Quinoa or Rice: If you’re using quinoa or rice, stir it into the sautéed vegetable mixture. This addition will give the filling extra heartiness and texture. Mix well to combine all ingredients and adjust seasoning as desired.
- Stuff the Peppers: Carefully spoon the vegetable mixture into each prepared bell pepper, filling them generously. If desired, sprinkle shredded mozzarella cheese on top of each stuffed pepper for a delicious cheesy finish.
- Bake: Place the stuffed peppers upright in a baking dish. If needed, add a splash of vegetable broth or water to the bottom of the dish to help steam the peppers while baking. Cover the dish with aluminum foil and bake in the preheated oven for 25 minutes. Then, remove the foil and bake for an additional 10-15 minutes, or until the peppers are tender and the cheese is bubbly and golden.
- Serve: Once done, remove the stuffed peppers from the oven and allow them to cool for a few minutes before serving. They can be enjoyed warm and make for great leftovers as well.
Extra Tips:
For added depth of flavor, consider roasting the vegetables before stuffing them into the peppers. This will enhance their natural sweetness and provide a more complex taste.
Additionally, feel free to experiment with different herbs or spices based on your preferences; fresh basil, parsley, or even a pinch of red pepper flakes can elevate the dish further.
If you want a heartier version, consider adding ground turkey or lentils to the vegetable mix. Enjoy your culinary adventure with these Ratatouille Stuffed Peppers!
Spinach and Feta Crepes
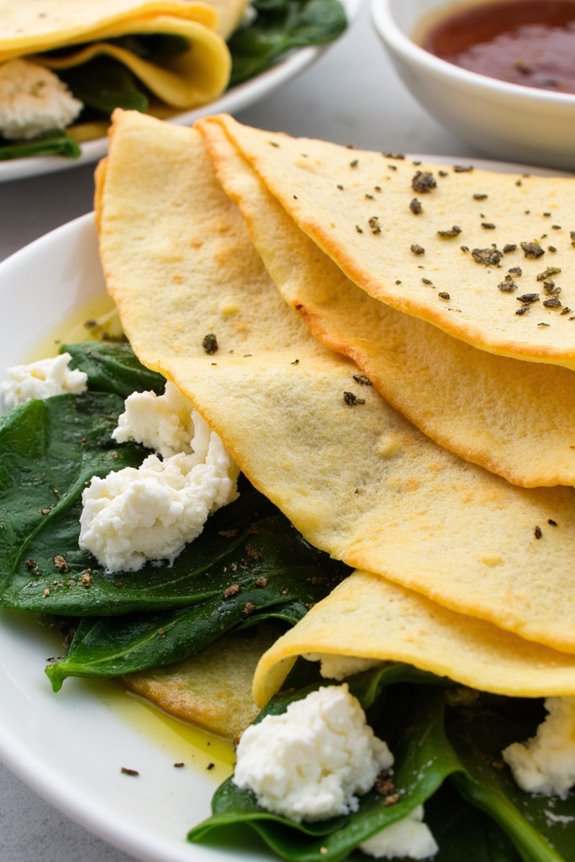
Spinach and Feta Crepes are a delightful and healthy option for a French dinner that can impress your family and friends while being easy to prepare. These savory crepes are filled with a flavorful mixture of sautéed spinach, creamy feta cheese, and aromatic herbs, making them a perfect dish that combines textures and tastes. Not only are they delicious, but they’re also packed with nutrients, making them a wholesome choice for any meal.
Making crepes from scratch is simpler than it may seem, and the key to achieving the perfect crepe lies in a well-blended batter and the right cooking technique. Once you have prepared the crepes, the filling comes together quickly, allowing you to serve a beautiful and satisfying dish that embodies the essence of French cuisine.
Whether you choose to serve them with a light salad or a drizzle of olive oil, these Spinach and Feta Crepes are sure to become a favorite in your household.
Ingredients (Serves 4-6)
- 1 cup all-purpose flour
- 2 large eggs
- 1 ¼ cups milk
- 1 tablespoon melted butter
- ½ teaspoon salt
- 2 tablespoons olive oil (for sautéing)
- 4 cups fresh spinach, chopped
- 1 cup feta cheese, crumbled
- 2 cloves garlic, minced
- 1 teaspoon dried oregano
- Salt and pepper to taste
Cooking Instructions
- Prepare the Crepe Batter: In a large mixing bowl, whisk together the flour and salt. In a separate bowl, beat the eggs and then add the milk and melted butter. Gradually pour the wet ingredients into the dry ingredients, whisking until the batter is smooth and free of lumps. Let the batter rest for at least 30 minutes to allow the gluten to relax.
- Cook the Crepes: Heat a non-stick skillet or crepe pan over medium heat and lightly grease it with a bit of oil or butter. Pour about ¼ cup of batter into the center of the pan, quickly swirling it around to spread the batter evenly across the bottom. Cook for 1-2 minutes until the edges start to lift and the bottom is lightly golden. Flip the crepe and cook for another 1-2 minutes. Transfer to a plate and repeat with the remaining batter, stacking the crepes as you go.
- Prepare the Filling: In the same skillet, add olive oil and heat over medium heat. Add the minced garlic and sauté for about 30 seconds until fragrant. Then, add the chopped spinach and cook until wilted, about 3-4 minutes. Remove from heat, and let it cool slightly before mixing in the crumbled feta cheese and oregano. Season with salt and pepper to taste.
- Assemble the Crepes: Take one crepe and place a generous spoonful of the spinach and feta filling in the center. Fold the sides of the crepe over the filling and then roll it up. Repeat with the remaining crepes and filling.
- Serve: You can serve the crepes warm, drizzled with a little olive oil or topped with a light salad. Garnish with fresh herbs if desired.
Extra Tips
When making crepes, be sure to let the batter rest for at least half an hour; this will improve the texture and make the crepes more pliable.
Additionally, don’t hesitate to experiment with the filling by adding ingredients like sun-dried tomatoes, olives, or herbs to enhance the flavor profile. Always use a non-stick skillet, and if your crepes tend to stick, consider adding a little more butter or oil to the pan.
Enjoy your cooking experience and bon appétit!
Herb-Crusted Pork Tenderloin
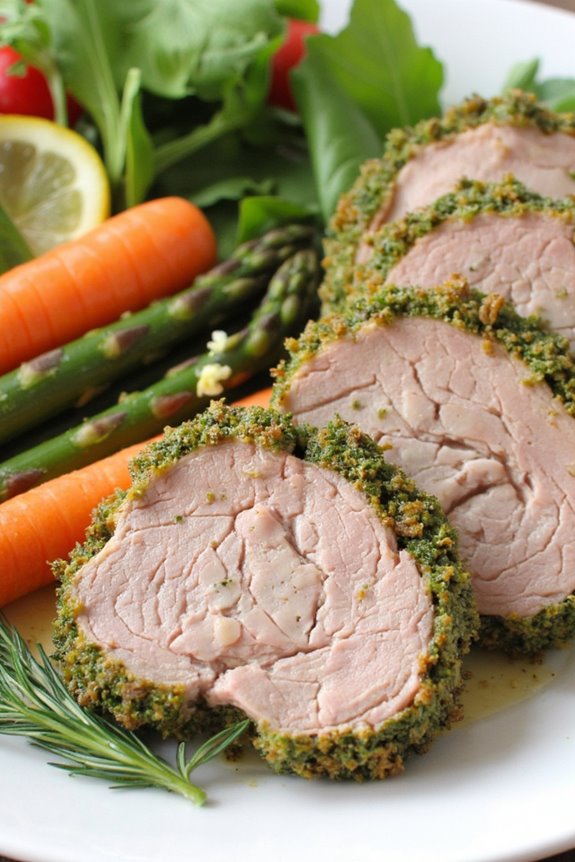
Herb-Crusted Pork Tenderloin is a delightful French-inspired dish that combines the succulent flavors of tender pork with a fragrant herb crust. This dish isn’t only delicious but also healthy, making it perfect for a family dinner or a special occasion.
The combination of fresh herbs, garlic, and a hint of Dijon mustard creates an aromatic crust that beautifully enhances the natural flavors of the pork, guaranteeing each bite is juicy and packed with flavor.
Cooking this dish is quite simple and can be achieved in just a few steps. The pork tenderloin is first seared to lock in the juices, then coated in a mixture of herbs and spices before being roasted to perfection.
Served alongside seasonal vegetables or a light salad, this dish provides a balanced and satisfying meal that will impress your guests while also being nutritious.
Ingredients (Serves 4-6):
- 1.5 to 2 pounds pork tenderloin
- 2 tablespoons Dijon mustard
- 2 tablespoons olive oil
- 2 cloves garlic, minced
- 1 tablespoon fresh rosemary, chopped
- 1 tablespoon fresh thyme, chopped
- 1 tablespoon fresh parsley, chopped
- Salt and pepper to taste
- 1 teaspoon lemon zest (optional)
Cooking Instructions:
- Preheat the Oven: Begin by preheating your oven to 400°F (200°C). This guarantees that the pork tenderloin will cook evenly and develop a nice crust when roasted.
- Prepare the Pork Tenderloin: Rinse the pork tenderloin under cold water and pat it dry with paper towels. This step is vital as it helps the herb crust adhere better to the meat.
- Season and Sear the Pork: In a large skillet, heat the olive oil over medium-high heat. Season the pork tenderloin generously with salt and pepper. Once the oil is hot, add the pork and sear it on all sides for about 3-4 minutes per side, until it’s golden brown. This locks in the juices and adds flavor.
- Make the Herb Mixture: In a small bowl, combine the Dijon mustard, minced garlic, chopped rosemary, thyme, parsley, and lemon zest (if using). Mix well to form a paste.
- Coat the Pork: Once the pork is seared, remove it from the skillet and place it on a baking tray lined with parchment paper. Spread the herb mixture evenly over the top and sides of the pork tenderloin, guaranteeing it’s well-coated.
- Roast the Pork: Place the baking tray in the preheated oven and roast the pork for about 20-25 minutes, or until its internal temperature reaches 145°F (63°C). Use a meat thermometer for accuracy.
- Rest the Pork: Once cooked, remove the pork from the oven and let it rest for 5-10 minutes. This resting period allows the juices to redistribute throughout the meat, resulting in a more tender and flavorful dish.
- Slice and Serve: After resting, slice the pork tenderloin into medallions and serve it warm with your choice of sides. Enjoy the delicious flavors of your herb-crusted pork tenderloin!
Extra Tips:
When making Herb-Crusted Pork Tenderloin, feel free to experiment with different herbs according to your taste preferences or seasonal availability. Fresh herbs tend to provide the best flavor, but dried herbs can also be used if fresh ones aren’t available—just remember to adjust the quantities, as dried herbs are more concentrated.
Additionally, serving the pork with a light sauce, such as a balsamic reduction or a simple pan sauce made from the drippings, can take this dish to the next level. Enjoy your culinary adventure!
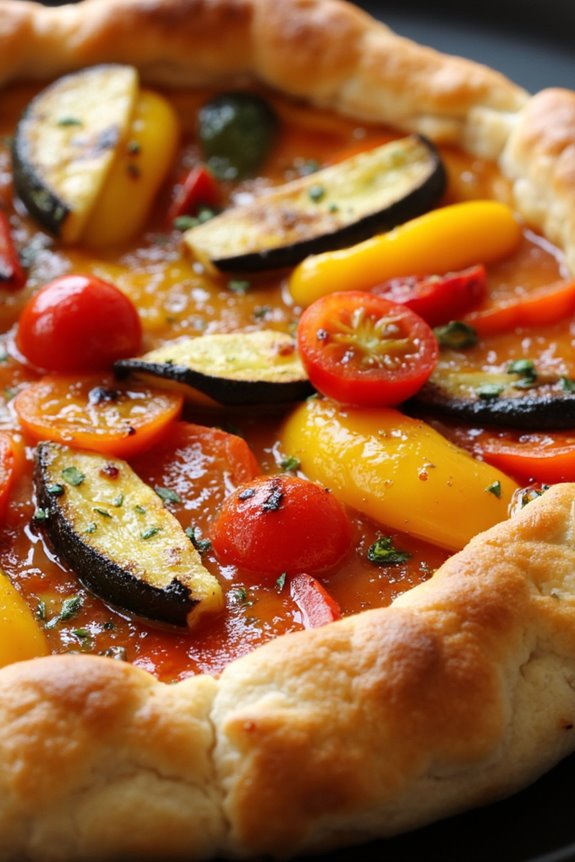
Roasted Vegetable Galette
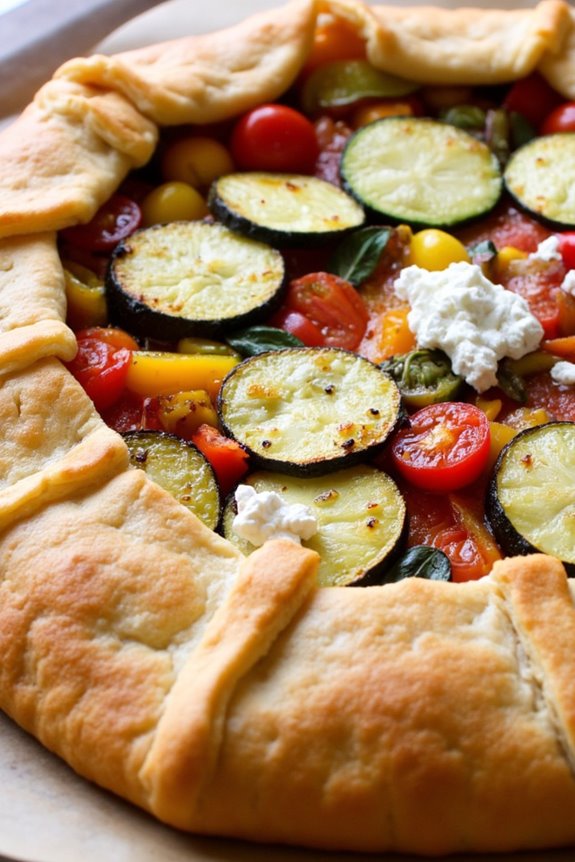
The Roasted Vegetable Galette is a delightful and rustic French dish that celebrates the flavors of seasonal vegetables. This free-form tart isn’t only visually appealing but also packed with nutrition, making it a perfect centerpiece for a healthy French dinner.
The flaky crust, made with whole wheat flour, encases an array of roasted vegetables, offering a medley of textures and tastes that are sure to please any palate.
Preparing a galette is simpler than it may seem. The beauty of this dish lies in its versatility; you can use any combination of vegetables that you have on hand or that are in season. Whether it’s zucchini, bell peppers, or eggplant, the roasted flavors meld beautifully with fresh herbs and creamy cheese.
Serve it with a crisp salad and a glass of French wine for a complete meal that showcases the best of healthy French cuisine.
Ingredients (serves 4-6):
- 1 ½ cups whole wheat flour
- ½ cup unsalted butter, chilled and cubed
- 1 teaspoon salt
- 4-5 tablespoons ice water
- 2 cups mixed seasonal vegetables (such as zucchini, bell peppers, red onion, and cherry tomatoes)
- 2 tablespoons olive oil
- Salt and pepper to taste
- 1 teaspoon dried thyme
- 1 cup goat cheese or feta cheese, crumbled
- 1 egg, beaten (for egg wash)
Cooking Instructions:
1. Prepare the Dough: In a mixing bowl, combine the whole wheat flour and salt. Add the cubed butter and use a pastry cutter or your fingers to mix until the mixture resembles coarse crumbs.
Gradually add the ice water, one tablespoon at a time, mixing until the dough comes together. Shape it into a disc, wrap in plastic wrap, and refrigerate for at least 30 minutes.
2. Roast the Vegetables: Preheat your oven to 400°F (200°C). Chop your selected vegetables into bite-sized pieces and place them on a baking sheet.
Drizzle with olive oil, season with salt, pepper, and dried thyme, and toss to coat. Roast the vegetables for about 20-25 minutes, or until they’re tender and slightly caramelized. Remove from the oven and let them cool slightly.
3. Roll Out the Dough: On a floured surface, roll out the chilled dough into a large circle, about 12 inches in diameter. Transfer the rolled dough to a parchment-lined baking sheet.
4. Assemble the Galette: Place the roasted vegetables in the center of the dough circle, leaving a 2-inch border around the edges.
Sprinkle the crumbled goat cheese or feta over the vegetables. Carefully fold the edges of the dough over the filling, pleating it as you go and leaving the center exposed.
5. Bake the Galette: Brush the exposed dough edges with the beaten egg to give it a golden color when baked. Bake in the preheated oven for 30-35 minutes, or until the crust is golden brown and the cheese is slightly melted.
6. Serve: Allow the galette to cool for a few minutes before slicing. Serve warm or at room temperature, garnished with fresh herbs if desired.
Extra Tips:
For the best flavor and texture, feel free to experiment with different cheeses or add a sprinkle of fresh herbs like basil or parsley just before serving.
Additionally, make sure not to overcrowd the vegetables on the baking sheet; this allows for even roasting and caramelization, enhancing their natural sweetness.
If you have any leftover galette, it can be stored in the refrigerator and enjoyed cold or reheated for a quick and delicious meal.