

Exploring the vibrant world of French cuisine is like adding a splash of color to your meals. Think classic Ratatouille or a Provencal Vegetable Tian; these dishes are all about celebrating fresh, seasonal produce. Each recipe is a feast for the eyes and a treat for your taste buds. If you’re eager to elevate your dining experience with these easy yet impressive recipes, you’re in the right place. Let’s get started on this culinary journey together!
Classic Ratatouille

Ratatouille is a traditional Provençal dish that celebrates the vibrant flavors of summer vegetables. Originating from France, this rustic vegetable medley isn’t only visually stunning but also incredibly versatile. It can be served hot, warm, or at room temperature, making it a perfect side dish for any meal or a delightful vegetarian main course. The key to a great ratatouille lies in the quality of the ingredients; using fresh, seasonal vegetables will elevate the dish to new heights.
In this recipe, we’ll guide you through preparing a classic ratatouille that brings together the rich flavors of eggplant, zucchini, bell peppers, and tomatoes, all simmered with fragrant herbs. This dish isn’t only a feast for the eyes but also a wholesome option that dishes out nutrients and taste. Whether you’re preparing a family dinner or hosting a gathering, this colorful vegetable dish is sure to impress.
Ingredients (Serves 4-6):
- 1 medium eggplant, diced
- 2 medium zucchini, sliced
- 1 red bell pepper, diced
- 1 yellow bell pepper, diced
- 1 medium onion, chopped
- 2 cloves garlic, minced
- 4 large ripe tomatoes, diced (or 1 can of diced tomatoes)
- 1/4 cup olive oil
- 1 teaspoon dried thyme
- 1 teaspoon dried basil
- Salt and pepper to taste
- Fresh basil leaves, for garnish (optional)
Cooking Instructions:
- Prepare the Vegetables: Start by washing and chopping all your vegetables. Dice the eggplant and bell peppers, slice the zucchini, chop the onion, and mince the garlic. If you’re using fresh tomatoes, dice them as well. This prep work guarantees that the cooking process goes smoothly and efficiently.
- Sauté the Onion and Garlic: In a large skillet or Dutch oven, heat the olive oil over medium heat. Add the chopped onion and sauté for about 5 minutes, or until it becomes translucent. Then, add the minced garlic and cook for an additional minute, stirring frequently to prevent burning.
- Cook the Eggplant: Add the diced eggplant to the skillet and cook for about 5-7 minutes, stirring occasionally. The eggplant will begin to soften and absorb the flavors from the onion and garlic.
- Incorporate the Other Vegetables: Next, add the zucchini and bell peppers to the skillet. Stir well to combine all the vegetables, then cook for another 5 minutes until they start to soften.
- Add Tomatoes and Herbs: Stir in the diced tomatoes (or canned tomatoes) along with the dried thyme and basil. Season with salt and pepper to taste. Bring the mixture to a gentle simmer, then reduce the heat to low.
- Simmer: Cover the skillet and let the ratatouille simmer for about 20-30 minutes. Stir occasionally, allowing the flavors to meld together and the vegetables to become tender. The longer it simmers, the more the flavors will develop.
- Taste and Adjust: After simmering, taste the ratatouille and adjust the seasoning if necessary. If you prefer a thicker consistency, you can uncover it and let it cook for an additional 10 minutes.
- Serve: Remove the ratatouille from heat and let it cool for a few minutes. Serve warm or at room temperature, garnished with fresh basil leaves if desired.
Extra Tips:
When making ratatouille, feel free to experiment with the vegetables you include. Seasonal vegetables like squash, carrots, or even green beans can add unique flavors to the dish.
Additionally, for a deeper flavor, consider adding a splash of balsamic vinegar or a pinch of sugar to balance the acidity of the tomatoes. Leftover ratatouille can be stored in the refrigerator for up to four days and tastes even better the next day as the flavors continue to develop.
Provencal Vegetable Tian

Provencal Vegetable Tian is a classic French dish that beautifully showcases the vibrant flavors of fresh vegetables, all baked together in a lovely, rustic presentation. Originating from the Provence region, this dish is a delightful medley of seasonal vegetables, typically including zucchini, eggplant, and tomatoes, layered in a baking dish and drizzled with olive oil and fragrant herbs. The result is a stunning and colorful dish that isn’t only visually appealing but also healthy and satisfying.
This dish is perfect for a summer gathering or as a side to complement grilled meats. The combination of vegetables and herbs offers a taste of Provence, bringing the warmth and essence of the Mediterranean to your table. Easy to prepare and requiring minimal ingredients, Provencal Vegetable Tian is a versatile option that can be served warm or at room temperature, making it an ideal dish for entertaining or meal prep.
Ingredients (Serves 4-6):
- 1 medium eggplant
- 2 medium zucchini
- 2 medium tomatoes
- 1 medium onion
- 3 cloves garlic, minced
- 1/4 cup olive oil
- 1 teaspoon dried thyme
- 1 teaspoon dried rosemary
- Salt and pepper to taste
- Fresh basil leaves for garnish (optional)
Cooking Instructions:
- Preheat the Oven: Begin by preheating your oven to 375°F (190°C). This will guarantee that the tian cooks evenly and the vegetables become tender while retaining their flavor.
- Prepare the Vegetables: Wash and slice the eggplant, zucchini, and tomatoes into thin rounds, about 1/4 inch thick. Additionally, finely chop the onion and mince the garlic. These vegetables will be layered in the baking dish, so uniformity in size helps with even cooking.
- Sauté the Onions and Garlic: In a large skillet, heat 2 tablespoons of olive oil over medium heat. Add the chopped onion and minced garlic, sautéing until the onions become translucent and fragrant, about 3-4 minutes. This step builds a flavorful base for the dish.
- Layer the Vegetables: In a greased baking dish, arrange the sautéed onions and garlic as the base layer. Next, layer the sliced eggplant, zucchini, and tomatoes in an alternating pattern, standing them upright for a beautiful presentation. You can create concentric circles or simply layer them flat, depending on your preference.
- Season and Drizzle: Once all the vegetables are layered, drizzle the remaining olive oil over the top. Sprinkle with dried thyme, rosemary, salt, and pepper to taste. This seasoning will enhance the natural flavors of the vegetables as they roast.
- Bake the Tian: Cover the baking dish with aluminum foil and place it in the preheated oven. Bake for 30 minutes covered, then remove the foil and bake for an additional 15-20 minutes, or until the vegetables are tender and lightly browned on top.
- Garnish and Serve: Once cooked, remove the tian from the oven and allow it to cool slightly. Garnish with fresh basil leaves if desired before serving. This dish can be enjoyed warm or at room temperature.
Extra Tips:
For an added depth of flavor, consider incorporating different herbs like oregano or adding a sprinkle of grated cheese on top during the last 10 minutes of baking.
If you prefer a more colorful dish, you can include bell peppers or carrots as part of your vegetable mix. Additionally, feel free to experiment with the arrangement; a layered, spiral presentation can make the dish even more visually appealing while showcasing the freshness of your ingredients.
French Green Bean Salad
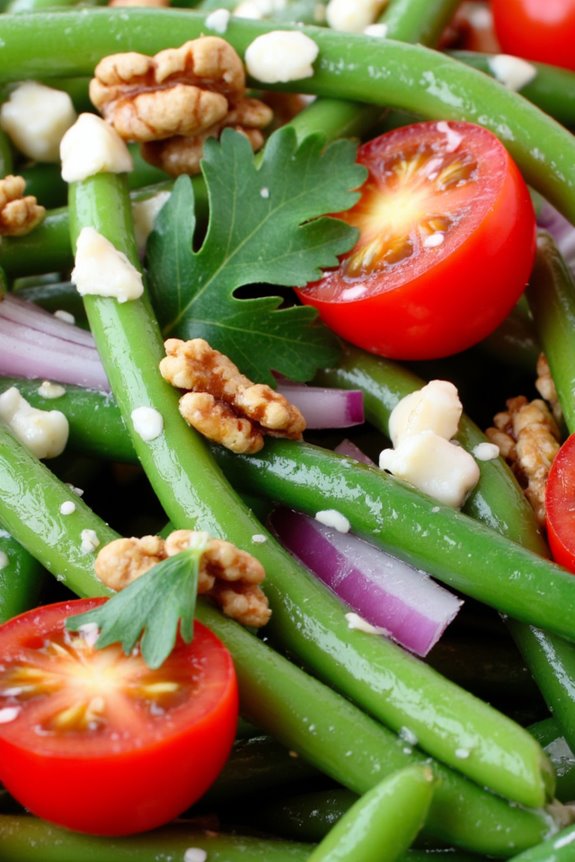
French Green Bean Salad, known as “Salade de Haricots Verts,” is a classic dish that showcases the bright, fresh flavors of green beans, often enhanced with a tangy vinaigrette. This vibrant salad isn’t only a feast for the eyes but also a healthy and delicious side dish perfect for any meal.
It can be served warm or cold, making it versatile for picnics, barbecues, or family gatherings. The combination of crisp green beans with the crunch of toasted nuts and the brightness of fresh herbs offers a delightful balance of textures and flavors.
This recipe highlights the simplicity of French cuisine, where high-quality ingredients shine through. The green beans are blanched to preserve their vibrant color and crisp texture, then tossed with a zesty dressing made from Dijon mustard, vinegar, and olive oil.
This salad can be made in advance and is a great way to incorporate seasonal produce into your diet.
Ingredients (serves 4-6):
- 1 pound fresh green beans, trimmed
- 1/4 cup red onion, finely chopped
- 1/4 cup toasted walnuts or almonds, chopped
- 1/4 cup cherry tomatoes, halved
- 3 tablespoons olive oil
- 1 tablespoon red wine vinegar
- 1 teaspoon Dijon mustard
- Salt and pepper to taste
- Fresh parsley, chopped (for garnish)
Cooking Instructions:
- Prepare the Green Beans: Start by bringing a large pot of salted water to a boil. Once boiling, add the trimmed green beans and cook for about 3-4 minutes until they’re bright green and tender-crisp. This method of blanching helps maintain their vibrant color and crunch.
- Ice Bath: While the green beans are cooking, prepare a bowl of ice water. Once the beans are done, immediately transfer them to the ice bath to stop the cooking process. Let them sit for about 5 minutes, then drain and pat dry with a clean kitchen towel.
- Make the Dressing: In a small bowl, whisk together the olive oil, red wine vinegar, Dijon mustard, salt, and pepper. This dressing will add a tangy flavor that complements the green beans beautifully.
- Combine Ingredients: In a large mixing bowl, combine the blanched green beans, chopped red onion, toasted walnuts or almonds, and halved cherry tomatoes. Drizzle the dressing over the salad and toss gently to combine, ensuring all ingredients are coated evenly with the dressing.
- Garnish and Serve: Transfer the salad to a serving platter or individual plates. Garnish with chopped fresh parsley for an added burst of flavor and color. Serve immediately or chill in the refrigerator for up to an hour before serving to enhance the flavors.
Extra Tips:
For an added depth of flavor, consider sautéing the nuts in a little olive oil before adding them to the salad. This will enhance their nuttiness and add an extra layer of richness.
Additionally, feel free to experiment by adding other ingredients such as feta cheese, olives, or even roasted bell peppers for variation. This salad is best enjoyed fresh, but it can be stored in an airtight container in the refrigerator for up to two days.
Creamy Potato Gratin

Creamy Potato Gratin, known as “Gratin Dauphinois” in France, is a classic dish that embodies the rich and comforting essence of French cuisine. This delectable recipe features thinly sliced potatoes baked in a luscious mixture of cream and cheese, resulting in a dish that’s both creamy and indulgent.
The gentle cooking brings out the natural sweetness of the potatoes while the cheese forms a rich, golden crust on top, making it a perfect side dish for any meal, or even a delightful main course when paired with a crisp salad.
This dish isn’t only easy to prepare but also offers the flexibility to incorporate different types of cheeses and seasonings, allowing you to customize the flavor to your liking. Ideal for gatherings or family dinners, Creamy Potato Gratin is sure to impress with its simple yet elegant presentation.
Follow this recipe to create a comforting and flavorful dish that will warm both your heart and soul.
Ingredients (serves 4-6):
- 1.5 kg (3.3 lbs) of potatoes (such as Russet or Yukon Gold)
- 2 cups heavy cream
- 1 cup whole milk
- 2 cloves garlic, minced
- 1 teaspoon salt
- ½ teaspoon black pepper
- 1 cup grated Gruyère cheese
- ½ cup grated Parmesan cheese
- 2 tablespoons unsalted butter (for greasing the baking dish)
- Fresh thyme leaves (optional, for garnish)
Cooking Instructions:
1. Preheat the Oven: Begin by preheating your oven to 350°F (175°C). This allows the dish to cook evenly and guarantees that the top will achieve a golden-brown color.
2. Prepare the Potatoes: Peel the potatoes and slice them thinly, about 1/8 inch thick, using a mandoline or a sharp knife. The thinner the slices, the creamier the gratin will be, as they’ll cook more uniformly.
3. Mix the Cream and Seasonings: In a mixing bowl, combine the heavy cream, whole milk, minced garlic, salt, and black pepper. Whisk the mixture until well blended, making sure that the garlic and spices are evenly distributed throughout the liquid.
4. Layer the Potatoes: Grease a baking dish (about 9×13 inches) with butter. Begin layering the sliced potatoes in the dish, slightly overlapping each slice. Pour a portion of the cream mixture over the first layer of potatoes, followed by a sprinkle of Gruyère cheese.
Repeat this process until all the potatoes and cream mixture are used, finishing with a layer of potatoes topped with the remaining cream and a generous amount of Gruyère and Parmesan cheese.
5. Bake the Gratin: Cover the baking dish with aluminum foil and bake in the preheated oven for about 45 minutes. This will allow the potatoes to soften and absorb the cream. After 45 minutes, remove the foil and continue baking for an additional 20-30 minutes or until the top is golden brown and bubbly.
6. Rest and Serve: Once done, remove the gratin from the oven and let it rest for about 10-15 minutes before serving. This resting period allows the dish to set, making it easier to cut into portions.
Extra Tips:
For an added depth of flavor, consider incorporating sautéed onions or leeks into the layers, or experiment with different cheeses such as cheddar or fontina for a unique twist.
Be sure to use a mix of cream and milk for the best texture, and don’t skip the resting time after baking; it’s essential for achieving the perfect slice. Additionally, feel free to garnish with fresh thyme leaves before serving for a fragrant touch. Enjoy your Creamy Potato Gratin!
Beetroot and Goat Cheese Salad

Beetroot and Goat Cheese Salad is a delightful fusion of earthy flavors and creamy textures, making it a perfect addition to any meal or a stand-alone dish for a light lunch. The vibrant colors of the roasted beets paired with the tangy goat cheese create a visual feast, while the complementary ingredients enhance the overall taste experience.
This salad isn’t only nutritious, but it also elevates your dining experience with its elegant presentation and refined flavors.
This easy-to-make salad can be prepared in advance, allowing the flavors to meld beautifully. The combination of roasted beets, fresh greens, and creamy goat cheese, topped with a zesty vinaigrette, makes it an ideal choice for gatherings or a revitalizing weeknight dinner.
Serve it alongside grilled meats or enjoy it as a light vegetarian option, and watch it quickly become a favorite in your recipe repertoire.
Ingredients (Serves 4-6):
- 4 medium-sized beetroots
- 150g (5 oz) goat cheese, crumbled
- 4 cups mixed salad greens (e.g., arugula, spinach, and frisée)
- 1/4 cup walnuts, toasted and roughly chopped
- 1/4 cup red onion, thinly sliced
- 1/4 cup balsamic vinegar
- 1/2 cup extra virgin olive oil
- 1 tablespoon Dijon mustard
- Salt and pepper to taste
- Fresh herbs (e.g., parsley or chives) for garnish (optional)
Cooking Instructions:
1. Prepare the Beetroots: Preheat your oven to 400°F (200°C). Wash the beetroots thoroughly to remove any dirt. Trim the tops and roots, then wrap each beetroot in aluminum foil. Place them on a baking sheet and roast in the preheated oven for about 45-60 minutes, or until a fork easily pierces through them.
Once cooked, allow them to cool slightly before peeling the skin off under running water.
2. Make the Vinaigrette: While the beetroots are roasting, prepare the vinaigrette. In a small bowl, whisk together the balsamic vinegar, Dijon mustard, salt, and pepper. Gradually add the olive oil while continuing to whisk until the mixture is well combined and emulsified. Set aside.
3. Assemble the Salad: Once the beetroots have cooled and are peeled, slice them into wedges or cubes. In a large salad bowl, combine the mixed salad greens, sliced beetroots, red onion, and toasted walnuts.
4. Add the Goat Cheese: Gently sprinkle the crumbled goat cheese over the top of the salad. Be careful not to break the cheese too much, as you want to maintain its texture.
5. Dress the Salad: Drizzle the prepared vinaigrette over the salad just before serving. Toss gently to combine all the ingredients, making certain that the beets and cheese are evenly distributed without mashing them.
6. Garnish and Serve: If desired, garnish with fresh herbs such as chopped parsley or chives for an added burst of flavor and color. Serve immediately and enjoy this delightful salad.
Extra Tips:
For a more intense flavor, consider adding roasted garlic or a splash of orange juice to your vinaigrette. If you’re short on time, you can use pre-cooked or canned beets; just make sure they’re well-drained before adding them to the salad.
Additionally, feel free to customize this salad by incorporating other ingredients such as sliced apples, pears, or even avocado for added texture and taste. Enjoy experimenting with different combinations to make this salad your own!
Spinach Quiche

Spinach quiche is a delightful and versatile dish that combines a flaky pastry crust with a creamy filling of fresh spinach, eggs, and cheese. This French classic is perfect for brunch, lunch, or even a light dinner, making it a favorite among home cooks and gourmets alike.
Its rich flavors and satisfying texture make it a popular choice for gatherings, and it can be easily customized with additional vegetables or protein to suit your taste.
This recipe for spinach quiche serves 4-6 people and is bound to impress your family and friends. Not only is it simple to prepare, but it also allows for the use of fresh ingredients, making it a healthy and delicious option.
Pair it with a crisp salad and a glass of white wine for a complete meal that celebrates the best of French cuisine.
Ingredients:
- 1 pre-made pie crust (9-inch)
- 1 tablespoon olive oil
- 1 small onion, finely chopped
- 2 cups fresh spinach, chopped
- 4 large eggs
- 1 cup heavy cream
- 1 cup shredded cheese (such as Gruyère or cheddar)
- Salt and pepper to taste
- 1/4 teaspoon nutmeg (optional)
Cooking Instructions:
- Preheat the Oven: Begin by preheating your oven to 375°F (190°C). This guarantees that your quiche will cook evenly and achieve that perfect golden-brown crust.
- Prepare the Pie Crust: Place the pre-made pie crust into a 9-inch pie dish. Gently press it into the dish and trim any excess crust hanging over the edges. You can prick the bottom with a fork to prevent bubbling during baking. Pre-bake the crust for about 10 minutes until it’s lightly golden, then remove it from the oven and set aside.
- Sauté the Onions and Spinach: In a skillet, heat the olive oil over medium heat. Add the finely chopped onion and sauté until it becomes translucent (about 5 minutes). Then, add the chopped spinach and cook for another 2-3 minutes until wilted. Remove from heat and let it cool slightly.
- Prepare the Egg Mixture: In a large mixing bowl, whisk together the eggs and heavy cream until well combined. Stir in the shredded cheese, sautéed onion, and spinach mixture. Season with salt, pepper, and nutmeg (if using) to taste.
- Fill the Crust: Carefully pour the egg and spinach mixture into the pre-baked pie crust, ensuring it’s evenly distributed.
- Bake the Quiche: Place the quiche in the preheated oven and bake for 30-35 minutes or until the filling is set and the top is golden. You can check for doneness by inserting a knife in the center; it should come out clean.
- Cool and Serve: Once baked, remove the quiche from the oven and let it cool for about 10 minutes before slicing. This will help the filling to set further, making it easier to serve.
Extra Tips:
When preparing spinach quiche, consider using a combination of cheeses for added flavor, such as feta or goat cheese.
If you prefer a lighter option, you can substitute half-and-half for the heavy cream. Additionally, feel free to incorporate other vegetables like mushrooms, bell peppers, or tomatoes for a more robust dish.
Leftovers can be stored in the refrigerator and reheated, making this quiche a convenient choice for meal prep. Enjoy your delicious creation!
Ratatouille-Stuffed Bell Peppers

Ratatouille-Stuffed Bell Peppers are a delightful way to enjoy the rich flavors of traditional ratatouille, all while presenting them in a vibrant and colorful bell pepper vessel. This dish not only brings together a medley of fresh vegetables but also provides a hearty and satisfying meal that’s perfect for both weeknight dinners and special occasions.
The combination of roasted bell peppers, filled with a savory mix of zucchini, eggplant, tomatoes, and herbs creates a harmonious balance of taste and nutrition. To make this dish even more appealing, you can customize the filling according to your preferences or seasonal produce.
This recipe is simple enough for beginners while still being impressive for seasoned cooks. With its beautiful presentation and delicious flavors, Ratatouille-Stuffed Bell Peppers are sure to become a favorite in your household.
Ingredients (serving size: 4-6 people)
- 4 large bell peppers (any color)
- 1 medium eggplant, diced
- 1 medium zucchini, diced
- 1 medium yellow squash, diced
- 1 cup cherry tomatoes, halved
- 1 medium onion, diced
- 3 cloves garlic, minced
- 2 tablespoons olive oil
- 1 teaspoon dried thyme
- 1 teaspoon dried basil
- Salt and pepper, to taste
- 1 cup shredded mozzarella cheese (optional)
- Fresh basil leaves, for garnish
Cooking Instructions
1. Preheat the Oven: Begin by preheating your oven to 375°F (190°C). This guarantees that your stuffed peppers will bake evenly and all ingredients will meld beautifully during the cooking process.
2. Prepare the Bell Peppers: While the oven is heating, wash the bell peppers and carefully cut the tops off. Remove the seeds and membranes from inside. If needed, trim the bottoms slightly to help them stand upright in the baking dish. Set the prepared peppers aside.
3. Cook the Vegetables: In a large skillet over medium heat, add the olive oil. Once hot, add the diced onion and garlic, sautéing for about 2-3 minutes until the onion becomes translucent.
Next, add the diced eggplant, zucchini, and yellow squash. Cook for an additional 5-7 minutes, stirring occasionally, until the vegetables soften. Finally, stir in the halved cherry tomatoes along with the dried thyme, dried basil, salt, and pepper. Cook for another 2 minutes until the tomatoes start to burst.
4. Stuff the Peppers: Remove the skillet from heat and carefully spoon the vegetable mixture into each bell pepper, packing it lightly. If you like, top each stuffed pepper with shredded mozzarella cheese for a cheesy finish.
5. Bake: Place the stuffed bell peppers upright in a baking dish. If you have extra filling, you can place it around the peppers in the dish. Cover the dish with aluminum foil and bake in the preheated oven for 30 minutes.
After 30 minutes, remove the foil and bake for an additional 10-15 minutes, or until the peppers are tender and the cheese is bubbly and golden.
6. Serve: Once cooked, remove the peppers from the oven and let them cool for a few minutes. Garnish with fresh basil leaves before serving. Enjoy your delicious Ratatouille-Stuffed Bell Peppers!
Extra Tips
When making Ratatouille-Stuffed Bell Peppers, feel free to experiment with different vegetables based on what you have at home or what’s in season.
Adding a bit of cooked quinoa or rice to the vegetable filling can enhance the dish’s heartiness. For those who prefer a bit of spice, consider adding crushed red pepper flakes to the vegetable mixture.
Also, if you prepare the filling ahead of time, you can make the assembly and baking process even quicker, making it a perfect option for busy weeknights.
French Lentil Salad
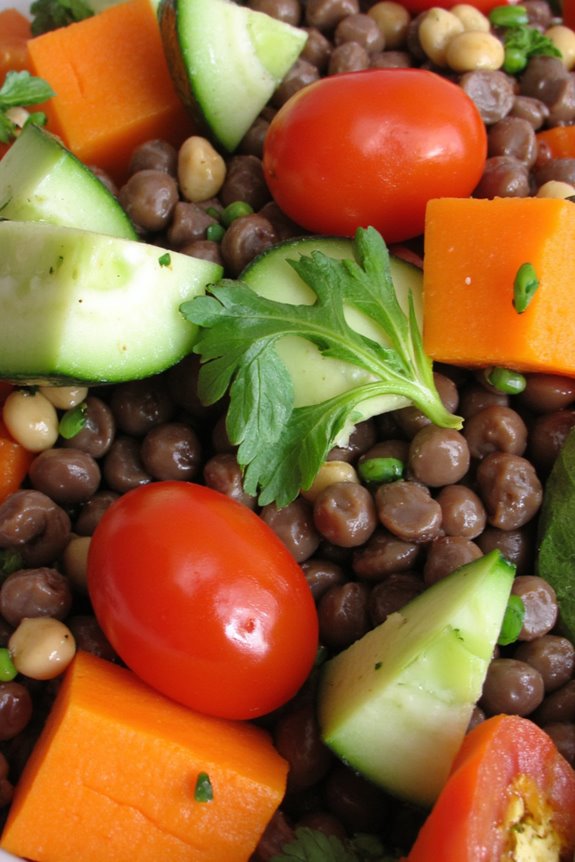
French Lentil Salad is a delightful and nutritious dish that showcases the rich flavors of France while being easy to prepare. This salad is perfect for a light lunch or as a side dish for dinner. The key ingredient, French green lentils, also known as Puy lentils, provides a firm texture and a slightly peppery flavor that pairs beautifully with fresh vegetables and a tangy vinaigrette. This dish isn’t only satisfying but also packed with protein, making it a great option for vegetarians and meat-eaters alike.
In this recipe, we’ll combine lentils with chopped vegetables, fresh herbs, and a zesty dressing that enhances the overall flavor profile. The beauty of this salad lies in its versatility; you can add or substitute vegetables based on your preferences or what you have on hand. Serve it warm or cold, and enjoy a taste of France in the comfort of your home.
Ingredients (Serves 4-6):
- 1 cup French green lentils
- 4 cups water or vegetable broth
- 1 medium red onion, finely chopped
- 1 cup cherry tomatoes, halved
- 1 medium cucumber, diced
- 1 red bell pepper, diced
- 1 carrot, diced
- 1/4 cup fresh parsley, chopped
- 1/4 cup fresh basil, chopped
- 1/4 cup olive oil
- 2 tablespoons red wine vinegar
- 1 tablespoon Dijon mustard
- Salt and pepper, to taste
Cooking Instructions:
- Rinse and Cook Lentils: Begin by rinsing the French green lentils under cold water to remove any impurities. In a medium saucepan, combine the lentils and 4 cups of water or vegetable broth. Bring to a boil over medium-high heat, then reduce to a simmer. Cook for 20-25 minutes or until the lentils are tender but still hold their shape. Drain any excess liquid and set aside to cool.
- Prepare the Vegetables: While the lentils are cooking, prepare your vegetables. Chop the red onion, cherry tomatoes, cucumber, red bell pepper, and carrot into small, uniform pieces. This guarantees even distribution of flavors throughout the salad.
- Make the Dressing: In a small bowl, whisk together the olive oil, red wine vinegar, Dijon mustard, and a pinch of salt and pepper. Taste and adjust the seasoning as needed. This dressing will enhance the freshness of the ingredients.
- Combine Ingredients: In a large mixing bowl, combine the cooked lentils with the chopped vegetables and the fresh herbs (parsley and basil). Pour the dressing over the salad and toss gently to combine, making sure everything is well coated with the vinaigrette.
- Chill and Serve: Allow the salad to sit for at least 15 minutes to let the flavors meld together. You can serve the salad warm or refrigerate it for up to an hour to serve it cold. It’s a great dish to make ahead of time, as the flavors will only get better.
Extra Tips:
When making French Lentil Salad, feel free to experiment with different vegetables and herbs based on your taste preferences or seasonal availability. You can also add ingredients like feta cheese or crumbled goat cheese for an extra layer of flavor.
For added crunch, consider incorporating nuts such as walnuts or almonds. Remember to taste and adjust the seasoning of the dressing before serving, as the balance of flavors is key to this dish. Enjoy your delicious French-inspired meal!
Zucchini and Tomato Tart
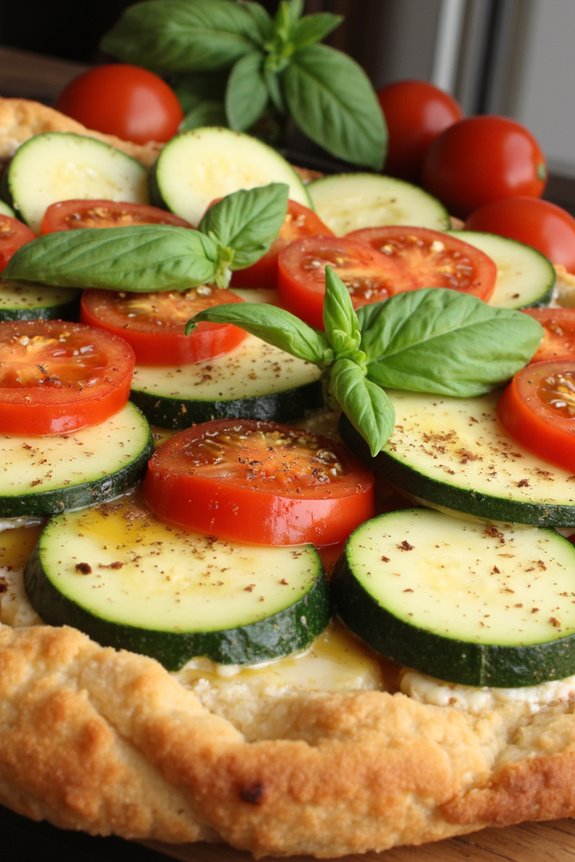
Zucchini and Tomato Tart is a delightful dish that highlights the best of summer vegetables in a flaky, buttery crust. This savory tart combines the delicate flavors of fresh zucchini and ripe tomatoes, enhanced by aromatic herbs and a creamy filling. It’s perfect for a light lunch or as a stunning centerpiece for a brunch gathering.
The tart can be served warm or at room temperature, making it an ideal option for entertaining. Making this tart is quite straightforward, and the result is a beautifully presented dish that will impress your family and friends. The combination of textures and flavors, from the flaky pastry to the tender vegetables, creates a dish that’s both satisfying and visually appealing.
Pair it with a simple green salad or a glass of chilled white wine to complete the meal.
Ingredients (Serves 4-6):
- 1 pre-made pie crust (or homemade if preferred)
- 2 medium zucchinis, thinly sliced
- 2 large ripe tomatoes, sliced
- 1 cup ricotta cheese
- 1 cup shredded mozzarella cheese
- 2 large eggs
- 2 tablespoons fresh basil, chopped
- 1 tablespoon olive oil
- Salt and pepper to taste
- 1 teaspoon dried oregano
- 1 clove garlic, minced
Cooking Instructions:
- Preheat the Oven: Preheat your oven to 375°F (190°C). This guarantees that the pie crust will bake evenly and become golden brown while the vegetables cook.
- Prepare the Pie Crust: Roll out the pre-made pie crust and fit it into a 9-inch tart pan, pressing it firmly into the edges. Trim any excess crust hanging over the edges. If using a homemade crust, roll it out to fit the tart pan and chill it in the fridge for 15 minutes before baking.
- Blind Bake the Crust: Place a sheet of parchment paper over the crust and fill it with pie weights or dried beans. Bake for about 15 minutes, then remove the weights and parchment paper. Bake for an additional 5-7 minutes until the crust is lightly golden. Remove from the oven and set aside to cool slightly.
- Prepare the Filling: In a large bowl, combine the ricotta cheese, mozzarella cheese, eggs, basil, olive oil, garlic, salt, pepper, and oregano. Mix well until fully combined, creating a creamy filling that will hold the vegetables.
- Layer the Vegetables: Start by spreading an even layer of the cheese mixture over the bottom of the pre-baked crust. Then, arrange the sliced zucchini and tomatoes on top, overlapping them slightly for a beautiful presentation.
- Bake the Tart: Place the assembled tart back into the oven and bake for 30-35 minutes, or until the vegetables are tender and the filling is set and lightly browned.
- Cool and Serve: Once baked, remove the tart from the oven and let it cool for about 10 minutes before slicing. Serve warm or at room temperature, garnished with additional fresh basil if desired.
Extra Tips:
For added flavor, consider sprinkling some grated Parmesan cheese on top before baking. If you want to enhance the taste of the vegetables, you can roast them lightly in olive oil before layering them into the tart. This will bring out their natural sweetness and add depth to the flavor.
Additionally, feel free to substitute or mix in other vegetables like bell peppers or onions based on your preference or what you have on hand. Enjoy your Zucchini and Tomato Tart!
Carrot and Parsnip Purée

Carrot and Parsnip Purée is a delightful and creamy side dish that brings together the natural sweetness of carrots and parsnips, making it a perfect accompaniment for a variety of main courses.
This dish isn’t only visually appealing, with its vibrant orange and pale yellow colors, but it also packs a nutritious punch, offering a good source of vitamins and fiber. The purée is smooth and velvety, making it an excellent choice for both adults and children alike.
Preparing Carrot and Parsnip Purée is simple and can be done in under an hour, making it a great option for busy weeknight dinners or special occasions. The combination of these root vegetables creates a unique flavor profile that’s enhanced with a touch of butter and cream, making it a rich and satisfying dish.
Serve it alongside roasted meats, grilled fish, or even as a base for a vegetarian meal, and watch how it elevates your dining experience.
Ingredients (Serves 4-6):
- 4 large carrots, peeled and chopped
- 2 large parsnips, peeled and chopped
- 1 medium onion, chopped
- 3 tablespoons unsalted butter
- 1/2 cup heavy cream
- Salt, to taste
- Freshly ground black pepper, to taste
- Chopped fresh parsley, for garnish (optional)
Instructions:
- Prepare the Vegetables: Begin by peeling and chopping the carrots and parsnips into uniform pieces to guarantee even cooking. Also, chop the onion. This will help the vegetables cook evenly and allow for a smoother purée.
- Cook the Vegetables: In a large pot, add the chopped carrots, parsnips, and onion. Fill the pot with enough water to cover the vegetables. Bring the water to a boil over medium-high heat, then reduce the heat to a simmer. Cook for about 20-25 minutes, or until the vegetables are tender and easily pierced with a fork.
- Drain and Dry: Once the vegetables are tender, carefully drain them in a colander. Allow them to sit for a few minutes to dry out slightly. This step is important because excess water can make the purée too runny.
- Purée the Vegetables: Return the drained vegetables to the pot or transfer them to a food processor. Add the unsalted butter and heavy cream. Using an immersion blender or a food processor, blend the mixture until smooth and creamy. If using a food processor, you may need to stop occasionally to scrape down the sides.
- Season: After achieving a smooth consistency, taste the purée and season with salt and freshly ground black pepper to your liking. Blend again briefly to incorporate the seasoning.
- Serve: Transfer the purée to a serving dish and garnish with chopped fresh parsley, if desired. Serve immediately while warm, or keep warm until ready to serve.
Extra Tips:
For an extra layer of flavor, consider adding a pinch of nutmeg or a splash of lemon juice to the purée just before serving.
If you prefer a lighter version, you can substitute half of the heavy cream with vegetable or chicken broth to maintain moisture without the added richness.
Additionally, this purée can be made ahead of time and reheated gently on the stove or in the microwave, making it a convenient option for meal prep.
Endive and Walnut Salad
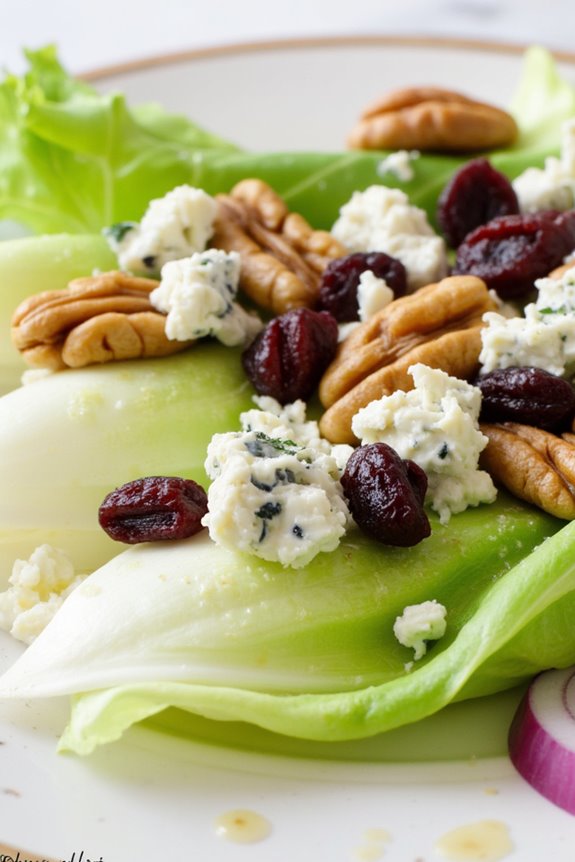
Endive and Walnut Salad is a rejuvenating and nutritious dish that showcases the crispness of endive leaves combined with the rich, earthy flavor of walnuts. This delightful salad isn’t only a perfect starter for a dinner party but also a great accompaniment to any main course. The balance of textures and flavors in this salad makes it a crowd-pleaser and an excellent choice for those looking to incorporate more vegetables into their diet.
This salad is also quite simple to prepare, requiring minimal cooking and just a few fresh ingredients. The slight bitterness of the endives is beautifully complemented by the nutty crunch of the walnuts and the creamy dressing. With its vibrant colors and appealing presentation, the Endive and Walnut Salad is sure to impress your guests and elevate your meal.
Ingredients (Serving Size: 4-6 people)
- 4 medium endives
- 1 cup walnuts, toasted
- 1/2 cup crumbled blue cheese (optional)
- 1/4 cup dried cranberries or raisins
- 1/4 red onion, thinly sliced
- 1/2 cup olive oil
- 2 tablespoons balsamic vinegar
- 1 tablespoon Dijon mustard
- Salt and pepper to taste
Cooking Instructions
- Prepare the Endives: Start by washing the endives under cold running water. Pat them dry with a clean kitchen towel. Cut off the base of each endive and remove any damaged or wilted outer leaves. Slice the endives into thin strips or leave them whole, depending on your presentation preference.
- Toast the Walnuts: Preheat your oven to 350°F (175°C). Spread the walnuts in a single layer on a baking sheet and toast them in the oven for about 8-10 minutes, or until they’re golden brown and fragrant. Keep an eye on them to prevent burning, and let them cool before adding to the salad.
- Prepare the Dressing: In a small bowl, whisk together the olive oil, balsamic vinegar, Dijon mustard, salt, and pepper until well combined. Taste and adjust the seasoning if necessary. The dressing should be tangy with a touch of sweetness.
- Assemble the Salad: In a large mixing bowl, combine the sliced endives, toasted walnuts, crumbled blue cheese (if using), dried cranberries or raisins, and sliced red onion. Drizzle the dressing over the salad ingredients and toss gently to coat everything evenly without bruising the endive leaves.
- Serve: Transfer the salad to a serving platter or individual bowls. You can garnish it with additional walnuts or cheese on top for an appealing presentation. Serve immediately for the best texture and flavor.
Extra Tips
When making the Endive and Walnut Salad, feel free to customize it by adding other ingredients such as sliced apples or pears for a hint of sweetness, or incorporating fresh herbs like parsley or chives for added freshness.
If you prefer a lighter dressing, you can replace some of the olive oil with Greek yogurt. This salad can be made ahead of time, but it’s best to dress it just before serving to maintain the crispness of the endives. Enjoy your salad with a side of crusty bread for a complete meal!
Herb-Infused Vegetable Soufflé

A savory herb-infused vegetable soufflé is a delightful dish that showcases the best of French cuisine while being both light and satisfying. This recipe combines fresh vegetables with a delicate soufflé base, creating a fluffy texture that melts in your mouth. Perfect for a brunch or a light dinner, this dish not only pleases the palate but also impresses with its beautiful presentation. The infusion of herbs elevates the flavor, making it a standout dish that’s certain to be a crowd-pleaser.
Preparing a soufflé may seem intimidating, but with the right approach, it can be quite simple and rewarding. The key to a successful soufflé lies in the preparation of the base and the careful folding of the egg whites, which provide the lift. This herb-infused vegetable soufflé is packed with nutrients from the vegetables and enriched with aromatic herbs, making it a delicious option for health-conscious diners. Follow this recipe for a light, airy dish that’s both comforting and elegant.
Ingredients (Serves 4-6):
- 2 tablespoons unsalted butter, plus extra for greasing
- 1 cup finely chopped onion
- 1 cup finely chopped bell pepper
- 1 cup finely chopped zucchini
- 1 cup finely chopped spinach
- 3 tablespoons all-purpose flour
- 1 cup milk
- 4 large eggs, separated
- 1 teaspoon fresh thyme, chopped
- 1 teaspoon fresh parsley, chopped
- 1 teaspoon fresh chives, chopped
- 1/2 teaspoon salt
- 1/4 teaspoon black pepper
- 1/4 teaspoon nutmeg
- 1/2 cup grated cheese (Gruyère or Parmesan)
Cooking Instructions:
1. Preheat the oven: Start by preheating your oven to 375°F (190°C). This guarantees that your soufflé will bake evenly and rise properly once it’s placed in the oven.
2. Prepare the baking dish: Grease a 2-quart soufflé dish or individual ramekins with butter. This will help the soufflé rise without sticking to the sides. If desired, you can dust the buttered dish with a little grated cheese or breadcrumbs for added texture.
3. Sauté the vegetables: In a large skillet, melt the 2 tablespoons of unsalted butter over medium heat. Add the chopped onion and bell pepper, sautéing for about 5 minutes until they soften.
Then, add the zucchini and spinach, cooking for another 3-4 minutes until the spinach wilts. Remove from heat and let the vegetable mixture cool slightly.
4. Make the soufflé base: In a saucepan, whisk together the flour and milk over medium heat until smooth. Continue cooking while whisking constantly until the mixture thickens and bubbles, about 2-3 minutes.
Remove from heat and stir in the sautéed vegetables, thyme, parsley, chives, salt, pepper, and nutmeg. Allow the mixture to cool for a few minutes before adding the egg yolks one at a time, mixing well after each addition.
5. Whip the egg whites: In a separate bowl, use an electric mixer to beat the egg whites until stiff peaks form. This step is essential as it provides the soufflé with its airy texture.
6. Fold the egg whites: Carefully fold the beaten egg whites into the vegetable mixture using a spatula. Be gentle to maintain the airiness of the egg whites, which will help the soufflé rise.
7. Add cheese and pour into dish: Gently fold in the grated cheese. Then, pour the soufflé mixture into the prepared dish, smoothing the top with a spatula.
8. Bake the soufflé: Place the soufflé in the preheated oven and bake for 25-30 minutes, or until the top is golden brown and the soufflé has risen. Avoid opening the oven door during baking, as this can cause the soufflé to collapse.
9. Serve immediately: Once the soufflé is done, remove it from the oven and serve it right away. The soufflé is best enjoyed fresh, as it will begin to deflate once it cools.
Extra Tips:
For a richer flavor, consider incorporating different herbs or adding a splash of cream to the vegetable mixture. You can also experiment with various vegetables based on what’s in season or available in your kitchen.
If you prefer a stronger cheese flavor, try using aged cheeses. Always remember to serve your soufflé immediately after baking for the best texture and appearance. Enjoy this delightful dish as a standalone meal or as a side to complement your favorite protein!
Savory Vegetable Galette

A Savory Vegetable Galette is a delightful and rustic dish that showcases the bounty of fresh vegetables, wrapped in a flaky, buttery crust. This French-inspired tart isn’t only visually appealing but also incredibly versatile, allowing you to use whatever seasonal vegetables you have on hand.
The galette can serve as a main course for a light lunch or dinner, or as a side dish at a gathering. With its free-form shape and the comforting combination of savory flavors, this recipe is sure to impress family and friends alike.
Making a Savory Vegetable Galette is easier than you might think, and it can be an enjoyable cooking project. The crust is simple to prepare, and the filling can be customized to suit your taste.
Whether you prefer zucchini, bell peppers, spinach, or mushrooms, this dish invites creativity. Pair it with a light salad or a glass of wine, and you have a wholesome meal that’s perfect for any occasion.
Ingredients (Serves 4-6):
- 1 ½ cups all-purpose flour
- ½ teaspoon salt
- ½ cup unsalted butter, cold and cubed
- 4-6 tablespoons ice water
- 2 cups assorted vegetables (e.g., zucchini, bell peppers, mushrooms, spinach)
- 1 cup shredded cheese (e.g., Gruyère, mozzarella, or feta)
- 1 tablespoon olive oil
- 1 teaspoon dried thyme (or fresh if available)
- Salt and pepper to taste
- 1 egg (for egg wash)
- Fresh herbs for garnish (optional)
Cooking Instructions:
1. Prepare the Crust: In a large mixing bowl, combine the flour and salt. Add the cold, cubed butter into the flour mixture and use a pastry cutter or your fingers to work the butter into the flour until it resembles coarse crumbs. Gradually add 4 tablespoons of ice water, mixing until the dough comes together. If needed, add an additional tablespoon of water.
Form the dough into a disk, wrap it in plastic wrap, and refrigerate for at least 30 minutes.
2. Preheat the Oven: Preheat your oven to 400°F (200°C). This guarantees that the galette will bake evenly and achieve a beautiful golden-brown crust.
3. Prepare the Filling: While the dough is chilling, wash and chop the assorted vegetables into bite-sized pieces. In a skillet, heat the olive oil over medium heat. Add the vegetables and sauté for about 5-7 minutes until they’re softened but not fully cooked.
Stir in the thyme, and season with salt and pepper to taste. Remove from heat and let cool slightly.
4. Roll Out the Dough: Once the dough has chilled, take it out of the refrigerator and place it on a lightly floured surface. Roll it out into a circle about 12 inches in diameter. Aim for an even thickness, about ¼ inch.
Transfer the rolled dough onto a parchment-lined baking sheet.
5. Assemble the Galette: Sprinkle the shredded cheese in the center of the rolled-out dough, leaving a 2-inch border. Top the cheese with the sautéed vegetables, spreading them evenly.
Fold the edges of the dough over the filling, creating pleats as you go, and leaving the center exposed.
6. Egg Wash and Bake: In a small bowl, beat the egg and brush it over the exposed crust to give it a shiny, golden finish. Bake in the preheated oven for 30-35 minutes, or until the crust is golden brown and the filling is bubbly.
7. Serve: Once baked, let the galette cool for a few minutes before slicing. Garnish with fresh herbs if desired, and serve warm or at room temperature.
Extra Tips:
For the best results, make sure your butter is very cold when making the dough, as this helps create a flaky texture.
Feel free to mix and match vegetables based on what’s in season or what you have available; just be mindful of their cooking times. If you want to add some extra flavor, consider incorporating spices or herbs into the vegetable mixture.
For a heartier version, you could include some cooked grains or beans into the filling. Enjoy your delicious Savory Vegetable Galette!