

Hosting a gathering and want to impress with minimal effort? I’ve got you covered with French recipes that are both elegant and easy. Think cozy French onion soup and sweet madeleines. From savory mini quiches to a beautifully simple raspberry clafoutis, these dishes will make your event memorable. Elevate your hosting game with these effortless yet sophisticated options.
Classic French Onion Soup
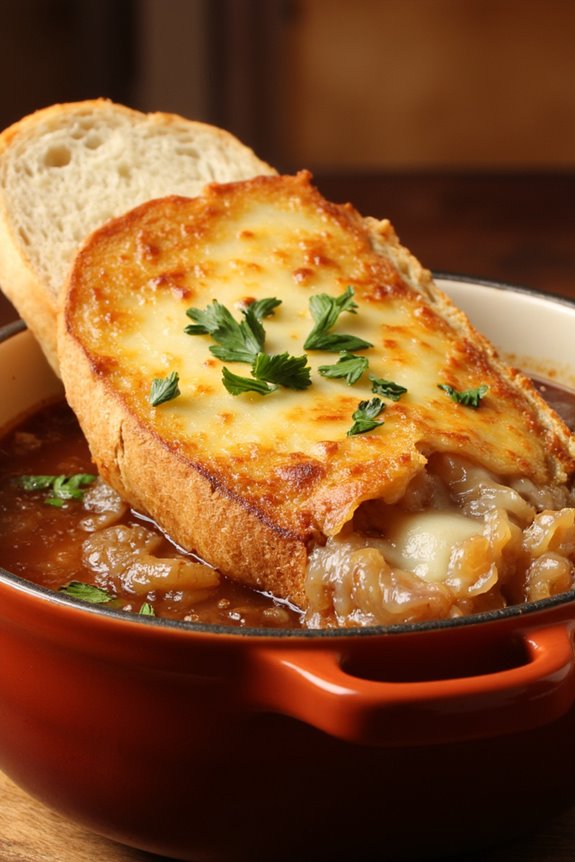
Classic French Onion Soup is a beloved dish that showcases the rich flavors and comforting qualities of French cuisine. This savory soup is made with caramelized onions, a hearty broth, and topped with melted cheese and crusty bread, making it a perfect starter for any gathering or party. The deep, rich flavor of the onions combined with the savory broth creates a warm and inviting experience that will have your guests asking for seconds.
Preparing this classic dish requires patience, particularly when it comes to caramelizing the onions. This step is essential as it develops the soup’s deep, sweet flavor. Once the onions are beautifully golden and fragrant, the rest of the soup comes together quickly. With a few simple ingredients and a little time, you’ll be able to impress your guests with this classic French dish that’s both simple and elegant.
Ingredients (Serves 4-6)
- 4 large yellow onions, thinly sliced
- 4 tablespoons unsalted butter
- 1 tablespoon olive oil
- 1 teaspoon sugar
- 4 cups beef broth
- 1 cup dry white wine
- 1 teaspoon fresh thyme (or ½ teaspoon dried thyme)
- Salt and black pepper, to taste
- 1 baguette, sliced into 1-inch pieces
- 2 cups grated Gruyère cheese
- Fresh parsley, chopped (for garnish)
Cooking Instructions
- Caramelize the Onions: In a large, heavy-bottomed pot, melt the butter and olive oil over medium heat. Add the sliced onions, stirring to coat them in the fat. Sprinkle the sugar over the onions to help with caramelization. Cook the onions, stirring frequently, for about 30-40 minutes until they’re deeply golden brown and caramelized. Be patient and avoid cooking them too quickly, as this can lead to burning.
- Deglaze the Pot: Once the onions are caramelized, pour in the white wine, scraping the bottom of the pot to release any browned bits. This step adds depth to the flavor of your soup. Allow the wine to simmer for about 5 minutes until it reduces slightly.
- Add the Broth and Seasonings: Pour in the beef broth and add the thyme. Season with salt and black pepper to taste. Bring the mixture to a gentle simmer and let it cook for another 20-30 minutes to meld the flavors.
- Prepare the Bread: While the soup is simmering, preheat your oven to 400°F (200°C). Arrange the baguette slices on a baking sheet and toast them in the oven for about 5-7 minutes until they’re golden and crispy.
- Assemble the Soup: Once the soup is ready, ladle it into oven-safe bowls. Place a few toasted baguette slices on top of each bowl and generously sprinkle with grated Gruyère cheese.
- Broil the Soup: Place the bowls on a baking sheet and put them under the broiler for about 3-5 minutes, or until the cheese is bubbling and golden brown. Watch closely to avoid burning.
- Serve: Carefully remove the bowls from the oven (they will be hot!), and garnish with chopped parsley before serving.
Extra Tips
When preparing Classic French Onion Soup, be mindful of the thickness of your broth. If you prefer a richer flavor, consider using homemade beef broth or a low-sodium store-bought option.
Additionally, using a combination of onions, like yellow and sweet onions, can enhance the sweetness and complexity of the soup. For a more aromatic experience, feel free to add a splash of sherry or brandy when deglazing the pot.
Remember to serve the soup hot and enjoy it with a crisp salad for a complete meal!
Mini Quiches Lorraine

Mini Quiches Lorraine are a delightful and versatile dish, perfect for any French-themed party or gathering. These bite-sized treats aren’t only easy to make, but they also pack a punch of flavor with their creamy filling and savory bacon. The combination of eggs, cream, cheese, and crispy lardons creates a rich filling that pairs perfectly with a flaky pastry crust. They can be served warm or at room temperature, making them ideal for entertaining guests.
Creating Mini Quiches Lorraine is straightforward and can be a fun activity for both novice and experienced cooks. You can customize these quiches by adding different ingredients such as vegetables or herbs, but the classic recipe shines with its simplicity. With just a few ingredients and minimal prep time, you’ll have a delicious appetizer that will impress your friends and family.
Ingredients (serving size: 4-6 people):
- 1 pre-made pie crust (or puff pastry)
- 6 large eggs
- 1 cup heavy cream
- 1 cup shredded Gruyère cheese
- 1 cup cooked bacon or lardons, chopped
- 1/2 teaspoon salt
- 1/4 teaspoon black pepper
- 1/4 teaspoon nutmeg (optional)
- Fresh chives, chopped (for garnish)
Cooking Instructions:
- Preheat the Oven: Begin by preheating your oven to 375°F (190°C). This guarantees that your quiches will bake evenly and develop a nice golden color.
- Prepare the Pie Crust: Roll out the pre-made pie crust on a lightly floured surface and cut it into circles that fit into your mini muffin tin. Press the dough circles into the greased muffin tin, making sure to cover the bottom and sides. This will form the base for your quiches.
- Cook the Bacon: In a skillet over medium heat, cook the chopped bacon or lardons until crispy. This usually takes about 5-7 minutes. Once cooked, remove them from the skillet and let them drain on paper towels to remove excess grease.
- Make the Filling: In a mixing bowl, whisk together the eggs and heavy cream until well combined. Add in the shredded Gruyère cheese, crispy bacon, salt, pepper, and nutmeg (if using). Mix until everything is evenly distributed.
- Fill the Crusts: Carefully pour the egg mixture into each pastry-lined muffin cup, filling them about three-quarters full. Be cautious not to overfill, as the mixture may overflow while baking.
- Bake the Quiches: Place the muffin tin in the preheated oven and bake for 20-25 minutes, or until the quiches are set and lightly browned on top. You can check for doneness by inserting a toothpick into the center; it should come out clean.
- Cool and Serve: Once baked, remove the quiches from the oven and let them cool for a few minutes. Carefully remove them from the muffin tin and garnish with chopped chives before serving.
Extra Tips:
For the best flavor, consider using high-quality ingredients, especially the cheese and bacon. You can also experiment by adding sautéed vegetables like spinach or mushrooms to the filling for added texture and taste.
If you have leftover filling, you can pour it into a small oven-safe dish and bake it separately. Mini Quiches Lorraine can be made ahead of time and stored in the refrigerator; simply reheat them in the oven before serving for maximum freshness. Enjoy your delicious French treat!
Ratatouille Tart

Ratatouille Tart is a delightful dish that beautifully showcases the vibrant flavors of seasonal vegetables, all nestled within a flaky pastry crust. This recipe not only makes for an impressive centerpiece at any gathering but also provides a colorful and healthy option that pleases both vegetarians and meat-eaters alike.
The combination of roasted vegetables, aromatic herbs, and creamy cheese creates a dish that’s both satisfying and eye-catching. Making a Ratatouille Tart is relatively straightforward and perfect for those looking to impress at their next dinner party. The key is to use fresh, high-quality ingredients to truly capture the essence of French cuisine.
Pair the tart with a simple green salad and a glass of crisp white wine for a complete meal that will leave your guests raving.
Ingredients (Serves 4-6):
- 1 pre-made pie crust or tart shell
- 1 medium eggplant, diced
- 1 medium zucchini, sliced
- 1 medium bell pepper, diced
- 1 medium onion, diced
- 2 cloves garlic, minced
- 2 medium tomatoes, diced
- 1 cup grated cheese (such as Gruyère or mozzarella)
- 2 tablespoons olive oil
- 1 teaspoon dried thyme
- 1 teaspoon dried oregano
- Salt and pepper to taste
- Fresh basil leaves for garnish (optional)
Cooking Instructions:
- Preheat the Oven: Begin by preheating your oven to 375°F (190°C). This guarantees that your tart will cook evenly and achieve a perfect golden crust.
- Prepare the Vegetables: In a large mixing bowl, combine the diced eggplant, zucchini, bell pepper, onion, garlic, and tomatoes. Drizzle with olive oil, then sprinkle in the dried thyme, oregano, salt, and pepper. Toss everything together until the vegetables are well coated with the oil and seasonings.
- Roast the Vegetables: Spread the vegetable mixture evenly on a baking sheet lined with parchment paper. Roast in the oven for about 20-25 minutes, or until the vegetables are tender and slightly caramelized. Stir halfway through for even roasting.
- Assemble the Tart: While the vegetables are roasting, roll out the pie crust or place the tart shell in a tart pan. If using a pie crust, make sure to prick the bottom with a fork to prevent bubbling. Once the vegetables are done roasting, remove them from the oven and allow them to cool slightly.
- Layer the Ingredients: Sprinkle half of the grated cheese over the bottom of the crust. Then, layer the roasted vegetables on top. Finally, sprinkle the remaining cheese over the vegetables for a deliciously cheesy topping.
- Bake the Tart: Place the assembled tart in the preheated oven and bake for an additional 25-30 minutes, or until the crust is golden brown and the cheese is bubbling.
- Garnish and Serve: Remove the tart from the oven and let it cool for a few minutes before slicing. Garnish with fresh basil leaves if desired, and serve warm or at room temperature.
Extra Tips:
For the best flavor, consider adding a splash of balsamic vinegar to the vegetable mixture before roasting. This will enhance the sweetness of the vegetables and add depth to the dish.
You can also experiment with different types of cheese or add a layer of pesto on the crust before adding the cheese for an extra burst of flavor. If you’re short on time, feel free to use store-bought roasted vegetables for a quicker assembly!
Enjoy your Ratatouille Tart as a delicious and impressive dish at your next gathering.
Crostini With Goat Cheese and Honey
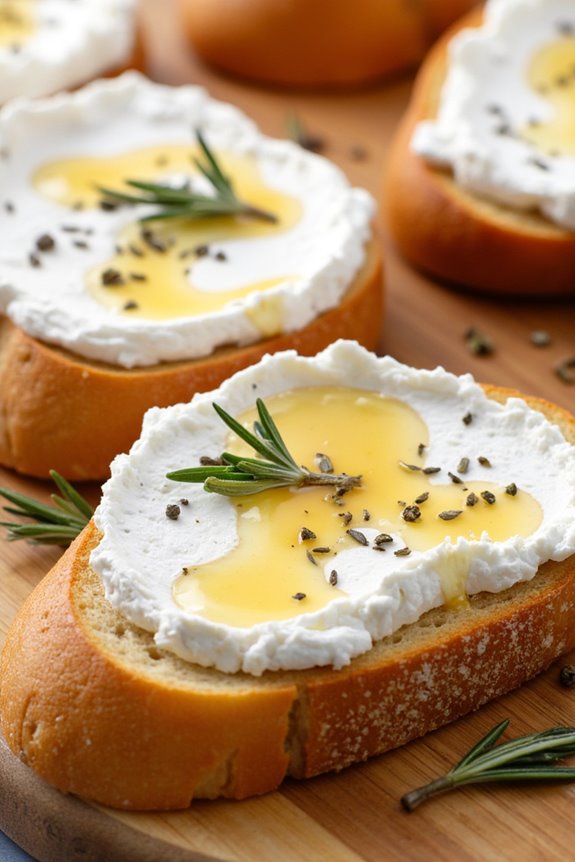
Crostini with Goat Cheese and Honey is a delightful appetizer that combines the creaminess of goat cheese, the sweetness of honey, and the satisfying crunch of toasted bread. This dish isn’t only easy to prepare but also brings a touch of sophistication to any gathering.
Perfect for a casual get-together or a more formal soirée, these little bites are sure to impress your guests and keep them coming back for more.
The beauty of this recipe lies in its simplicity, allowing you to savor the distinct flavors of each ingredient. The tangy goat cheese pairs perfectly with the rich sweetness of honey, and the toasted crostini serves as a wonderful vessel to hold all of these delightful flavors together.
With just a few simple ingredients and minimal prep time, you can create a stunning appetizer that will elevate your French-inspired party menu.
Ingredients (Serves 4-6)
- 1 French baguette
- 8 oz goat cheese, softened
- 2-3 tablespoons honey
- Fresh thyme or rosemary leaves (for garnish)
- Olive oil (for drizzling)
- Salt and pepper (to taste)
Cooking Instructions
- Preheat the Oven: Begin by preheating your oven to 400°F (200°C). This guarantees that your crostini will be perfectly toasted and crispy.
- Slice the Baguette: Take the French baguette and slice it into ½-inch thick pieces. You should have about 12-15 slices, which will be your crostini base.
- Toast the Bread: Arrange the baguette slices on a baking sheet. Drizzle a little olive oil over each slice, making sure they’re lightly coated. Place the baking sheet in the preheated oven and toast for about 8-10 minutes or until the crostini are golden brown and crispy. Keep an eye on them to prevent burning.
- Spread the Goat Cheese: Once the crostini are toasted, remove them from the oven and allow them to cool slightly. Generously spread the softened goat cheese onto each slice.
- Drizzle with Honey: After adding the goat cheese, take your honey and drizzle it over the cheese on each crostini. The amount can vary based on your sweetness preference, but a teaspoon per crostini is a good start.
- Garnish: Finally, sprinkle some fresh thyme or rosemary leaves on top of the honey-drizzled goat cheese. This not only adds flavor but also makes the crostini visually appealing.
- Serve and Enjoy: Arrange the finished crostini on a serving platter and enjoy them immediately while they’re fresh and warm.
Extra Tips
For added flavor, consider experimenting with different herbs or toppings such as crushed walnuts or a sprinkle of black pepper on top of the honey.
You could also swap out the honey for a fruit preserve, like fig or apricot, for a twist on the classic recipe. If you’re preparing the crostini ahead of time, assemble them just before serving to guarantee the bread remains crispy.
Enjoy your delightful creation at your next gathering!
Savory Palmiers
Savory Palmiers are a delightful French pastry that will elevate any gathering with their elegant appearance and irresistible flavor. These flaky, buttery treats are made from puff pastry and filled with a variety of savory ingredients, making them a versatile option for your party menu. They aren’t only simple to prepare but also impressive to serve, perfect for impressing your guests without requiring extensive culinary skills.
Often enjoyed as an appetizer or snack, these palmiers can be filled with ingredients like cheese, herbs, olives, or even tapenade. The beauty of Savory Palmiers lies in their adaptability; you can customize the filling to suit your taste and the theme of your party.
Once baked, these pastries puff up beautifully, creating a crunchy exterior that encases a delicious filling. Serve them warm or at room temperature, and watch them disappear in no time!
Ingredients (Serves 4-6):
- 1 sheet of puff pastry (thawed)
- 1/2 cup grated cheese (Gruyère, cheddar, or your choice)
- 1/4 cup pesto or tapenade
- 1/4 cup sun-dried tomatoes (chopped)
- 1/4 cup finely chopped fresh herbs (basil, parsley, or thyme)
- 1 egg (beaten, for egg wash)
- Salt and pepper (to taste)
Cooking Instructions:
- Preheat the Oven: Begin by preheating your oven to 400°F (200°C). This guarantees that the pastries will cook evenly and develop a beautiful golden color.
- Prepare the Puff Pastry: Unroll the thawed puff pastry sheet on a lightly floured surface. Gently roll it out with a rolling pin to smooth out any creases and create an even thickness.
- Spread the Filling: Using a spatula or the back of a spoon, spread the pesto or tapenade evenly across the puff pastry, leaving a small border around the edges. This will help contain the filling when rolling.
- Add the Cheese and Other Ingredients: Sprinkle the grated cheese, chopped sun-dried tomatoes, and fresh herbs evenly over the spread. Season with salt and pepper to taste.
- Roll the Pastry: Starting from one edge, roll the pastry tightly towards the center until you reach the middle. Repeat the same with the other edge, so both rolls meet in the center.
- Chill the Roll: Place the rolled pastry in the freezer for about 15-20 minutes. This step makes it easier to slice the palmiers neatly.
- Slice the Palmiers: Once chilled, remove the roll from the freezer and use a sharp knife to slice it into 1/2-inch thick pieces. Arrange these slices on a baking sheet lined with parchment paper, spacing them a couple of inches apart.
- Egg Wash: Brush the tops of the sliced palmiers with the beaten egg. This will give them a nice glossy finish when baked.
- Bake: Place the baking sheet in the preheated oven and bake for 15-20 minutes, or until the palmiers are golden brown and puffed up. Keep an eye on them to avoid burning.
- Cool and Serve: Remove the palmiers from the oven and let them cool slightly on the baking sheet. Serve warm or at room temperature for the best flavor.
Extra Tips:
For an added burst of flavor, try experimenting with different fillings such as caramelized onions, feta cheese, or olives. You can also sprinkle some sesame seeds or poppy seeds on top before baking for an extra crunch.
Make sure to watch the baking time closely, as ovens can vary, and you want to achieve that perfect golden-brown finish. Enjoy your Savory Palmiers as a delightful addition to your party spread!
Coq Au Vin Bites
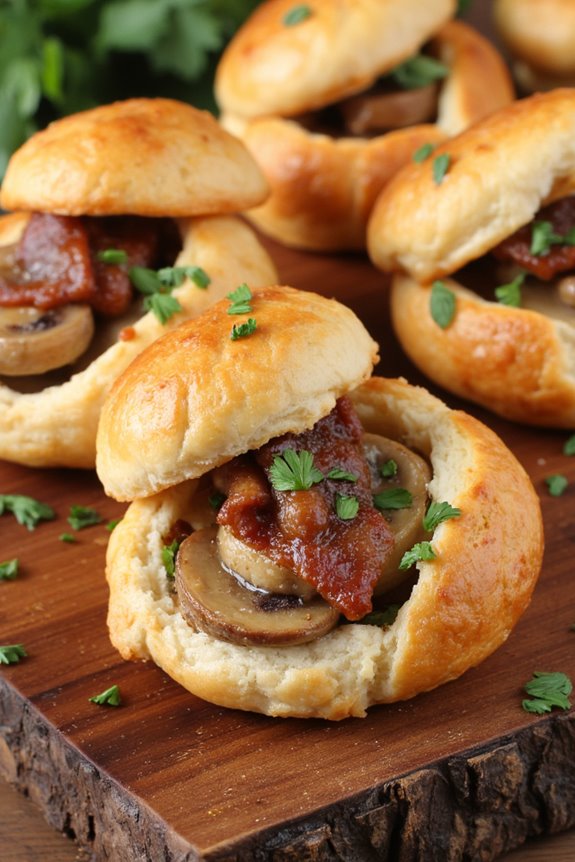
If you’re looking to impress your guests with a taste of France at your next gathering, Coq Au Vin Bites are the perfect choice. This delightful appetizer captures the rich, hearty flavors of the classic French dish, Coq Au Vin, while presenting them in a bite-sized form that’s perfect for parties.
Tender chicken is marinated in red wine and cooked with mushrooms, bacon, and aromatics, then served on crispy puff pastry bites. They aren’t only delicious but also visually appealing, making them a standout dish at any celebration.
These savory bites are sure to be a hit, bringing the essence of French cuisine to your table with ease. Whether you’re hosting a casual get-together or an elegant soirée, Coq Au Vin Bites will add a touch of sophistication to your spread. Preparation of this dish can be done ahead of time, allowing you to enjoy your party without being tied to the kitchen.
Ingredients (Serves 4-6):
- 1 lb boneless, skinless chicken thighs, diced
- 1 cup red wine (preferably Burgundy)
- 4 strips of bacon, diced
- 1 cup mushrooms, sliced
- 1 small onion, finely chopped
- 2 cloves garlic, minced
- 2 tablespoons tomato paste
- 1 cup chicken broth
- 1 teaspoon dried thyme
- 2 tablespoons olive oil
- Salt and pepper, to taste
- 1 package of puff pastry (2 sheets), thawed
- 1 egg (for egg wash)
- Fresh parsley, chopped (for garnish)
Cooking Instructions:
- Marinate the Chicken: In a large bowl, combine the diced chicken thighs and red wine. Cover and refrigerate for at least 2 hours, or overnight for best results. This step enhances the flavor of the chicken and tenderizes the meat.
- Cook the Bacon: In a large skillet, heat the olive oil over medium heat. Add the diced bacon and cook until crispy. Remove the bacon from the skillet and place it on a paper towel to drain excess fat. This adds a smoky flavor to the dish.
- Sauté the Vegetables: In the same skillet, add the chopped onion, minced garlic, and sliced mushrooms. Sauté for about 5 minutes, or until the onions are translucent and the mushrooms are tender. This builds the aromatic base for your filling.
- Combine Ingredients: Add the marinated chicken (with the marinade), chicken broth, tomato paste, thyme, and the cooked bacon back into the skillet. Stir well and reduce heat to low. Simmer for about 15 minutes until the chicken is cooked through and the liquid has thickened slightly. Season with salt and pepper to taste.
- Prepare Puff Pastry: Preheat your oven to 400°F (200°C). Roll out the thawed puff pastry sheets on a lightly floured surface. Cut them into squares or circles, depending on your preference. Place them on a baking sheet lined with parchment paper.
- Fill the Pastry: Spoon the chicken mixture into the center of each puff pastry piece, being careful not to overfill. Fold the edges of the pastry over the filling to create pockets or leave them open-faced for a more rustic look.
- Egg Wash: Beat the egg in a small bowl and brush it over the tops of the pastry to achieve a golden-brown finish when baked.
- Bake: Place the baking sheet in the preheated oven and bake for 15-20 minutes, or until the pastry is puffed and golden. This will give your bites the perfect flaky texture.
- Serve: Remove the bites from the oven and let them cool slightly before transferring them to a serving platter. Garnish with fresh parsley for a pop of color.
Extra Tips:
For an added depth of flavor, consider using a good quality red wine that you’d enjoy drinking. It’s also important to allow the chicken to marinate for enough time to really absorb the flavors.
If you’re short on time, a quick 30-minute marinade can suffice, but an overnight soak is ideal. You can prepare the filling in advance and assemble the bites just before baking, making them an easy and elegant addition to your party menu!
French Garlic Butter Shrimp
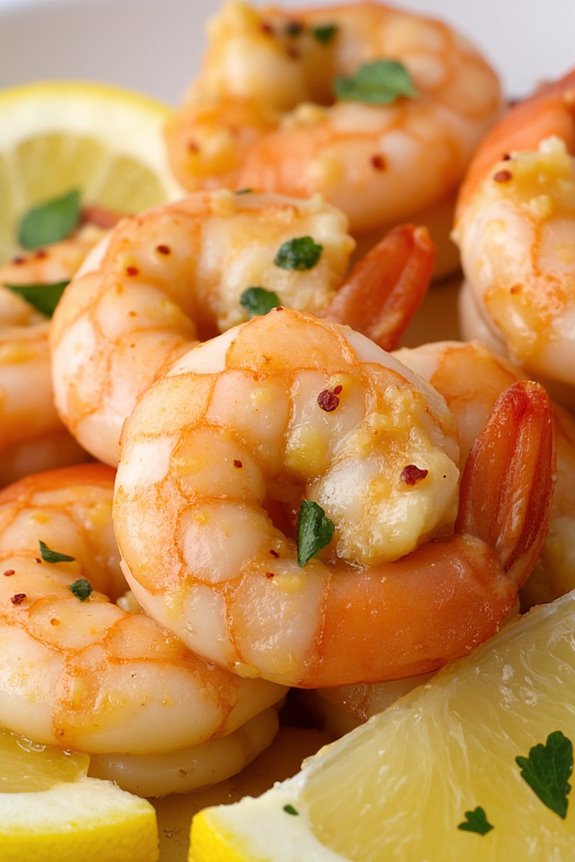
French Garlic Butter Shrimp is a delightful dish that embodies the rich flavors of French cuisine while being incredibly easy to prepare. This dish features succulent shrimp sautéed in a fragrant garlic butter sauce, making it a perfect option for a dinner party or a cozy meal at home. The combination of fresh herbs, garlic, and lemon elevates the shrimp, giving it a burst of flavor that’s both comforting and sophisticated.
Not only is French Garlic Butter Shrimp quick to make, but it also pairs beautifully with crusty bread, rice, or a simple salad, allowing you to create a complete meal in no time. Whether you’re entertaining guests or enjoying a weeknight dinner with family, this dish is sure to impress. With just a handful of ingredients and minimal cooking time, you can bring a taste of France to your table.
Ingredients (Serves 4-6):
- 1 ½ pounds large shrimp, peeled and deveined
- 6 tablespoons unsalted butter
- 4 cloves garlic, minced
- 1 teaspoon red pepper flakes (optional)
- 1 tablespoon fresh parsley, chopped
- 1 tablespoon fresh lemon juice
- Salt and pepper, to taste
- Lemon wedges, for serving
Cooking Instructions:
- Prepare the Shrimp: Begin by rinsing the shrimp under cold water and patting them dry with paper towels. This step is essential as it helps achieve a nice sear when cooking. Season the shrimp with salt and pepper to taste.
- Melt the Butter: In a large skillet, melt the unsalted butter over medium heat. Make sure the butter is fully melted but not browned. This will create a rich base for the garlic sauce.
- Sauté the Garlic: Add the minced garlic to the melted butter and sauté for about 1-2 minutes until fragrant. Be careful not to let the garlic burn, as it can become bitter. Stir occasionally to guarantee even cooking.
- Cook the Shrimp: Increase the heat to medium-high and add the seasoned shrimp to the skillet. Cook for about 2-3 minutes on one side until they turn pink and start to curl. Flip the shrimp over and cook for an additional 1-2 minutes until fully cooked through and opaque.
- Add Flavor: Once the shrimp are cooked, sprinkle in the red pepper flakes (if using), chopped parsley, and lemon juice. Toss everything together gently to coat the shrimp evenly in the garlic butter sauce. Cook for another minute to allow the flavors to meld.
- Serve: Remove the skillet from heat and transfer the shrimp to a serving platter. Garnish with extra parsley and serve with lemon wedges on the side for squeezing over the shrimp before enjoying.
Extra Tips:
For the best flavor, opt for fresh shrimp whenever possible, as they’ve a superior taste compared to frozen. If you’re using frozen shrimp, make sure to thaw them completely and pat them dry to prevent excess water from diluting the sauce.
Additionally, feel free to customize the dish by adding other herbs like thyme or basil, or even incorporating vegetables such as cherry tomatoes or spinach for added color and nutrition. Don’t forget to have some crusty bread on hand to soak up the delicious garlic butter sauce!
Creamy Mushroom Vol-au-Vent
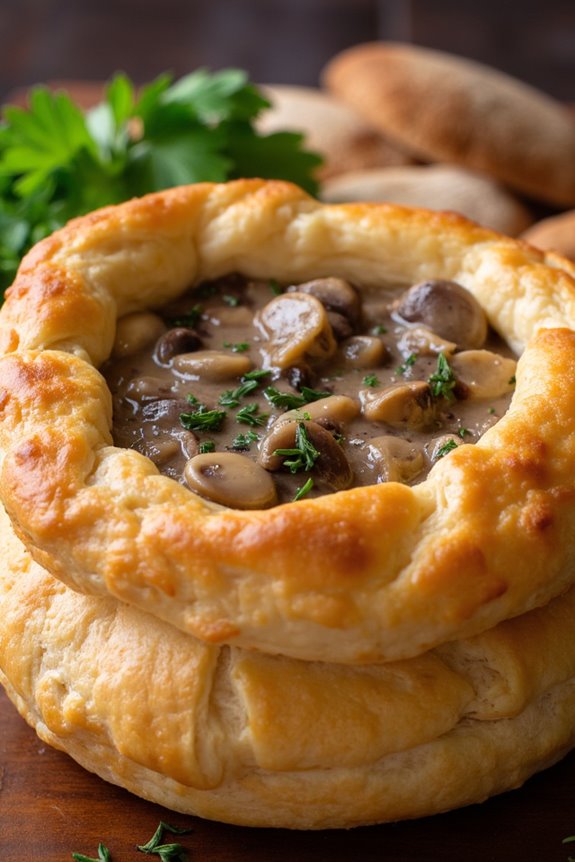
Creamy Mushroom Vol-au-Vent is a delightful French pastry dish that’s perfect for any gathering or party. These light and flaky puff pastry shells are filled with a rich and savory mushroom cream sauce, making them an irresistible bite-sized treat.
With their elegant presentation and comforting flavors, they’re sure to impress your guests and elevate your culinary repertoire.
Preparing Creamy Mushroom Vol-au-Vent is simpler than it may appear. The key lies in the quality of the ingredients and the technique used to create the creamy filling, which is made with fresh mushrooms, herbs, and a touch of cream.
Whether you’re hosting a dinner party or a casual get-together, these vol-au-vent pastries will add a touch of sophistication to your menu.
Ingredients (Serves 4-6)
- 6 large puff pastry shells (store-bought or homemade)
- 2 tablespoons unsalted butter
- 1 small onion, finely chopped
- 2 cloves garlic, minced
- 400 grams mixed mushrooms (such as cremini, button, and shiitake), finely chopped
- 1 teaspoon fresh thyme leaves (or ½ teaspoon dried thyme)
- ½ cup heavy cream
- ½ cup vegetable or chicken broth
- Salt and pepper to taste
- Fresh parsley, chopped (for garnish)
Cooking Instructions
- Preheat the Oven: Begin by preheating your oven to 400°F (200°C). If you’re using store-bought puff pastry shells, arrange them on a baking sheet lined with parchment paper and set aside.
- Sauté the Aromatics: In a large skillet over medium heat, melt the butter. Once the butter is melted, add the chopped onion and garlic. Sauté for about 3-4 minutes, or until the onion becomes translucent and fragrant.
- Cook the Mushrooms: Add the finely chopped mushrooms to the skillet. Cook for about 5-7 minutes, stirring occasionally, until the mushrooms release their moisture and become tender.
- Add Herbs and Cream: Stir in the fresh thyme, followed by the heavy cream and broth. Increase the heat slightly and bring the mixture to a gentle simmer. Allow it to cook for an additional 3-5 minutes, or until the sauce thickens slightly. Season with salt and pepper to taste.
- Fill the Pastry Shells: Once the mushroom mixture is ready, remove it from the heat. Carefully spoon the creamy mushroom filling into each of the puff pastry shells, filling them generously.
- Bake the Vol-au-Vents: Place the filled pastry shells in the preheated oven and bake for 15-20 minutes, or until the pastry is golden brown and puffed. Keep an eye on them to guarantee they don’t over-bake.
- Garnish and Serve: Once baked, remove from the oven and allow them to cool slightly. Garnish with freshly chopped parsley before serving warm.
Extra Tips
When preparing Creamy Mushroom Vol-au-Vent, opt for a variety of mushrooms to enhance the flavor profile of the filling.
You can also experiment with different herbs or add a splash of white wine for a more complex taste. If you prefer a vegetarian option, verify that the broth used is vegetable-based.
These vol-au-vent shells can be made ahead of time; just fill and bake right before serving for the best texture.
French Cheese Platter
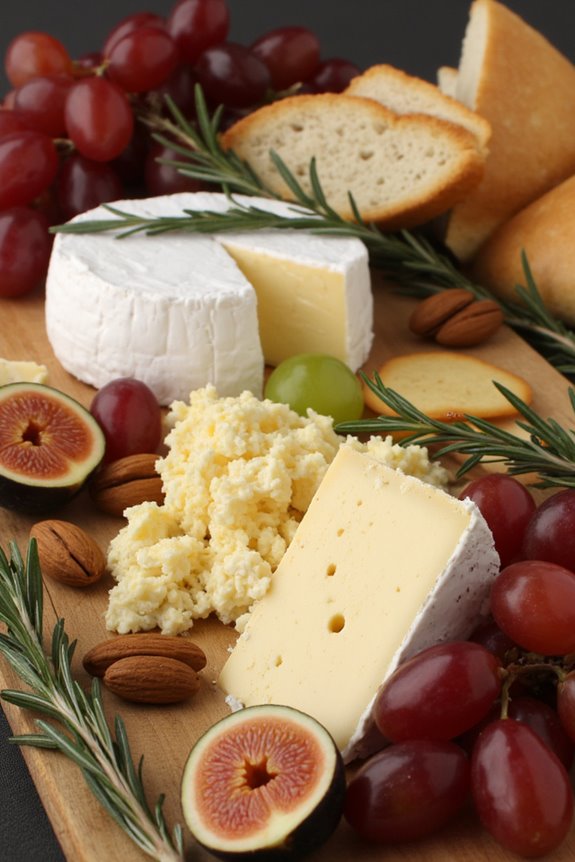
A French cheese platter, or “plateau de fromage,” is an elegant and delightful way to showcase a selection of cheeses, fruits, and accompaniments. It’s perfect for parties, gatherings, or even a cozy night in. The beauty of this dish lies in its simplicity; you can mix and match your favorite cheeses to create a beautiful spread that will impress your guests.
Traditionally, a French cheese platter features a variety of textures and flavors, from creamy Brie to tangy Roquefort, and is often accompanied by nuts, fruits, and crusty bread.
When preparing a French cheese platter, presentation is key. Use a wooden board or a large platter as your base and arrange the cheeses in a way that invites guests to dig in. Make certain to include a variety of cheeses, such as soft, hard, and blue varieties, along with seasonal fruits and complementary items like honey or fig jam. Not only does this dish offer a taste of France, but it also allows for creativity and personalization based on your preferences and the season.
Ingredients (serving size: 4-6 people)
- 200g Brie cheese
- 200g Camembert cheese
- 200g Roquefort cheese
- 200g Comté cheese
- 100g goat cheese
- A handful of walnuts
- A handful of almonds
- 1 cup of mixed grapes (red and green)
- 1 cup of fresh figs (or dried figs if out of season)
- 1-2 tablespoons of honey
- A selection of crackers or baguette slices
- A few sprigs of fresh thyme or rosemary (for garnish)
Cooking Instructions
- Select Your Base: Choose a large wooden cheese board or a flat serving platter as your base. This will be the canvas for your cheese arrangement, so verify that it’s clean and dry.
- Prepare the Cheeses: Take the cheeses out of the refrigerator about 30 minutes before serving to allow them to come to room temperature. This enhances their flavors and makes them easier to slice.
- Arrange the Cheeses: Start placing the cheeses on the board. Cut the Brie and Camembert into wedges or leave them whole for guests to cut themselves. Crumble or slice the Roquefort and Comté, and place the goat cheese in the center as a focal point. Confirm there’s enough space between each cheese for the other ingredients.
- Add Accompaniments: Fill in the gaps around the cheeses with the nuts and fruits. Scatter walnuts and almonds, and cluster the grapes around the cheeses. Cut the figs in half and place them strategically to create visual interest.
- Include Spreads and Breads: Add small bowls of honey or fig jam on the side for drizzling. Arrange the crackers or baguette slices alongside the platter, making sure they’re accessible for guests.
- Garnish: Ultimately, add a few sprigs of fresh thyme or rosemary for garnish. This not only adds aesthetic appeal but also a hint of freshness to the platter.
Extra Tips
When creating your French cheese platter, consider the balance of flavors and textures. A good mix of creamy, soft, hard, and blue cheeses will provide a delightful experience for your guests.
Don’t hesitate to customize the platter based on seasonal availability or personal preferences; for example, swap in seasonal fruits like pears or apples in the fall. Finally, encourage guests to experiment with different cheese and pairing combinations for a fun tasting experience!
Tarte Tatin With Apples
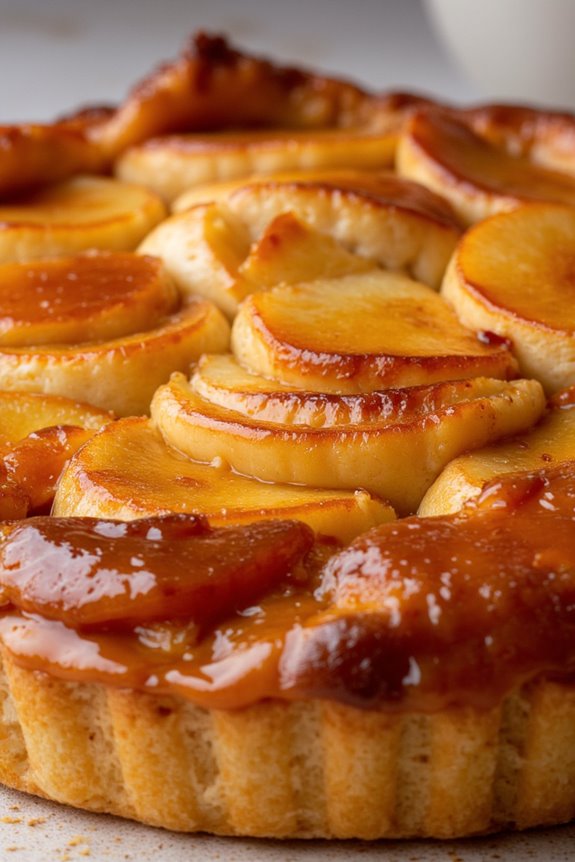
Tarte Tatin is a classic French dessert that showcases the delightful combination of caramelized apples and buttery pastry. This delightful upside-down tart is a perfect balance of sweetness and tartness, making it an ideal treat for any gathering.
Its origins trace back to the Tatin sisters in Lamotte-Beuvron, France, and it has since become a beloved dish that highlights the simplicity yet elegance of French cooking.
Making Tarte Tatin With Apples isn’t only a rewarding experience but also a fun way to impress your guests with a traditional French dessert. The key to a successful Tarte Tatin lies in the caramelization of the apples and the use of a good quality pastry.
When baked, the apples become tender and infused with caramel flavor, all while nestled under a layer of flaky pastry. This dessert can be served warm with a scoop of vanilla ice cream or a dollop of crème fraîche, making it a delightful end to any meal.
Ingredients (Serves 4-6):
- 6 medium-sized apples (preferably Granny Smith or Honeycrisp)
- 150g (3/4 cup) granulated sugar
- 90g (6 tablespoons) unsalted butter
- 1 teaspoon vanilla extract
- 1 teaspoon ground cinnamon (optional)
- 1 sheet of puff pastry (store-bought or homemade)
- Flour (for dusting)
Cooking Instructions:
1. Prepare the Apples: Begin by peeling, coring, and halving the apples. This will allow them to cook evenly and absorb the caramel flavor. Set them aside in a bowl to prevent browning.
2. Make the Caramel: In a 9-inch (23 cm) oven-safe skillet or a heavy-bottomed pan, melt the butter over medium heat. Once melted, add the granulated sugar and stir continuously until the mixture starts to turn a golden brown color.
This caramelization process should take about 5-7 minutes. Be careful not to burn the sugar.
3. Add the Apples: Once the caramel reaches a golden hue, remove the skillet from heat and carefully add the apple halves, placing them cut-side down in the caramel. Arrange them neatly in a circular pattern, as they’ll be the top of the tart once flipped.
4. Cook the Apples: Return the skillet to low heat and allow the apples to cook in the caramel for about 15-20 minutes. This step helps the apples soften and absorb the caramel flavors.
If using, sprinkle the cinnamon over the apples during the last few minutes of cooking.
5. Preheat the Oven: While the apples are cooking, preheat your oven to 190°C (375°F). This will prepare it for baking the tart once the pastry is added.
6. Prepare the Pastry: Roll out the puff pastry on a lightly floured surface to fit the skillet. It should be slightly larger than the diameter of the skillet.
7. Assemble the Tart: Carefully place the rolled-out pastry over the caramelized apples, tucking the edges down around the apples to create a seal. This will help contain the juices while baking.
8. Bake the Tart: Place the skillet in the preheated oven and bake for 25-30 minutes or until the pastry is golden brown and puffed.
9. Cool and Flip: Once baked, remove the skillet from the oven and let it cool for about 5 minutes. Using a large plate, carefully invert the tart onto the plate, allowing the apples to be on top.
Be cautious as the caramel may still be hot.
10. Serve: Slice the Tarte Tatin and serve warm, optionally with a scoop of ice cream or crème fraîche.
Extra Tips:
When preparing Tarte Tatin, it’s crucial to choose the right apples, as they should hold their shape and not turn mushy when cooked. Granny Smith or Honeycrisp apples are excellent choices for their tartness and firmness.
Additionally, make sure to keep an eye on the caramel while cooking; it can go from perfectly golden to burnt quickly. If you want to add a little twist, consider incorporating a splash of Calvados or apple brandy into the caramel for an extra layer of flavor.
Enjoy your delicious creation with friends and family!
Chocolate Mousse Cups
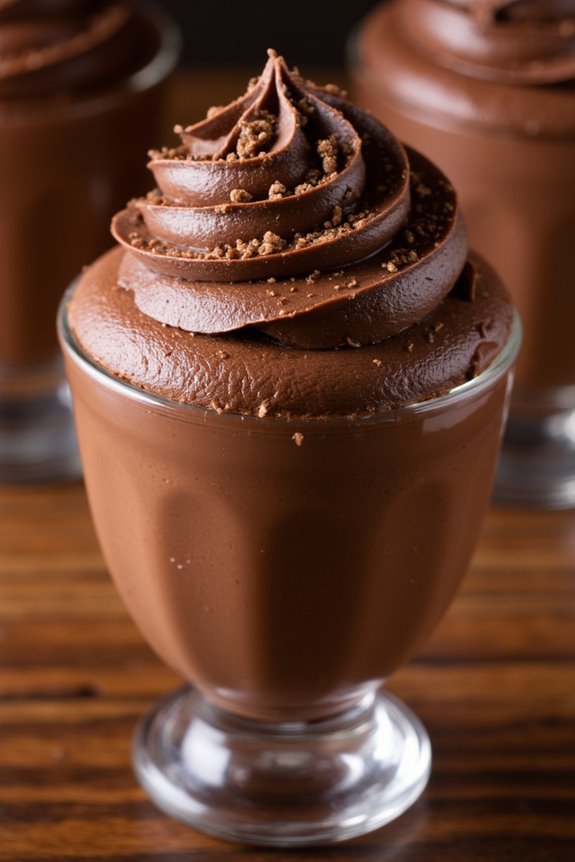
Chocolate Mousse Cups are a delightful and elegant dessert that can elevate any gathering. This traditional French treat features a rich, airy chocolate mousse that’s both indulgent and surprisingly easy to make. With its creamy texture and deep chocolate flavor, it’s sure to impress your guests while offering a touch of sophistication to your party.
Making Chocolate Mousse Cups requires minimal ingredients and can be prepared in advance, allowing you to focus on other elements of your event. They can be served in individual cups, making them perfect for portion control and presentation. Whether you’re hosting a birthday celebration, a dinner party, or simply want to indulge yourself, these mousse cups are a delightful addition to your menu.
Ingredients (serves 4-6):
- 6 oz (170 g) dark chocolate (70% cocoa), chopped
- 3 tablespoons unsalted butter
- 3 large eggs, separated
- 1/4 cup granulated sugar
- 1 cup heavy whipping cream
- 1 teaspoon vanilla extract
- A pinch of salt
- Chocolate shavings or whipped cream for garnish (optional)
Instructions:
- Melt the Chocolate: In a heatproof bowl, combine the chopped dark chocolate and unsalted butter. Place the bowl over a pot of simmering water, making sure the bottom of the bowl doesn’t touch the water. Stir occasionally until completely melted and smooth. Remove from heat and allow it to cool slightly.
- Whip the Egg Whites: In a clean bowl, use an electric mixer to beat the egg whites on medium speed until they become frothy. Gradually add the granulated sugar while continuing to beat until stiff peaks form. This should take about 3-5 minutes. Set aside.
- Combine Egg Yolks with Chocolate: In another bowl, whisk the egg yolks until pale. Slowly whisk in the melted chocolate mixture until fully combined. Add the vanilla extract and a pinch of salt, mixing well.
- Incorporate Egg Whites: Gently fold one-third of the whipped egg whites into the chocolate mixture to lighten it. Then, carefully fold in the remaining egg whites in two additions, being cautious not to deflate the mixture.
- Whip the Cream: In a separate bowl, whip the heavy cream until soft peaks form. Gently fold the whipped cream into the chocolate mixture until no streaks remain. This will give your mousse its luscious texture.
- Chill the Mousse: Spoon the mousse into individual cups or serving bowls. Cover with plastic wrap and refrigerate for at least 2 hours or until set. This allows the flavors to meld and the mousse to firm up.
- Serve: Once chilled, garnish with chocolate shavings or a dollop of whipped cream if desired. Enjoy your elegant Chocolate Mousse Cups!
Extra Tips:
For an extra layer of flavor, consider adding a splash of espresso or a hint of orange zest to the chocolate mixture before folding in the egg whites. This can enhance the richness of the chocolate and provide a unique twist to the classic recipe.
Additionally, make sure to use high-quality chocolate for the best flavor, and don’t skip the chilling step, as it’s essential for achieving the perfect mousse consistency. Enjoy your delicious creations!
Madeleines With Lemon Zest
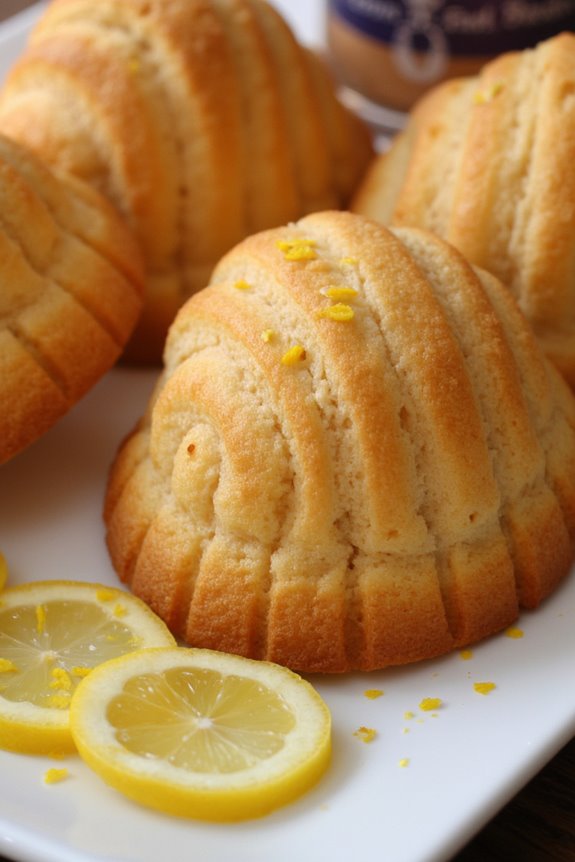
Madeleines are small, shell-shaped sponge cakes that are a delightful addition to any gathering. They’re light, airy, and have a unique texture that makes them perfect for serving alongside tea or coffee. The addition of lemon zest brightens these treats, adding a revitalizing citrus flavor that complements their sweetness perfectly.
These classic French cakes are surprisingly easy to make and will impress your guests with their delicate flavor and beautiful presentation. To achieve the perfect madeleines, it’s vital to pay attention to the batter’s consistency and the baking process. Cooling the batter before baking allows the cakes to rise beautifully and develop their signature hump. The use of quality ingredients also plays a significant role in enhancing the flavor, so opt for fresh eggs and real butter if possible.
Follow this recipe, and you’ll have a platter of warm, buttery madeleines that will transport you straight to a quaint Parisian café.
Ingredients (Serves 4-6)
- 1 cup all-purpose flour
- 1/2 teaspoon baking powder
- 1/4 teaspoon salt
- 1/2 cup unsalted butter, melted and slightly cooled
- 3 large eggs
- 3/4 cup granulated sugar
- 1 teaspoon vanilla extract
- Zest of 1 lemon
- Powdered sugar, for dusting (optional)
Cooking Instructions
- Preheat the Oven: Begin by preheating your oven to 375°F (190°C). This guarantees that the madeleines bake evenly and develop a nice golden color.
- Prepare the Pan: Grease a madeleine pan with butter or cooking spray to prevent sticking. Dust the pan lightly with flour, tapping out any excess. This step is vital for achieving the classic madeleine shape without any sticking.
- Mix Dry Ingredients: In a medium bowl, whisk together the flour, baking powder, and salt. This guarantees that the leavening agent is evenly distributed throughout the flour, which will help the madeleines rise properly.
- Beat Eggs and Sugar: In a large bowl, whisk the eggs and granulated sugar together until the mixture becomes thick and pale, about 5 minutes. This step incorporates air into the batter, which is crucial for light and fluffy madeleines.
- Add Flavorings: Stir in the melted butter, vanilla extract, and lemon zest into the egg mixture. Make sure the butter has cooled slightly before mixing it in; otherwise, it may cook the eggs.
- Combine Mixtures: Gently fold the dry ingredients into the wet ingredients using a spatula. Be careful not to overmix; the batter should be smooth but still have some small lumps.
- Chill the Batter: Cover the batter and refrigerate it for at least 30 minutes. Chilling the batter helps create the signature hump on top of the madeleines.
- Fill the Pan: Spoon the chilled batter into the prepared madeleine pan, filling each mold about three-quarters full. This allows room for the cakes to rise without overflowing.
- Bake: Place the pan in the preheated oven and bake for 8-10 minutes or until the madeleines are golden and spring back when lightly touched.
- Cool and Serve: Remove the madeleines from the oven and let them cool in the pan for a few minutes before transferring them to a wire rack. Dust with powdered sugar if desired before serving.
Extra Tips
For the best results, confirm that your ingredients are at room temperature, especially the eggs, which will help create a smoother batter. Experiment with different flavors by substituting lemon zest with orange or almond extract for a unique twist.
Serve your madeleines warm for the best texture and flavor, and store any leftovers in an airtight container to maintain their freshness. Enjoy your delightful madeleines with a cup of tea or coffee for an authentic French experience!
Profiteroles With Vanilla Cream
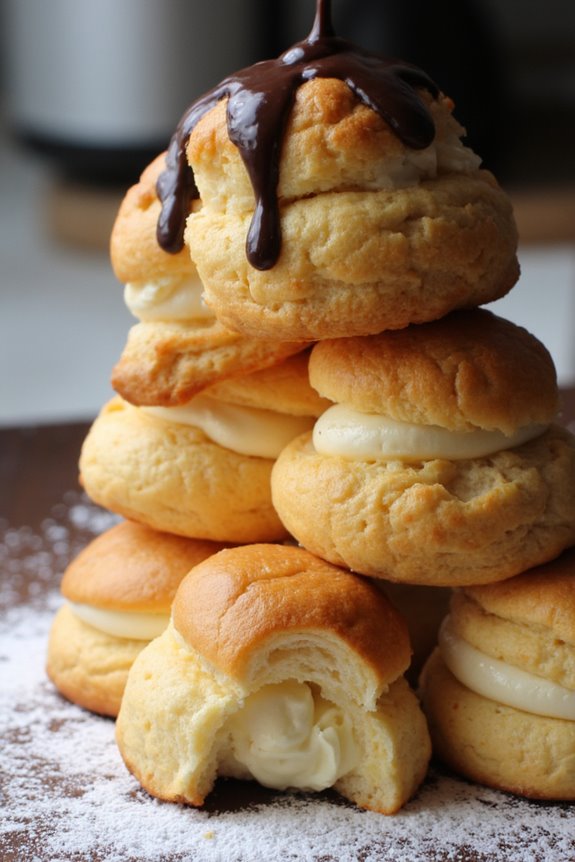
Profiteroles, also known as cream puffs, are delightful French pastries made from choux pastry filled with sweet cream or custard. These little treats aren’t only elegant but also incredibly versatile, making them a perfect addition to any party. When filled with vanilla cream and drizzled with chocolate sauce or dusted with powdered sugar, they become an irresistible dessert that will impress your guests.
Making profiteroles might seem complex, but with a bit of patience and the right technique, you can create this classic French dessert at home. The light, airy texture of the choux pastry combined with the rich, flavorful vanilla cream is a match made in culinary heaven.
Whether you’re serving them at a dinner party, a birthday celebration, or a casual get-together, these profiteroles are sure to steal the show.
Ingredients (Serves 4-6)
- 1 cup all-purpose flour
- 1/2 cup unsalted butter
- 1 cup water
- 1/4 teaspoon salt
- 4 large eggs
- 1 cup heavy cream
- 1/4 cup powdered sugar
- 1 teaspoon vanilla extract
- Chocolate sauce (optional, for drizzling)
- Powdered sugar (optional, for dusting)
Cooking Instructions
1. Make the Choux Pastry: In a medium saucepan, combine the water, butter, and salt. Bring to a boil over medium heat. Once boiling, remove from heat and stir in the flour until the mixture forms a ball and pulls away from the sides of the pan.
Allow the dough to cool slightly.
2. Incorporate the Eggs: Once the dough has cooled for about 5 minutes, add the eggs one at a time, mixing well after each addition. The dough should become smooth and glossy.
3. Pipe the Profiteroles: Preheat your oven to 425°F (220°C). Line a baking sheet with parchment paper. Using a piping bag fitted with a round tip, pipe small mounds of dough (about the size of a walnut) onto the prepared baking sheet, spacing them about 2 inches apart.
4. Bake: Place the baking sheet in the preheated oven and bake for 20-25 minutes, or until the profiteroles are puffed and golden brown. Avoid opening the oven door during baking to guarantee they rise properly.
5. Cool the Profiteroles: Once baked, remove the profiteroles from the oven and let them cool completely on a wire rack.
6. Prepare the Vanilla Cream: In a mixing bowl, whip the heavy cream with the powdered sugar and vanilla extract until stiff peaks form. Be careful not to over-whip.
7. Fill the Profiteroles: Once the profiteroles are cool, use a sharp knife to make a small slit in the side of each puff. Use a piping bag to fill each profiterole with the vanilla cream through the slit.
8. Serve: Arrange the filled profiteroles on a serving platter. Drizzle with chocolate sauce or dust with powdered sugar if desired, then serve immediately.
Extra Tips
When making profiteroles, it’s important to verify that the dough isn’t too wet or too dry; this will affect the puffing of the pastry.
If you have leftover profiteroles, store them in an airtight container to maintain their texture. You can also experiment with different fillings like chocolate mousse or pastry cream, and feel free to get creative with toppings. Enjoy your sweet creation!
Crêpes Suzette

Crêpes Suzette is a classic French dessert that delights with its delicate, thin pancakes and a luscious sauce made from butter, sugar, and orange juice. Originating in the late 19th century, this dish is often flambéed with orange liqueur, creating a dramatic presentation that’s perfect for any festive celebration.
The crêpes themselves are versatile and can be enjoyed with various fillings, but the signature Suzette sauce elevates them to an extraordinary level of flavor and sophistication.
To make Crêpes Suzette, the crêpes are prepared first and then filled with the delicious orange sauce. This recipe is ideal for serving 4-6 people, making it a great choice for your next dinner party or festive gathering. The combination of citrus and sweetness, along with the warm, buttery sauce, will leave your guests craving more.
Ingredients (Serves 4-6)
- 1 cup all-purpose flour
- 2 large eggs
- 1 ½ cups milk
- 2 tablespoons melted butter
- 2 tablespoons sugar
- Pinch of salt
- 1 tablespoon orange zest
- ¼ cup freshly squeezed orange juice
- ¼ cup Grand Marnier or orange liqueur (optional)
- 4 tablespoons unsalted butter (for the sauce)
- ¼ cup sugar (for the sauce)
Cooking Instructions
1. Make the Crêpe Batter: In a mixing bowl, whisk together the flour, eggs, milk, melted butter, sugar, salt, and orange zest until smooth. The batter should be thin; let it rest for at least 30 minutes at room temperature to guarantee the crêpes are tender.
2. Cook the Crêpes: Heat a non-stick skillet or crêpe pan over medium heat. Lightly grease the pan with a small amount of butter. Pour about ¼ cup of batter into the pan, swirling it to coat the bottom evenly. Cook for about 1-2 minutes until the edges start to lift and the bottom is lightly golden. Flip the crêpe and cook for an additional 1 minute.
Repeat with the remaining batter, stacking the cooked crêpes on a plate and covering them with a kitchen towel to keep warm.
3. Prepare the Sauce: In a saucepan over medium heat, melt the 4 tablespoons of unsalted butter and add the sugar, stirring until it dissolves. Add the freshly squeezed orange juice and continue to cook for about 2-3 minutes until the sauce thickens slightly.
If using, carefully add the Grand Marnier or orange liqueur, igniting it with a long lighter to flambé (this step is optional).
4. Serve the Crêpes: For each crêpe, fold it into quarters and place it in the warm sauce. Allow it to soak briefly before serving. Arrange the crêpes on plates and drizzle with additional sauce. Serve immediately, garnished with orange slices or zest if desired.
Extra Tips
When making Crêpes Suzette, it’s important to have a well-heated pan to guarantee that the crêpes cook evenly and don’t stick.
If you’re not comfortable flambéing, you can skip that step and serve the crêpes with the sauce straight from the pan. For a twist, consider adding a splash of lemon juice or a sprinkle of cinnamon to the sauce for added flavor.
Enjoy the process and have fun with this delightful French treat!
Raspberry Clafoutis
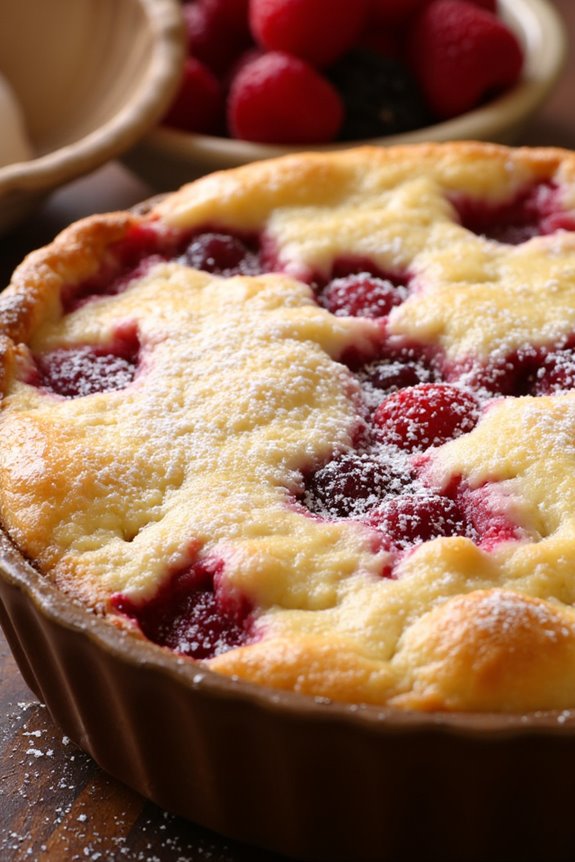
Raspberry Clafoutis is a classic French dessert that showcases the delightful combination of sweet fruit and a rich, custard-like batter. Traditionally made with cherries, this versatile dish can easily be adapted to feature other fruits, making it a favorite for any occasion.
The beauty of clafoutis lies in its simplicity; it requires minimal ingredients and can be prepared in just a short amount of time, making it an ideal choice for both casual gatherings and elegant dinner parties.
This dish is best served warm, straight from the oven, allowing the flavors to meld beautifully while providing a comforting, homey feel. The tartness of the raspberries balances perfectly with the sweetness of the batter, resulting in a delightful treat that will impress your guests.
Whether enjoyed as a dessert or a sweet brunch option, Raspberry Clafoutis is sure to be a hit at your next French-themed party.
Ingredients (Serves 4-6)
- 1 cup fresh raspberries
- 3 large eggs
- 1 cup whole milk
- 1/2 cup granulated sugar
- 1 teaspoon vanilla extract
- 1/2 teaspoon salt
- 1/2 cup all-purpose flour
- 1 tablespoon unsalted butter (for greasing the baking dish)
- Powdered sugar (for dusting, optional)
Cooking Instructions
- Preheat the Oven: Begin by preheating your oven to 350°F (175°C). This guarantees that the clafoutis cooks evenly and achieves a nice golden top.
- Prepare the Baking Dish: Take a 9-inch round pie dish or a similar-sized baking dish and use the unsalted butter to grease the bottom and sides. This step is essential to prevent the clafoutis from sticking once it’s baked.
- Arrange the Raspberries: Evenly distribute the fresh raspberries at the bottom of the greased baking dish. You can sprinkle them lightly with a little sugar if you prefer a sweeter flavor.
- Make the Batter: In a mixing bowl, whisk together the eggs, whole milk, granulated sugar, vanilla extract, and salt until well combined. Gradually add the flour, whisking until the mixture is smooth and free of lumps.
- Combine and Pour: Once the batter is mixed, pour it gently over the raspberries in the baking dish. Confirm that the raspberries are evenly covered by the batter.
- Bake the Clafoutis: Place the baking dish in the preheated oven and bake for 30-35 minutes. The clafoutis is done when it’s puffed up, golden brown on top, and a toothpick inserted in the center comes out clean.
- Cool and Serve: After baking, remove the clafoutis from the oven and allow it to cool slightly. Dust with powdered sugar if desired, then slice and serve warm.
Extra Tips
For an extra touch of flavor, consider adding a hint of almond extract or a sprinkle of lemon zest to the batter.
If you use frozen raspberries, be sure to thaw and drain them well to avoid excess moisture in the batter. Clafoutis can be served with a dollop of whipped cream or a scoop of vanilla ice cream for an indulgent dessert.
Enjoy experimenting with different fruits like blueberries or plums for a variety of delicious clafoutis options!