

Lunchtime is the perfect opportunity to indulge in something delicious yet simple. French cuisine offers just the right mix of elegance and ease for a midday pick-me-up. Whether you’re in the mood for a classic Quiche Lorraine or a refreshing Salade Niçoise, there’s a recipe here to suit your craving. I’m excited to introduce you to these effortless yet tasty dishes. Let’s savor these French-inspired lunch ideas together!
Classic French Quiche Lorraine

Quiche Lorraine is a classic French dish that hails from the Lorraine region in northeastern France. This savory tart is characterized by its flaky pastry crust filled with a rich custard made from eggs, cream, and a generous amount of crispy bacon. The combination of the buttery crust and the creamy filling creates a delightful texture and flavor that’s perfect for lunch or brunch.
What makes Quiche Lorraine particularly appealing is its versatility; it can be served warm or at room temperature, making it a great dish to prepare ahead of time for gatherings.
The origins of Quiche Lorraine date back to the 16th century, and over the years, it has evolved into various regional variations. Traditional recipes often call for lardons or bacon, but modern adaptations may include different vegetables or cheeses. Regardless of the variations, the essence of Quiche Lorraine remains its deliciously creamy filling encased in a golden-brown crust.
Whether you’re hosting a brunch or simply enjoying a slice for lunch, this classic French dish is bound to impress.
Ingredients (Serves 4-6):
- 1 pie crust (store-bought or homemade)
- 6 slices of bacon, diced
- 1 cup heavy cream
- 3 large eggs
- 1 cup grated Gruyère cheese
- 1/2 teaspoon salt
- 1/4 teaspoon black pepper
- 1/4 teaspoon nutmeg
- 2 tablespoons chopped fresh chives (optional for garnish)
Instructions:
- Preheat the Oven: Begin by preheating your oven to 400°F (200°C). This guarantees that your quiche will bake evenly and develop a lovely golden crust.
- Prepare the Pie Crust: If you’re using a store-bought pie crust, place it in a 9-inch pie dish. If you’re making a homemade crust, roll it out to fit the pie dish and carefully place it inside. Press the crust against the sides and bottom of the dish, trimming any excess. Prick the bottom with a fork to prevent bubbling during baking.
- Cook the Bacon: In a skillet over medium heat, cook the diced bacon until crispy. This should take about 5-7 minutes. Once done, use a slotted spoon to transfer the bacon to a paper towel-lined plate to drain excess grease.
- Make the Custard: In a mixing bowl, whisk together the heavy cream, eggs, salt, pepper, and nutmeg until well combined. The mixture should be smooth and uniform in color.
- Assemble the Quiche: Evenly distribute the cooked bacon over the bottom of the pie crust. Sprinkle the grated Gruyère cheese on top of the bacon. Finally, pour the egg and cream mixture over the filling, ensuring it’s evenly distributed.
- Bake the Quiche: Place the quiche in the preheated oven and bake for 35-40 minutes, or until the custard is set and the top is lightly browned. You can check for doneness by inserting a knife into the center; it should come out clean.
- Cool and Serve: Once baked, remove the quiche from the oven and allow it to cool for about 10-15 minutes before slicing. This will help the filling to set a bit more. Serve warm or at room temperature, garnished with fresh chives if desired.
Extra Tips:
For an added depth of flavor, consider sautéing some onions or leeks along with the bacon. You can also experiment with different cheeses, such as cheddar or feta, for a unique twist.
If you have leftover quiche, it can be stored in the refrigerator for a few days and reheated in the oven or microwave. Enjoy this versatile dish with a simple green salad or fresh fruit for a complete meal!
Ratatouille Tart
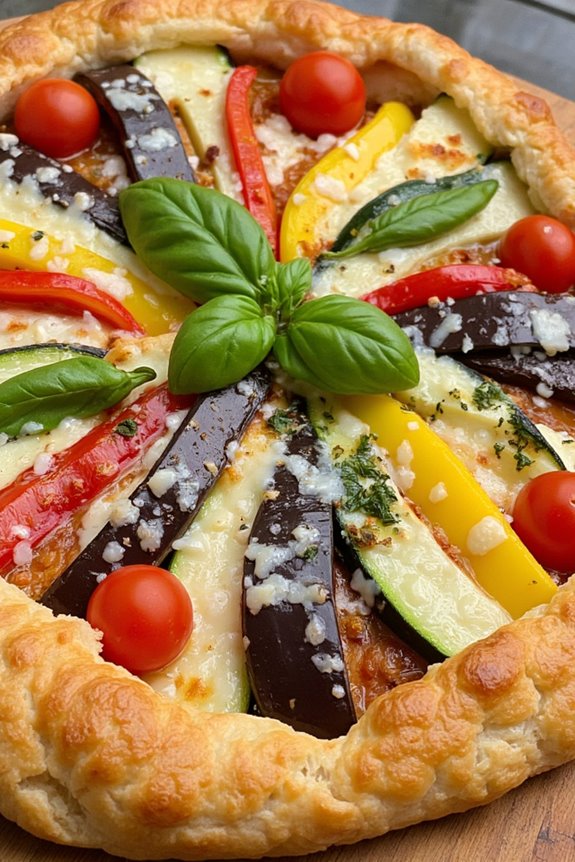
Ratatouille Tart is a delightful French dish that combines the classic flavors of ratatouille with the flaky, buttery goodness of a tart crust. This dish not only serves as a hearty lunch option but also makes for an eye-catching centerpiece at any gathering. The vibrant vegetables like zucchini, eggplant, and bell peppers are beautifully arranged on the tart crust, making it both visually appealing and delicious.
This recipe captures the essence of traditional French cuisine with a modern twist, perfect for impressing your guests or simply enjoying a comforting meal at home.
To make the Ratatouille Tart, you’ll begin by preparing a savory tart crust that provides a buttery base for the fresh vegetables. The tart is then filled with a mixture of sautéed vegetables, herbs, and cheese, which are baked until golden and tender. Each bite bursts with the aromatic flavors of Provence, making it a satisfying dish that can be served warm or at room temperature.
Whether paired with a simple salad or enjoyed on its own, this Ratatouille Tart is sure to become a favorite in your lunch repertoire.
Ingredients (Serves 4-6):
- 1 pre-made tart crust (9 inches)
- 1 medium zucchini, thinly sliced
- 1 medium eggplant, thinly sliced
- 1 red bell pepper, thinly sliced
- 1 yellow bell pepper, thinly sliced
- 1 medium onion, thinly sliced
- 2 cloves garlic, minced
- 1 cup cherry tomatoes, halved
- 1 teaspoon dried thyme
- 1 teaspoon dried oregano
- 1/2 cup grated Parmesan cheese
- 1/2 cup ricotta cheese
- 2 tablespoons olive oil
- Salt and pepper to taste
- Fresh basil leaves for garnish (optional)
Cooking Instructions:
1. Preheat the Oven: Begin by preheating your oven to 375°F (190°C). This guarantees that the tart bakes evenly and achieves a golden crust.
2. Prepare the Tart Crust: Place the pre-made tart crust into a 9-inch tart pan. Gently press it into the corners and trim any excess dough from the edges. Use a fork to poke small holes in the bottom of the crust to prevent it from puffing up during baking. Set aside.
3. Sauté the Vegetables: In a large skillet over medium heat, add the olive oil and heat it until shimmering. Add the sliced onion and garlic, sautéing for about 2-3 minutes until they become translucent.
Then, add the zucchini, eggplant, red, and yellow bell peppers. Cook for an additional 5-7 minutes, stirring occasionally until the vegetables are tender. Season with salt, pepper, thyme, and oregano.
4. Prepare the Cheese Filling: In a mixing bowl, combine the ricotta cheese and half of the grated Parmesan cheese. Mix until smooth, adding a pinch of salt and pepper to taste. This will serve as the base layer for the tart.
5. Assemble the Tart: Spread the ricotta mixture evenly across the bottom of the tart crust. Layer the sautéed vegetables on top, arranging them in a visually appealing manner.
Finally, scatter the halved cherry tomatoes over the vegetables and sprinkle the remaining Parmesan cheese on top.
6. Bake the Tart: Place the assembled tart in the preheated oven and bake for about 30-35 minutes, or until the crust is golden brown and the vegetables are cooked through. Keep an eye on it to verify it doesn’t over-brown.
7. Garnish and Serve: Once baked, remove the tart from the oven and let it cool for a few minutes. Garnish with fresh basil leaves if desired, then slice and serve warm or at room temperature.
Extra Tips:
For an added depth of flavor, consider roasting the vegetables beforehand instead of sautéing them. This enhances their natural sweetness and gives them a beautifully caramelized texture.
Additionally, feel free to swap out any of the vegetables based on what you have on hand or what’s in season. Ratatouille Tart is versatile, so you can use seasonal vegetables to make it your own.
Ultimately, if you want a richer flavor, add a splash of balsamic vinegar to the sautéed vegetables for an extra kick.
Croque Monsieur

The Croque Monsieur is a classic French sandwich that combines the rich flavors of ham, cheese, and béchamel sauce, all layered between two slices of crusty bread. Originating from French cafés, this delightful dish is perfect for lunch or a light dinner. It’s both comforting and indulgent, making it a beloved choice across the globe.
Not only is it quick to prepare, but it also allows for customization, whether you want to swap out the ham for turkey or add a fried egg on top for a Croque Madame.
To make a perfect Croque Monsieur, it’s important to use high-quality ingredients. The bread should be thick-cut and sturdy enough to hold up to the fillings and sauces. Gruyère cheese is the traditional choice, offering a nutty flavor that melts beautifully. The béchamel sauce, a creamy mixture of butter, flour, and milk, adds richness and ties all the components together. When baked, the sandwich turns golden brown and crispy, making it irresistible.
Ingredients (Serves 4-6):
- 8 slices of thick-cut white or sourdough bread
- 8 slices of ham (preferably high-quality, like French jambon)
- 1 cup grated Gruyère cheese
- 1 cup of milk
- 2 tablespoons unsalted butter
- 2 tablespoons all-purpose flour
- 1 tablespoon Dijon mustard
- Salt and pepper to taste
- Fresh parsley for garnish (optional)
Cooking Instructions:
- Prepare the Béchamel Sauce: In a saucepan over medium heat, melt the butter. Once melted, add the flour and whisk continuously for about 2 minutes to create a roux. Gradually add the milk while whisking to prevent lumps. Continue cooking until the sauce thickens, about 5-7 minutes. Season with salt, pepper, and Dijon mustard. Remove from heat and set aside.
- Assemble the Sandwiches: Lay out 4 slices of bread on a clean surface. On each slice, layer a slice of ham followed by a generous amount of grated Gruyère cheese. Top with another slice of bread to create a sandwich.
- Add Béchamel Sauce: Spread a layer of the béchamel sauce generously on top of each sandwich. Sprinkle extra Gruyère cheese over the béchamel for added flavor and a crispy topping.
- Bake the Sandwiches: Preheat your oven to 400°F (200°C). Place the assembled sandwiches on a baking sheet lined with parchment paper. Bake in the oven for about 15-20 minutes or until the sandwiches are golden brown and the cheese is bubbling.
- Serve: Once baked, remove the sandwiches from the oven and let them cool for a minute. Cut them in half and garnish with fresh parsley if desired. Serve hot with a side salad or pickles for a complete meal.
Extra Tips:
For an added twist, consider using different types of cheese such as Emmental or Swiss for a unique flavor profile. If you want to elevate your Croque Monsieur, try adding a layer of sautéed mushrooms or spinach within the sandwich.
Additionally, for a crunchier texture, you can grill the sandwiches in a skillet with a bit of butter before baking them, ensuring they’re crispy on the outside and gooey on the inside. Bon appétit!
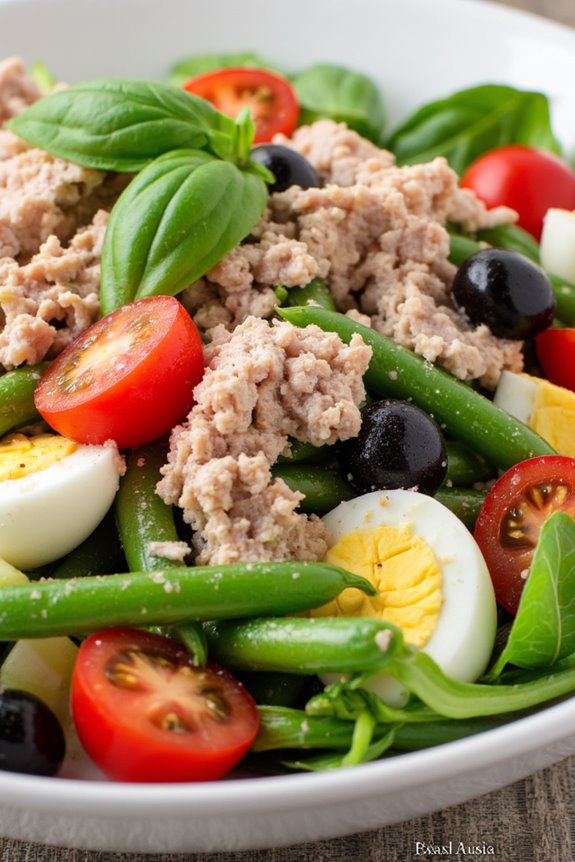
Salade Niçoise
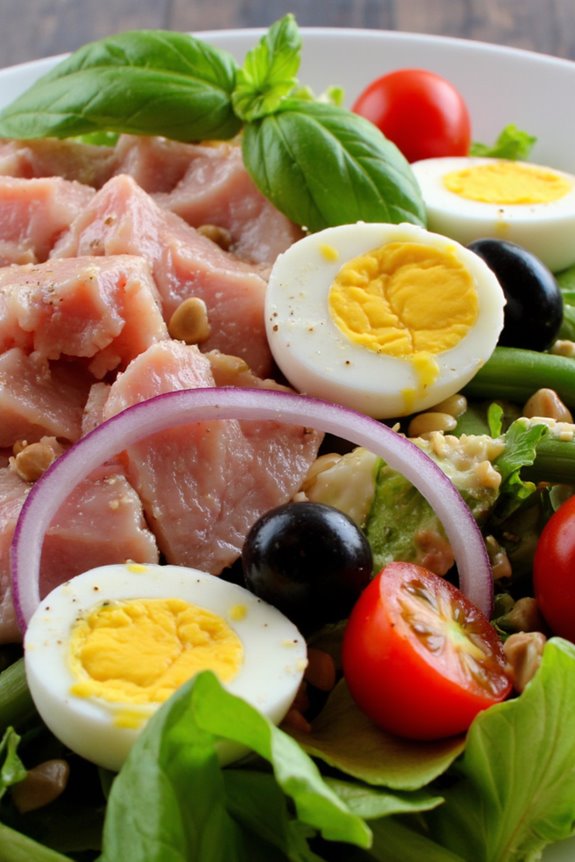
Salade Niçoise is a classic French dish that hails from the sunny region of Nice on the French Riviera. This vibrant salad is a celebration of fresh ingredients, combining crisp vegetables, protein-packed tuna, and hard-boiled eggs, all dressed with a zesty vinaigrette. It’s perfect for a light lunch or as a starter for a larger meal, offering a delightful mix of textures and flavors that transport you straight to the Mediterranean.
The beauty of this dish lies in its versatility; feel free to adjust the ingredients based on seasonal availability or personal taste preferences.
To prepare a traditional Salade Niçoise, it’s crucial to choose high-quality ingredients. The salad typically features green beans, ripe tomatoes, and olives, alongside the main proteins. While many recipes include canned tuna, using fresh seared tuna can elevate the dish to a whole new level. This recipe serves 4-6 people, making it ideal for sharing with family and friends during a leisurely lunch or a picnic in the park.
Ingredients:
- 1 pound (450g) fresh green beans, trimmed
- 4 medium ripe tomatoes, quartered
- 1 cup (150g) black olives, preferably Niçoise or Kalamata
- 1 small red onion, thinly sliced
- 4 large eggs
- 1 can (5-6 oz/150-170g) tuna in olive oil, drained (or 8 oz/225g seared fresh tuna)
- 4 cups (about 150g) mixed salad greens (arugula, lettuce, etc.)
- 1/4 cup (60ml) extra virgin olive oil
- 2 tablespoons red wine vinegar
- 1 teaspoon Dijon mustard
- Salt and pepper, to taste
- Fresh basil leaves, for garnish
Cooking Instructions:
- Prepare the Eggs: Start by hard-boiling the eggs. Place them in a pot and cover with cold water. Bring to a boil over medium-high heat, then reduce the heat and let them simmer for 9-12 minutes. After cooking, transfer the eggs to an ice bath to cool, then peel and quarter them once they’re cool to the touch.
- Blanch the Green Beans: In a separate pot, bring salted water to a boil. Add the trimmed green beans and cook for 3-4 minutes until they’re bright green and tender-crisp. Drain and immediately plunge them into a bowl of ice water to stop the cooking process. Once cooled, drain and set aside.
- Prepare the Vinaigrette: In a small bowl, whisk together the extra virgin olive oil, red wine vinegar, Dijon mustard, salt, and pepper to taste. Adjust the seasoning as desired. This dressing will enhance the flavors of the salad.
- Assemble the Salad: In a large serving bowl or platter, arrange the mixed salad greens as a base. Top with the quartered tomatoes, sliced red onion, blanched green beans, olives, and tuna (if using canned, flake it; if using seared, slice it). Finally, add the quartered eggs on top.
- Dress and Serve: Drizzle the prepared vinaigrette over the salad just before serving. Toss gently to combine, ensuring all ingredients are coated with the dressing. Garnish with fresh basil leaves for a final touch.
Extra Tips:
When making Salade Niçoise, remember that fresh, high-quality ingredients make a significant difference in flavor. If you can find fresh, local vegetables, they’ll elevate your salad.
Additionally, while traditional recipes often include specific ingredients, feel free to customize the salad to your liking—adding ingredients like bell peppers or artichokes can add an interesting twist. For those who prefer a bit more protein, consider adding cooked shrimp or chicken.
Enjoy this delightful salad chilled for a revitalizing meal!
French Onion Soup
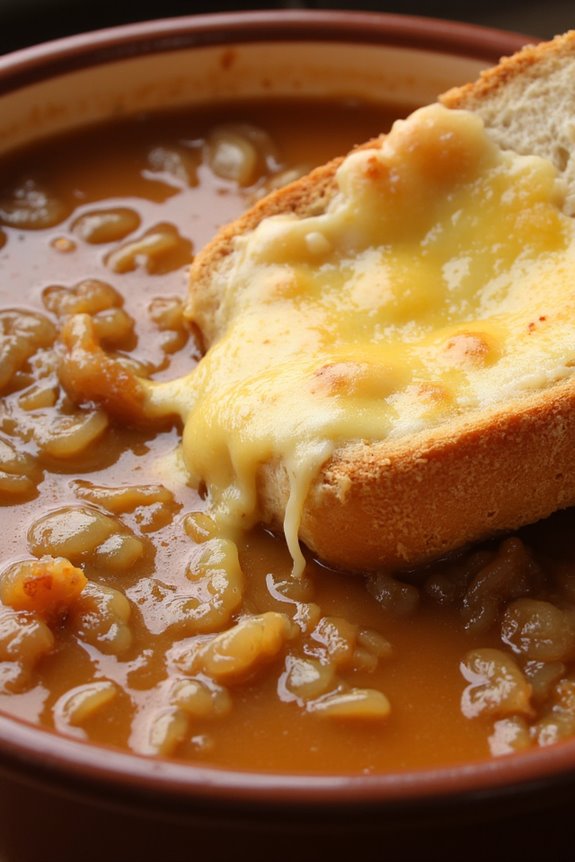
French Onion Soup is a classic dish that showcases the rich flavors of caramelized onions in a savory broth, topped with melted cheese and crusty bread. Originating from France, this comforting soup has become a beloved staple worldwide, often served as an appetizer or a light meal. The secret to an exceptional French Onion Soup lies in the slow caramelization of the onions, which brings out their natural sweetness, creating a deep, complex flavor profile that pairs beautifully with the broth.
The dish isn’t only hearty but also a celebration of simple ingredients coming together to create something extraordinary. Traditionally, it’s made with beef broth, but you can easily substitute it with vegetable broth for a lighter version. Topped with a generous layer of Gruyère cheese, the soup is then baked until bubbly and golden, making it an irresistible treat on a chilly day or any time you crave comfort food.
Ingredients (serving size: 4-6 people)
- 4 large yellow onions, thinly sliced
- 4 tablespoons unsalted butter
- 1 tablespoon olive oil
- 1 teaspoon sugar
- 4 cups beef broth (or vegetable broth)
- 1/2 cup dry white wine (optional)
- 2 teaspoons fresh thyme leaves (or 1 teaspoon dried thyme)
- Salt and pepper to taste
- 1 baguette, sliced into 1-inch thick pieces
- 1 1/2 cups Gruyère cheese, grated
- 1/2 cup Parmesan cheese, grated (optional)
Cooking Instructions
- Caramelize the Onions: In a large, heavy-bottomed pot or Dutch oven, melt the butter and olive oil over medium heat. Add the sliced onions and stir to coat them with the butter. Cook the onions slowly, stirring occasionally, for about 30-40 minutes until they become deeply caramelized. Add the sugar halfway through the cooking process to enhance the sweetness of the onions.
- Deglaze the Pot: Once the onions are caramelized, pour in the white wine (if using) to deglaze the pot. Use a wooden spoon to scrape up any brown bits stuck to the bottom. Let the wine simmer for about 2-3 minutes until it has reduced slightly.
- Add the Broth and Seasoning: Pour in the beef broth and add the thyme, salt, and pepper. Bring the mixture to a simmer, then reduce the heat to low. Let it simmer for at least 20 minutes to allow the flavors to meld together.
- Prepare the Bread: While the soup is simmering, preheat your oven to 400°F (200°C). Place the sliced baguette on a baking sheet and toast them in the oven for about 5-7 minutes until they’re crisp and golden.
- Assemble the Soup: Once the soup is ready, ladle it into oven-safe bowls. Place a slice or two of the toasted baguette on top of each bowl of soup, then sprinkle a generous amount of Gruyère cheese over the bread. If desired, add some grated Parmesan cheese for extra flavor.
- Broil the Soup: Place the bowls on a baking sheet and broil them in the oven for about 3-5 minutes, or until the cheese is melted, bubbly, and slightly golden.
Extra Tips
For the best flavor, take your time caramelizing the onions; the deeper the color, the richer the taste. If you prefer a vegetarian version, simply swap the beef broth for vegetable broth and avoid using any meat-based toppings.
Additionally, using a mix of cheeses, such as Gruyère and Emmental, can add complexity to the cheese topping. Serve the soup immediately after broiling for the best texture and flavor, and enjoy the comforting warmth of this classic French dish!
Crêpes With Savory Fillings

Crêpes are a versatile French delicacy that can be enjoyed in both sweet and savory forms. When filled with savory ingredients, they make for a delicious and satisfying lunch option. The beauty of crêpes lies not only in their delicate texture but also in their ability to accommodate a wide variety of fillings. From sautéed mushrooms and cheese to spinach and ham, the possibilities are endless. This recipe focuses on a delightful combination of ingredients that will please even the pickiest eaters.
Making crêpes may seem intimidating at first, but with a little practice, you’ll be flipping them like a pro. The batter is simple to prepare, and once you’ve got the technique down, you can experiment with different fillings based on your taste preferences. Whether you’re hosting a brunch or preparing a cozy lunch for yourself and your family, these savory crêpes are sure to impress.
Ingredients (Serves 4-6 people):
- 1 cup all-purpose flour
- 2 large eggs
- 1 1/2 cups milk
- 1/4 teaspoon salt
- 2 tablespoons melted butter (plus more for cooking)
- 1 cup cooked spinach, chopped
- 1 cup mushrooms, sliced and sautéed
- 1 cup shredded cheese (such as Gruyère or mozzarella)
- 1/2 cup cooked ham or diced chicken (optional)
- Fresh herbs (such as parsley or chives) for garnish
Cooking Instructions:
- Prepare the Batter: In a mixing bowl, whisk together the flour and salt. In another bowl, beat the eggs and then add the milk and melted butter. Gradually pour the wet ingredients into the dry ingredients, whisking until the batter is smooth and free of lumps. Let the batter rest for at least 30 minutes to allow the gluten to relax, resulting in tender crêpes.
- Cook the Crêpes: Heat a non-stick skillet or crêpe pan over medium heat and lightly grease it with melted butter. Pour about 1/4 cup of batter into the center of the pan, quickly swirling it around to form an even layer. Cook for about 1-2 minutes, or until the edges start to lift and the bottom is lightly golden. Flip the crêpe using a spatula and cook for another minute on the other side. Transfer to a plate and repeat with the remaining batter, stacking the crêpes as you go.
- Prepare the Filling: In a bowl, combine the cooked spinach, sautéed mushrooms, shredded cheese, and optional ham or chicken. Mix well to ascertain that all ingredients are evenly distributed.
- Assemble the Crêpes: Take one crêpe and place a generous amount of the filling mixture in the center. Fold the crêpe over the filling, either in half or into quarters, to enclose the filling. Repeat with the remaining crêpes and filling.
- Heat the Filled Crêpes: Return the filled crêpes to the skillet over low heat for a few minutes, allowing the cheese to melt and the filling to heat through. This step can also be done in the oven at 350°F (175°C) for about 10 minutes if preferred.
- Serve: Carefully transfer the warmed crêpes to plates and garnish with fresh herbs. Serve immediately while hot.
Extra Tips:
For the best results, make sure your skillet is adequately heated before pouring in the batter; a drop of water should sizzle immediately upon contact. If you find that the batter is too thick after resting, you can add a little more milk to achieve the desired consistency.
Experiment with different fillings based on seasonal ingredients or personal preferences, and don’t be afraid to get creative with your garnishes, such as a dollop of sour cream or a sprinkle of grated Parmesan cheese!
Tarte Tatin

Tarte Tatin is a classic French upside-down caramelized apple tart that has captivated dessert lovers for generations. Originating from the Loire Valley, this delightful dish is believed to have been created by accident at the Tatin sisters’ hotel in the late 19th century. The sisters’ intention was to make a traditional apple pie, but a mishap led to the apples being caramelized in butter and sugar before being topped with pastry and baked, resulting in a delicious, gooey, and slightly tangy dessert that has since become a staple in French cuisine.
The beauty of Tarte Tatin lies in its simplicity and the rich flavors that come from just a few quality ingredients. The caramelization of the apples creates a luscious topping that pairs perfectly with the flaky pastry base. Served warm with a dollop of crème fraîche or a scoop of vanilla ice cream, this dessert can be a showstopper for any lunch gathering or special occasion. With a little patience and care, you can recreate this French classic right in your own kitchen.
Ingredients (Serves 4-6):
- 6-8 medium-sized apples (such as Granny Smith or Honeycrisp)
- 100g unsalted butter
- 150g granulated sugar
- 1 teaspoon vanilla extract
- 1 sheet of puff pastry (store-bought)
- A pinch of salt
- Optional: Crème fraîche or vanilla ice cream for serving
Cooking Instructions:
- Prepare the Apples: Begin by peeling, coring, and quartering the apples. This will help them cook evenly and allow the caramel to envelop them properly. Choose firm apples that will hold their shape when cooked.
- Make the Caramel: In a heavy, ovenproof skillet (preferably cast iron), melt the butter over medium heat. Once melted, add the sugar and stir until it begins to dissolve and turn golden. Be cautious not to burn it; you want a rich caramel color that will enhance the flavor of the apples.
- Add the Apples: Carefully arrange the quartered apples in the skillet, packing them tightly. Cook the apples in the caramel for about 15-20 minutes, turning them occasionally so they cook evenly and absorb the caramel flavor. Add the vanilla extract and a pinch of salt during this step.
- Prepare the Pastry: Preheat your oven to 200°C (400°F). Roll out the puff pastry on a lightly floured surface to fit the skillet if necessary. Once the apples are tender and nicely caramelized, remove the skillet from the heat and lay the puff pastry over the apples, tucking the edges down around the apples.
- Bake the Tart: Place the skillet in the preheated oven and bake for 25-30 minutes or until the pastry is golden brown and puffed up. Keep an eye on it to make sure it doesn’t burn.
- Invert the Tart: Once baked, remove the skillet from the oven and let it cool for a few minutes. Carefully run a knife around the edges to loosen the tart. Place a large serving plate over the skillet and, using oven mitts, flip the tart over onto the plate. The apples should now be on top, beautifully caramelized.
- Serve: Allow the Tarte Tatin to cool slightly before slicing. Serve warm, optionally with a dollop of crème fraîche or a scoop of vanilla ice cream.
Extra Tips:
When making Tarte Tatin, it’s essential to use apples that can withstand baking, like Granny Smith or Honeycrisp, for the best texture.
Be patient while caramelizing the apples; this step is key to achieving the rich flavor and glossy appearance. Additionally, if you want a more complex flavor, consider adding a splash of brandy or Calvados to the caramel before adding the apples.
Enjoy the process and savor the decadent results!
Pissaladière
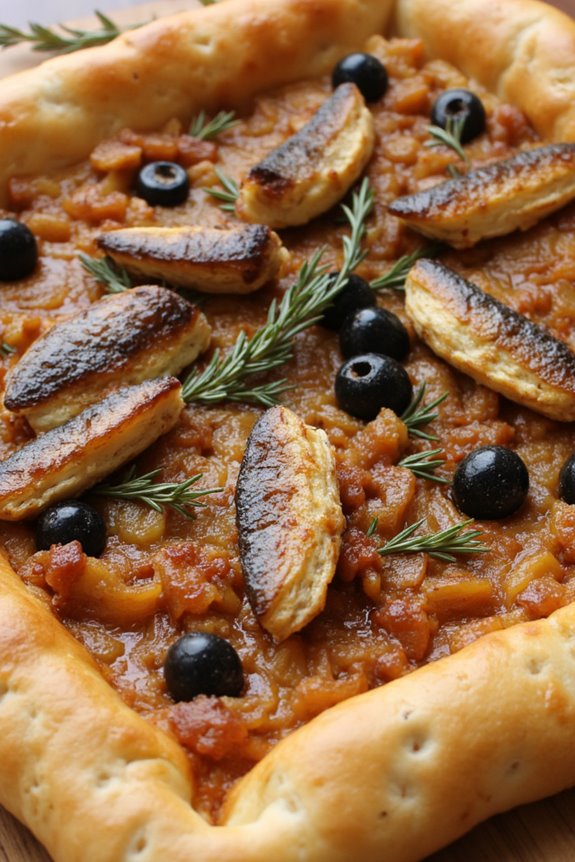
Pissaladière is a savory tart originating from the Nice region of France, characterized by its rich flavors and aromatic toppings. Traditionally made with a flaky pastry crust, this dish is topped with caramelized onions, anchovies, and black olives, creating a delightful combination that’s both hearty and satisfying.
Pissaladière is often enjoyed as a light lunch or a delectable appetizer, perfect for sharing with friends and family. Its unique taste profile showcases the culinary traditions of the Mediterranean, making it a beloved dish among both locals and visitors.
Making Pissaladière is a straightforward process, and the end result is a beautifully golden tart that’s sure to impress. The key to a great Pissaladière lies in the slow cooking of the onions, allowing their natural sweetness to shine through.
While anchovies may not be to everyone’s taste, they add an umami depth that elevates the overall flavor of the dish. Don’t hesitate to experiment with the toppings, as olives and herbs can be adjusted to your liking.
Ingredients (serves 4-6):
- 1 pre-made puff pastry sheet
- 4 large onions, thinly sliced
- 3 tablespoons olive oil
- 1 teaspoon sugar
- 1 teaspoon salt
- 1 teaspoon black pepper
- 10-12 anchovy fillets, drained
- 1 cup black olives, pitted and halved (preferably Niçoise olives)
- 1 tablespoon fresh thyme leaves (or 1 teaspoon dried thyme)
- 1 egg, beaten (for egg wash)
Cooking Instructions:
1. Prepare the Pastry: Preheat your oven to 400°F (200°C). Roll out the puff pastry on a lightly floured surface to fit a 10-inch tart pan. Press the pastry into the pan, trimming any excess from the edges. Prick the base with a fork to prevent it from puffing up during baking.
Place the pastry in the refrigerator to chill while you prepare the filling.
2. Caramelize the Onions: In a large skillet, heat the olive oil over medium heat. Add the sliced onions, salt, and sugar. Cook the onions slowly, stirring occasionally, until they become soft and golden, about 25-30 minutes.
This slow cooking will enhance their sweetness and mellow their flavor.
3. Season the Onions: Once the onions are caramelized, remove them from the heat and stir in the black pepper and thyme. Allow the mixture to cool slightly.
4. Assemble the Tart: Remove the pastry from the refrigerator and spread the caramelized onion mixture evenly over the pastry base. Arrange the anchovy fillets in a decorative pattern on top of the onions, and scatter the halved olives over the tart.
5. Bake the Tart: Brush the edges of the pastry with the beaten egg to give it a golden color when baked. Place the tart in the preheated oven and bake for 25-30 minutes or until the pastry is puffed and golden brown.
6. Serve: Once baked, remove the Pissaladière from the oven and let it cool slightly before slicing. Serve warm or at room temperature, garnished with additional thyme if desired.
Extra Tips:
When making Pissaladière, feel free to adjust the amount of anchovies and olives based on your personal preference. If you’re not a fan of anchovies, try substituting them with capers for a different flavor profile.
Additionally, serving the tart with a simple side salad can enhance the meal and provide a revitalizing contrast to the rich flavors of the tart. Enjoy your Pissaladière as a delightful French lunch that transports you to the sunny shores of the Mediterranean!
Niçoise Pasta Salad

Niçoise Pasta Salad is a vibrant and hearty dish that brings the flavors of the French Riviera to your table. Combining al dente pasta with fresh vegetables, protein-rich ingredients, and a zesty dressing, this salad isn’t only visually appealing but also incredibly satisfying. Perfect for a picnic, lunch, or light dinner, it’s a delightful way to enjoy the classic Niçoise flavors in a unique pasta form.
This dish is versatile, allowing you to adjust the ingredients based on what you have on hand or your personal preferences. Whether you prefer tuna, chickpeas, or a mix of both for added texture, Niçoise Pasta Salad is a crowd-pleaser that can be enjoyed by everyone. Serve it chilled or at room temperature, and you’ll have a revitalizing meal that embodies the essence of Mediterranean cuisine.
Ingredients (serving size: 4-6 people)
- 12 oz fusilli or penne pasta
- 1 cup cherry tomatoes, halved
- 1 cup green beans, trimmed and blanched
- 1/2 cup black olives, pitted and sliced
- 1 can (5 oz) tuna in olive oil, drained and flaked
- 3 hard-boiled eggs, quartered
- 1/4 cup red onion, thinly sliced
- 1/4 cup fresh basil leaves, torn
- 1/4 cup extra virgin olive oil
- 2 tablespoons red wine vinegar
- 1 teaspoon Dijon mustard
- Salt and pepper to taste
Cooking Instructions
- Cook the Pasta: In a large pot of salted boiling water, add the pasta and cook according to package instructions until al dente. Once cooked, drain the pasta and rinse it under cold water to stop the cooking process. Set aside to cool completely.
- Prepare the Vegetables: While the pasta is cooling, prepare the vegetables. Blanch the green beans in boiling water for about 3 minutes until they’re bright green and tender-crisp. Drain and immediately transfer them to a bowl of ice water to halt the cooking. Once cooled, drain and set aside. Halve the cherry tomatoes, slice the olives, and thinly slice the red onion.
- Make the Dressing: In a small bowl, whisk together the olive oil, red wine vinegar, Dijon mustard, salt, and pepper until well combined. Taste and adjust seasoning as necessary.
- Combine Ingredients: In a large mixing bowl, combine the cooled pasta, cherry tomatoes, green beans, olives, red onion, and flaked tuna. Pour the dressing over the salad and gently toss to combine all the ingredients, ensuring that the pasta is evenly coated.
- Add Final Touches: Gently fold in the quartered hard-boiled eggs and torn basil leaves. Be careful not to break the eggs too much, as they add a beautiful presentation to the salad.
- Chill and Serve: Cover the salad and let it chill in the refrigerator for at least 30 minutes to allow the flavors to meld. Serve chilled or at room temperature, garnished with additional basil if desired.
Extra Tips
For a more filling meal, consider adding chickpeas or diced grilled chicken to the salad for added protein. This dish is highly customizable; feel free to substitute any vegetables you have on hand, like bell peppers or cucumbers, to make it your own.
Additionally, this salad can be made a day in advance, making it an excellent option for meal prep or entertaining. Just give it a good toss before serving to redistribute the dressing and flavors!
Baguette Sandwiches
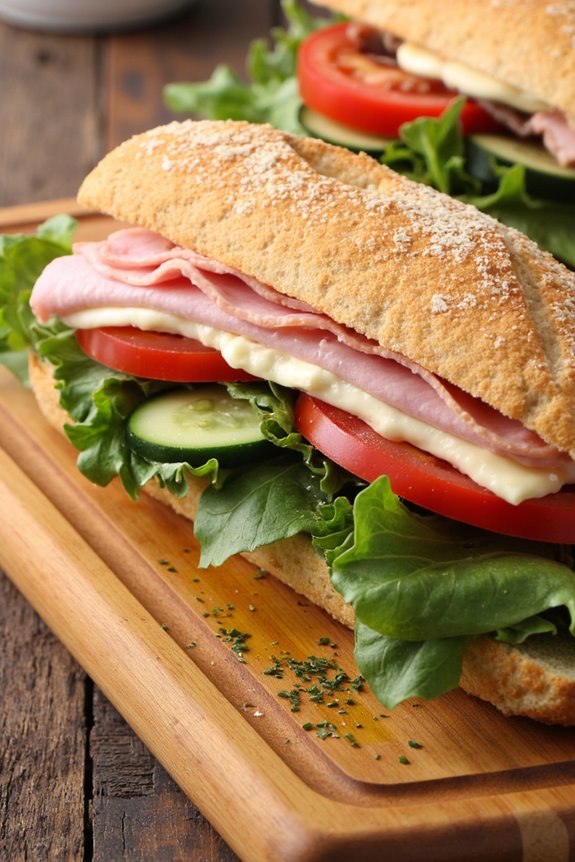
Baguette sandwiches are a classic French meal that can be enjoyed at lunch or as a casual dinner. The delicious crusty bread filled with a variety of fresh ingredients makes for a satisfying and customizable dish.
Whether you’re looking to create a simple ham and cheese sandwich or an elaborate option filled with gourmet toppings, baguette sandwiches can be adapted to suit any taste. They’re perfect for picnics, lunch boxes, or a quick meal on the go.
To prepare your baguette sandwiches, choose high-quality ingredients for the best results. Fresh baguettes are essential, as their crispy crust and soft interior provide the perfect base for your fillings. You can fill your sandwiches with deli meats, cheeses, fresh vegetables, spreads, and condiments, tailoring each sandwich to your preference.
Pair your sandwiches with a side salad or some crispy chips to complete the meal.
Ingredients (serving size of 4-6 people):
- 2 large baguettes
- 8 ounces of sliced deli ham
- 8 ounces of sliced turkey breast
- 8 ounces of sliced Swiss cheese
- 1 cup of mixed salad greens
- 1 large tomato, sliced
- 1 cucumber, thinly sliced
- 1/2 cup of mayonnaise
- 1 tablespoon of Dijon mustard
- Salt and pepper to taste
- Olive oil (optional, for drizzling)
- Fresh herbs (such as basil or parsley, optional for garnish)
Cooking Instructions:
- Prepare the Ingredients: Start by gathering all your ingredients. Slice the baguettes in half lengthwise, ensuring you maintain the integrity of the crust. Lay them open on a clean cutting board. Slice the tomato and cucumber, and set aside.
- Mix the Spread: In a small bowl, combine the mayonnaise and Dijon mustard. Stir until well mixed. This spread will add flavor and moisture to your sandwiches, so feel free to adjust the proportions based on your taste preferences.
- Assemble the Sandwiches: Begin by spreading a generous layer of the mayonnaise and mustard mix on the inside of each baguette half. Next, layer the sliced deli ham and turkey breast evenly across the bottom half of each baguette. Follow this with slices of Swiss cheese.
- Add Vegetables: Place a handful of mixed salad greens on top of the cheese, followed by slices of tomato and cucumber. Season the vegetables with a pinch of salt and pepper to enhance their flavors.
- Close and Slice: Carefully place the top half of the baguette onto the filled bottom half. Press down gently to compress the sandwich slightly. Using a sharp knife, slice the sandwiches into individual portions, about 4-6 pieces per baguette, depending on your preferred size.
- Serve: Arrange the sliced sandwiches on a serving platter. If desired, drizzle a little olive oil over the top and garnish with fresh herbs for an added touch of flavor and presentation.
Extra Tips:
When making baguette sandwiches, consider toasting the bread lightly for added crunch and warmth. You can also experiment with different spreads such as pesto or hummus for a unique taste.
Feel free to customize your fillings based on seasonal ingredients or personal preferences, and don’t hesitate to add a dash of your favorite spices for extra flavor. Enjoy your baguette sandwiches fresh, but they can also be wrapped and stored in the refrigerator for a quick meal later.
Provencal Vegetable Salad
Provencal Vegetable Salad, or “Salade Niçoise,” is a vibrant, fresh dish that embodies the flavors of the French Riviera. Originating from Nice, this salad showcases the region’s bountiful produce and is perfect for a light lunch or a revitalizing side dish. The combination of crisp vegetables, rich olives, and fragrant herbs makes this salad not only visually appealing but also bursting with flavor.
Furthermore, the addition of classic ingredients such as tuna and hard-boiled eggs elevates it to a satisfying, nutritious meal. This salad is incredibly versatile and can be customized to suit your taste preferences. You can use whatever seasonal vegetables you have on hand, allowing for endless variations.
Whether enjoyed on a sunny patio or served at a picnic, Provencal Vegetable Salad is sure to transport you to the sunny shores of France with each delightful bite.
Ingredients (serving size: 4-6 people)
- 4 cups mixed salad greens (e.g., arugula, romaine, or mesclun)
- 2 medium tomatoes, diced
- 1 medium cucumber, diced
- 1 bell pepper, diced (any color)
- 1 small red onion, thinly sliced
- 1 cup green beans, trimmed and blanched
- 1 cup cherry tomatoes, halved
- 1 cup black olives (preferably Niçoise or Kalamata)
- 1 can (about 6 ounces) tuna in olive oil, drained
- 4 hard-boiled eggs, quartered
- 1/4 cup fresh basil, chopped
- 1/4 cup extra virgin olive oil
- 2 tablespoons red wine vinegar
- Salt and pepper to taste
Cooking Instructions
- Prepare the Vegetables: Begin by washing and prepping all your vegetables. Dice the tomatoes, cucumber, and bell pepper into bite-sized pieces. Thinly slice the red onion and halve the cherry tomatoes. Confirm the green beans are trimmed and blanched in boiling water for about 3 minutes until bright green and tender-crisp. Drain and immediately plunge them into an ice bath to stop the cooking process.
- Assemble the Base: In a large salad bowl, place the mixed salad greens as the base. This will provide a crunchy texture and a fresh flavor that complements the other ingredients.
- Add the Vegetables: Layer the prepared vegetables over the salad greens. Start with the diced tomatoes, cucumber, and bell pepper, then add the sliced red onion, blanched green beans, and halved cherry tomatoes. This colorful arrangement not only enhances the visual appeal but also guarantees that each bite is packed with different flavors.
- Incorporate the Proteins: Gently flake the drained tuna and scatter it over the top of the salad. Add the quartered hard-boiled eggs, placing them evenly throughout for a balanced look and flavor.
- Season the Salad: Sprinkle the black olives and chopped fresh basil over the salad. This will introduce a salty, briny flavor that perfectly complements the freshness of the vegetables.
- Prepare the Dressing: In a small bowl, whisk together the extra virgin olive oil, red wine vinegar, and a pinch of salt and pepper. This simple dressing will enhance the flavors of the salad without overpowering them.
- Dress and Serve: Drizzle the dressing over the salad just before serving. Toss gently to combine all the ingredients and ensure they’re evenly coated with the dressing. Serve immediately, or allow it to rest for a few minutes for the flavors to meld.
Extra Tips
When making Provencal Vegetable Salad, feel free to get creative with your ingredients. You can swap out vegetables based on what’s in season or what you have available.
For a heartier version, consider adding cooked potatoes or incorporating grilled chicken. If you’re making this salad in advance, keep the dressing separate until you’re ready to serve to prevent the greens from wilting. Enjoy your culinary journey to Provence!
Galette Bretonne

Galette Bretonne is a traditional buckwheat crepe hailing from the Brittany region of France. Known for its rustic flavor and wholesome ingredients, this dish is typically filled with savory fillings, making it an ideal choice for lunch or a light dinner. The use of buckwheat flour not only gives the galette a distinctive nutty taste but also makes it gluten-free, which is perfect for those with gluten sensitivities.
This dish is highly versatile and can be customized with a variety of fillings, including cheese, eggs, ham, and vegetables, allowing everyone to find their favorite combination. Making Galette Bretonne at home is a delightful experience that connects you with the culinary traditions of France.
The key to a perfect galette is achieving the right batter consistency and cooking it on a hot, flat surface. Traditionally, these crepes are cooked on a “bilig,” a special griddle used in Brittany, but a non-stick skillet will work just as well in your kitchen. With a few simple ingredients and some technique, you can enjoy this delicious dish that brings the flavors of France right to your table.
Ingredients (Serves 4-6)
- 1 cup buckwheat flour
- 2 cups water
- 1/2 teaspoon salt
- 1 tablespoon olive oil (plus more for cooking)
- 2 cups grated cheese (e.g., Gruyère or Emmental)
- 4-6 eggs
- 4-6 slices of ham (optional)
- Fresh herbs (e.g., chives or parsley) for garnish
Cooking Instructions
1. Prepare the batter: In a large mixing bowl, combine the buckwheat flour and salt. Gradually add in the water while whisking to avoid lumps. The batter should be smooth and slightly runny. Add the olive oil and mix well.
Let the batter rest for at least 30 minutes at room temperature. This allows the flour to hydrate properly and results in a better texture.
2. Heat the skillet: Place a non-stick skillet or crepe pan over medium heat. Once hot, lightly grease the surface with a little olive oil using a paper towel or brush. It’s important to maintain a consistent temperature to guarantee even cooking.
3. Cook the galettes: Pour about 1/2 cup of the batter into the center of the skillet. Quickly swirl the pan to spread the batter evenly into a thin layer. Cook for about 2-3 minutes until the edges lift and the bottom is golden brown.
4. Add fillings: Carefully flip the galette using a spatula. On one half, add a handful of grated cheese, a slice of ham (if using), and crack an egg on top. Cook for an additional 2-3 minutes until the cheese melts and the egg white is set but the yolk remains runny.
5. Fold and serve: Gently fold the galette over the fillings so that it forms a triangle or a half-moon shape. Cook for another minute to make sure everything is heated through. Slide the galette onto a plate and garnish with fresh herbs.
Repeat the process with the remaining batter and fillings.
Extra Tips
When making Galette Bretonne, feel free to experiment with different fillings based on your preferences. Vegetables such as sautéed mushrooms, spinach, or caramelized onions can add great flavor and nutrition.
If you prefer a crispy texture, let the galettes cook a bit longer on both sides. Additionally, consider serving the galettes with a side salad or a light vinaigrette for a complete meal. Enjoy your culinary journey to Brittany!