

I’ve been on a delightful journey, exploring the beauty of French vegetarian recipes. Picture a Ratatouille that’s as colorful as it is delicious or a Spinach and Goat Cheese Tart that exudes simple elegance. These dishes are a treat for both your taste buds and your eyes. As you enjoy these culinary creations, you’ll be inspired to try the next gem in this collection. Happy cooking!
Classic Ratatouille
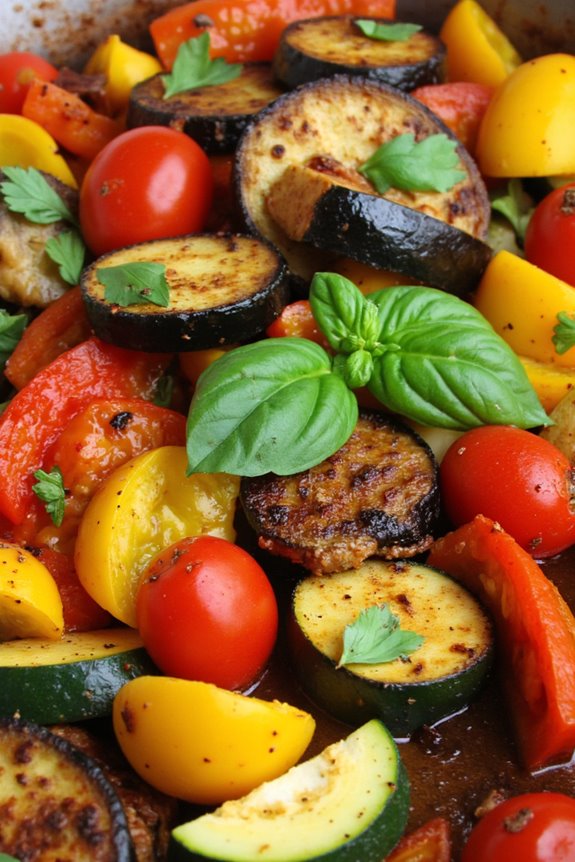
Ratatouille is a traditional French Provençal stewed vegetable dish that perfectly embodies the flavors of the Mediterranean. This classic recipe is a symphony of summer vegetables, including eggplant, zucchini, bell peppers, tomatoes, and fragrant herbs, all simmered together to create a dish that’s both hearty and light.
Ideal for a vegetarian meal, ratatouille can be served as a main dish, a side, or even as a topping for bread or pasta. The beauty of ratatouille lies not only in its vibrant colors and rich flavors but also in its versatility and simplicity, making it a beloved staple in French cuisine.
Creating a delicious ratatouille requires a bit of patience and love, as the vegetables are often cooked separately to maintain their distinct flavors and textures before being combined. The key is to allow the vegetables to soften and meld together without turning into a mushy mixture.
The result is a dish that’s as visually appealing as it’s tasty, with each vegetable retaining its integrity while contributing to a harmonious whole. This recipe serves 4-6 people, making it perfect for a family meal or a small gathering of friends.
Ingredients for Classic Ratatouille (serves 4-6):
- 2 medium eggplants
- 2 medium zucchinis
- 1 red bell pepper
- 1 yellow bell pepper
- 1 large onion
- 4 large ripe tomatoes
- 3 cloves of garlic
- 1/4 cup olive oil
- 1 teaspoon dried thyme
- 1 teaspoon dried oregano
- 1 bay leaf
- Salt and pepper to taste
- Fresh basil leaves for garnish
Cooking Instructions:
- Preparation of Vegetables:
- Begin by washing all the vegetables thoroughly. Cut the eggplants and zucchinis into 1-inch cubes. Remove the seeds from the bell peppers and chop them into similar-sized pieces. Dice the onion and mince the garlic cloves. Finally, peel and chop the tomatoes into chunks.
- Cook the Eggplant:
- Heat half of the olive oil in a large sauté pan over medium heat. Add the eggplant cubes and cook them until they’re golden brown and tender, about 8-10 minutes. Remove the eggplant from the pan and set aside.
- Sauté the Zucchini and Peppers:
- In the same pan, add a little more olive oil if needed, and sauté the zucchini and bell peppers until they start to soften, about 6-8 minutes. Remove from the pan and set aside with the eggplant.
- Cook the Onions and Garlic:
- Add the remaining olive oil to the pan and sauté the diced onion until translucent, approximately 5 minutes. Add the minced garlic and cook for an additional minute, stirring to make sure it doesn’t burn.
- Combine All Ingredients:
- Add the chopped tomatoes, thyme, oregano, and bay leaf to the pan with the onions and garlic. Stir well, and then add the cooked eggplant, zucchini, and bell peppers. Season with salt and pepper to taste.
- Simmer the Ratatouille:
- Lower the heat, cover the pan, and let the ratatouille simmer for about 30-40 minutes. Stir occasionally to prevent sticking. The vegetables should be soft, and the flavors should meld together.
- Finish and Serve:
- Remove the bay leaf, taste, and adjust seasoning if necessary. Garnish with fresh basil leaves before serving. Ratatouille can be enjoyed hot, at room temperature, or even cold.
Extra Tips:
For the best flavor, use the freshest and ripest ingredients you can find, as ratatouille is a dish that shines with quality produce.
To enhance the taste, consider preparing the dish a day ahead and allowing it to rest overnight in the refrigerator, as this will allow the flavors to deepen and marry together beautifully.
Additionally, be sure to adjust the cooking time based on the size of your vegetable cuts; smaller pieces will cook faster, while larger chunks will require more time to soften properly.
Vegetarian French Onion Soup
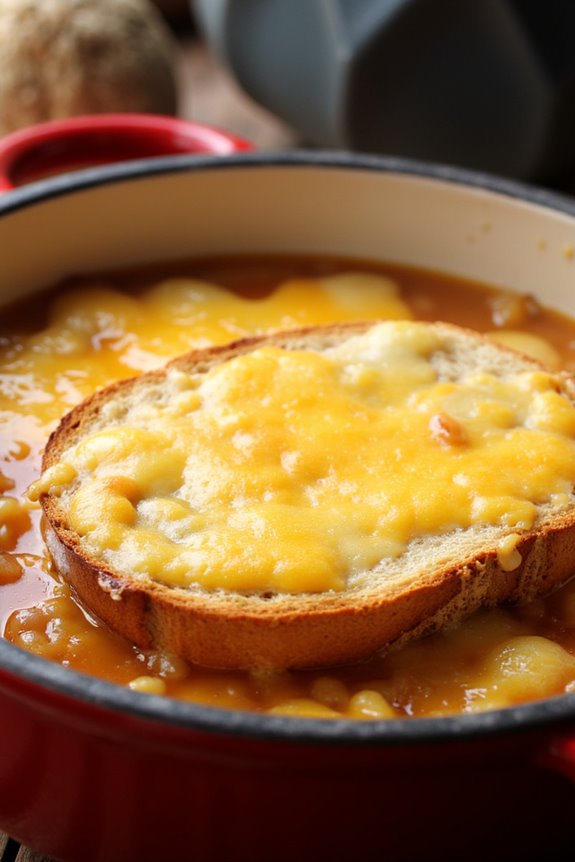
French Onion Soup is a classic dish that’s known for its savory flavors and comforting qualities. Traditionally made with beef broth, this vegetarian version captures the essence of the original while being entirely plant-based. The rich, caramelized onions serve as the star of the soup, imparting a deep flavor that pairs beautifully with crusty bread and melted cheese. This recipe is perfect for those who are looking to enjoy the taste of French cuisine without the meat.
Creating a Vegetarian French Onion Soup involves selecting quality ingredients that bring out the best in each other. The key lies in slowly caramelizing the onions to achieve a deep, complex flavor, which forms the foundation of the soup. A combination of vegetable broth, herbs, and a splash of wine adds depth and richness, making this dish a delightful experience for both vegetarians and omnivores alike.
Whether served as a starter or a main course, this soup is sure to warm hearts and satisfy taste buds.
Ingredients (Serves 4-6):
- 6 large yellow onions, thinly sliced
- 3 tablespoons unsalted butter
- 2 tablespoons olive oil
- 1 teaspoon salt
- 1/2 teaspoon sugar
- 2 cloves garlic, minced
- 1/4 cup dry white wine
- 8 cups vegetable broth
- 1 bay leaf
- 1 teaspoon dried thyme
- Salt and pepper to taste
- 1 baguette, sliced
- 2 cups grated Gruyère or Swiss cheese
Instructions:
- Caramelize the Onions: In a large pot or Dutch oven, heat the butter and olive oil over medium heat. Add the sliced onions and stir to coat them evenly. Sprinkle with salt and sugar, which helps to caramelize the onions. Cook, stirring occasionally, for about 30-40 minutes until the onions are golden brown and caramelized.
- Add Garlic and Wine: Add the minced garlic to the caramelized onions and cook for an additional 1-2 minutes until fragrant. Pour in the white wine, scraping up any brown bits stuck to the bottom of the pot. Let it simmer for 3-4 minutes until the wine reduces slightly.
- Simmer the Soup: Add the vegetable broth, bay leaf, and dried thyme to the pot. Increase the heat to bring the soup to a gentle boil, then reduce to a simmer. Cover and let it cook for 20-25 minutes, allowing the flavors to meld together. Season with salt and pepper to taste.
- Prepare the Bread: Preheat your oven to 400°F (200°C). Place the baguette slices on a baking sheet and toast them in the oven for 5-7 minutes until they’re crisp and golden.
- Assemble and Serve: Remove the bay leaf from the soup. Ladle the soup into oven-safe bowls, placing a toasted baguette slice on top of each. Sprinkle generously with grated cheese. Place the bowls on a baking sheet and broil in the oven for 3-5 minutes, or until the cheese is melted and bubbly. Serve hot and enjoy!
Extra Tips: When caramelizing the onions, patience is key. Confirm that you cook them slowly over medium heat to prevent burning and to draw out their natural sweetness.
For a more rustic presentation, consider using a mix of onion varieties, such as sweet onions or red onions, to add different layers of flavor. If you wish to make the soup vegan, you can substitute the butter with additional olive oil and use a plant-based cheese.
Finally, always taste the soup before serving and adjust the seasoning as needed to suit your preference.
Spinach and Goat Cheese Tart
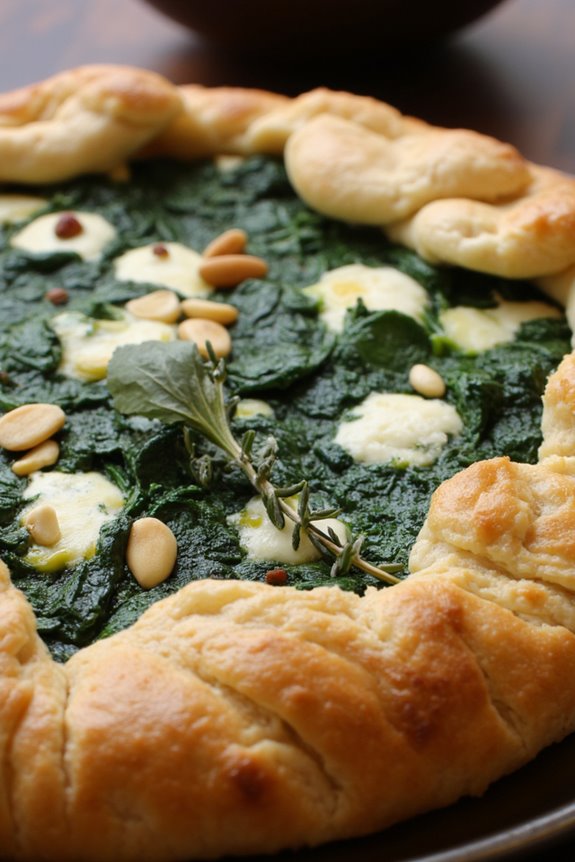
The Spinach and Goat Cheese Tart is a delightful and savory dish that embodies the elegance of French vegetarian cuisine. Perfect for a light lunch or a sophisticated dinner appetizer, this tart combines the rich, creamy texture of goat cheese with the fresh, slightly bitter taste of spinach. The flaky pastry crust provides a satisfying contrast to the soft filling, making each bite a harmonious blend of flavors and textures. This dish not only pleases the palate but also presents beautifully, with its vibrant green and golden-brown hues.
Whether you’re hosting a gathering or simply treating yourself to a gourmet meal at home, this tart is sure to impress. The combination of ingredients is simple yet sophisticated, reflecting the essence of French culinary artistry. The preparation process is straightforward, allowing even novice cooks to create a dish that looks and tastes like it came from a professional kitchen. Serve it warm, paired with a fresh salad and a glass of wine, to fully enjoy its flavors.
Ingredients (Serves 4-6):
- 1 sheet of puff pastry
- 1 tablespoon olive oil
- 1 onion, finely chopped
- 2 cloves garlic, minced
- 300 grams fresh spinach, washed and chopped
- 200 grams goat cheese, crumbled
- 3 eggs
- 200 ml heavy cream
- Salt and pepper, to taste
- A pinch of nutmeg
- 1 tablespoon pine nuts (optional)
- 1 tablespoon fresh thyme leaves
Cooking Instructions:
- Preheat the Oven: Begin by preheating your oven to 200°C (400°F). This guarantees that the tart cooks evenly and achieves a perfect golden crust.
- Prepare the Pastry: Roll out the puff pastry on a lightly floured surface to fit your tart pan. Gently press the pastry into the pan, trimming any excess edges. Prick the base with a fork to prevent it from puffing up during baking.
- Sauté the Vegetables: Heat olive oil in a large skillet over medium heat. Add the chopped onion and garlic, sautéing until they become translucent and fragrant. Stir in the spinach and cook until wilted, then remove from heat and let cool slightly.
- Prepare the Filling: In a mixing bowl, whisk together the eggs, heavy cream, salt, pepper, and nutmeg until well combined. Stir in the sautéed spinach mixture and crumbled goat cheese.
- Assemble the Tart: Pour the filling into the prepared pastry shell, spreading it evenly. Sprinkle pine nuts and fresh thyme leaves on top for added flavor and texture.
- Bake the Tart: Place the tart in the preheated oven and bake for 25-30 minutes, or until the filling is set and the pastry is golden brown. Remove from the oven and allow it to cool slightly before serving.
Extra Tips:
For an extra touch of flavor, consider adding a teaspoon of Dijon mustard to the egg mixture before pouring it into the pastry shell. This will enhance the tart’s complexity and bring out the richness of the goat cheese.
Additionally, if you prefer a crispier crust, blind-bake the pastry shell for 10 minutes before adding the filling. Confirm you let the tart cool slightly before slicing, as this helps the filling to set properly, making it easier to serve clean slices.
Enjoy your Spinach and Goat Cheese Tart with a side of mixed greens for a complete meal.
Provençal Stuffed Tomatoes
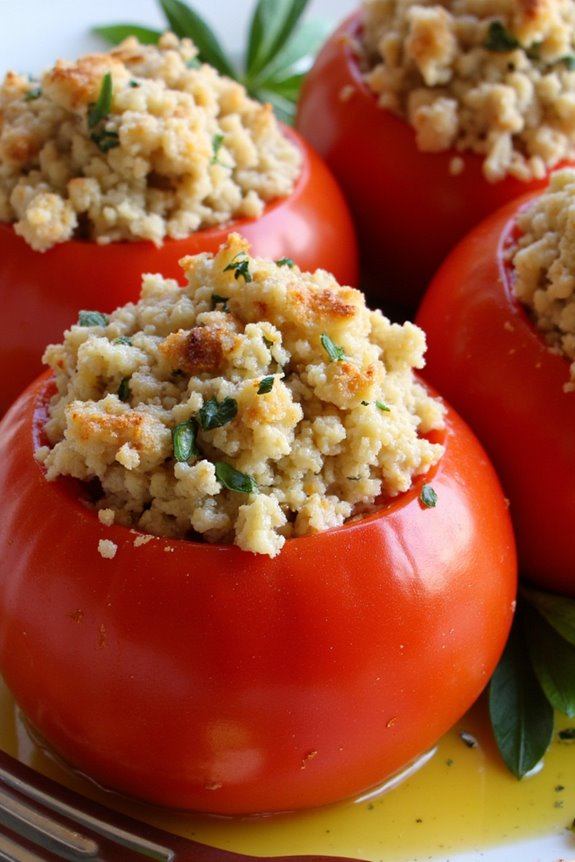
Provençal Stuffed Tomatoes are a delightful and flavorful dish that brings the essence of southern France to your dining table. This vegetarian recipe features ripe, juicy tomatoes filled with a savory mixture of bread crumbs, herbs, and cheese, making it a perfect option for a light lunch or a side dish. The combination of fresh ingredients and aromatic herbs captures the essence of Provençal cuisine, which is known for its emphasis on fresh produce, olive oil, and fragrant herbs.
This dish isn’t only visually appealing but also incredibly nourishing. It’s a great way to use up stale bread and is highly adaptable to whatever herbs you have on hand. The stuffing of these tomatoes is rich in flavor yet light enough to let the tomatoes shine as the star of the dish. Serve these tomatoes warm, straight from the oven, or at room temperature, which makes them convenient for preparing in advance when hosting a gathering.
Ingredients (serving size: 4-6 people):
- 6 large, ripe tomatoes
- 1 cup fresh breadcrumbs
- 1/4 cup grated Parmesan cheese
- 1/4 cup chopped fresh parsley
- 2 tablespoons chopped fresh basil
- 2 cloves garlic, minced
- 1 small onion, finely chopped
- 1/4 cup olive oil
- Salt and black pepper to taste
- Optional: 1/4 cup pine nuts
Cooking Instructions:
- Prepare the Tomatoes: Preheat your oven to 375°F (190°C). Carefully slice the tops off the tomatoes and scoop out the seeds and pulp using a spoon. Make sure to leave enough flesh so that the tomatoes maintain their shape. Lightly salt the insides of the tomatoes and place them upside down on a paper towel to drain any excess moisture.
- Make the Stuffing: In a large mixing bowl, combine the fresh breadcrumbs, grated Parmesan cheese, chopped parsley, chopped basil, minced garlic, finely chopped onion, and optional pine nuts. Mix these ingredients thoroughly until well combined.
- Season the Stuffing: Add olive oil to the breadcrumb mixture and season with salt and black pepper to taste. Mix well to verify the olive oil coats the stuffing ingredients evenly, giving the mixture a cohesive texture.
- Stuff the Tomatoes: Turn the tomatoes right side up and place them in a baking dish. Fill each tomato generously with the prepared stuffing mixture, pressing down gently to compact the stuffing slightly.
- Bake the Tomatoes: Drizzle a bit of olive oil over the tops of the stuffed tomatoes for extra richness. Place the baking dish in the preheated oven and bake for about 25-30 minutes, or until the tomatoes are tender and the stuffing is golden brown on top.
- Serve: Allow the stuffed tomatoes to cool slightly before serving. They can be enjoyed warm or at room temperature, making them versatile for various serving occasions.
Extra Tips:
When choosing tomatoes for this dish, select ones that are firm yet ripe to ascertain they hold their shape during baking. If you prefer, you can substitute the Parmesan cheese with another type of cheese, such as Pecorino Romano or Gruyère, for a different flavor profile.
Additionally, the stuffing can be prepared in advance and stored in the refrigerator, allowing you to assemble and bake the tomatoes just before serving. This dish pairs wonderfully with a crisp white wine or a light rosé, enhancing the Provençal dining experience.
Mushroom and Leek Quiche
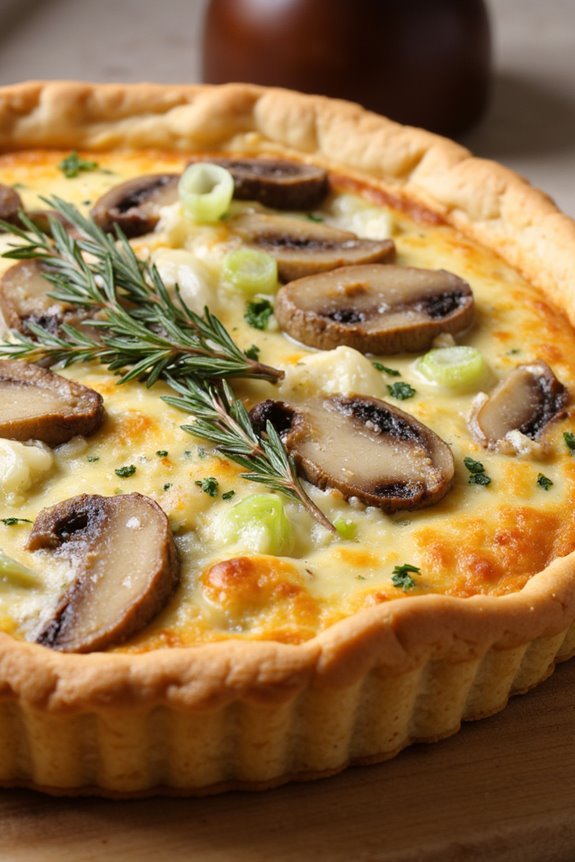
Mushroom and Leek Quiche is a delightful French vegetarian recipe that combines the earthy flavors of mushrooms with the mild sweetness of leeks, all nestled in a creamy custard filling. This dish is perfect for any meal of the day and is especially satisfying as a brunch or lunch option. The flaky pastry crust provides a perfect contrast to the rich filling, making every bite a delightful experience.
The combination of ingredients not only celebrates the essence of French cuisine but also caters to those who enjoy a plant-based diet. The preparation of Mushroom and Leek Quiche involves several steps, including preparing the pastry crust, sautéing the vegetables, and mixing them into a creamy egg mixture.
This quiche can be served warm or at room temperature, making it a versatile dish for entertaining or for a simple family meal. It isn’t only delicious but also visually pleasing, with the golden crust encasing the colorful filling. The balance of flavors and textures in this dish makes it a favorite among vegetarians and non-vegetarians alike.
Ingredients (Serving size: 4-6 people)
- 1 pre-made pastry crust (or homemade, if preferred)
- 2 tablespoons olive oil
- 1 large leek, washed and sliced
- 250g mushrooms, sliced
- 3 large eggs
- 200ml heavy cream
- 100ml milk
- 100g grated Gruyère cheese
- Salt and pepper to taste
- 1 tablespoon chopped fresh thyme
- 1 teaspoon butter (for greasing)
Cooking Instructions
- Prepare the Crust: Preheat your oven to 190°C (375°F). Grease a 9-inch pie dish with butter. Roll out the pastry crust and lay it into the dish, pressing it firmly into the edges. Trim any excess dough. Prick the bottom with a fork to prevent bubbling.
- Blind Bake: Line the crust with parchment paper and fill with pie weights or dried beans. Bake in the preheated oven for 10 minutes. Remove the weights and parchment, and bake for another 5 minutes until lightly golden. Set aside to cool.
- Sauté Vegetables: Heat olive oil in a large skillet over medium heat. Add the sliced leeks and cook until soft, about 5 minutes. Add the mushrooms and sauté until they release their moisture and become golden brown. Season with salt and pepper, and stir in the fresh thyme. Remove from heat and let cool slightly.
- Prepare Custard Mixture: In a mixing bowl, whisk together the eggs, heavy cream, and milk. Season with a pinch of salt and pepper. Stir in the grated Gruyère cheese until well combined.
- Assemble Quiche: Spread the leek and mushroom mixture evenly over the baked crust. Pour the custard mixture over the top, making sure it fills all gaps and covers the vegetables.
- Bake the Quiche: Place the assembled quiche in the preheated oven and bake for 25-30 minutes, or until the filling is set and the top is golden brown. A knife inserted into the center should come out clean.
- Cool and Serve: Allow the quiche to cool for at least 10 minutes before slicing. Serve warm or at room temperature.
Extra Tips
For the best results, verify that your leeks are thoroughly cleaned, as they can often hold grit between their layers. When sautéing the mushrooms, avoid crowding the pan, as this will allow them to brown properly instead of steaming.
If you prefer a more robust flavor, consider adding a small amount of nutmeg to the custard mixture. Additionally, letting the quiche cool slightly before cutting will help maintain its shape, making it easier to serve.
Cauliflower Gratin
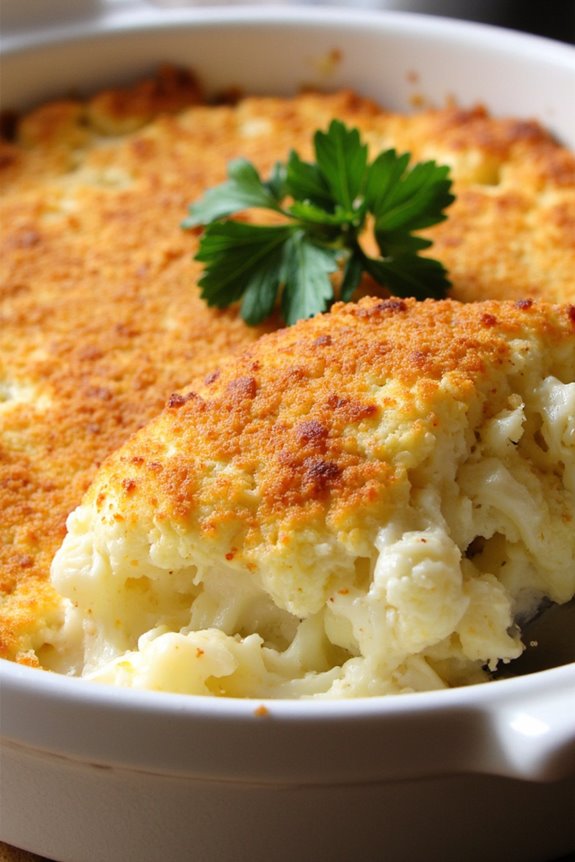
This recipe takes the humble cauliflower and elevates it with the use of a silky béchamel sauce, enhanced with the flavors of nutmeg, garlic, and herbs. The addition of Gruyère cheese introduces an element of sophistication, while breadcrumbs provide a crunchy topping that complements the creamy interior.
Whether served at a family dinner or a festive gathering, this Cauliflower Gratin is sure to impress with its comforting flavors and beautiful presentation.
Ingredients for 4-6 servings:
- 1 large head of cauliflower, cut into florets
- 2 tablespoons unsalted butter
- 2 tablespoons all-purpose flour
- 2 cups whole milk
- 1/2 teaspoon ground nutmeg
- 1 clove garlic, minced
- Salt and black pepper to taste
- 1 cup grated Gruyère cheese
- 1/2 cup grated Parmesan cheese
- 1/2 cup breadcrumbs
- 2 tablespoons chopped fresh parsley (optional)
Cooking Instructions:
1. Preheat the Oven: Begin by preheating your oven to 375°F (190°C). This will make certain it’s ready for baking once your ingredients are prepared.
2. Prepare the Cauliflower: Bring a large pot of salted water to a boil, and add the cauliflower florets. Cook them for about 5 minutes until they’re just tender but still firm. Drain the florets and set them aside.
3. Make the Béchamel Sauce: In a medium saucepan, melt the butter over medium heat. Add the flour and whisk continuously for about 1 minute until it forms a smooth paste, known as a roux.
Gradually whisk in the milk, making sure there are no lumps. Add the minced garlic, ground nutmeg, salt, and pepper. Continue to cook, stirring constantly, until the sauce thickens and coats the back of a spoon.
4. Combine with Cheese: Remove the béchamel sauce from the heat and stir in 3/4 cup of the Gruyère cheese until melted and well incorporated.
5. Assemble the Gratin: In a greased baking dish, arrange the cauliflower florets evenly. Pour the cheese sauce over the cauliflower, making sure all pieces are well-coated.
6. Add the Topping: In a small bowl, mix together the breadcrumbs, remaining Gruyère cheese, and Parmesan cheese. Sprinkle this mixture over the top of the cauliflower and sauce.
7. Bake the Gratin: Place the dish in the preheated oven and bake for 25-30 minutes, or until the top is golden brown and the sauce is bubbling around the edges.
8. Garnish and Serve: Remove the gratin from the oven and let it cool slightly. Garnish with freshly chopped parsley before serving, if desired.
Extra Tips:
For a deeper flavor, you can roast the cauliflower florets in the oven with a drizzle of olive oil before incorporating them into the gratin. This will add a subtle caramelization and enhance the overall taste.
Additionally, if you prefer a spicier kick, consider adding a pinch of cayenne pepper to the béchamel sauce. Finally, this dish can be prepared a day in advance; simply assemble and refrigerate until you’re ready to bake, making it a convenient option for entertaining.
Lentil and Vegetable Cassoulet
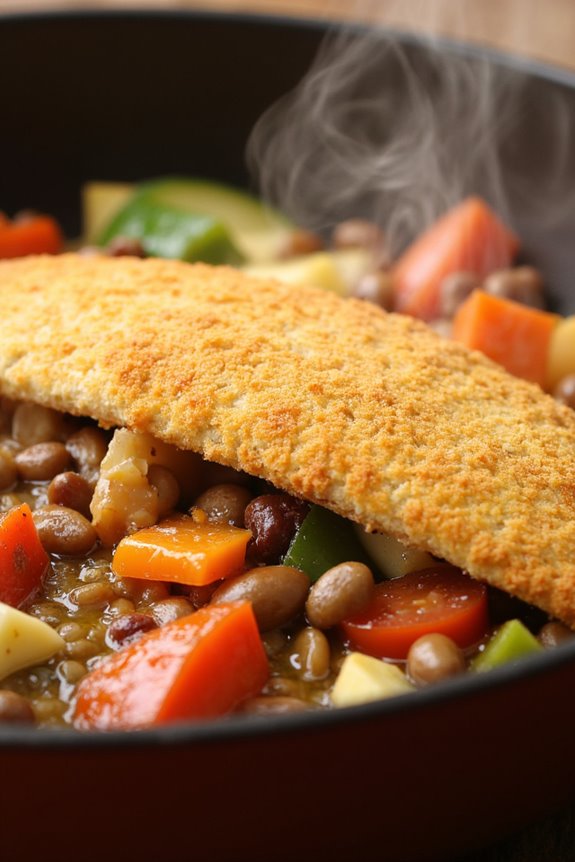
Cassoulet is a traditional French dish that’s typically made with meats like duck and sausage. However, this vegetarian version offers a delightful twist that still captures the hearty and comforting essence of the original. Packed with protein-rich lentils, a variety of colorful vegetables, and aromatic herbs, this Lentil and Vegetable Cassoulet is a wholesome meal that’s perfect for both family dinners and special occasions.
It’s a great way to enjoy French cuisine while catering to a vegetarian diet. The beauty of this dish lies in its layers of flavors and textures. The lentils provide a satisfying base, while the vegetables add freshness and vibrancy to the dish. A mix of herbs and spices infuses the cassoulet with a depth of flavor that will have everyone asking for seconds.
This recipe is designed to serve 4-6 people, making it ideal for a small gathering or for leftovers that can be enjoyed throughout the week.
Ingredients (for 4-6 servings):
- 1 1/2 cups green or brown lentils
- 2 tablespoons olive oil
- 1 large onion, chopped
- 2 cloves garlic, minced
- 2 carrots, sliced
- 2 celery stalks, sliced
- 1 red bell pepper, chopped
- 1 zucchini, chopped
- 1 (14-ounce) can diced tomatoes
- 4 cups vegetable broth
- 1 teaspoon dried thyme
- 1 teaspoon dried rosemary
- 1 bay leaf
- Salt and pepper, to taste
- 1 cup breadcrumbs
- 2 tablespoons chopped fresh parsley
Instructions:
- Prepare the Lentils: Rinse the lentils under cold water and pick out any debris. Set them aside.
- Sauté the Vegetables: In a large pot or Dutch oven, heat the olive oil over medium heat. Add the chopped onion and garlic, and sauté for about 2-3 minutes until the onion becomes translucent.
- Add the Vegetables: Stir in the sliced carrots, celery, red bell pepper, and zucchini. Cook for another 5 minutes, stirring occasionally, until the vegetables begin to soften.
- Add Tomatoes and Herbs: Pour in the can of diced tomatoes, along with the dried thyme, rosemary, bay leaf, salt, and pepper. Stir to combine all the ingredients.
- Incorporate Lentils and Broth: Add the rinsed lentils to the pot, followed by the vegetable broth. Bring the mixture to a boil, then reduce the heat to low and let it simmer for 30-35 minutes, or until the lentils are tender and have absorbed most of the liquid.
- Prepare the Breadcrumb Topping: While the cassoulet is simmering, preheat your oven to 350°F (175°C). In a separate bowl, mix the breadcrumbs with the chopped fresh parsley.
- Assemble the Cassoulet: Once the lentils are cooked, remove the bay leaf and transfer the mixture to a baking dish. Evenly sprinkle the breadcrumb mixture over the top.
- Bake the Cassoulet: Place the baking dish in the preheated oven and bake for about 15 minutes, or until the breadcrumbs are golden and crispy.
- Serve and Enjoy: Remove the cassoulet from the oven and let it cool slightly before serving. Enjoy the dish warm, garnished with additional parsley if desired.
Extra Tips:
When cooking the lentils, be sure not to overcook them as they can turn mushy. If you prefer a spicier kick, consider adding a pinch of red pepper flakes during the sautéing of the vegetables.
For an added depth of flavor, you can also include a splash of red wine when adding the tomatoes. If you have leftovers, they can be stored in an airtight container in the refrigerator for up to three days. Reheat gently on the stove, adding a splash of broth if needed to maintain the desired consistency.
Caramelized Shallot Tarte Tatin
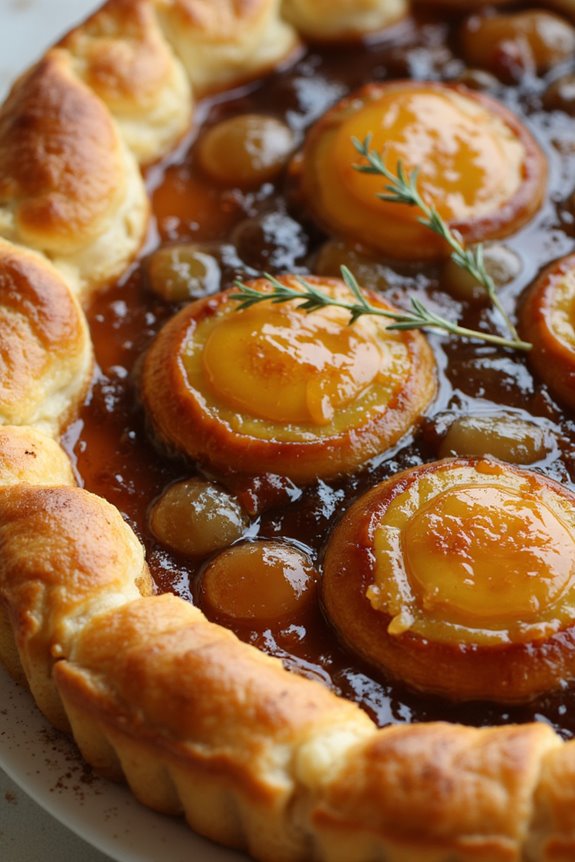
Caramelized Shallot Tarte Tatin is a delightful French-inspired vegetarian dish that perfectly balances sweet, savory, and tangy flavors. This dish features richly caramelized shallots nestled in a crisp, buttery puff pastry, creating a harmonious blend of textures and tastes. Ideal for a cozy dinner or an elegant brunch, this dish is bound to impress with its sophisticated yet comforting profile.
The preparation process involves slowly caramelizing shallots until they reach a beautiful deep amber hue, which enhances their natural sweetness. This is then paired with a touch of balsamic vinegar for a subtle acidity that lifts the flavors. The entire mixture is topped with a golden puff pastry that bakes to perfection, creating a stunning inverted tart once turned out onto a serving plate. This recipe serves 4-6 people, making it perfect for a small gathering or a family meal.
Ingredients (serving size: 4-6 people):
- 12-15 medium shallots, peeled and halved
- 2 tablespoons olive oil
- 2 tablespoons unsalted butter
- 2 tablespoons sugar
- 2 tablespoons balsamic vinegar
- A pinch of salt
- Freshly ground black pepper, to taste
- 1 sheet of puff pastry, thawed
- Fresh thyme leaves, for garnish (optional)
Instructions:
- Preheat the Oven: Start by preheating your oven to 400°F (200°C). This guarantees that the oven is hot enough to perfectly bake the pastry once it’s added.
- Caramelize the Shallots: In a large oven-safe skillet, heat the olive oil and butter over medium heat. Add the halved shallots, cut side down, and sprinkle with sugar. Cook for about 15-20 minutes, occasionally stirring, until the shallots are golden brown and caramelized.
- Add Balsamic and Season: Once the shallots are caramelized, add balsamic vinegar, salt, and pepper. Stir gently to coat the shallots evenly and cook for another 2-3 minutes until the vinegar reduces slightly and forms a glaze.
- Prepare the Pastry: Roll out the puff pastry on a lightly floured surface to remove any creases and even out the thickness. Trim the pastry into a round shape, slightly larger than the skillet.
- Assemble the Tarte Tatin: Carefully lay the pastry over the shallots, tucking the edges down into the skillet around the shallots. This allows the pastry to envelop the filling as it bakes.
- Bake the Tarte Tatin: Transfer the skillet to the preheated oven and bake for 25-30 minutes, or until the pastry is puffed and golden brown.
- Invert and Serve: Once baked, remove the skillet from the oven and let it cool for a few minutes. Carefully invert the tarte tatin onto a serving plate. Garnish with fresh thyme leaves if desired.
Extra Tips: To achieve perfectly caramelized shallots, patience is key. Allow the shallots to cook slowly over medium heat, as rushing this process can lead to uneven cooking.
When inverting the tarte tatin, use a plate that’s slightly larger than the skillet to catch any juices that might spill out. If the shallots stick to the pan, gently coax them out with a spatula and place them back onto the tart. This dish can be served warm or at room temperature, making it versatile for various dining settings.
Asparagus and Brie Galette
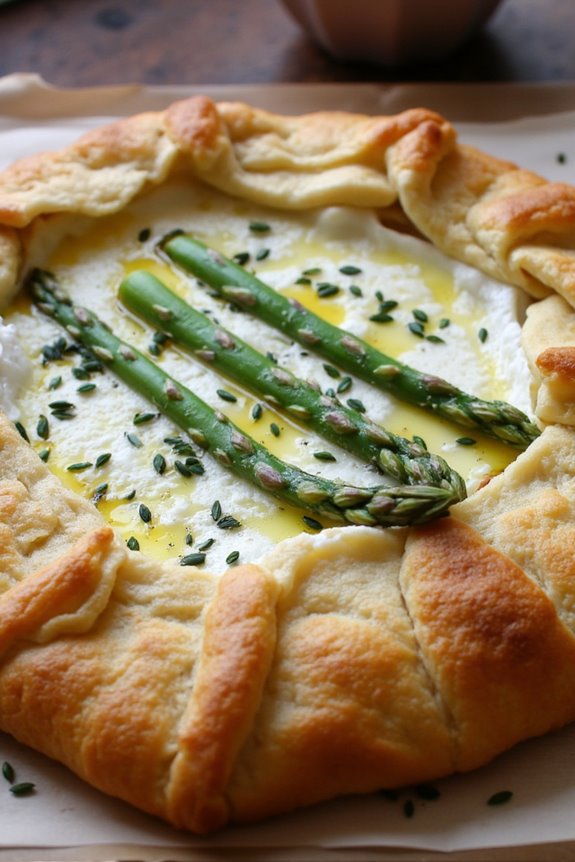
Asparagus and Brie Galette is a delightful French-inspired vegetarian dish that combines the creamy richness of Brie cheese with the fresh, vibrant taste of asparagus. This rustic tart is perfect for brunch, lunch, or a light dinner, and it showcases the elegance of French cuisine with simple, yet flavorful ingredients.
The flaky crust provides the perfect vessel for the savory filling, making it a crowd-pleaser for any occasion. This galette isn’t only visually appealing but also incredibly easy to prepare. The buttery pastry envelops the asparagus spears and Brie slices, which melt together in the oven to create a harmonious blend of flavors and textures.
A sprinkle of fresh herbs adds a burst of freshness and color, making this dish both wholesome and indulgent. Ideal for serving 4-6 people, this recipe is perfect for entertaining guests or enjoying a cozy meal with family.
Ingredients (serving size: 4-6 people)
- 1 sheet of puff pastry
- 1 bunch of fresh asparagus (approx. 1 pound)
- 200g Brie cheese, sliced
- 1 tablespoon Dijon mustard
- 1 egg, beaten (for egg wash)
- Salt and pepper to taste
- 1 tablespoon olive oil
- Fresh thyme or chives for garnish
Cooking Instructions
- Preheat the Oven: Begin by preheating your oven to 400°F (200°C). This guarantees that the oven is at the right temperature when you’re ready to bake the galette.
- Prepare the Asparagus: Wash and trim the asparagus by snapping off the woody ends. Toss the asparagus in a bowl with olive oil, salt, and pepper to coat them evenly.
- Roll Out the Puff Pastry: On a lightly floured surface, roll out the puff pastry into a rough circle, about 12 inches in diameter. Transfer the rolled-out pastry onto a baking sheet lined with parchment paper.
- Assemble the Galette: Spread a thin layer of Dijon mustard over the center of the pastry, leaving a 2-inch border. Arrange the asparagus spears over the mustard, followed by slices of Brie cheese. Fold the edges of the pastry over the filling, pleating as you go to create a rustic edge.
- Apply Egg Wash: Brush the edges of the pastry with the beaten egg. This will give the galette a golden-brown finish once baked.
- Bake: Place the galette in the preheated oven and bake for 25-30 minutes, or until the pastry is golden and the cheese is bubbly.
- Garnish and Serve: Once baked, remove the galette from the oven and let it cool slightly. Sprinkle fresh thyme or chives over the top for a pop of color and flavor. Slice and serve warm or at room temperature.
Extra Tips
For an even more flavorful galette, consider adding a pinch of nutmeg or a drizzle of balsamic glaze before serving. You can also substitute the Brie with other soft cheeses like Camembert or goat cheese for a different taste.
If you prefer a more substantial crust, make your own shortcrust pastry instead of using store-bought puff pastry. To ascertain the base of the galette stays crisp, avoid overloading it with too many toppings, and always preheat your baking sheet for a crispier bottom crust.
Truffle Risotto With Wild Mushrooms
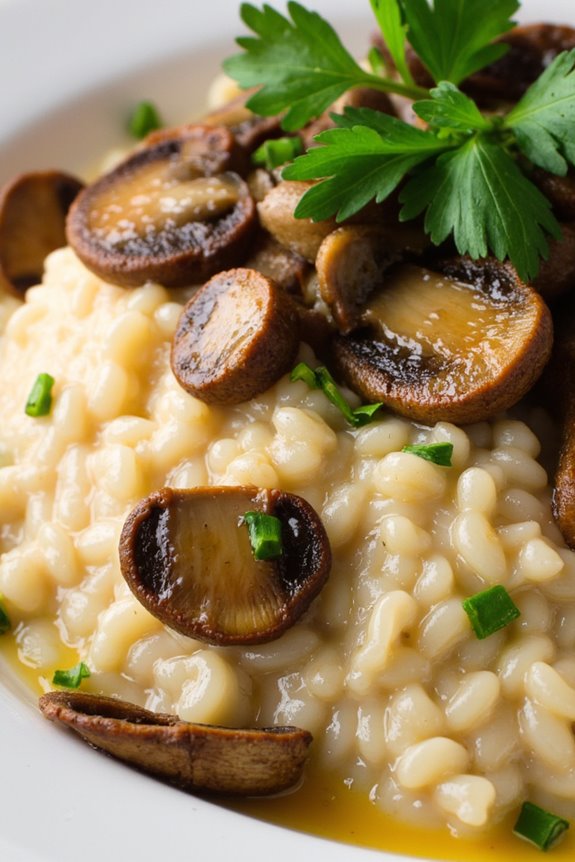
Truffle Risotto With Wild Mushrooms is an exquisite dish that brings together the rich, earthy flavors of wild mushrooms and the luxurious aroma of truffles. This vegetarian delight is perfect for a sophisticated dinner party or a cozy night in, offering a wonderful depth of flavor and a creamy texture that’s bound to impress.
The key to this dish lies in the quality of the ingredients, with fresh mushrooms and truffle oil or truffle paste providing a truly authentic taste of French cuisine. The risotto is cooked slowly, allowing the Arborio rice to absorb the flavors of the vegetable broth, wine, and aromatic spices. This method of cooking creates a creamy consistency, which is then elevated by the addition of Parmesan cheese for a rich, savory finish.
This Truffle Risotto With Wild Mushrooms isn’t only delicious but also a beautiful representation of how vegetarian dishes can be both hearty and elegant, making it a staple in French vegetarian cooking.
Ingredients for 4-6 servings:
- 1 ½ cups Arborio rice
- 1 cup wild mushrooms (e.g., chanterelles, porcini), cleaned and sliced
- 1 small onion, finely chopped
- 2 cloves garlic, minced
- 4 cups vegetable broth
- 1 cup dry white wine
- 1 tablespoon olive oil
- 2 tablespoons unsalted butter
- ½ cup grated Parmesan cheese
- 1 tablespoon truffle oil or truffle paste
- Salt and freshly ground black pepper to taste
- Fresh parsley, chopped, for garnish
Cooking Instructions:
- Prepare the Broth: In a saucepan, heat the vegetable broth over medium heat until it’s warm, then reduce the heat and keep it warm while you prepare the risotto.
- Sauté Aromatics: In a large skillet or saucepan, heat the olive oil and 1 tablespoon of butter over medium heat. Add the chopped onion and garlic, and sauté for about 2-3 minutes until the onion becomes translucent.
- Cook the Mushrooms: Add the wild mushrooms to the skillet and cook for 5-7 minutes until they’re tender and any moisture they release has evaporated. Season with a pinch of salt and pepper. Remove the mushrooms from the skillet and set them aside.
- Toast the Rice: In the same skillet, add the Arborio rice and stir it for about 2 minutes until the edges of the rice grains become translucent. This step is vital for a perfect risotto texture.
- Add Wine: Pour in the white wine and stir continuously until the liquid is mostly absorbed by the rice. This will add a depth of flavor to the risotto.
- Gradually Add Broth: Begin adding the warm vegetable broth, one ladleful at a time, stirring frequently. Wait until the liquid is mostly absorbed before adding the next ladleful. Continue this process until the rice is creamy and tender, which should take about 18-20 minutes.
- Finish the Risotto: Once the rice is cooked, stir in the cooked mushrooms, the remaining tablespoon of butter, and the grated Parmesan cheese. Mix well to combine.
- Add Truffle Flavor: Drizzle the truffle oil over the risotto and gently fold it in until evenly distributed. Adjust seasoning with salt and pepper as needed.
- Serve: Spoon the risotto into serving bowls, garnish with chopped fresh parsley, and serve immediately while hot.
Extra Tips:
For the best results, use high-quality wild mushrooms and verify they’re fresh and cleaned properly before cooking. The choice of wine can greatly affect the taste, so consider using a good quality dry white wine that you’d enjoy drinking.
Keep a close eye on the risotto as it cooks, stirring often to prevent it from sticking to the bottom of the pan. If you desire a more intense truffle flavor, you can add a bit more truffle oil or paste, but do so sparingly to avoid overpowering the dish.
Finally, serve the risotto immediately after cooking to enjoy its creamy texture at its best.
Roasted Beet Salad With Walnuts and Goat Cheese

Roasted Beet Salad With Walnuts and Goat Cheese is a delightful and vibrant dish that combines earthy beets, crunchy walnuts, and creamy goat cheese, all brought together with a simple yet flavorful dressing. This salad is perfect as a starter or a light main course and is a great way to incorporate more vegetables into your diet. The roasting process enhances the natural sweetness of the beets, making them the perfect complement to the tangy goat cheese and the nutty crunch of the walnuts.
To prepare this salad, you’ll start by roasting the beets until they’re tender, which brings out their natural sugars and deepens their flavor. Once cooled, the beets are sliced and mixed with toasted walnuts, crumbled goat cheese, and arugula or mixed greens. A simple vinaigrette made from olive oil, balsamic vinegar, honey, and Dijon mustard ties all the components together, enhancing the flavors without overpowering them. Serve this salad as a beautiful addition to any meal or enjoy it on its own for a nutritious vegetarian option.
Ingredients for 4-6 servings:
- 4 medium-sized beets
- 1/2 cup walnuts
- 4 oz goat cheese
- 6 cups arugula or mixed greens
- 3 tablespoons olive oil
- 1 tablespoon balsamic vinegar
- 1 tablespoon honey
- 1 teaspoon Dijon mustard
- Salt and pepper to taste
Cooking Instructions:
- Preheat the Oven: Start by preheating your oven to 400°F (200°C).
- Prepare the Beets: Wash the beets thoroughly, then wrap each beet individually in aluminum foil. Place the wrapped beets on a baking sheet and roast in the preheated oven for about 45-60 minutes, or until the beets are fork-tender.
- Toast the Walnuts: While the beets are roasting, place the walnuts on a separate baking sheet. Toast them in the oven for about 5-7 minutes, or until they’re golden brown and fragrant. Be sure to keep an eye on them to prevent burning.
- Make the Dressing: In a small bowl, whisk together the olive oil, balsamic vinegar, honey, and Dijon mustard. Season the dressing with salt and pepper to taste. Set aside.
- Prepare the Beets: Once the beets are done roasting, allow them to cool slightly before handling. Peel the skins off the beets (they should come off easily) and slice them into thin rounds or wedges.
- Assemble the Salad: In a large salad bowl, combine the arugula or mixed greens, sliced beets, toasted walnuts, and crumbled goat cheese. Drizzle the prepared dressing over the salad and toss gently to combine.
- Serve: Divide the salad onto plates or serve it from the bowl. Enjoy this colorful and flavorful salad while the beets are slightly warm or at room temperature.
Extra Tips: When selecting beets, try to choose ones that are similar in size to guarantee even roasting. If you’re short on time, you can boil the beets instead of roasting them, though roasting will give a richer flavor. For added depth, consider using a variety of beets such as golden or Chioggia (candy-striped) beets. Finally, if you prefer a bit of sweetness, you can add a handful of dried cranberries or a splash of orange juice to the dressing.
Savory Crepes With Spinach and Ricotta
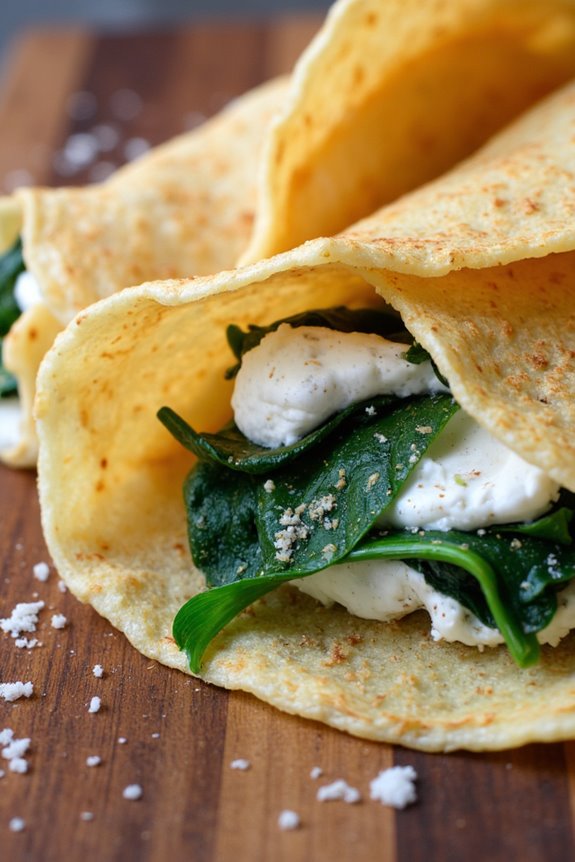
Savory Crepes With Spinach and Ricotta is a delightful French vegetarian dish that showcases the delicate art of crepe-making paired with a rich, creamy filling. This recipe takes simple ingredients and transforms them into a gourmet experience, perfect for a brunch or a light dinner.
The crepes are thin, tender, and golden, serving as the perfect vessel for the flavorful filling made from fresh spinach and creamy ricotta cheese. The combination of textures and flavors makes this dish a favorite among vegetarians and non-vegetarians alike.
The filling is enriched with a hint of nutmeg and a sprinkle of Parmesan, which enhances the earthy taste of the spinach and the smoothness of the ricotta. Served hot, these crepes are a comforting and satisfying meal that can be paired with a simple green salad or a glass of crisp white wine.
This recipe is designed to serve 4-6 people, making it ideal for a small gathering or family meal. Let’s explore the ingredients and steps needed to bring this classic French dish to your table.
Ingredients (Serves 4-6)
For the Crepes:
- 1 cup all-purpose flour
- 2 large eggs
- 1 1/4 cups milk
- 2 tablespoons unsalted butter, melted
- 1/4 teaspoon salt
For the Filling:
- 2 tablespoons olive oil
- 1 clove garlic, minced
- 10 oz fresh spinach, washed and roughly chopped
- 1 cup ricotta cheese
- 1/4 cup grated Parmesan cheese
- 1/4 teaspoon ground nutmeg
- Salt and pepper to taste
Cooking Instructions
- Prepare the Crepe Batter:
- In a large mixing bowl, whisk together the flour and salt. In another bowl, beat the eggs and then slowly add the milk, whisking continuously. Gradually add the wet ingredients to the dry ingredients while whisking to avoid lumps. Stir in the melted butter. Cover the bowl and let the batter rest for at least 30 minutes.
- Cook the Crepes:
- Heat a non-stick skillet over medium heat and lightly grease with butter. Pour about 1/4 cup of batter into the skillet, tilting it to spread the batter evenly. Cook for about 2 minutes until the edges start to lift from the pan and the bottom is golden brown. Flip and cook the other side for another minute. Transfer to a plate and repeat with the remaining batter.
- Prepare the Filling:
- In a large skillet, heat olive oil over medium heat. Add garlic and sauté for about 30 seconds until fragrant. Add the spinach and cook until wilted, about 3-4 minutes. Remove from heat and let it cool slightly. In a bowl, mix the cooked spinach with ricotta cheese, Parmesan, nutmeg, salt, and pepper.
- Assemble the Crepes:
- Place a crepe on a flat surface, and spoon about 2-3 tablespoons of the spinach and ricotta filling down the center. Fold the crepe over the filling to create a roll. Repeat the process with the remaining crepes and filling.
- Warm the Assembled Crepes:
- Preheat the oven to 350°F (180°C). Arrange the filled crepes in a single layer in a baking dish. Cover with foil and bake for 10-15 minutes until heated through.
Extra Tips
When making the crepe batter, confirm all ingredients are at room temperature to achieve a smoother consistency. Letting the batter rest is vital as it allows the flour to fully absorb the liquids, resulting in tender crepes.
If the batter seems too thick, feel free to thin it out with a little more milk. Additionally, if you prefer a richer flavor, consider adding a bit of lemon zest to the filling for a revitalizing contrast.
Finally, these crepes can be made ahead of time and stored in the refrigerator, making it a convenient dish for entertaining.
French Lentil Salad With Dijon Vinaigrette
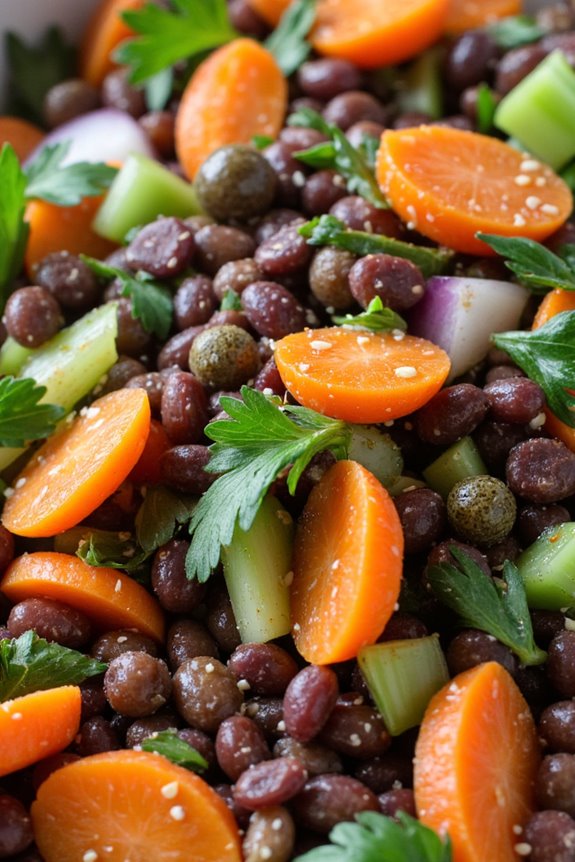
French Lentil Salad With Dijon Vinaigrette is a delightful and nutritious dish that showcases the best of French cuisine while being entirely plant-based. This hearty salad is perfect for a light lunch or as a side dish at dinner parties, offering a medley of flavors and textures that will please both vegetarians and non-vegetarians alike.
The earthy taste of French lentils pairs beautifully with the tangy and robust Dijon vinaigrette, creating a revitalizing salad full of character. With the addition of fresh herbs, crunchy vegetables, and a hint of garlic, this dish is as vibrant in color as it’s in taste.
French lentils, also known as lentilles du Puy, are small, dark green, and speckled with hints of blue. They hold their shape well when cooked, making them ideal for salads. The Dijon vinaigrette is a classic French dressing made with mustard, vinegar, and olive oil, known for its sharp and piquant flavor profile. This recipe serves 4-6 people and is perfect for those looking to enjoy a classic French dish with a healthy twist.
Ingredients (serves 4-6):
- 1 cup French lentils
- 4 cups water
- 1 bay leaf
- 1 small red onion, finely chopped
- 1 carrot, diced
- 1 celery stalk, diced
- 1/4 cup fresh parsley, chopped
- 1/4 cup fresh chives, chopped
- 2 tablespoons capers, drained
- Salt and pepper to taste
For the Dijon Vinaigrette:
- 3 tablespoons Dijon mustard
- 2 tablespoons red wine vinegar
- 1/4 cup extra virgin olive oil
- 1 garlic clove, minced
- Salt and pepper to taste
Cooking Instructions:
- Cook the Lentils: Rinse the lentils under cold water and drain. In a medium saucepan, combine the lentils, water, and bay leaf. Bring to a boil over medium-high heat. Once boiling, reduce the heat to a simmer and cook uncovered for about 20-25 minutes, or until the lentils are tender but not mushy. Drain and discard the bay leaf.
- Prepare the Vegetables: While the lentils are cooking, finely chop the red onion, dice the carrot and celery, and set aside. Chop the parsley and chives, and have the capers ready.
- Make the Vinaigrette: In a small bowl, whisk together the Dijon mustard, red wine vinegar, and minced garlic. Gradually whisk in the olive oil until the vinaigrette is well combined. Season with salt and pepper to taste.
- Assemble the Salad: In a large mixing bowl, combine the cooked lentils, chopped red onion, diced carrot, diced celery, parsley, chives, and capers. Pour the Dijon vinaigrette over the salad and toss gently to guarantee everything is well coated.
- Season and Serve: Taste the salad and add salt and pepper as needed. Serve the French Lentil Salad With Dijon Vinaigrette at room temperature or chilled, as preferred.
Extra Tips:
For a bit of extra flavor, consider adding crumbled goat cheese or toasted walnuts to the salad. If you prefer a bit more acidity, add a splash of lemon juice to the vinaigrette.
This salad can be made ahead of time and stored in the refrigerator for up to two days; just be sure to give it a good stir before serving. Also, if you like a spicier touch, a pinch of red pepper flakes can be added to the vinaigrette.
Enjoy this dish as a healthy, satisfying meal that embodies the elegance and simplicity of French cuisine.
Chocolate Soufflé
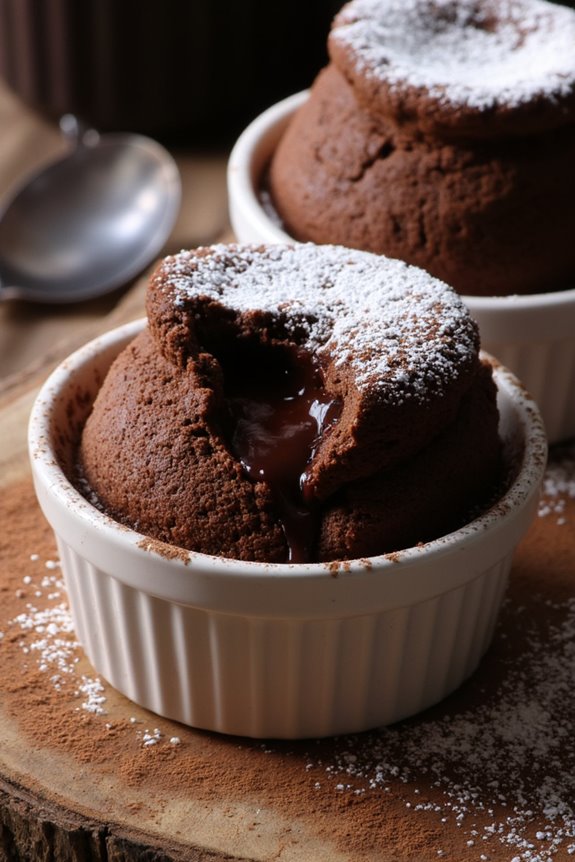
A perfect blend of rich, dark chocolate and a fluffy, airy texture, the Chocolate Soufflé is a quintessential French dessert that captures the heart of chocolate lovers. Its delicate rise and molten center create an indulgent experience that can elevate any dining occasion.
Despite its sophisticated appearance, this dessert requires only a few ingredients and, with careful attention to detail, can be mastered in your own kitchen.
To achieve the perfect soufflé, it’s essential to start with high-quality chocolate and fresh eggs. The process revolves around creating a smooth chocolate base, folding in perfectly whipped egg whites, and baking it to a heavenly rise. The soufflé should be served immediately out of the oven while still warm and puffed to impress your guests with its dramatic presentation.
Ingredients for 4-6 servings:
- 200g dark chocolate (70% cocoa)
- 6 large eggs, separated
- 150g granulated sugar
- 1 tsp vanilla extract
- 1/4 tsp cream of tartar
- Butter (for greasing)
- Cocoa powder (for dusting)
Cooking Instructions:
- Preheat and Prepare: Preheat your oven to 375°F (190°C). Generously butter the insides of six ramekins, and dust with cocoa powder to prevent sticking. Place the prepared ramekins on a baking sheet.
- Melt the Chocolate: In a double boiler or heatproof bowl set over simmering water, melt the dark chocolate. Stir occasionally until smooth. Remove from heat and allow it to cool slightly.
- Prepare the Egg Yolks: In a separate bowl, whisk together the egg yolks and half of the sugar (75g) until the mixture is pale and thick. Stir this into the melted chocolate, adding the vanilla extract, and mix until fully combined.
- Whip the Egg Whites: In a clean, dry bowl, add the egg whites and cream of tartar. Using an electric mixer, beat the egg whites until soft peaks form. Gradually add the remaining sugar (75g), continuing to beat until stiff, glossy peaks form.
- Fold the Mixtures: Gently fold a third of the whipped egg whites into the chocolate mixture to lighten it. Carefully fold in the remaining egg whites, making sure not to deflate the mixture.
- Fill and Bake: Gently spoon the soufflé mixture into the prepared ramekins, filling each about 3/4 full. Smooth the top with a spatula, then run your thumb around the inside edge to help the soufflé rise evenly. Bake for 12-15 minutes, or until the soufflés have risen and the tops are set with a slight wobble in the center.
- Serve Immediately: Once out of the oven, serve the soufflés immediately. They’ll deflate as they cool, so prompt service is key to enjoying their full effect.
Extra Tips:
For the best results, use room temperature ingredients, as they blend more smoothly and provide better volume when whipping.
Be gentle when folding the egg whites into the chocolate mixture to maintain the airiness essential for a good rise.
Finally, verify your oven is fully preheated and avoid opening the oven door during baking to prevent the soufflés from collapsing. Enjoy this dessert with a dusting of powdered sugar or a side of fresh fruits to complement its richness.
Raspberry Clafoutis
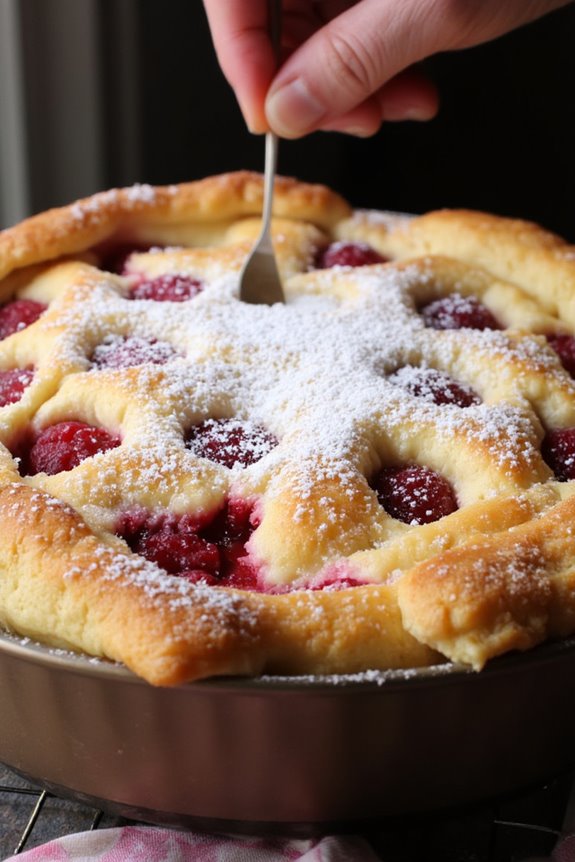
Raspberry Clafoutis is a delightful French dessert that combines the tartness of fresh raspberries with a rich, custard-like batter. Originating from the Limousin region of France, this dish traditionally features cherries, but raspberries offer a reinvigorating twist to the classic recipe. Perfectly suited for summer gatherings or a cozy family dessert, Raspberry Clafoutis is a simple yet elegant dish that brings the charm of French patisserie to your home kitchen.
The beauty of this recipe lies in its simplicity. With minimal ingredients and a straightforward preparation, even novice bakers can achieve a beautiful result. The batter, similar to a pancake mixture, is versatile and can be adapted with various fruits as per your preference.
When baked, the raspberries impart a lovely tang, which is balanced by the sweetness of the custard. Served warm, with a dusting of powdered sugar, this dessert is sure to be a crowd-pleaser.
Ingredients (serving size: 4-6 people):
- 1 cup fresh raspberries
- 3 large eggs
- 1/2 cup granulated sugar
- 1 cup whole milk
- 1/2 cup all-purpose flour
- 1 teaspoon vanilla extract
- 1/4 teaspoon salt
- 2 tablespoons unsalted butter, melted
- Powdered sugar for dusting
Cooking Instructions:
- Preheat the Oven: Begin by preheating your oven to 350°F (175°C). This guarantees that the oven is at the right temperature when you’re ready to bake the clafoutis.
- Prepare the Baking Dish: Grease a 9-inch round baking dish with a little bit of butter. This will prevent the clafoutis from sticking to the dish and guarantee easy removal once baked.
- Combine the Wet Ingredients: In a mixing bowl, whisk together the eggs and granulated sugar until the mixture becomes pale and frothy. This process incorporates air, which helps in creating a light texture.
- Add Milk and Flavoring: Gradually add the milk, melted butter, and vanilla extract to the egg mixture. Stir until everything is well combined.
- Incorporate the Dry Ingredients: Sift the flour and salt into the wet ingredients. Whisk gently to avoid lumps, guaranteeing a smooth batter. This step is essential for the texture of the clafoutis.
- Arrange the Raspberries: Spread the raspberries evenly over the bottom of the prepared baking dish. Pour the batter over the raspberries, ensuring they’re evenly distributed in the dish.
- Bake the Clafoutis: Place the dish in the preheated oven and bake for about 35-40 minutes, or until the clafoutis is set and golden brown on top. A toothpick inserted in the center should come out clean.
- Cool and Serve: Allow the clafoutis to cool for a few minutes. Dust with powdered sugar before serving, and enjoy warm for the best flavor.
Extra Tips:
For an added depth of flavor, consider incorporating a splash of almond extract in the batter. Additionally, if raspberries aren’t in season, you can substitute them with other fruits such as cherries, blueberries, or sliced peaches.
Remember that the clafoutis will continue to firm up as it cools, so avoid overbaking. Serve with a dollop of whipped cream or a scoop of vanilla ice cream for an indulgent treat.