

There’s something enchanting about French desserts during the holiday season. Indulging in a Bûche De Noël adorned with charming meringue mushrooms or finding a surprise in a Galette Des Rois is simply delightful. A Croquembouche can elegantly grace your holiday table, bringing joy to everyone. These classic treats not only satisfy your sweet tooth but also add a touch of magic to your festivities. Ready to explore these creations and sprinkle some French elegance into your celebrations?
Bûche De Noël (Yule Log)
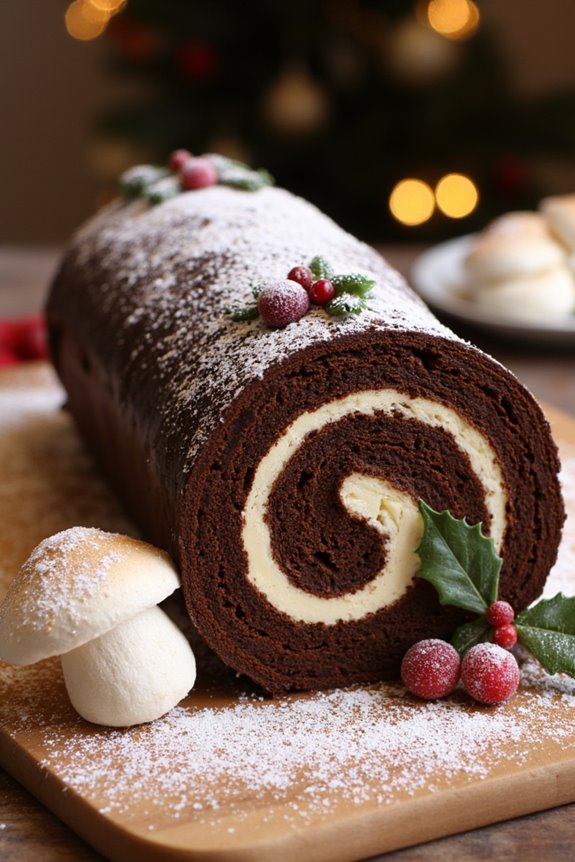
Bûche De Noël, also known as the Yule Log, is a traditional French dessert enjoyed during the Christmas season. This festive cake is designed to resemble a wooden log, symbolizing the warmth and cheer of the holiday.
The Bûche De Noël consists of a light sponge cake rolled with a creamy filling and often decorated with chocolate ganache to mimic bark, with additional festive decorations such as meringue mushrooms or sugared berries.
Creating a Bûche De Noël is a delightful way to showcase your baking skills and bring a touch of French tradition to your holiday celebrations. This recipe serves 4-6 people and involves preparing a genoise sponge, a rich filling, and a decadent chocolate ganache. With some patience and creativity, you can craft a beautiful and delicious centerpiece for your holiday table.
Ingredients
- Genoise Sponge:
- 4 large eggs
- 100g granulated sugar
- 100g all-purpose flour
- 1 teaspoon vanilla extract
- Pinch of salt
- Filling:
- 250ml heavy cream
- 2 tablespoons powdered sugar
- 1 teaspoon vanilla extract
- Chocolate Ganache:
- 150g dark chocolate, chopped
- 150ml heavy cream
- 25g unsalted butter
- Decorations (optional):
- Powdered sugar for dusting
- Meringue mushrooms
- Sugared cranberries or holly leaves
Instructions
1. Preheat the Oven and Prepare the Pan:
Preheat your oven to 180°C (350°F). Line a 30x40cm (12×16 inch) baking tray with parchment paper and lightly grease it to prevent sticking.
2. Make the Genoise Sponge:
In a large mixing bowl, whisk the eggs and granulated sugar together using an electric mixer on high speed for about 5-7 minutes until the mixture is pale, thick, and doubled in volume.
Gently fold in the flour, salt, and vanilla extract using a spatula, being careful not to deflate the batter.
3. Bake the Sponge:
Pour the batter into the prepared baking tray, spreading it evenly. Bake for 10-12 minutes, or until the sponge is golden and springs back when lightly touched.
Remove from the oven and cool for a few minutes.
4. Roll the Cake:
Lay a clean kitchen towel on a flat surface and dust it with powdered sugar. Invert the cake onto the towel, peel off the parchment paper, and gently roll the cake with the towel starting from one short side.
Let it cool completely in this rolled position.
5. Prepare the Filling:
Whip the heavy cream, powdered sugar, and vanilla extract together in a bowl until stiff peaks form.
6. Unroll and Fill the Cake:
Carefully unroll the cooled sponge cake. Spread the whipped cream filling evenly over the cake, leaving a small border on all sides.
Reroll the cake without the towel and place it seam-side down on a serving platter.
7. Make the Chocolate Ganache:
Heat the heavy cream in a small saucepan until it begins to simmer. Remove from heat and pour over the chopped chocolate and butter in a heatproof bowl.
Let it sit for a minute, then stir until smooth and glossy. Allow the ganache to cool slightly until thickened but still pourable.
8. Decorate the Yule Log:
Spread the ganache over the rolled cake, using a spatula to create a bark-like texture. Decorate with meringue mushrooms, sugared cranberries, or holly leaves as desired.
Dust with powdered sugar to resemble snow.
Extra Tips
When making the Bûche De Noël, make sure that the sponge cake doesn’t overbake, as it needs to remain pliable for rolling.
If the cake cracks slightly during rolling, the ganache will help cover any imperfections. You can prepare the meringue mushrooms and sugared decorations in advance to save time on the day of assembly.
If you find the rolling process challenging, practice rolling a plain tea towel first to get a feel for the technique.
Galette Des Rois (King Cake)
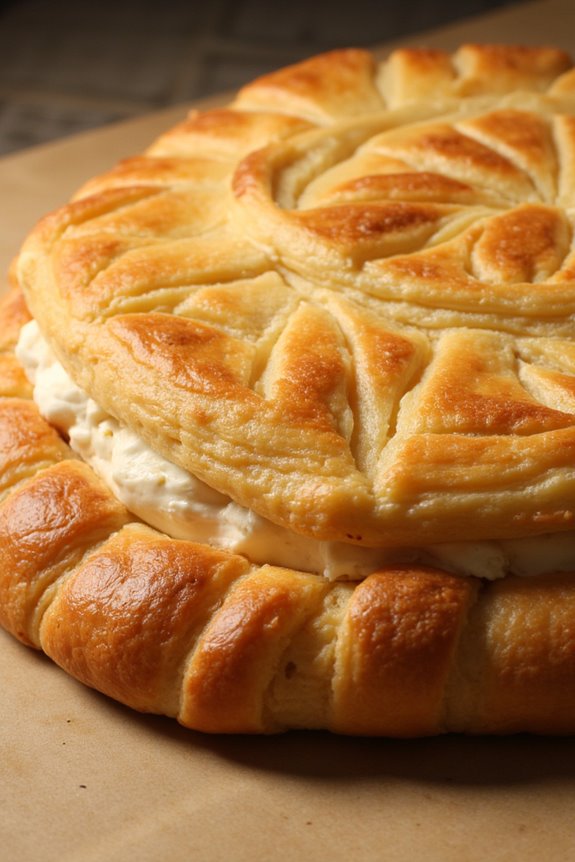
Galette Des Rois, also known as King Cake, is a traditional French dessert enjoyed in celebration of the Epiphany, which marks the visit of the Magi to the Baby Jesus. This delightful pastry is characterized by its flaky, buttery layers encasing a rich almond cream filling.
It’s typically served in early January, and it’s customary to hide a small figurine, or “fève,” inside the cake. The person who finds the fève in their slice gets to be king or queen for the day and wear the golden paper crown that often accompanies the cake.
This delectable dessert isn’t only a treat for the taste buds but also a centerpiece for family gatherings during the festive season. It involves a few steps but is well worth the effort when you see the delighted faces of your loved ones.
Below, you’ll find a recipe that serves 4-6 people, perfect for a small gathering. Enjoy the process of making and sharing this charming and delicious tradition.
Ingredients (Serves 4-6)
- 2 sheets of puff pastry
- 1 cup almond meal
- 1/2 cup unsalted butter, softened
- 1/2 cup granulated sugar
- 2 large eggs
- 1 teaspoon pure vanilla extract
- 1/4 teaspoon almond extract
- 1 small figurine or dried bean (optional)
- 1 egg yolk for egg wash
- 1 tablespoon milk
Cooking Instructions
- Prepare the Almond Cream Filling: In a mixing bowl, cream together the softened butter and granulated sugar until light and fluffy. Beat in the eggs, one at a time, making certain each is fully incorporated before adding the next. Stir in the almond meal, vanilla extract, and almond extract until you have a smooth and homogeneous mixture. Set aside.
- Roll out the Puff Pastry: On a lightly floured surface, gently roll out each sheet of puff pastry to guarantee it’s slightly larger than your desired cake size. Using a plate or a cake pan as a guide, cut out two equal-sized circles from the pastry sheets.
- Assemble the Galette: Place one circle of puff pastry on a baking sheet lined with parchment paper. Spread the almond cream filling evenly over the pastry, leaving about a 1-inch border around the edges. If using a fève, gently insert it into the filling. Brush the exposed border with water to help seal the edges.
- Seal the Galette: Place the second circle of pastry over the filling. Press down on the edges to seal, then use a fork or your fingers to crimp the edges securely.
- Decorate and Finish the Galette: In a small bowl, mix the egg yolk with milk to create an egg wash. Brush the top of the galette with this mixture. Use the back of a knife to lightly score a design on the top of the pastry, being careful not to cut through to the filling.
- Bake the Galette: Preheat your oven to 400°F (200°C). Bake the galette for 25-30 minutes or until the pastry is golden brown and puffed. Remove from the oven and allow it to cool slightly before serving.
Extra Tips
For the best results, make certain your puff pastry remains cold until you’re ready to use it, as this helps it puff up nicely in the oven.
If you have time, refrigerate the assembled galette for 30 minutes before baking, which can help it hold its shape better. Remember to warn your guests about the hidden fève to prevent any surprises!
The galette can be served warm or at room temperature, and it pairs beautifully with a glass of cider or a cup of coffee. Enjoy celebrating this charming French tradition!
Tarte Tatin (Upside-Down Apple Tart)
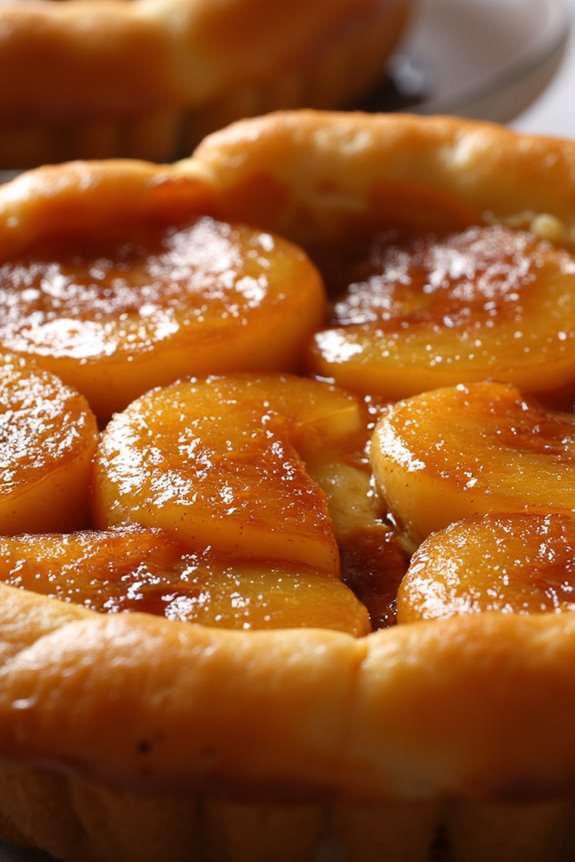
Tarte Tatin is a classic French dessert that transforms a simple apple tart into an elegant and delicious treat. This upside-down apple tart is known for its caramelized apples and buttery pastry, creating a perfect blend of sweet and savory flavors. Originally created by the Tatin sisters in the late 19th century, this dessert has become a staple in French cuisine and a favorite around the world, especially during the holiday season.
The magic of Tarte Tatin lies in its simplicity and the rich, caramel flavor that develops as the apples cook slowly in sugar and butter. The apples are arranged in a skillet with the pastry on top and then baked until golden brown. Once baked, the tart is flipped over to reveal the beautifully caramelized apples. This recipe serves 4-6 people, making it an ideal dessert for gatherings and festive occasions.
Ingredients:
- 1 sheet of puff pastry (thawed if frozen)
- 6-8 medium-sized apples (such as Golden Delicious or Granny Smith)
- 1 cup granulated sugar
- 1/2 cup unsalted butter
- 1 tablespoon lemon juice
- 1 teaspoon vanilla extract
- A pinch of salt
Cooking Instructions:
- Preheat the Oven: Preheat your oven to 375°F (190°C) to guarantee it’s hot enough to bake the tart evenly.
- Prepare the Apples: Peel, core, and quarter the apples. Try to keep the apple quarters uniform in size for even cooking. Sprinkle them with lemon juice to prevent browning.
- Caramelize the Sugar: In a large oven-proof skillet, melt the butter over medium heat. Add the sugar and stir until it dissolves and begins to caramelize, turning a golden brown color. Watch carefully to avoid burning.
- Arrange the Apples: Once the caramel is ready, remove the skillet from heat and carefully arrange the apple quarters in a circular pattern, placing them cut-side up. Pack them tightly as they’ll shrink during cooking.
- Add Flavorings: Drizzle the vanilla extract over the apples and sprinkle a pinch of salt to enhance the sweetness.
- Cover with Puff Pastry: Roll out the thawed puff pastry to fit over the skillet, making sure it’s large enough to tuck around the edges of the apples. Place the pastry over the apples, tucking the edges down the sides of the skillet.
- Bake the Tart: Place the skillet in the preheated oven and bake for about 30-35 minutes or until the pastry is golden brown and puffed.
- Cool and Flip: Remove the skillet from the oven and let it cool for about 10 minutes. Place a large plate over the skillet and carefully invert them together to flip the tart out of the skillet. Confirm the plate is large enough to catch any caramel that might spill.
Extra Tips:
For the best results, choose firm apples that hold their shape during cooking. If you prefer a deeper caramel flavor, allow the sugar to caramelize a bit longer, but be careful not to burn it.
If you don’t have an oven-proof skillet, you can caramelize the apples in a stovetop pan and transfer them to a baking dish before adding the pastry. Adjust the sweetness by using less sugar if your apples are particularly sweet. Enjoy your Tarte Tatin warm, perhaps with a scoop of vanilla ice cream or a dollop of crème fraîche for a truly indulgent treat.
Croquembouche (Cream Puff Tower)
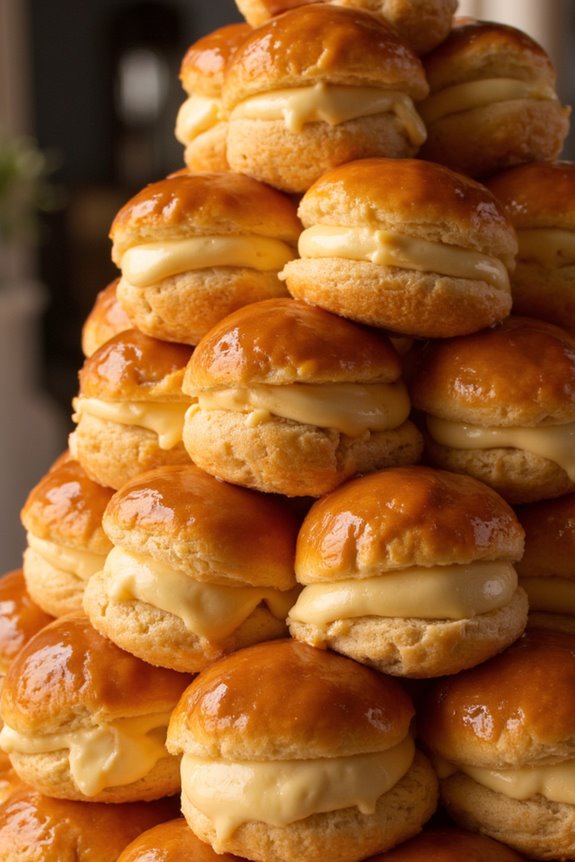
Croquembouche, known as a Cream Puff Tower, is an iconic French dessert often served at weddings and festive occasions like Christmas. This towering masterpiece is made up of delicate, cream-filled choux pastry puffs stacked in a cone shape and held together with caramel. The name “Croquembouche” translates to “crunch in the mouth,” highlighting the delightful texture of the caramelized sugar coating.
While it may seem intimidating to prepare, assembling a Croquembouche can be a rewarding culinary experience, impressing your guests with its elegant appearance and delightful taste.
The key to a successful Croquembouche lies in the perfect preparation of the choux pastry and the careful construction of the tower. The choux pastry, light and airy, is the foundation of this dessert. Once baked and cooled, the puffs are filled with a delicious vanilla pastry cream. The caramel acts as the glue to hold the puffs together, forming the signature tower shape. This recipe serves 4-6 people, making it perfect for a small festive gathering.
Ingredients:
- 1 cup water
- 1/2 cup unsalted butter
- 1 cup all-purpose flour
- 4 large eggs
- 1/4 teaspoon salt
- 2 cups milk
- 1/2 cup sugar
- 4 egg yolks
- 1/4 cup cornstarch
- 2 teaspoons vanilla extract
- 1 cup granulated sugar (for caramel)
- 1/4 cup water (for caramel)
Instructions:
- Prepare the Choux Pastry: Preheat your oven to 400°F (200°C). In a saucepan, combine 1 cup of water, 1/2 cup unsalted butter, and 1/4 teaspoon salt. Bring to a boil. Remove from heat and stir in 1 cup of flour until the mixture forms a ball. Let it cool slightly.
- Incorporate Eggs: Transfer the dough to a mixing bowl. Beat in the eggs one at a time, making certain each is fully incorporated before adding the next. The dough should be smooth and glossy.
- Bake the Pastry Puffs: Using a piping bag, pipe small mounds of dough onto a baking sheet lined with parchment paper. Wet your finger to smooth any peaks. Bake for 20-25 minutes or until golden brown. Allow them to cool completely.
- Make the Pastry Cream: In a saucepan, warm 2 cups of milk until just simmering. In a separate bowl, whisk together 4 egg yolks, 1/2 cup sugar, and 1/4 cup cornstarch. Gradually whisk in the hot milk. Return to the saucepan and cook over medium heat until thickened. Remove from heat and stir in 2 teaspoons of vanilla extract. Cover and chill.
- Fill the Puffs: Once the pastry cream is chilled, transfer it to a piping bag. Poke a small hole in the bottom of each puff and fill them with the pastry cream.
- Prepare the Caramel: In a saucepan, combine 1 cup granulated sugar and 1/4 cup water. Cook over medium heat, swirling occasionally, until the sugar melts and turns a golden amber color. Remove from heat.
- Assemble the Croquembouche: Dip the top of each filled puff into the caramel and begin stacking them in a circle on a serving platter, forming a cone shape. Use the caramel to glue the puffs together, working quickly before it hardens.
Extra Tips:
When making the choux pastry, make certain that your dough isn’t too hot when adding the eggs, as this could cause them to cook prematurely. For the caramel, be cautious, as it can quickly go from perfect to burnt; remove it from the heat as soon as it reaches a golden color.
If the caramel hardens while assembling, gently reheat it. Additionally, consider wearing gloves when handling hot caramel to avoid burns. A Croquembouche is best served the day it’s made to maintain its crisp texture.
Clafoutis Aux Cerises (Cherry Clafoutis)

Clafoutis Aux Cerises, or Cherry Clafoutis, is a classic French dessert that beautifully combines the tartness of cherries with a sweet, flan-like batter. Originating from the Limousin region, this rustic yet elegant dish is traditionally made with unpitted cherries, which are said to impart a richer flavor as they bake. However, pitted cherries can also be used for convenience and ease of eating.
The dessert is perfect for the holiday season, offering a delightful blend of textures and flavors that are certain to impress your family and friends. This Clafoutis is simple to prepare and can be served warm or at room temperature, making it a versatile addition to your Christmas dessert table.
The creamy batter, infused with vanilla, envelops the juicy cherries, creating a harmonious balance of sweetness and tartness. Whether you’re an experienced baker or a novice in the kitchen, this recipe is straightforward and promises a delicious outcome. Serve it with a dusting of powdered sugar or a dollop of whipped cream for an extra touch of indulgence.
Ingredients (Serves 4-6):
- 1 cup whole milk
- 1/2 cup heavy cream
- 3 large eggs
- 2/3 cup granulated sugar
- 1 tablespoon vanilla extract
- 1/2 cup all-purpose flour
- 1/4 teaspoon salt
- 2 cups fresh cherries, pitted (or unpitted, if preferred)
- 2 tablespoons unsalted butter, melted
- Powdered sugar, for dusting
Cooking Instructions:
- Preheat the Oven: Start by preheating your oven to 350°F (175°C). This guarantees that the Clafoutis will bake evenly and achieve the perfect texture.
- Prepare the Batter: In a large mixing bowl, whisk together the milk, heavy cream, eggs, granulated sugar, and vanilla extract until smooth and well combined. Slowly add the flour and salt, continuing to whisk until the batter is completely free of lumps.
- Butter the Baking Dish: Grease a 9-inch round baking dish or pie pan with the melted butter. Make sure to coat the sides and bottom thoroughly to prevent sticking.
- Arrange the Cherries: Evenly distribute the cherries across the bottom of the prepared baking dish. Pour the batter over the cherries, ensuring they’re evenly covered.
- Bake the Clafoutis: Place the dish in the preheated oven and bake for 35-40 minutes, or until the Clafoutis is puffed and golden brown around the edges. A toothpick inserted into the center should come out mostly clean.
- Cool and Serve: Allow the Clafoutis to cool slightly before serving. Dust with powdered sugar just before serving for a festive touch.
Extra Tips:
For the best flavor, use fresh, ripe cherries if they’re in season. If using unpitted cherries, remind your guests to watch out for the pits while enjoying the dessert.
For a more intense cherry flavor, consider adding a tablespoon of cherry brandy or kirsch to the batter. To elevate the presentation, serve the Clafoutis in individual ramekins.
If you don’t have fresh cherries, frozen cherries can be used; just be sure to thaw and drain them well before use. Finally, if you’re feeling adventurous, try experimenting with other fruits like apricots or plums for a delicious variation on this classic recipe.
Pain D’épices (Spiced Bread)
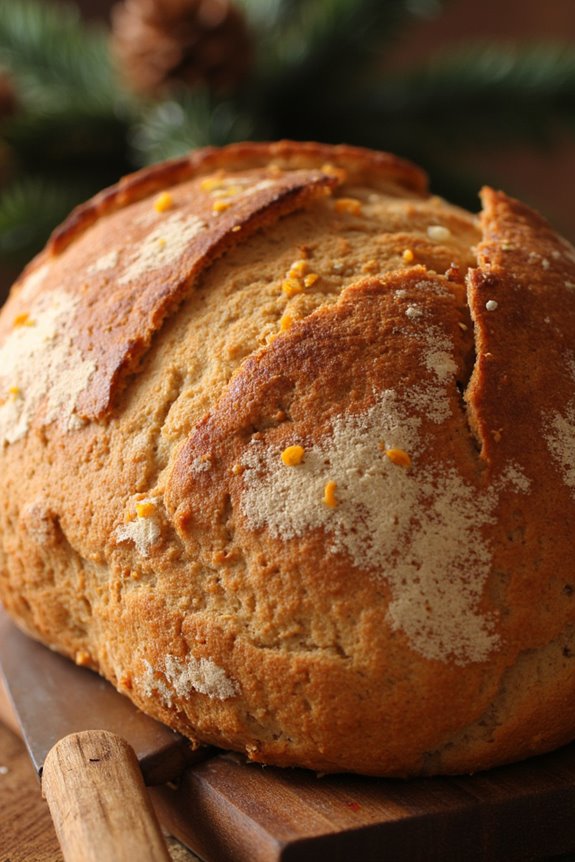
Pain D’épices, also known as French spiced bread, is a traditional treat that brings warmth and flavor to the holiday season. This delightful loaf combines a mixture of spices like cinnamon, ginger, and cloves with the sweetness of honey, creating a fragrant and tasty bread that’s perfect for Christmas gatherings.
Pain D’épices can be enjoyed on its own, or served with a spread of butter or jam for a simple yet satisfying dessert or snack.
Originating from Eastern France, this spiced bread has a rich history dating back to the Middle Ages. It was initially made by monks and was known for its long shelf life, making it a staple during the winter months.
Today, Pain D’épices is cherished for its aromatic spices and moist texture. It’s a wonderful addition to any holiday table and makes for a great homemade gift.
Ingredients for 4-6 Servings:
- 250g all-purpose flour
- 125g honey
- 100g brown sugar
- 10g baking powder
- 1 teaspoon ground cinnamon
- 1 teaspoon ground ginger
- 1/2 teaspoon ground cloves
- 1/2 teaspoon ground nutmeg
- 1/2 teaspoon salt
- 200ml milk
- 1 large egg
- 50g unsalted butter, melted
- Zest of 1 orange
Cooking Instructions:
- Preheat Oven: Begin by preheating your oven to 180°C (350°F). This guarantees your oven is at the right temperature when the batter is ready.
- Prepare Baking Pan: Grease a loaf pan with butter or line it with parchment paper to prevent the bread from sticking.
- Mix Dry Ingredients: In a large mixing bowl, combine the flour, baking powder, cinnamon, ginger, cloves, nutmeg, and salt. Whisk these dry ingredients together until they’re well combined.
- Combine Wet Ingredients: In a separate bowl, mix the honey and brown sugar until the sugar dissolves. Add the milk, egg, melted butter, and orange zest, and whisk together until smooth.
- Incorporate Mixtures: Gradually pour the wet ingredients into the dry ingredients while stirring gently. Mix until just combined, being careful not to overmix as this can make the bread dense.
- Pour Batter: Pour the batter into the prepared loaf pan, smoothing the top with a spatula.
- Bake: Place the loaf pan in the preheated oven and bake for 45 to 50 minutes, or until a toothpick inserted in the center comes out clean.
- Cool: Once baked, remove the pan from the oven and allow the bread to cool in the pan for about 10 minutes. Then, transfer the loaf to a wire rack to cool completely before slicing.
Extra Tips:
For the best flavor, allow the Pain D’épices to rest for a day before serving; this allows the spices to develop further.
If you prefer a more intense spice flavor, feel free to adjust the spice measurements to suit your taste.
Pain D’épices also freezes well, so you can make it ahead of time and enjoy it throughout the holidays. Simply wrap it tightly in plastic wrap and store it in the freezer.
Mont Blanc (Chestnut Dessert)
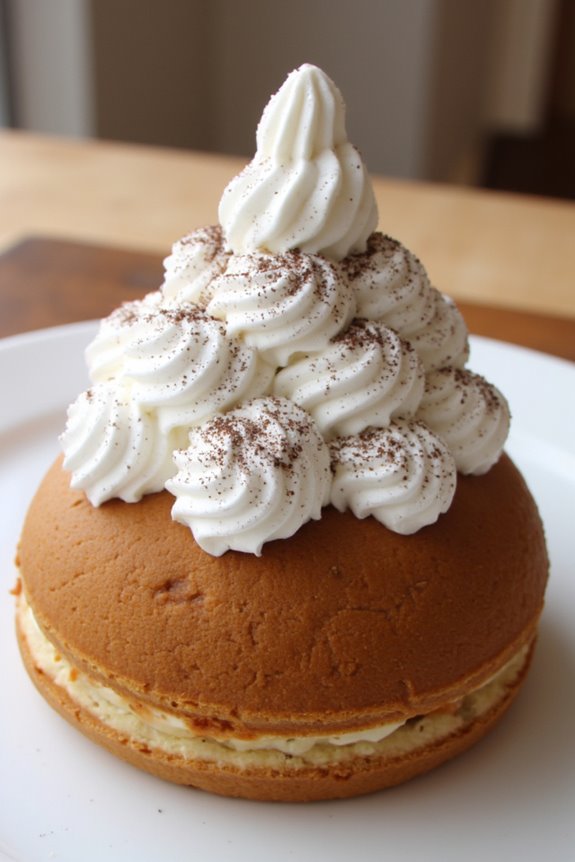
Mont Blanc, a classic French Christmas dessert, is a delightful combination of sweetened chestnut puree and whipped cream, delicately piped into a mountain-like shape. Named after the snow-capped Mont Blanc, the highest mountain in the Alps, this dessert is renowned for its elegant presentation and rich, nutty flavor. Traditionally served during the holiday season, it brings a touch of sophistication to any festive gathering.
The dessert isn’t only a treat for the taste buds but also a visual feast that captures the essence of winter with its creamy peaks and valleys.
Preparing Mont Blanc at home can be a rewarding experience, especially when shared with friends and family. This recipe is designed to serve 4-6 people, making it perfect for small gatherings or family dinners. The key to a successful Mont Blanc is to use high-quality chestnuts and cream, guaranteeing a smooth and luscious texture.
While the preparation may seem intricate, following the steps carefully will lead to a stunning dessert that’s sure to impress your guests. Let’s plunge into the recipe and create a delicious Mont Blanc dessert that embodies the spirit of Christmas.
Ingredients (Serves 4-6):
- 500g cooked and peeled chestnuts
- 200g granulated sugar
- 1 vanilla bean or 1 tsp vanilla extract
- 250ml whole milk
- 250ml heavy cream
- 2 tbsp icing sugar (powdered sugar)
- 1 tbsp rum (optional)
- 100g dark chocolate, grated (optional, for garnish)
Cooking Instructions:
- Prepare the Chestnut Puree:
- In a medium saucepan, combine the cooked chestnuts, granulated sugar, vanilla bean (split and seeds scraped) or vanilla extract, and whole milk.
- Cook over medium heat, stirring occasionally, until the chestnuts are very soft and the mixture thickens, about 20 minutes.
- Remove from heat, discard the vanilla bean if used, and let it cool slightly.
- Blend the Mixture:
- Transfer the chestnut mixture to a blender or food processor and blend until smooth. If the puree is too thick, add a bit more milk to reach a smooth consistency.
- Add the rum, if using, and blend again to incorporate. Set aside to cool completely.
- Whip the Cream:
- In a large bowl, whip the heavy cream with the icing sugar until soft peaks form. Be careful not to overwhip, as it can turn into butter.
- Assemble the Mont Blanc:
- Fill a piping bag fitted with a large star nozzle with the chestnut puree.
- Pipe the puree onto serving plates, creating a mound or mountain shape.
- Top the chestnut mounds with dollops of whipped cream, shaping it to resemble snow-capped peaks.
- Garnish and Serve:
- If desired, sprinkle the grated dark chocolate over the whipped cream for an added touch of elegance and flavor.
- Serve immediately to enjoy the contrasting textures and flavors.
Extra Tips:
When making Mont Blanc, verify that the chestnut puree is completely smooth, as any lumps can make piping difficult and affect the final presentation.
If you don’t have a piping bag, you can use a plastic freezer bag with a corner snipped off. Also, make sure the whipped cream is chilled before serving for the best texture.
For an extra festive touch, consider serving Mont Blanc with a drizzle of chocolate sauce or a dusting of edible gold leaf for an elegant and luxurious finish.
Canelé De Bordeaux (Caramelized Custard Cakes)
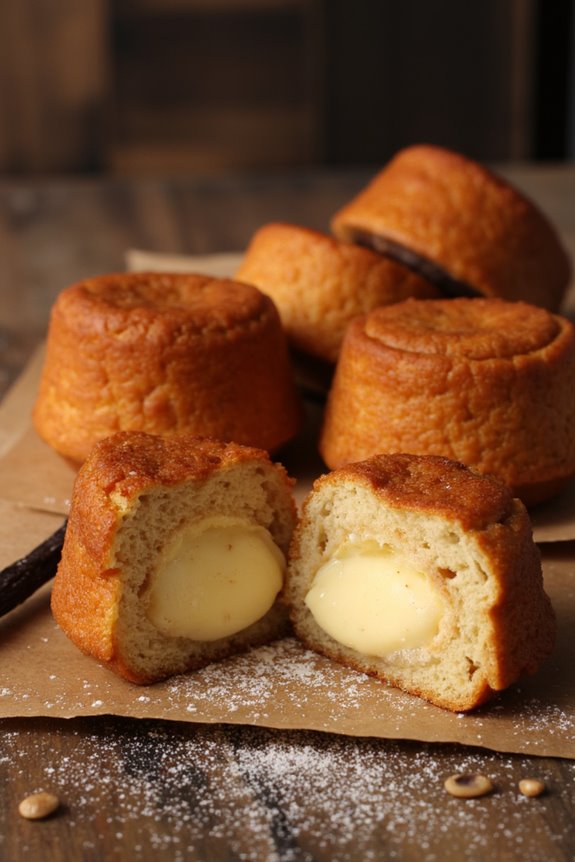
Canelé De Bordeaux, or caramelized custard cakes, are a classic French dessert that boasts a crispy, caramelized exterior and a soft, tender custard center. Originating from the Bordeaux region, these delightful pastries are traditionally flavored with vanilla and a hint of rum. The contrast between the crunchy shell and the creamy interior is what makes canelés so irresistible. Perfect for a holiday dessert or as a sweet treat with coffee, these little cakes are bound to impress your guests with their unique texture and rich flavors.
While preparing canelés might seem intimidating at first, with the right tools and a bit of patience, you’ll find the process quite rewarding. The key to achieving the perfect texture lies in using copper molds lined with beeswax, which help create the signature crisp exterior. If you don’t have copper molds, silicone molds can be a good alternative, though the crust may not be as crisp. This recipe serves 4-6 people, making it an ideal choice for a small gathering or a family holiday treat.
Ingredients (Serves 4-6):
- 500 ml whole milk
- 50 g unsalted butter
- 2 tsp vanilla extract
- 120 g all-purpose flour
- 250 g granulated sugar
- 2 large eggs
- 2 large egg yolks
- 60 ml dark rum
- A pinch of salt
- Beeswax or butter, for lining the molds
Cooking Instructions:
- Prepare the Milk Mixture: In a medium saucepan, combine the whole milk and unsalted butter. Heat over medium heat until the butter melts and the mixture is warm but not boiling. Remove from heat and stir in the vanilla extract. Allow the mixture to cool to room temperature.
- Mix the Dry Ingredients: In a large mixing bowl, sift together the all-purpose flour, granulated sugar, and a pinch of salt. Mixing the dry ingredients thoroughly guarantees an even distribution, which is essential for the batter’s consistency.
- Combine Eggs and Rum: In a separate bowl, whisk together the eggs and egg yolks until combined. Add the dark rum and mix well. This mixture will contribute to the custard’s rich flavor and smooth texture.
- Create the Batter: Gradually add the egg mixture to the dry ingredients, stirring constantly to avoid lumps. Slowly pour in the cooled milk mixture, stirring until the batter is smooth and homogenous. The batter should be quite thin.
- Rest the Batter: Cover the bowl with plastic wrap or a lid and refrigerate for at least 24 hours. This resting period is vital as it allows the flavors to meld and the batter to thicken slightly, resulting in a better texture for the canelés.
- Prepare the Molds: Before baking, preheat your oven to 220°C (428°F). If using copper molds, line them with beeswax or butter to prevent sticking and to help form the crispy crust.
- Fill and Bake the Molds: Pour the batter into the prepared molds, filling them about ¾ full. Place the molds on a baking sheet and bake in the preheated oven for 15 minutes. Then, reduce the oven temperature to 180°C (356°F) and continue baking for another 45-50 minutes, or until the canelés are deeply caramelized.
- Cool and Serve: Allow the canelés to cool in the molds for a few minutes before removing them. Serve warm or at room temperature. They’re best eaten on the day they’re made.
Extra Tips: For a truly authentic flavor, use high-quality vanilla extract and a good dark rum. If you can’t find beeswax, butter will suffice, though it won’t create the same crispness. Be sure to preheat the oven properly and monitor the canelés closely during baking to avoid burning. If using silicone molds, consider baking them a bit longer for a crisper crust. Finally, patience is key—let the batter rest for at least 24 hours for the best results.
Tarte Au Citron (Lemon Tart)

Tarte Au Citron, or Lemon Tart, is a classic French dessert known for its vibrant, tangy flavor and smooth texture. It’s a delightful combination of a buttery, flaky tart crust and a luscious lemon filling that’s both invigorating and satisfying. This dessert is perfect for festive occasions, offering a bright and zesty contrast to the rich and hearty dishes that typically accompany holiday meals.
Whether served as a finale to a grand dinner or as a standalone treat, Tarte Au Citron is sure to impress your guests with its elegant simplicity and exquisite taste.
The beauty of Tarte Au Citron lies in its balance of flavors and textures. The crispness of the tart shell complements the creamy tartness of the lemon curd, creating a harmonious dessert experience. Making a Tarte Au Citron requires attention to detail, from preparing the perfect pastry to achieving the right consistency for the filling.
But fear not, with a bit of patience and practice, you can create a dessert that not only looks stunning but also tastes heavenly. Below is a recipe for making this delightful dessert, serving 4-6 people.
Ingredients:
- For the Pastry:
- 1 1/4 cups all-purpose flour
- 1/2 cup unsalted butter, chilled and diced
- 1/4 cup granulated sugar
- 1/4 teaspoon salt
- 1 egg yolk
- 2 tablespoons cold water
- For the Lemon Filling:
- 3/4 cup freshly squeezed lemon juice (about 3-4 lemons)
- Zest of 2 lemons
- 3/4 cup granulated sugar
- 4 large eggs
- 1/2 cup heavy cream
Cooking Instructions:
- Prepare the Pastry:
- In a large bowl, combine the flour, sugar, and salt. Add the diced butter and use your fingers or a pastry cutter to rub it into the flour until the mixture resembles coarse crumbs.
- Stir in the egg yolk and cold water, mixing just until the dough comes together. Form the dough into a disc, wrap it in plastic wrap, and refrigerate for at least 30 minutes.
- Preheat the Oven:
- Preheat your oven to 375°F (190°C).
- Roll Out the Dough:
- On a lightly floured surface, roll out the chilled dough into a circle about 1/8 inch thick. Carefully transfer it to a 9-inch tart pan, pressing it into the edges and trimming any excess.
- Blind Bake the Tart Shell:
- Line the pastry with parchment paper and fill it with pie weights or dried beans. Bake in the preheated oven for 15 minutes. Remove the weights and parchment paper, and bake for an additional 5 minutes until the crust is lightly golden. Let cool completely.
- Make the Lemon Filling:
- In a medium saucepan, whisk together the lemon juice, lemon zest, sugar, and eggs until smooth. Place the pan over medium heat and cook, stirring constantly, until the mixture thickens enough to coat the back of a spoon, about 10 minutes.
- Remove from heat and strain the mixture through a fine-mesh sieve into a bowl to remove any lumps. Stir in the heavy cream until well combined.
- Fill and Bake the Tart:
- Pour the lemon filling into the cooled tart shell. Bake in the oven at 325°F (160°C) for 15-20 minutes, or until the filling is set but still slightly wobbly in the center. Allow the tart to cool to room temperature before serving.
Extra Tips:
For the best results, make sure to use fresh lemons for the juice and zest, as they provide the brightest flavor. When blind baking, make certain your tart shell is well-chilled before adding the filling to prevent it from shrinking.
If you prefer a sweeter tart, increase the sugar slightly in the filling to suit your taste. Additionally, consider serving the Tarte Au Citron with a dollop of whipped cream or a sprinkle of powdered sugar for an extra touch of elegance.
Mille-Feuille (Napoleon Pastry)
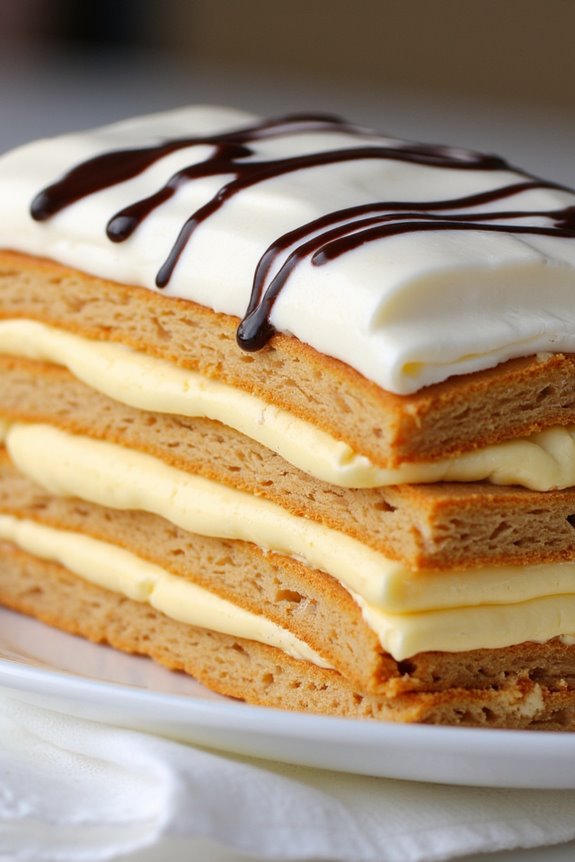
Mille-Feuille, also known as Napoleon Pastry, is a classic French dessert that’s as delightful to the eyes as it’s to the taste buds. This exquisite dessert consists of layers of crispy puff pastry alternating with rich and creamy fillings, typically vanilla pastry cream. Topped with a delicate icing and often adorned with a chocolate drizzle, Mille-Feuille is a festive treat that’s perfect for any holiday celebration, especially Christmas.
Its name, which means “a thousand leaves” in French, refers to the many layers of flaky pastry that create a symphony of textures when you take a bite. The beauty of Mille-Feuille lies in its seemingly complex structure, which is surprisingly achievable with some patience and precision.
This recipe will guide you through creating this elegant dessert for a serving size of 4-6 people. While it does take time to prepare, the end result is a stunning dessert that’s sure to impress your guests. Whether you’re a seasoned baker or a novice, Mille-Feuille is a rewarding project that celebrates the artistry of French patisserie.
Ingredients (Serves 4-6):
- 500g puff pastry
- 2 cups whole milk
- 1 vanilla bean, split and scraped
- 6 egg yolks
- 1/2 cup granulated sugar
- 1/4 cup cornstarch
- 2 tablespoons unsalted butter
- 1 cup heavy cream
- 1/2 cup powdered sugar
- 1/2 teaspoon vanilla extract
- 1/4 cup dark chocolate, melted
Cooking Instructions:
- Prepare the Puff Pastry: Preheat the oven to 400°F (200°C). Roll out the puff pastry on a floured surface to about 1/8-inch thickness. Trim the edges to create a neat rectangle, then cut into three equal parts. Place the pastry on a baking sheet lined with parchment paper. Prick the pastry all over with a fork to prevent it from puffing up unevenly.
- Bake the Puff Pastry: Cover the pastry with another sheet of parchment paper and place a second baking sheet on top to weigh it down. Bake for about 15-20 minutes until golden brown and crisp. Remove the top baking sheet and parchment paper for the final 5 minutes to allow the pastry to crisp up. Set aside to cool.
- Make the Vanilla Pastry Cream: In a saucepan, heat the milk and vanilla bean until just boiling. In a separate bowl, whisk together the egg yolks, granulated sugar, and cornstarch until smooth. Gradually whisk the hot milk into the egg mixture, then return everything to the saucepan. Cook over medium heat, whisking constantly, until the mixture thickens and comes to a boil. Remove from heat, stir in the butter, and let cool completely.
- Assemble the Mille-Feuille: Once the pastry and pastry cream have cooled, whip the heavy cream with the powdered sugar and vanilla extract until stiff peaks form. Fold the whipped cream into the pastry cream to lighten it. Place one puff pastry layer on a serving plate, spread half of the pastry cream evenly over it, and top with another pastry layer. Repeat with the remaining cream and finish with the third pastry layer.
- Decorate the Mille-Feuille: For the icing, mix powdered sugar with a little water to create a smooth glaze. Spread over the top layer of pastry. Drizzle the melted chocolate over the icing in a zigzag pattern and use a toothpick to create a feathered effect. Chill in the refrigerator for at least an hour before serving to allow the layers to set.
Extra Tips:
When preparing Mille-Feuille, it’s essential to maintain the crispiness of the puff pastry. To achieve this, make sure that the pastry is baked thoroughly until it’s golden brown and completely cooled before assembling.
Additionally, to avoid the pastry from becoming soggy, assemble the dessert shortly before serving. If you find the pastry cream too thick, you can adjust by adding a little milk to reach the desired consistency.
Finally, for a more pronounced vanilla flavor, let the vanilla bean steep in the milk longer before using it in the pastry cream. Enjoy your Mille-Feuille as a stunning centerpiece to your holiday dessert table!
Gâteau Opéra (Opera Cake)

Gâteau Opéra, also known as Opera Cake, is a classic French dessert that beautifully marries layers of almond sponge cake, coffee buttercream, and rich chocolate ganache. This elegant and decadent cake is traditionally topped with a glossy chocolate glaze and often features a decorative script of “Opéra” on top.
The cake’s intricate layers and harmonious flavors make it a show-stopping centerpiece for any holiday gathering, bringing a taste of sophisticated French patisserie into your home.
Crafting a Gâteau Opéra requires patience and precision, as each component needs to be prepared and assembled with care. The almond sponge, known as Joconde, provides a delicate yet sturdy base that soaks up the coffee syrup, enhancing the cake’s moistness and flavor. The coffee buttercream adds a smooth, creamy layer that balances the richness of the chocolate ganache, creating a multi-textured delight in every bite.
Although this dessert may seem intimidating to create, following these detailed instructions will guide you to a successful bake that will impress your family and guests this festive season.
Ingredients (serves 4-6):
- Almond Sponge (Joconde):
- 100g ground almonds
- 100g icing sugar
- 30g all-purpose flour
- 3 large eggs
- 3 large egg whites
- 1 tablespoon granulated sugar
- 20g unsalted butter, melted
- Coffee Syrup:
- 100ml water
- 50g granulated sugar
- 2 teaspoons instant coffee granules
- Coffee Buttercream:
- 100g unsalted butter, softened
- 200g icing sugar
- 2 tablespoons brewed coffee, cooled
- Chocolate Ganache:
- 200g dark chocolate, chopped
- 200ml heavy cream
- Chocolate Glaze:
- 100g dark chocolate, finely chopped
- 50ml heavy cream
- 1 tablespoon light corn syrup
Instructions:
- Prepare the Almond Sponge (Joconde):
- Preheat your oven to 220°C (425°F). Line a baking sheet with parchment paper.
- In a mixing bowl, whisk together the ground almonds, icing sugar, and flour. Add the whole eggs one at a time, mixing until smooth.
- In a separate bowl, beat the egg whites until soft peaks form, gradually adding granulated sugar until stiff peaks form. Gently fold the egg whites into the almond mixture, then fold in the melted butter.
- Spread the batter evenly onto the prepared baking sheet. Bake for 5-7 minutes until lightly golden. Cool completely before cutting.
- Make the Coffee Syrup:
- In a small saucepan, combine water, sugar, and coffee granules. Bring to a boil until the sugar dissolves. Let it cool.
- Prepare the Coffee Buttercream:
- In a large bowl, beat the softened butter until creamy. Gradually add icing sugar and mix until smooth. Add the brewed coffee and beat until fully incorporated.
- Prepare the Chocolate Ganache:
- Place the chopped chocolate in a bowl. Heat the cream until just boiling and pour over the chocolate. Let sit for a minute, then stir until smooth. Allow to cool slightly.
- Assemble the Cake:
- Cut the sponge into three equal rectangles. Place one layer on a serving plate and brush generously with coffee syrup.
- Spread half of the coffee buttercream over the syrup-soaked sponge. Add another sponge layer and repeat the syrup and buttercream layering.
- Top with the final sponge layer and brush with syrup. Spread the chocolate ganache evenly over the top and sides of the cake.
- Create the Chocolate Glaze:
- Heat the cream and corn syrup together until just boiling. Pour over the chopped chocolate, wait a minute, then stir until smooth.
- Pour the glaze over the assembled cake, allowing it to drip down the sides for a smooth finish. Chill the cake until the glaze is set.
- Decorate:
- Use any remaining buttercream to pipe “Opéra” or any desired decoration on top of the cake.
Extra Tips:
For the best results, verify all ingredients are at room temperature before beginning. When folding egg whites into the almond mixture, be gentle to maintain the airiness of the batter.
The Joconde should be baked just until set to avoid dryness. Allow the cake to chill thoroughly after assembly to help the layers set, making slicing easier and cleaner. If desired, you can prepare the cake a day in advance, as the flavors tend to develop and improve with time.
Madeleines (Shell-Shaped Cakes)
Madeleines are delightful, small sponge cakes that are famous for their distinctive shell shape. Originating from the Lorraine region in France, these light and buttery treats are perfect for the holiday season, adding a touch of French elegance to your dessert table.
The key to making perfect Madeleines lies in achieving the right texture, which is soft and spongy with a slightly crisp edge. They’re traditionally flavored with lemon zest or vanilla, but you can also experiment with other flavors like almond or orange.
To make Madeleines for 4-6 people, you’ll need to carefully follow the recipe, guaranteeing that you allow the batter to rest before baking. This resting period is vital as it helps develop the signature hump that’s characteristic of these cakes.
When baked to perfection, Madeleines are wonderful both warm and at room temperature. They pair beautifully with tea or coffee and can even be dusted with powdered sugar or dipped in chocolate for an extra festive touch.
Ingredients:
- 1/2 cup (113g) unsalted butter, melted and cooled, plus extra for greasing the pan
- 2/3 cup (133g) granulated sugar
- 1 cup (125g) all-purpose flour
- 2 large eggs
- 1 teaspoon vanilla extract
- Zest of 1 lemon
- 1/2 teaspoon baking powder
- 1/8 teaspoon salt
Instructions:
- Prepare the Madeleine Pan: Begin by generously greasing the madeleine pan with butter to prevent the cakes from sticking. After greasing, lightly dust the pan with flour, shaking off any excess to guarantee an even coating.
- Mix the Ingredients: In a bowl, whisk together the eggs and sugar until the mixture becomes pale and thickens, which should take about 3-5 minutes. Stir in the vanilla extract and lemon zest to add flavor.
- Combine Dry Ingredients: In a separate bowl, sift together the flour, baking powder, and salt. Gradually fold this dry mixture into the egg mixture, being careful not to deflate the batter.
- Add Butter: Slowly pour the melted and cooled butter into the batter, gently folding it in until just combined. Guarantee the butter is fully incorporated for a smooth batter.
- Rest the Batter: Cover the bowl with plastic wrap and refrigerate for at least 1 hour, or up to overnight. This resting period is essential for developing the characteristic hump of the Madeleines.
- Preheat the Oven: When ready to bake, preheat your oven to 375°F (190°C).
- Fill the Pan: Spoon the batter into the prepared madeleine pan, filling each mold about three-quarters full. This will allow the batter to rise properly without overflowing.
- Bake: Bake in the preheated oven for 10-12 minutes, or until the edges are golden brown and the center springs back when lightly touched.
- Cool: Remove the madeleines from the oven and allow them to cool in the pan for a couple of minutes before transferring them to a wire rack to cool completely.
Extra Tips:
For the best results, guarantee your ingredients are at room temperature before beginning, as this helps the batter mix evenly and rise properly.
Additionally, if you don’t have a madeleine pan, mini muffin tins can serve as a substitute, although the iconic shell shape will be absent.
Remember, patience is key; allowing the batter to rest is vital for achieving the perfect texture and hump.
Finally, Madeleines are best enjoyed fresh but can be stored in an airtight container for a few days.