

As the sun shines brighter, I’m all about embracing meals that are as light and refreshing as the season itself. French cuisine has some wonderful options that fit perfectly into this vibe. Think Ratatouille Salad with its burst of colors or the refreshing coolness of Cucumber Soup. These dishes bring the flavors of summer right to your table. Let’s explore these simple and tasty recipes together.
Ratatouille Salad
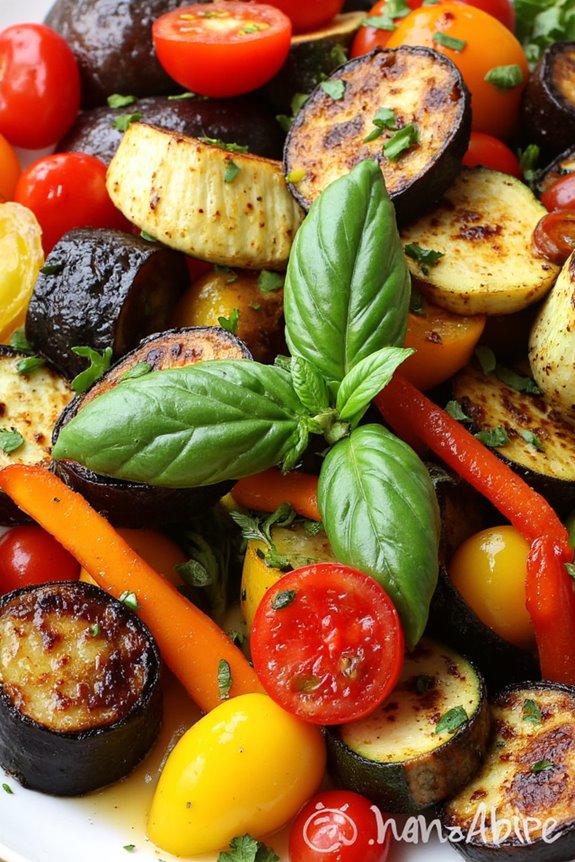
Ratatouille Salad is a delightful summer dish that combines the fresh, vibrant flavors of traditional ratatouille with the crispness of a salad. This dish showcases an array of colorful vegetables, typically including eggplant, zucchini, bell peppers, and tomatoes, which are roasted to bring out their natural sweetness. Tossed with fresh herbs and a light vinaigrette, Ratatouille Salad isn’t only visually appealing but also bursting with flavor, making it a perfect side dish for summer barbecues or a light lunch option.
The beauty of Ratatouille Salad lies in its versatility. You can enjoy it warm or cold, and it pairs wonderfully with grilled meats, crusty bread, or even as a standalone vegetarian meal. The combination of roasted veggies and fresh greens creates a satisfying texture, while the herbs and dressing add a rejuvenating touch. Whether you’re entertaining guests or simply treating yourself, this Ratatouille Salad will surely impress.
Ingredients (Serves 4-6):
- 1 medium eggplant, diced
- 2 medium zucchini, diced
- 1 red bell pepper, diced
- 1 yellow bell pepper, diced
- 1 medium onion, diced
- 2 cups cherry tomatoes, halved
- 3 tablespoons olive oil
- Salt and pepper to taste
- 1 teaspoon dried thyme
- 1 teaspoon dried oregano
- 2 tablespoons fresh basil, chopped
- 2 tablespoons red wine vinegar
- 1 tablespoon Dijon mustard
Cooking Instructions:
- Prepare the Vegetables: Preheat your oven to 400°F (200°C). Begin by washing and dicing the eggplant, zucchini, red and yellow bell peppers, and onion into similar-sized pieces to guarantee even cooking. Halve the cherry tomatoes and set all the vegetables aside.
- Roast the Vegetables: In a large bowl, combine the diced eggplant, zucchini, bell peppers, and onion. Drizzle with 2 tablespoons of olive oil, season with salt, pepper, thyme, and oregano, and toss until the vegetables are evenly coated. Spread the mixture in a single layer on a baking sheet. Roast in the preheated oven for about 25-30 minutes, or until the vegetables are tender and slightly caramelized, stirring halfway through for even cooking.
- Prepare the Dressing: While the vegetables are roasting, whisk together the remaining tablespoon of olive oil, red wine vinegar, Dijon mustard, and a pinch of salt and pepper in a small bowl until well combined. This dressing will enhance the flavors of the roasted vegetables.
- Assemble the Salad: Once the roasted vegetables have cooled slightly, transfer them to a large serving bowl. Add the halved cherry tomatoes and chopped fresh basil. Drizzle the dressing over the top and gently toss the salad to combine all the ingredients thoroughly.
- Serve: The Ratatouille Salad can be served warm, at room temperature, or chilled. If desired, garnish with additional fresh basil before serving for an extra burst of color and flavor.
Extra Tips:
For added texture and flavor, consider including some crumbled feta cheese or toasted pine nuts to your Ratatouille Salad. If you prefer a more pronounced flavor, allow the roasted vegetables to marinate in the dressing for a few hours before serving. This will enhance the taste and guarantee that the dish is even more delicious.
Additionally, feel free to experiment with other summer veggies like squash or even a handful of leafy greens to customize the salad to your liking!
Niçoise Salad
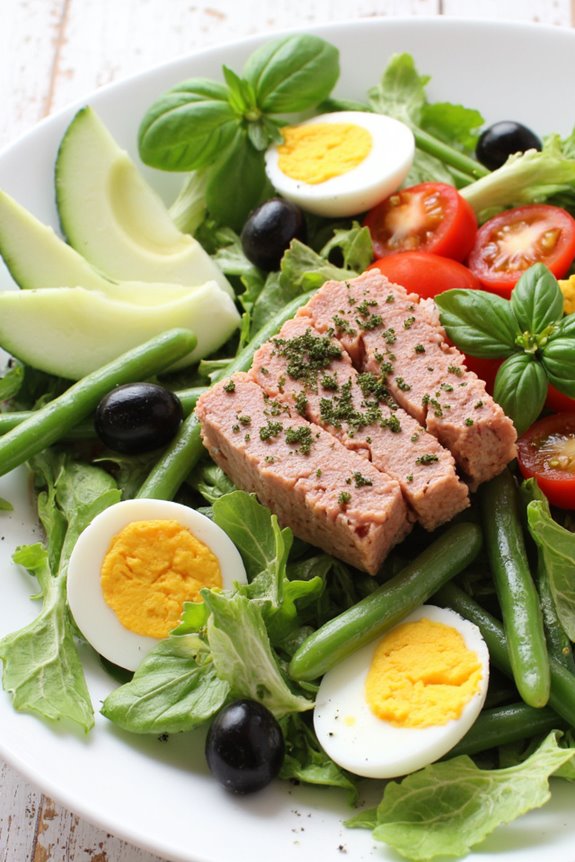
Niçoise Salad is a vibrant and fresh dish that hails from the sunny shores of Nice, France. This salad isn’t only a delight for the eyes with its colorful array of ingredients, but it also embodies the flavors of the Mediterranean. Traditionally, it’s made with a base of fresh greens and topped with a variety of ingredients, including tuna, hard-boiled eggs, olives, and fresh vegetables. This dish is perfect for hot summer days when you want a light yet satisfying meal that can be enjoyed as a main course or a side.
The beauty of the Niçoise Salad lies in its versatility. You can customize it based on your preferences or the ingredients you have on hand. Whether you choose to use fresh or canned tuna, add anchovies, or incorporate seasonal vegetables, the result is always a rejuvenating and hearty salad that captures the essence of French cuisine. Serve it with a drizzle of olive oil and a squeeze of lemon for a truly authentic experience.
Ingredients (Serves 4-6)
- 4 cups mixed salad greens (such as arugula and romaine)
- 1 cup green beans, trimmed
- 2 medium tomatoes, cut into wedges
- 1 medium cucumber, sliced
- 1 cup canned tuna in olive oil, drained and flaked
- 4 hard-boiled eggs, peeled and quartered
- 1/2 cup black olives (preferably Niçoise or Kalamata)
- 1/4 cup red onion, thinly sliced
- 1/4 cup fresh basil leaves, torn
- 1/4 cup extra virgin olive oil
- 2 tablespoons red wine vinegar
- Salt and pepper, to taste
Cooking Instructions
- Prepare the Vegetables: Start by washing and prepping all the fresh vegetables. Trim the green beans and cut the tomatoes into wedges. Slice the cucumber and thinly slice the red onion. Set aside the prepared vegetables in a large bowl.
- Blanch the Green Beans: Bring a pot of salted water to a boil. Add the trimmed green beans and cook for about 3-4 minutes until they’re bright green and tender-crisp. Immediately transfer them to an ice bath to stop the cooking process. Once cooled, drain and set aside.
- Prepare the Hard-Boiled Eggs: If you haven’t already boiled the eggs, place them in a pot of cold water. Bring to a boil and then reduce to a simmer for about 9-12 minutes. Remove the eggs, cool in cold water, then peel and quarter them.
- Assemble the Salad: In a large serving bowl or platter, lay the mixed greens as the base. Arrange the blanched green beans, tomato wedges, cucumber slices, and red onion evenly over the greens. Add the flaked tuna and quartered hard-boiled eggs on top.
- Add Olives and Basil: Scatter the black olives over the salad and sprinkle the torn basil leaves for an aromatic touch.
- Dress the Salad: In a small bowl, whisk together the olive oil, red wine vinegar, salt, and pepper. Drizzle the dressing over the assembled salad just before serving to keep the ingredients fresh and crisp.
Extra Tips
For an added twist, try incorporating seasonal vegetables like bell peppers or radishes, or even adding some cooked potatoes for a heartier version. You can also substitute the tuna for grilled chicken or chickpeas for a vegetarian option.
As with any salad, the key is to use the freshest ingredients possible, so visit your local farmer’s market if you can. Finally, allow the salad to sit for 10-15 minutes after dressing it; this helps the flavors to meld beautifully before serving.
Tarte Provençale

Tarte Provençale is a delightful savory tart that captures the essence of the sun-kissed flavors of the South of France. This dish, often enjoyed as a snack, light lunch, or appetizer, is a perfect showcase for the fresh vegetables and aromatic herbs that are abundant in the Mediterranean region. With a flaky pastry crust holding a flavorful mixture of tomatoes, zucchini, and aromatic herbs, it’s a dish that brings a taste of Provence to your table.
It’s easy to prepare and can be enjoyed warm or at room temperature, making it a versatile choice for summer gatherings.
To create this dish, you’ll need to gather a selection of fresh ingredients that highlight the vibrant flavors of the season. The combination of ripe tomatoes, tender zucchini, and fragrant herbs like thyme and basil will give your Tarte Provençale a deliciously rustic charm.
When baked, the tart develops a golden crust and a savory filling that’s sure to impress your family and friends. Serve it alongside a simple green salad for a complete meal that embodies the joys of summer dining.
Ingredients (Serves 4-6):
- 1 pre-made pie crust (9-inch)
- 2 medium tomatoes, sliced
- 1 medium zucchini, sliced
- 1 small onion, thinly sliced
- 2 cloves garlic, minced
- 3 tablespoons olive oil
- 1 teaspoon dried thyme
- 1 teaspoon dried basil
- Salt and pepper, to taste
- 1 cup grated cheese (such as Gruyère or mozzarella)
- Fresh basil leaves, for garnish (optional)
Cooking Instructions:
- Preheat the Oven: Begin by preheating your oven to 375°F (190°C). This guarantees that your tart will bake evenly and develop a nice golden color.
- Prepare the Pie Crust: Roll out the pre-made pie crust into a 9-inch tart pan. Press it gently into the bottom and up the sides of the pan, trimming any excess dough. Prick the bottom of the crust with a fork to prevent bubbling during baking.
- Sauté the Onions and Garlic: In a skillet over medium heat, add the olive oil. Once hot, add the sliced onions and sauté for about 5 minutes until they become translucent. Add the minced garlic and cook for an additional minute, being careful not to let it burn.
- Layer the Vegetables: Spread the sautéed onions and garlic evenly over the bottom of the pie crust. Layer the sliced tomatoes and zucchini on top, alternating them for a visually appealing presentation.
- Season the Filling: Sprinkle the dried thyme, dried basil, salt, and pepper over the layered vegetables. This will infuse the tart with the delightful herby flavors characteristic of Provence.
- Add Cheese: Finally, evenly sprinkle the grated cheese over the top of the vegetables. The cheese will melt and create a deliciously gooey layer that binds the flavors together.
- Bake the Tart: Place the tart in the preheated oven and bake for 30-35 minutes, or until the crust is golden brown and the cheese is bubbly. Keep an eye on it to confirm it doesn’t over-brown.
- Cool and Serve: Once baked, remove the tart from the oven and allow it to cool for about 10 minutes. Garnish with fresh basil leaves before slicing and serving.
Extra Tips:
For an even more flavorful Tarte Provençale, consider using heirloom tomatoes for their rich taste and vibrant colors. You can also experiment with different vegetables such as bell peppers or eggplant for added variety.
If you prefer a lighter version, opt for a whole wheat pie crust or even a crust made from cauliflower. This tart can be made ahead of time and stored in the fridge, making it perfect for picnics or potlucks. Enjoy the flavors of Provence in every bite!
Shrimp and Avocado Tartine
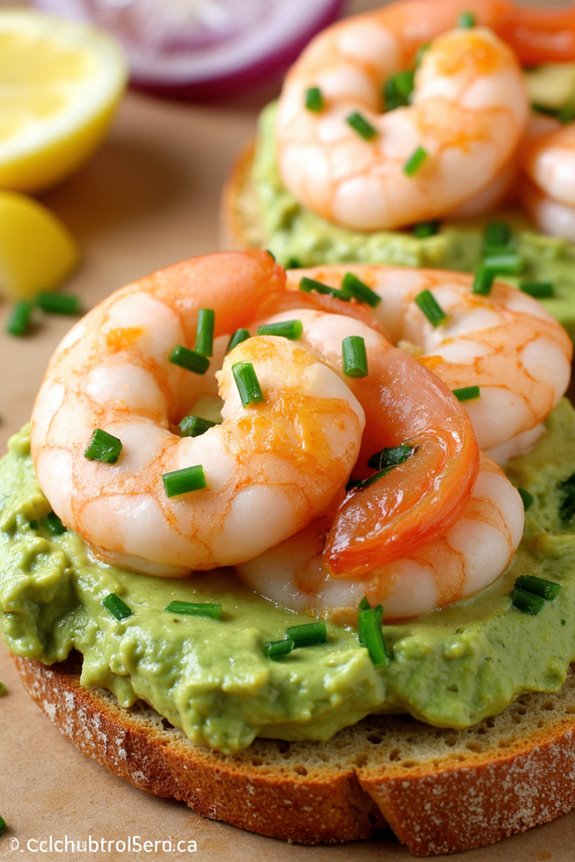
The Shrimp and Avocado Tartine is a quintessential summer dish that captures the essence of French cuisine with its light, fresh flavors and elegant presentation. This open-faced sandwich is perfect for warm weather gatherings, picnics, or even a leisurely brunch. The creamy avocado pairs beautifully with succulent shrimp, while a hint of lemon and fresh herbs adds brightness and depth to the dish.
Served on crusty bread, this tartine isn’t only delicious but also visually appealing, making it a fantastic option for impressing your guests.
To prepare this delightful dish, you’ll want to choose high-quality ingredients that will enhance the overall flavor. Fresh, plump shrimp are vital, so opt for wild-caught if possible. Ripe avocados are essential for that creamy texture, and don’t forget to have some good artisan bread on hand to create the perfect base for your tartine.
Once you have everything ready, this recipe will come together quickly, allowing you to enjoy your time in the kitchen and savor the delicious results.
Ingredients (serves 4-6 people):
- 1 pound large shrimp, peeled and deveined
- 2 ripe avocados
- 1 tablespoon olive oil
- 1 tablespoon lemon juice
- Salt and pepper to taste
- 1 teaspoon Dijon mustard
- 1 tablespoon fresh parsley, chopped
- 1 tablespoon fresh chives, chopped
- 4-6 slices of crusty bread (such as baguette or sourdough)
- Optional: lemon wedges for serving
Cooking Instructions:
- Prepare the Shrimp: In a medium-sized pot, bring salted water to a boil. Once boiling, add the shrimp and cook for 2-3 minutes or until they turn pink and opaque. Be careful not to overcook. Remove from heat, drain, and set aside to cool.
- Make the Avocado Mixture: While the shrimp are cooling, cut the avocados in half, remove the pits, and scoop the flesh into a bowl. Add the lemon juice, salt, pepper, and Dijon mustard. Mash the mixture with a fork until it reaches your desired consistency (smooth or chunky).
- Combine Shrimp and Herbs: Once the shrimp have cooled, chop them into bite-sized pieces. In a separate bowl, combine the shrimp with the chopped parsley and chives. Mix well and season with a little more salt and pepper if needed.
- Toast the Bread: Preheat your oven to 400°F (200°C). Place the slices of bread on a baking sheet and drizzle with olive oil. Toast in the oven for about 5-7 minutes, or until golden brown and crispy.
- Assemble the Tartine: Spread a generous layer of the avocado mixture on each slice of toasted bread. Top with the shrimp mixture, ensuring an even distribution.
- Serve: Arrange the Shrimp and Avocado Tartines on a serving platter. Serve immediately, garnishing with lemon wedges on the side for an extra burst of flavor.
Extra Tips:
To elevate your Shrimp and Avocado Tartine, consider adding a sprinkle of red pepper flakes for a touch of heat or a few slices of radish for crunch. You can also experiment with different herbs such as dill or cilantro to suit your taste preferences.
If you’re making these in advance, keep the avocado mixture separate until just before serving to prevent browning. Enjoy this vibrant dish with a chilled glass of white wine or sparkling water for a revitalizing summer meal!
Chilled Cucumber Soup
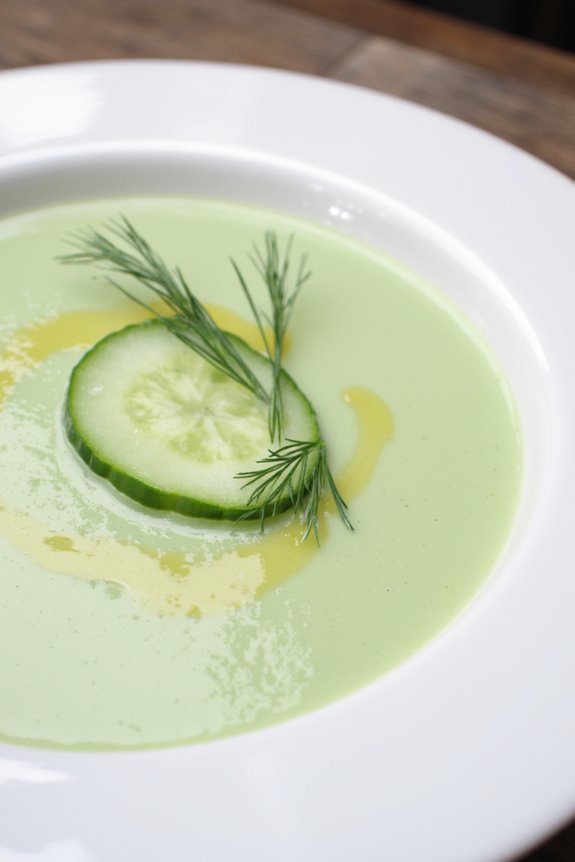
Chilled Cucumber Soup is a revitalizing and light dish that embodies the essence of French summer cuisine. Perfect for hot days, this soup isn’t only easy to prepare but also offers a delightful burst of flavors. The combination of cooling cucumbers, creamy yogurt, and fresh herbs makes it an ideal appetizer or light meal, leaving you feeling rejuvenated and satisfied.
To enhance the flavors, let the soup chill in the refrigerator for at least an hour before serving. This allows the ingredients to meld together beautifully, resulting in a smooth and velvety texture. Serve it in chilled bowls, garnished with a sprig of fresh dill or mint for an extra touch of elegance. Paired with crusty bread or a light salad, Chilled Cucumber Soup is the perfect dish for alfresco dining on warm summer evenings.
Ingredients (Serves 4-6):
- 4 medium cucumbers, peeled and diced
- 1 cup plain Greek yogurt
- 1 cup vegetable broth (chilled)
- 2 tablespoons fresh lemon juice
- 1 small onion, finely chopped
- 2 cloves garlic, minced
- 1/4 cup fresh dill, chopped (plus extra for garnish)
- Salt and pepper to taste
- Olive oil for drizzling
Cooking Instructions:
- Prepare the Cucumbers: Start by peeling and dicing the cucumbers. Reserve a few slices for garnish later. The cucumbers should be fresh and firm to guarantee the best flavor and texture in the soup.
- Blend the Base: In a blender, combine the diced cucumbers, Greek yogurt, chilled vegetable broth, lemon juice, finely chopped onion, minced garlic, and fresh dill. Blend on high until the mixture is completely smooth and creamy. This step is essential as it creates the desired consistency of the soup.
- Season the Soup: Taste the blended mixture and season it with salt and pepper according to your preference. Blend again briefly to incorporate the seasoning. Adjust the flavors as necessary, depending on your taste.
- Chill the Soup: Pour the blended soup into a large bowl or container and cover it with plastic wrap or a lid. Place it in the refrigerator and let it chill for at least one hour. This chilling time will enhance the flavors and provide a revitalizing experience when served.
- Serve: Once chilled, give the soup a gentle stir before serving. Ladle the soup into individual bowls, and garnish each serving with a drizzle of olive oil, a slice of reserved cucumber, and a sprinkle of fresh dill.
Extra Tips:
For an added twist, consider incorporating other fresh herbs such as mint or basil for a unique flavor profile. You can also experiment with the texture by adding diced avocados or toasted nuts for a crunchy contrast.
If you prefer a thinner soup, adjust the consistency by adding more vegetable broth until you reach your desired thickness. Enjoy this vibrant dish as a starter or a light meal during the warm summer months!
Grilled Vegetable Platter
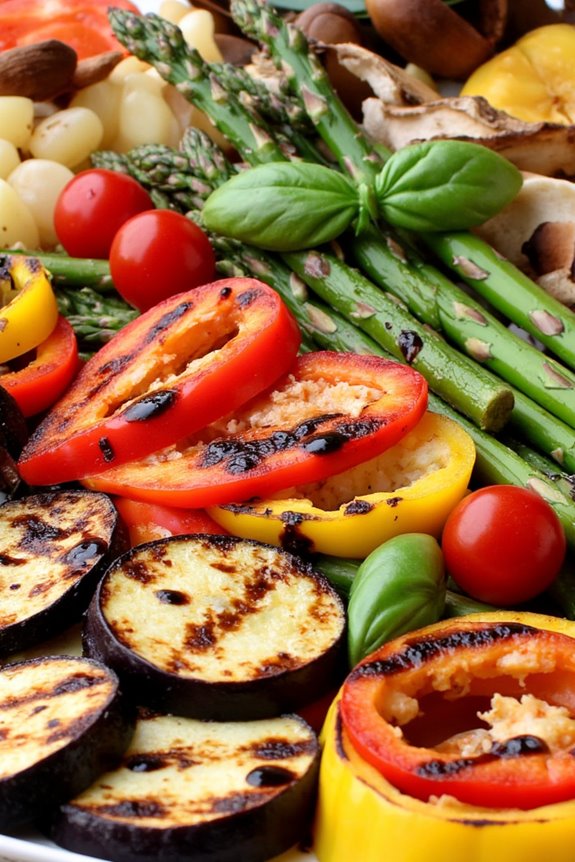
Grilled vegetable platters are a quintessential part of French summer cuisine, showcasing the vibrant produce of the season. This dish isn’t only a feast for the eyes but also a celebration of flavors, as the vegetables caramelize beautifully over the grill, intensifying their natural sweetness. Perfect for outdoor gatherings or a simple family dinner, this platter can be served warm, at room temperature, or even cold, making it a versatile addition to any meal.
To create a visually stunning and delicious grilled vegetable platter, select a variety of seasonal vegetables. Zucchini, bell peppers, eggplant, and asparagus are classic choices that provide a rainbow of colors and textures. Tossed in olive oil and a sprinkle of herbs, these vegetables take on a delightful smoky flavor that pairs wonderfully with crusty French bread or as a side to grilled meats.
Ingredients (Serves 4-6):
- 2 medium zucchini, sliced into rounds
- 2 bell peppers (red and yellow), cut into strips
- 1 medium eggplant, sliced into rounds
- 1 bunch of asparagus, trimmed
- 1 cup cherry tomatoes
- 3 tablespoons olive oil
- 2 teaspoons dried herbs (such as thyme or rosemary)
- Salt and pepper, to taste
- Fresh basil leaves, for garnish (optional)
- Balsamic glaze, for drizzling (optional)
Cooking Instructions:
- Prepare the Vegetables: Begin by washing and slicing all the vegetables. Cut the zucchini and eggplant into rounds, the bell peppers into strips, and trim the asparagus. Keep the cherry tomatoes whole. This preparation guarantees that the vegetables cook evenly when grilled.
- Marinate the Vegetables: In a large mixing bowl, combine the sliced zucchini, bell peppers, eggplant, asparagus, and cherry tomatoes. Drizzle with olive oil and sprinkle the dried herbs, salt, and pepper. Toss everything well to confirm the vegetables are evenly coated. Let them marinate for at least 15 minutes to absorb the flavors.
- Preheat the Grill: While the vegetables are marinating, preheat your grill to medium-high heat. This guarantees a good sear on the vegetables, enhancing their flavor and texture. If using a grill pan, heat it on the stove until it’s hot.
- Grill the Vegetables: Once the grill is ready, place the vegetables in a single layer on the grill grates or grill pan. Grill each type of vegetable for about 3-5 minutes per side, or until they’re tender and have nice grill marks. Be sure to keep an eye on the cherry tomatoes, as they’ll cook faster.
- Assemble the Platter: Once all the vegetables are grilled to perfection, remove them from the grill and arrange them on a large serving platter. For a beautiful presentation, layer them in a circular pattern or in rows, mixing colors and shapes.
- Garnish and Serve: Finish off the platter by drizzling with balsamic glaze, if desired, and garnishing with fresh basil leaves. Serve warm, at room temperature, or chilled.
Extra Tips: For an even more flavorful grilled vegetable platter, consider adding a splash of lemon juice or a sprinkle of feta cheese before serving. You can also experiment with different vegetables based on what’s in season or what you have on hand. Additionally, if you prefer a smoky flavor, try adding a few wood chips to your grill or opting for a charcoal grill instead of gas. Enjoy your summer cooking!
French Potato Salad
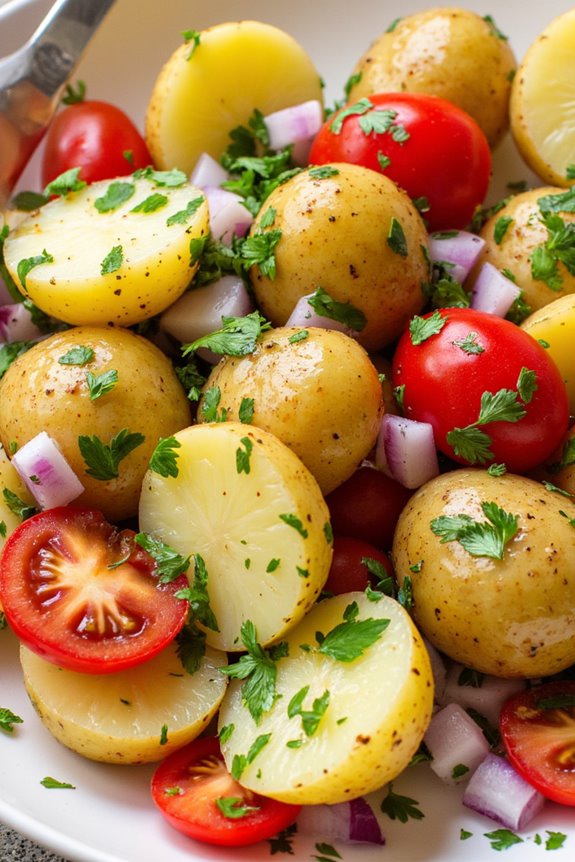
French Potato Salad, or “Salade de Pommes de Terre,” is a delightful dish that highlights the natural flavors of fresh ingredients. This classic recipe is perfect for summer gatherings, picnics, or as a side dish for grilled meats. Unlike some potato salads that are heavy on mayonnaise, this version uses a light vinaigrette, allowing the potatoes to shine while still being wonderfully flavorful. The addition of herbs and vegetables enhances the dish, making it not only tasty but also visually appealing.
To create a truly authentic French Potato Salad, it’s essential to choose the right type of potatoes. Waxy potatoes, such as fingerlings or new potatoes, work best as they hold their shape well when cooked. The dressing can be adjusted to taste, and adding seasonal ingredients can make this salad even more special. Serve it chilled or at room temperature, and enjoy the invigorating flavors that evoke the essence of a sunny French summer.
Ingredients (Serves 4-6):
- 2 pounds waxy potatoes (like fingerling or new potatoes)
- 1/4 cup red wine vinegar
- 1/2 cup extra virgin olive oil
- 1 teaspoon Dijon mustard
- 1 small red onion, finely diced
- 1 cup cherry tomatoes, halved
- 1/4 cup fresh parsley, chopped
- 1/4 cup fresh chives, chopped
- Salt and pepper to taste
Cooking Instructions:
- Prepare the Potatoes: Begin by washing the potatoes thoroughly to remove any dirt. Place them in a large pot and cover with cold water. Add a generous pinch of salt to the water. Bring the pot to a boil over medium-high heat, then reduce to a simmer. Cook the potatoes until they’re fork-tender, which should take about 15-20 minutes.
- Drain and Cool: Once the potatoes are cooked, carefully drain them in a colander. Allow them to cool slightly, then cut them into halves or quarters depending on their size. If using smaller potatoes, leaving them whole is perfectly fine. Set the potatoes aside to cool completely.
- Make the Dressing: In a separate bowl, combine the red wine vinegar, Dijon mustard, salt, and pepper. Slowly whisk in the extra virgin olive oil until the dressing is well-emulsified. Taste and adjust seasoning if necessary.
- Combine Ingredients: In a large mixing bowl, combine the cooled potatoes, diced red onion, halved cherry tomatoes, chopped parsley, and chives. Pour the dressing over the salad and gently toss to coat everything evenly. Be careful not to mash the potatoes while mixing.
- Chill and Serve: Cover the salad with plastic wrap and refrigerate for at least 30 minutes to allow the flavors to meld. Serve chilled or at room temperature, garnished with additional herbs if desired.
Extra Tips: When making French Potato Salad, feel free to customize the ingredients based on what you have available. You can add ingredients like olives, capers, or even diced bell peppers for extra flavor and texture.
For an even richer flavor, let the salad sit for a few hours or overnight in the fridge. This allows the potatoes to absorb the dressing fully, resulting in a more harmonious taste. Always taste before serving, as a final sprinkle of salt or pepper can make a big difference!
Summer Berry Clafoutis

Summer Berry Clafoutis is a delightful French dessert that showcases the vibrant flavors of seasonal berries. Traditionally made with cherries, this version embraces a medley of mixed summer berries such as strawberries, blueberries, raspberries, and blackberries, creating a colorful and delicious treat.
The custard-like batter envelops the fruit, resulting in a dish that’s both light and satisfying, perfect for warm weather gatherings or a casual family dinner.
Making Summer Berry Clafoutis is a straightforward process that combines simple ingredients to create a stunning dessert. The clafoutis can be served warm or at room temperature, making it an excellent make-ahead option for entertaining.
Dust it with powdered sugar before serving for an elegant touch, and enjoy the harmony of flavors that this classic French dish brings to your summer table.
Ingredients (serving size: 4-6 people)
- 1 cup mixed summer berries (strawberries, blueberries, raspberries, blackberries)
- 3 large eggs
- 1 cup whole milk
- 1/2 cup granulated sugar
- 1 teaspoon vanilla extract
- 1/4 teaspoon salt
- 1/2 cup all-purpose flour
- 2 tablespoons unsalted butter (melted)
- Powdered sugar (for dusting)
Cooking Instructions
1. Prepare the baking dish**: Preheat your oven to 350°F (175°C). Next, lightly grease** a 9-inch round pie dish or an oven-safe skillet with butter. This guarantees that the clafoutis doesn’t stick to the dish and makes for easier serving.
2. Mix the batter: In a mixing bowl, whisk together the eggs, milk, granulated sugar, vanilla extract, and salt until well combined. Gradually sift in the flour, whisking continuously to avoid lumps.
Then, fold in the melted butter until the batter is smooth.
3. Arrange the berries: Evenly distribute the mixed summer berries in the bottom of the prepared baking dish. The variety of colors and textures will create a visually appealing dessert.
4. Pour the batter: Carefully pour the batter over the arranged berries, making sure they’re submerged in the mixture. The batter will rise around the fruit as it bakes, creating a lovely custard-like texture.
5. Bake the clafoutis: Place the baking dish in the preheated oven and bake for 35-40 minutes or until the clafoutis is puffed and lightly golden on top. A toothpick inserted into the center should come out clean.
6. Cool and serve: Once baked, remove the clafoutis from the oven and allow it to cool for a few minutes. Dust with powdered sugar just before serving for a touch of sweetness and visual appeal.
Extra Tips
For a more intense flavor, consider adding a splash of almond extract along with the vanilla or even a pinch of cinnamon to the batter.
You can also experiment with different combinations of berries based on what’s in season or available. If you’re looking for a gluten-free option, substituting the all-purpose flour with almond flour can yield a delightful twist on the traditional clafoutis.
Enjoy your Summer Berry Clafoutis with a scoop of vanilla ice cream or a dollop of whipped cream for an added indulgence!
Goat Cheese and Herb Stuffed Tomatoes
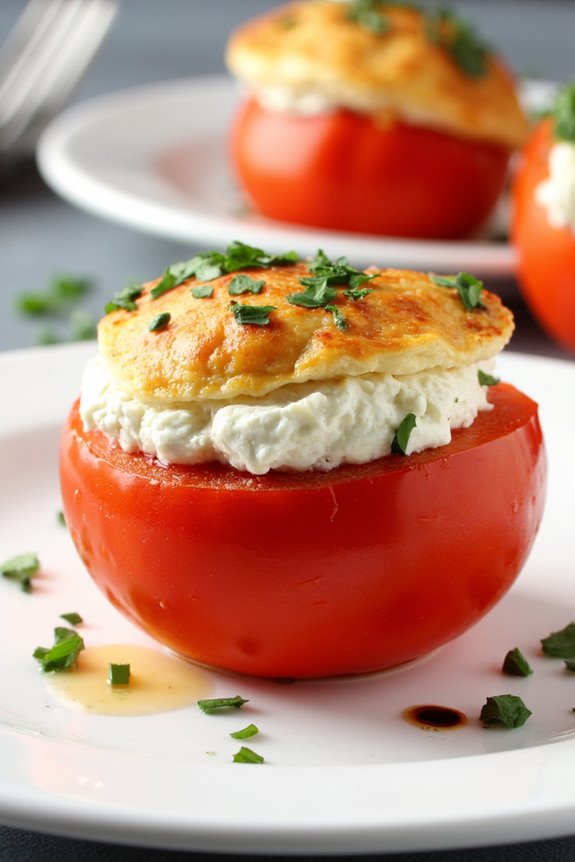
Goat Cheese and Herb Stuffed Tomatoes are a delightful dish perfect for summer gatherings, picnics, or a light dinner. The combination of sweet, ripe tomatoes with creamy goat cheese and fresh herbs creates a flavor explosion that’s both invigorating and indulgent.
This dish showcases the vibrant flavors of summer produce, making it a quintessential French recipe that’s sure to impress your guests. Preparing these stuffed tomatoes is quite simple, and the result is a beautiful, colorful plate that’s just as pleasing to the eye as it’s to the palate.
With a handful of ingredients and minimal cooking time, you can create a dish that highlights the natural sweetness of the tomatoes while elevating them with rich, tangy cheese and fragrant herbs. Whether served warm or at room temperature, these stuffed tomatoes are a versatile addition to any summer meal.
Ingredients (serving size: 4-6 people)
- 6 medium ripe tomatoes
- 1 cup goat cheese, softened
- 1/4 cup fresh basil, finely chopped
- 1/4 cup fresh parsley, finely chopped
- 2 tablespoons fresh chives, finely chopped
- 1 tablespoon olive oil
- Salt and pepper to taste
- Balsamic glaze (for drizzling, optional)
Cooking Instructions
1. Preheat the oven: Begin by preheating your oven to 375°F (190°C). This guarantees that your stuffed tomatoes will cook evenly and develop a lovely golden color.
2. Prepare the tomatoes: Rinse the tomatoes under cool water. Cut the tops off each tomato and carefully scoop out the insides using a small spoon or melon baller, creating a hollow shell. Be careful not to puncture the sides of the tomatoes.
Set the hollowed tomatoes upside down on a paper towel to drain excess moisture.
3. Make the filling: In a mixing bowl, combine the softened goat cheese, chopped basil, parsley, chives, olive oil, salt, and pepper. Mix well until all ingredients are evenly incorporated.
The mixture should be creamy and spreadable.
4. Stuff the tomatoes: Take the hollowed tomatoes and fill each one generously with the goat cheese mixture. Press down slightly to guarantee the filling is compact but be careful not to overfill, as they may spill over during baking.
5. Arrange and bake: Place the stuffed tomatoes upright in a baking dish. If desired, drizzle with a little extra olive oil and season with salt and pepper.
Bake in the preheated oven for about 20-25 minutes, or until the tomatoes are tender and the tops are slightly golden.
6. Serve: Remove the tomatoes from the oven and let them cool for a few minutes. If using, drizzle with balsamic glaze before serving.
These stuffed tomatoes can be enjoyed warm or at room temperature.
Extra Tips
For an added burst of flavor, consider mixing in other herbs like thyme or oregano to the goat cheese filling. You can also experiment with different types of cheese, such as feta or ricotta, for a unique twist.
If you have leftovers, they can be stored in the refrigerator for a couple of days and enjoyed as a tasty snack or light lunch. Just reheat them gently in the oven before serving to retain their deliciousness.
Lemon and Lavender Sorbet

As summer unfolds, there’s nothing quite as invigorating as a scoop of sorbet to beat the heat. Lemon and Lavender Sorbet combines the zesty brightness of lemons with the delicate floral notes of lavender, creating a delightful dessert that’s both energizing and calming.
This frozen treat is perfect for hot days, outdoor gatherings, or as a palate cleanser between courses at a dinner party. Plus, it’s simple to make and requires minimal ingredients, making it a great option for those new to dessert-making.
This sorbet not only tantalizes your taste buds but also adds an elegant touch to any summer occasion. The infusion of lavender offers a unique twist to the classic lemon sorbet, elevating it to a gourmet dessert that will impress your guests.
With just a few steps and a bit of patience while freezing, you can whip up this exquisite treat that captures the essence of summer in every bite.
Ingredients (Serves 4-6):
- 1 cup fresh lemon juice (about 4-5 lemons)
- 1 cup granulated sugar
- 2 cups water
- 2 tablespoons dried culinary lavender
- Zest of 2 lemons
- Pinch of salt
Cooking Instructions:
1. Prepare the Lavender Infusion****: In a small saucepan, combine 1 cup of water and the dried lavender. Bring the mixture to a gentle simmer over medium heat and let it steep for about 10-15 minutes. This will allow the lavender to release its aromatic flavor.
Once steeped, remove the saucepan from the heat and strain the liquid through a fine-mesh sieve into a bowl, discarding the lavender flowers.
2. Make the Lemon Syrup: In the same saucepan, combine the strained lavender infusion, 1 cup of sugar, the remaining cup of water, lemon juice, lemon zest, and a pinch of salt. Heat over medium heat, stirring gently until the sugar has completely dissolved.
Allow the mixture to cool to room temperature.
3. Chill the Mixture: Once the lemon syrup is cool, cover it and place it in the refrigerator for at least an hour. This step is essential as it enhances the flavors and guarantees that the sorbet mixture is cold before it goes into the freezer.
4. Freeze the Sorbet: Pour the chilled mixture into an ice cream maker and churn according to the manufacturer’s instructions until it reaches a soft-serve consistency. This typically takes about 20-25 minutes.
If you don’t have an ice cream maker, you can pour the mixture into a shallow dish and place it in the freezer, stirring every 30 minutes until it’s firm and fluffy (about 3-4 hours).
5. Serve: Once the sorbet is fully frozen, scoop it into bowls or cones and enjoy! For an extra touch, garnish with a sprig of fresh lavender or a twist of lemon zest.
Extra Tips:
For the best flavor, use fresh lemons and high-quality culinary lavender, as this will greatly enhance the overall taste of your sorbet.
If you prefer a sweeter sorbet, feel free to adjust the amount of sugar to your liking. Additionally, if you don’t have an ice cream maker, the manual stirring method works well, but make sure to stir vigorously to break up any ice crystals that may form.
Enjoy your homemade Lemon and Lavender Sorbet as a revitalizing end to any summer meal!