

There’s nothing quite like starting the day with a touch of Parisian charm. The aroma of freshly baked croissants filling the kitchen is pure bliss. Picture the delicate crunch of a baguette with creamy butter and sweet jam. Every bite feels indulgent yet beautifully simple. Ready to bring a little French flair to your mornings?
Croissants

Croissants are the epitome of a classic French breakfast, known for their flaky, buttery layers and golden-brown exterior. Originating from Austria, the croissant became a staple in French patisseries and has since become synonymous with French breakfast culture.
Making croissants at home can be a rewarding experience, and while the process requires patience and precision, the result is a batch of warm, fresh croissants that are perfect to enjoy with coffee or tea.
The key to a successful croissant is in the technique of layering butter within the dough through a process called lamination. This involves rolling and folding the dough multiple times to create thin layers of butter and dough, which puff up and separate as they bake.
This guide will walk you through the process of making croissants from scratch, including the ingredients needed to serve 4-6 people, step-by-step instructions, and additional tips to guarantee your croissants are as delicious as those found in a French boulangerie.
Ingredients for Serving Size 4-6:
- 500g all-purpose flour
- 60g sugar
- 10g salt
- 10g active dry yeast
- 300ml warm milk
- 250g unsalted butter, cold
- 1 egg (for egg wash)
Cooking Instructions:
1. Prepare the Dough: In a large mixing bowl, combine the flour, sugar, salt, and yeast. Gradually add the warm milk, mixing until a dough forms. Knead the dough on a lightly floured surface for about 5-7 minutes until it’s smooth and elastic.
Shape the dough into a rectangle, wrap it in plastic wrap, and refrigerate for at least 1 hour.
2. Prepare the Butter Layer: Place the cold butter between two sheets of parchment paper and pound it with a rolling pin to form a 20cm square. Refrigerate the butter until firm but pliable.
3. Laminate the Dough: Roll the chilled dough into a 40cm x 20cm rectangle. Place the butter in the center of the dough rectangle and fold the dough over the butter, sealing the edges.
Roll the dough into a 60cm x 20cm rectangle. Fold the dough into thirds, like a letter, and refrigerate for 30 minutes. Repeat the rolling and folding process two more times, chilling the dough between each fold.
4. Shape the Croissants: Roll the laminated dough into a 60cm x 30cm rectangle. Cut the dough into triangles (approximately 12cm wide at the base).
Starting from the base, roll each triangle towards the tip to form a crescent shape. Place the croissants on a baking sheet lined with parchment paper.
5. Proof the Croissants: Cover the croissants with a kitchen towel and let them rise in a warm place for about 1-2 hours, or until doubled in size.
6. Bake the Croissants: Preheat the oven to 200°C (400°F). Brush the croissants with beaten egg to give them a glossy finish.
Bake for 15-20 minutes, or until golden brown and puffed. Allow them to cool slightly on a wire rack before serving.
Extra Tips:
For best results, make sure that your butter is cold but pliable to achieve the desired flaky texture. If the butter starts to melt during the lamination process, refrigerate the dough to keep it firm.
Additionally, control the temperature and humidity in your kitchen, as warm conditions can cause the butter to melt, while excessively cold environments can make the dough difficult to roll.
Finally, practice patience with the proofing time, as this allows the dough to develop the perfect airy layers characteristic of a well-made croissant.
Pain Au Chocolat

Pain Au Chocolat, often referred to as “chocolate croissants,” is a delectable treat that instantly transports you to a quaint Parisian café. This classic French pastry is made from layers of buttery, flaky puff pastry wrapped around rich, dark chocolate. While it might seem intimidating to make at home, with the right ingredients and techniques, you can recreate this delightful breakfast pastry in your own kitchen.
Whether you’re looking to impress guests or simply indulge yourself, homemade Pain Au Chocolat is a rewarding culinary endeavor.
The secret to an authentic Pain Au Chocolat lies in the quality of the ingredients and the technique. The pastry dough, known as détrempe, is a basic yeast dough that’s repeatedly folded and rolled out with butter to create the characteristic flaky layers. The chocolate is typically a dark chocolate baton, but you can substitute it with your favorite chocolate bars.
Although it requires patience and precision, the process of making Pain Au Chocolat can be a meditative experience, culminating in a warm, golden-brown pastry that’s perfect for breakfast or brunch.
Ingredients for 4-6 servings:
- 2 1/4 cups all-purpose flour
- 1 packet (2 1/4 teaspoons) active dry yeast
- 1/4 cup sugar
- 1 teaspoon salt
- 1 cup unsalted butter, chilled and cut into small cubes
- 3/4 cup warm milk (110°F / 45°C)
- 1 large egg
- 6 ounces dark chocolate bars or batons
- 1 tablespoon milk (for egg wash)
- 1 egg (for egg wash)
Instructions:
- Prepare the Dough:
- In a large mixing bowl, combine the flour, sugar, and salt. In a separate small bowl, dissolve the yeast in the warm milk and let it sit for about 5 minutes until frothy.
- Add the yeast mixture to the flour mixture and combine until it forms a sticky dough. Knead the dough on a lightly floured surface for about 5 minutes until smooth. Wrap in plastic wrap and refrigerate for at least 2 hours or overnight.
- Prepare the Butter Block:
- Place the chilled butter cubes between two sheets of parchment paper. Using a rolling pin, pound and roll the butter into a rectangle about 1/2-inch thick. Chill the butter block while the dough is resting.
- Laminate the Dough:
- Roll out the chilled dough on a floured surface into a large rectangle. Place the cold butter block in the center and fold the edges of the dough over the butter to encase it completely.
- Roll the dough into a long rectangle, then fold it into thirds like a letter. This is your first turn. Wrap in plastic and chill for 30 minutes. Repeat the rolling and folding process two more times, chilling for 30 minutes between each turn.
- Shape the Pastries:
- Roll the laminated dough into a large rectangle, about 1/4-inch thick. Cut into smaller rectangles, approximately 4×6 inches.
- Place a piece of chocolate at one end of each rectangle and roll the dough around the chocolate, sealing the edges gently.
- Proof and Bake:
- Place the rolled pastries on a baking sheet lined with parchment paper, seam side down. Cover with a clean kitchen towel and let them rise for about 1-2 hours until doubled in size.
- Preheat your oven to 400°F (200°C). In a small bowl, whisk together the egg and tablespoon of milk for the egg wash. Brush the tops of the pastries with the egg wash.
- Bake for 15-20 minutes until golden brown and puffed. Allow to cool slightly before serving.
Extra Tips:
To guarantee the best results, keep the dough and butter as cold as possible throughout the process to achieve the perfect flaky layers. If your kitchen is warm, consider placing the dough and butter back in the refrigerator between steps to prevent the butter from melting into the dough.
When rolling out the dough, use gentle but firm pressure to maintain even layers. Finally, don’t rush the proofing stage; allowing the pastries to rise properly will guarantee a light, airy texture once baked.
Enjoy your freshly baked Pain Au Chocolat with a hot cup of coffee or tea for an authentic French breakfast experience.
Baguette With Butter and Jam
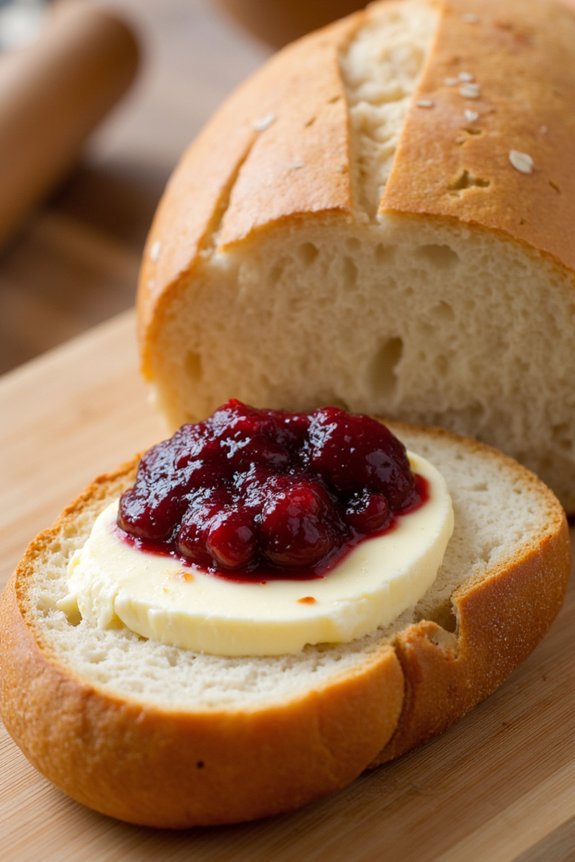
Baguette With Butter and Jam is a quintessential French breakfast staple that’s both simple and satisfying. This classic dish relies on quality ingredients to shine, emphasizing the perfect balance of crusty baguette, creamy butter, and sweet jam. The baguette’s chewy interior and crisp crust provide the perfect base for a generous spread of butter, which melts slightly when applied to the warm bread. Topped with a dollop of your favorite jam, this dish showcases the harmony of sweet and savory flavors, making it a beloved choice for a leisurely breakfast or brunch.
To prepare Baguette With Butter and Jam for a group of 4-6 people, it’s crucial to have fresh French baguettes, high-quality unsalted butter, and a selection of jams. A good baguette will have a golden brown crust that crackles when you slice it and a soft, airy interior. The butter should be at room temperature to guarantee it spreads easily over the bread, and the jams chosen should complement the mild sweetness of the butter without overpowering it. Popular jam choices include strawberry, apricot, or raspberry, but feel free to explore different varieties to suit your taste.
Ingredients (Serves 4-6)
- 2 fresh French baguettes
- 1 cup unsalted butter, at room temperature
- 1 cup of assorted jams (strawberry, apricot, raspberry, etc.)
Cooking Instructions
- Preheat the Oven: Preheat your oven to 350°F (175°C). This will warm the baguettes slightly, enhancing their flavor and texture.
- Warm the Baguettes: Place the baguettes directly on the oven rack and warm them for about 5-7 minutes. This will make the crust crisp and the inside soft and chewy.
- Prepare the Butter: While the baguettes are warming, verify the butter is at room temperature. If it’s still too firm, cut it into small pieces and allow it to soften more quickly.
- Slice the Baguettes: Remove the baguettes from the oven and let them cool slightly. Using a serrated knife, slice each baguette diagonally into pieces about 1-inch thick. Arrange the slices on a serving platter.
- Serve with Butter and Jam: Spread a generous amount of butter on each slice, allowing it to melt slightly. Top with your choice of jam, spreading it over the butter. Serve immediately while the bread is still warm.
Extra Tips
To elevate this simple dish, consider using artisanal or homemade jams to bring unique flavors to your breakfast table. Additionally, if you prefer a more rustic presentation, serve the butter in a small dish and allow guests to butter their bread to taste.
For an added touch, sprinkle a pinch of fleur de sel on the butter before adding the jam for a delightful contrast of flavors. Remember, the quality of the ingredients is key, so choose the freshest baguettes and the best quality butter and jams you can find.
Brioche
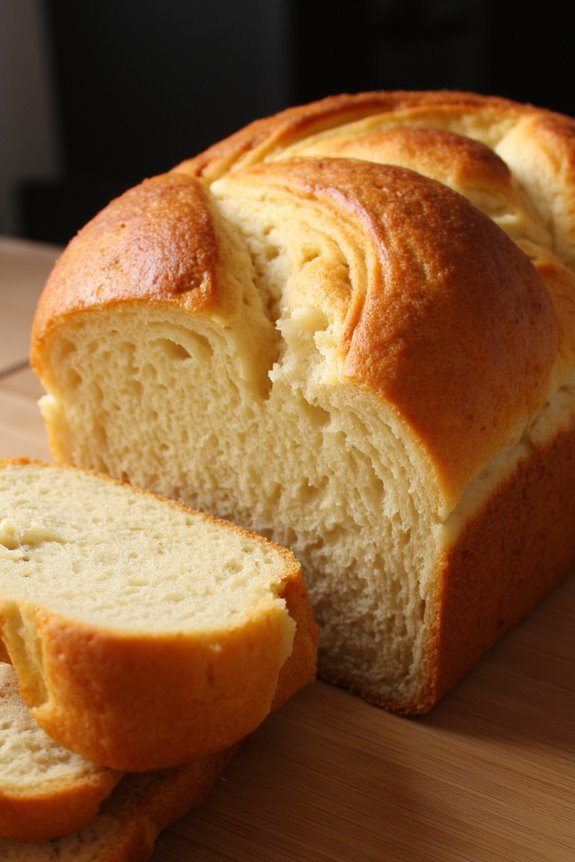
Brioche is a rich and buttery bread that holds a special place in the domain of French breakfast delicacies. Known for its soft, tender crumb and golden, flaky crust, brioche is versatile enough to be enjoyed on its own, with a simple spread of jam or butter, or as a base for more complex dishes such as French toast or bread pudding. This classic French bread is enriched with eggs and butter, which gives it its unique flavor and texture that can elevate any breakfast spread.
Making brioche at home requires a bit of patience and precision, but the results are well worth the effort. The dough needs time to rise and develop its characteristic airy texture, but most of the preparation time is hands-off, allowing you to enjoy the process without feeling rushed. This recipe will guide you through creating a delicious brioche loaf that serves 4-6 people, perfect for a luxurious breakfast or brunch.
Ingredients (for 4-6 servings):
- 4 cups all-purpose flour
- 1/4 cup granulated sugar
- 2 teaspoons salt
- 1 tablespoon active dry yeast
- 1/2 cup warm whole milk (about 110°F or 43°C)
- 5 large eggs, room temperature
- 1 cup unsalted butter, softened and cut into pieces
- 1 egg yolk (for egg wash)
- 1 tablespoon milk (for egg wash)
Instructions:
- Prepare the Yeast: In a small bowl, dissolve the active dry yeast in the warm milk. Stir gently and let it sit for about 5 minutes until it becomes foamy. This indicates that the yeast is active and ready to use.
- Mix the Dry Ingredients: In a large mixing bowl, combine the all-purpose flour, granulated sugar, and salt. Stir well to confirm the ingredients are evenly distributed.
- Combine Wet and Dry Ingredients: Create a well in the center of the dry ingredients and pour in the yeast mixture along with the eggs. Using a wooden spoon or the paddle attachment of a stand mixer, mix until a rough dough forms.
- Add the Butter: Gradually add the softened butter, a few pieces at a time, mixing well after each addition. Continue to knead the dough for about 10 minutes, either by hand or using a stand mixer with the dough hook attachment. The dough should become smooth and elastic, though it will remain slightly sticky.
- First Rise: Transfer the dough to a lightly greased bowl, cover it with a clean kitchen towel or plastic wrap, and let it rise in a warm place for about 1.5 to 2 hours, or until doubled in size.
- Shape the Brioche: Gently deflate the risen dough and turn it out onto a lightly floured surface. Divide the dough into equal portions and shape each into a ball. Place the shaped dough balls into a greased loaf pan or arrange them on a baking sheet for individual rolls.
- Second Rise: Cover the shaped brioche with a kitchen towel and let it rise again for about 45 minutes to 1 hour, until they’re puffed and nearly doubled in size.
- Preheat the Oven: While the dough is undergoing its second rise, preheat your oven to 375°F (190°C).
- Egg Wash and Bake: In a small bowl, whisk together the egg yolk and milk to create an egg wash. Gently brush the tops of the brioche with the egg wash for a shiny, golden crust. Bake in the preheated oven for 25-30 minutes, or until the brioche is golden brown and sounds hollow when tapped on the bottom.
- Cool and Serve: Allow the brioche to cool slightly on a wire rack before serving. Enjoy it warm or at room temperature with your favorite breakfast accompaniments.
Extra Tips: When making brioche, it’s important to use room-temperature ingredients to confirm the dough mixes well and rises properly. If your kitchen is cool, you can create a warm environment for rising by placing the covered dough inside an oven with just the light on.
Additionally, if you find the dough too sticky to handle, dust your hands and work surface with a little flour, but be cautious not to add too much, as this can alter the texture of the bread. Brioche can be stored in an airtight container for a few days or frozen for longer storage.
Madeleines
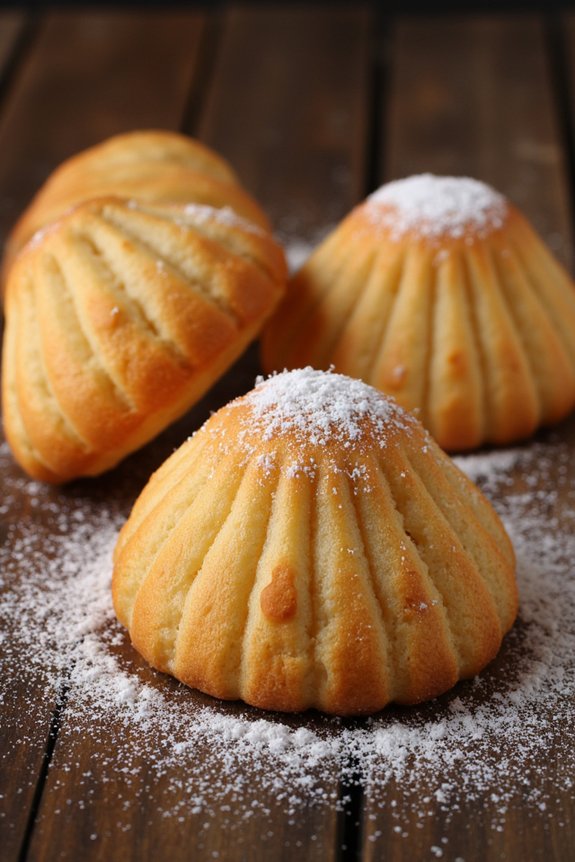
Madeleines are a quintessential French pastry that’s perfect for breakfast or a delightful afternoon snack. These small, shell-shaped sponge cakes are known for their light, airy texture and delicate flavor. Originating from the Lorraine region of France, Madeleines have become a beloved treat worldwide, often enjoyed with a cup of tea or coffee. The secret to their unique shape and texture lies in the special Madeleines pan, which gives them their characteristic ridges and hump.
To achieve the perfect Madeleines, the batter must be prepared with care, allowing the flavors to meld and develop. This recipe yields approximately 24 Madeleines, making it perfect for serving 4-6 people. The process involves a few key techniques, such as chilling the batter before baking, which helps create that classic hump. With a few simple ingredients and steps, you can bring the taste of France to your kitchen with this classic recipe.
Ingredients for 4-6 servings:
- 1 cup all-purpose flour
- 1/2 teaspoon baking powder
- 1/4 teaspoon salt
- 2 large eggs
- 2/3 cup granulated sugar
- 1 teaspoon pure vanilla extract
- 1 teaspoon lemon zest
- 1/2 cup unsalted butter, melted and cooled
- Powdered sugar, for dusting (optional)
Instructions:
- Prepare the dry ingredients: In a medium-sized bowl, whisk together the flour, baking powder, and salt until evenly combined. Set aside for later use.
- Mix the wet ingredients: In a separate large bowl, beat the eggs and sugar together using an electric mixer on medium speed, until the mixture becomes thick and pale, which typically takes about 5 minutes. This step is vital for incorporating air into the batter, resulting in fluffy Madeleines.
- Add flavor: Once the egg mixture is ready, gently fold in the vanilla extract and lemon zest, making sure they’re evenly distributed throughout the batter.
- Combine wet and dry ingredients: Gradually add the flour mixture to the egg mixture, folding gently with a spatula until just combined. Be careful not to overmix, as this can deflate the batter.
- Incorporate the butter: Slowly pour the melted and cooled butter into the batter, folding it in carefully. Confirm that the butter is fully integrated without deflating the batter.
- Chill the batter: Cover the bowl with plastic wrap and refrigerate the batter for at least 1 hour. Chilling helps develop the flavors and enables the batter to firm up, which is necessary for creating the signature hump.
- Preheat the oven and prepare the pan: Preheat your oven to 375°F (190°C). Butter and lightly flour a Madeleine pan to prevent sticking.
- Fill the molds: Spoon the batter into the prepared Madeleine pan, filling each mold about 3/4 full. Avoid overfilling to prevent overflow during baking.
- Bake the Madeleines: Place the pan in the oven and bake for 10-12 minutes, or until the edges are golden brown and the centers spring back when lightly touched. The signature hump should have formed by this point.
- Cool and serve: Remove the Madeleines from the oven and let them cool in the pan for a few minutes before transferring them to a wire rack. Dust with powdered sugar, if desired, before serving warm or at room temperature.
Extra Tips:
To enhance the flavor of your Madeleines, consider experimenting with different extracts such as almond or orange blossom. It’s also vital to use room temperature ingredients, especially the eggs, as this helps in achieving a smooth batter. If you have time, allow the batter to chill overnight; this will enhance the flavor and texture even more.
Finally, confirm your oven is fully preheated before baking, as the initial burst of heat is necessary to create the characteristic hump of Madeleines.
Crêpes

Crêpes are a quintessential part of French cuisine, often enjoyed as a delightful breakfast or dessert. These thin, delicate pancakes can be served with a variety of sweet or savory fillings, making them a versatile addition to any meal.
Originating from Brittany in the northwest of France, crêpes have become a beloved dish worldwide, with each region adding its own unique twist. Whether you prefer them with a simple dusting of sugar and lemon juice or filled with Nutella and bananas, crêpes are certain to please any palate.
The key to perfect crêpes lies in achieving the right batter consistency and mastering the art of flipping them just at the right moment. The batter is typically made from basic ingredients like flour, milk, and eggs, making it both simple and affordable.
Once you get the hang of it, creating these paper-thin pancakes becomes second nature. This recipe will guide you through making classic French crêpes for a serving size of 4-6 people, ideal for a family breakfast or brunch.
Ingredients for Crêpes (serving size: 4-6 people):
- 2 cups all-purpose flour
- 3 large eggs
- 2 cups milk
- 1/4 cup water
- 1/4 teaspoon salt
- 2 tablespoons unsalted butter, melted (plus extra for cooking)
- 1 tablespoon sugar (optional, for sweet crêpes)
- 1 teaspoon vanilla extract (optional, for sweet crêpes)
Cooking Instructions:
- Prepare the Batter: In a large mixing bowl, whisk together the flour and salt. In a separate bowl, beat the eggs. Gradually add the milk and water to the eggs, whisking continuously. Make a well in the center of the flour mixture and pour in the wet ingredients, whisking until smooth. Add the melted butter (and sugar and vanilla extract if making sweet crêpes) and continue to whisk until fully incorporated. The batter should be runny and smooth with no lumps.
- Rest the Batter: Cover the bowl with plastic wrap or a clean kitchen towel and let the batter rest for at least 30 minutes at room temperature. This allows the gluten to relax, resulting in more tender crêpes.
- Heat the Pan: Place a non-stick skillet or a crêpe pan over medium heat. Add a small amount of butter to coat the surface, spreading it evenly with a pastry brush or paper towel.
- Cook the Crêpes: Pour about 1/4 cup of batter into the center of the pan, quickly lifting and tilting the pan in a circular motion to spread the batter evenly across the surface. Cook for about 1-2 minutes, or until the edges begin to lift and the underside is lightly golden.
- Flip the Crêpes: Carefully flip the crêpe using a spatula and cook for an additional 30 seconds to 1 minute on the other side. Remove the crêpe from the pan and place it on a plate. Repeat with the remaining batter, adding more butter to the pan as needed.
- Serve the Crêpes: Stack the cooked crêpes on a plate and cover them with a clean kitchen towel to keep warm. Serve with your choice of fillings, such as fresh fruit, jam, chocolate spread, or savory ingredients like ham and cheese.
Extra Tips:
To guarantee your crêpes turn out perfectly, use a non-stick pan or a well-seasoned crêpe pan. This will prevent the batter from sticking and make flipping easier.
If the batter is too thick, add a bit more milk to achieve the right consistency. Similarly, if you find the crêpes are too thick, reduce the amount of batter used per crêpe.
Remember to keep the heat at a medium level to prevent burning and to allow the crêpes to cook evenly. Enjoy experimenting with different fillings to find your favorite combination!
French Omelette

A French omelette is a classic breakfast dish that epitomizes the elegance and simplicity of French cuisine. Unlike its American counterpart, the French omelette is known for its soft, creamy texture and its lightly golden exterior. The key to mastering a French omelette lies in its technique; it requires gentle stirring and careful folding to achieve the desired consistency. Traditionally, the omelette is filled with fresh herbs like chives, parsley, or tarragon, which enhance its subtle flavors.
Whether served plain or with a touch of cheese, the French omelette is a delightful way to start your day. Crafting the perfect French omelette can be a rewarding culinary challenge. It demands attention to detail and patience, but the results are well worth the effort. For those new to this dish, practice is vital to achieving the perfect balance of a tender interior and a slightly browned exterior.
When prepared correctly, a French omelette should resemble a soft, custard-like interior encased in a thin, golden layer. This recipe provides a step-by-step guide to making a classic French omelette that serves 4-6 people, guaranteeing everyone at the breakfast table can enjoy this timeless dish.
Ingredients for 4-6 servings:
- 12 large eggs
- 6 tablespoons unsalted butter
- Salt to taste
- Freshly ground black pepper to taste
- 3 tablespoons chopped fresh chives or herbs of choice
- Optional: 1 cup grated Gruyère or Emmental cheese
Cooking Instructions:
1. Prepare the Ingredients:
Crack the eggs into a large bowl. Add a pinch of salt and pepper, and beat the eggs with a fork or whisk until they’re well combined. Stir in the chopped herbs, reserving a small amount for garnish.
2. Heat the Pan:
Place a non-stick skillet over medium-low heat. Add 1 tablespoon of butter and allow it to melt, swirling the pan to coat it evenly.
3. Cook the Omelette:
Pour in one-fourth of the egg mixture into the skillet, making sure the eggs spread out evenly. Allow the eggs to set undisturbed for about 10-15 seconds.
4. Stir and Scramble:
Using a spatula, gently stir the eggs with small, circular motions, while simultaneously shaking the pan with your other hand. This step is fundamental in creating a creamy texture.
5. Form the Omelette:
As the eggs begin to thicken but are still slightly runny, tilt the pan and use the spatula to fold one side of the omelette towards the center. If using cheese, sprinkle a small amount over the omelette before folding.
6. Complete the Fold:
Fold the opposite side of the omelette towards the center to enclose the filling. Let it cook for another 10-15 seconds to set. The omelette should have a light golden color on the outside.
7. Serve:
Slide the omelette onto a warm plate, seam side down. Repeat the process with the remaining egg mixture, adding more butter to the pan as needed. Garnish with reserved herbs.
Extra Tips:
To achieve the perfect French omelette, it’s important to maintain a low to medium heat to prevent the eggs from browning too quickly. Use a non-stick pan to guarantee easy folding and sliding. Be gentle with the eggs, as overworking them can lead to a rubbery texture.
If you prefer a richer flavor, consider adding a splash of cream or milk to the egg mixture before cooking. Finally, remember that practice makes perfect; don’t be discouraged if your first few attempts aren’t flawless.
Quiche Lorraine

Quiche Lorraine is a classic French dish, perfect for breakfast or brunch, that hails from the Lorraine region of France. Known for its creamy custard filling and rich, savory flavors, Quiche Lorraine traditionally features a blend of eggs, cream, and bacon nestled in a buttery crust. This delightful dish has become a beloved staple in French cuisine, often served warm and enjoyed with a side salad or light fruit.
To make the perfect Quiche Lorraine, you’ll need to focus on creating a delicate, flaky crust and a smooth, flavorful filling. The combination of crispy bacon with the creamy egg and cheese mixture offers a satisfying taste experience. This recipe serves 4-6 people, making it an ideal choice for a family breakfast or a small gathering of friends.
Ingredients (serves 4-6)
- 1 pre-made pie crust or homemade shortcrust pastry
- 6 slices of bacon, diced
- 1 cup grated Gruyère cheese
- 3 large eggs
- 1 1/4 cups heavy cream
- 1/4 teaspoon salt
- 1/4 teaspoon freshly ground black pepper
- 1/8 teaspoon ground nutmeg
Cooking Instructions
- Preheat the Oven: Preheat your oven to 375°F (190°C). This guarantees that your quiche will cook evenly from the start.
- Prepare the Crust: Roll out the pie crust and carefully fit it into a 9-inch (23 cm) quiche or pie dish. Trim any excess dough hanging over the edges and prick the bottom of the crust with a fork to prevent bubbling.
- Blind Bake the Crust: Line the crust with parchment paper and fill it with pie weights or dried beans. Bake in the preheated oven for 10 minutes. Remove the weights and parchment, then bake for an additional 5 minutes until the crust is lightly golden. Allow it to cool slightly.
- Cook the Bacon: In a medium skillet over medium heat, cook the diced bacon until crispy. Transfer the bacon to a paper towel-lined plate to drain excess grease.
- Prepare the Filling: In a mixing bowl, whisk together the eggs, heavy cream, salt, pepper, and nutmeg until well combined. Stir in the grated Gruyère cheese and cooked bacon.
- Assemble the Quiche: Pour the egg and bacon mixture into the partially baked crust. Spread the filling evenly with a spatula to guarantee even cooking.
- Bake the Quiche: Place the quiche in the oven and bake for about 30-35 minutes, or until the filling is set and the top is lightly golden. The center should be slightly wobbly but not liquid.
- Cool and Serve: Allow the quiche to cool for at least 10 minutes before slicing and serving. This resting period will help the filling set completely.
Extra Tips
For an even flakier crust, consider chilling the pie dough in the refrigerator for about 30 minutes before rolling it out. This will help prevent shrinkage during baking.
If you like a more robust flavor, try adding a pinch of thyme or a sprinkle of chopped chives to the filling. Quiche Lorraine can be made ahead of time and reheated gently in the oven, making it a convenient option for busy mornings or entertaining guests.
Café Au Lait

Café au lait, a beloved classic French breakfast beverage, is a comforting blend of strong coffee and steamed milk. This warm, creamy drink is traditionally served in a bowl rather than a cup, making it a cozy and inviting way to start the day. Ideal for leisurely mornings or a sophisticated brunch, café au lait is simple to make and rich in flavor, capturing the essence of a French café right in your own kitchen.
The perfect café au lait balances the robust taste of coffee with the smoothness of milk, creating a harmonious and delightful experience for the palate. Whether you prefer your coffee light or strong, this recipe allows you to adjust the coffee-to-milk ratio according to your taste. Serve it alongside a buttery croissant or a slice of brioche for an authentic French breakfast experience.
Ingredients for 4-6 servings:
- 4 cups of strong brewed coffee
- 4 cups of whole milk
- Sugar or sweetener (optional)
Cooking Instructions:
- Brew the Coffee: Start by brewing a pot of strong coffee. You can use a French press, drip coffee maker, or espresso machine, depending on your preference and available equipment. Aim for a bold, rich flavor to complement the milk.
- Heat the Milk: In a saucepan over medium heat, warm the milk. Stir constantly to prevent scorching and to guarantee the milk heats evenly. Don’t bring the milk to a boil, as this can alter the taste and texture. When the milk is steaming and small bubbles form around the edges, it’s ready.
- Froth the Milk (Optional): If you prefer a frothy café au lait, use a frother or a whisk to create a light foam on the milk. This step is optional but adds a lovely texture and presentation to your drink.
- Mix Coffee and Milk: Pour equal parts of brewed coffee and steamed milk into each serving bowl or large cup. Adjust the ratio according to your preference; some might enjoy a stronger coffee flavor, while others might prefer more milk.
- Sweeten to Taste: If desired, add sugar or your preferred sweetener to taste. Stir well to combine.
- Serve Immediately: Serve your café au lait hot, accompanied by your favorite French pastries or breakfast items.
Extra Tips:
For the best café au lait, always use fresh, high-quality coffee beans for brewing. Whole milk is recommended for its creamy texture, but you can substitute it with your preferred milk or non-dairy alternative if desired.
To enhance the flavor, consider adding a pinch of cinnamon or a drop of vanilla extract to the milk before heating. If you’re serving café au lait to a crowd, prepare the coffee and milk separately, and let guests mix their own cups to their liking.
Enjoy this delightful beverage as part of a leisurely morning ritual or a special weekend treat.
Tartine

Tartine is a quintessential French open-faced sandwich that brings together simple, fresh ingredients to create a delightful breakfast experience. Originating from the French word “tartiner,” which means to spread, a tartine is generally composed of a slice of crusty bread topped with a spread and a variety of toppings like cheese, vegetables, or meats.
In this recipe, we’re going to make a classic tartine with a creamy goat cheese base, topped with ripe tomatoes, fresh basil, and a drizzle of olive oil, perfect for a leisurely breakfast.
This tartine recipe is designed to serve 4-6 people, making it an ideal choice for a family breakfast or a small brunch gathering. The combination of creamy cheese, juicy tomatoes, and fragrant basil on a crisp baguette slice isn’t only visually appealing but also incredibly satisfying.
Below, you’ll find the list of ingredients needed and step-by-step instructions to help you prepare this classic French breakfast dish.
Ingredients for 4-6 People:
- 1 French baguette
- 8 oz creamy goat cheese
- 3-4 ripe tomatoes
- Fresh basil leaves (about 1 bunch)
- 2 tablespoons extra virgin olive oil
- Salt and pepper to taste
Instructions:
- Prepare the Baguette: Preheat your oven to 375°F (190°C). Slice the baguette into 1/2 inch thick slices, creating about 12-16 pieces. Arrange the slices on a baking sheet.
- Toast the Bread: Place the baking sheet in the preheated oven and toast the baguette slices for about 5-7 minutes, or until they’re golden brown and crisp. Remove from the oven and let them cool slightly.
- Prepare the Toppings: While the bread is toasting, slice the tomatoes into thin rounds and set them aside. Wash and pat dry the basil leaves.
- Assemble the Tartine: Spread a generous layer of goat cheese on each toasted baguette slice. Top with 1-2 slices of tomato, depending on the size of the bread. Add a few fresh basil leaves on top of the tomatoes.
- Season and Finish: Drizzle each tartine with a bit of extra virgin olive oil. Sprinkle with salt and pepper to taste.
- Serve: Arrange the tartines on a serving platter and serve immediately while the bread is still slightly warm.
Extra Tips:
For an added touch of flavor, consider rubbing a clove of garlic on the toasted baguette slices before spreading the goat cheese. This will infuse a subtle garlic essence into the tartine.
If you prefer a bit of tang, balsamic glaze can be drizzled on top of the tartines as a final flourish. Additionally, feel free to experiment with various toppings such as smoked salmon, avocado, or thin slices of cured meats to personalize your tartines to your taste.
Chausson Aux Pommes

Chausson Aux Pommes, or apple turnovers, is a classic French pastry that’s perfect for breakfast or as a delightful snack. These flaky pastries are filled with a luscious apple filling, often accentuated with a hint of cinnamon or vanilla. The combination of buttery puff pastry and sweet, tender apples creates a delicious treat that’s both comforting and elegant.
While the preparation may seem intricate, the result is well worth the effort, offering a taste of traditional French cuisine in every bite. The beauty of Chausson Aux Pommes lies in its simplicity and the quality of its ingredients. The key is using fresh apples that have a balance of tartness and sweetness, such as Granny Smith or Honeycrisp, and a high-quality puff pastry.
This dish serves 4-6 people, making it ideal for a family breakfast or a special brunch gathering. With a little patience and attention to detail, you can create these delightful pastries that are sure to impress.
Ingredients for 4-6 servings:
- 4 medium apples (Granny Smith or Honeycrisp)
- 1 tablespoon lemon juice
- 1/3 cup granulated sugar
- 1 teaspoon ground cinnamon
- 1 teaspoon vanilla extract
- 2 sheets puff pastry
- 1 egg (for egg wash)
- 2 tablespoons unsalted butter
- A pinch of salt
- Powdered sugar (optional, for dusting)
Cooking Instructions:
1. Prepare the Apples: Peel, core, and dice the apples into small cubes. Place them in a bowl and toss with lemon juice to prevent browning.
2. Cook the Filling: In a medium saucepan over medium heat, melt the butter. Add the diced apples, granulated sugar, cinnamon, and a pinch of salt. Stir occasionally and cook until the apples are soft and the mixture is thickened, about 10-15 minutes.
Stir in the vanilla extract. Remove from heat and let cool completely.
3. Prepare the Puff Pastry: Roll out the puff pastry sheets on a lightly floured surface. Use a round cutter to cut out circles about 5-6 inches in diameter.
4. Fill and Shape the Pastries: Spoon a generous amount of the apple mixture onto one half of each pastry circle. Fold the other half over the filling to create a half-moon shape. Press the edges together gently, then use a fork to crimp and seal the edges.
5. Apply Egg Wash: Beat the egg in a small bowl and brush over the top of each pastry to give it a golden finish when baked.
6. Bake: Preheat the oven to 400°F (200°C). Place the pastries on a baking sheet lined with parchment paper. Bake for 20-25 minutes or until the pastries are puffed and golden brown.
7. Cool and Serve: Allow the pastries to cool slightly before serving. Dust with powdered sugar if desired.
Extra Tips:
To guarantee the best texture, make sure the apple filling is completely cooled before placing it onto the puff pastry; this helps prevent the pastry from becoming soggy.
Additionally, if you have time, chill the shaped turnovers in the refrigerator for about 15 minutes before baking. This helps the pastry hold its shape and enhances its flaky texture.
Finally, feel free to experiment with additional flavors like a sprinkle of nutmeg or a splash of brandy in the filling for an extra depth of flavor.
Clafoutis
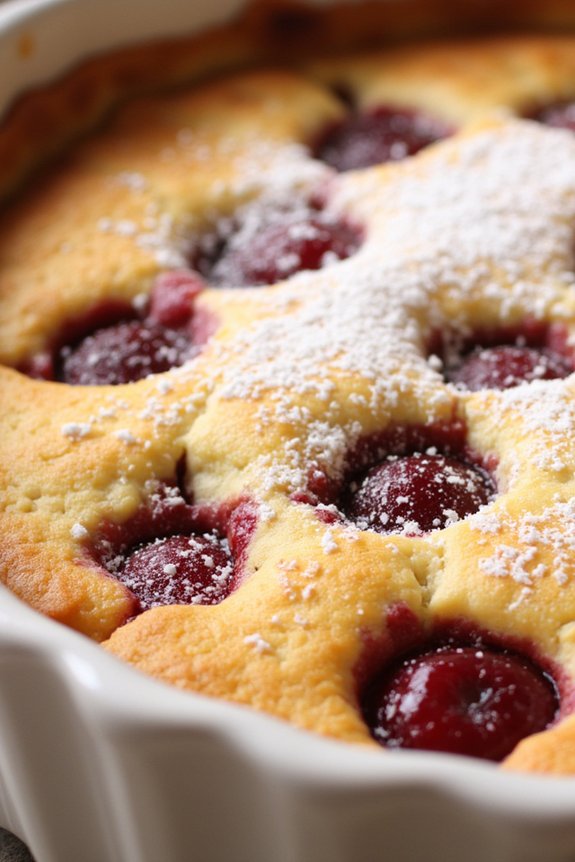
Clafoutis is a classic French dessert that’s perfect for breakfast or brunch, offering a delightful combination of a custard-like texture with the sweetness of fresh fruit. Traditionally made with cherries, this dish can also be adapted to include other fruits such as berries or stone fruits, depending on the season and your preference.
The batter is similar to that of a pancake, crepe, or flan, and when baked, it creates a deliciously light and custardy treat that’s both rustic and elegant. Clafoutis is a beloved dish in France, celebrated for its simplicity and the way it highlights the natural flavors of the fruit it encases.
To prepare Clafoutis, you’ll need a few basic ingredients that you likely already have in your pantry, along with fresh fruit. This recipe serves 4-6 people, making it an excellent choice for a small gathering or family breakfast.
The preparation is straightforward, requiring only a few steps to mix and bake, allowing you to enjoy a warm, comforting dish with minimal fuss. Whether you’re enjoying it as an indulgent breakfast or a sweet end to a meal, Clafoutis is sure to be a delightful addition to your menu.
Ingredients (Serves 4-6):
- 1 cup whole milk
- 3 large eggs
- 1/2 cup granulated sugar
- 1 tablespoon vanilla extract
- 1/8 teaspoon salt
- 1/2 cup all-purpose flour
- 2 cups fresh cherries, pitted (or fruit of choice)
- 1 tablespoon unsalted butter (for greasing)
- Powdered sugar (for dusting)
Cooking Instructions:
- Preheat the Oven: Begin by preheating your oven to 350°F (175°C). This guarantees that the oven reaches the correct temperature before you place the Clafoutis inside, allowing for even cooking.
- Prepare the Batter: In a mixing bowl, whisk together the milk, eggs, granulated sugar, vanilla extract, and salt until well combined. Gradually add the flour, whisking constantly to prevent lumps from forming. Continue whisking until the batter is smooth and consistent.
- Prepare the Baking Dish: Take a 9-inch round baking dish and grease it with the unsalted butter. This helps prevent the Clafoutis from sticking to the dish, making it easier to serve.
- Arrange the Fruit: Evenly distribute the pitted cherries (or chosen fruit) across the bottom of the prepared baking dish. This guarantees that each slice will have a good amount of fruit.
- Pour the Batter: Carefully pour the batter over the fruit in the baking dish, making sure the fruit remains evenly distributed and doesn’t clump together.
- Bake the Clafoutis: Place the baking dish in the preheated oven and bake for approximately 35-40 minutes, or until the Clafoutis is puffed and golden brown, and a toothpick inserted in the center comes out clean.
- Cool and Serve: Once baked, remove the Clafoutis from the oven and let it cool for 5-10 minutes. Dust the top with powdered sugar before serving. Serve warm or at room temperature.
Extra Tips:
For best results, use fresh, ripe fruit as it enhances the flavor and texture of the Clafoutis. If cherries aren’t in season, consider using other fruits like raspberries, blueberries, or sliced peaches.
You can also add a splash of liqueur, such as Kirsch or Amaretto, to the batter for an extra depth of flavor. If you prefer a slightly richer texture, substitute half of the milk with heavy cream.
Remember that Clafoutis should be enjoyed soon after baking, as it tends to lose its ideal texture when stored for too long.
Pain Perdu
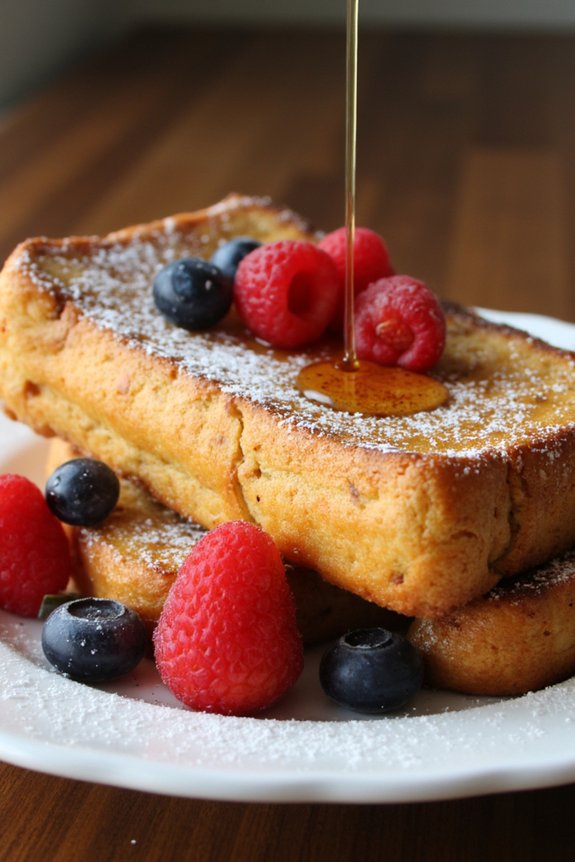
Pain Perdu, also known as French toast, is a classic French breakfast dish that transforms stale bread into a delightful morning treat. Originally designed as a way to use up old bread, Pain Perdu has become a beloved dish worldwide, cherished for its custardy interior and golden-brown exterior. Its name, which translates to “lost bread,” signifies its original purpose of revitalizing bread that would otherwise be discarded.
The dish can be made with various types of bread, including brioche or baguette, and is typically served with a sprinkle of powdered sugar, fresh fruits, or a drizzle of syrup. This recipe for Pain Perdu serves 4-6 people and is perfect for a weekend breakfast or brunch. The key to making the perfect Pain Perdu lies in the soaking process, allowing the bread to absorb the rich custard mixture fully.
Pair it with a hot cup of coffee or freshly squeezed orange juice for a complete breakfast experience. Whether you’re serving children or adults, Pain Perdu is sure to be a hit at your breakfast table.
Ingredients for 4-6 servings:
- 8 slices of day-old bread (preferably brioche or baguette)
- 4 large eggs
- 1 cup whole milk
- 1/4 cup heavy cream
- 1/4 cup granulated sugar
- 1 teaspoon vanilla extract
- 1/2 teaspoon ground cinnamon
- A pinch of salt
- 2 tablespoons unsalted butter
- Powdered sugar, for serving
- Fresh berries or syrup, for serving
Cooking Instructions:
- Prepare the Custard Mixture: In a large mixing bowl, whisk together the eggs, milk, heavy cream, granulated sugar, vanilla extract, cinnamon, and salt until well combined. Make sure the mixture is smooth and the sugar is fully dissolved.
- Soak the Bread: Arrange the bread slices in a single layer in a shallow dish or baking pan. Pour the custard mixture over the bread, making certain each slice is well coated. Let the bread soak for at least 10 minutes, turning the slices halfway through to make certain of even absorption.
- Preheat the Pan: Heat a large skillet or griddle over medium heat. Add 1 tablespoon of butter and allow it to melt and coat the surface evenly.
- Cook the Bread: Carefully place the soaked bread slices into the hot skillet. Cook each side for 3-4 minutes or until golden brown and slightly crispy on the edges. You may need to cook the bread in batches, adding more butter as necessary.
- Serve: Once cooked, transfer the Pain Perdu to a serving platter. Dust with powdered sugar and serve with fresh berries or syrup on the side.
Extra Tips:
For the best results, use bread that’s at least a day old. Fresh bread may become too soggy when soaked in the custard mixture. Additionally, if you prefer a more decadent flavor, you can add a splash of your favorite liqueur, such as Grand Marnier or Cointreau, to the custard mixture.
Remember to keep an eye on the heat while cooking to prevent the bread from burning; adjust the heat as necessary to achieve a perfectly golden-brown exterior. Enjoy your Pain Perdu with a variety of toppings, such as whipped cream or nuts, to suit your taste preferences.
Pains Aux Raisins

Pains Aux Raisins, also known as raisin snails or escargots aux raisins, are a delightful pastry that hails from France. These delicious treats are made from a buttery, flaky croissant dough, filled with a rich pastry cream and scattered with plump, juicy raisins. The dough is rolled into a spiral shape, creating the iconic snail-like appearance. They’re then baked to golden perfection, making for a luxurious breakfast or a sweet treat any time of the day.
Pains Aux Raisins embody the elegance and indulgence of classic French patisserie, making them a favorite in bakeries worldwide. To enjoy the perfect Pains Aux Raisins, it’s vital to prepare each component with care. The croissant dough needs time to rest and develop its signature layers, while the pastry cream should be smooth and flavorful. Raisins, pre-soaked in warm water or rum, add a burst of sweetness and moisture, balancing the richness of the cream and the lightness of the pastry.
This recipe yields 4-6 servings, ideal for sharing with family or friends during a leisurely breakfast or brunch.
Ingredients:
- 500g all-purpose flour
- 300g unsalted butter, chilled
- 250ml whole milk
- 50g granulated sugar
- 10g salt
- 10g instant yeast
- 2 eggs
- 1 teaspoon vanilla extract
- 150g raisins
- 50ml warm water or rum (for soaking raisins)
- 500ml whole milk (for pastry cream)
- 100g granulated sugar (for pastry cream)
- 4 egg yolks
- 50g cornstarch
- 1 teaspoon vanilla extract (for pastry cream)
- 1 egg (for egg wash)
Instructions:
- Prepare the Croissant Dough:
- In a large bowl, combine the flour, sugar, salt, and yeast. Stir in the milk and eggs to form a dough. Knead until smooth, about 10 minutes. Cover and let rise for 1 hour or until doubled in size.
- Roll out the dough into a rectangle. Place the chilled butter between two sheets of parchment paper and roll into a thinner rectangle. Place the butter on one half of the dough and fold the other half over. Seal the edges and roll into a larger rectangle.
- Fold the rectangle into thirds like a letter. Rotate 90 degrees and roll out again. Repeat the folding process two more times. Wrap in plastic and chill for at least 1 hour.
- Make the Pastry Cream:
- In a saucepan, heat the milk until just boiling. In a separate bowl, whisk together the yolks, sugar, cornstarch, and vanilla. Gradually whisk in the hot milk.
- Return the mixture to the saucepan and cook over medium heat, whisking constantly, until thickened. Remove from heat and cover with plastic wrap directly on the surface. Cool completely.
- Assemble the Pains Aux Raisins:
- Soak the raisins in warm water or rum for 10 minutes, then drain.
- Roll out the chilled dough into a large rectangle. Spread an even layer of pastry cream over the surface and sprinkle with soaked raisins.
- Roll the dough into a tight log and slice into 1-inch pieces. Arrange on a baking sheet lined with parchment paper. Cover and let rise for another 30 minutes.
- Bake:
- Preheat the oven to 375°F (190°C). Brush the tops of the pastries with egg wash. Bake for 15-20 minutes or until golden brown and puffed.
Extra Tips:
When making Pains Aux Raisins, make certain that all your ingredients, especially the butter, are well chilled to help achieve the desired flaky layers.
Use a ruler to maintain even thickness while rolling the dough, ensuring consistent baking. If time allows, prepare the croissant dough a day ahead to enhance flavor and texture.
For a glossy finish, brush the pastries with a simple syrup made from equal parts sugar and water immediately after baking. This step will also help to keep them moist and fresh.
Galettes

Galettes, also known as galettes de sarrasin, are a savory French delicacy originating from the Brittany region. Unlike their sweet cousin, the crêpe, galettes are made with buckwheat flour, giving them a distinct, nutty flavor and a hearty texture. Traditionally, these savory pancakes are filled with ingredients like ham, cheese, and eggs, making them a popular breakfast choice in France.
They aren’t only delicious but also gluten-free, making them an excellent option for those with dietary restrictions.
Creating the perfect galette involves preparing a smooth batter, cooking it to a golden brown crisp, and then filling it with your choice of savory toppings. The batter itself is simple, making it an accessible recipe for home cooks. Once you master the technique of spreading and flipping the galette, you can enjoy this French breakfast classic anytime.
Serve them hot, folded over a variety of fillings, and enjoy a piece of Brittany in your home kitchen.
Ingredients for 4-6 servings:
- 2 cups buckwheat flour
- 2 1/2 cups water
- 2 large eggs
- 1 teaspoon salt
- Butter or oil for cooking
- 6 slices of ham
- 6 eggs (one per galette)
- 1 1/2 cups grated Gruyère or Emmental cheese
- Freshly ground black pepper to taste
- Chopped fresh chives for garnish (optional)
Cooking Instructions:
- Prepare the Batter: In a large mixing bowl, combine the buckwheat flour and salt. Make a well in the center and add the eggs. Gradually whisk in the water, mixing until you achieve a smooth batter with no lumps. Cover and let it rest for at least 30 minutes at room temperature. This resting period will allow the flour to hydrate fully, resulting in a better texture.
- Preheat the Pan: Heat a non-stick crêpe pan or a large skillet over medium-high heat. Add a small amount of butter or oil, swirling to coat the surface evenly.
- Cook the Galettes: Pour about 1/2 cup of batter onto the hot pan, tilting it to spread the batter into a thin, even circle. Cook for 2-3 minutes until the edges start to lift and the bottom is golden brown. Flip the galette gently using a spatula and cook for another minute on the other side.
- Add the Fillings: Once flipped, immediately crack an egg onto the center of the galette. Use a spatula to gently spread the egg white across the surface without breaking the yolk. Arrange a slice of ham and a handful of cheese around the egg. Season with black pepper.
- Finish Cooking: Let the galette cook for an additional 2-3 minutes until the egg white is set, the cheese has melted, and the edges are crisp. Fold the edges of the galette over the fillings to create a square shape, leaving the yolk visible.
- Serve: Transfer the finished galette to a plate. Garnish with freshly chopped chives if desired. Repeat the process with the remaining batter and fillings.
Extra Tips:
For the best results, verify your batter is smooth and lump-free by using a whisk or hand blender. If the batter thickens as it rests, you can thin it with a little water before cooking.
The pan should be adequately preheated to achieve the crispy texture that’s characteristic of a good galette. If you prefer a runny yolk, reduce the cooking time after the egg is added.
Feel free to experiment with different fillings such as sautéed mushrooms, spinach, or even smoked salmon to customize your galettes to your taste.