

French cuisine is known for its rich, indulgent flavors, but who says you can’t enjoy them while keeping it low carb?
Think Coq Au Vin or Beef Bourguignon, but without the carb overload.
Keto Ratatouille and creamy Cauliflower Gratin are just a couple of the delicious options to explore.
These recipes capture the essence of French cooking with a health-conscious twist.
Let’s explore these flavorful French delights together!
Low-Carb Coq Au Vin
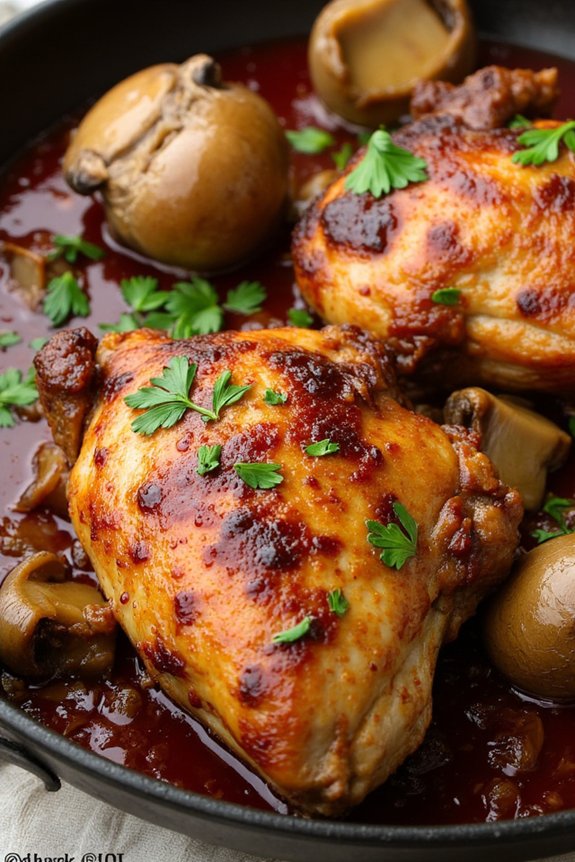
Coq Au Vin is a classic French dish known for its rich flavors and slow-cooked tenderness. Traditionally stewed with red wine, mushrooms, and small onions, it’s perfect for a hearty family meal. In this low-carb version, we maintain the essence of this French classic while reducing the carbohydrate content, making it suitable for those following a low-carb diet. The dish is both elegant and comforting, with the chicken becoming tender and flavorful as it absorbs the complex flavors of the wine and herbs.
This recipe serves 4-6 people and is perfect for a cozy dinner party or a special family gathering. The chicken is simmered in red wine, giving it a deep, robust flavor, while the mushrooms and herbs add earthiness and aromatics. The sauce is thickened with a low-carb alternative to guarantee that every bite is deliciously satisfying without the added carbohydrates. Serve it with a side of cauliflower mash or a fresh green salad to complete the meal.
Ingredients:
- 4-6 bone-in chicken thighs
- Salt and pepper, to taste
- 2 tablespoons olive oil
- 150g bacon, chopped
- 250g button mushrooms, sliced
- 1 onion, chopped
- 2 garlic cloves, minced
- 2 cups red wine
- 1 cup chicken broth
- 2 tablespoons tomato paste
- 1 teaspoon dried thyme
- 2 bay leaves
- 1 tablespoon butter
- 1 tablespoon xanthan gum (as a low-carb thickener)
- Fresh parsley, chopped (for garnish)
Instructions:
- Prepare the Chicken: Season the chicken thighs with salt and pepper on both sides. Heat the olive oil in a large Dutch oven over medium-high heat. Add the chicken thighs, skin side down, and sear until golden brown on both sides. Remove the chicken from the pot and set aside.
- Cook the Bacon: In the same pot, add the chopped bacon and cook until crisp. Remove the bacon and set aside, leaving the fat in the pot.
- Sauté Vegetables: Add the sliced mushrooms to the pot and sauté until they release their moisture and are golden brown. Add the chopped onion and minced garlic, and cook until the onion is translucent.
- Deglaze and Simmer: Pour in the red wine to deglaze the pot, scraping up any browned bits from the bottom. Add the chicken broth, tomato paste, thyme, and bay leaves. Stir well.
- Return Chicken to Pot: Return the seared chicken thighs and cooked bacon to the pot. Bring the mixture to a simmer, cover, and reduce the heat to low. Let it cook for about 40-45 minutes, or until the chicken is tender and cooked through.
- Thicken the Sauce: Remove the chicken from the pot once cooked. Increase the heat to medium-high and let the sauce reduce slightly. Stir in the butter and xanthan gum, whisking until the sauce thickens to your desired consistency.
- Serve: Return the chicken to the pot, gently coating it with the thickened sauce. Garnish with fresh chopped parsley and serve hot.
Extra Tips:
When selecting the red wine for this recipe, opt for a dry variety like Pinot Noir or Merlot for the best flavor profile. It’s important to use good quality wine as it greatly impacts the final taste of the dish.
If you prefer a thicker sauce, adjust the quantity of xanthan gum slowly as it thickens quickly. Finally, for a more intense flavor, consider marinating the chicken in the red wine mixture for a few hours before cooking.
Keto Ratatouille
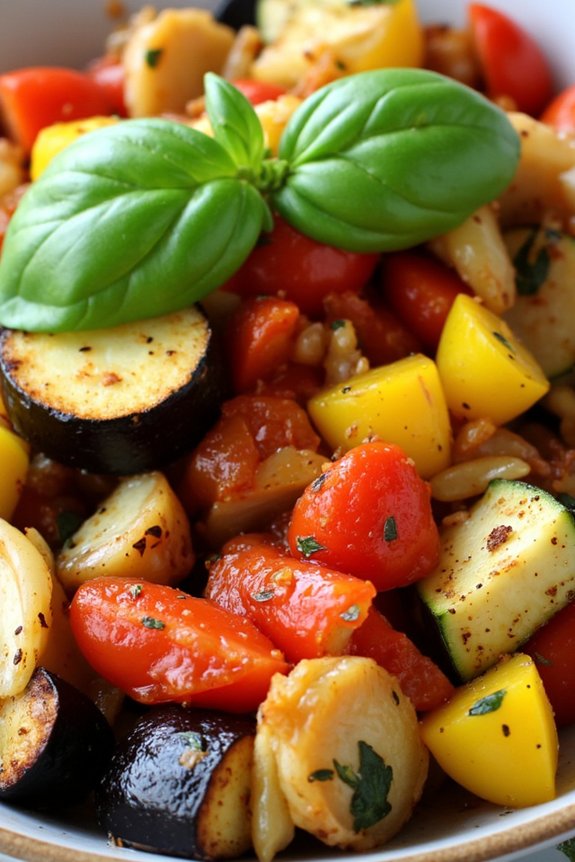
Keto Ratatouille is a delightful low-carb twist on the classic French dish that brings together a medley of fresh vegetables, enhanced with aromatic herbs. This dish is perfect for anyone following a ketogenic diet, as it offers a healthy dose of nutrients while keeping carb counts down. The vibrant colors and rich flavors make it a feast for both the eyes and the palate, and its versatility means it can be served as a main course or a hearty side dish.
The traditional ratatouille, which hails from the Provence region, typically includes eggplant, zucchini, bell peppers, and tomatoes, and is simmered to perfection. In this keto-friendly version, we maintain all these classic ingredients, but focus on reducing the carbohydrate content by guaranteeing that the vegetables are cooked in a way that brings out their natural sweetness without the need for added sugars. By using high-quality olive oil and fresh herbs, we amplify the dish’s natural flavors, making it a satisfying choice for any meal.
Ingredients for Keto Ratatouille (serving size: 4-6 people):
- 2 medium eggplants, diced
- 2 medium zucchinis, sliced
- 1 red bell pepper, chopped
- 1 yellow bell pepper, chopped
- 1 large onion, chopped
- 4 cloves garlic, minced
- 4 medium tomatoes, chopped
- 1/4 cup olive oil
- 1 teaspoon dried thyme
- 1 teaspoon dried oregano
- Salt and pepper to taste
- Fresh basil leaves for garnish
Cooking Instructions:
1. Prepare the Vegetables:
Start by washing all the vegetables. Dice the eggplants, slice the zucchinis, chop the bell peppers, onion, and tomatoes, and mince the garlic. Keep the vegetables separate as they’ll be added to the dish at different times.
2. Cook the Eggplants:
In a large skillet, heat a tablespoon of olive oil over medium heat. Add the diced eggplants and cook until they begin to soften and brown, about 5-7 minutes. Remove them from the skillet and set aside.
3. Sauté the Aromatics:
In the same skillet, add another tablespoon of olive oil. Add the chopped onion and minced garlic. Sauté until the onion becomes translucent and fragrant, approximately 3-4 minutes.
4. Add the Peppers and Zucchini:
Incorporate the chopped red and yellow bell peppers along with the sliced zucchini into the skillet. Cook for another 5 minutes until the vegetables start to soften.
5. Combine with Tomatoes and Herbs:
Add the chopped tomatoes, along with the previously cooked eggplant, into the skillet. Stir in the dried thyme, oregano, salt, and pepper. Mix everything well to ascertain that the herbs are evenly distributed.
6. Simmer the Ratatouille:
Lower the heat and let the mixture simmer for about 20-25 minutes, stirring occasionally. This allows the flavors to meld together and the vegetables to become tender.
7. Final Touches:
Once cooked, taste the ratatouille and adjust the seasoning if necessary. Serve hot, garnished with fresh basil leaves for an extra burst of flavor.
Extra Tips:
For the best results, choose vegetables that are firm and fresh, as this will enhance the overall texture and taste of the dish. If time allows, let the ratatouille sit for a few hours or overnight before serving, as this can deepen the flavors even further.
Additionally, consider using a cast-iron skillet or a heavy-bottomed pan for even heat distribution, guaranteeing that the vegetables cook evenly. If you prefer a spicier kick, a pinch of red pepper flakes can be added during the cooking process.
Cauliflower Gratin
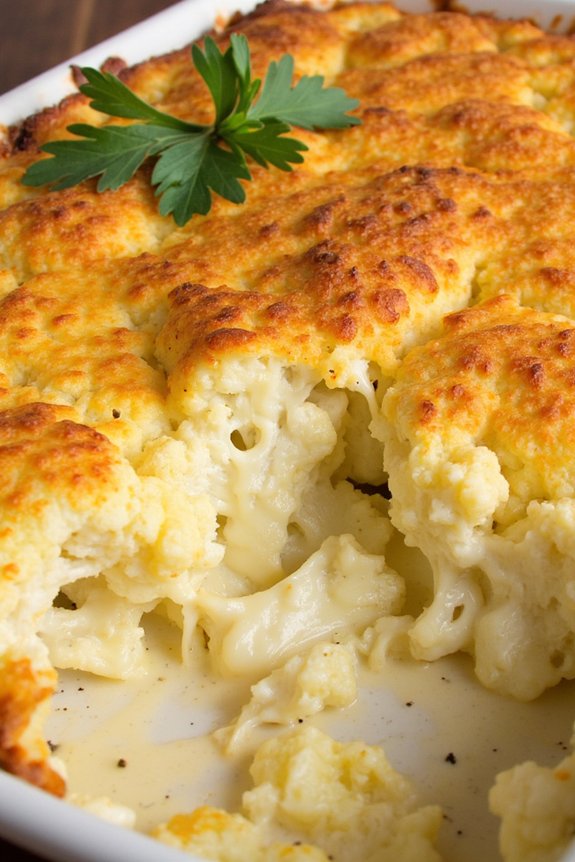
Cauliflower Gratin is a delicious, low-carb twist on the classic French dish, Gratin Dauphinois. This dish combines the creamy richness of a traditional gratin with the lightness and health benefits of cauliflower. Perfect for those looking to indulge in French cuisine without the added carbohydrates, Cauliflower Gratin serves as a sumptuous side dish or a main course when paired with a fresh salad. Its velvety cheese sauce and crispy top make it a favorite for dinner parties or cozy family meals.
This recipe makes a wonderful addition to any low-carb menu, offering the comfort of a gratin without the heaviness of potatoes. The dish is simple to prepare, featuring cauliflower florets enveloped in a creamy, cheesy sauce, and baked to perfection with a golden, bubbling crust. The use of heavy cream and Gruyère cheese makes it decadent, while the cauliflower keeps it light and satisfying. Here’s how to make Cauliflower Gratin for 4-6 people.
Ingredients:
- 1 large head of cauliflower, cut into florets
- 1 cup heavy cream
- 1 cup grated Gruyère cheese
- 1/2 cup grated Parmesan cheese
- 2 tablespoons unsalted butter
- 1 clove garlic, minced
- 1 teaspoon salt
- 1/2 teaspoon freshly ground black pepper
- 1/4 teaspoon nutmeg
- 1 tablespoon chopped fresh parsley (optional, for garnish)
Cooking Instructions:
- Preheat the Oven: Start by preheating your oven to 375°F (190°C). This guarantees that the oven is at the right temperature when you’re ready to bake the gratin.
- Prepare the Cauliflower: In a large pot, bring salted water to a boil. Add the cauliflower florets and blanch them for about 5 minutes, until they’re just tender but still firm. Drain the cauliflower well and set aside.
- Make the Cheese Sauce: In a medium saucepan, melt the butter over medium heat. Add the minced garlic and sauté until fragrant, about 1 minute. Stir in the heavy cream, salt, pepper, and nutmeg. Bring the mixture to a gentle simmer, then add the Gruyère cheese, stirring constantly until the cheese is fully melted and the sauce is smooth.
- Assemble the Gratin: Place the drained cauliflower florets in a baking dish, spreading them out evenly. Pour the cheese sauce over the cauliflower, making sure all pieces are well-coated. Sprinkle the grated Parmesan cheese evenly over the top.
- Bake the Gratin: Place the baking dish in the preheated oven and bake for 25-30 minutes, or until the top is golden brown and the cheese is bubbling. If you want an extra crispy top, you can broil it for an additional 2-3 minutes.
- Garnish and Serve: Remove the gratin from the oven and let it cool for a few minutes. Sprinkle with chopped fresh parsley before serving, if desired. Serve hot.
Extra Tips:
For a little extra flavor, consider adding a sprinkle of smoked paprika or cayenne pepper to the cheese sauce for a subtle kick. Confirm that the cauliflower is well-drained to prevent the gratin from becoming watery. If Gruyère cheese is unavailable, you can substitute with aged cheddar or Swiss cheese for a different taste profile.
Zucchini Noodles With Pesto and Parmesan
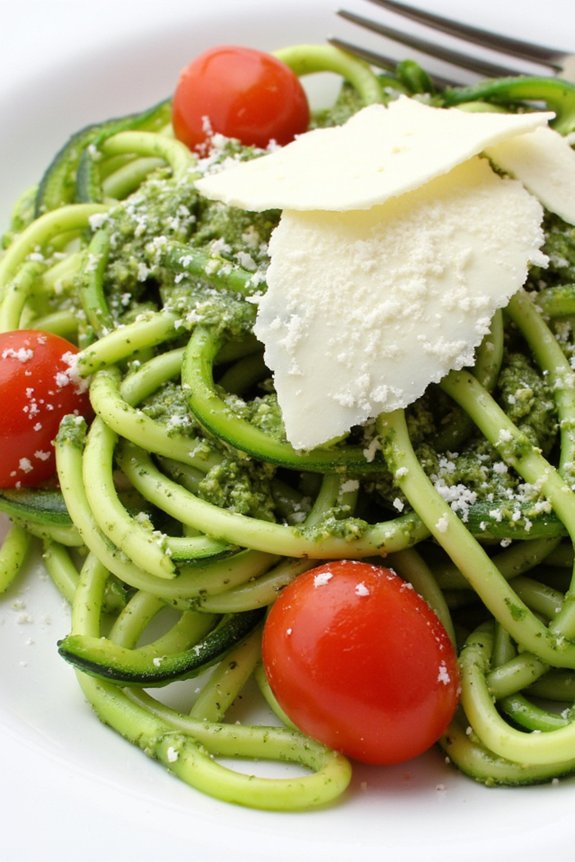
Zucchini Noodles With Pesto and Parmesan is a delightful low-carb French-inspired dish that brings together the fresh flavors of summer zucchini, aromatic pesto, and the creamy, savory taste of Parmesan cheese. This dish is perfect for those who are looking to enjoy a light yet satisfying meal.
It’s easy to prepare and makes for a beautiful presentation, whether you’re serving it as a main dish or as a side. The zucchini noodles, often fondly called “zoodles,” are a great pasta alternative for those cutting down on carbs.
Paired with a homemade pesto sauce, this dish isn’t only nutritious but also bursts with flavor. The Parmesan cheese adds a touch of richness, making each bite a harmonious blend of freshness and indulgence. Ideal for a casual family dinner or a special occasion, this recipe is designed to serve 4-6 people, ensuring everyone gets a taste of this delicious, healthy creation.
Ingredients (Serving Size: 4-6 people):
- 4 medium zucchinis
- 1 cup fresh basil leaves
- 1/2 cup grated Parmesan cheese
- 1/3 cup pine nuts
- 2 cloves garlic
- 1/2 cup olive oil
- Salt and pepper to taste
- 1/4 cup cherry tomatoes (optional)
- Extra Parmesan cheese for garnish
Cooking Instructions:
- Prepare the Zucchini Noodles: Begin by washing and drying the zucchinis. Use a spiralizer to create long, noodle-like strands. If you don’t have a spiralizer, a julienne peeler or a mandoline with a julienne blade can be used as an alternative.
- Make the Pesto Sauce: In a food processor, combine the basil leaves, pine nuts, garlic, and grated Parmesan cheese. Pulse until the mixture is finely chopped. With the processor running, slowly drizzle in the olive oil until the pesto reaches a smooth consistency. Season with salt and pepper to taste.
- Cook the Zoodles: Heat a large skillet over medium heat. Add a tablespoon of olive oil and then the zucchini noodles. Sauté the zoodles for about 3-4 minutes, stirring occasionally until they’re just tender but still have a slight crunch. Avoid overcooking to prevent them from becoming mushy.
- Combine the Ingredients: Reduce the heat to low, and add the pesto sauce to the skillet with the zoodles. Toss gently to coat the noodles evenly with the pesto. If using, add the cherry tomatoes and cook for another minute.
- Serve and Garnish: Once well combined, remove the skillet from the heat. Transfer the zucchini noodles with pesto to serving plates. Garnish with extra Parmesan cheese and a sprinkle of freshly ground black pepper.
Extra Tips:
When making Zucchini Noodles With Pesto and Parmesan, it’s important to use fresh, firm zucchinis for the best texture. Be sure to dry the zucchini thoroughly before spiralizing to avoid excess moisture.
If pine nuts aren’t available, you can substitute them with walnuts or almonds for a different flavor profile. The pesto can be made in advance and stored in the refrigerator for up to a week or frozen for longer storage.
This dish is best served immediately after preparation to maintain the ideal texture of the zoodles.
Low-Carb Beef Bourguignon
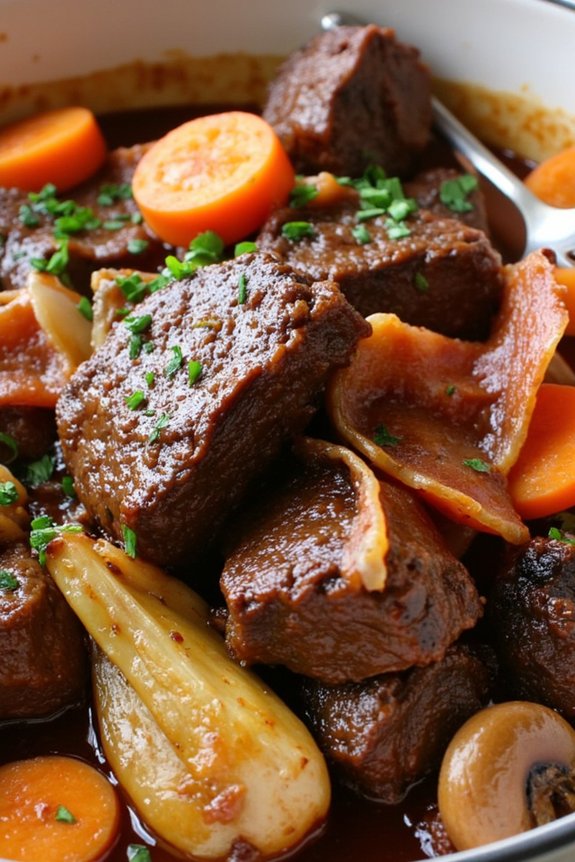
Beef Bourguignon is a traditional French classic, offering a rich and deep flavor profile that typically includes a generous helping of red wine and slow-cooked beef. This low-carb version of the dish maintains all the delicious, hearty flavors by carefully selecting ingredients that are friendly to a carb-conscious diet. By substituting certain traditional elements with low-carb alternatives and using significant herbs and spices, you can enjoy this comforting meal without straying from your dietary goals.
The key to a successful Low-Carb Beef Bourguignon lies in the quality of the beef and the balance of flavors. The slow cooking process allows the beef to become tender and infuse with the wine, broth, and aromatic vegetables. This dish is perfect for a cozy family gathering, offering a satisfying depth of flavors and aromas. The following recipe serves 4-6 people, making it ideal for a small dinner party or a special family meal.
Ingredients:
- 2 lbs beef chuck, cut into 2-inch cubes
- 1 bottle (750 ml) dry red wine
- 2 cups beef broth
- 1/4 cup tomato paste
- 2 tablespoons olive oil
- 1 tablespoon butter
- 4 slices bacon, chopped
- 1 large onion, chopped
- 2 cloves garlic, minced
- 2 carrots, sliced
- 1 cup mushrooms, quartered
- 1 teaspoon dried thyme
- 2 bay leaves
- Salt and pepper to taste
- Fresh parsley, chopped (for garnish)
Cooking Instructions:
- Prepare the Beef: Pat the beef cubes dry with paper towels and season them generously with salt and pepper. This step helps in browning the meat, which is vital for flavor development.
- Brown the Bacon and Beef: In a large Dutch oven, heat olive oil and butter over medium-high heat. Add the chopped bacon and cook until crispy. Remove the bacon with a slotted spoon and set aside. In the same pot, brown the beef cubes in batches, ensuring not to overcrowd the pot, until all sides are well-browned. Remove the beef and set aside with the bacon.
- Sauté Vegetables: In the same pot, add the chopped onion and carrots. Cook until the onions are translucent, about 5 minutes. Add the minced garlic and cook for another minute until fragrant.
- Deglaze the Pot: Pour in the red wine and scrape the bottom of the pot with a wooden spoon to release all the flavorful brown bits. Allow the wine to simmer for 5 minutes to reduce slightly.
- Combine Ingredients: Return the beef and bacon to the pot. Stir in the tomato paste, beef broth, mushrooms, thyme, and bay leaves. Bring the mixture to a simmer.
- Slow Cook: Cover the pot with a lid and place it in a preheated oven at 325°F (160°C). Cook for 2 1/2 to 3 hours, or until the beef is very tender.
- Final Touches: Once cooked, remove the pot from the oven. Discard the bay leaves and adjust seasoning with additional salt and pepper if needed.
- Serve: Serve the Low-Carb Beef Bourguignon hot, garnished with freshly chopped parsley.
Extra Tips:
For a deeper flavor, consider preparing the beef stew a day ahead. The flavors meld wonderfully overnight in the fridge, making it even more delicious when reheated.
If you prefer a thicker sauce, you can remove the beef and vegetables at the end of cooking and simmer the liquid on the stove until it reduces to your desired consistency.
Always remember to taste and adjust the seasoning before serving, as the flavors develop over cooking.
Almond Flour Madeleines

Almond Flour Madeleines are a delightful twist on the classic French tea cake, perfect for anyone following a low-carb lifestyle. These delicate, shell-shaped cakes are known for their light and airy texture with a hint of buttery goodness. By substituting traditional wheat flour with almond flour, you can maintain the integrity of this beloved pastry while keeping it low in carbohydrates. The rich, nutty flavor of the almond flour pairs beautifully with the subtle sweetness, making these madeleines a perfect accompaniment to a cup of tea or coffee.
This recipe isn’t only low in carbs but also gluten-free, making it suitable for those with dietary restrictions. The batter is quick to prepare and requires only a few ingredients, yet it results in a sophisticated treat that can impress guests or serve as a special indulgence for yourself. With the use of a madeleine pan, these cakes will achieve the iconic scallop shape, making them as visually appealing as they’re delicious. This batch serves 4-6 people, making it ideal for a small gathering or a family dessert.
Ingredients:
- 1 cup almond flour
- 2/3 cup granulated erythritol or preferred low-carb sweetener
- 1/2 teaspoon baking powder
- 1/4 teaspoon salt
- 3 large eggs
- 1 teaspoon vanilla extract
- 1/2 teaspoon almond extract
- 1/2 cup unsalted butter, melted and cooled
- Zest of 1 lemon (optional)
- Powdered erythritol for dusting (optional)
Cooking Instructions:
- Preheat the Oven: Preheat your oven to 375°F (190°C). Grease a madeleine pan with a little butter or non-stick spray to guarantee the cakes release easily after baking.
- Mix Dry Ingredients: In a medium-sized bowl, whisk together the almond flour, erythritol, baking powder, and salt until well combined. This will guarantee even distribution of the leavening agent and sweetener.
- Prepare the Wet Ingredients: In a separate large bowl, beat the eggs with an electric mixer on high speed until they’re pale and thick, about 5 minutes. This step is essential, as it incorporates air into the eggs, giving the madeleines their signature light texture.
- Combine Ingredients: Gently fold the almond flour mixture into the beaten eggs, being careful not to deflate them. Add the vanilla and almond extracts, melted butter, and lemon zest, if using. Continue to fold until the mixture is smooth and well combined.
- Fill the Pan: Spoon the batter into the prepared madeleine pan, filling each shell about three-quarters full. The batter should spread slightly but not overflow.
- Bake: Place the pan in the preheated oven and bake for 10-12 minutes, or until the edges are golden brown and the centers spring back when gently pressed.
- Cool and Serve: Allow the madeleines to cool in the pan for a few minutes before transferring them to a wire rack to cool completely. Dust with powdered erythritol before serving, if desired.
Extra Tips:
For the best results, it’s important to let the batter rest in the refrigerator for at least an hour before baking. This resting period helps to firm up the batter and contributes to the characteristic hump that forms on the back of the madeleines during baking.
If you don’t have a madeleine pan, you can use a mini-muffin tin, but the shape and texture may differ slightly. Finally, verify your butter is cooled to room temperature before adding it to the batter to prevent the eggs from cooking prematurely.
Creamy Garlic Chicken

Creamy Garlic Chicken is a delectable low-carb French dish that combines the rich flavors of chicken with a creamy garlic sauce to create a mouthwatering meal. This dish is perfect for those who are looking for a satisfying yet healthy option that doesn’t compromise on taste.
The creamy garlic sauce adds a luscious texture to the tender chicken, making it a favorite for both weeknight dinners and special occasions. This recipe serves 4-6 people and is a fantastic choice for those following a low-carb diet.
With its rich and satisfying flavors, Creamy Garlic Chicken is sure to become a staple in your kitchen. Pair it with a side of steamed vegetables or a fresh green salad to complete the meal. Let’s explore the ingredients and the step-by-step process to create this delicious dish.
Ingredients:
- 6 boneless, skinless chicken breasts
- 1 tablespoon olive oil
- 1 tablespoon butter
- 6 cloves garlic, minced
- 1 cup heavy cream
- 1 cup chicken broth
- 1 teaspoon Dijon mustard
- 1 teaspoon dried thyme
- Salt and pepper to taste
- Fresh parsley, chopped (for garnish)
Cooking Instructions:
- Prepare the Chicken: Begin by seasoning the chicken breasts with salt and pepper on both sides. This will enhance the flavor of the chicken as it cooks.
- Sear the Chicken: In a large skillet, heat the olive oil over medium-high heat. Add the chicken breasts and sear them for about 5-6 minutes on each side, or until they’re golden brown and cooked through. Remove the chicken from the skillet and set aside.
- Make the Sauce: In the same skillet, add the butter and allow it to melt. Then, add the minced garlic and sauté for about 1 minute until it becomes fragrant, being careful not to burn it.
- Combine Ingredients: Pour in the chicken broth, heavy cream, and Dijon mustard. Stir everything together, scraping up any brown bits from the bottom of the skillet, which add flavor to the sauce.
- Simmer and Thicken: Add the dried thyme and let the sauce simmer for about 5 minutes, stirring occasionally, until it thickens slightly.
- Return the Chicken: Place the chicken breasts back into the skillet, making sure they’re well-coated with the sauce. Allow them to simmer in the sauce for another 5 minutes to absorb the flavors.
- Garnish and Serve: Once the chicken is heated through and the sauce has reached your desired consistency, turn off the heat. Garnish with freshly chopped parsley and serve immediately.
Extra Tips:
To guarantee the chicken remains juicy and flavorful, avoid overcooking it during the searing process. If the sauce becomes too thick, you can add a little more chicken broth to reach your preferred consistency.
For an added depth of flavor, consider using fresh thyme instead of dried. This dish can also be customized with other herbs or spices to suit your taste preferences. Enjoy this delightful French-inspired Creamy Garlic Chicken with your favorite low-carb accompaniments for a balanced and delicious meal.
Keto French Onion Soup
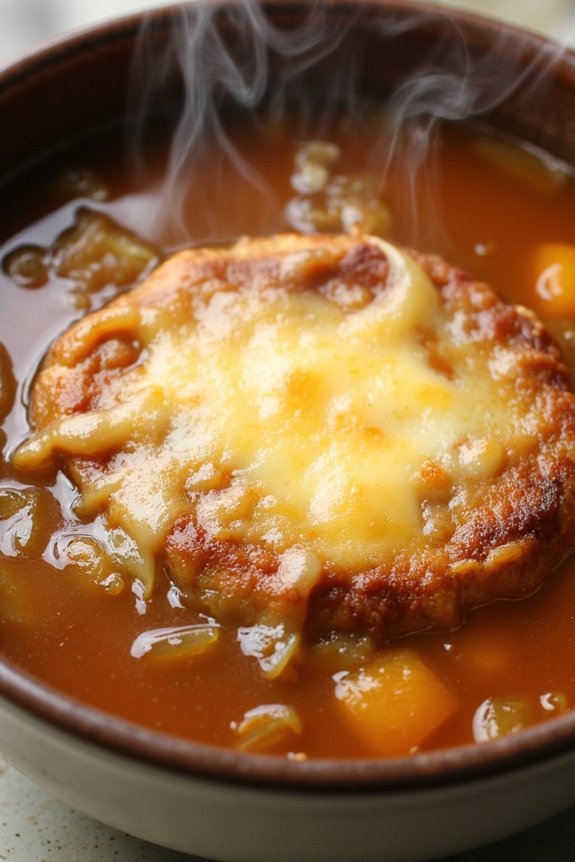
French Onion Soup is a classic dish that can be easily adapted to fit a low-carb, keto-friendly diet without sacrificing its rich and savory flavors. This Keto French Onion Soup maintains the essence of the traditional recipe, featuring caramelized onions in a robust beef broth, topped with a layer of gooey melted cheese. By utilizing keto-friendly ingredients, you can enjoy this comforting soup while staying on track with your dietary goals.
The key to a successful Keto French Onion Soup lies in the slow caramelization of the onions, which develops a deep, sweet flavor that’s the hallmark of this dish. Instead of the usual bread topping, this version uses a low-carb alternative to provide that satisfying crunch. Whether you’re serving it as a starter or a main course, this soup is sure to warm you from the inside out.
Ingredients (Serves 4-6):
- 6 large yellow onions, thinly sliced
- 4 tablespoons unsalted butter
- 2 cloves garlic, minced
- 1 teaspoon dried thyme
- 1 bay leaf
- 1/2 cup dry white wine (optional)
- 8 cups beef broth (preferably homemade or low-sodium)
- Salt and pepper to taste
- 1 tablespoon Worcestershire sauce
- 1/2 teaspoon xanthan gum (optional, for thickening)
- 1 cup shredded Gruyère cheese
- 1/2 cup grated Parmesan cheese
- 4-6 slices of low-carb bread or chaffles (optional, for topping)
Cooking Instructions:
- Caramelize the Onions: In a large pot or Dutch oven, melt the butter over medium heat. Add the sliced onions and cook, stirring occasionally, until they’re deeply caramelized, about 30-45 minutes. This step is essential for developing the soup’s rich flavor.
- Add Garlic and Herbs: Stir in the minced garlic, dried thyme, and bay leaf, and cook for an additional 1-2 minutes until fragrant.
- Deglaze the Pot: Pour in the white wine, if using, and scrape up any browned bits from the bottom of the pot. Allow the wine to reduce by half, about 5 minutes.
- Simmer the Soup: Add the beef broth, Worcestershire sauce, salt, and pepper. Bring the mixture to a boil, then reduce the heat and let it simmer for about 20-30 minutes. If you prefer a slightly thicker soup, stir in the xanthan gum.
- Prepare the Toppings: While the soup simmers, preheat your oven to broil. Arrange the low-carb bread slices or chaffles on a baking sheet and sprinkle with shredded Gruyère and Parmesan cheeses.
- Broil the Toppings: Place the baking sheet under the broiler until the cheese is melted and bubbly, about 3-5 minutes.
- Assemble and Serve: Ladle the soup into oven-safe bowls, place a cheese-topped bread slice or chaffle on top of each serving, and serve immediately.
Extra Tips:
To enhance the flavor of your Keto French Onion Soup, consider using homemade beef broth, which tends to be richer and more flavorful than store-bought versions.
If you’re unable to find Gruyère cheese, Swiss cheese is a suitable substitute. Remember to taste the soup before adding salt, as the cheese and broth can be quite salty on their own.
For a creative twist, try adding a splash of balsamic vinegar to the soup just before serving, which will elevate the sweetness of the caramelized onions.
Herbed Butter Salmon
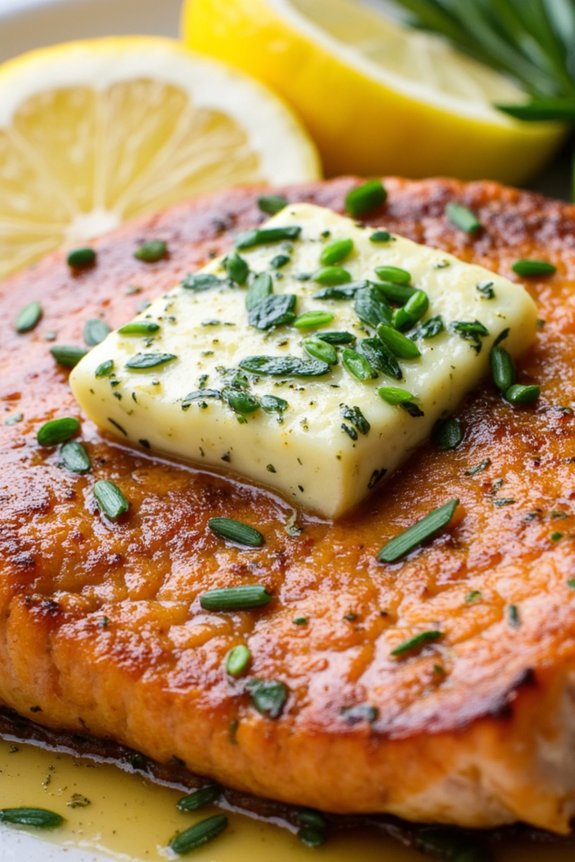
Herbed Butter Salmon is a delightful, low-carb French-inspired dish that combines the rich flavors of fresh herbs and buttery salmon to create a meal that’s both satisfying and healthy. This recipe is perfect for those looking to enjoy a sophisticated meal without the high carb content. The dish uses simple, fresh ingredients to bring out the natural flavors of the salmon, making it a great option for a family dinner or an elegant gathering.
The herbed butter adds an aromatic layer to the salmon, creating a moist, flavorful, and tender fish that’s sure to impress. With its bright and vibrant taste, this dish offers a taste of French cuisine that’s easy to prepare in your own kitchen. The combination of herbs such as parsley, dill, and chives, along with garlic and lemon, complements the rich, buttery texture of the salmon. This recipe serves 4-6 people, making it perfect for a small dinner party or a hearty family meal.
Ingredients:
- 4-6 salmon fillets, skin-on
- 1/2 cup unsalted butter, softened
- 2 tablespoons fresh parsley, finely chopped
- 2 tablespoons fresh dill, finely chopped
- 1 tablespoon fresh chives, finely chopped
- 3 cloves garlic, minced
- 1 lemon, zested and juiced
- Salt and pepper to taste
- Lemon wedges, for serving
Instructions:
- Preheat the Oven: Start by preheating your oven to 375°F (190°C). This temperature is ideal for baking salmon so that it cooks through evenly without drying out.
- Prepare the Herbed Butter: In a medium bowl, combine the softened butter, parsley, dill, chives, minced garlic, lemon zest, and lemon juice. Mix well until all the ingredients are fully incorporated, forming a smooth and fragrant herbed butter.
- Season the Salmon: Place the salmon fillets on a baking sheet lined with parchment paper or aluminum foil. Season each fillet with salt and pepper on both sides to taste.
- Apply the Herbed Butter: Spread the herbed butter generously over the top of each salmon fillet. Make sure to cover the surface evenly, allowing the butter to melt over the salmon as it cooks.
- Bake the Salmon: Place the baking sheet in the preheated oven and bake for about 15-20 minutes, or until the salmon is cooked through and flakes easily with a fork. The internal temperature should reach 145°F (63°C).
- Serve: Remove the salmon from the oven and let it rest for a few minutes. Serve warm with lemon wedges on the side for an extra burst of citrus flavor.
Extra Tips:
When selecting salmon for this dish, opt for high-quality, fresh fillets to guarantee the best flavor and texture. If possible, choose wild-caught salmon, as it tends to have a richer taste.
Softening the butter to room temperature before mixing will make it easier to incorporate the herbs evenly. Be cautious not to overcook the salmon; it should remain moist and tender.
For a complete low-carb meal, consider serving the Herbed Butter Salmon with a side of steamed asparagus or a fresh green salad.
Spinach and Cheese Soufflé

Spinach and Cheese Soufflé is a classic French dish that combines the delicate flavors of fresh spinach with the richness of cheese, creating a fluffy, savory delight. This dish is perfect for a low-carb diet, as it relies on the natural creaminess of the cheese and the lightness of whipped egg whites to achieve its airy texture.
Soufflés are known for their impressive rise and light texture, making them an elegant choice for a dinner party or a special family meal. The key to a successful soufflé lies in the preparation of the ingredients and the careful folding of the delicate egg whites into the spinach and cheese mixture.
This recipe is designed for 4-6 people, guaranteeing everyone gets to enjoy a generous helping of this delightful dish. The combination of spinach, Gruyère cheese, and perfectly whipped egg whites creates a harmonious blend of flavors and textures that will have your guests asking for seconds.
Ingredients (for 4-6 servings):
- 3 tablespoons unsalted butter
- 3 tablespoons almond flour
- 1 cup whole milk
- 1/2 teaspoon salt
- 1/4 teaspoon ground nutmeg
- 1/4 teaspoon black pepper
- 6 large eggs, separated
- 1 cup grated Gruyère cheese
- 2 cups fresh spinach, chopped
- 1/4 teaspoon cream of tartar
Cooking Instructions:
- Preheat Oven and Prepare Ramekins: Start by preheating your oven to 375°F (190°C). Butter six ramekins and dust them lightly with almond flour to prevent sticking. This will help the soufflés rise evenly.
- Cook the Spinach: In a medium-sized saucepan over medium heat, melt one tablespoon of butter. Add the chopped spinach and sauté until wilted, about 3-4 minutes. Remove the spinach from the pan and set aside to cool.
- Prepare the Base: In the same saucepan, melt the remaining butter over medium heat. Stir in the almond flour and cook for about 1 minute. Gradually add the milk, whisking continuously to prevent lumps. Cook until the mixture thickens, approximately 2-3 minutes. Remove from heat and stir in salt, nutmeg, and black pepper.
- Combine with Spinach and Cheese: Once the base mixture is slightly cooled, mix in the egg yolks, one at a time. Stir in the grated Gruyère cheese and the cooked spinach until well combined.
- Whip the Egg Whites: In a clean, dry bowl, add the egg whites and cream of tartar. Using an electric mixer, beat the egg whites until stiff peaks form. This step is essential for achieving the airy texture of the soufflé.
- Fold the Egg Whites: Gently fold one-third of the whipped egg whites into the spinach and cheese mixture to lighten it. Carefully fold in the remaining egg whites until just combined, being cautious not to deflate the mixture.
- Fill and Bake: Divide the mixture evenly among the prepared ramekins, filling them almost to the top. Place them on a baking sheet and bake in the preheated oven for 20-25 minutes, or until the soufflés are puffed up and golden brown on top. Avoid opening the oven door during baking to prevent them from collapsing.
- Serve Immediately: Once baked, serve the soufflés immediately. They’re best enjoyed right out of the oven when they’re at their fluffiest.
Extra Tips:
When making a soufflé, timing is everything. Whipping the egg whites to the right consistency and gently folding them into the base mixture is vital to achieving the perfect rise.
Confirm your oven is fully preheated before placing the soufflés in, and resist the temptation to open the oven door during baking. These soufflés can also be customized by adding herbs or different types of cheese to suit your taste. Enjoy experimenting with this versatile and impressive dish!
Low-Carb Quiche Lorraine

Low-Carb Quiche Lorraine is a delightful and savory dish that brings a taste of France to your table while keeping carbohydrates to a minimum. This classic French recipe has been adapted to fit a low-carb lifestyle by using ingredients that are both flavorful and diet-friendly. The creamy filling, rich with eggs and cream, is complemented by the smoky bacon and the sharpness of Gruyère cheese, all encased in a buttery almond flour crust that keeps the carbs in check.
This dish is perfect for breakfast, brunch, or even a light dinner, and it’s sure to impress your guests with its sophisticated flavors and elegant presentation.
To make a Low-Carb Quiche Lorraine that serves 4-6 people, you’ll need to begin by preparing the almond flour crust, which serves as a delicious and healthy alternative to traditional pastry crusts. Once the crust is ready, you can focus on creating the filling, which combines eggs, cream, bacon, and cheese to create a rich and satisfying dish.
The quiche is baked to golden perfection, making it a visually appealing and mouthwatering addition to any meal. With the right ingredients and a little bit of patience, you’ll be able to master this low-carb take on a French classic.
Ingredients
- 1 1/2 cups almond flour
- 1/4 cup unsalted butter, melted
- 1/4 teaspoon salt
- 6 large eggs
- 1 cup heavy cream
- 1 cup Gruyère cheese, grated
- 6 slices bacon, cooked and crumbled
- 1/4 teaspoon ground nutmeg
- Salt and pepper, to taste
Instructions
- Prepare the Crust: Preheat your oven to 350°F (175°C). In a medium bowl, mix the almond flour, melted butter, and 1/4 teaspoon of salt until the mixture resembles wet sand. Press this mixture into the bottom and up the sides of a 9-inch pie pan to form an even crust. Use a fork to prick the bottom of the crust to prevent it from bubbling up during baking.
- Bake the Crust: Place the crust in the preheated oven and bake for about 10 minutes or until it’s lightly golden. Remove from the oven and set aside to cool slightly while you prepare the filling.
- Prepare the Filling: In a large mixing bowl, whisk together the eggs and heavy cream until well combined. Stir in the grated Gruyère cheese, crumbled bacon, ground nutmeg, and a pinch of salt and pepper. Mix until all ingredients are evenly distributed.
- Assemble the Quiche: Pour the egg mixture into the pre-baked crust, spreading it out evenly. Use a spatula to make sure the bacon and cheese are evenly distributed throughout the filling.
- Bake the Quiche: Return the filled quiche to the oven and bake for 30-35 minutes, or until the filling is set and the top is golden brown. To check for doneness, insert a knife into the center of the quiche; it should come out clean.
- Cool and Serve: Once baked, remove the quiche from the oven and allow it to cool for at least 10 minutes before slicing. This will help the filling set further and make it easier to cut neat slices. Serve warm or at room temperature.
Extra Tips
For a more flavorful crust, consider adding a teaspoon of dried herbs such as thyme or rosemary to the almond flour mixture. If Gruyère cheese isn’t available, you can substitute it with Swiss cheese or another type of semi-hard cheese that melts well.
When cooking the bacon, aim for a crispy texture as this will add a satisfying crunch to each bite of quiche. Finally, if you prefer a more pronounced nutmeg flavor, you can increase the amount slightly, keeping in mind that a little goes a long way.
Enjoy your Low-Carb Quiche Lorraine as part of a balanced meal with a side salad or roasted vegetables.
Chocolate Avocado Mousse
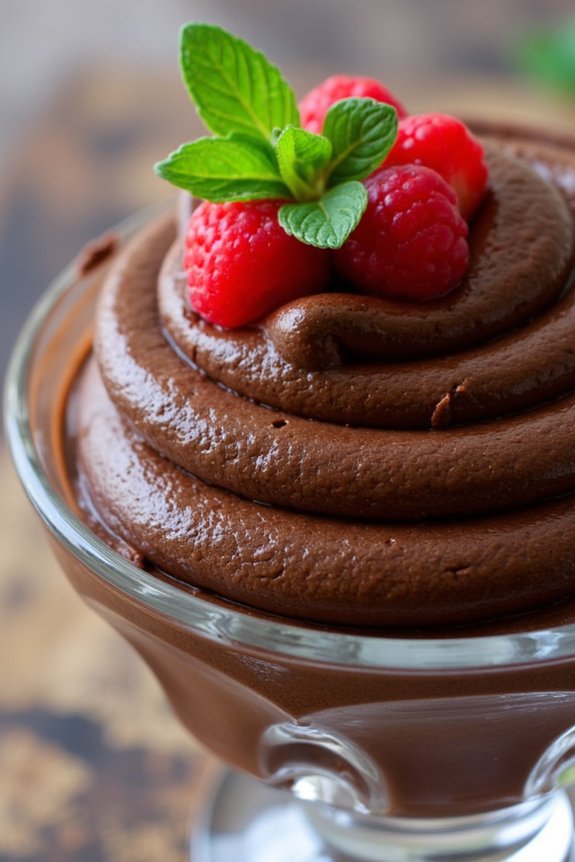
Indulge in a velvety and rich French-inspired dessert with a healthy twist: Chocolate Avocado Mousse. This delectable treat combines the creaminess of ripe avocados with the deep, luscious flavor of dark chocolate, creating a dessert that’s not only low in carbohydrates but also packed with nutrients.
Perfect for those looking to enjoy a guilt-free dessert, this mousse is both satisfying and simple to prepare, making it an ideal option for dinner parties or a cozy night in. The natural creaminess of avocados provides a smooth texture without the need for heavy cream or sugar, while the richness of dark chocolate guarantees that every spoonful is a delightful experience.
The subtle addition of natural sweeteners and a hint of vanilla enhances the dessert’s flavor profile, making it a favorite among both health-conscious individuals and dessert enthusiasts. Whether you’re a seasoned chef or a beginner in the kitchen, you’ll find this Chocolate Avocado Mousse easy to make and even easier to enjoy.
Ingredients for 4-6 Servings:
- 3 ripe avocados, peeled and pitted
- 1 cup (200g) dark chocolate chips (70% cocoa or higher)
- 1/4 cup (60ml) unsweetened almond milk
- 1/4 cup (60ml) maple syrup or honey
- 1 teaspoon vanilla extract
- A pinch of sea salt
- Fresh berries and mint leaves for garnish (optional)
Cooking Instructions:
- Melt the Chocolate: Begin by melting the dark chocolate chips. You can do this by placing the chocolate in a heatproof bowl over a pot of simmering water (double boiler method) or by microwaving in 30-second intervals, stirring in between, until smooth and completely melted. Set aside to cool slightly.
- Prepare the Avocado Base: In a blender or food processor, combine the ripe avocados, almond milk, maple syrup (or honey), vanilla extract, and a pinch of sea salt. Blend on high speed until the mixture is smooth and creamy.
- Incorporate the Chocolate: Add the slightly cooled, melted chocolate to the avocado mixture. Blend again until the chocolate is fully incorporated and the mixture is smooth and uniform.
- Chill the Mousse: Transfer the mousse mixture into serving glasses or bowls. Cover with plastic wrap and refrigerate for at least 2 hours, allowing the mousse to set and the flavors to meld.
- Serve and Garnish: Before serving, garnish each serving with fresh berries and mint leaves if desired. Enjoy your Chocolate Avocado Mousse chilled for the best texture and flavor.
Extra Tips:
For a more intense chocolate flavor, consider adding a tablespoon of unsweetened cocoa powder to the avocado mixture before blending. If you prefer a sweeter mousse, adjust the sweetener to taste, keeping in mind that the sweetness can be affected by the ripeness of the avocados and the type of chocolate used.
For an added twist, a pinch of cinnamon or chili powder can be incorporated for a subtle spice. Remember, the key to the perfect texture is using ripe avocados, so confirm they’re soft to the touch but not overripe. Enjoy this delicious, low-carb dessert knowing you’ve created a healthy treat with a touch of French elegance.