

There’s something truly special about strolling through a French market and discovering vibrant produce and fragrant herbs. The joy of transforming these fresh finds into delightful dishes is an experience I love sharing. From zesty lemon madeleines to rustic ratatouille, these recipes bring a touch of magic to everyday cooking. Ready to sprinkle some French flair into your kitchen? Let’s explore these charming recipes together.
Rustic Ratatouille
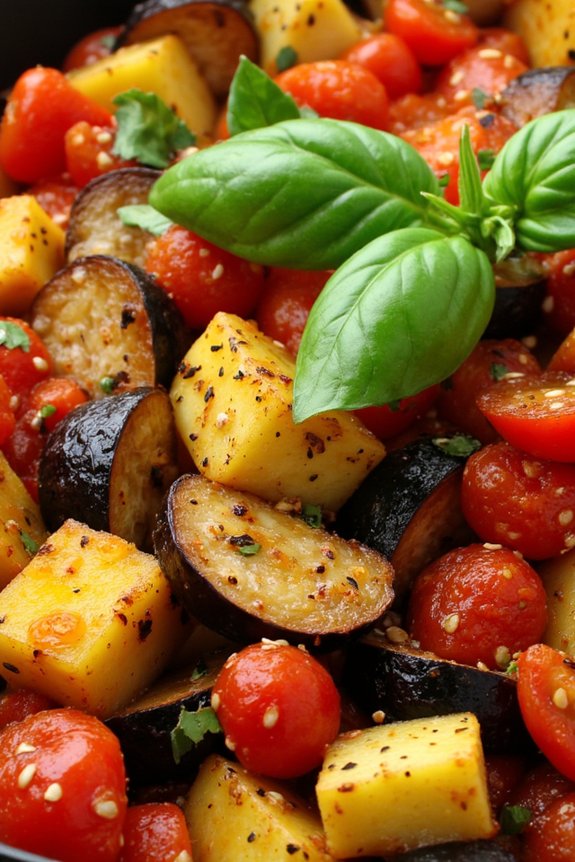
Ratatouille is a classic French Provençal stewed vegetable dish that perfectly captures the essence of rustic French cooking. This Rustic Ratatouille not only highlights the fresh, vibrant flavors of the vegetables but also pays homage to the traditional methods of slow cooking that bring out the natural sweetness and depth of flavor.
It’s a dish that celebrates simplicity, allowing each ingredient to shine through harmoniously, making it a delightful accompaniment or a satisfying main course.
To make this Rustic Ratatouille, you need to source the freshest vegetables available, ideally straight from a local market where they’re ripe and full of flavor. The beauty of this dish lies in its flexibility; while it has a few staple ingredients, you can adjust based on what’s in season or available.
The gentle cooking process melds the flavors together, resulting in a comforting and nourishing dish that’s perfect for any occasion.
Ingredients (Serves 4-6):
- 2 medium eggplants
- 2 zucchini
- 1 red bell pepper
- 1 yellow bell pepper
- 1 large onion
- 3 cloves garlic
- 4 ripe tomatoes
- 1/4 cup olive oil
- 1 teaspoon dried thyme
- 1 teaspoon dried oregano
- Salt and pepper to taste
- Fresh basil leaves for garnish
Cooking Instructions:
- Prepare the Vegetables: Begin by washing all the vegetables thoroughly. Cut the eggplants and zucchinis into 1/2-inch cubes. Dice the onion and bell peppers, and mince the garlic cloves. For the tomatoes, you can either dice them or use a food processor to make a rough puree.
- Sauté the Onions and Garlic: In a large heavy-bottomed pot or Dutch oven, heat the olive oil over medium heat. Add the diced onions and minced garlic, and sauté until the onions become translucent and the garlic is fragrant, about 3-4 minutes.
- Cook the Vegetables: Add the diced eggplants and cook for about 5 minutes, stirring occasionally, until they start to soften. Next, add the zucchini and bell peppers, continuing to stir and cook for another 5 minutes.
- Add the Tomatoes and Herbs: Stir in the tomatoes, thyme, oregano, salt, and pepper. Mix well to confirm all the vegetables are coated with the spices.
- Simmer: Reduce the heat to low, cover the pot, and let the ratatouille simmer gently for about 30-40 minutes. Stir occasionally to prevent sticking and confirm even cooking. The vegetables should be tender and the flavors well combined.
- Adjust Seasoning: Taste and adjust the seasoning, adding more salt or pepper as needed.
- Serve: Once cooked, remove from heat and let it sit for a few minutes before serving. Garnish with fresh basil leaves and serve warm. This dish can be enjoyed on its own or as a side with crusty bread or rice.
Extra Tips:
For the best flavor, try to make Rustic Ratatouille a day ahead of time. Allowing it to sit overnight enhances the flavors as they meld together beautifully.
You can also experiment by adding other herbs like rosemary or a splash of balsamic vinegar for a tangy twist. If you prefer a slightly richer texture, you can drizzle a bit more olive oil before serving.
Provencal Tomato Tart

The Provencal Tomato Tart is a delightful and savory dish that beautifully embodies the flavors of the French countryside. This tart combines the sweetness of ripe tomatoes with the earthiness of fresh herbs, all encased in a flaky pastry crust. It’s perfect for a casual lunch or an elegant dinner, offering a taste of Provence in every bite.
The dish is simple to prepare yet impressive enough to serve to guests, showcasing the vibrant colors and fresh ingredients typical of French market cuisine. This recipe serves 4-6 people, making it ideal for a small gathering or as part of a larger spread. The combination of juicy tomatoes, aromatic herbs, and creamy cheese creates a rich and satisfying flavor profile that’s sure to please.
Whether you’re looking to impress friends with your culinary skills or simply want to enjoy a delicious homemade meal, the Provencal Tomato Tart is a must-try recipe that celebrates the best of French flavors.
Ingredients:
- 1 sheet of puff pastry, thawed
- 4-5 medium ripe tomatoes
- 1 cup grated Gruyere cheese
- 1/4 cup Dijon mustard
- 1 tablespoon olive oil
- 2 teaspoons Herbes de Provence
- Salt and pepper to taste
- Fresh basil leaves for garnish
Instructions:
- Preheat the Oven: Start by preheating your oven to 400°F (200°C). This guarantees that the oven is hot enough to create a crisp, golden crust for your tart.
- Prepare the Pastry: Roll out the thawed puff pastry on a floured surface to fit a tart pan or baking sheet. Carefully place it into the pan and trim any excess dough.
- Spread the Mustard: Evenly spread the Dijon mustard over the base of the pastry. This will add a layer of flavor and help to prevent the pastry from becoming soggy from the tomatoes.
- Layer the Cheese: Sprinkle the grated Gruyere cheese evenly over the mustard-covered pastry. The cheese will melt as it bakes, creating a deliciously creamy layer.
- Slice and Arrange the Tomatoes: Slice the tomatoes into thin rounds and arrange them in an overlapping pattern over the cheese. This not only looks appealing but guarantees every bite has the perfect tomato flavor.
- Season the Tart: Drizzle olive oil over the tomatoes, then sprinkle with Herbes de Provence, salt, and pepper. These seasonings enhance the natural sweetness of the tomatoes and add a fragrant herbal note.
- Bake the Tart: Place the tart in the preheated oven and bake for 25-30 minutes, or until the pastry is puffed and golden brown, and the tomatoes are slightly caramelized.
- Garnish and Serve: Once baked, remove the tart from the oven and let it cool slightly. Garnish with fresh basil leaves before slicing and serving.
Extra Tips:
For the best results, use the ripest tomatoes you can find, as they’ll be the star of the dish. If you prefer a slightly crispier crust, you can pre-bake the pastry for about 5 minutes before adding the toppings.
Feel free to experiment with different types of cheese, such as mozzarella or feta, to customize the tart to your taste. Make sure to let the tart rest for a few minutes after baking to make slicing easier and to allow the flavors to meld together.
Classic French Onion Soup

French Onion Soup is a quintessential dish that embodies the heart and soul of French cuisine. Known for its rich, savory broth and caramelized onions, this soup is a comforting favorite perfect for cold nights. The key to a classic French Onion Soup lies in slowly cooking the onions to develop their natural sweetness and complexity.
Once the onions are perfectly caramelized, they’re combined with a robust beef broth, seasoned with thyme and bay leaves, and finished with a splash of wine for added depth. Traditionally, French Onion Soup is served with a crusty baguette slice topped with melted Gruyère or Swiss cheese. This creates a delightful contrast between the silky soup and the crispy, cheesy bread.
The simplicity of its ingredients belies the depth of flavor achieved with patience and care. Whether served as a starter or a main course, this soup is sure to impress with its rich flavor and comforting warmth.
Ingredients (serving size: 4-6 people):
- 6 large onions, thinly sliced
- 4 tablespoons unsalted butter
- 2 tablespoons olive oil
- 1 teaspoon salt
- 1/2 teaspoon sugar
- 2 cloves garlic, minced
- 1/2 cup dry white wine
- 8 cups beef broth
- 2 bay leaves
- 1 teaspoon fresh thyme leaves (or 1/2 teaspoon dried thyme)
- Salt and pepper to taste
- 1 baguette, sliced
- 2 cups grated Gruyère or Swiss cheese
Cooking Instructions:
- Caramelize the Onions: In a large pot or Dutch oven, melt the butter with the olive oil over medium heat. Add the sliced onions, salt, and sugar. Cook, stirring occasionally, until the onions are deep golden brown and caramelized, about 30 to 40 minutes. Be patient; this step is essential for developing flavor.
- Add Garlic and Deglaze: Add the minced garlic to the caramelized onions and cook for another minute until fragrant. Pour in the white wine to deglaze the pan, using a wooden spoon to scrape up any browned bits from the bottom. Simmer until the wine is reduced by half.
- Simmer the Broth: Add the beef broth, bay leaves, and thyme to the pot. Bring the soup to a simmer and let it cook for 20 to 30 minutes to allow the flavors to meld. Season with salt and pepper according to taste.
- Prepare the Bread Topping: While the soup simmers, preheat the oven to 400°F (200°C). Arrange the baguette slices on a baking sheet and toast in the oven until golden brown, about 5 minutes. Remove from the oven and set aside.
- Assemble and Serve: Ladle the hot soup into oven-safe bowls. Top each serving with a toasted baguette slice and a generous amount of grated cheese. Place the bowls on a baking sheet and broil in the oven until the cheese is melted and bubbly, about 3 to 5 minutes. Serve immediately.
Extra Tips: For the best flavor, use a mix of yellow and sweet onions when making your soup. This combination enhances the sweetness and complexity of the dish.
If you prefer a stronger cheese flavor, consider using a mix of Gruyère and Parmesan. Finally, keep an eye on your onions as they caramelize; stir them frequently to prevent burning and guarantee even cooking. Enjoy your Classic French Onion Soup with a glass of wine or a light salad for a complete meal.
Herbed Goat Cheese Tartines
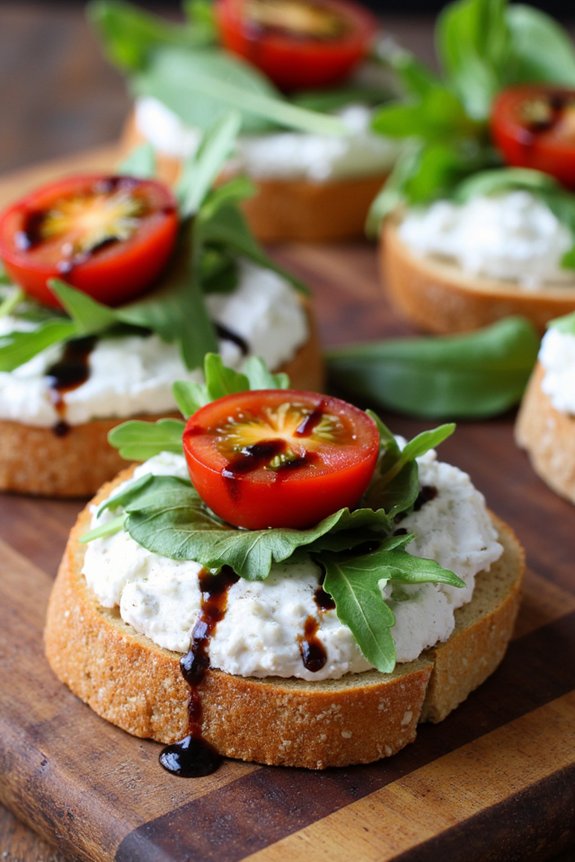
Herbed Goat Cheese Tartines are a delightful and elegant addition to any meal, offering a rich blend of flavors that are both rustic and refined. These tartines are perfect for a light lunch, an appetizer at a dinner party, or a charming addition to a brunch spread. The creamy goat cheese, infused with fresh herbs, is spread over crusty slices of baguette and topped with vibrant ingredients that capture the essence of a French market.
The secret to crafting these exquisite tartines lies in the balance of flavors and textures. The goat cheese provides a tangy and creamy base, while the herbs add a fresh and aromatic dimension. The crunchy baguette slices are the perfect vehicle for this savory topping, providing both a satisfying crunch and a neutral backdrop that lets the other ingredients shine. With just a few simple ingredients and a little bit of time, you can create a dish that transports you to a quaint café in the heart of France.
Ingredients (Serves 4-6):
- 1 French baguette
- 8 ounces of goat cheese
- 2 tablespoons of olive oil
- 1 tablespoon of fresh thyme leaves, chopped
- 1 tablespoon of fresh chives, chopped
- 1 clove of garlic, minced
- Salt and pepper to taste
- 1 cup of cherry tomatoes, halved
- 1/4 cup of arugula leaves
- 1 tablespoon of balsamic glaze
Cooking Instructions:
- Prepare the Baguette: Preheat your oven to 375°F (190°C). Slice the baguette into 1/2-inch thick slices. Arrange the slices on a baking sheet and lightly brush both sides with olive oil. Place in the oven and toast for about 8-10 minutes, or until they’re golden brown and crispy. Remove from the oven and let them cool slightly.
- Mix the Goat Cheese: In a medium-sized bowl, combine the goat cheese, olive oil, chopped thyme, chopped chives, minced garlic, salt, and pepper. Mix until the ingredients are well combined and the goat cheese is smooth and spreadable.
- Assemble the Tartines: Spread a generous amount of the herbed goat cheese mixture onto each toasted baguette slice. Be sure to cover the slice evenly for a consistent flavor in every bite.
- Add the Toppings: Top each tartine with a few halved cherry tomatoes and a couple of arugula leaves. Drizzle a small amount of balsamic glaze over the top for an extra layer of flavor.
- Final Touches: Arrange the tartines on a serving platter. Serve immediately while the baguette slices are still slightly warm, which enhances the flavors of the cheese and herbs.
Extra Tips:
When preparing Herbed Goat Cheese Tartines, consider using a high-quality goat cheese for the best flavor and texture. If you prefer a milder taste, you can substitute with cream cheese or ricotta.
Fresh herbs are essential for this recipe, but if you need to substitute with dried herbs, reduce the quantity by about half, as dried herbs are more concentrated. You can also experiment with additional toppings like roasted bell peppers or olives for a unique twist.
Ultimately, prepare the toppings and cheese mixture in advance to save time on the day of serving.
Fresh Nicoise Salad

The Fresh Nicoise Salad is a classic French dish that embodies the vibrant flavors of the Mediterranean. Known for its beautiful presentation and balanced combination of fresh ingredients, this salad is both nourishing and delightful. It traditionally includes a variety of vegetables, hard-boiled eggs, and tuna, all brought together with a zesty vinaigrette, making it a perfect choice for a light lunch or a revitalizing dinner. Its colorful array of ingredients not only makes it a visual feast but also offers a burst of flavors with each bite.
In this recipe, we aim to capture the essence of a traditional Nicoise Salad while focusing on fresh, high-quality ingredients. The salad is meant to be a harmonious blend of textures and flavors, with the crispness of vegetables, the richness of tuna, and the tang of the dressing. This recipe serves 4-6 people, providing a generous portion for each person to savor and enjoy. Whether you’re a seasoned cook or trying your hand at French cuisine for the first time, this dish is sure to impress.
Ingredients (Serves 4-6):
- 2 cups cherry tomatoes, halved
- 1 pound small potatoes, boiled and quartered
- 1/2 pound green beans, trimmed and blanched
- 1/2 red onion, thinly sliced
- 4 hard-boiled eggs, peeled and quartered
- 1/4 cup black olives, pitted
- 2 cans (5-6 oz each) tuna, packed in olive oil, drained
- 1 small head of Bibb or butter lettuce, leaves separated
- 2 tablespoons capers, rinsed
- 1/4 cup fresh parsley, chopped
- Salt and black pepper to taste
For the Vinaigrette:
- 1/3 cup extra-virgin olive oil
- 2 tablespoons red wine vinegar
- 1 tablespoon Dijon mustard
- 1 clove garlic, minced
- Salt and black pepper to taste
Cooking Instructions:
- Prepare the Vegetables: Start by boiling the small potatoes in salted water until tender, about 15-20 minutes. Drain and set aside to cool. Blanch the green beans in boiling water for 2-3 minutes, then transfer them to an ice bath to stop the cooking process. Drain and set aside.
- Make the Vinaigrette: In a small bowl, whisk together the olive oil, red wine vinegar, Dijon mustard, and minced garlic. Season with salt and pepper to taste. Adjust the flavors as necessary, verifying the dressing is well-balanced.
- Assemble the Salad Base: On a large platter or serving bowl, arrange the lettuce leaves to create a bed for the salad. Layer the boiled potatoes, blanched green beans, and halved cherry tomatoes over the lettuce.
- Add Remaining Ingredients: Scatter the sliced red onion, black olives, and capers over the salad. Place the quartered hard-boiled eggs evenly around the dish. Break the drained tuna into chunks and distribute it over the top.
- Dress the Salad: Drizzle the prepared vinaigrette evenly over the entire salad. Toss gently to verify all ingredients are coated with the dressing. Sprinkle with chopped parsley for a fresh finish.
- Season and Serve: Taste the salad and adjust the seasoning with additional salt and pepper if necessary. Serve immediately to enjoy the freshest flavors.
Extra Tips:
For the best results, use high-quality tuna packed in olive oil, as it enhances the salad’s richness and flavor. When blanching the green beans, verify they remain bright and crisp by not overcooking them.
To save time, you can prepare the potatoes and green beans in advance and store them in the refrigerator until ready to use. When serving, arrange the salad components attractively to maintain the classic Nicoise presentation and encourage guests to enjoy it with their eyes first.
Savory Mushroom Quiche
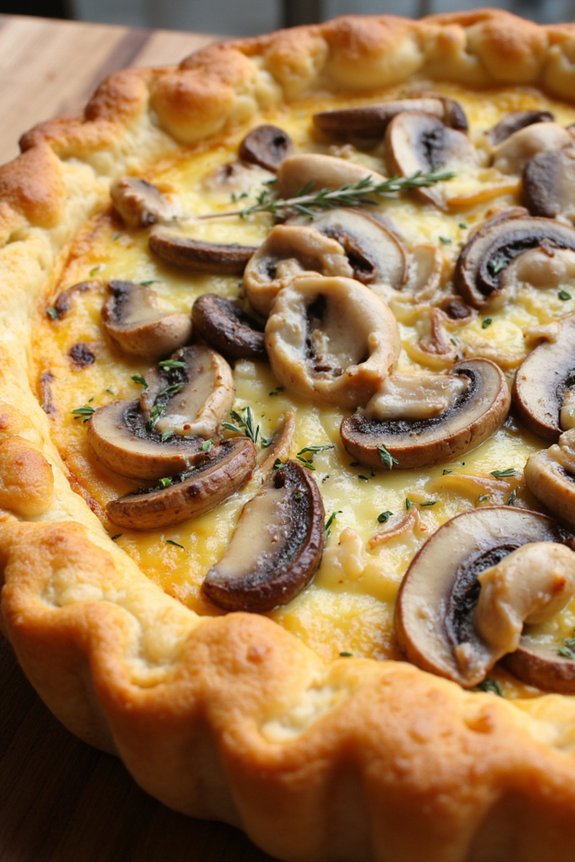
Savory Mushroom Quiche is a delightful dish that beautifully combines the earthiness of mushrooms with the rich creaminess of a classic quiche filling. Perfect for brunch, lunch, or even a light dinner, this French-inspired recipe is bound to impress your family and friends.
The flaky crust provides a satisfying contrast to the soft, savory filling, while the aromatic herbs and cheese add layers of flavor that will delight your taste buds. This dish isn’t only delicious but also versatile, allowing you to customize the ingredients to suit your preferences or dietary needs.
Whether you choose to serve it warm from the oven or at room temperature, the Savory Mushroom Quiche is a welcome addition to any meal. Its preparation is straightforward, making it an ideal recipe for home cooks of all skill levels. Gather your ingredients, and let’s get cooking!
Ingredients (Serves 4-6):
- 1 pre-made pie crust
- 2 tablespoons olive oil
- 1 medium onion, finely chopped
- 2 cloves garlic, minced
- 2 cups mixed mushrooms, sliced
- 1 teaspoon thyme, dried
- 1 teaspoon rosemary, dried
- 3 large eggs
- 1 cup heavy cream
- 1/2 cup whole milk
- 1 cup Gruyère cheese, grated
- Salt and pepper to taste
Instructions:
1. Preheat the Oven: Start by preheating your oven to 375°F (190°C). This guarantees that your quiche will cook evenly.
2. Prepare the Crust: Roll out the pre-made pie crust and carefully fit it into a 9-inch pie pan. Trim any excess dough and use a fork to prick the bottom of the crust. This prevents bubbling during baking. Place the crust in the refrigerator to chill while you prepare the filling.
3. Cook the Vegetables: In a large skillet, heat the olive oil over medium heat. Add the chopped onion and cook until it becomes translucent, about 5 minutes. Stir in the minced garlic, sliced mushrooms, thyme, and rosemary.
Season with salt and pepper, and cook until the mushrooms are tender and all the moisture has evaporated, about 8-10 minutes. Remove from heat and let cool slightly.
4. Prepare the Egg Mixture: In a large bowl, whisk together the eggs, heavy cream, and whole milk until well combined. Stir in the grated Gruyère cheese and the cooked mushroom mixture. Mix until everything is evenly distributed.
5. Assemble the Quiche: Pour the mushroom and egg mixture into the prepared pie crust, spreading it evenly. Make sure the filling is smooth on top.
6. Bake the Quiche: Place the quiche on a baking sheet and bake in the preheated oven for 35-40 minutes, or until the filling is set and the top is golden brown. A knife inserted into the center should come out clean.
7. Cool and Serve: Remove the quiche from the oven and let it cool on a wire rack for at least 10 minutes before slicing. This resting time allows the custard to set completely and makes for cleaner slices.
Extra Tips:
For a more robust flavor, consider using a mix of wild mushrooms such as shiitake, cremini, and oyster mushrooms. If you prefer a more herby note, fresh thyme and rosemary can be used in place of dried herbs.
Additionally, feel free to substitute the Gruyère cheese with another type of cheese like Swiss or Emmental if you prefer. Remember to not overfill the crust with the egg mixture, as it will expand slightly during baking. Enjoy your Savory Mushroom Quiche warm or at room temperature for the best taste experience.
Zesty Lemon Madeleines

Zesty Lemon Madeleines are a delightful treat that embodies the charm and elegance of French patisserie. These small, shell-shaped cakes are known for their light, airy texture and subtle, citrusy flavor. Perfect for an afternoon tea or as a sweet ending to a meal, Zesty Lemon Madeleines bring a touch of sophistication to any occasion. The fresh zest and juice of lemons infuse these madeleines with a bright, tangy flavor that’s both invigorating and irresistible.
To create these delightful confections, you’ll need to master a simple batter, which is then baked to perfection in a traditional madeleine pan. The key to achieving their characteristic humps and delicate texture lies in the careful folding of ingredients and the strategic chilling of the batter before baking. With a little practice and patience, you’ll be able to whip up a batch of these iconic cakes that capture the essence of French baking.
Ingredients (Serves 4-6)
- 1 cup all-purpose flour
- 1/2 teaspoon baking powder
- 1/4 teaspoon salt
- 2 large eggs
- 2/3 cup granulated sugar
- 1 teaspoon vanilla extract
- 1 tablespoon lemon zest
- 2 tablespoons lemon juice
- 1/2 cup unsalted butter, melted and cooled
- Powdered sugar for dusting (optional)
Cooking Instructions
- Prepare the dry ingredients: In a medium bowl, whisk together the flour, baking powder, and salt. Set aside.
- Mix the wet ingredients: In a separate large bowl, beat the eggs and granulated sugar together using an electric mixer on medium-high speed until the mixture becomes pale and thick, about 3-5 minutes. Add in the vanilla extract, lemon zest, and lemon juice, and mix until fully combined.
- Combine the batter: Gently fold the dry ingredients into the wet mixture in three additions, being careful not to overmix. Then, gradually fold in the melted butter until the batter is smooth and homogenous.
- Chill the batter: Cover the bowl with plastic wrap and refrigerate the batter for at least 1 hour, or up to overnight. This chilling step is vital for achieving the classic hump and texture of madeleines.
- Prepare the pan: Preheat your oven to 375°F (190°C). Grease a madeleine pan with butter and lightly dust with flour, tapping out any excess.
- Fill the molds: Spoon the chilled batter into the prepared madeleine molds, filling each mold about 3/4 full.
- Bake the madeleines: Bake in the preheated oven for 10-12 minutes or until the edges are golden brown and the centers spring back when lightly touched.
- Cool and serve: Remove the madeleines from the oven and let them cool in the pan for a few minutes before transferring them to a wire rack. Dust with powdered sugar before serving, if desired.
Extra Tips
To guarantee your Zesty Lemon Madeleines have the perfect texture, make sure not to overmix the batter, as this can lead to dense cakes.
Chilling the batter is essential; it helps the madeleines rise properly and develop their characteristic hump.
If you don’t have a madeleine pan, you can use a mini muffin pan as an alternative, though the shape will differ.
For the best flavor, use fresh lemons for both the zest and juice. When zesting, avoid the white pith, as it can be bitter.
Enjoy your madeleines fresh, as they’re best consumed the day they’re made.
Traditional Coq Au Vin
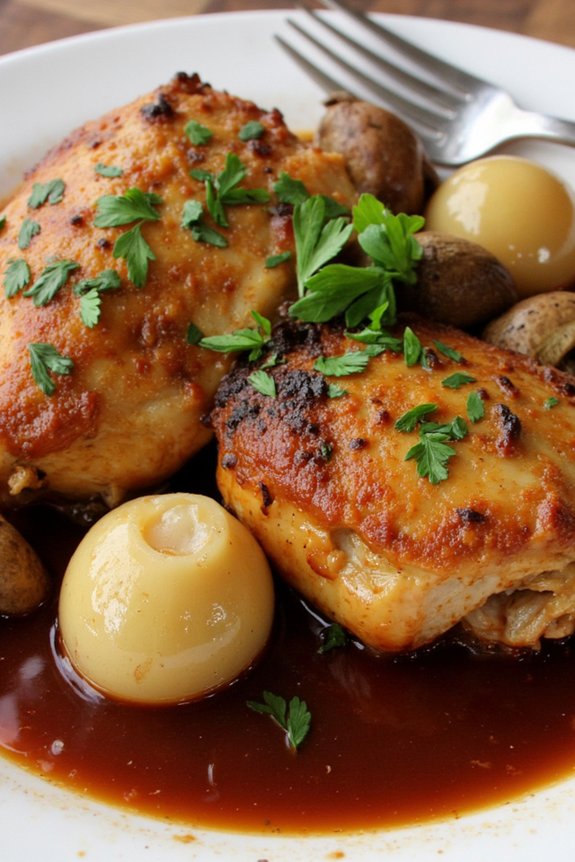
Traditional Coq Au Vin is a classic French dish that embodies the essence of rustic and comforting cuisine. Originating from the Burgundy region, this dish features chicken braised with red wine, mushrooms, lardons, and onions, resulting in a rich and flavorful stew. It’s a perfect choice for a cozy dinner, especially when you want to impress guests with your culinary skills.
The long, slow cooking process allows the flavors to meld beautifully, creating a tender and aromatic dish that pairs wonderfully with crusty bread or creamy mashed potatoes.
This recipe for Traditional Coq Au Vin serves 4-6 people, making it an ideal choice for a family gathering or a small dinner party. The ingredients are simple yet flavorful, and the cooking process, while requiring some patience, is straightforward enough for home cooks of all skill levels.
By following the step-by-step instructions, you’ll be able to create a delightful dish that’s sure to become a favorite in your culinary repertoire.
Ingredients:
- 1 whole chicken, cut into 8 pieces
- Salt and freshly ground black pepper
- 2 tablespoons olive oil
- 4 ounces bacon or pancetta, diced
- 2 tablespoons unsalted butter
- 12 pearl onions, peeled
- 2 cloves garlic, minced
- 2 tablespoons all-purpose flour
- 2 cups red wine (preferably Burgundy or Pinot Noir)
- 1 cup chicken stock
- 1 tablespoon tomato paste
- 1 bouquet garni (parsley, thyme, and bay leaf tied together)
- 8 ounces mushrooms, quartered
- 2 tablespoons chopped fresh parsley
Instructions:
- Prepare the Chicken: Season the chicken pieces generously with salt and pepper. In a large Dutch oven or heavy pot, heat the olive oil over medium-high heat. Brown the chicken pieces in batches, confirming they’re golden on all sides. Once browned, remove the chicken from the pot and set aside.
- Cook the Bacon: In the same pot, add the diced bacon and cook until crispy. Remove the bacon with a slotted spoon and set aside. Leave the rendered fat in the pot.
- Sauté the Vegetables: Add the butter to the pot. Once melted, add the pearl onions and cook until they’re lightly browned. Stir in the garlic and cook for an additional minute.
- Thicken the Sauce: Sprinkle the flour over the onions and garlic, stirring to coat evenly. Cook for 1-2 minutes to eliminate the raw flour taste.
- Deglaze and Simmer: Gradually add the red wine, scraping the bottom of the pot to release any browned bits. Stir in the chicken stock, tomato paste, and bouquet garni. Return the chicken pieces and bacon to the pot, confirming they’re submerged in the liquid.
- Cook the Stew: Bring the mixture to a simmer, then reduce the heat to low. Cover the pot and let the dish cook gently for 1.5 to 2 hours, or until the chicken is tender and the flavors have melded.
- Add Mushrooms: In the final 20 minutes of cooking, add the quartered mushrooms to the pot. This will guarantee they’re cooked perfectly without becoming too soft.
- Finish and Serve: Remove the bouquet garni before serving. Sprinkle the stew with fresh parsley for a burst of color and flavor. Serve hot with your choice of accompaniment.
Extra Tips:
For an authentic Coq Au Vin, choose a good-quality red wine that you enjoy drinking, as it will greatly influence the dish’s flavor. If time allows, marinate the chicken in wine, onions, and herbs overnight for an even deeper flavor profile.
When reheating leftovers, do so gently over low heat to preserve the chicken’s tenderness. Finally, if you prefer a thicker sauce, remove the chicken once cooked and simmer the liquid until it reduces to your desired consistency.
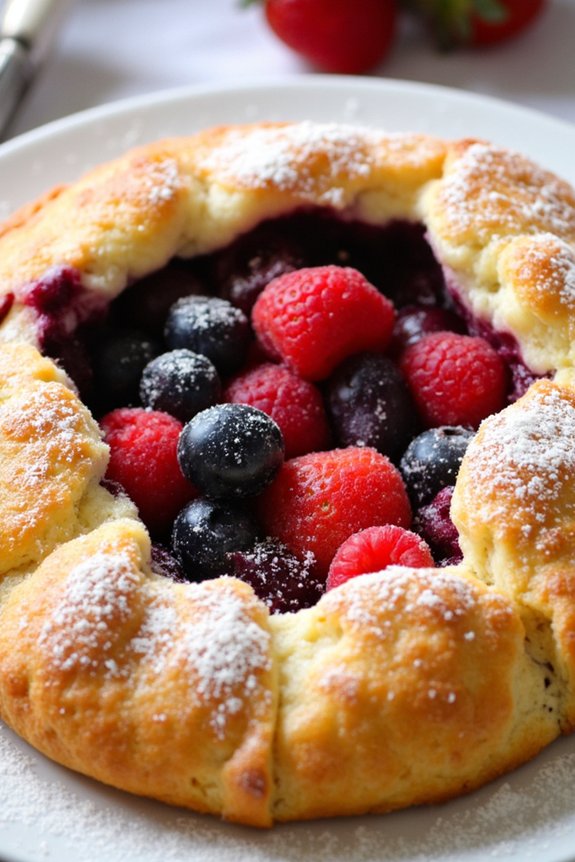
Caramelized Apple Galette

A Caramelized Apple Galette is a delightful French dessert that combines the rustic charm of a free-form tart with the sweet richness of caramelized apples. This dish is perfect for showcasing the natural sweetness and tartness of fresh apples, enhanced by the buttery, flaky texture of a homemade or store-bought pastry crust.
The simplicity of the galette allows the flavors of the apples to shine, making it an ideal dessert for a special occasion or a casual family meal.
Creating a Caramelized Apple Galette involves layering thinly sliced apples on a rich, buttery pastry, then baking until the crust is golden and the apples are tender and caramelized. A sprinkle of sugar and a touch of cinnamon enhance the apples’ natural flavors, while a brush of apricot jam gives the final product a beautiful glaze.
This dish is perfect for serving 4-6 people, making it a versatile option for both small gatherings and larger celebrations.
Ingredients for 4-6 servings:
- 1 sheet of store-bought puff pastry or homemade pastry dough
- 4 medium-sized apples (such as Granny Smith or Honeycrisp)
- 1/4 cup granulated sugar
- 1/4 cup brown sugar
- 1 teaspoon ground cinnamon
- 2 tablespoons unsalted butter, melted
- 1 tablespoon fresh lemon juice
- 1 egg, beaten (for egg wash)
- 2 tablespoons apricot jam
- 1 tablespoon water
Cooking Instructions:
- Prepare the Pastry: Preheat your oven to 400°F (200°C). Roll out the pastry dough on a lightly floured surface into a circle about 12 inches in diameter. Transfer the rolled pastry onto a baking sheet lined with parchment paper.
- Prepare the Apples: Peel, core, and thinly slice the apples. In a large bowl, toss the apple slices with lemon juice to prevent browning.
- Caramelize the Apples: In a separate bowl, mix the granulated sugar, brown sugar, and cinnamon. Add the sugar mixture to the apples and toss until the apples are evenly coated.
- Assemble the Galette: Arrange the apple slices in concentric circles on top of the pastry, leaving a 2-inch border around the edges. Fold the edges of the pastry up over the apples, pleating as necessary to hold the shape.
- Brush and Bake: Brush the folded edges of the pastry with the beaten egg. Drizzle the melted butter over the apples. Bake the galette in the preheated oven for 35-40 minutes, or until the pastry is golden brown and the apples are tender.
- Glaze the Galette: In a small saucepan, heat the apricot jam and water over low heat until melted and smooth. Brush the warm glaze over the apples and the pastry edges while the galette is still warm.
- Cool and Serve: Allow the galette to cool slightly before slicing. Serve warm or at room temperature.
Extra Tips:
When choosing apples for your galette, opt for varieties that hold their shape well during baking, such as Granny Smith or Honeycrisp.
If you prefer a sweeter galette, consider adding a touch more sugar or using sweeter apple varieties.
To prevent the pastry from becoming soggy, ascertain the apple slices are evenly coated and excess moisture is minimized.
For an added touch of flavor, consider sprinkling a handful of chopped nuts, such as walnuts or almonds, over the apples before baking.
Summer Berry Clafoutis
Summer Berry Clafoutis is a delightful French dessert that captures the essence of summer with its rich and creamy custard base, perfectly complemented by the tartness of fresh berries.
This rustic dish originates from the Limousin region of France and is traditionally made with cherries, but this version takes advantage of the abundance of summer berries. The clafoutis comes together with a pancake-like batter that bakes around the berries, creating a soft, custardy texture that’s perfect for a warm summer evening.
This recipe is ideal for serving 4-6 people, making it perfect for a family meal or a small gathering. The clafoutis can be served warm or at room temperature, and a dusting of powdered sugar adds a delicate sweetness to balance the tart berries.
Whether you’re enjoying it for dessert or a mid-afternoon treat, this Summer Berry Clafoutis is sure to become a seasonal favorite.
Ingredients:
- 1 cup mixed fresh berries (such as strawberries, blueberries, raspberries, and blackberries)
- 3 large eggs
- 1/2 cup granulated sugar
- 1 cup whole milk
- 1 teaspoon vanilla extract
- 1/2 cup all-purpose flour
- 1/4 teaspoon salt
- 2 tablespoons unsalted butter, melted
- Powdered sugar, for dusting
Instructions:
- Preheat the Oven: Preheat your oven to 350°F (175°C). Lightly grease a 9-inch round baking dish or pie pan with butter or non-stick spray.
- Prepare the Berries: Wash your berries thoroughly and pat them dry. Hull and slice the strawberries if using. Arrange the berries evenly at the bottom of the prepared baking dish.
- Mix the Batter: In a mixing bowl, whisk together the eggs and granulated sugar until well combined and slightly frothy. Add the milk and vanilla extract to the egg mixture and whisk until smooth.
- Incorporate Dry Ingredients: Sift the flour and salt into the wet mixture. Stir gently until just combined and smooth, making sure there are no lumps.
- Add Butter: Stir in the melted butter into the batter, mixing until well incorporated.
- Pour the Batter: Carefully pour the batter over the berries in the baking dish, ensuring that the berries are evenly distributed and submerged.
- Bake the Clafoutis: Place the dish in the preheated oven and bake for 35-40 minutes, or until the clafoutis is puffed, set, and lightly golden brown on the edges. A toothpick inserted into the center should come out clean.
- Cool and Serve: Remove the clafoutis from the oven and let it cool for a few minutes. Dust with powdered sugar before serving. Enjoy warm or at room temperature.
Extra Tips:
For the best flavor, use the freshest berries available, and feel free to experiment with different combinations to suit your taste.
If you prefer a firmer set, consider adding a tablespoon of cornstarch to the batter. Clafoutis can also be prepared in advance and stored in the refrigerator for up to two days; simply reheat it in a warm oven before serving.
For an added touch, serve with a dollop of whipped cream or a scoop of vanilla ice cream.