

French cuisine has a charm that captivates me every single time. It feels like each dish carries a little piece of history. My grandmother’s Coq Au Vin had an aroma that could make anyone’s mouth water. If you’re intrigued by these cherished recipes, you’re in for a delicious journey. Let’s explore France’s culinary heritage together.
Coq Au Vin
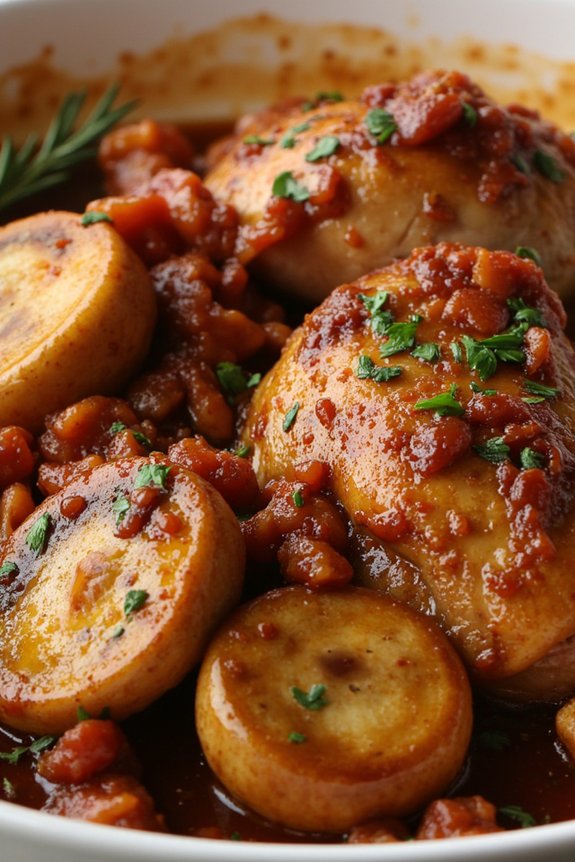
Coq Au Vin is a classic French dish that combines tender chicken with rich flavors of red wine, mushrooms, and aromatic herbs. Traditionally prepared with rooster, today’s version often uses chicken, making it easier to find ingredients while maintaining authenticity. The dish is known for its deep, savory flavor, which comes from slow-cooking the chicken in red wine, alongside onions, garlic, and herbs. This method not only tenderizes the meat but also infuses it with the rich, complex flavors that make Coq Au Vin a beloved staple in French cuisine.
The origins of Coq Au Vin are somewhat debated, with some claiming it dates back to Roman times, while others attribute it to the Burgundy region of France. Regardless of its history, this hearty dish has earned its place in kitchens around the world. It’s often served with crusty bread or potatoes, allowing diners to soak up the delicious sauce. Perfect for a cozy dinner or a special occasion, Coq Au Vin is a dish that brings warmth and satisfaction to the table, embodying the essence of traditional French cooking.
Ingredients (serves 4-6):
- 1 whole chicken (about 3-4 lbs), cut into pieces
- Salt and pepper, to taste
- 2 tablespoons olive oil
- 4 ounces bacon, diced
- 1 large onion, chopped
- 2 cloves garlic, minced
- 2 cups red wine (preferably Burgundy or Pinot Noir)
- 1 cup chicken stock
- 2 tablespoons tomato paste
- 1 bay leaf
- 1 teaspoon dried thyme
- 1/2 pound mushrooms, sliced
- 2 tablespoons all-purpose flour
- 2 tablespoons butter
- Fresh parsley, chopped (for garnish)
Cooking Instructions:
- Prepare the Chicken: Season the chicken pieces with salt and pepper. Heat the olive oil in a large Dutch oven or heavy-bottomed pot over medium heat. Add the chicken pieces and brown on all sides. Remove the chicken from the pot and set aside.
- Cook the Bacon and Vegetables: In the same pot, add the diced bacon and cook until crispy. Remove the bacon and set aside. Keep the bacon fat in the pot and add the onions. Sauté until they’re translucent, then add the garlic and cook for another minute.
- Deglaze and Simmer: Return the chicken pieces to the pot. Pour in the red wine and chicken stock, scraping the bottom of the pot to release any browned bits. Stir in the tomato paste, bay leaf, and thyme. Bring to a simmer, cover, and cook on low heat for 45 minutes to 1 hour, until the chicken is tender.
- Cook the Mushrooms: While the chicken is simmering, melt the butter in a separate pan over medium heat. Add the mushrooms and sauté until they’re golden brown. Sprinkle the flour over the mushrooms and stir well to coat.
- Combine and Thicken: Add the mushrooms to the pot with the chicken. Stir well and cook for another 15 to 20 minutes, allowing the sauce to thicken. Adjust seasoning with salt and pepper if necessary.
- Serve: Remove the bay leaf and discard. Garnish the Coq Au Vin with crispy bacon and chopped parsley before serving. Enjoy with crusty bread or mashed potatoes.
Extra Tips:
To enhance the flavors of Coq Au Vin, consider preparing it a day in advance. Allowing it to rest overnight in the refrigerator helps the flavors meld together beautifully.
When choosing wine, opt for a good quality red wine that you’d also enjoy drinking, as it greatly influences the taste of the dish. If possible, use a heavy-bottomed pot or Dutch oven for even cooking and heat distribution.
Finally, don’t rush the cooking process; slow cooking is key to achieving the tender, flavorful meat that makes Coq Au Vin so delicious.
Bouillabaisse

Bouillabaisse is a classic French dish that originates from the port city of Marseille. This traditional seafood stew is a culinary masterpiece that combines a variety of fresh fish and shellfish in a rich, aromatic broth. The essence of bouillabaisse lies in its simplicity and the quality of its ingredients, which include fresh seafood, aromatic herbs, and a medley of vegetables. The dish is often served with a side of rouille, a garlicky mayonnaise-like sauce, and crusty bread, making it a hearty and fulfilling meal.
Crafting an authentic bouillabaisse requires attention to detail and a little bit of time, but the end result is a delightful symphony of flavors and textures. The key to making a great bouillabaisse is using the freshest seafood available and allowing the flavors to meld together through a gentle simmer. Traditionally, bouillabaisse includes a variety of fish such as red snapper, monkfish, and sea bass, as well as shellfish like mussels and clams. This recipe serves 4-6 people, making it perfect for a family gathering or a special occasion.
Ingredients (serves 4-6):
- 2 pounds of mixed fish fillets (such as red snapper, monkfish, and sea bass)
- 1 pound of mussels, cleaned and debearded
- 1 pound of clams, cleaned
- 1 pound of shrimp, peeled and deveined
- 2 tablespoons olive oil
- 1 large onion, chopped
- 2 leeks, white and light green parts only, sliced
- 4 garlic cloves, minced
- 1 fennel bulb, sliced
- 4 tomatoes, chopped
- 2 cups fish stock or water
- 1 cup dry white wine
- 1 teaspoon saffron threads
- 2 bay leaves
- 1 teaspoon dried thyme
- Salt and pepper to taste
- 1/4 cup fresh parsley, chopped
- Rouille sauce (optional)
- Crusty bread for serving
Cooking Instructions:
- Prepare the Broth: In a large pot, heat the olive oil over medium heat. Add the chopped onion, leeks, garlic, and fennel to the pot. Sauté for about 5 minutes until the vegetables are soft and translucent.
- Add Tomatoes and Liquids: Stir in the chopped tomatoes, fish stock, and white wine. Bring the mixture to a boil, then reduce the heat to a simmer. Add the saffron threads, bay leaves, thyme, salt, and pepper. Allow the broth to simmer gently for around 20 minutes so the flavors can meld together.
- Add Fish and Shellfish: Gently add the mixed fish fillets, mussels, clams, and shrimp to the pot. Make sure the seafood is submerged in the broth. Cover the pot and cook for another 10-15 minutes, or until the fish is cooked through and the shellfish have opened.
- Finish and Serve: Once the seafood is cooked, discard any mussels or clams that haven’t opened. Stir in the chopped parsley. Taste the broth and adjust seasoning if necessary. Serve the bouillabaisse hot, accompanied by crusty bread and rouille sauce on the side.
Extra Tips:
When making bouillabaisse, it’s important to use the freshest seafood you can find, as this will greatly enhance the flavor of the dish. If saffron is unavailable, you can substitute a pinch of turmeric for color, though it won’t replicate the unique flavor of saffron.
Be sure not to overcook the seafood; the fish should be tender and the shellfish just opened. For an authentic experience, serve the bouillabaisse with a generous dollop of rouille sauce and a side of garlic-rubbed toasted bread. Enjoying this dish with a glass of chilled white wine is highly recommended to complement the rich flavors.
Ratatouille
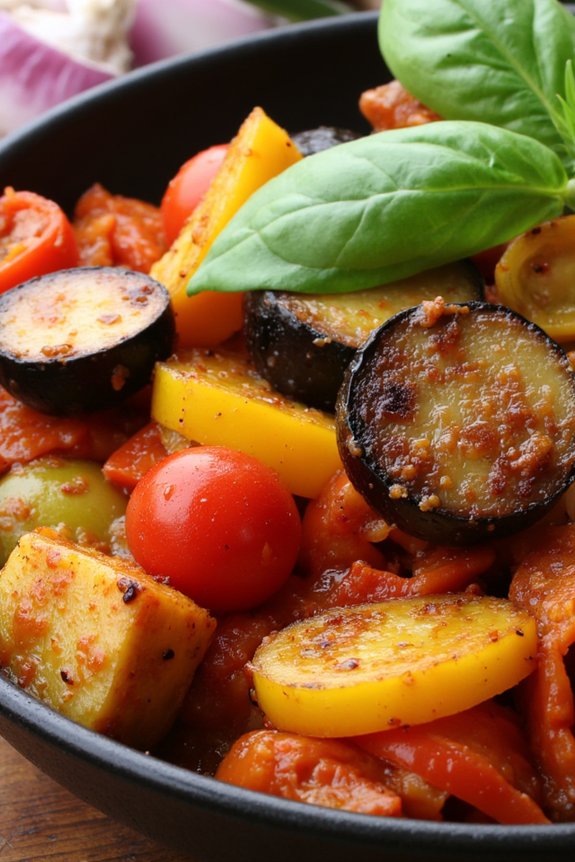
Ratatouille is a classic French Provençal stewed vegetable dish that highlights the best of fresh summer produce. Originating from the region of Nice, this vibrant and colorful dish is a celebration of the bounty of the Mediterranean, featuring a delightful combination of zucchini, eggplant, bell peppers, tomatoes, and aromatic herbs.
Traditionally served as a side dish or a main course, ratatouille is popular for its simplicity and versatility, allowing the natural flavors of the vegetables to shine through. Often associated with rustic home cooking, ratatouille is a dish that embodies the spirit of French cuisine, emphasizing the use of fresh, high-quality ingredients.
The dish can be cooked in various ways, but the goal is always the same: to accomplish a harmonious blend of flavors where each vegetable is cooked to perfection. Whether you prefer a more chunky, stew-like consistency or a finely diced, layered presentation, ratatouille is a comforting dish that’s sure to please both the palate and the eye.
Ingredients for 4-6 servings:
- 2 medium eggplants
- 2 medium zucchini
- 2 bell peppers (red and yellow)
- 4 ripe tomatoes
- 1 large onion
- 4 cloves of garlic
- 1/4 cup olive oil
- 1 teaspoon dried thyme
- 1 teaspoon dried oregano
- Salt and pepper to taste
- A handful of fresh basil leaves
Cooking Instructions:
- Prepare the Vegetables: Begin by washing all the vegetables thoroughly. Cut the eggplants and zucchini into 1/2-inch cubes. Deseed the bell peppers and cut them into strips. Dice the tomatoes, and finely chop the onion and garlic.
- Sauté the Onions and Garlic: In a large, heavy-bottomed pot or Dutch oven, heat the olive oil over medium heat. Add the chopped onion and garlic, and sauté for about 5 minutes until they become translucent and fragrant.
- Cook the Eggplant: Add the cubed eggplant to the pot, stirring occasionally. Cook for about 8-10 minutes until the eggplant pieces soften and begin to brown slightly.
- Add the Zucchini and Bell Peppers: Stir in the zucchini and bell peppers. Cook for another 5-7 minutes, allowing the vegetables to soften while stirring occasionally.
- Incorporate the Tomatoes and Herbs: Add the diced tomatoes, thyme, and oregano to the pot. Season with salt and pepper to taste. Stir well to combine all the ingredients.
- Simmer the Ratatouille: Reduce the heat to low, cover the pot, and let the ratatouille simmer for about 30-40 minutes. Stir occasionally to guarantee even cooking and prevent sticking. The vegetables should be tender and the flavors well melded by the end of cooking.
- Finish with Fresh Basil: Just before serving, stir in the fresh basil leaves, allowing their aroma to infuse the dish. Adjust seasoning if necessary.
Extra Tips:
For a deeper flavor, some chefs recommend roasting the vegetables separately before combining them in the pot. This can enhance the caramelization and add a subtle smokiness to the dish.
Ratatouille is incredibly versatile and can be served hot, warm, or cold. It pairs wonderfully with crusty bread, pasta, or rice, and can even be a delicious topping for grilled meats or fish. Additionally, ratatouille improves with time, so consider making it a day in advance to allow the flavors to fully develop.
Boeuf Bourguignon
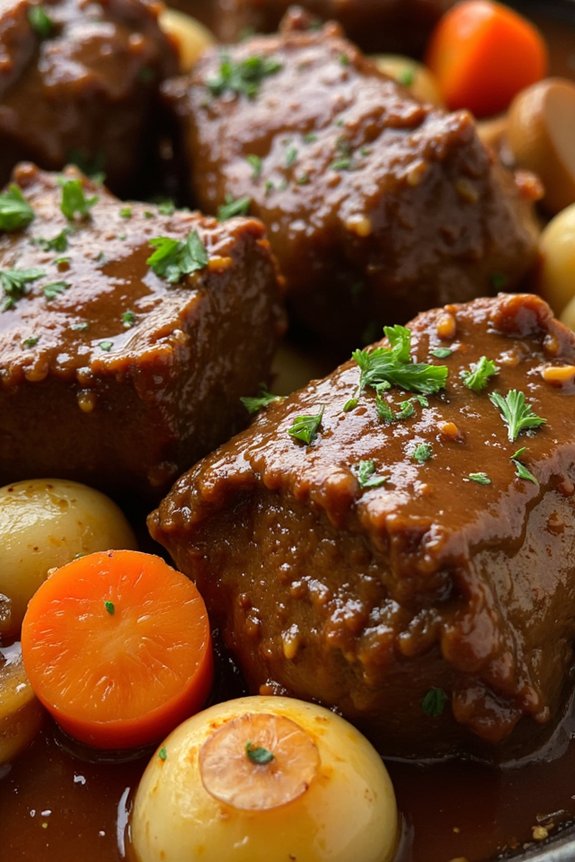
Boeuf Bourguignon is a classic French dish that embodies the rustic yet refined flavors of the Burgundy region. This hearty beef stew is renowned for its deeply savory, wine-infused sauce and tender chunks of beef. Traditionally, it’s prepared with red wine from Burgundy, which imparts a rich, robust flavor to the dish.
Carrot, onion, garlic, and bouquet garni are essential components that add depth and complexity, while mushrooms and pearl onions contribute texture and sweetness. Boeuf Bourguignon is often served with crusty bread or over a bed of buttery mashed potatoes, making it a perfect meal for a cozy gathering.
This traditional recipe for Boeuf Bourguignon serves 4-6 people. It requires a bit of time and patience, allowing the flavors to meld beautifully as the dish simmers. The key to success is selecting high-quality ingredients, especially the beef and wine, to guarantee the best possible flavor.
Once you master this recipe, you’ll have a go-to dish that’s sure to impress family and friends with its rich aroma and classic taste.
Ingredients:
- 2 pounds beef chuck, cut into 2-inch cubes
- Salt and freshly ground black pepper
- 3 tablespoons olive oil
- 4 ounces bacon, diced
- 1 large onion, sliced
- 2 carrots, sliced
- 2 cloves garlic, minced
- 2 tablespoons all-purpose flour
- 3 cups red wine (preferably Burgundy)
- 2-3 cups beef stock
- 1 tablespoon tomato paste
- 1 bouquet garni (parsley, thyme, and bay leaf)
- 18-24 pearl onions, peeled
- 8 ounces mushrooms, quartered
- 2 tablespoons unsalted butter
- Chopped fresh parsley, for garnish
Instructions:
- Prepare the Beef: Season the beef cubes generously with salt and pepper. Heat 2 tablespoons of olive oil in a large Dutch oven over medium-high heat. In batches, brown the beef cubes on all sides. Remove the beef and set aside.
- Cook the Bacon: In the same Dutch oven, add the diced bacon. Cook until crisp, then remove with a slotted spoon and set aside, leaving the fat in the pot.
- Sauté the Vegetables: Add the sliced onion and carrots to the Dutch oven. Sauté until the onions are translucent, about 5 minutes. Stir in the minced garlic and cook for another minute.
- Add the Beef and Flour: Return the beef and bacon to the pot. Sprinkle the flour over the mixture and stir to coat the meat and vegetables evenly. Cook for 3-4 minutes to brown the flour.
- Deglaze and Simmer: Pour in the red wine, scraping up any browned bits from the bottom of the pot. Add enough beef stock to just cover the meat. Stir in the tomato paste and add the bouquet garni. Bring to a gentle boil, then reduce the heat to low. Cover and simmer for 2 to 3 hours, or until the beef is fork-tender.
- Cook the Mushrooms and Pearl Onions: In a separate skillet, heat the remaining olive oil and butter. Add the pearl onions and mushrooms, cooking until browned and tender. Add them to the pot during the last 30 minutes of cooking.
- Finish and Serve: Discard the bouquet garni. Taste and adjust seasoning with salt and pepper as needed. Garnish with chopped parsley before serving.
Extra Tips:
For the best flavor, prepare Boeuf Bourguignon a day in advance and let it sit overnight in the refrigerator. This allows the flavors to deepen and meld together.
When reheating, do so gently over low heat to avoid overcooking the beef. If you prefer a thicker sauce, remove the lid during the last 15-20 minutes of cooking to allow the liquid to reduce. Pair the dish with a good quality Burgundy wine to complement the flavors in the stew.
Quiche Lorraine

Quiche Lorraine is a classic French dish that combines the creamy richness of eggs and cream with the savory flavors of bacon and cheese, all nestled in a delicate, flaky pastry crust. Originating from the Lorraine region in northeastern France, this quiche is perfect for breakfast, brunch, or even as a light lunch or dinner.
Its simplicity and elegance make it a beloved staple in French cuisine, and it’s a dish that can easily be adapted with additional ingredients such as onions, mushrooms, or spinach to suit your taste.
When preparing Quiche Lorraine, the key is to attain a perfect balance between the creamy custard and the crispness of the crust. This dish is both satisfying and versatile, making it a favorite for many home cooks. While it can be served hot, it’s equally delicious at room temperature, allowing for easy preparation ahead of time.
Follow this traditional recipe to serve 4-6 people and enjoy a taste of France in your own home.
Ingredients for Quiche Lorraine (serves 4-6):
- 1 9-inch pie crust (store-bought or homemade)
- 6 slices of bacon
- 1 cup grated Gruyère cheese
- 3 large eggs
- 1 1/2 cups heavy cream
- 1/2 teaspoon salt
- 1/4 teaspoon freshly ground black pepper
- 1/4 teaspoon nutmeg
Cooking Instructions:
- Preheat the Oven: Start by preheating your oven to 375°F (190°C). This guarantees that the quiche bakes evenly.
- Prepare the Pie Crust: Roll out your pie crust and fit it into a 9-inch pie pan. Press it gently against the sides and trim any excess dough. Prick the bottom with a fork to prevent bubbling.
- Bake the Crust: Line the crust with parchment paper and fill with pie weights or dried beans. Blind bake for 10 minutes. Remove the weights and parchment, then bake for an additional 5 minutes. This step helps keep the crust crisp.
- Cook the Bacon: While the crust is baking, cook the bacon in a skillet over medium heat until crisp. Remove from the pan and drain on paper towels. Once cool, crumble it into small pieces.
- Prepare the Filling: In a large bowl, whisk together the eggs, heavy cream, salt, pepper, and nutmeg until well combined.
- Assemble the Quiche: Sprinkle the crumbled bacon and grated Gruyère cheese evenly over the baked crust. Pour the egg mixture over the top, ensuring even distribution.
- Bake the Quiche: Place the quiche in the preheated oven and bake for 30-35 minutes, or until the filling is set and the top is lightly golden. A knife inserted into the center should come out clean.
- Cool and Serve: Allow the quiche to cool for at least 10 minutes before slicing. This helps the filling set further, making it easier to cut.
Extra Tips:
For a perfectly flaky crust, make sure your pie crust ingredients (especially the butter) are cold before mixing. If you prefer a richer flavor, you can substitute Gruyère with Emmental cheese.
Additionally, be careful not to overbake the quiche, as this can cause the custard to become rubbery. If the crust begins to brown too quickly, cover the edges with foil to prevent burning.
Finally, remember that Quiche Lorraine can be customized with your favorite ingredients, making it a versatile addition to any meal.
Cassoulet
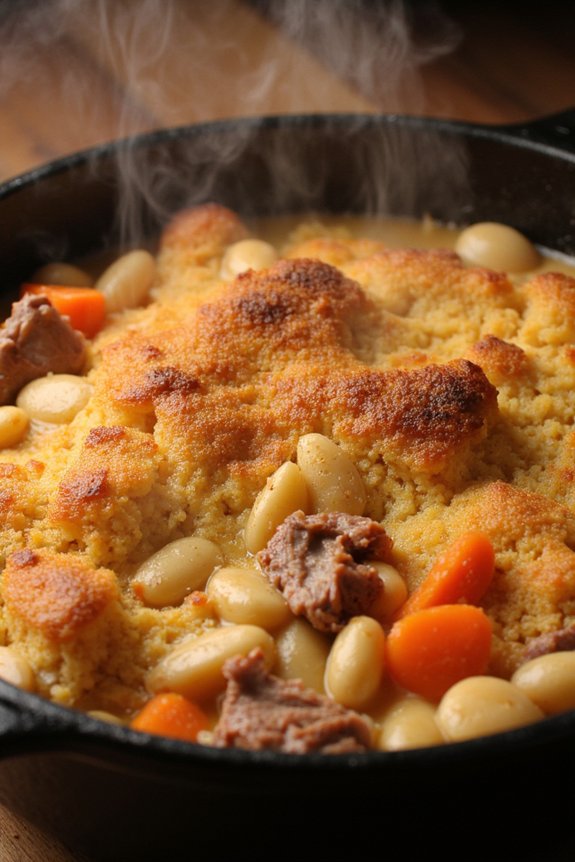
Cassoulet is a rich, slow-cooked casserole originating from the south of France, particularly the region of Languedoc. Known as the epitome of French comfort food, this dish is traditionally made with white beans and a variety of meats, such as pork, duck, and sausages. The flavors meld together beautifully during the long, slow cooking process, creating a hearty and flavorful meal perfect for gathering family and friends around the table. The dish is named after the earthenware pot, the “cassole,” in which it’s traditionally cooked.
The history of cassoulet is deeply rooted in French culinary tradition, with each region claiming its own version of the recipe. Despite slight variations, the essence of cassoulet remains the same: a celebration of rustic, robust flavors that come together harmoniously. This recipe aims to bring the authentic taste of French countryside cooking to your kitchen, serving 4-6 people with a delightful mixture of tender meats and creamy beans. Prepare yourself for a comforting and satisfying meal that pays homage to its rich history.
Ingredients:
- 1 pound dried white beans (such as Great Northern or cannellini)
- 1 tablespoon olive oil
- 1 pound pork shoulder, cut into 1-inch pieces
- 1/2 pound duck confit, shredded
- 1/2 pound pork sausages, sliced
- 1 onion, chopped
- 2 carrots, chopped
- 4 garlic cloves, minced
- 1 bouquet garni (a bundle of herbs, typically thyme, bay leaf, and parsley)
- 4 cups chicken stock
- Salt and pepper to taste
- 1 cup breadcrumbs
Instructions:
- Prepare the Beans: Begin by soaking the dried white beans in cold water overnight. The next day, drain and rinse the beans thoroughly. This will guarantee they cook evenly and reach the desired creamy texture.
- Brown the Meats: In a large, heavy-bottomed pot, heat the olive oil over medium-high heat. Add the pork shoulder pieces and sausages, browning them on all sides. Remove the meats from the pot and set them aside.
- Sauté Vegetables: In the same pot, add the chopped onions and carrots. Sauté until the onions are translucent and the carrots have softened slightly, about 5 minutes. Add the minced garlic and cook for another minute until fragrant.
- Combine Ingredients: Return the browned meats to the pot. Add the soaked and drained beans, chicken stock, and bouquet garni. Stir everything together, making sure the ingredients are well combined.
- Simmer the Cassoulet: Bring the mixture to a simmer over medium heat. Lower the heat to maintain a gentle simmer and cover the pot. Cook for about 1.5 to 2 hours, or until the beans are tender and the flavors have melded together. Stir occasionally to prevent sticking.
- Add Duck Confit: Once the beans are tender, add the shredded duck confit to the pot. Season the cassoulet with salt and pepper to taste, adjusting the seasoning as needed.
- Bake the Cassoulet: Preheat your oven to 350°F (175°C). Transfer the cassoulet to a large baking dish if necessary. Sprinkle the breadcrumbs evenly over the top. Bake in the preheated oven for about 30 minutes, or until the top is golden brown and crispy.
- Serve: Remove the cassoulet from the oven and let it rest for a few minutes before serving. Enjoy this hearty and aromatic dish with a side of crusty bread.
Extra Tips:
When preparing cassoulet, patience is key. The slow cooking process is essential for developing the deep, rich flavors that characterize this dish.
If you can, prepare the cassoulet a day ahead and refrigerate overnight. Reheating it the next day will enhance the flavors even more, as they’ve more time to meld together.
Additionally, don’t hesitate to adjust the amount of liquid as needed; the beans should be creamy but not too soupy. Using high-quality meats and fresh herbs will also greatly enhance the taste of your cassoulet.
Escargots De Bourgogne
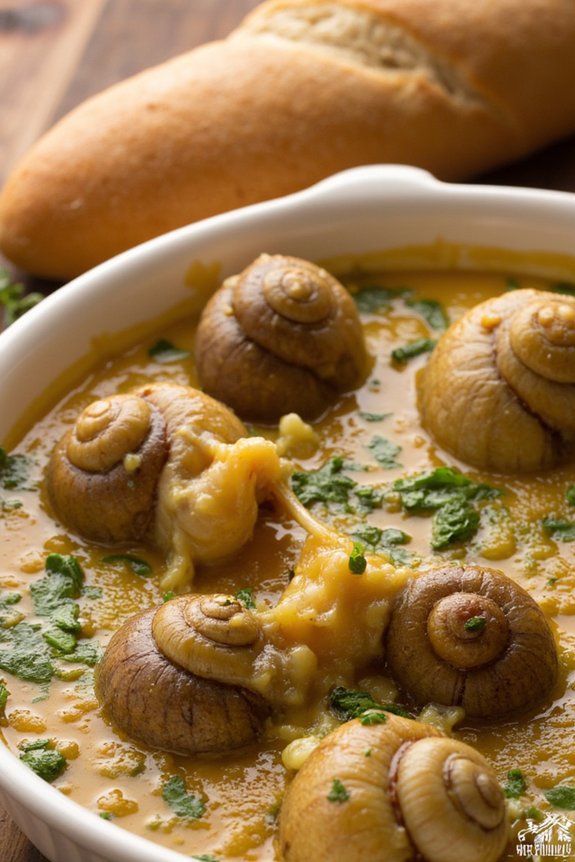
Traditionally served as an appetizer, Escargots De Bourgogne are often presented in special escargot dishes with dimpled plates, allowing each snail to be nestled in its own pool of butter. This recipe provides a step-by-step guide to preparing this traditional French dish at home, guaranteeing you capture the authentic taste and texture that define this gastronomic treat.
Ingredients for 4-6 people:
- 24 canned or fresh escargots, cleaned
- 1 cup unsalted butter, softened
- 4 cloves garlic, minced
- 2 tablespoons shallots, minced
- 3 tablespoons fresh parsley, chopped
- 1 tablespoon fresh thyme, chopped
- 1 tablespoon fresh chives, chopped
- 1 teaspoon lemon juice
- Salt and freshly ground black pepper to taste
- 24 snail shells or escargot dishes
- French baguette, for serving
Cooking Instructions:
1. Prepare the Garlic Herb Butter: In a medium bowl, combine the softened butter, minced garlic, shallots, parsley, thyme, chives, and lemon juice. Mix well until all ingredients are fully incorporated.
Season the mixture with salt and freshly ground black pepper to taste.
2. Prepare the Snails: If using canned escargots, rinse them under cold water and drain well. If using fresh snails, confirm they’re thoroughly cleaned and cooked according to package instructions or trusted methods.
3. Fill the Escargot Shells or Dishes: Place a small amount of the prepared garlic herb butter into the bottom of each shell or indentation of the escargot dish.
Add one escargot to each and top with more garlic herb butter, making sure the snail is completely covered.
4. Bake the Escargots: Preheat your oven to 375°F (190°C). Arrange the filled shells or dishes on a baking sheet and bake in the preheated oven for 10-12 minutes, or until the butter is bubbly and the escargots are heated through.
5. Serve Immediately: Carefully remove the baking sheet from the oven. Serve the escargots hot, accompanied by slices of French baguette to soak up the flavorful butter.
Extra Tips: When preparing Escargots De Bourgogne, using high-quality butter and fresh herbs can greatly enhance the dish’s flavor.
If you don’t have access to snail shells, escargot dishes or small oven-proof dishes are excellent alternatives. Confirm that the escargots are fully submerged in the butter mixture to prevent them from drying out during baking.
Finally, always serve the dish immediately to enjoy it at its best.
Tarte Tatin
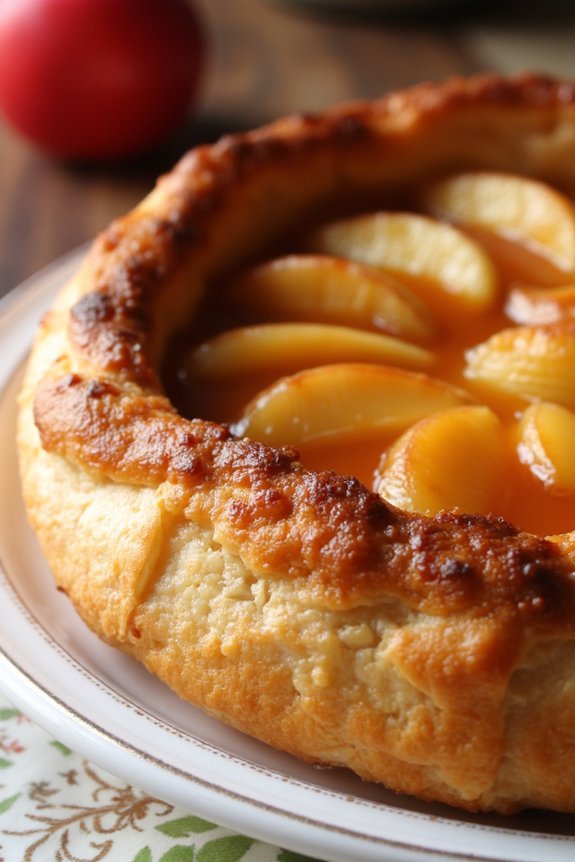
Tarte Tatin is a classic French dessert that originated in the Loire Valley. This upside-down caramelized apple tart is an illustration of the simplicity and elegance of French patisserie. The story goes that this dish was created by mistake at the Hotel Tatin in the late 19th century when one of the Tatin sisters accidentally cooked apples in sugar and butter for too long. In a quick attempt to rescue the dessert, she placed a pastry crust on top of the caramelized apples and baked it. The result was a deliciously sweet and sticky tart that has since become a beloved classic.
The beauty of Tarte Tatin lies in its ability to transform simple ingredients into something extraordinary. The apples become tender and infused with the rich flavors of caramel, while the pastry, once inverted, remains crispy and buttery. It’s a dessert that’s both rustic and sophisticated, combining textures and flavors that are sure to delight any palate. Perfect for a cozy night in or a gathering with friends, Tarte Tatin serves as an impressive yet approachable dessert option.
Ingredients for 4-6 people:
- 6 to 8 medium-sized firm apples (such as Granny Smith or Golden Delicious)
- 1 cup granulated sugar
- 1/2 cup unsalted butter
- 1 sheet of puff pastry (store-bought or homemade)
- Flour, for dusting
- A pinch of salt
- Optional: a splash of vanilla extract or a sprinkle of cinnamon
Cooking Instructions:
- Prepare the Apples:
- Peel, core, and quarter the apples. Confirm that the apples are cut into uniform pieces to guarantee even cooking.
- Make the Caramel:
- In a heavy ovenproof skillet or a cast-iron pan, melt the butter over medium heat. Add the sugar and stir gently until the mixture becomes a golden brown caramel. Be patient, as this can take several minutes. Avoid stirring too frequently to prevent crystallization.
- Arrange the Apples:
- Once the caramel is ready, carefully arrange the apple quarters in the skillet, rounded side down. Pack them tightly as they’ll shrink during cooking. Let the apples cook in the caramel for about 10-15 minutes, or until they start to soften.
- Prepare the Pastry:
- While the apples are cooking, preheat your oven to 375°F (190°C). Roll out the puff pastry on a lightly floured surface until it’s slightly larger than the diameter of your skillet.
- Assemble the Tarte Tatin:
- Carefully lay the rolled-out puff pastry over the apples, tucking the edges down the sides of the skillet. Be cautious as the caramel is hot. Prick the pastry with a fork to allow steam to escape.
- Bake the Tart:
- Transfer the skillet to the preheated oven and bake for 25-30 minutes, or until the pastry is golden brown and puffed.
- Invert and Serve:
- Once baked, remove the skillet from the oven and let it rest for a few minutes. Place a large plate over the skillet and carefully invert the tart onto the plate. Be cautious of any hot caramel that may spill.
Extra Tips:
To achieve the best results with your Tarte Tatin, choose apples that hold their shape well when cooked, such as Granny Smith or Golden Delicious. Confirm your caramel reaches a deep amber color for a rich flavor, but be careful not to burn it.
If you’re feeling adventurous, add a splash of vanilla extract or a pinch of cinnamon to the caramel for an extra layer of flavor. Ultimately, allow the tart to cool slightly before serving, as this will help the caramel set and make it easier to slice. Enjoy your Tarte Tatin with a dollop of crème fraîche or vanilla ice cream for an indulgent finish.
Soupe À L’oignon
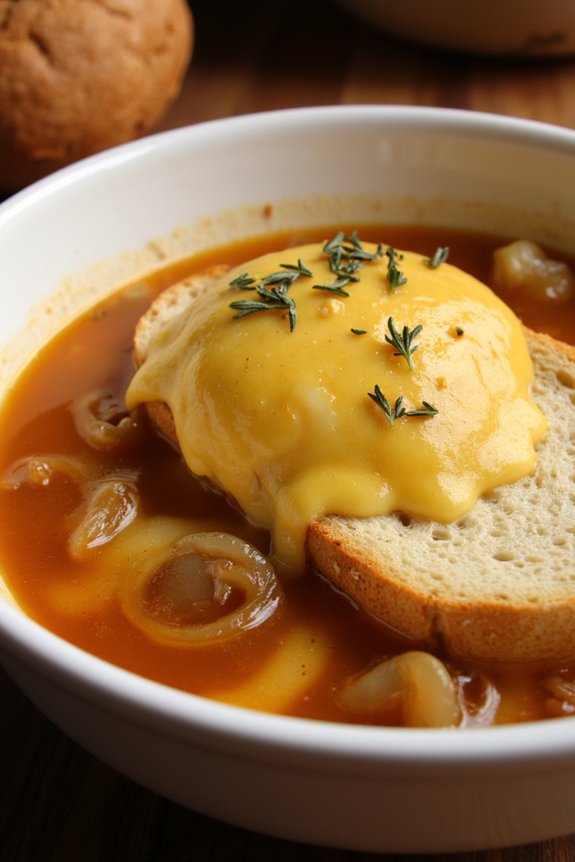
Soupe À L’oignon, or French Onion Soup, is a classic and comforting dish that showcases the depth of flavor that can be achieved with simple ingredients. Originating from France, this dish has been a staple in French cuisine for centuries. Traditionally served as a starter, it’s perfect for chilly evenings or when you need a hearty and warming meal.
The magic of this soup lies in the slow caramelization of onions, which brings out their natural sweetness, combined with a rich beef broth that creates a deeply flavorful base. Topped with crusty bread and melted cheese, Soupe À L’oignon is a delightful combination of textures and tastes.
This recipe serves 4-6 people and offers an authentic experience of this beloved French dish. You’ll need to allow adequate time for the onions to properly caramelize, which is key to developing the soup’s rich flavor. Once the onions are ready, the rest of the process is straightforward, making this dish an achievable luxury for home cooks. With a few ingredients and some patience, you can bring a taste of France into your kitchen.
Ingredients:
- 6 large yellow onions, thinly sliced
- 3 tablespoons unsalted butter
- 1 tablespoon olive oil
- 2 cloves garlic, minced
- 1 tablespoon all-purpose flour
- 8 cups beef stock
- 1/2 cup dry white wine
- 1 bay leaf
- 1 teaspoon fresh thyme leaves (or 1/2 teaspoon dried thyme)
- Salt and pepper, to taste
- 1 baguette, sliced into 1-inch thick rounds
- 2 cups grated Gruyère cheese
Instructions:
- Prepare the Onions: In a large, heavy-bottomed pot or Dutch oven, melt the butter with the olive oil over medium heat. Add the sliced onions and a pinch of salt. Stir to coat the onions in the butter and oil, then cook, stirring occasionally, until the onions are caramelized. This process should take about 30-40 minutes. The onions should be a deep golden brown.
- Add Garlic and Flour: Once the onions are caramelized, add the minced garlic and cook for an additional minute until fragrant. Sprinkle the flour over the onions and stir well, cooking for another 2-3 minutes to eliminate the raw flour taste.
- Deglaze and Simmer: Pour in the white wine to deglaze the pot, scraping the bottom with a wooden spoon to release any stuck-on bits. Add the beef stock, bay leaf, and thyme. Increase the heat to medium-high and bring the soup to a gentle boil, then reduce the heat to low and let it simmer uncovered for about 30 minutes. Season with salt and pepper to taste.
- Prepare the Bread: While the soup simmers, preheat your oven’s broiler. Arrange the baguette slices on a baking sheet and toast them under the broiler until golden brown on both sides. This should take about 2-3 minutes per side. Keep a close eye on them to prevent burning.
- Assemble and Serve: Once the soup has finished simmering, remove the bay leaf and discard it. Ladle the soup into oven-safe bowls, place a slice of toasted baguette on top of each, and sprinkle generously with Gruyère cheese. Place the bowls under the broiler until the cheese is melted and bubbly. Serve immediately.
Extra Tips:
For the best flavor, take your time caramelizing the onions; rushing this step will result in less depth of flavor. If your onions are sticking to the pot, add a splash of water to help them release.
When choosing a wine, opt for a dry variety like Sauvignon Blanc or Chardonnay to complement the richness of the soup. If you prefer a vegetarian option, substitute beef stock with a high-quality vegetable stock.
Finally, for a more robust flavor, add a splash of brandy or sherry before simmering the soup. Enjoy your Soupe À L’oignon with a fresh salad and a glass of wine for a complete French dining experience.
Croque Monsieur

Croque Monsieur is a classic French bistro staple that brings together the delicious flavors of ham and cheese with a creamy béchamel sauce, all toasted to perfection on crusty bread. This hearty and satisfying sandwich makes for a perfect brunch, lunch, or even a light dinner option.
Originally created in Parisian cafes, its simplicity and rich flavors have made it a beloved dish worldwide. The hallmark of a great Croque Monsieur is the balance of crunchy, golden-brown crust and the melted, gooey cheese filling.
The name “Croque Monsieur” translates to “Mister Crunch” in English, aptly describing the delightful texture that awaits with every bite. The sandwich is typically made with white or sourdough bread, Gruyère cheese, and a thick slice of good-quality ham.
The pièce de résistance, however, is the béchamel sauce that adds a creamy richness. Perfect for a cozy meal or an impressive addition to a brunch spread, this recipe serves 4-6 people, ensuring everyone gets a taste of this French classic.
Ingredients for 4-6 Servings:
- 8 slices of white or sourdough bread
- 2 tablespoons of unsalted butter, melted
- 1 tablespoon of Dijon mustard
- 8 slices of high-quality ham
- 2 cups of grated Gruyère cheese
- 1/4 cup of grated Parmesan cheese
- 2 tablespoons of all-purpose flour
- 1 cup of whole milk
- A pinch of nutmeg
- Salt and pepper to taste
Cooking Instructions:
- Prepare the Béchamel Sauce:
- In a small saucepan, melt 2 tablespoons of butter over medium heat. Stir in the flour and cook for about 1 minute, creating a roux.
- Gradually whisk in the milk until smooth and thickened, about 4-5 minutes. Add a pinch of nutmeg, salt, and pepper. Set aside.
- Prepare the Bread:
- Preheat your oven to 400°F (200°C). Line a baking sheet with parchment paper.
- Brush one side of each bread slice with melted butter. Place them buttered-side down on the prepared baking sheet.
- Assemble the Sandwich:
- Spread a thin layer of Dijon mustard on each slice of bread.
- On half of the slices, layer 2 slices of ham and a generous amount of Gruyère cheese.
- Top Off the Sandwich:
- Top with the remaining bread slices, buttered-side up.
- Pour a few tablespoons of béchamel sauce over each sandwich, spreading it evenly.
- Sprinkle with the remaining Gruyère and Parmesan cheese.
- Bake the Sandwiches:
- Place the sandwiches in the preheated oven and bake for 10-15 minutes, or until the cheese is melted and bubbly, and the tops are golden brown.
- For an extra crispy top, switch to broil for the last 1-2 minutes, but watch closely to prevent burning.
- Serve:
- Remove from the oven and let cool for a few minutes before serving. Enjoy warm.
Extra Tips:
For an added flavor boost, consider using a mix of cheeses such as Emmental or Comté in addition to Gruyère. If you want to make a Croque Madame variation, simply top each sandwich with a fried egg before serving.
When making the béchamel, whisk continuously to avoid lumps, and adjust the consistency with a little extra milk if needed. To add a bit of flair, you can sprinkle some fresh herbs like parsley or chives on top before serving. Enjoy your homemade Croque Monsieur with a simple green salad for a well-rounded meal.
Clafoutis
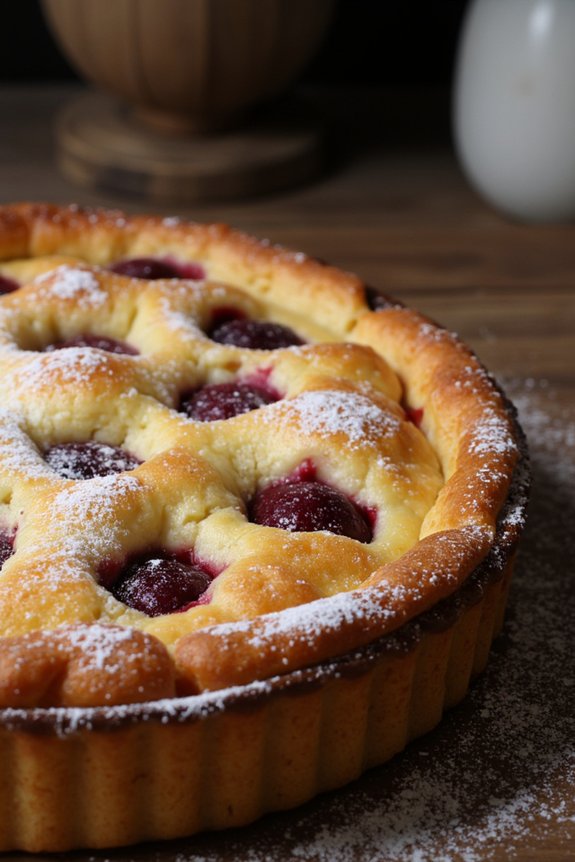
Clafoutis is a classic French dessert that’s both simple to make and delightful to eat. Originating from the Limousin region of France, this dish traditionally features cherries embedded in a flan-like batter. The beauty of clafoutis lies in its versatility, as it can be made with various fruits depending on the season, such as plums, apricots, or berries, although cherries remain the authentic choice.
The contrast between the sweet, juicy fruit and the creamy, custard-like batter creates a harmonious blend of flavors and textures that’s bound to impress any dessert lover.
This recipe for clafoutis serves 4-6 people, making it an ideal treat for small gatherings or family dinners. It’s a wonderful way to showcase fresh fruit while enjoying a taste of traditional French cuisine. The preparation is straightforward, and the baking process fills your kitchen with a delightful aroma, making it a rewarding dish to prepare and serve.
Whether you’re an experienced baker or a novice, clafoutis is a dish that’s both forgiving and satisfying to make.
Ingredients:
- 1 cup of whole milk
- 3 large eggs
- 1/2 cup of granulated sugar
- 1 cup of all-purpose flour
- 1 teaspoon of vanilla extract
- 1/4 teaspoon of salt
- 1 tablespoon of unsalted butter (for greasing)
- 2 cups of fresh cherries, pitted
- Powdered sugar (for dusting)
Cooking Instructions:
- Preheat the Oven: Begin by preheating your oven to 350°F (175°C). This guarantees that the oven is at the right temperature by the time your clafoutis is ready to bake.
- Prepare the Batter: In a large mixing bowl, whisk together the milk, eggs, and sugar until well combined. Gradually add the flour, vanilla extract, and salt, continuing to whisk until you achieve a smooth batter. The consistency should be similar to that of a thick pancake batter.
- Grease the Baking Dish: Use the tablespoon of unsalted butter to thoroughly grease a 9-inch baking dish. This will prevent the clafoutis from sticking to the dish and make serving easier.
- Assemble the Clafoutis: Pour a small amount of the batter into the greased baking dish, just enough to cover the bottom. Arrange the pitted cherries over the thin layer of batter, distributing them evenly across the dish. Pour the remaining batter over the cherries, ensuring they’re submerged.
- Bake the Clafoutis: Place the baking dish in the preheated oven and bake for 35-45 minutes, or until the top is golden brown and the batter is set. You can test the doneness by inserting a toothpick into the center; it should come out clean.
- Cool and Serve: Once baked, remove the clafoutis from the oven and let it cool slightly for about 10 minutes. Dust the top with powdered sugar before serving. Clafoutis can be enjoyed warm or at room temperature.
Extra Tips:
When making clafoutis, using fresh, ripe cherries will enhance the flavor of the dish considerably. If cherries aren’t in season, you can substitute them with other fruits like plums or berries.
For a richer flavor, you can add a splash of almond extract or a tablespoon of kirsch (cherry brandy) to the batter. Additionally, if you prefer a smoother texture, you can blend the batter in a blender to guarantee there are no lumps.
Poulet Basquaise

Poulet Basquaise is a classic French dish originating from the Basque region, known for its vibrant flavors and colorful presentation. This traditional recipe combines tender chicken with a medley of peppers, tomatoes, and flavorful spices, creating a hearty and aromatic meal. The dish is typically cooked slowly, allowing the flavors to meld together beautifully and the chicken to become tender and juicy.
Poulet Basquaise is often served with rice or crusty bread to soak up the delicious sauce, making it a satisfying and comforting meal.
The essence of Poulet Basquaise lies in its use of fresh, high-quality ingredients that add depth and richness to the dish. The combination of bell peppers, onions, and garlic provides a fragrant base, while ripe tomatoes and white wine offer a subtle acidity that balances the richness of the chicken.
The addition of fresh herbs such as thyme and bay leaves infuses the dish with a delightful aroma, making it an irresistible choice for both casual family dinners and special occasions.
Ingredients (Serves 4-6)
- 4-6 chicken thighs or drumsticks
- 2 tablespoons olive oil
- 1 large onion, thinly sliced
- 2 red bell peppers, thinly sliced
- 2 green bell peppers, thinly sliced
- 4 garlic cloves, minced
- 4 ripe tomatoes, diced
- 1 cup dry white wine
- 1 cup chicken stock
- 2 tablespoons tomato paste
- 1 teaspoon smoked paprika
- 1 bay leaf
- 2 sprigs fresh thyme
- Salt and black pepper, to taste
- Fresh parsley, for garnish
Cooking Instructions
- Prepare the Chicken: Season the chicken thighs or drumsticks with salt and black pepper. Heat olive oil in a large, heavy-based pan over medium-high heat. Add the chicken pieces and brown them on all sides, about 5-7 minutes. Remove the chicken from the pan and set aside.
- Cook the Vegetables: In the same pan, add the sliced onions and bell peppers. Cook for about 5 minutes until the vegetables start to soften. Add the minced garlic and cook for another minute until fragrant.
- Add Tomatoes and Spices: Stir in the diced tomatoes, tomato paste, and smoked paprika. Cook for about 2 minutes, allowing the tomato mixture to thicken slightly.
- Deglaze the Pan: Pour in the white wine, scraping the bottom of the pan to release any browned bits. Allow the wine to reduce by half, about 3 minutes.
- Simmer the Sauce: Add the chicken stock, bay leaf, and thyme sprigs to the pan. Stir well to combine all the ingredients.
- Cook the Chicken: Return the browned chicken pieces to the pan, nestling them into the sauce. Lower the heat to a gentle simmer, cover the pan, and cook for 30-35 minutes. Check occasionally, ensuring the chicken is cooked through and the sauce has thickened.
- Finish and Serve: Once cooked, remove the bay leaf and thyme sprigs. Adjust the seasoning with salt and pepper if needed. Garnish with freshly chopped parsley before serving. Serve the Poulet Basquaise hot, with rice or crusty bread on the side.
Extra Tips
For the best flavor, try to use bone-in, skin-on chicken pieces, as they add richness to the sauce. If you prefer a spicier dish, you can add a pinch of cayenne pepper or a diced chili along with the garlic.
To make the dish even more flavorful, consider marinating the chicken in advance with a bit of olive oil, garlic, and herbs. Finally, if you have the time, preparing the dish a day in advance allows the flavors to deepen even further, making it an even more delicious meal when reheated.
Salade Niçoise
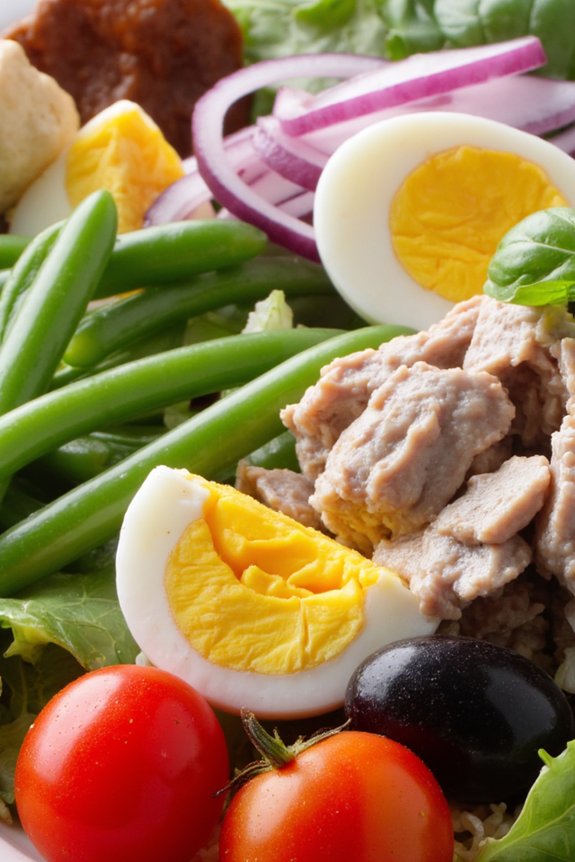
Salade Niçoise is a classic French salad that originates from the city of Nice. This vibrant and colorful dish is a celebration of Mediterranean flavors, combining fresh vegetables, ripe tomatoes, briny olives, and tender tuna. Traditionally served as a composed salad, Salade Niçoise is known for its balance of flavors and textures, making it a perfect light yet satisfying meal.
Whether enjoyed as a main course or an appetizer, this salad is a delightful way to experience the essence of French cuisine.
The beauty of Salade Niçoise lies in its simplicity and the quality of its ingredients. Each component is carefully chosen to enhance the overall taste of the salad. While there are many variations, the authentic version typically includes ingredients like hard-boiled eggs, green beans, and anchovies, all drizzled with a light vinaigrette.
This recipe will guide you through creating a traditional Salade Niçoise for 4-6 people, ensuring you capture the true flavors of the French Riviera.
Ingredients (Serves 4-6):
- 1 pound small new potatoes
- 1/2 pound green beans, trimmed
- 4 large eggs
- 2 cups cherry tomatoes, halved
- 1/2 cup nicoise or kalamata olives, pitted
- 1/4 cup red onion, thinly sliced
- 1 can (about 7 ounces) high-quality tuna in olive oil, drained
- 8 anchovy fillets (optional)
- 4 cups mixed salad greens
- 1/4 cup fresh basil leaves
- Salt and black pepper to taste
For the Dressing:
- 1/4 cup extra-virgin olive oil
- 2 tablespoons red wine vinegar
- 1 tablespoon Dijon mustard
- 1 small garlic clove, minced
- Salt and black pepper to taste
Cooking Instructions:
- Prepare the Potatoes and Eggs: Start by boiling the new potatoes in a pot of salted water until tender, about 15 minutes. In the same pot, add the eggs during the last 7 minutes of cooking. Once done, remove the eggs and place them in a bowl of ice water to cool. Drain the potatoes and set them aside to cool slightly.
- Cook the Green Beans: In the same pot of boiling water, blanch the green beans for about 2-3 minutes until they’re bright green and tender-crisp. Drain and plunge them into ice water to stop the cooking process, then drain again and set aside.
- Make the Dressing: In a small bowl, whisk together the olive oil, red wine vinegar, Dijon mustard, minced garlic, salt, and pepper until well combined.
- Assemble the Salad: On a large serving platter or in a large salad bowl, arrange the mixed greens as a base. Cut the cooled potatoes into halves or quarters and arrange them over the greens. Shell the cooled eggs and cut them into quarters, adding them to the salad along with the green beans, cherry tomatoes, olives, and red onion.
- Add Tuna and Anchovies: Flake the drained tuna over the salad and, if using, arrange the anchovy fillets on top. Sprinkle the fresh basil leaves over the salad.
- Dress and Serve: Drizzle the dressing evenly over the salad. Gently toss the salad to coat the ingredients with the dressing, taking care not to break the delicate components. Season with additional salt and pepper if needed and serve immediately.
Extra Tips:
For the best flavor, use the highest quality ingredients you can find, especially when it comes to the tuna and olives. Feel free to customize the salad by adding or omitting certain ingredients based on your preferences, such as substituting fresh grilled tuna for canned or adding capers for extra brininess.
To save time, you can prepare the components in advance and assemble the salad just before serving. If desired, serve the salad with crusty French bread to make it a more substantial meal.
Pissaladière

Pissaladière is a savory, traditional dish from the Provence region in southern France, often likened to a pizza but with its own unique flair. This delightful tart is characterized by a thick base of bread dough, topped with caramelized onions, anchovies, and black olives. Rich in flavors and rustic in appearance, Pissaladière is a perfect reflection of the Provençal spirit, combining simple ingredients to create a harmonious and satisfying meal.
It’s typically enjoyed as an appetizer or a light lunch, often accompanied by a crisp green salad and a glass of rosé.
Originating from the port city of Nice, Pissaladière showcases the Mediterranean culinary tradition of using locally available ingredients. The name itself is derived from “pissalat,” a type of anchovy paste traditionally spread over the dough. While the anchovies provide a robust and salty punch, the sweetness of the slow-cooked onions balances the flavors beautifully.
Preparing Pissaladière is a rewarding experience, as it allows the cook to savor the process of creating an authentic French dish with deep-rooted history and taste.
Ingredients
- 2 cups all-purpose flour
- 1 teaspoon salt
- 1 packet (2 1/4 teaspoons) active dry yeast
- 3/4 cup warm water
- 2 tablespoons olive oil
- 2 pounds yellow onions, thinly sliced
- 2 tablespoons olive oil (for onions)
- 1 teaspoon sugar
- 1/2 teaspoon salt (for onions)
- 20 anchovy fillets, drained
- 20 Niçoise or Kalamata olives, pitted
- Fresh thyme sprigs (optional)
Instructions
1. Prepare the Dough: In a large bowl, combine the flour and salt. In a small bowl, dissolve the yeast in warm water and let it sit for about 5-10 minutes until frothy. Add the yeast mixture and olive oil to the flour, and mix until a dough forms. Knead on a lightly floured surface for about 5-7 minutes until smooth and elastic.
Place the dough in a lightly oiled bowl, cover with a damp cloth, and let it rise in a warm place for about 1 hour, or until doubled in size.
2. Prepare the Onions: While the dough rises, heat the olive oil in a large skillet over medium heat. Add the sliced onions, sugar, and salt. Cook, stirring occasionally, for about 30-40 minutes until the onions are golden and caramelized. If the onions start to stick, add a splash of water. Once done, set aside to cool.
3. Preheat the Oven: Preheat your oven to 425°F (220°C).
4. Roll Out the Dough: Punch down the dough and roll it out on a floured surface to fit a greased baking sheet or a round pizza pan, about 1/4 inch thick.
5. Assemble the Pissaladière: Spread the caramelized onions evenly over the dough. Arrange the anchovy fillets in a crisscross pattern on top of the onions, and place an olive in each diamond formed by the anchovies. If desired, sprinkle with fresh thyme sprigs for added aroma.
6. Bake: Bake in the preheated oven for 15-20 minutes, or until the edges are golden brown and crisp. Remove from the oven and let it cool slightly before serving.
Extra Tips
When preparing Pissaladière, patience is key, especially during the caramelization process of the onions, as they need to be cooked slowly to achieve the right sweetness and texture.
If you’re not a fan of anchovies, you can modify the recipe to include toppings like sun-dried tomatoes or roasted bell peppers, though traditionalists might argue it would no longer be a true Pissaladière.
Finally, if you don’t have Niçoise olives, Kalamata olives are an excellent substitute, offering a similar depth of flavor. Enjoy your Pissaladière warm or at room temperature for the best taste experience.
Crêpes Suzette

Crêpes Suzette is a quintessentially French dessert that combines the delicate texture of crêpes with a rich, buttery, orange-flavored sauce. This classic dish is believed to have been created in the late 19th century and has since become a beloved staple in French cuisine. The crêpes are usually flambéed, adding a dramatic flair to the dining experience and enhancing the flavors of the dish. Perfect for a special occasion or a delightful treat, Crêpes Suzette offers a harmonious blend of sweetness and citrusy zest that’s guaranteed to impress any guest.
The origins of Crêpes Suzette are as enchanting as its taste, with stories attributing its creation to a mix of serendipity and culinary genius. While the crêpes themselves are simple to make, the accompanying sauce requires a touch of finesse to achieve the perfect balance of flavors. The key to this recipe is the use of fresh orange juice and zest, combined with Grand Marnier or another orange-flavored liqueur, to create a sauce that’s both vibrant and indulgent.
When prepared correctly, the crêpes absorb the sauce beautifully, offering a melt-in-your-mouth experience that’s both sophisticated and comforting.
Ingredients (Serves 4-6):
- 1 cup all-purpose flour
- 2 tablespoons granulated sugar
- 1/4 teaspoon salt
- 3 large eggs
- 1 1/2 cups whole milk
- 1 teaspoon vanilla extract
- 4 tablespoons unsalted butter, melted
- Zest of 1 orange
- Juice of 2 oranges
- 1/4 cup Grand Marnier or another orange-flavored liqueur
- 1/2 cup unsalted butter
- 1/2 cup granulated sugar
Cooking Instructions:
- Prepare the Crêpe Batter: In a mixing bowl, whisk together the flour, sugar, and salt. In another bowl, beat the eggs and gradually add the milk and vanilla extract, whisking until smooth. Slowly add the wet ingredients to the dry ingredients, stirring constantly to avoid lumps. Stir in the melted butter. Cover the batter and let it rest for at least 30 minutes.
- Cook the Crêpes: Heat a non-stick skillet over medium heat and lightly grease it with butter. Pour about 1/4 cup of batter into the pan, swirling to evenly coat the bottom. Cook for about 1-2 minutes until the edges start to lift and the bottom is golden brown, then flip and cook the other side for another minute. Repeat with the remaining batter. Stack the cooked crêpes on a plate and keep them warm.
- Prepare the Sauce: In a large skillet, combine the orange zest, orange juice, and sugar over medium heat. Stir the mixture until the sugar dissolves. Add the butter and stir until the sauce becomes smooth and slightly thickened.
- Flambé the Crêpes: Carefully pour the Grand Marnier into the sauce and allow it to warm slightly. Using a long lighter, carefully ignite the liqueur to flambé the sauce. Let the flames subside naturally, which will enhance the flavor.
- Coat the Crêpes: Once the flames have died down, add the crêpes one at a time into the sauce, turning them to coat evenly. Allow them to soak up the sauce for a few seconds before folding them into quarters.
- Serve: Arrange the coated crêpes on a warm serving platter and spoon any remaining sauce over the top. Serve immediately for the best flavor and presentation.
Extra Tips:
When making Crêpes Suzette, verify your crêpe batter is smooth and free of lumps for the best texture. Resting the batter allows the flour to fully hydrate, resulting in tender crêpes.
If you don’t have Grand Marnier, you can substitute with Cointreau or Triple Sec. Always be cautious when flambéing; ensure there are no flammable materials nearby and use a long-handled lighter to keep your hands safe.
The key to a successful sauce is the balance of sweetness and citrus, so feel free to adjust the sugar or orange juice to taste.